Chuck
-
Posts
9,703 -
Joined
-
Last visited
Content Type
Profiles
Forums
Gallery
Events
Everything posted by Chuck
-
 I think that little bit wont matter. You may have to adjust the slot widths in the bulkheads and bulkhead former...but thats it. The plans for example call for 1/16" thick planking....because its a readily available size....but because I am milling my own stock, the planks are actually 3/64" thick. That is closer to scale and easier to work with. So feel free as I have done to change things up. As long as you think ahead or shoot me the question before hand, you should be good to go. Again this is the beauty of a scratch build. You have some flexibility as long as you think through the consequences. Following the plans will do the trick...when you adjust any wood sizes...think about what you will need to adjust on the plans....but it may not even be needed. Chuck
- 1,051 replies
-
- 3
-

-
- cheerful
- Syren Ship Model Company
- (and 1 more)
-
Yes but its easy enough to do the conversion....in fact there are many translators on the web for free. You type in the imperial number and it gives you the metric equivalent. If its close you will be good to go. I wish I could do more but short of doing the translations myself for every part and material (which I wont do) I dont see how it could cause a problem. Use this chart http://mdmetric.com/tech/cvtcht.htm Couldnt you order your wood in in imperial measurements if they are being milled for you in the UK? If I ask say Jeff to cut me stock at 3mm thick he will certainly do that. Wouldnt a source in the UK do that too but in reverse? If not, just use the chart to convert before ordering. But I cant take the time to do this many conversions. You will have to print out the chart when ordering your wood and possibly order a ruler or two with imperial measurements on it for the project. Then you are good to go. All materials will be listed in the monograph with imperial sizes when I use them....so you will know how large to cut stuff by using your new imperial ruler of measurement. All of my rulers have metric on one side and imperial on the other so I dont see why it causes a problem if you had one of these and used a conversion chart. I do it all the time. Chuck
- 1,051 replies
-
- 2
-
-
- cheerful
- Syren Ship Model Company
- (and 1 more)
-
I am not sure what you mean....wood list or materials list??? Since its a scratch project more or less there are no parts to inventory. Except for those few I mentioned so far. As far as a wood list goes...I do have a preliminary. I wont know for certain until after I build her. Its impossible to know before its built with 100% certainty. The wood list I have used and stocked up on are as follows. It should be very close. Remember that this is not a kit. 1/4" Ply 4' x 4' All boxwood sheets are 24" long......and 3" wide 7/32" Boxwood sheet 2 1/4" ........1 1/8" ........2 5/32" .......2 3/16 .........5 1/16" .......3 1/32" .......3 .025 ........1 3/32" ........1 but maybe 2 sheets depending. One 3/8" x 3/8" strip for the lower mast 24" long Basswood sheets.... 1/32" ....two sheets 1/16" ...2 sheets
- 1,051 replies
-
- 6
-
-
- cheerful
- Syren Ship Model Company
- (and 1 more)
-
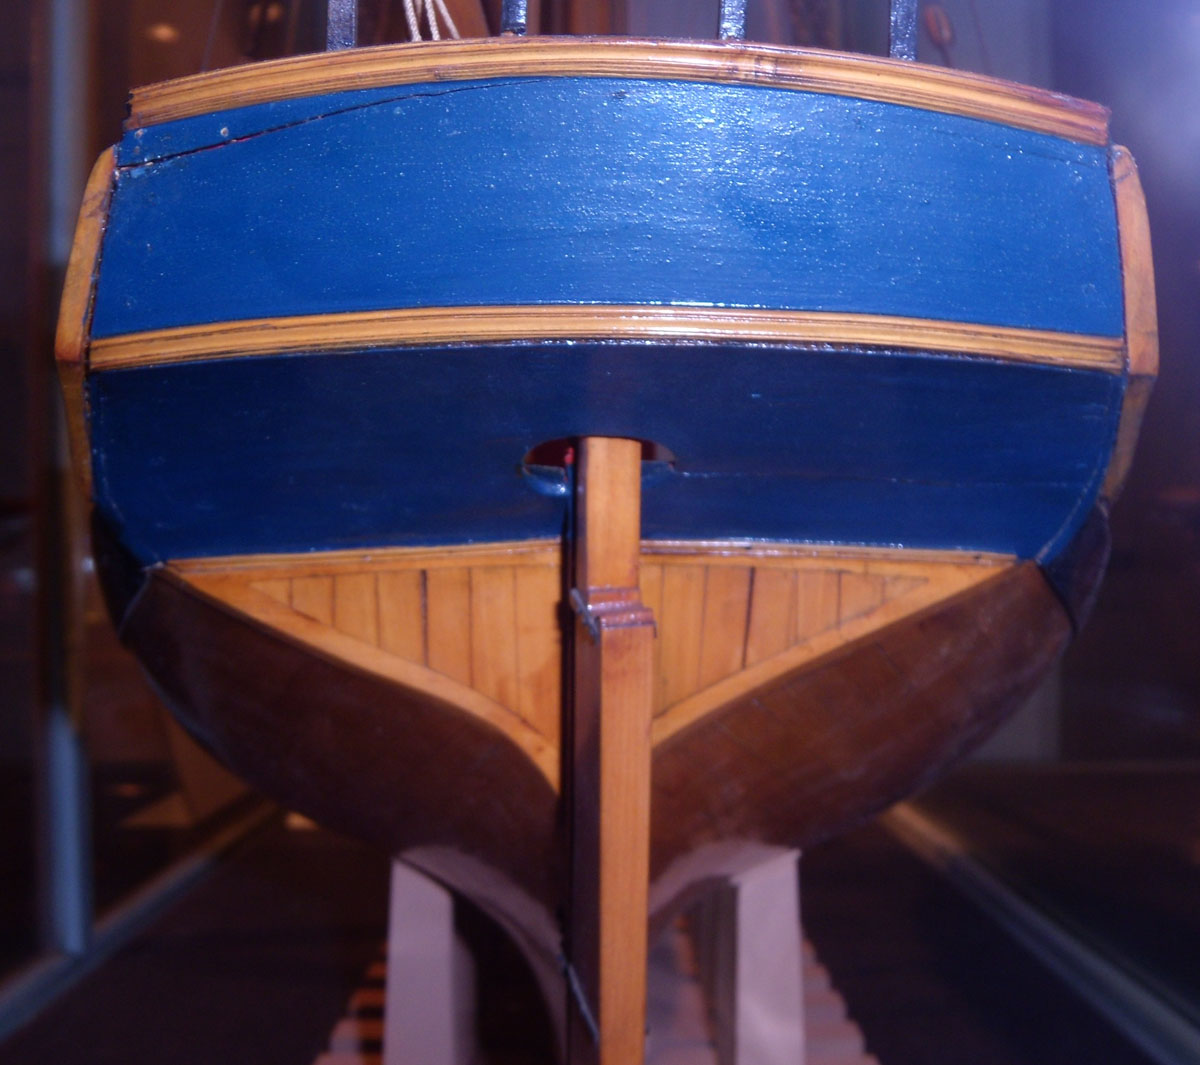
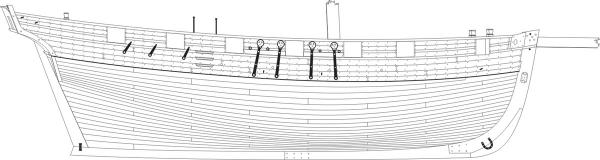
And one last image of the contemporary planking expansion detail. It shows the square tuck pretty well. For those that might have one on there model although its unlikely. I have never seen a kit that shows one. They are usually left off because they can be rather complex. You can also see the number of planks....twenty which matches my model exactly. Ten down to the bottom of the square tuck and ten more below that. Hence the two planking belts I used. Chuck
- 1,051 replies
-
- 2
-
-
- cheerful
- Syren Ship Model Company
- (and 1 more)
-
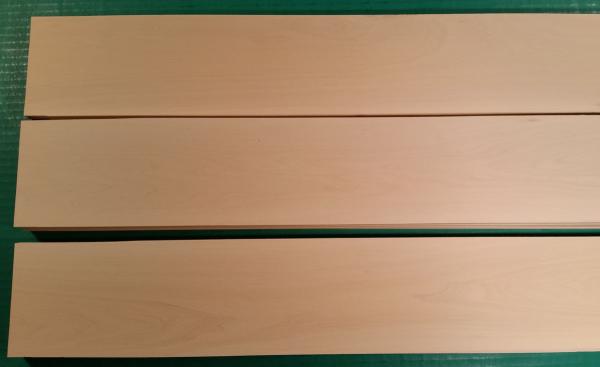
Thanks Its all Boxwood and from Hobbymill. Jeff was kind enough to cut me all the wood for the lower planking and the remainder of the project from a really nice piece. Its the best boxwood I have ever seen. Heres a picture...I should have waited so I could use this better stuff above teh wales...but most of that will be covered up anyway. So it should be OK. Chuck OH and another not so flattering image of the square tuck on that contemporary model. Lots of cracks and damage. It looks pretty beat up. Also the last photo shows teh cheerful drawing I made.....you can see the differences I dont think its the original blue paint on that model. My reason is that you can see bits of it within the splits and cracks which means it was painted after the cracks developed.


- 1,051 replies
-
- 8
-
-
- cheerful
- Syren Ship Model Company
- (and 1 more)
-
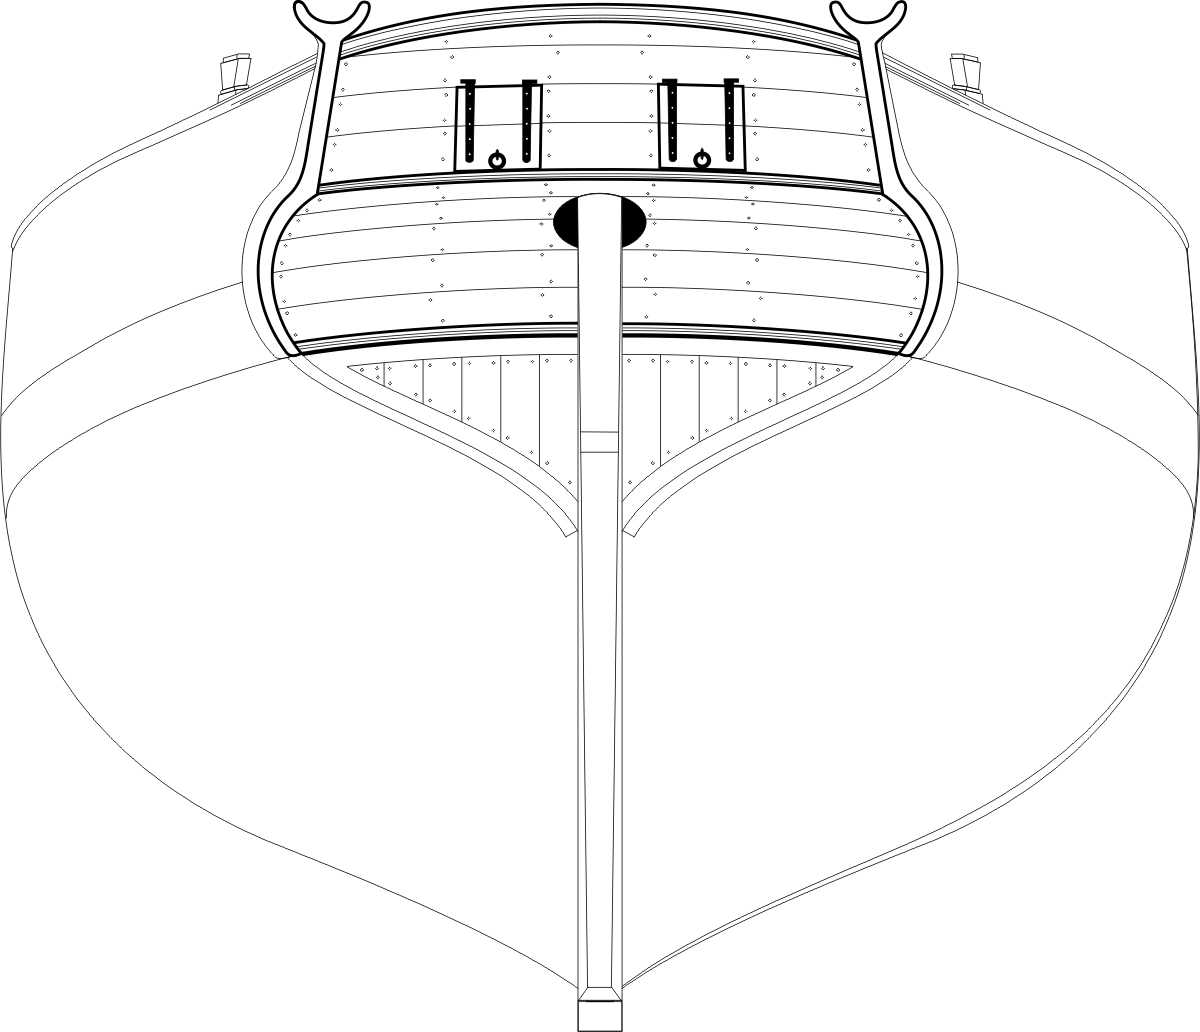
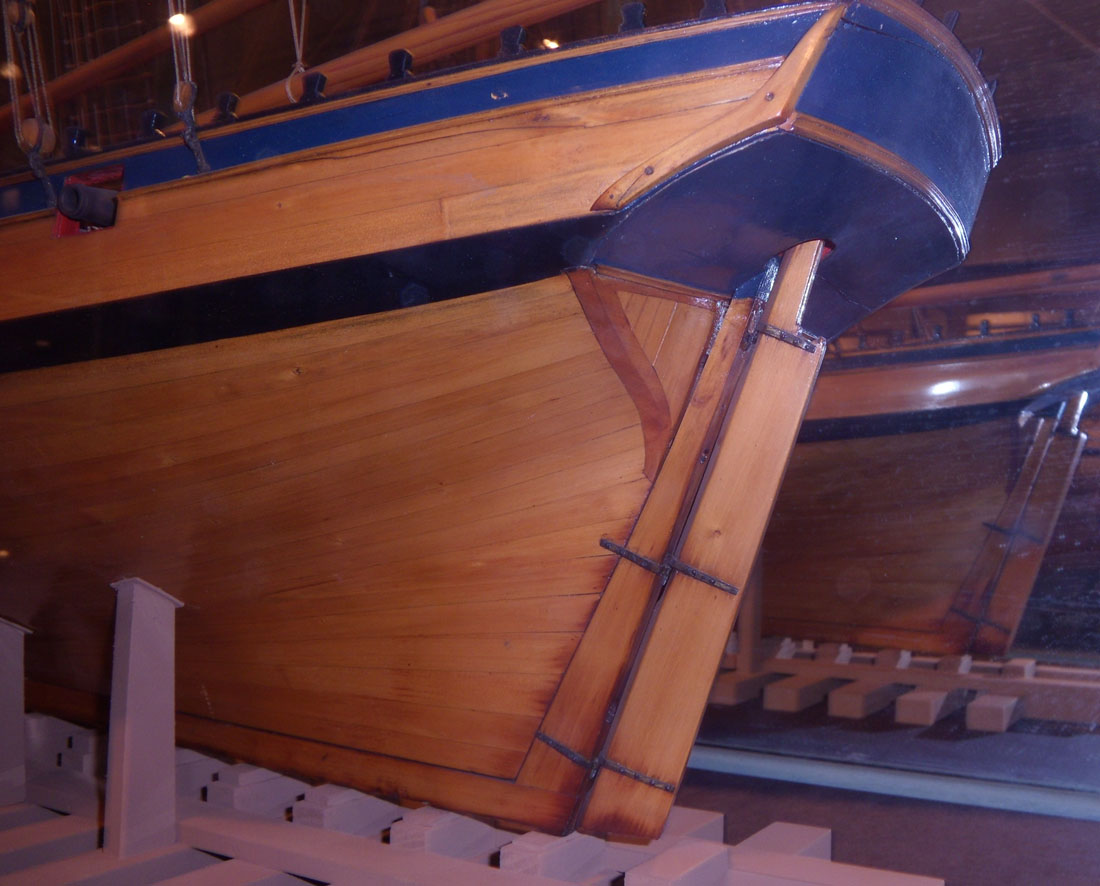
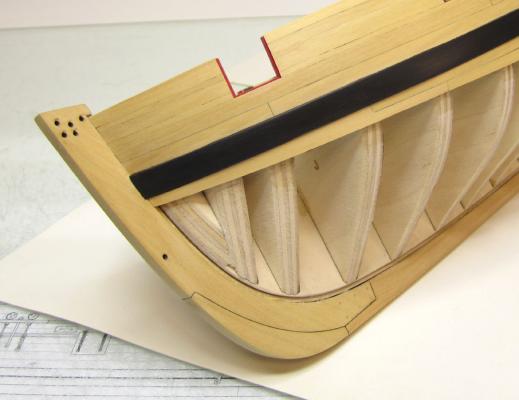
Jan The square tuck frame should be rabbeted so the hull planking and square tuck planking has the the butt ends protected from the elements. The lower counter planking has its butt ends protected by the fashion pieces. The strip between the lower counter and the square tuck is just a fancy molding strip and cosmetic. I have about 40 pictures of this model from every conceivable angle. Just havent had the time to reduce them so I can post them. But if you want to see any particular area let me know and I will reduce and post those....If you click on the picture above in that post it gets really big...you can see that detail..The fancy molding strip is placed too low however on that model in my opinion. The frame for the square tuck needs to be a consistent width all of the way around to look good. Thats the hard part but in a few steps it can be done without incident. Chuck
- 1,051 replies
-
- 4
-
-
- cheerful
- Syren Ship Model Company
- (and 1 more)
-
I will do that on the next update..... Christian...It is the square tuck that you are seeing. Its actually curved slightly to follow the counter. So you see it as a triangle on the plan. Thats what I am going to start next. Shouldnt be long before another update with that. See what it looks like on the Rogers Collection cutter model. Chuck

- 1,051 replies
-
- 4
-
-
- cheerful
- Syren Ship Model Company
- (and 1 more)
-
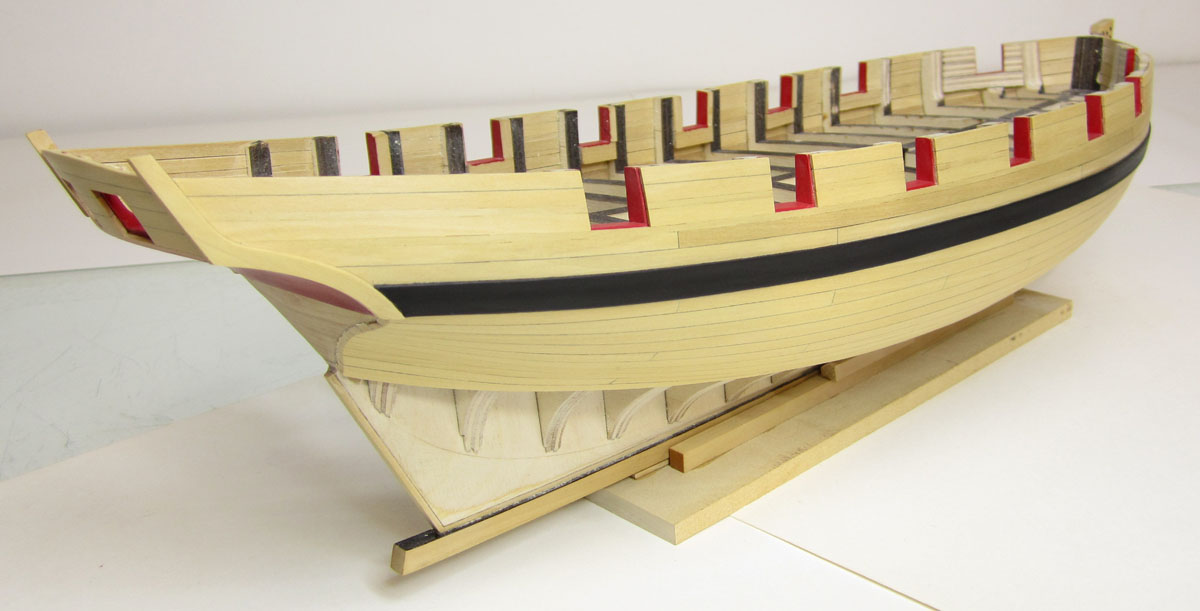
This model is actually not that small. At 1/4" scale the hull is 17 3/4" long......fully rigged she is 29 1/4" long....and 25.5" tall. Chuck
- 1,051 replies
-
- 3
-
-
- cheerful
- Syren Ship Model Company
- (and 1 more)
-
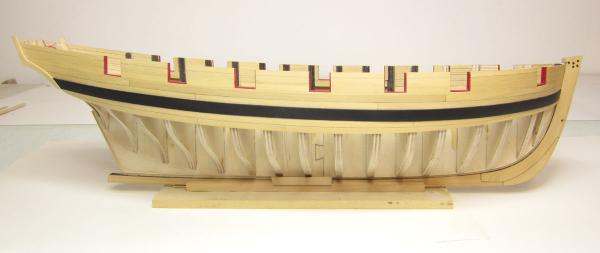
Not Really Kurt There are a few magazine articles, the Peterson book on Rigging, A few other books may have a nugget or two, but thats it. Its pretty much spread all over the place. You really cant count on the AOTS book for Alert. Its much earlier than Cheerful. The cutter didnt change all that much but there are still vast differences in some areas. Its also has a few errors in it which have been discussed to death. The windlass is one of them. Luckily there are quite a few contemporary models of cutters out there. There are also tons of plans for cutters on the NMM site. AND the Cheerful plans are excellent in every respect. Very detailed which is why I chose it. I pent the day planking. Got the first belt done ob the starboard side. It went quickly. Only eight planks. The starboard side is now half planked. I must complete the square tuck on the starboard side next before I can plank the lower belt. Luckily because its a POB design and NOT a fully framed model, I dont have to follow actual practice for building the square tuck. So based on my design I can do one half of the tuck at a time. I am eager to get it done to see how it will work out. Once the square tuck is done then I will plank the remaining 10 strakes in the lower belt....then I must repeat the process on the other side. Chuck


- 1,051 replies
-
- 30
-
-
- cheerful
- Syren Ship Model Company
- (and 1 more)
-
Looking good so far...dont worry about the warped BF....You can straighten that out quickly with the filler blocks as was mentioned. Enjoy the model and dont hesitate to ask any questions. Chuck
-
I dont think so....You should be OK. Chuck
- 1,051 replies
-
- 3
-
-
- cheerful
- Syren Ship Model Company
- (and 1 more)
-
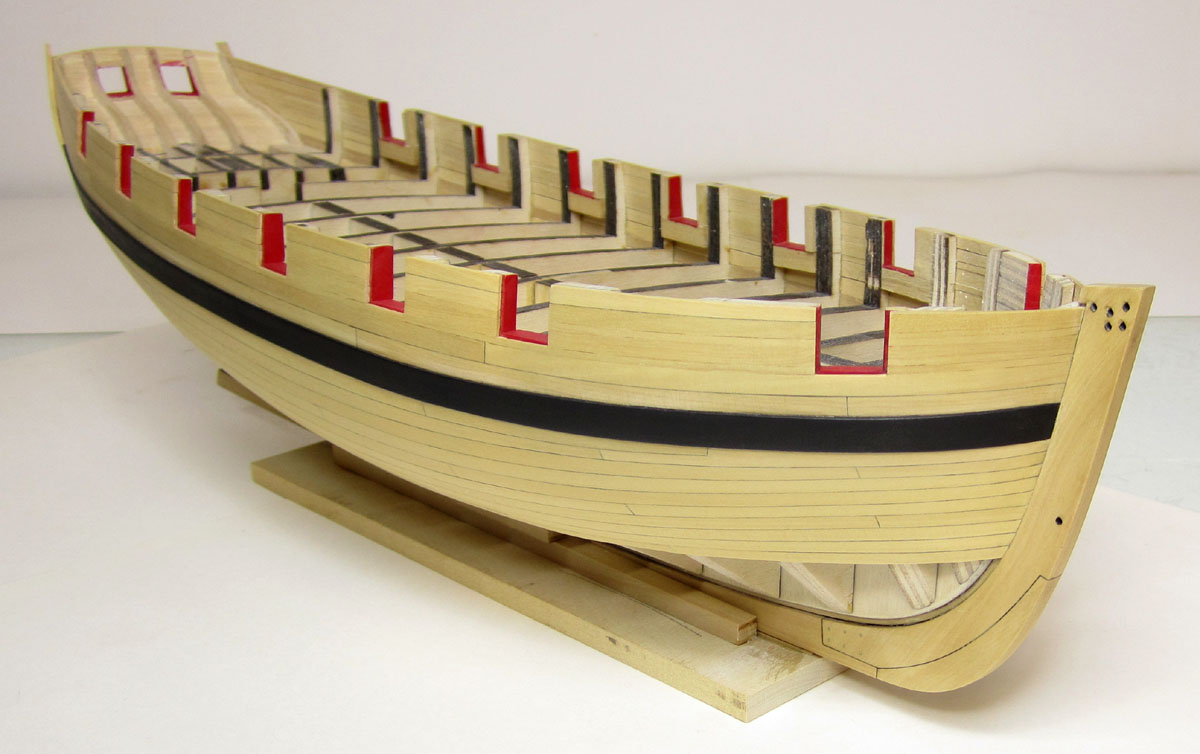
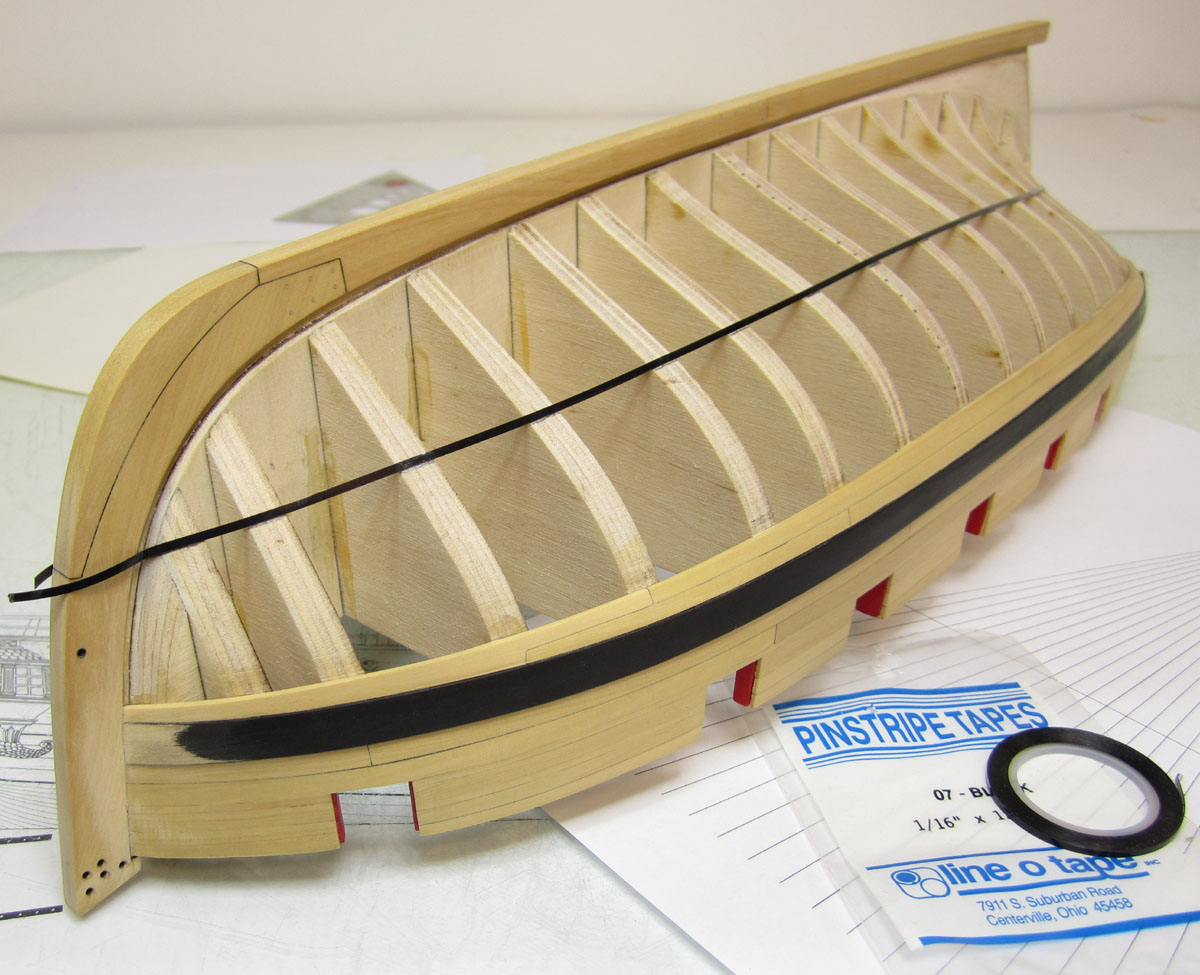
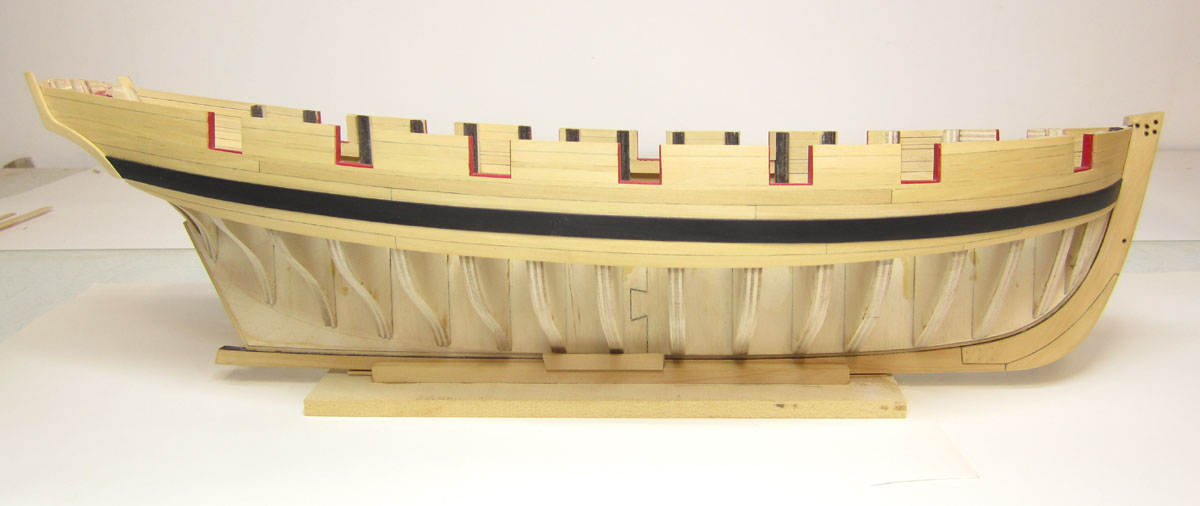
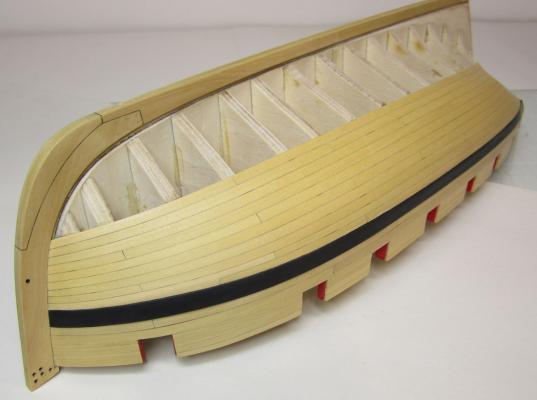
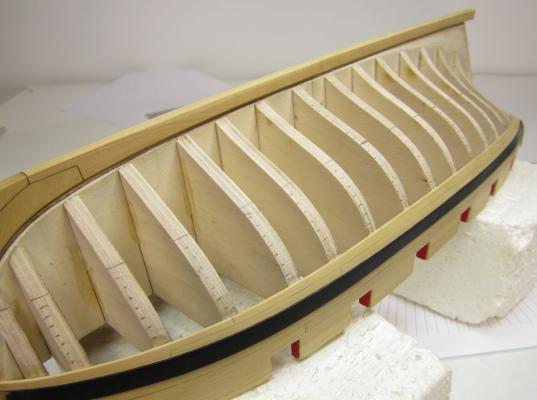
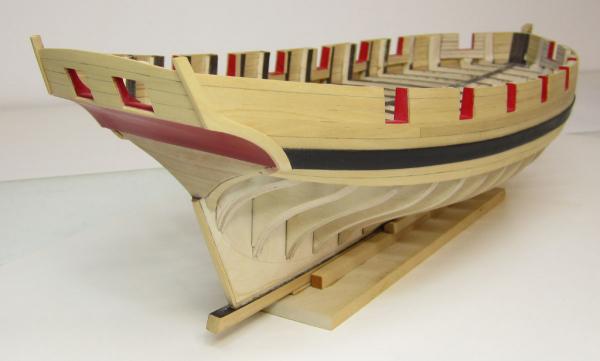
I have started to line out the hull for planking. There are 20 strakes under the wales. The first two are already done....those were the ones with the drop plank. So I measured midship for the remaining 18 strakes. They will be 3/16" wide. Interestingly, the strakes fit perfectly as they did on the contemporary draft. There will be just two belts of strakes. The first will have the remaining 8 under the wales. The bottom belt will have ten. Basically the hull was split in half down to the bottom of the square tuck as shown in that contemporary planking expansion. I used black line tape to split the hull into the two belts. I am spending a great deal of time examining it from all angles until I am pleased with it. Then I marked along the tape and removed it. All there is left to do is to take the space remaining in belt one on each bulkhead and transfer it to a tick strip. The tick strip is divided into eight with the help of the planking fan. Then the tick marks are transferred back to that bulkhead. Once again I am amazed at how the cutter is so well designed by the naval architects. Almost every bulkhead except for the four forward bulkheads have strakes exactly 3/16" wide. Its a straight run to the square tuck with 3/16" planks. No tapering/widening required in this first belt . Only those at the extreme bow need to be tapered which is a huge time saver. This will not be the case in the lower belt. The strakes will get wider at the stern as they run off the hull and also require tapering at the bow. But it should be a very very close match to that original planking expansion for 1806. Yippee for me. It all worked out. I also started fixing the wales at the bow which you can see in the photos. They are now the proper thickness entering the rabbet or nearly so....almost there!!

- 1,051 replies
-
- 28
-
-
- cheerful
- Syren Ship Model Company
- (and 1 more)
-
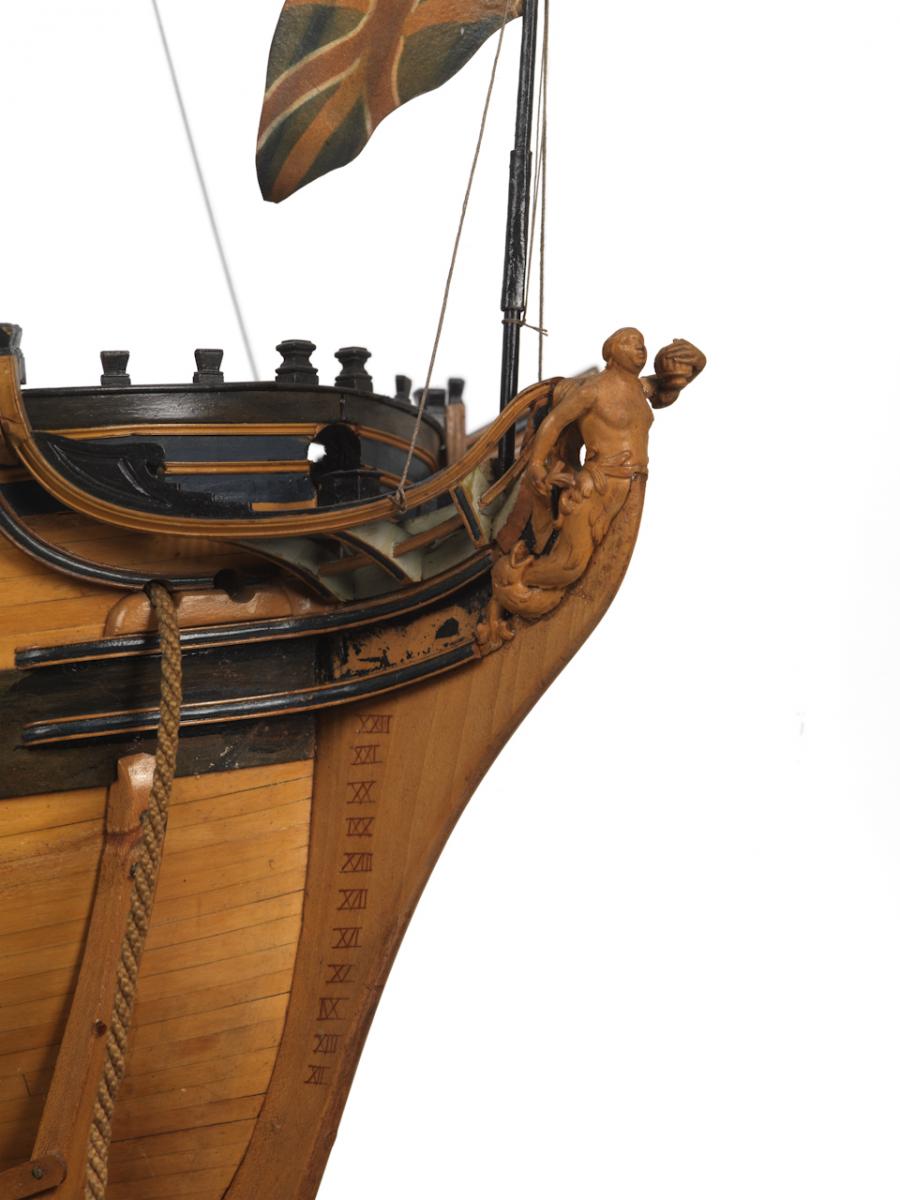
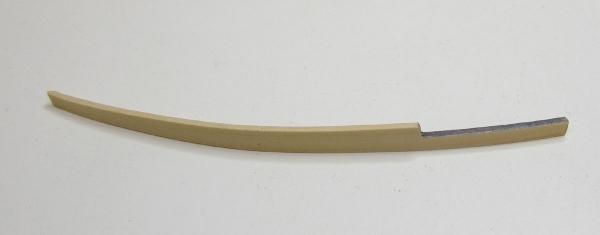
Thanks...I am fixing up the wales as we speak. I will post another picture soon after its done. I noticed after I posted the photos that that I didnt take the wales down at the bow enough before painting them. Basically, in actual practice, the wales would fit into the same rabbet. Therefore they would not be thicker than the surrounding planking at the bow where it enters the stem rabbet. They gradually reduce in thickness until they are the same as the surrounding planks. This is a nice little detail that no one would probably ever notice but after its done it will make the model even more historically accurate. I am reducing the thickness right now and will repaint. See this contemporary model from the rogers collection...notice how the wales dont stand proud of the planking along the stem rabbet. They are flush....and all fit into the rabbet nicely as compared to my model which will soon be all fixed up. This is true for most ships during this period including frigates like the Winchelsea. But because its one of those little details often overlooked...I always forget.... and have to go back and fix it later. Its a carry-over habit from my kit building days where this is never mentioned. I also included a picture of a mermaid class frigate 1780ish. Look at the stem where the wales enter the rabbet. Chuck


- 1,051 replies
-
- 13
-
-
- cheerful
- Syren Ship Model Company
- (and 1 more)
-
Thanks.... Fam...Yes its standard English practice. To have one drop plank under the wales. If you look at most contemporary models you will see this. This particular drop plank was shown on a "planking expansion" draft for the Cheerful. I am following it pretty darn closely. This will be exactly as shown on that contemporary draft. Richard, the drop planks were cut by hand. I found its shape just like I did in the tutorial I posted. I used wide packaging tape. Once traced, I removed the tape and transferred it to some stiff card stock. I cut it out as a test piece. Once I was satisfied I simply transferred it to the boxwood sheet. You cant use the plans because of the foreshortening at the bow. You must make take the space from your model directly. See the tutorial here...Even though the Winchelsea doesnt have any drop planks or steelers its the same method used. http://modelshipworldforum.com/resources/Framing_and_Planking/Lining%20Off%20your%20hull%20for%20planking.pdf
- 1,051 replies
-
- 4
-
-
- cheerful
- Syren Ship Model Company
- (and 1 more)
-
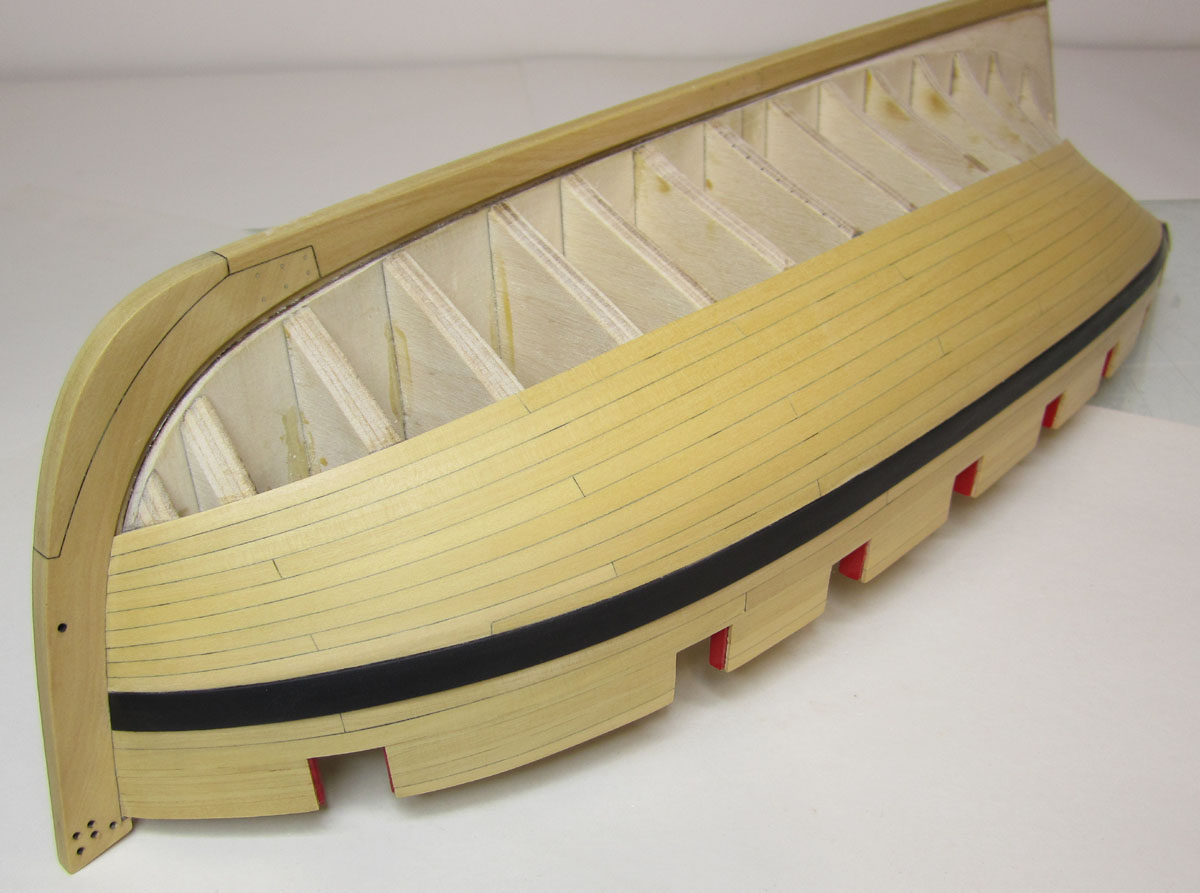
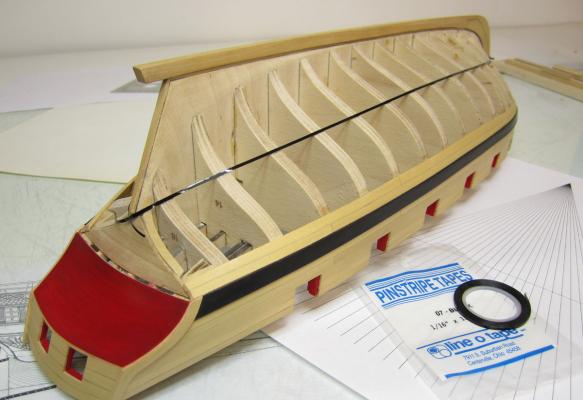
I added the first two strakes below the wales. This was to get the drop plank out of the way. The drop plank was shaped from a piece of card stock first just to get the hang of it. After I was satisfied that it fit OK I cut the real ones from wide stock the same thickness as the planking. They were pre shaped as you can see. You can also see my pencil on the edge to simulate the tarred seams. Now I will line off the remainder of the hull into two belts and finish the planking. I also painted the first of many layers of red paint on the counter at the stern. Chuck
- 1,051 replies
-
- 27
-
-
- cheerful
- Syren Ship Model Company
- (and 1 more)
-
Yes it works...I basically do the same thing with a hair dryer.
- 1,051 replies
-
- 4
-
-
- cheerful
- Syren Ship Model Company
- (and 1 more)
-
Thank you I do have more images though.......and a couple of contemporary drafts. But yes it was done both ways.

- 1,051 replies
-
- 13
-
-
- cheerful
- Syren Ship Model Company
- (and 1 more)
-
Thanks... No its correct....there was never a one size fits all for these things. Some had alternating holes and others had them as I have designed it. And as Jan points out, there is the example above from the NMM. I have also seen other contemporary models that show them like this too. There was always some variation on the same. The good news is...should you decide to build her, you could absolutely change it to what you believe is correct. That is why it wont be a kit but released as a scratch project. I am 100% confident that the Windlass is correctly designed and portrayed. Not that there arent other configurations that would work as well. Chuck
- 1,051 replies
-
- 9
-
-
- cheerful
- Syren Ship Model Company
- (and 1 more)
-
Thanks, I used a hair dryer and slowly bent it to the desired shape while heating it up. The hair dryer was on the highest the hottest setting. Chuck
- 1,051 replies
-
- 5
-
-
- cheerful
- Syren Ship Model Company
- (and 1 more)
-
Thanks..... That is still the plan. As soon as I complete the exterior planking with the square tuck and write the first few chapters of the monograph (which will be posted on my site as a free download) the plans will be released.
- 1,051 replies
-
- 10
-
-
- cheerful
- Syren Ship Model Company
- (and 1 more)
-
Well that is very interesting. Thank you Sjors. I have printed it and will stick the printout in the model so when I am ready to restore her I at least have a starting point. Here is the model in question by the way. I havent had time to give it a thorough researching yet. That is a big help. The name on the back is "Margareta" or "St. Margarethen" Chuck
- 1,051 replies
-
- 6
-
-
- cheerful
- Syren Ship Model Company
- (and 1 more)
-
I use a nail clipper. Gives a nice crisp snip and doesnt make the edges of the rope ragged. Both cutting edges are flush so you can get close in on a know or anything you want to cut. Buy a good pair though....cheap ones wont work as well.
-
Thats exactly how its working...I have my club meeting tonight so no work getting done at all. Plus I have to get some stuff ready for Thanksgiving at my place this year. Yikes.
-
Its been so long I am not entirely sure. Tough to remember every last detail. Best to be safe and move it down by at least 1/32" do give you a bit of wiggle room. Chuck
- 659 replies
-
- 2
-
-
- syren
- model shipways
- (and 1 more)
-
Fine run to that plank...dont forget to measure up from the top of that plank at the bow to make sure that you have enough room for all of the strakes along the stem. I see many builds that curve the initial plank to high up on the stem and it causes issues later.
- 659 replies
-
- 1
-
-
- syren
- model shipways
- (and 1 more)