
Supplies of the Ship Modeler's Handbook are running out. Get your copy NOW before they are gone! Click on photo to order.
×


Chuck
-
Posts
9,449 -
Joined
-
Last visited
Reputation Activity
-

 Chuck reacted to cafmodel in CAFmodel Woodcarving Studio
Works are gradually being updated
Customized various bow puppets and reliefs
450449987@qq.com
-
Chuck reacted to Beckmann in TRE KRONER 1742 by Beckmann - 3"/8' scale - Transom-Model
Hello everyone, and thank you for your interest and comments.
Not much has happened since my last post, but I have decided on a color to be used for the paneling of the “underste Kajyt”. Siggi had suggested a turquoise color, which is common for the rococo-style. In addition to all sorts of other suggestions such as grey, natural or red, I somehow stuck with it. Not because it was historically vouched for my model, but because it is something different from the usual red and white, and spreads a Northern European-Scandinavian cool atmosphere, which I like for my model, it is not English, so red would have been a good choice.
It may still be a little intense, but I'll leave it that way for now:
In the Danish National Archives, under the archive number A 1175d, there is a layout of the stern cabins of the Orlog ship ELEPHANTEN (same size, same designer and same year of construction as the TRE KRONER) and under the archive number A 975 an elaborately drawn longitudinal section of a Danish ship oft he line, which also shows the paneling of the “underste Kajyt” and the “Storre Kajyt” (great cabin). The “Storre Kajyt” has fluted flat columns with Corinthian capitals.
I am basing my model on both drawings, i.e. there will be no partitions in the areas of my stern section and the paneling in the upper cabin will be correspondingly more elaborate.
Further clues are provided by a contemporary cutaway model from the Krigsmuseet, where the rudder trunk, the stern bench and a bookshelf are beautifully depicted, and the preserved interior of the Swedish royal yacht AMPHION in the Sjohistoriska Museet in Stockholm. It doesn't have to be quite so magnificent, but the columns and the paneling are comparable to the sectional drawing A 975 (see above) I visited and photographed the Amphion myself, it is extremely impressive.
Best regards,
Matthias
-
 Chuck got a reaction from PaddyO in HMS Tiger 1747 by Siggi52 - 1:48 - 60 gun ship from NMM plans
Beautiful work and photo
-
 Chuck got a reaction from marsalv in Sloop Speedwell 1752 by Chuck - Ketch Rigged Sloop - POF - prototype build
To scupper or not to scupper.
Most contemporary models do not show the scuppers. In fact the contemporary model of Speedwell doesnt show the scuppers. I didnt add the scuppers on my Winnie build which was typical. But I am going to show them on my speedwell. Nothing fancy. These arent too crazy to do. Not like the hawse holes will be. But you do have to be careful. You need to carefully measure them inboard and outboard so they look like they line up. You can actually use the deck planking templates because I have marked the inboard locations for all of the scuppers.
When I drill my scuppers I dont even try to drill them all the way through. That adds unnecessary difficulty. I drill shallow holes only about 1/16" deep or slightly more. Inboard, I start with a small pilot hole with a small drill bit. Then in this case, I used a #47 drill bit afterwards to make them larger. Finally I used a round file to smooth out the hole’s insides. I lightly sanded the inboard bulwarks over the scuppers with some 400 grit sandpaper to smooth out any fraying. This will require some paint touch-up later when they are all done. The scupper holes were made flush with the deck level or just a hair above.
I prefer to use a soft pencil to darken the inside of the holes. I made sure to cover the entire inside surface of the scuppers including the back of the hole. Then I touch up the red bulwark paint. On this model I drilled the scuppers before I added the waterway. I just wanted to try something new. It worked out really well for me. No chipping or fraying of the water way at all. You can do it whichever way is more comfortable for you.
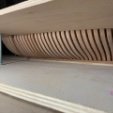
The picture below shows the holes drilled and darkened with the pencil. They are nice and dark. I touched up the red paint as well on the bulwarks afterwards. You can see the waterway strip also prepared in advance and ready to be glued into position.
The waterway is a 3/64" x 3/64" strip of cedar. I sanded one of the four corners of the strip down its entire length. I used an Emory board or sanding stick. Basically I made it triangular in profile. Then I held it in position so I could mark the positions for the scuppers along its length. I really tried to get these exactly where they should be located. I used a round mini file to make the half round openings along the length of the waterway where the scuppers were marked out. Once in position this really looked good. I used the same soft pencil to darken the round notches I made along the waterway as well. Below you can see how the scuppers inboard turned out. I made the waterway in two pieces for the gun deck rather than use one long strip that spanned across the whole length.
I also prepared the waterway for the poop deck, port and starboard. This was easy...no scuppers, LOL. Just make the strip triangular. Dont worry about trying to make it concave or anything fancy.
Here is a photo.
Finally to the outboard side. No difference here really. I used those outboard templates we used way back when....remember those. If you have to shift the template fore and aft a bit to line them up with the inboard scuppers you made on the opposite side of the deck/hull its no big deal. But this template will give you a really good start and can be rested atop the wales.
I drilled with a small drill bit first and again made the holes larger using the #47 bit. I cleaned them up a bit and darkened them with a soft pencil. Once again...no need to drill all the way through and hope you meet the same scupper hole you drilled on the inboard side. Fake it ...till you make it .....I always say. I drilled part way through once again. Make sure you really darken them inside the holes nicely and completely.
Dont add the waterway on the fcastle deck yet. I think it best to drill the hawse holes first. I will be doing that next me thinks.
-
 Chuck got a reaction from Mirabell61 in HMS Tiger 1747 by Siggi52 - 1:48 - 60 gun ship from NMM plans
Beautiful work and photo
-
Chuck reacted to Freebird in Sloop Speedwell 1752 by Freebird (Rick) - Syren Ship Model Company - 1:32 Scale - POF
Given the length of the keel, especially since it's assembled in a free state (not constrained), chances are good that the keel might have a twist or slight bend in it. I can't draw a straight line with a ruler, so checking with a laser seemed like a good idea. Also, with the stern needing to be exactly vertical, the laser makes that an easy task to accomplish. But mostly, with the keel coming out as straight as it did, is a testament to the quality of Chuck's laser cutting skills, design and quality materials.
Best Regards .... Rick
-
 Chuck got a reaction from FrankWouts in Sloop Speedwell 1752 by Chuck - Ketch Rigged Sloop - POF - prototype build
Yupp....I have always done this on every ship model that I have made showing the scuppers. Works like a charm.
-
Chuck reacted to Freebird in Sloop Speedwell 1752 by Freebird (Rick) - Syren Ship Model Company - 1:32 Scale - POF
First, thank you ALL for likes, I very much appreciate it!
Shaped the deadwood and added the wedges. Sanding down to shape was an all day affair, lots of patient sanding. Not 100% happy with the results, it’s a little too thin at the base of the wedges. Hope that won’t be a problem down the road.
This morning I glued the deadwood to the keel. It needs to be perfectly vertical and since the keel is so long naked eyeballs won’t cut it. In anticipation of this build I had bought a cheap laser level a while back. I built the jigs to hold the keel assembly and laid everything out on my building board. I first aligned the plan to the laser line and then the jigs, which I had drawn center lines on. Nothing is secured yet, just some weights for now and I know when I secure the plans and jigs, I’ll have to go through this exercise again, but it this gives me a feel for where I’m at alignment wise. All I can say is Wow! Once everything was in place the laser line lined up almost perfectly with my center lines. Never would have thought something this long would be straight. I took some photos but it was very difficult.
Best Regards …. Rick
-
Chuck reacted to Blue Ensign in Medway Longboat 1742 by Blue Ensign - FINISHED - Syren Ship Model Company - ½” scale
Post 21
Painting the rails
There were some very fine imperfections between the capping rail and inboard sheer planking still apparent after two coats of thinned paint.
4849
I applied some fine surface filler atop the rails.
Several more thinned paint coats were applied with sanding in-between initially using 400, then 1000 grit.
At this point in Part three of the guide it is suggested that the decorative frieze and rail are fitted but I thought I would attend to the floorboards and platforms first.
I will return to add final paint coats once the boarding is installed.
Floorboarding
The floorboards comprise the central board with a broad plank adjacent and a narrower plank outside.
2304a
The two broad planks either side of the central plank are easy to identify on 1/16th cedar sheet.
2303a
The centre plank along with the two narrower outer planks are found on sheet R. These are made up from two 1/32nd strips glued together. The top layers are slightly narrower to form a rabbet, one each side on the central plank, and one on the outer edges of the outer planks.
2307
The central plank with the two broad planks.
2305a
These should meet the centre plank at all points. There is a gap at the fore end which I don’t think will accept edge bending, so the inner edges look to need shaping to allow the fore end to meet the central plank.
The broad planks will also require some lateral bending to sit down on the frames.
2308a
The two outer planks abut the broad planks with the rabbet on the outer edge.
The central plank is fitted first which is necessary to provide a solid edge to work the broad plank fit.
Trial fitting revealed a potential problem.
With an open framed version the fit of the central board is perhaps slightly more critical than the fully planked version.
4855a
The fit of the boards on the frames will be seen from below and as can be seen the central plank does not sit fully down on the third from bow frame due to the more acute angle of the frame.
Having discussed with Chuck a small wedge was added to fill the gap.
4853
One of the advantages of open frames is that there is convenient access to clamp this part in place.
B.E
29/05/2024
-
 Chuck got a reaction from ccoyle in Sloop Speedwell 1752 by Chuck - Ketch Rigged Sloop - POF - prototype build
To scupper or not to scupper.
Most contemporary models do not show the scuppers. In fact the contemporary model of Speedwell doesnt show the scuppers. I didnt add the scuppers on my Winnie build which was typical. But I am going to show them on my speedwell. Nothing fancy. These arent too crazy to do. Not like the hawse holes will be. But you do have to be careful. You need to carefully measure them inboard and outboard so they look like they line up. You can actually use the deck planking templates because I have marked the inboard locations for all of the scuppers.
When I drill my scuppers I dont even try to drill them all the way through. That adds unnecessary difficulty. I drill shallow holes only about 1/16" deep or slightly more. Inboard, I start with a small pilot hole with a small drill bit. Then in this case, I used a #47 drill bit afterwards to make them larger. Finally I used a round file to smooth out the hole’s insides. I lightly sanded the inboard bulwarks over the scuppers with some 400 grit sandpaper to smooth out any fraying. This will require some paint touch-up later when they are all done. The scupper holes were made flush with the deck level or just a hair above.
I prefer to use a soft pencil to darken the inside of the holes. I made sure to cover the entire inside surface of the scuppers including the back of the hole. Then I touch up the red bulwark paint. On this model I drilled the scuppers before I added the waterway. I just wanted to try something new. It worked out really well for me. No chipping or fraying of the water way at all. You can do it whichever way is more comfortable for you.
The picture below shows the holes drilled and darkened with the pencil. They are nice and dark. I touched up the red paint as well on the bulwarks afterwards. You can see the waterway strip also prepared in advance and ready to be glued into position.
The waterway is a 3/64" x 3/64" strip of cedar. I sanded one of the four corners of the strip down its entire length. I used an Emory board or sanding stick. Basically I made it triangular in profile. Then I held it in position so I could mark the positions for the scuppers along its length. I really tried to get these exactly where they should be located. I used a round mini file to make the half round openings along the length of the waterway where the scuppers were marked out. Once in position this really looked good. I used the same soft pencil to darken the round notches I made along the waterway as well. Below you can see how the scuppers inboard turned out. I made the waterway in two pieces for the gun deck rather than use one long strip that spanned across the whole length.
I also prepared the waterway for the poop deck, port and starboard. This was easy...no scuppers, LOL. Just make the strip triangular. Dont worry about trying to make it concave or anything fancy.
Here is a photo.
Finally to the outboard side. No difference here really. I used those outboard templates we used way back when....remember those. If you have to shift the template fore and aft a bit to line them up with the inboard scuppers you made on the opposite side of the deck/hull its no big deal. But this template will give you a really good start and can be rested atop the wales.
I drilled with a small drill bit first and again made the holes larger using the #47 bit. I cleaned them up a bit and darkened them with a soft pencil. Once again...no need to drill all the way through and hope you meet the same scupper hole you drilled on the inboard side. Fake it ...till you make it .....I always say. I drilled part way through once again. Make sure you really darken them inside the holes nicely and completely.
Dont add the waterway on the fcastle deck yet. I think it best to drill the hawse holes first. I will be doing that next me thinks.
-
 Chuck got a reaction from mtaylor in HMS Tiger 1747 by Siggi52 - 1:48 - 60 gun ship from NMM plans
Beautiful work and photo
-
 Chuck got a reaction from FriedClams in HMS Tiger 1747 by Siggi52 - 1:48 - 60 gun ship from NMM plans
Beautiful work and photo
-
Chuck reacted to Siggi52 in HMS Tiger 1747 by Siggi52 - 1:48 - 60 gun ship from NMM plans
Keith, the end is in sight, but I think it takes a lot of time to get there. There are at least a lot of things to do left.
Ian, no with these sticks and ropes I would't play.
Today the Tiger came up from the basement to see some daylight. And both Tigers now are looking how it rains outside.
-
 Chuck got a reaction from KARAVOKIRIS in Sloop Speedwell 1752 by Chuck - Ketch Rigged Sloop - POF - prototype build
To scupper or not to scupper.
Most contemporary models do not show the scuppers. In fact the contemporary model of Speedwell doesnt show the scuppers. I didnt add the scuppers on my Winnie build which was typical. But I am going to show them on my speedwell. Nothing fancy. These arent too crazy to do. Not like the hawse holes will be. But you do have to be careful. You need to carefully measure them inboard and outboard so they look like they line up. You can actually use the deck planking templates because I have marked the inboard locations for all of the scuppers.
When I drill my scuppers I dont even try to drill them all the way through. That adds unnecessary difficulty. I drill shallow holes only about 1/16" deep or slightly more. Inboard, I start with a small pilot hole with a small drill bit. Then in this case, I used a #47 drill bit afterwards to make them larger. Finally I used a round file to smooth out the hole’s insides. I lightly sanded the inboard bulwarks over the scuppers with some 400 grit sandpaper to smooth out any fraying. This will require some paint touch-up later when they are all done. The scupper holes were made flush with the deck level or just a hair above.
I prefer to use a soft pencil to darken the inside of the holes. I made sure to cover the entire inside surface of the scuppers including the back of the hole. Then I touch up the red bulwark paint. On this model I drilled the scuppers before I added the waterway. I just wanted to try something new. It worked out really well for me. No chipping or fraying of the water way at all. You can do it whichever way is more comfortable for you.
The picture below shows the holes drilled and darkened with the pencil. They are nice and dark. I touched up the red paint as well on the bulwarks afterwards. You can see the waterway strip also prepared in advance and ready to be glued into position.
The waterway is a 3/64" x 3/64" strip of cedar. I sanded one of the four corners of the strip down its entire length. I used an Emory board or sanding stick. Basically I made it triangular in profile. Then I held it in position so I could mark the positions for the scuppers along its length. I really tried to get these exactly where they should be located. I used a round mini file to make the half round openings along the length of the waterway where the scuppers were marked out. Once in position this really looked good. I used the same soft pencil to darken the round notches I made along the waterway as well. Below you can see how the scuppers inboard turned out. I made the waterway in two pieces for the gun deck rather than use one long strip that spanned across the whole length.
I also prepared the waterway for the poop deck, port and starboard. This was easy...no scuppers, LOL. Just make the strip triangular. Dont worry about trying to make it concave or anything fancy.
Here is a photo.
Finally to the outboard side. No difference here really. I used those outboard templates we used way back when....remember those. If you have to shift the template fore and aft a bit to line them up with the inboard scuppers you made on the opposite side of the deck/hull its no big deal. But this template will give you a really good start and can be rested atop the wales.
I drilled with a small drill bit first and again made the holes larger using the #47 bit. I cleaned them up a bit and darkened them with a soft pencil. Once again...no need to drill all the way through and hope you meet the same scupper hole you drilled on the inboard side. Fake it ...till you make it .....I always say. I drilled part way through once again. Make sure you really darken them inside the holes nicely and completely.
Dont add the waterway on the fcastle deck yet. I think it best to drill the hawse holes first. I will be doing that next me thinks.
-
 Chuck got a reaction from KentM in Sloop Speedwell 1752 by Chuck - Ketch Rigged Sloop - POF - prototype build
Yupp....I have always done this on every ship model that I have made showing the scuppers. Works like a charm.
-
 Chuck got a reaction from JpR62 in Sloop Speedwell 1752 by Chuck - Ketch Rigged Sloop - POF - prototype build
Yupp....I have always done this on every ship model that I have made showing the scuppers. Works like a charm.
-
 Chuck got a reaction from Ryland Craze in Sloop Speedwell 1752 by Chuck - Ketch Rigged Sloop - POF - prototype build
Yupp....I have always done this on every ship model that I have made showing the scuppers. Works like a charm.
-
Chuck got a reaction from FrankWouts in HMS Winchelsea 1764 by Trussben - FINISHED - 1:48
Great News Ben...Glad to see you almost making sawdust again.
-
Chuck reacted to Seventynet in Speedwell 1752 by Seventynet (Ian) - Syren Ship Model Company - 1:32 Scale - POF Sloop
Greetings,
Let the real work begin! I am ready to start the frames.
I realized that the keel I had made a year ago is slightly thicker than Chuck’s but I think I can get away with a little tapering at the stern when the time comes. The rest of the fittings were straightforward although I had my fair share of screwups. I decided to employ a higher build board jig so that the stern and stem posts were clasped at their tops - though I know that these extensions will get in my way later. I will interchange the lower jigs when the time comes.
Cheers,
Ian
-
Chuck reacted to Trussben in HMS Winchelsea 1764 by Trussben - FINISHED - 1:48
Work has restarted on Chapter 7, all of the beam positions were checked again and numbered 1-30, #25 was permantly installed and I have started adjusting the bulkheads and doors into position, I really happy to be back building again.
ben
-
 Chuck got a reaction from Tobias in Sloop Speedwell 1752 by Chuck - Ketch Rigged Sloop - POF - prototype build
To scupper or not to scupper.
Most contemporary models do not show the scuppers. In fact the contemporary model of Speedwell doesnt show the scuppers. I didnt add the scuppers on my Winnie build which was typical. But I am going to show them on my speedwell. Nothing fancy. These arent too crazy to do. Not like the hawse holes will be. But you do have to be careful. You need to carefully measure them inboard and outboard so they look like they line up. You can actually use the deck planking templates because I have marked the inboard locations for all of the scuppers.
When I drill my scuppers I dont even try to drill them all the way through. That adds unnecessary difficulty. I drill shallow holes only about 1/16" deep or slightly more. Inboard, I start with a small pilot hole with a small drill bit. Then in this case, I used a #47 drill bit afterwards to make them larger. Finally I used a round file to smooth out the hole’s insides. I lightly sanded the inboard bulwarks over the scuppers with some 400 grit sandpaper to smooth out any fraying. This will require some paint touch-up later when they are all done. The scupper holes were made flush with the deck level or just a hair above.
I prefer to use a soft pencil to darken the inside of the holes. I made sure to cover the entire inside surface of the scuppers including the back of the hole. Then I touch up the red bulwark paint. On this model I drilled the scuppers before I added the waterway. I just wanted to try something new. It worked out really well for me. No chipping or fraying of the water way at all. You can do it whichever way is more comfortable for you.
The picture below shows the holes drilled and darkened with the pencil. They are nice and dark. I touched up the red paint as well on the bulwarks afterwards. You can see the waterway strip also prepared in advance and ready to be glued into position.
The waterway is a 3/64" x 3/64" strip of cedar. I sanded one of the four corners of the strip down its entire length. I used an Emory board or sanding stick. Basically I made it triangular in profile. Then I held it in position so I could mark the positions for the scuppers along its length. I really tried to get these exactly where they should be located. I used a round mini file to make the half round openings along the length of the waterway where the scuppers were marked out. Once in position this really looked good. I used the same soft pencil to darken the round notches I made along the waterway as well. Below you can see how the scuppers inboard turned out. I made the waterway in two pieces for the gun deck rather than use one long strip that spanned across the whole length.
I also prepared the waterway for the poop deck, port and starboard. This was easy...no scuppers, LOL. Just make the strip triangular. Dont worry about trying to make it concave or anything fancy.
Here is a photo.
Finally to the outboard side. No difference here really. I used those outboard templates we used way back when....remember those. If you have to shift the template fore and aft a bit to line them up with the inboard scuppers you made on the opposite side of the deck/hull its no big deal. But this template will give you a really good start and can be rested atop the wales.
I drilled with a small drill bit first and again made the holes larger using the #47 bit. I cleaned them up a bit and darkened them with a soft pencil. Once again...no need to drill all the way through and hope you meet the same scupper hole you drilled on the inboard side. Fake it ...till you make it .....I always say. I drilled part way through once again. Make sure you really darken them inside the holes nicely and completely.
Dont add the waterway on the fcastle deck yet. I think it best to drill the hawse holes first. I will be doing that next me thinks.
-
 Chuck got a reaction from Jorge_Goncalves in Sloop Speedwell 1752 by Chuck - Ketch Rigged Sloop - POF - prototype build
To scupper or not to scupper.
Most contemporary models do not show the scuppers. In fact the contemporary model of Speedwell doesnt show the scuppers. I didnt add the scuppers on my Winnie build which was typical. But I am going to show them on my speedwell. Nothing fancy. These arent too crazy to do. Not like the hawse holes will be. But you do have to be careful. You need to carefully measure them inboard and outboard so they look like they line up. You can actually use the deck planking templates because I have marked the inboard locations for all of the scuppers.
When I drill my scuppers I dont even try to drill them all the way through. That adds unnecessary difficulty. I drill shallow holes only about 1/16" deep or slightly more. Inboard, I start with a small pilot hole with a small drill bit. Then in this case, I used a #47 drill bit afterwards to make them larger. Finally I used a round file to smooth out the hole’s insides. I lightly sanded the inboard bulwarks over the scuppers with some 400 grit sandpaper to smooth out any fraying. This will require some paint touch-up later when they are all done. The scupper holes were made flush with the deck level or just a hair above.
I prefer to use a soft pencil to darken the inside of the holes. I made sure to cover the entire inside surface of the scuppers including the back of the hole. Then I touch up the red bulwark paint. On this model I drilled the scuppers before I added the waterway. I just wanted to try something new. It worked out really well for me. No chipping or fraying of the water way at all. You can do it whichever way is more comfortable for you.
The picture below shows the holes drilled and darkened with the pencil. They are nice and dark. I touched up the red paint as well on the bulwarks afterwards. You can see the waterway strip also prepared in advance and ready to be glued into position.
The waterway is a 3/64" x 3/64" strip of cedar. I sanded one of the four corners of the strip down its entire length. I used an Emory board or sanding stick. Basically I made it triangular in profile. Then I held it in position so I could mark the positions for the scuppers along its length. I really tried to get these exactly where they should be located. I used a round mini file to make the half round openings along the length of the waterway where the scuppers were marked out. Once in position this really looked good. I used the same soft pencil to darken the round notches I made along the waterway as well. Below you can see how the scuppers inboard turned out. I made the waterway in two pieces for the gun deck rather than use one long strip that spanned across the whole length.
I also prepared the waterway for the poop deck, port and starboard. This was easy...no scuppers, LOL. Just make the strip triangular. Dont worry about trying to make it concave or anything fancy.
Here is a photo.
Finally to the outboard side. No difference here really. I used those outboard templates we used way back when....remember those. If you have to shift the template fore and aft a bit to line them up with the inboard scuppers you made on the opposite side of the deck/hull its no big deal. But this template will give you a really good start and can be rested atop the wales.
I drilled with a small drill bit first and again made the holes larger using the #47 bit. I cleaned them up a bit and darkened them with a soft pencil. Once again...no need to drill all the way through and hope you meet the same scupper hole you drilled on the inboard side. Fake it ...till you make it .....I always say. I drilled part way through once again. Make sure you really darken them inside the holes nicely and completely.
Dont add the waterway on the fcastle deck yet. I think it best to drill the hawse holes first. I will be doing that next me thinks.
-
Chuck got a reaction from marsalv in HMS Portland 1770 by scrubbyj427 - 1:48 - 4th rate 50-gun ship
Beautiful....simply beautiful.
-
 Chuck got a reaction from KenW in Sloop Speedwell 1752 by Chuck - Ketch Rigged Sloop - POF - prototype build
Yupp....I have always done this on every ship model that I have made showing the scuppers. Works like a charm.
-
Chuck reacted to yvesvidal in Sloop Speedwell 1752 by Chuck - Ketch Rigged Sloop - POF - prototype build
That is the trick.....faking the holes and not connecting them.
Yves