


Chuck
-
Posts
9,390 -
Joined
-
Last visited
Reputation Activity
-

 Chuck got a reaction from muratx in HM Cutter Cheerful 1806 by Chuck - FINISHED - 1:48 scale - kit prototype
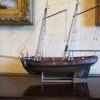
And finally....the deck is planked. This is a big milestone for me because it is the last really big messy job to be done. The remainder of the project will be small fittings and less sanding. There will be less dust and less paint touch up.
The planking was pretty straight forward after having lined off the deck. I just following the plan I drew on the false deck. Each plank was tapered to match. The scarphed planks were handles much the same way the drop plank was on the outside of the hull. If I thought it was needed, I made a card stock template. The scarphed planks were cut from wider stock (7/32" or even 1/4" wide planks).
Next I will create the rudder port because it will be the last time I can turn the hull upside down without too much trouble. Once that is done I will return outboard and finish off all of the details. The boom crutches, boarding ladders, scuppers and channels etc.
-
 Chuck got a reaction from fatih79 in HM Cutter Cheerful 1806 by Chuck - FINISHED - 1:48 scale - kit prototype
And finally....the deck is planked. This is a big milestone for me because it is the last really big messy job to be done. The remainder of the project will be small fittings and less sanding. There will be less dust and less paint touch up.
The planking was pretty straight forward after having lined off the deck. I just following the plan I drew on the false deck. Each plank was tapered to match. The scarphed planks were handles much the same way the drop plank was on the outside of the hull. If I thought it was needed, I made a card stock template. The scarphed planks were cut from wider stock (7/32" or even 1/4" wide planks).
Next I will create the rudder port because it will be the last time I can turn the hull upside down without too much trouble. Once that is done I will return outboard and finish off all of the details. The boom crutches, boarding ladders, scuppers and channels etc.
-
 Chuck got a reaction from CharlieZardoz in HM Cutter Cheerful 1806 by Chuck - FINISHED - 1:48 scale - kit prototype
And finally....the deck is planked. This is a big milestone for me because it is the last really big messy job to be done. The remainder of the project will be small fittings and less sanding. There will be less dust and less paint touch up.
The planking was pretty straight forward after having lined off the deck. I just following the plan I drew on the false deck. Each plank was tapered to match. The scarphed planks were handles much the same way the drop plank was on the outside of the hull. If I thought it was needed, I made a card stock template. The scarphed planks were cut from wider stock (7/32" or even 1/4" wide planks).
Next I will create the rudder port because it will be the last time I can turn the hull upside down without too much trouble. Once that is done I will return outboard and finish off all of the details. The boom crutches, boarding ladders, scuppers and channels etc.
-
 Chuck got a reaction from Remcohe in HM Cutter Cheerful 1806 by Chuck - FINISHED - 1:48 scale - kit prototype
And finally....the deck is planked. This is a big milestone for me because it is the last really big messy job to be done. The remainder of the project will be small fittings and less sanding. There will be less dust and less paint touch up.
The planking was pretty straight forward after having lined off the deck. I just following the plan I drew on the false deck. Each plank was tapered to match. The scarphed planks were handles much the same way the drop plank was on the outside of the hull. If I thought it was needed, I made a card stock template. The scarphed planks were cut from wider stock (7/32" or even 1/4" wide planks).
Next I will create the rudder port because it will be the last time I can turn the hull upside down without too much trouble. Once that is done I will return outboard and finish off all of the details. The boom crutches, boarding ladders, scuppers and channels etc.
-
 Chuck got a reaction from Erebus and Terror in HM Cutter Cheerful 1806 by Chuck - FINISHED - 1:48 scale - kit prototype
And finally....the deck is planked. This is a big milestone for me because it is the last really big messy job to be done. The remainder of the project will be small fittings and less sanding. There will be less dust and less paint touch up.
The planking was pretty straight forward after having lined off the deck. I just following the plan I drew on the false deck. Each plank was tapered to match. The scarphed planks were handles much the same way the drop plank was on the outside of the hull. If I thought it was needed, I made a card stock template. The scarphed planks were cut from wider stock (7/32" or even 1/4" wide planks).
Next I will create the rudder port because it will be the last time I can turn the hull upside down without too much trouble. Once that is done I will return outboard and finish off all of the details. The boom crutches, boarding ladders, scuppers and channels etc.
-
 Chuck got a reaction from Jay 1 in HM Cutter Cheerful 1806 by Chuck - FINISHED - 1:48 scale - kit prototype
And finally....the deck is planked. This is a big milestone for me because it is the last really big messy job to be done. The remainder of the project will be small fittings and less sanding. There will be less dust and less paint touch up.
The planking was pretty straight forward after having lined off the deck. I just following the plan I drew on the false deck. Each plank was tapered to match. The scarphed planks were handles much the same way the drop plank was on the outside of the hull. If I thought it was needed, I made a card stock template. The scarphed planks were cut from wider stock (7/32" or even 1/4" wide planks).
Next I will create the rudder port because it will be the last time I can turn the hull upside down without too much trouble. Once that is done I will return outboard and finish off all of the details. The boom crutches, boarding ladders, scuppers and channels etc.
-
 Chuck got a reaction from SailorGreg in HM Cutter Cheerful 1806 by Chuck - FINISHED - 1:48 scale - kit prototype
And finally....the deck is planked. This is a big milestone for me because it is the last really big messy job to be done. The remainder of the project will be small fittings and less sanding. There will be less dust and less paint touch up.
The planking was pretty straight forward after having lined off the deck. I just following the plan I drew on the false deck. Each plank was tapered to match. The scarphed planks were handles much the same way the drop plank was on the outside of the hull. If I thought it was needed, I made a card stock template. The scarphed planks were cut from wider stock (7/32" or even 1/4" wide planks).
Next I will create the rudder port because it will be the last time I can turn the hull upside down without too much trouble. Once that is done I will return outboard and finish off all of the details. The boom crutches, boarding ladders, scuppers and channels etc.
-
 Chuck got a reaction from tlevine in HM Cutter Cheerful 1806 by Chuck - FINISHED - 1:48 scale - kit prototype
And finally....the deck is planked. This is a big milestone for me because it is the last really big messy job to be done. The remainder of the project will be small fittings and less sanding. There will be less dust and less paint touch up.
The planking was pretty straight forward after having lined off the deck. I just following the plan I drew on the false deck. Each plank was tapered to match. The scarphed planks were handles much the same way the drop plank was on the outside of the hull. If I thought it was needed, I made a card stock template. The scarphed planks were cut from wider stock (7/32" or even 1/4" wide planks).
Next I will create the rudder port because it will be the last time I can turn the hull upside down without too much trouble. Once that is done I will return outboard and finish off all of the details. The boom crutches, boarding ladders, scuppers and channels etc.
-
 Chuck got a reaction from captainbob in HM Cutter Cheerful 1806 by Chuck - FINISHED - 1:48 scale - kit prototype
And finally....the deck is planked. This is a big milestone for me because it is the last really big messy job to be done. The remainder of the project will be small fittings and less sanding. There will be less dust and less paint touch up.
The planking was pretty straight forward after having lined off the deck. I just following the plan I drew on the false deck. Each plank was tapered to match. The scarphed planks were handles much the same way the drop plank was on the outside of the hull. If I thought it was needed, I made a card stock template. The scarphed planks were cut from wider stock (7/32" or even 1/4" wide planks).
Next I will create the rudder port because it will be the last time I can turn the hull upside down without too much trouble. Once that is done I will return outboard and finish off all of the details. The boom crutches, boarding ladders, scuppers and channels etc.
-
 Chuck got a reaction from cog in HM Cutter Cheerful 1806 by Chuck - FINISHED - 1:48 scale - kit prototype
And finally....the deck is planked. This is a big milestone for me because it is the last really big messy job to be done. The remainder of the project will be small fittings and less sanding. There will be less dust and less paint touch up.
The planking was pretty straight forward after having lined off the deck. I just following the plan I drew on the false deck. Each plank was tapered to match. The scarphed planks were handles much the same way the drop plank was on the outside of the hull. If I thought it was needed, I made a card stock template. The scarphed planks were cut from wider stock (7/32" or even 1/4" wide planks).
Next I will create the rudder port because it will be the last time I can turn the hull upside down without too much trouble. Once that is done I will return outboard and finish off all of the details. The boom crutches, boarding ladders, scuppers and channels etc.
-
 Chuck reacted to druxey in HM Cutter Cheerful 1806 by Chuck - FINISHED - 1:48 scale - kit prototype
Nice to see the deck planking done as it actually was in those days! No excuses any more, folks....
-
 Chuck got a reaction from Maury S in HM Cutter Cheerful 1806 by Chuck - FINISHED - 1:48 scale - kit prototype
And finally....the deck is planked. This is a big milestone for me because it is the last really big messy job to be done. The remainder of the project will be small fittings and less sanding. There will be less dust and less paint touch up.
The planking was pretty straight forward after having lined off the deck. I just following the plan I drew on the false deck. Each plank was tapered to match. The scarphed planks were handles much the same way the drop plank was on the outside of the hull. If I thought it was needed, I made a card stock template. The scarphed planks were cut from wider stock (7/32" or even 1/4" wide planks).
Next I will create the rudder port because it will be the last time I can turn the hull upside down without too much trouble. Once that is done I will return outboard and finish off all of the details. The boom crutches, boarding ladders, scuppers and channels etc.
-
 Chuck got a reaction from DavidM in HM Cutter Cheerful 1806 by Chuck - FINISHED - 1:48 scale - kit prototype
And finally....the deck is planked. This is a big milestone for me because it is the last really big messy job to be done. The remainder of the project will be small fittings and less sanding. There will be less dust and less paint touch up.
The planking was pretty straight forward after having lined off the deck. I just following the plan I drew on the false deck. Each plank was tapered to match. The scarphed planks were handles much the same way the drop plank was on the outside of the hull. If I thought it was needed, I made a card stock template. The scarphed planks were cut from wider stock (7/32" or even 1/4" wide planks).
Next I will create the rudder port because it will be the last time I can turn the hull upside down without too much trouble. Once that is done I will return outboard and finish off all of the details. The boom crutches, boarding ladders, scuppers and channels etc.
-
 Chuck got a reaction from WackoWolf in HM Cutter Cheerful 1806 by Chuck - FINISHED - 1:48 scale - kit prototype
And finally....the deck is planked. This is a big milestone for me because it is the last really big messy job to be done. The remainder of the project will be small fittings and less sanding. There will be less dust and less paint touch up.
The planking was pretty straight forward after having lined off the deck. I just following the plan I drew on the false deck. Each plank was tapered to match. The scarphed planks were handles much the same way the drop plank was on the outside of the hull. If I thought it was needed, I made a card stock template. The scarphed planks were cut from wider stock (7/32" or even 1/4" wide planks).
Next I will create the rudder port because it will be the last time I can turn the hull upside down without too much trouble. Once that is done I will return outboard and finish off all of the details. The boom crutches, boarding ladders, scuppers and channels etc.
-
 Chuck got a reaction from egkb in HM Cutter Cheerful 1806 by Chuck - FINISHED - 1:48 scale - kit prototype
And finally....the deck is planked. This is a big milestone for me because it is the last really big messy job to be done. The remainder of the project will be small fittings and less sanding. There will be less dust and less paint touch up.
The planking was pretty straight forward after having lined off the deck. I just following the plan I drew on the false deck. Each plank was tapered to match. The scarphed planks were handles much the same way the drop plank was on the outside of the hull. If I thought it was needed, I made a card stock template. The scarphed planks were cut from wider stock (7/32" or even 1/4" wide planks).
Next I will create the rudder port because it will be the last time I can turn the hull upside down without too much trouble. Once that is done I will return outboard and finish off all of the details. The boom crutches, boarding ladders, scuppers and channels etc.
-
 Chuck got a reaction from AnobiumPunctatum in HM Cutter Cheerful 1806 by Chuck - FINISHED - 1:48 scale - kit prototype
And finally....the deck is planked. This is a big milestone for me because it is the last really big messy job to be done. The remainder of the project will be small fittings and less sanding. There will be less dust and less paint touch up.
The planking was pretty straight forward after having lined off the deck. I just following the plan I drew on the false deck. Each plank was tapered to match. The scarphed planks were handles much the same way the drop plank was on the outside of the hull. If I thought it was needed, I made a card stock template. The scarphed planks were cut from wider stock (7/32" or even 1/4" wide planks).
Next I will create the rudder port because it will be the last time I can turn the hull upside down without too much trouble. Once that is done I will return outboard and finish off all of the details. The boom crutches, boarding ladders, scuppers and channels etc.
-
 Chuck got a reaction from Ryland Craze in HM Cutter Cheerful 1806 by Chuck - FINISHED - 1:48 scale - kit prototype
And finally....the deck is planked. This is a big milestone for me because it is the last really big messy job to be done. The remainder of the project will be small fittings and less sanding. There will be less dust and less paint touch up.
The planking was pretty straight forward after having lined off the deck. I just following the plan I drew on the false deck. Each plank was tapered to match. The scarphed planks were handles much the same way the drop plank was on the outside of the hull. If I thought it was needed, I made a card stock template. The scarphed planks were cut from wider stock (7/32" or even 1/4" wide planks).
Next I will create the rudder port because it will be the last time I can turn the hull upside down without too much trouble. Once that is done I will return outboard and finish off all of the details. The boom crutches, boarding ladders, scuppers and channels etc.
-
 Chuck got a reaction from dvm27 in HM Cutter Cheerful 1806 by Chuck - FINISHED - 1:48 scale - kit prototype
And finally....the deck is planked. This is a big milestone for me because it is the last really big messy job to be done. The remainder of the project will be small fittings and less sanding. There will be less dust and less paint touch up.
The planking was pretty straight forward after having lined off the deck. I just following the plan I drew on the false deck. Each plank was tapered to match. The scarphed planks were handles much the same way the drop plank was on the outside of the hull. If I thought it was needed, I made a card stock template. The scarphed planks were cut from wider stock (7/32" or even 1/4" wide planks).
Next I will create the rudder port because it will be the last time I can turn the hull upside down without too much trouble. Once that is done I will return outboard and finish off all of the details. The boom crutches, boarding ladders, scuppers and channels etc.
-
 Chuck got a reaction from reilly in HM Cutter Cheerful 1806 by Chuck - FINISHED - 1:48 scale - kit prototype
And finally....the deck is planked. This is a big milestone for me because it is the last really big messy job to be done. The remainder of the project will be small fittings and less sanding. There will be less dust and less paint touch up.
The planking was pretty straight forward after having lined off the deck. I just following the plan I drew on the false deck. Each plank was tapered to match. The scarphed planks were handles much the same way the drop plank was on the outside of the hull. If I thought it was needed, I made a card stock template. The scarphed planks were cut from wider stock (7/32" or even 1/4" wide planks).
Next I will create the rudder port because it will be the last time I can turn the hull upside down without too much trouble. Once that is done I will return outboard and finish off all of the details. The boom crutches, boarding ladders, scuppers and channels etc.
-
Chuck reacted to rafine in Cutter Cheerful 1806 by rafine - FINISHED
After doing the stern, it was almost a relief to get back to planking the lower hull. I've now done the lower segment on the starboard side through the rough sanding. I started with the garboard strake and then worked from top and bottom until the area was filled in. The final strake required some shaping and fitting, but generally the work went fairly smoothly.
Before moving on to the port side, I will drill and fill for the treenails on this side ( there are well over a thousand holes to be done on each side and I want to break up that task).
Bob
-
 Chuck got a reaction from mtaylor in US Brig Syren by knightyo
That is looking very good Alan. Its fantastic to see you back in the workshop. Hope you are doing well. These are difficult pieces to shape and they look like they will work out very nicely.
Chuck
-
Chuck reacted to knightyo in US Brig Syren by knightyo
Thanks Chuck, it's a blast to be working on this again. I'm still following your practicums step by step. If you see me start heading down a wrong path anywhere, just let me know!
-
 Chuck got a reaction from qwerty2008 in 1760's Royal Navy deck planking and waterway nibbing patterns?
Yes I agree with that...Half of its original width at the butt end. If it was thinner it would defeat the purpose of doing it that way.
Primary sources are key including contemporary models.
Its like the outboard planking around the ports...
You rarely see it illustrated and talked about in books like Robert's or Mondfeld. But the methods are shown on contemporary drafts and texts and building contracts....
Like this detail outboard of the planking on top of and below the ports...you will never find it in Monfeld If you want raise the level of accuracy always try and get your hands on some primary sources.
-
 Chuck got a reaction from dashi in 1760's Royal Navy deck planking and waterway nibbing patterns?
Uh...not exactly
From the same Goodwin book. It just wasnt illustrated. There is a whole section about the margin plank. The bottom drawing does show and list the margin plank but only the later nibbed variety. In actual practice this is how it was done back then.
Here is an excerpt...
" Parallel to the ships side and fayed to the waterway was a strake of planking known as the margin plank. The function of this was to prevent the normal straight deck planking from being tapered to a fine angle where it met the curvature of the ship's side at the fore and after ends. The margin plank was thus fashioned to receive the butts of those planks. It was stipulated that no plank was to be 'joggled" into the margin plank unless the length of its tapered edge was more than twice the width of the plank, and that the plank was only to be tapered or "snaped" to half its width at the butt end. The margin plank was the same thickness as the deck plank, but one and a half times as wide."
This describes very late 18th century nibbing practice and early 19th. Prior to this, 1760's... rather than nib into the margin or waterway, they hooked the planks as shown in the contemporary models I posted which is as primary a source as you can get. The "hooked" planks instead sitting against and alongside the margin. They were also tapered and curved a bit at the fore and aft ends of the deck. This was done to keep the margin/waterway in tact among other reasons. The rules are out there..you just have to find them. Primary sources are the key. Secondary sources are all over the map with omissions and simplifications. Goodwin is an excellent source. Sadly Mondfeld is not held in the same way. Although I wish that it was indeed the way Roberts described..it would be much less hassle.
To further complicate about actual deck planking practices from this time, other details are rarely illustrated but can be seen on contemporary models and described in primary texts. Those include the anchor style deck planks that sometimes ran along the bulwarks a couple of strakes inboard. Also from Goodwin..
" fitted two strakes of either top and butt or anchor stock 4ft from each side of the ship. The function of this was to resist any athwartships compression that occurred when the vessel was in heavy seas."
One other rule....not often illustrated "no plank butts between the hatches and comings" A single length of deck plank was laid between the hatches with no need for butt seams even though this may have disrupted the normal three or four butt shift pattern.
Depending on how historically accurate you want to get with the details,there are many rules like this and no one source really contains them all. But once again, luckily for us... most have been compiled in the fully framed series. Makes our lives much easier. This secondary source contains more of these rules in one place than any other. So unless you want to poke around and gather the many many other resources...both primary and secondary for these individual nuggets, I highly recommend the series.
-
 Chuck got a reaction from thomaslambo in 1760's Royal Navy deck planking and waterway nibbing patterns?
Wq3296...interesting but I have never heard of that before or seen any primary sources that show it done that way...without a margin plank that is...
Do you have any other sources besides the Jim roberts book. At this early time I have always seen a margin plank (wide waterway plank) for English Frigates and larger. For a Bermuda sloop I am not as certain....but I would include it. Jim just breezed over the topic of deck planking in that book writing about a page and a half. No illustrations or mention of time periods etc. Or which decks. I am also just talking about round bowed weather decks from the period...not a forecastle deck such as shown on ships like Bellona with a beakhead bulkhead. That was handled slightly different across the flat end on the forward side of the focastle deck. But the lower decks as far as know would have been scarfed and hooked as I have shown with a wide waterway/margin plank. Jim Roberts was entirely too brief on the subject...But I would love to see additional sources about it.
See this image
There was no reason to use hooked planks on the forecastle deck above....however the lower decks I assumed were done just as described and shown in the earlier post of the frigate Minerva. But the waterway/margin was very wide. It is perfectly described in the Fully Framed series...Volume one for the lower decks and Volume two for the weather decks
Chuck