HOLIDAY DONATION DRIVE - SUPPORT MSW - DO YOUR PART TO KEEP THIS GREAT FORUM GOING! (Only 13 donations so far - C'mon guys!)
×


Salty Sea Dog
-
Posts
666 -
Joined
-
Last visited
Content Type
Profiles
Forums
Gallery
Events
Everything posted by Salty Sea Dog
-
 Hi Jon! I've found the nut slotting files to be useful for quite a few things. You will want to look for the flat, double-edged type instead of the newer wedge- shaped ones that make more of a V- shaped notch.
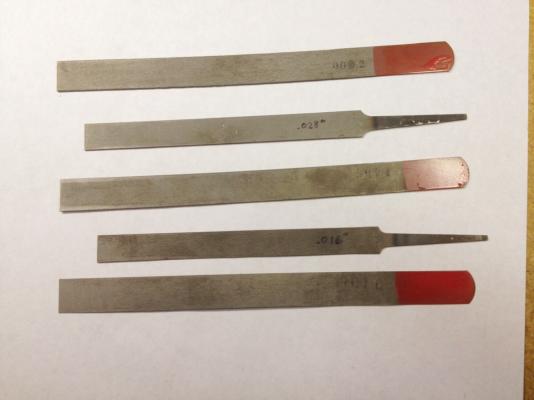
- 515 replies
-
- 2
-

-
- artesania latina
- whaleboat
- (and 1 more)
-
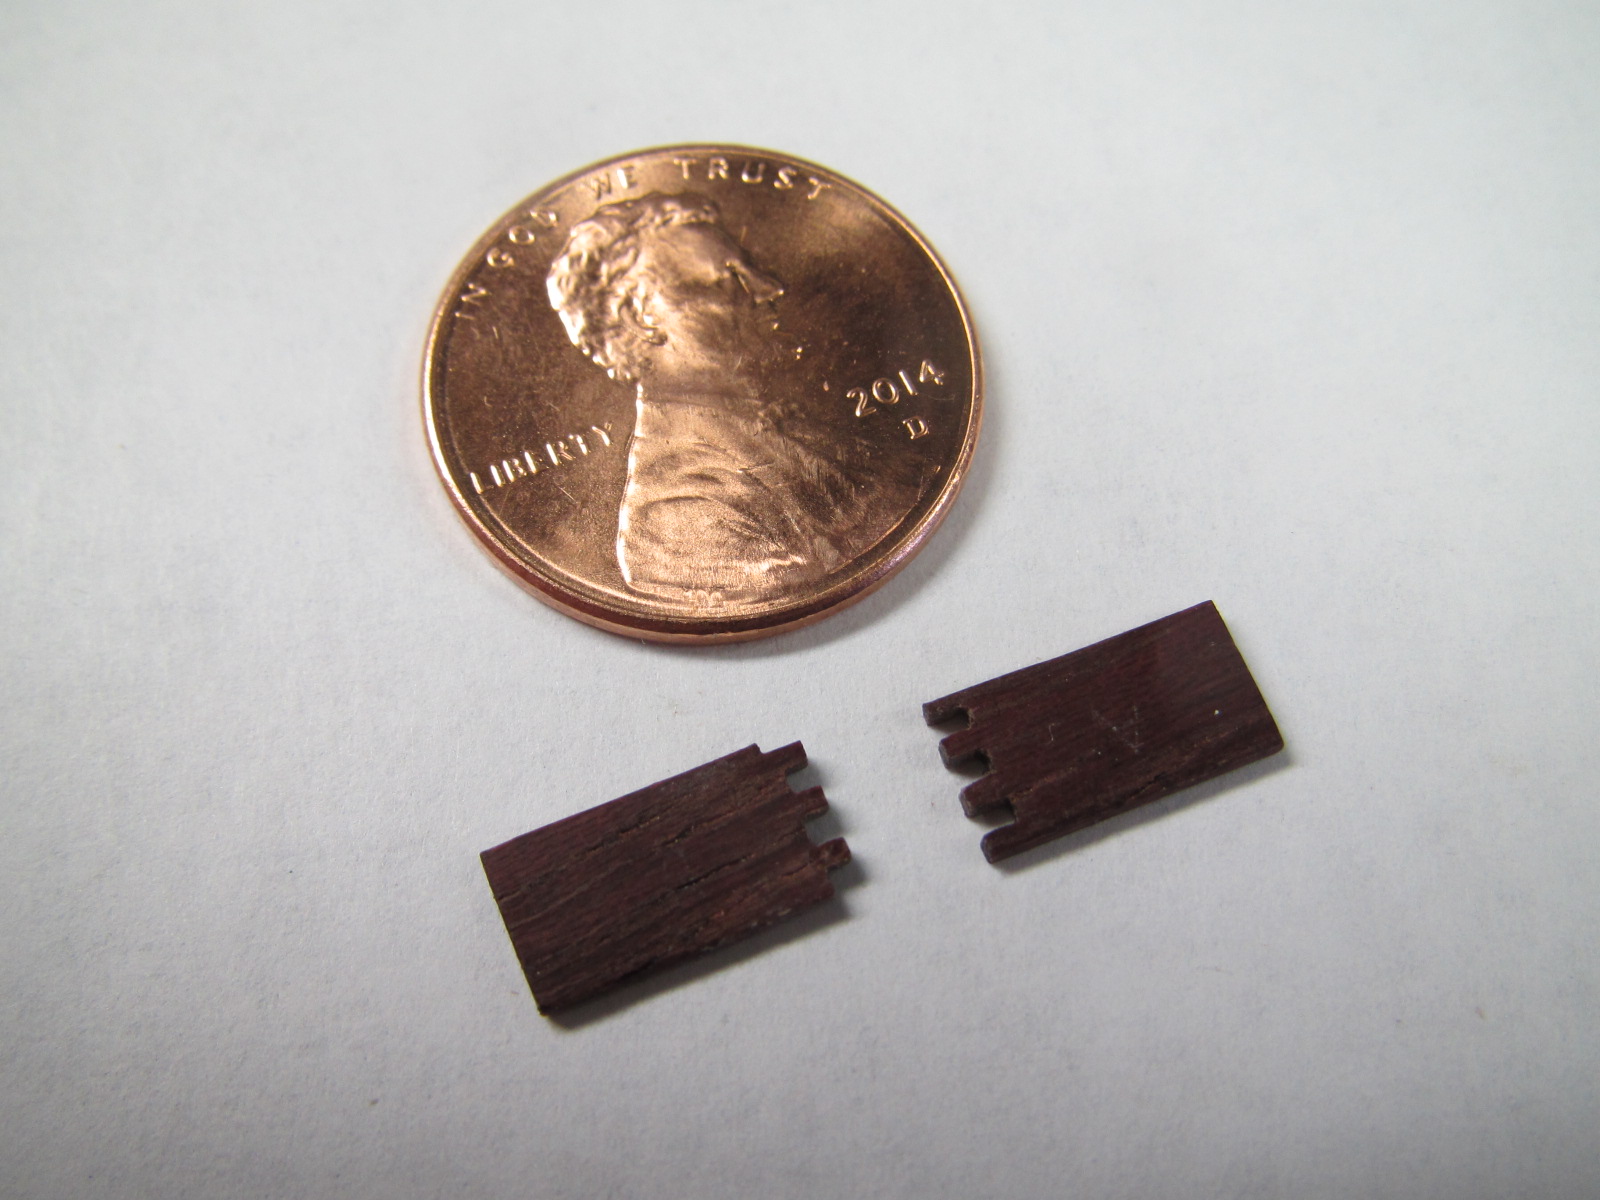
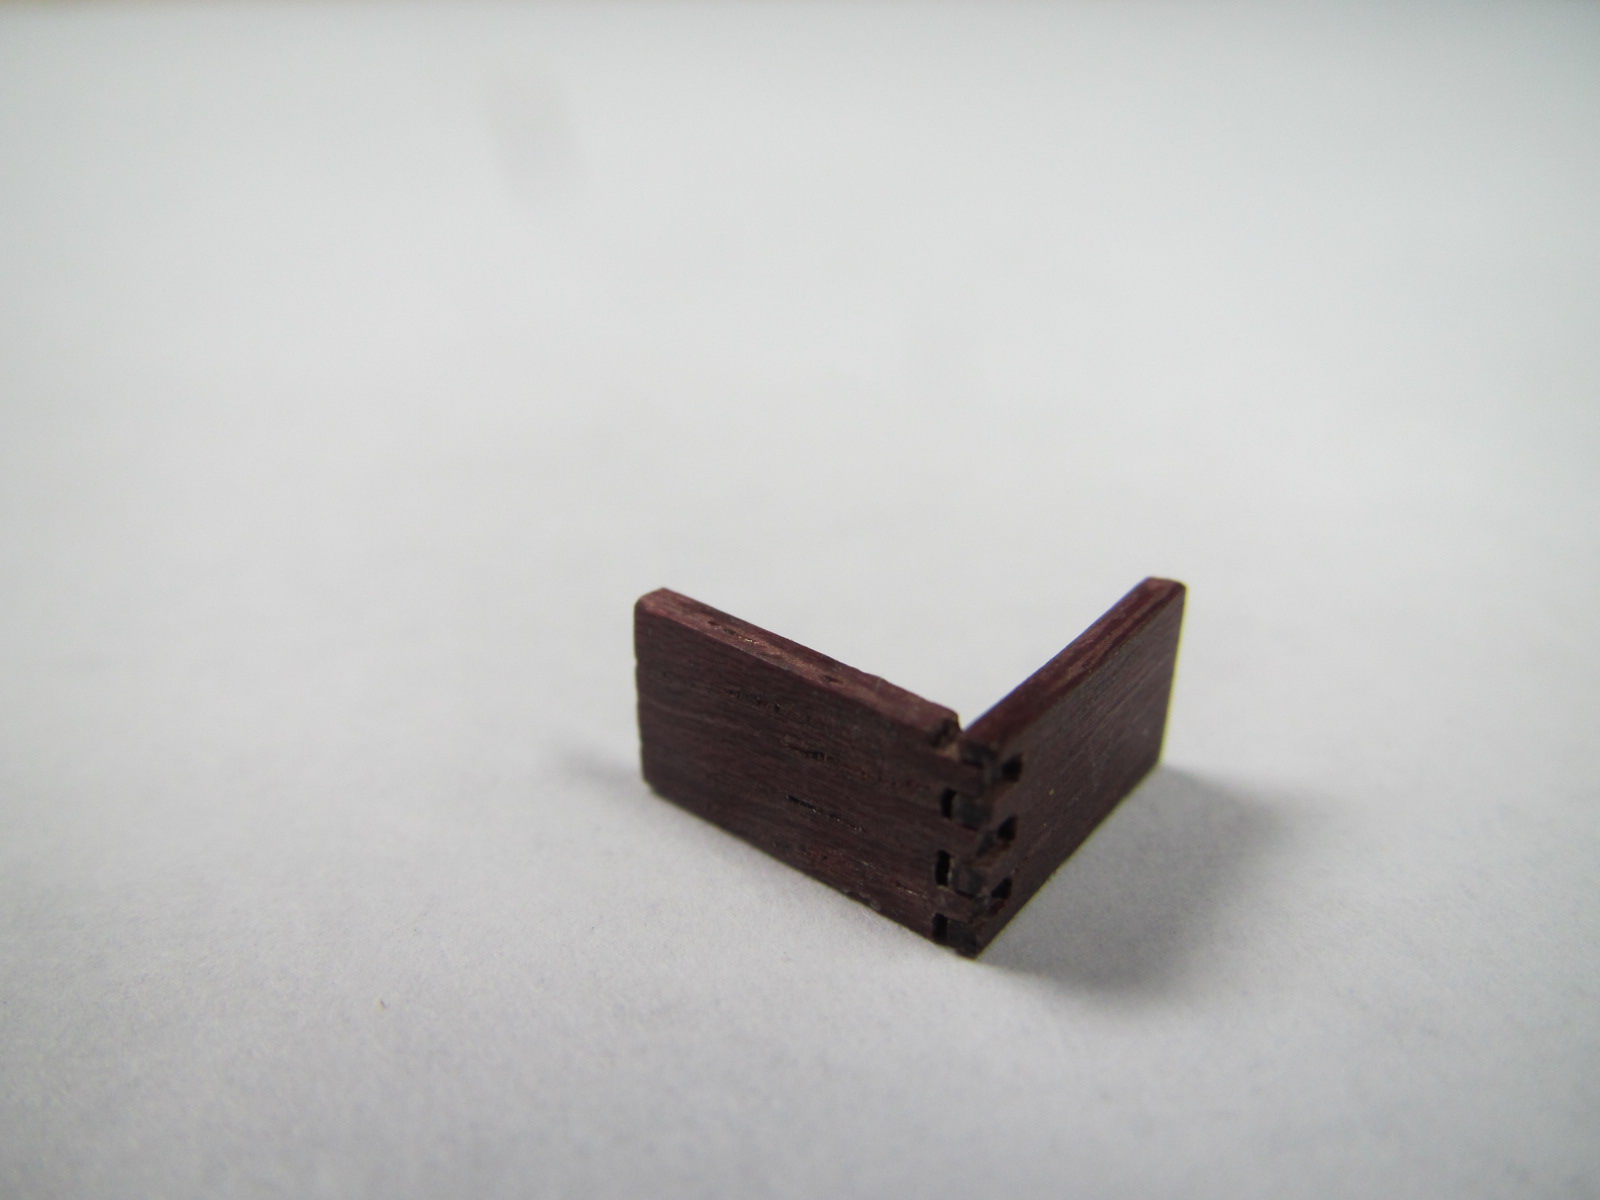
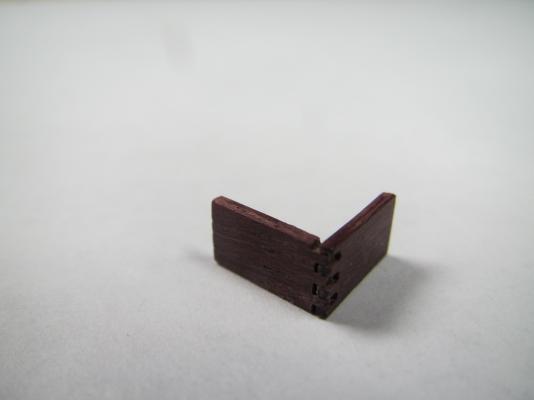
Merry Christmas everyone! Got in a little boat time late this morning and decided to take a break from the mini coopering. I started working on the compass box and decided it needed to be put together with box joints. Sounded logical being a box and all... The joints were filed using guitar nut slotting files working from .010" up to .032". I still have a little fine tuning to do on this corner, and then do 3 more corners. Maybe this isn't very logical at all...

- 515 replies
-
- 7
-
-
- artesania latina
- whaleboat
- (and 1 more)
-
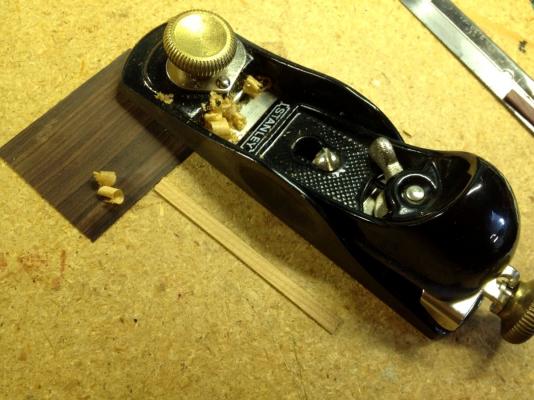
Just a quick FYI: Forces beyond my control caused my car to stop at the local Woodcraft store today. I was talking to one of the guys there and he said that they have been really disappointed with the quality of the Stanley products out of the Mexico factory and have had to return full shipments of products. Just thought I'd mention that in case anyone was getting ready to order a Stanley 12-960 based on my raves about mine.
-
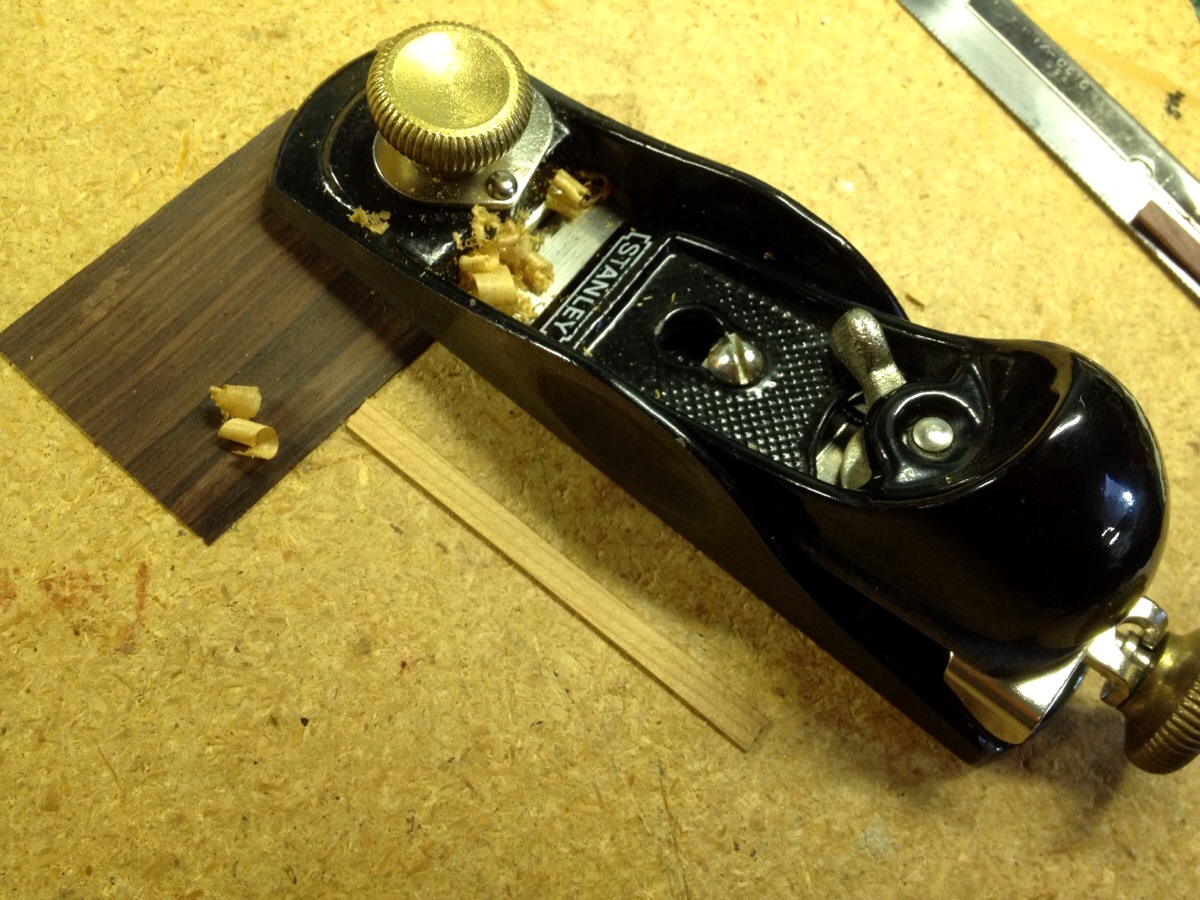
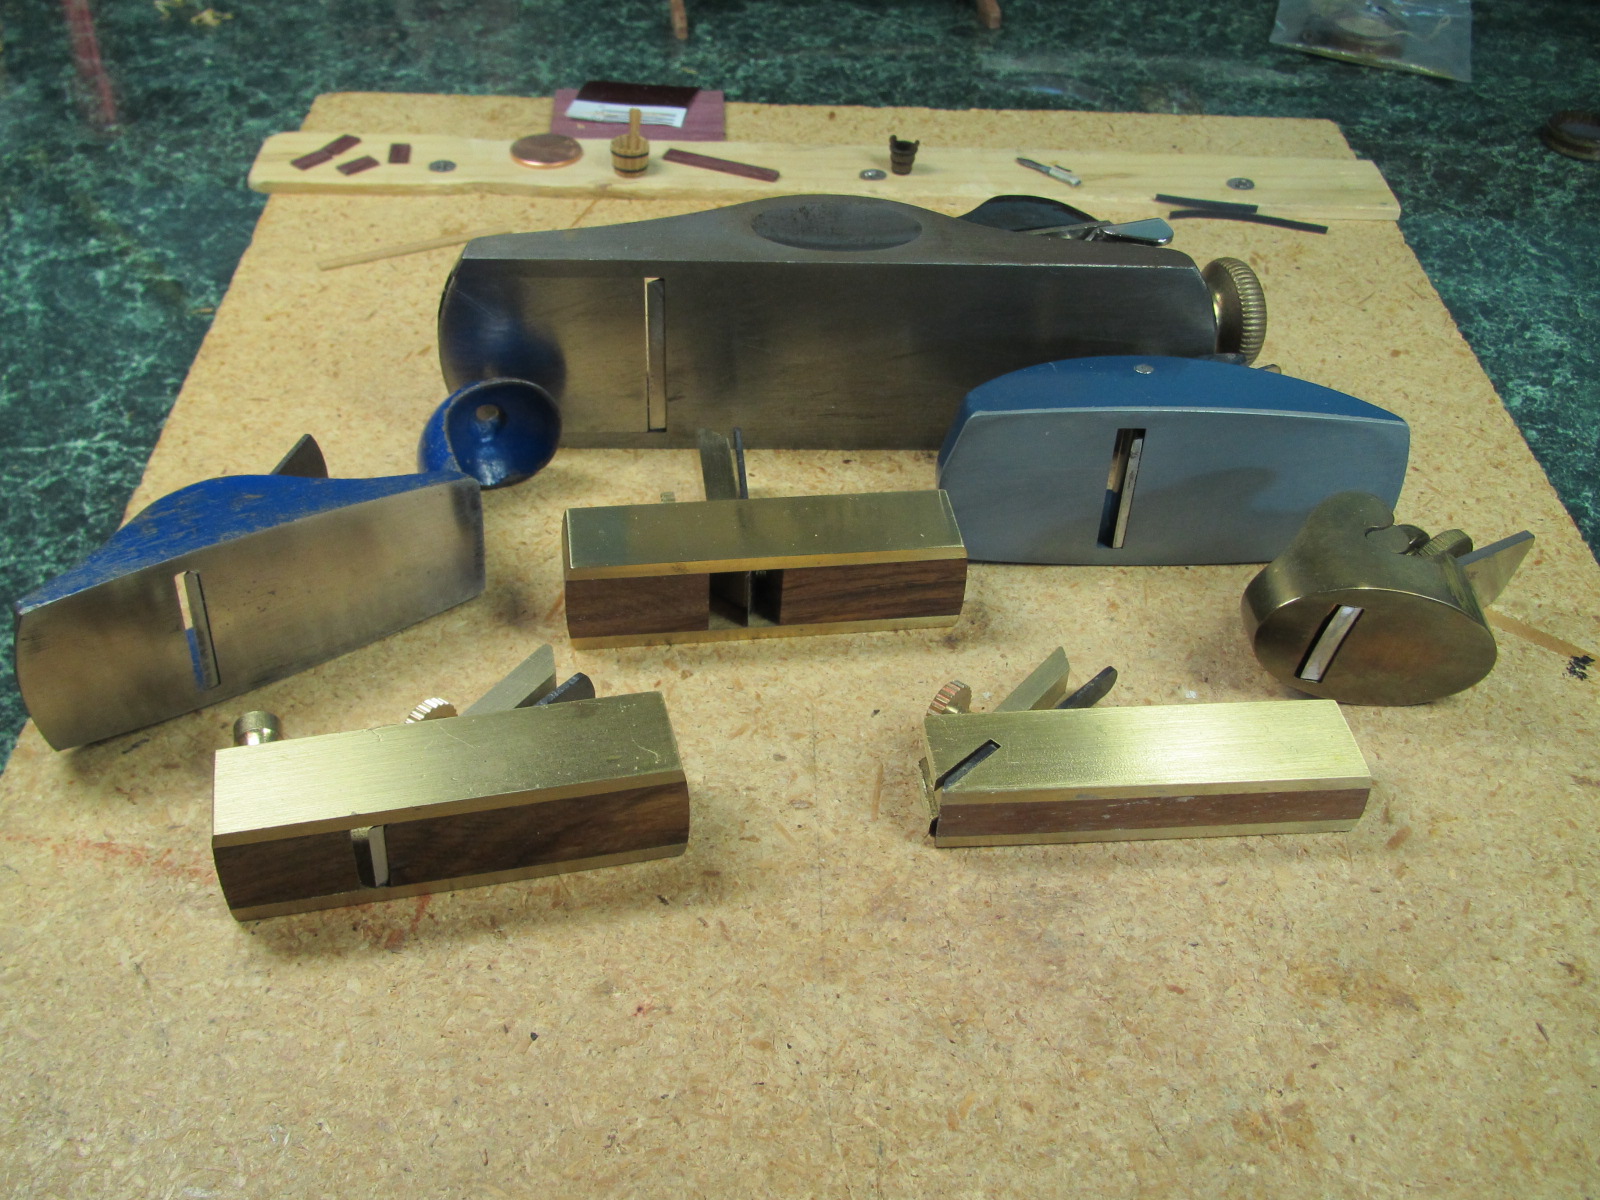
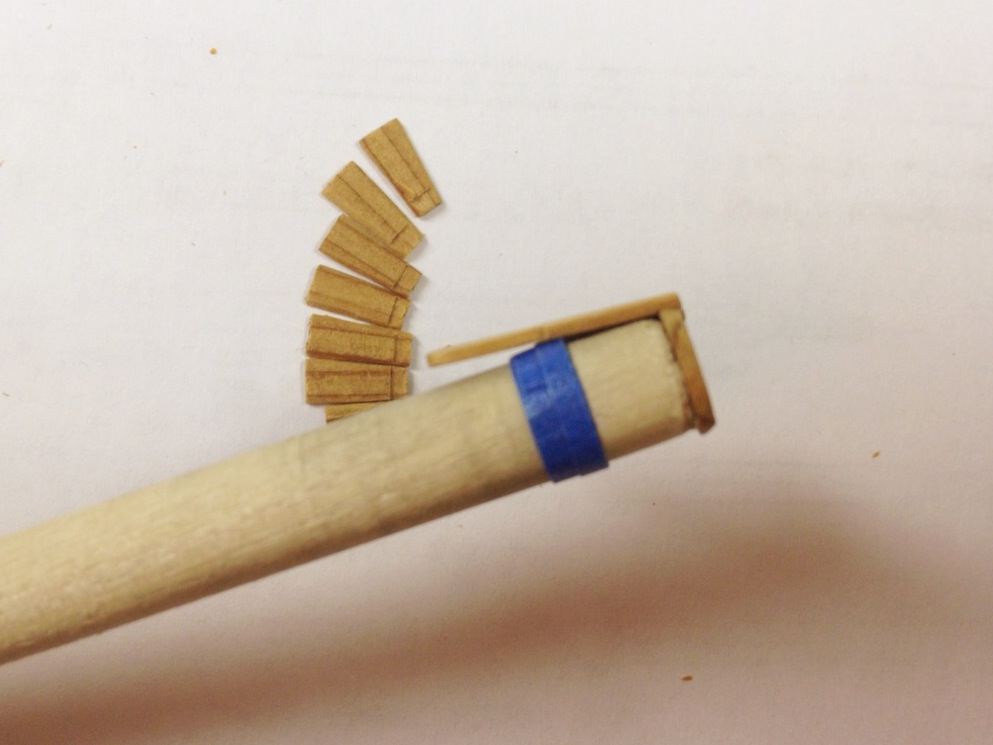
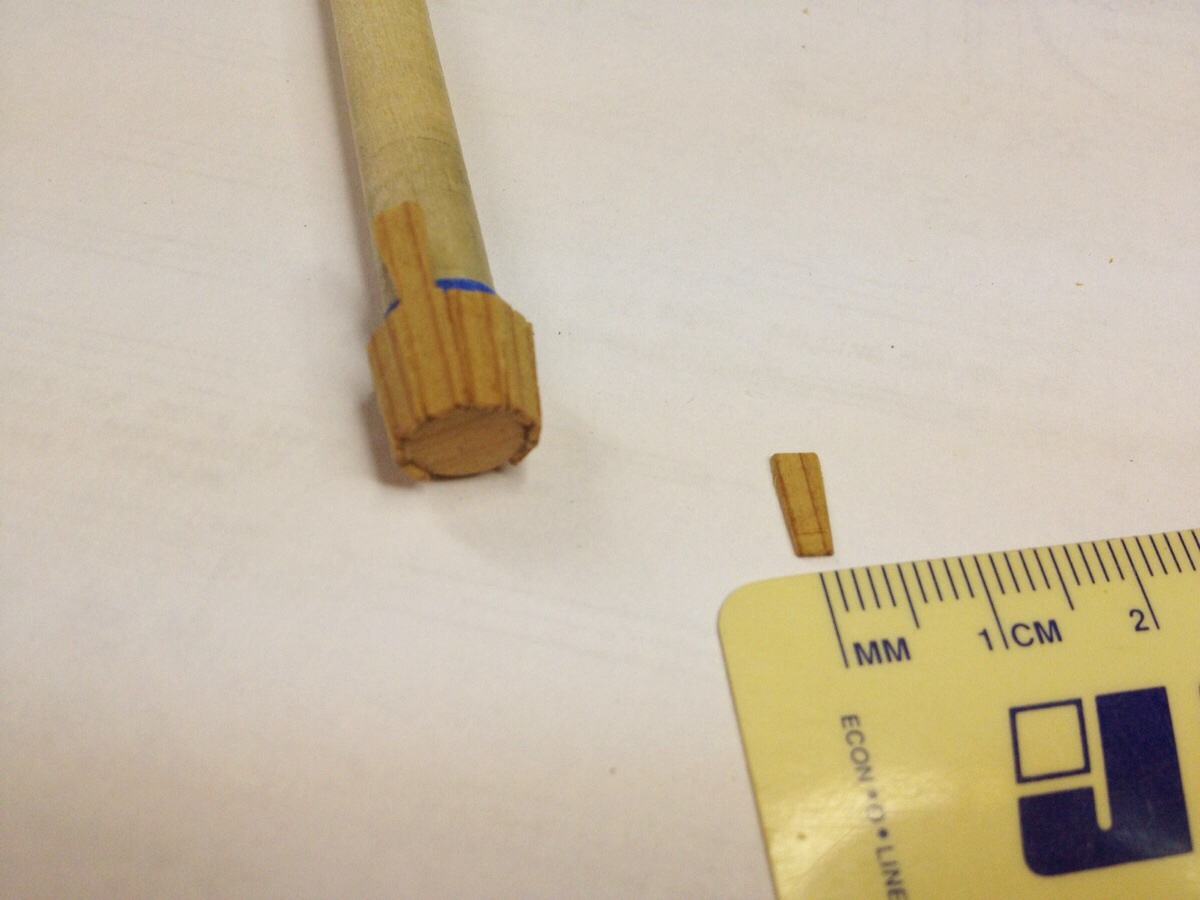
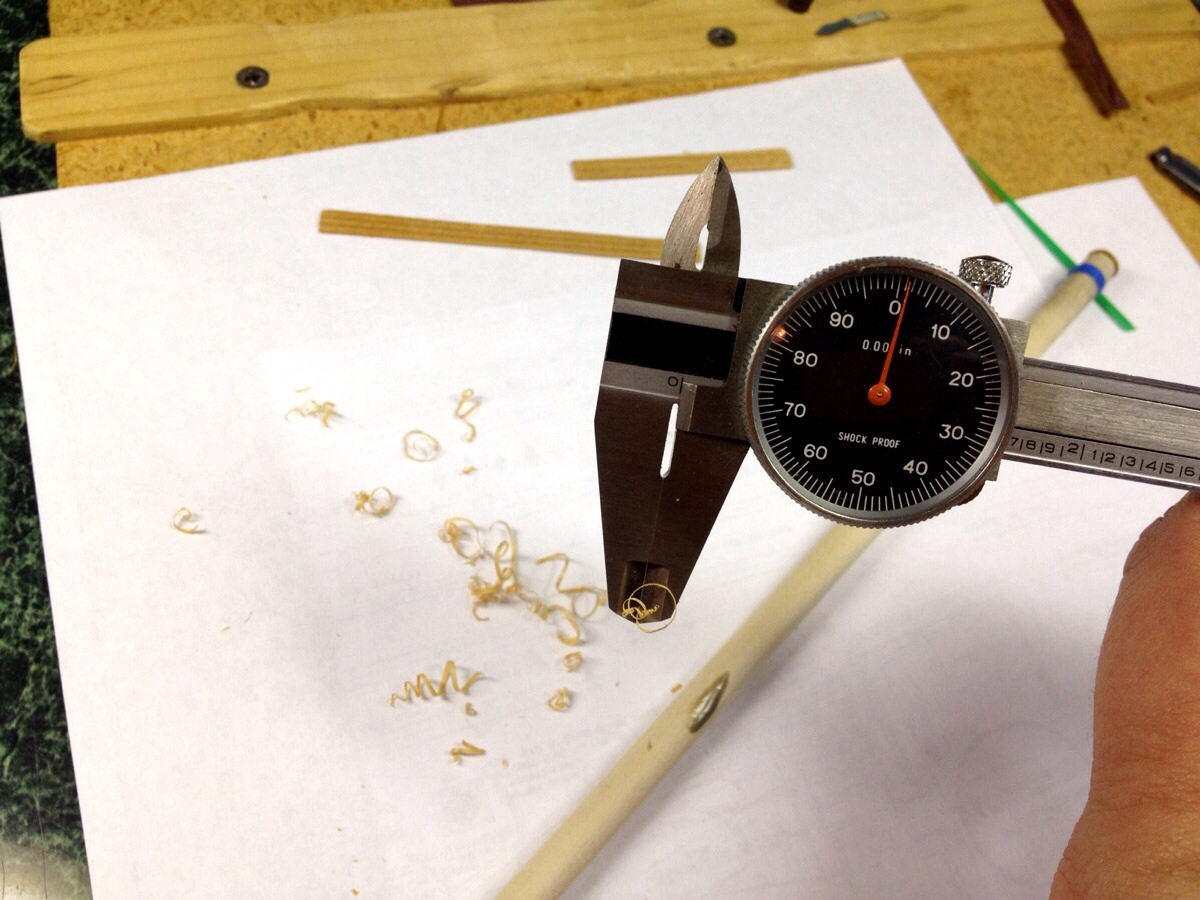
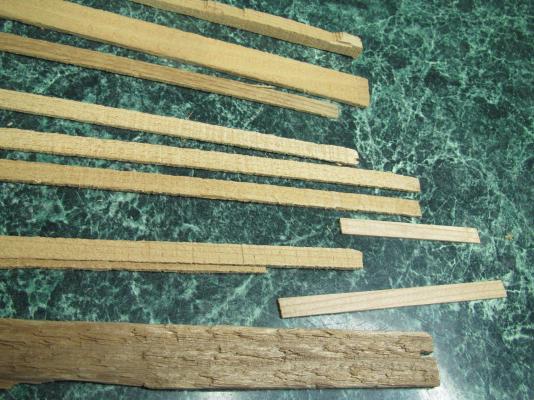
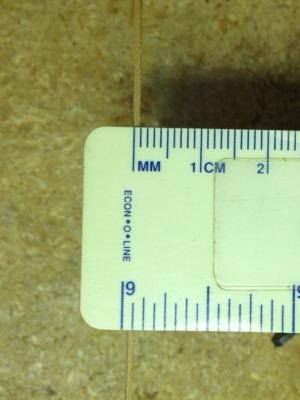
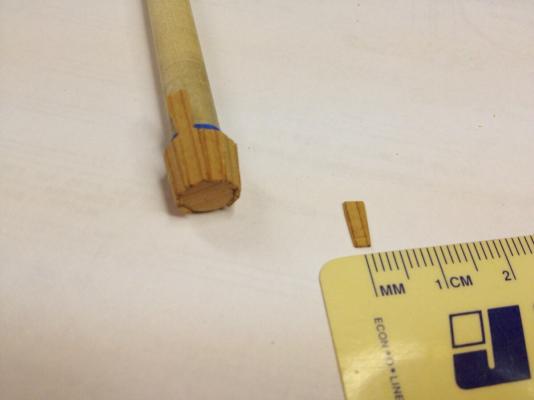
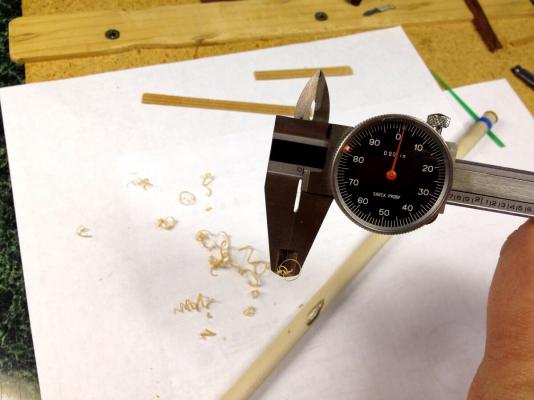
Here's some info on the making of the tiny staves for the piggin using simple tools. The same method will be used for the bucket and lantern case. If you are a serious scratch builder, you would just use your Jim saw and thicknesser instead to make the custom size strips, and skip ahead to the tapering step. For a kit builder just needing a few custom sized strips of wood to bash a kit or scratch some items like these, this is an inexpensive solution to keep you going. You wouldn't want to make a ship's worth of planks this way. The wood I used was cedar because it has a warm color that looks right for buckets, is easy to work, and best of all, it was free. There were some odd pieces of wood left in the garage by the previous owner of my house, and an old fence picket that had split was one of them. No doubt, the previous owner never got around to making buckets with it. 1) The first step was to whack off a length of the picket and cut that into rough strips. I whacked off a 15" piece just so I could have longer strips for stuff should I ever need them in the future. If you don't have a motorized saw of some sort, you could just cut off a 3" piece with a handsaw and then use a little razor saw to make some oversized strips. I used a bandsaw and a fence to cut longer oversized strips. I cut the strips so the grain would be quartersawn (the dark thin grain lines are perpendicular to the face of the strips). This was more for the looks than anything else. The dark rough piece was the face of the fence picket. The strips cut from this small cut-off of scrap wood is good for a dozen buckets or more! 2) The strips were brought to a 1mm thickness with a hand plane. Instead of trying to plane the 15" long pieces, shorter 3" long pieces were planed. It is really easy to snap a longer piece of a wood like cedar when planing this thin, and I can manage the short ones easily at my drydock work station. When you are planing this thin, you need something thinner but strong to hold the piece against, Don't use sheet metal! If you plane too thin, that could damage your plane blade. A thin piece of hardwood works great. This is a little veneer of Indian Rosewood that's about 40 thousands thick (.040") and is very tough. I just butt the end of the strip against the veneer, hold the veneer with my left hand and plane with the right. Pretty easy and not much workspace is needed. There are all kinds of small modeler's hand planes out there and I have an assortment, but I swear by my Stanley 12-960 low angle block plane. My 2 cents on hand planes: Although the 12-960 dwarfs the little planes, it's features and adjustability make it much easier to use with very controllable, precise results. First off, the mouth (where the blade pokes through the bottom) is adjustable in width. You need a very fine opening to take the tiny shavings we will be making (about .0015"). If you look in the picture above, the 12-960 has been adjusted way tighter than the smaller planes without adjustable openings. The 12-960 has an easy adjustment (the big knob on the back) to control the depth of the cut. The others have a single set screw that you loosen to reposition the blade, and you may or may not end up with the ajustment being better once you re-tighten it. It takes a lot of practice to get a set screw holder type plane adjusted to within .001" tolerance, which is what is really needed for precision small scale stuff. The blade can also get rotated a little crooked when re-tightening set screws. With the 12-960, there's another adjustment that can correct a crooked blade. Once you are all finely adjusted, if you catch a gnarly change of grain in hardwood, a set screw holder can slip and mess up your adjustment. The 12-960 has an indexed holder that positively locks into a notch in the blade. Speaking of the blade, the 12-960's blade is about twice as thick as the others and is made of better steel that holds a sharp edge longer. I find this plane a joy to use. I bought mine about 15 years ago and it was made in Sheffield England then. I think they are now made in Mexico and hopefully they are still the nice tool that mine is. There are more expensive versions of this plane from L.N. and Veritas. but it's hard to beat this one at about $35. You can actually plane end grain with this low-angle version. Once the strips were planed to thickness, the edges were trued up and planed to 3mm wide. I did this by simply holding the strip in my left hand and planing with the right. Sounds iffy when you say it, but it's actually very easy. You don't bear down on the wood, you just slide the plane past the strip and it scares the wood off the edge! No blood lost. 3) The 3mm x 1mm x 3" long strips were cut into lengths a little longer than the staves needed to be (about 9mm long for 1/25 scale). I then tapered the staves with the plane so the narrow end was 2mm wide. In hindsight, the fit would have been better if they had been a bit under 2.5mm. This was done by taking a short cut off the end to be the narrow end, followed by slightly longer strokes until the whole 9mm length is one continuous cut. Very little pressure was applied and it worked out to about 6 passes on each side. This looks scary, but I did it by holding the little stave in my left hand and planing with the right. Keep in mind that the blade is set for a .0015" shaving, so your fingers would pretty much have to touch the bottom of the plane to get cut! No blood in my bucket! I back-beveled the edges of the staves with 220 grit sandpaper glued to a flat piece of hardwood. I have a courser grit at the other end. These sanding sticks are really handy and don't load up as bad as a small file. The bottom of the bucket was shaped from a wider 1mm thick piece of cedar. The bucket bottom (about 8mm dia.) was glued to the end of a dowel, it's edge beveled, and the bucket assembly continues as was shown in the earlier posts. The beveled notches on the inside stave bottoms were cut with a #11 Xacto blade to receive the bucket bottom. The tape around the dowel flares the staves out. It was necessary to adjust the stave tapers with the sanding stick because they were a bit over-tapered. The bands were cut from a thin plastic container's label (like the label on a plastic bottle of soda) and blackened with a Sharpie and stuck on with white glue. Geez, I guess I wrote another small book. Best wishes


- 515 replies
-
- 7
-
-
- artesania latina
- whaleboat
- (and 1 more)
-
Well Ferit, as you can see here, I get paid big money! JSGerson- I'll try to post the steps with pictures when I get home this evening.
- 515 replies
-
- 7
-
-
- artesania latina
- whaleboat
- (and 1 more)
-
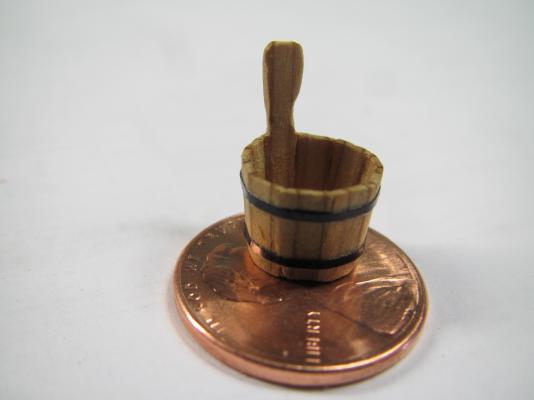
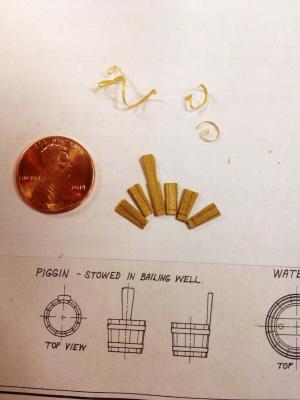
Hi J.Pett! Thanks! I didn't consider painting the bands because I had so much trouble trying to paint the 1/32" stripes on the oars. I gave up and used the Pactra tape on the oars. Here's the finished piggin bigger than life with warts and all. I guess I can say that the little splintered out stave edges give it a used look. Yeah, that's it! It's a used piggin. BTW, these are the mylar jar label bands that were blacked out with a Sharpie. J.P. - I know you have an interest in handplanes, do you (or anyone else) think it would be helpful if I posted how I made the stave blanks from a junk cedar fence picket?
- 515 replies
-
- 8
-
-
- artesania latina
- whaleboat
- (and 1 more)
-
Hi Matti, The 1st photo in the last post is really cool. So will you add workmen to help show what's going on? I'm glad that medication will cure your condition. The doctors confirmed what we already knew - you are a nice guy with a big heart! Heal well my friend, you are in our thoughts. Happy Holidays.
-
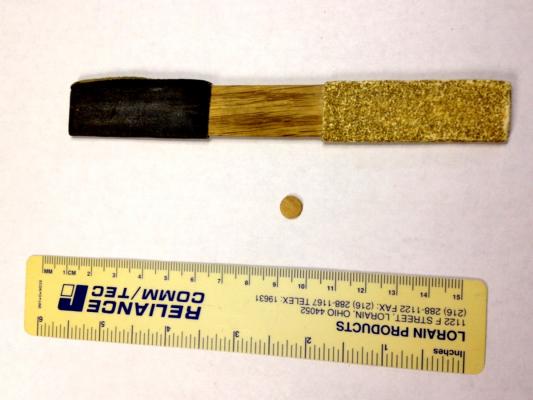
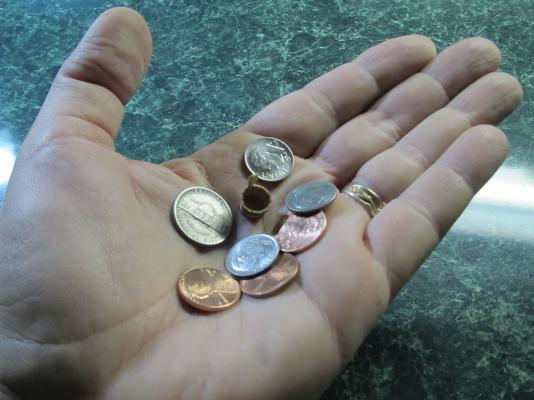
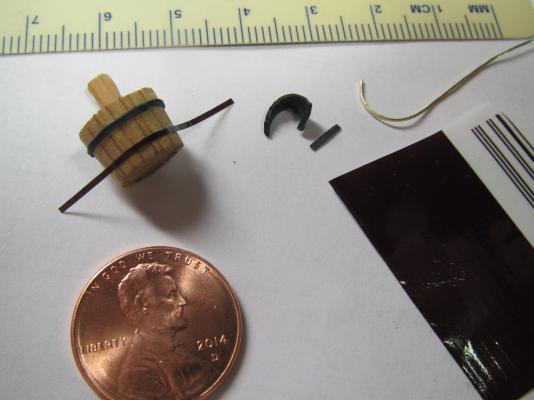
Hi Augie, I have what I thought was thin-wall heat shrink tubing and after shrinking a piece, the wall thickness measured at about 25 thousands. That doesn't seem like much, but it looks massive at this scale! Also, I don't know how to evenly slice off a piece at the width I'm trying to use, which is only about 1.5/64ths" wide! Yup, my eyes are starting to bug out. I made a band of black paper that was 9 thousands thick and it looks bulky. Also at this size, the paper swells a little with glue and the edges end up looking puffy. I tried hammering a 26 gauge wire flat and using it but it ended up 15 thousands thick and is a booger to make look straight and even. After rummaging in the trash, the winner is a label that was wrapped around a plastic jar. The label is plastic or mylar and is 4 thousands thick. It leaves a crisp edge and definitely does not look too thick! Here's a picture with the top band in the 9 thousands thick black paper and the hammered 26 guage wire loosely placed as a bottom band. In this picture, the 4 thousands thick mylar is lightly tacked on the lower band position with white glue. The 1st object to the right of that is the heat shrink tubing. Just to the right of that and slightly below, is a piece of the 9 thousands thick black paper. It looks pretty crisp until the glue is absorbed. To the right of that is the hammered 26 guage wire. The mylar label is lying flat below that. Although it looks black, it's actually a Hershey brown. I'm going to try coloring it with a Sharpie. Best wishes,
- 515 replies
-
- 9
-
-
- artesania latina
- whaleboat
- (and 1 more)
-
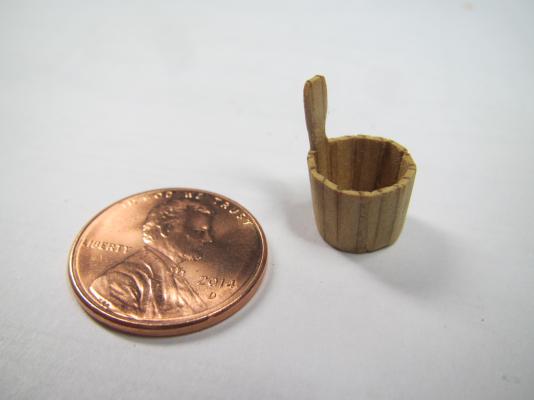
Thanks Lawrence! I have some catching up to do on your Victory. My head spins looking at all the work that went into that. Happy Holidays! With a gentle twist, the piggin seperated from the dowel. I did a little sanding and now I'm looking for something suitable to make the bands from. I'll probably try paper first.
- 515 replies
-
- 7
-
-
- artesania latina
- whaleboat
- (and 1 more)
-
Lynx by Basic – Panart
Salty Sea Dog replied to Basic's topic in - Kit build logs for subjects built from 1801 - 1850
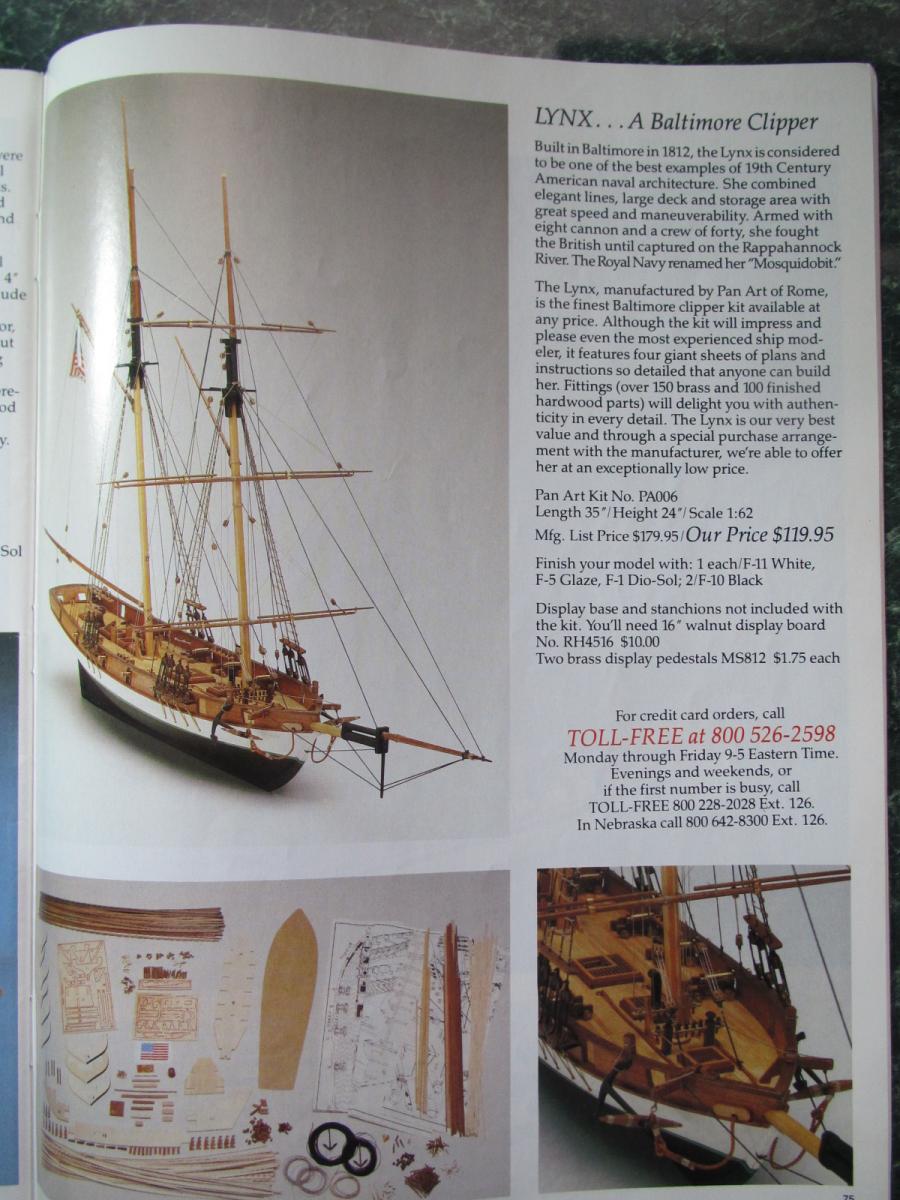
I have a bit more info about the Dikar Roger B. Taney, but since Basic's build log is sort of getting off-topic, I added it to Charlie's kit discussion thread: http://modelshipworld.com/index.php/topic/8403-albatros-baltimore-clipper-scale-question/ Basic - I thought you might get a kick out of how your kit's description appeared in an old 1986 Model Expo catalog. Click photo for easier reading.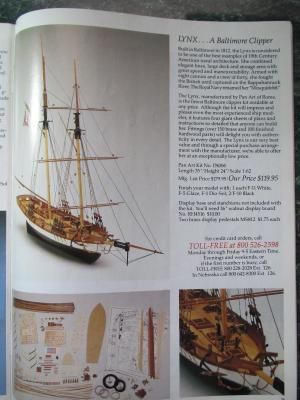
-
Albatros Baltimore Clipper Scale Question
Salty Sea Dog replied to CharlieZardoz's topic in Wood ship model kits
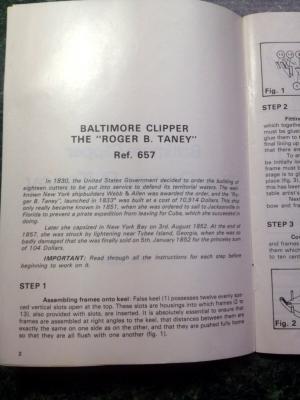
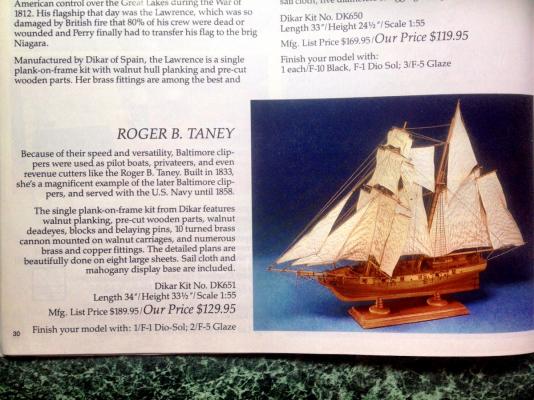
Hi Charlie, Thought I should shift the conversation to your thread here from Basic's Lynx build log since it was kind of getting hijacked. Your and juhu's conversation got me to researching more about the Roger B. Taney and Baltimore Clippers. I admit to being a bit confused on the whole cutter vs clipper thing. I have the Dikar RBT kit and it describes it as a Baltimore Clipper on the box. I also have an old 1986 Model Expo catalog from when they sold the kit, and it sort of says the same thing.Is the RBT consideredd a Clipper? Here's the description from the ME catalog: Here's the verbage on the side of the Dikar box. The translation is goofy and I think they meant "pirating" instead of "filibustering"! This is the intro from the Dikar instruction booklet. I think this was translated a bit better: This seems to be a decent kit and if weight means anything, it's heavy! EDIT: Click photos for easier reading.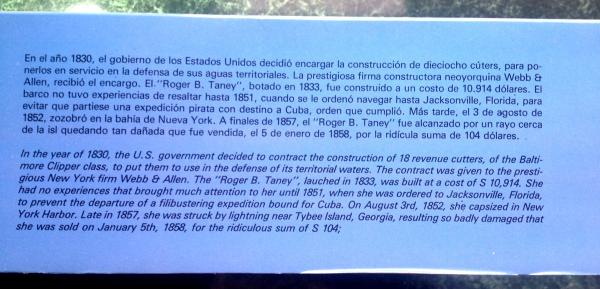
-
Your build is looking AMAZING! Maybe you should tell your wife that all you want for Christmas is your choice of where the ship gets displayed. Of course if that means moving an alpaca or sewing stuff, you're on your own buddy! Hope you have a great Holiday Season!
- 2,191 replies
-
- 1
-
-
- confederacy
- Model Shipways
- (and 1 more)
-
Hi Augie! I'm either patient or stubborn depending on who you ask!
- 515 replies
-
- 2
-
-
- artesania latina
- whaleboat
- (and 1 more)
-
Lynx by Basic – Panart
Salty Sea Dog replied to Basic's topic in - Kit build logs for subjects built from 1801 - 1850
Dikar has the Roger B. Taney in 1:54. -
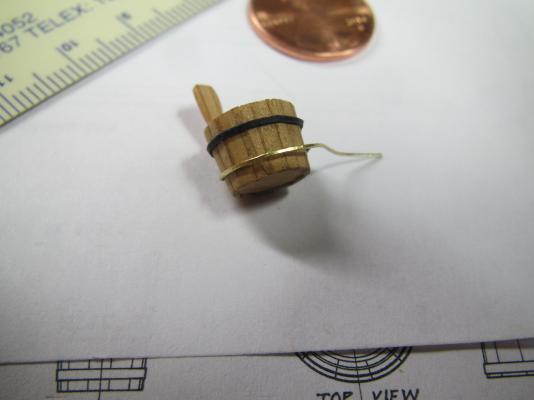
Hi Ferit! Thanks for stopping by. Hope things are going well for you. I got in a little shipyard time tonight and worked some more on the piggin. This mini coopering is sort of tricky! OK, that was bad! I tacked the bottom of the barrel to the end of a dowel with a small drop of white glue. The edge of the bottom is beveled. The inside faces at the stave bottoms have a beveled notch that lock into the edge of the bottom. I wrapped some tape around the dowel to help flare the staves out. This works pretty good but I have a bit to learn to get a better feel for the proper amount of tapering needed on the stave edges. I think this will clean up ok once I complete the circle and can sand it. Best wishes,

- 515 replies
-
- 11
-
-
- artesania latina
- whaleboat
- (and 1 more)
-
Here's a quick look at what I've been up to today. Making a piggin! Still got a few staves to make. The staves were tapered with a hand plane set for a really light cut - 1-1/2 thousands! haha! Fun times!
- 515 replies
-
- 9
-
-
- artesania latina
- whaleboat
- (and 1 more)
-
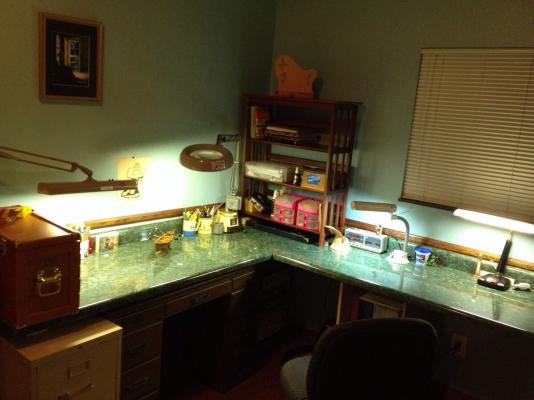
Hi Lawrence! I am in my new shipyard right now trying to turn a piece of an old cedar fence picket into staves to make 1:25 scale piggins, buckets and lantern cases! Having a blast and I'll post pictures when I get further along. The new shipyard: Thanks for stopping by!

- 515 replies
-
- 10
-
-
- artesania latina
- whaleboat
- (and 1 more)
-
While you have been recouping and becoming a vegetarian, I have been rummaging through the ship locker and have found some measurements for a bailing piggin. The kit was also 1/16 (3/4" = 1'), so no scale conversions will be needed. The measurements worked cleaner in mm than fractional inches. Base diameter: 12mm Height to rim: 11mm Rim diameter: 14mm Height to top of handle: 22mm The handle is an extended stave that is sculpted a bit for grip. If you Google "piggin", you will get a lot of helpful images. Don't know how many they would have had, but since they were riding so low, hopefully they had a few. I suppose they could have also bailed with coconut shells too. Nice job on the fruit! Best wishes,
- 625 replies
-
- 3
-
-
- bounty launch
- model shipways
- (and 1 more)
-
Arr de darr Cap'n! Just got done reading your log from the start and have really enjoyed it. Are you able to still eat pizza left handed? I am looking into the proper scale of bailing buckets too and will be interested to see what you discover. Hope you mend quickly! Best wishes
- 625 replies
-
- 2
-
-
- bounty launch
- model shipways
- (and 1 more)
-
Wow - I haven't seen a cut-off wheel like that one before. The ones I've used are the wafer-thin reddish brown ceramic ones. You get great control with them because of the very thin kerf.
-
Questions about Magellan era Portuguese Carrack
Salty Sea Dog replied to Salty Sea Dog's topic in Nautical/Naval History
Woodrat, Tarbrush & wq3296 - Thanks for the additional info. The kit's stern castle does look a bit big but I think I must like a big stern castle haha! The upper level of the 2 levels is an open balcony so it might not be as heavy as it looks? wq3296 - By any chance did you have a build log of your Sao Miguel on the old MSW1 that had an open side with interior details? I'll have to look for "The Pepper Wreck". That sounds like a great resource. -
Hi Matti! This is looking great! The dead eyes on the real ship almost look too small! Hope that helps!
-
Hi grsjax - to address your original question, the short answer is yes. I like using shellac but have to point out that I do not use the stuff in a can. Depending on what you buy, there will be additives of all sorts to slow down shellac's fast dry time and who knows what else. It's generally too thick out of the can as well. I go old school and disolve the shellac flakes in alcohol - the purer the alcohol, the better. Shellac has historically been the finish of choice in classical and early steel string acoustic guitars and it's that connection that got me using it (i used to repair guitars). I also use shellac as a barrier coat between incompatible finishes. I like using oils to make the grain of bare wood pop, then seal it with shellac and top coat with lacquer on some projects (haven't tried this on a ship and this would only be suitable where a high gloss was wanted). I have not tried top-coating shellac with poly (I would think it would be fine, but I'd test it on scrap). Poly was not a type of finish I worked with on acoustic instruments so I lack much first hand experience with it. All finishes affect the sound of a wooden acoustic instrument and poly damps the sound more than others. Since a ship model only has to look good and not sound good too, poly seems to be a great choice (...if you were to tune your shroud lines...) Anyway I digress. If you are trying to seal a pourous wood, the use of fine pumice rubbed in with the shellac works great. The pumice goes invisible in shellac. For pictures and more than you may care to know about all this, there is more info in my whaleboat log (link below). Best wishes,