HOLIDAY DONATION DRIVE - SUPPORT MSW - DO YOUR PART TO KEEP THIS GREAT FORUM GOING! (Only 24 donations so far out of 49,000 members - C'mon guys!)
×


Salty Sea Dog
-
Posts
666 -
Joined
-
Last visited
Content Type
Profiles
Forums
Gallery
Events
Everything posted by Salty Sea Dog
-
 Haha! No need for talk like that - you have done some spectacular work! If you really want to see some crazy good tiny work, check out some of Jim Baumann's stuff. I think he has one of those Sci-Fi shrink ray guns!
- 515 replies
-
- 4
-

-
- artesania latina
- whaleboat
- (and 1 more)
-
I won't be taking orders Lawrence - I'd go broke! I'm too slow.
- 515 replies
-
- 4
-
-
- artesania latina
- whaleboat
- (and 1 more)
-
Your ship is looking really nice! Your skill level has improved at every step too - way to go! The latest pictures are amazing.
-
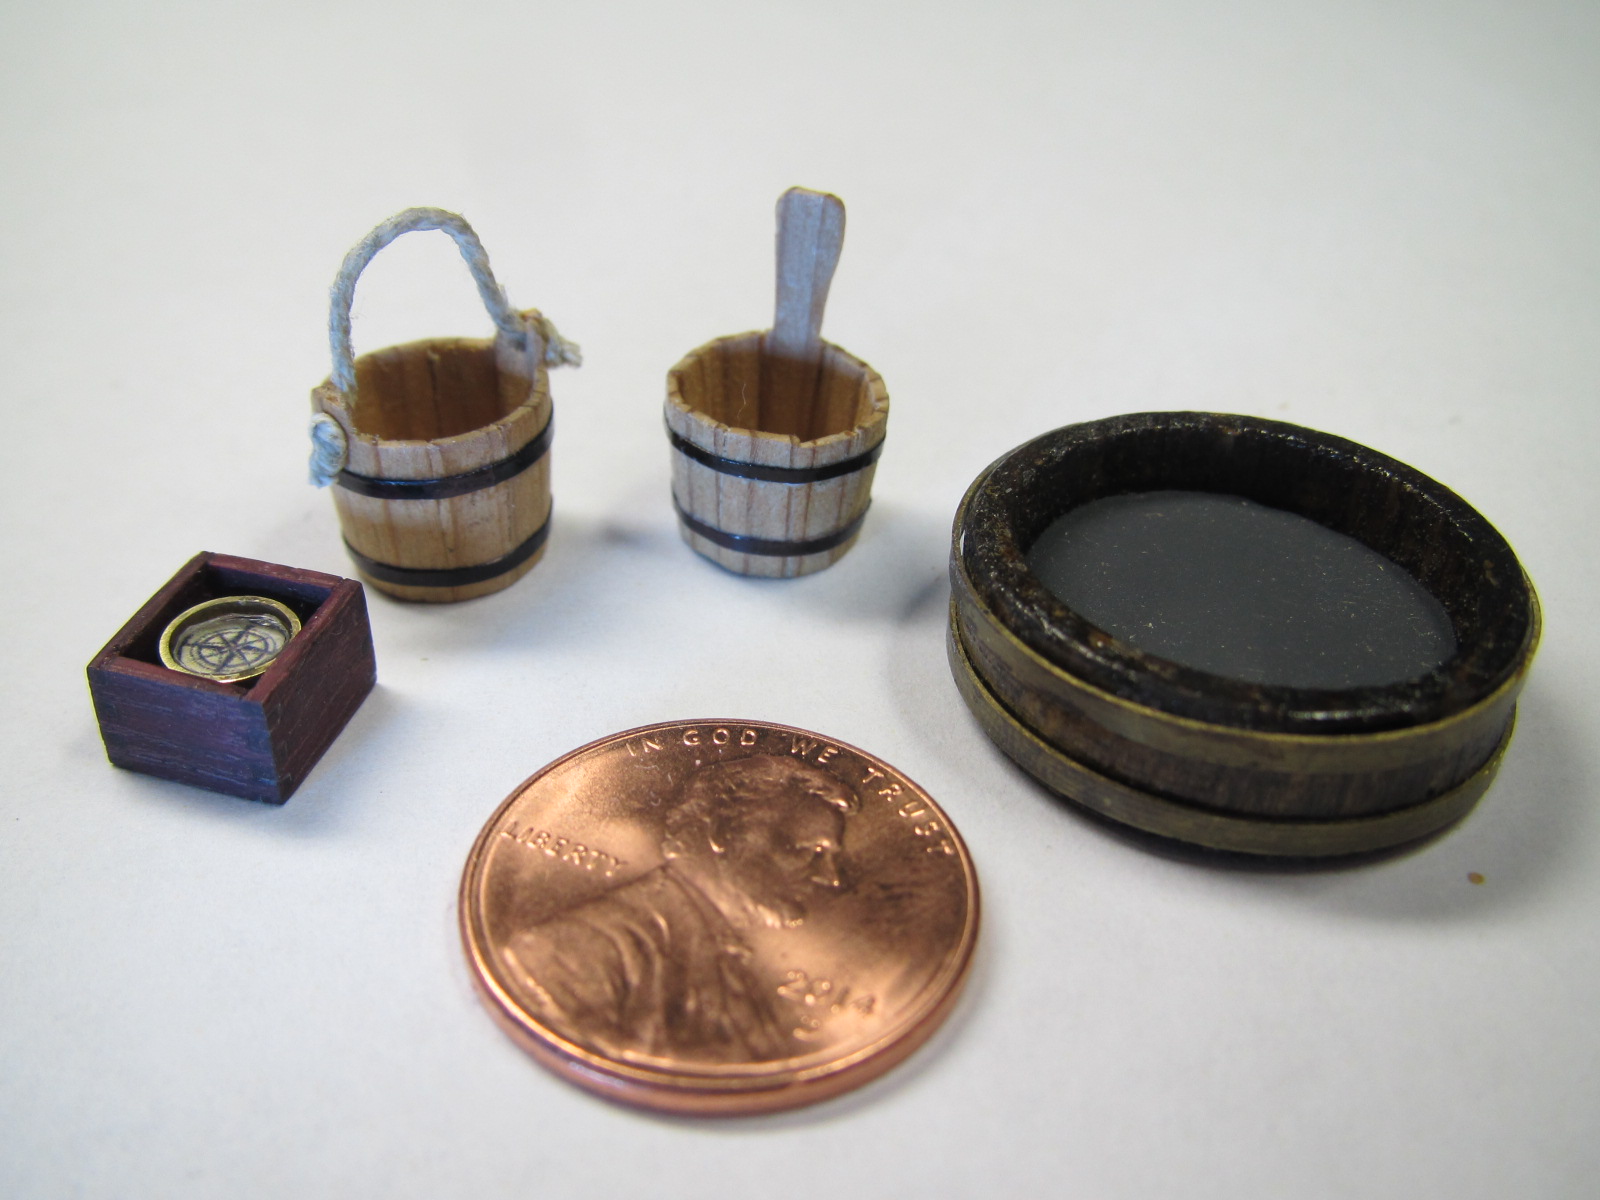
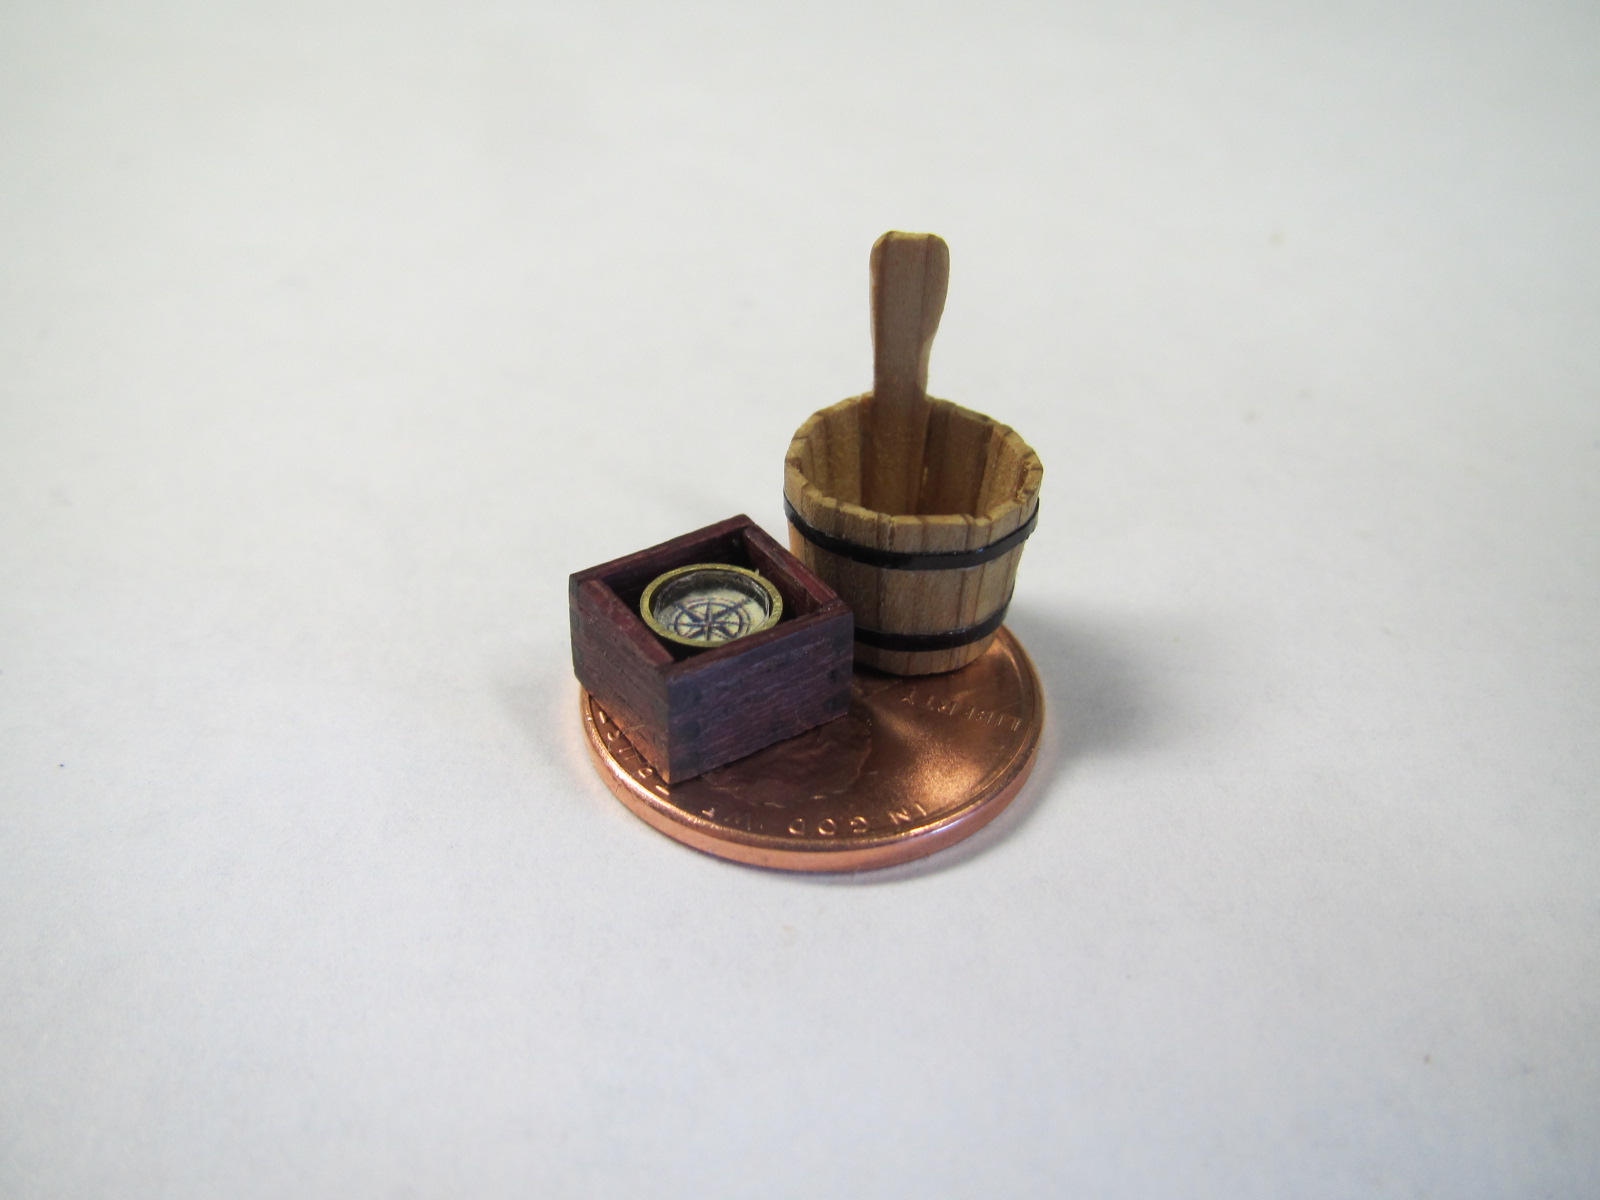
The first full week back to work after the holidays was crazy for me too. I did get in some shipyard time today. Yup, another bucket does fit on the penny! For the latest bucket, I tried pulling out the big guns, well maybe the little gun. I used a 1/8" Japanese chisel I got years ago to help when cleaning up corners in inlay cavities on ebony guitar fingerboards. The heft of a "real" chisel made cutting the ebony end grain much easier than an Xacto knife. For the bucket staves, shaving the edges for a nice fit was a breeze with this chisel, and the bevels were much more precise than sandpaper. The problem with scratch building these buckets is now the kit supplied line buckets look pretty bad. Dang! I may set a record for the longest time to finish a boat that was nearly done. Best wishes,


- 515 replies
-
- 12
-
-
- artesania latina
- whaleboat
- (and 1 more)
-
If you do decide about magnifiction, the Optivisor with a Quasar led light kit is pretty nice. This company also makes an Acuvisor, but the lenses are plastic where the Optivisor's are optical glass. The Optivisor is worth the extra cost for the for the clarity (I started with the Acuvisor). That is cool about your son. Let's get him going on a build log of his own! BTW, my swollen head deflated as soon as I saw your compass' brass mounting! I wonder if I could pull that off at 1:25 scale...
- 425 replies
-
- 6
-
-
- bounty launch
- model shipways
- (and 1 more)
-
Very cool Omega! I just came across your build and haven't stopped grinning yet! Really nice work!
- 120 replies
-
- 1
-
-
- mystic
- motor yacht
- (and 2 more)
-
Nice buckets Captain! I understand about that weathering!
- 625 replies
-
- 2
-
-
- bounty launch
- model shipways
- (and 1 more)
-
Nice compass! The brass mounting looks terrific.
- 425 replies
-
- 3
-
-
- bounty launch
- model shipways
- (and 1 more)
-
Haha! I wholeheartedly agree with Captain Steve. If ever you should think you have posted too many pictures, then you have almost posted enough! Your Wasa is eye candy!
-
Michael and Matt, Thanks for the awesome comments! This is extra awesome coming from two folks with such amazing skills. I am trapped inside my drydock room because my head is now too big to fit back through the doorway!
- 515 replies
-
- 5
-
-
- artesania latina
- whaleboat
- (and 1 more)
-
Hi Matt! Just wore out the like button on your build! Love the little details. Nicely done!
- 425 replies
-
- 1
-
-
- bounty launch
- model shipways
- (and 1 more)
-
Hi, Just a quick note to say that I added some scale size info to the compass box post that should help you Bounty Launch builders.
- 396 replies
-
- 2
-
-
- Idea
- Bright Idea
- (and 1 more)
-
I think another bucket might fit on this penny...

- 515 replies
-
- 8
-
-
- artesania latina
- whaleboat
- (and 1 more)
-
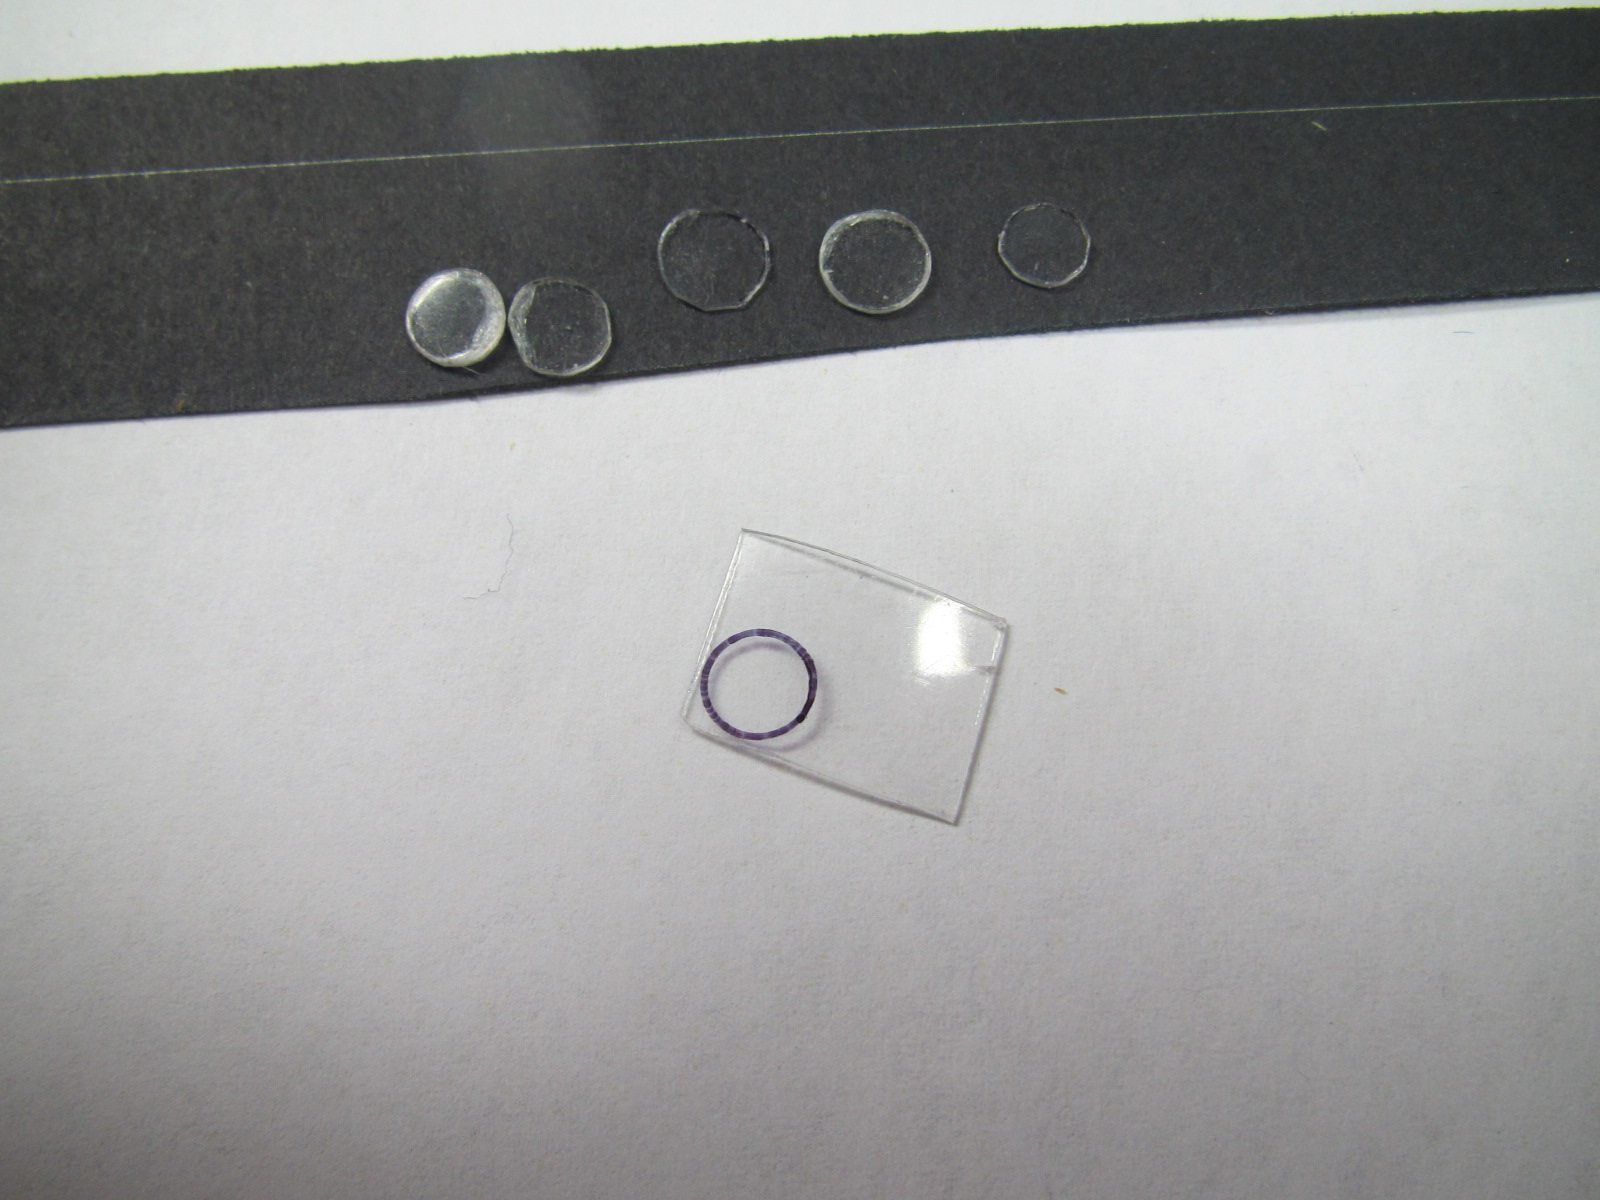
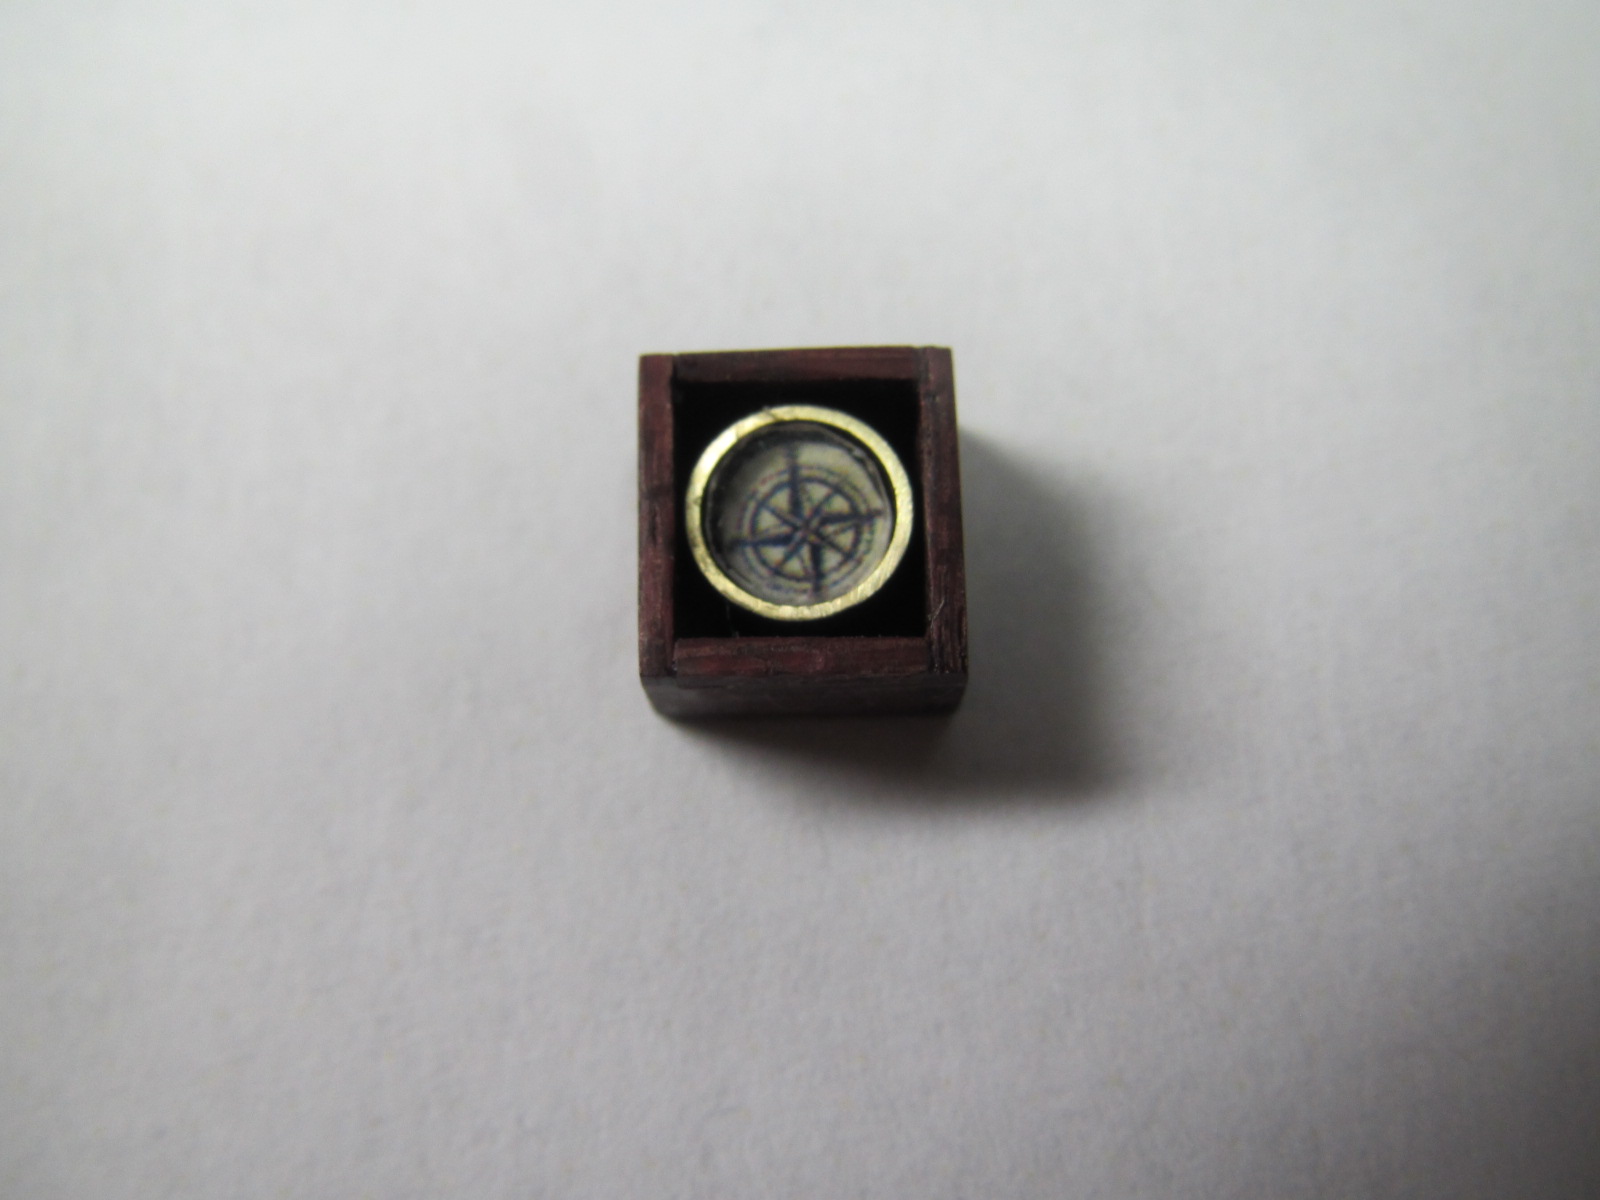
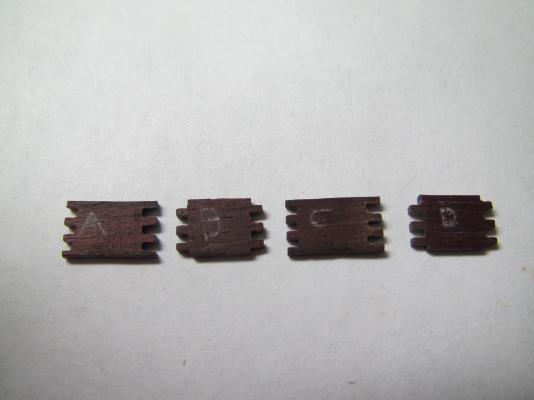
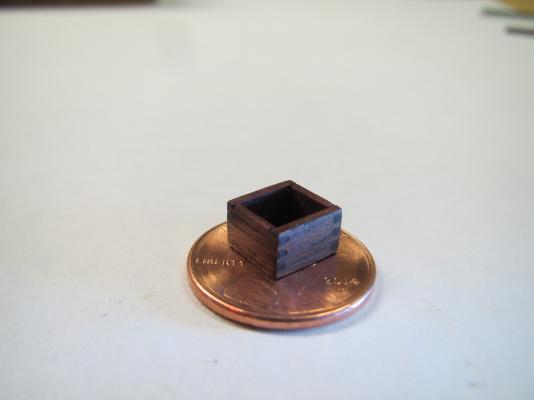
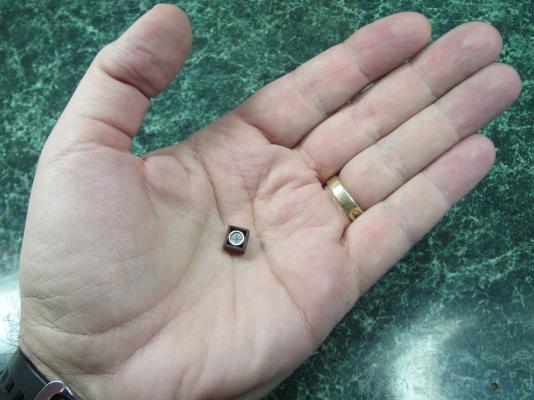
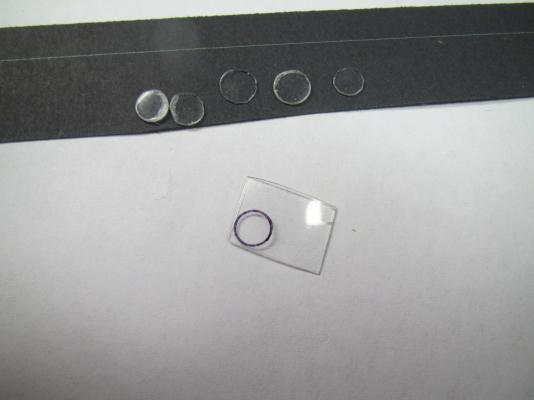
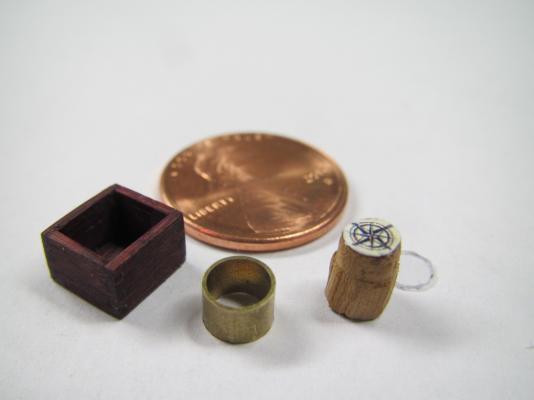
CLEAR PLASTIC JARS OR BOTTLES, BRASS TUBING & STUBBORNNESS The Captain invited me to his table to share how I recently made a compass box for my whaleboat. One of the pieces needed was a 'glass' lens for the compass. I ended up using a piece of clear plastic cut from the side of a plastic jar. The curvature of the jar adds a bit of magnification to the lens which makes a nice effect. It proved tougher than I expected to make a little lens and I ended up with a few rejects. Here's what I learned from my failed attempts: 1) Do not shape it with sandpaper or a double-cut file. The thicker jar plastic actually seems to be a 3-layer lamination, and I'm guessing the heat from coarser shaping methods causes a de-lamination that clouds up the edge of the lens. It actually swells up too. In hindsight, the really flimsy clear water bottles are probably a single layer and may not have these problems. However, it may be the thickness of the jars that help create the little bit of magnification. I don't know if all of the thicker plastic containers are laminations. More testing is needed! 2) When using a single cut file, don't keep filing for long in the same place or the heat will start clouding the plastic. 3) Use scissors to cut the plastic as close to the final shape as possible so you don't have to file very much. Don't try to cut tight curves with scissors though or it will cloud up. Cut straight litle segments instead of curves, and then file to a smooth curve. 4) It's really hard to file a perfect circle. I wasn't able to. The compass box itself was made with thin pieces of hardwood because I was concerned the tiny box joint fingers would snap off if I used too soft of a wood. This is 1mm thick purpleheart. I used guitar nut slotting files and progressively widened the little slots between fingers from .010" up to .032" wide. These files cut a rounded bottom (for guitar strings) so I squared up the corners of the .032" slots with the skinny .010" file tilted to get into the corners. The joints were then fine tuned for fit with 320 grit sandpaper. The sides of the box were labeled for orientation since the joints at each corner were unique. It's a little tedious but it looks cool! If I were going to do a lot of this sort of thing, I think that I would jig up a Dremel flex shaft with a cut-off wheel under a little table and cut the pieces just as you would at 1:1 on a table saw with a sled. Here's the pieces ready to assemble. The housing is a short piece of brass tubing. The rose compass was from Google Images, and I found that if I put the image into a Word document, I could shrink it way down with decent resolution by grabbing the corner of the image and making it tiny on the document itself before printing. I shaped a piece of cedar to almost fit inside the tubing and then pressed it in and the tubing shaved it to shape. If you happen to have a dowel of the right size, just use that. Note that the end of the cedar that the compass rose is attached to is intentionally at a slight angle. I was after the effect of the compass tilting on its mounting giblets....mounting gimlets?...mounting gimbals? Anyway, whatever those mounting thingies are called that alows a compass to self-level. The assembled compass box: Best wishes and Happy Nw Year! EDIT TO ADD: This compass box is 1:25th scale and is 7mm x 7mm x 5mm tall with a compass (brass tubing o.d.) diameter of about 3/16" overall. Those of you building the Bounty Launch are at 1:16 or 3/4" scale. The compass box sizing is from my New Bedford Whaleboat plans, which are also 3/4" scale, so your compass box should be a huge 7/16" x 7/16" x 5/16" tall with a compass diameter about 5/16" overall.


- 396 replies
-
- 13
-
-
- Idea
- Bright Idea
- (and 1 more)
-
Nice! It really doesn't get much better than this. What did you use for the broom straw?
-
CaptainSteve and Augie - Thanks for the nice words. Captain you are more than welcome to copy anything you want! If I ever need hairy coconuts for a build, I will be copying you! Those are so freakin' cool! Augie -The compass already appears to be perfectly calibrated! Guess I'll get back to mini coopering now. Best wishes
- 515 replies
-
- 3
-
-
- artesania latina
- whaleboat
- (and 1 more)
-
Hello eveyone! I worked on the compass box today and was trying to make a "glass" lens for it. Once again, I found use for a plastic jar (this time one that sunflower seeds had come in). The curvature of the jar adds to the look and actually appears to maginify a little. Making the lens proved really difficult and resulted in plenty of failed attempts. Here's what I learned when shaping the plastic from jars. 1) Do not shape it with sandpaper or a double-cut file. The plastic actually seems to be a 3-layer lamination and I'm guessing the heat from coarser shaping methods causes a de-lamination that clouds up the edge of the lens. It actually swells up too. 2) When using a single cut file, don't file too much in the same place for the same reason. 3) Use scissors to cut the plastic as close to the final shape as possible so you don't have to file very much. Don't try to cut curves with scissors or it will cloud up. Cut straight litle segments instead of curves, and then file to a smooth curve. 4) It's really hard to file a perfect circle. I wasn't able to. Here's the pieces ready to assemble. The housing is a short piece of brass tubing. The rose compass was from Google Images, and I found that if I put the image into a Word document, I could shrink it way down with decent resolution by grabbing the corner of the image and making it tiny on the document before printing. I shaped a piece of cedar to almost fit inside the tubing and then pressed it in and the tubing shaved it to shape. Note that the end of the cedar that the compass rose is attached to is at a slight angle. I was after the effect of the compass tilting on its mouting giblets....mounting gimlets?...mounting gimbals? Anyway, whatever those mounting thingies are that alows a compass to self-level. The finished compass box. Best wishes,


- 515 replies
-
- 8
-
-
- artesania latina
- whaleboat
- (and 1 more)
-
The wire details in the capstan are great! Thanks for including the steps on the stove assembly. Seeing how something is done is always a bonus IMHO.
- 2,191 replies
-
- 2
-
-
- confederacy
- Model Shipways
- (and 1 more)
-
I think it's a cool idea. For me, seeing an unexpected detail in someone's build really helps bring them to life and adds more interest. The hairy coconuts are a great example!
- 625 replies
-
- 3
-
-
- bounty launch
- model shipways
- (and 1 more)
-
They are a bit pricey and I acquired mine over time. I imagine it's due to their precision widths and limited market. The files do have rounded edges, so after getting the box joint slots to width, I went back with the skinny .010" file to square the corners and with some 320 grit sandpaper to fine-tune the slot widths. It's pretty tricky, but it looks cool! You need to add a guitar to your must-have shop tools! When your build starts to get you frazzled, you can either pick up the guitar and play something to calm you down, or in my case, get frazzled by clumsy guitar playing fingers so that anything on the boat model seems super easy. Either way, it's a win!
-
No you can't leave this forum Ferit! I have way too much to learn from you! The compass will only point north if it is already pointing that way! Thanks Augie! I think I'll stay away from the candles since I would probably burn the house down!
- 515 replies
-
- 2
-
-
- artesania latina
- whaleboat
- (and 1 more)