HOLIDAY DONATION DRIVE - SUPPORT MSW - DO YOUR PART TO KEEP THIS GREAT FORUM GOING! (78 donations so far out of 49,000 members - C'mon guys!)
×


tkay11
-
Posts
1,829 -
Joined
-
Last visited
Content Type
Profiles
Forums
Gallery
Events
Everything posted by tkay11
-
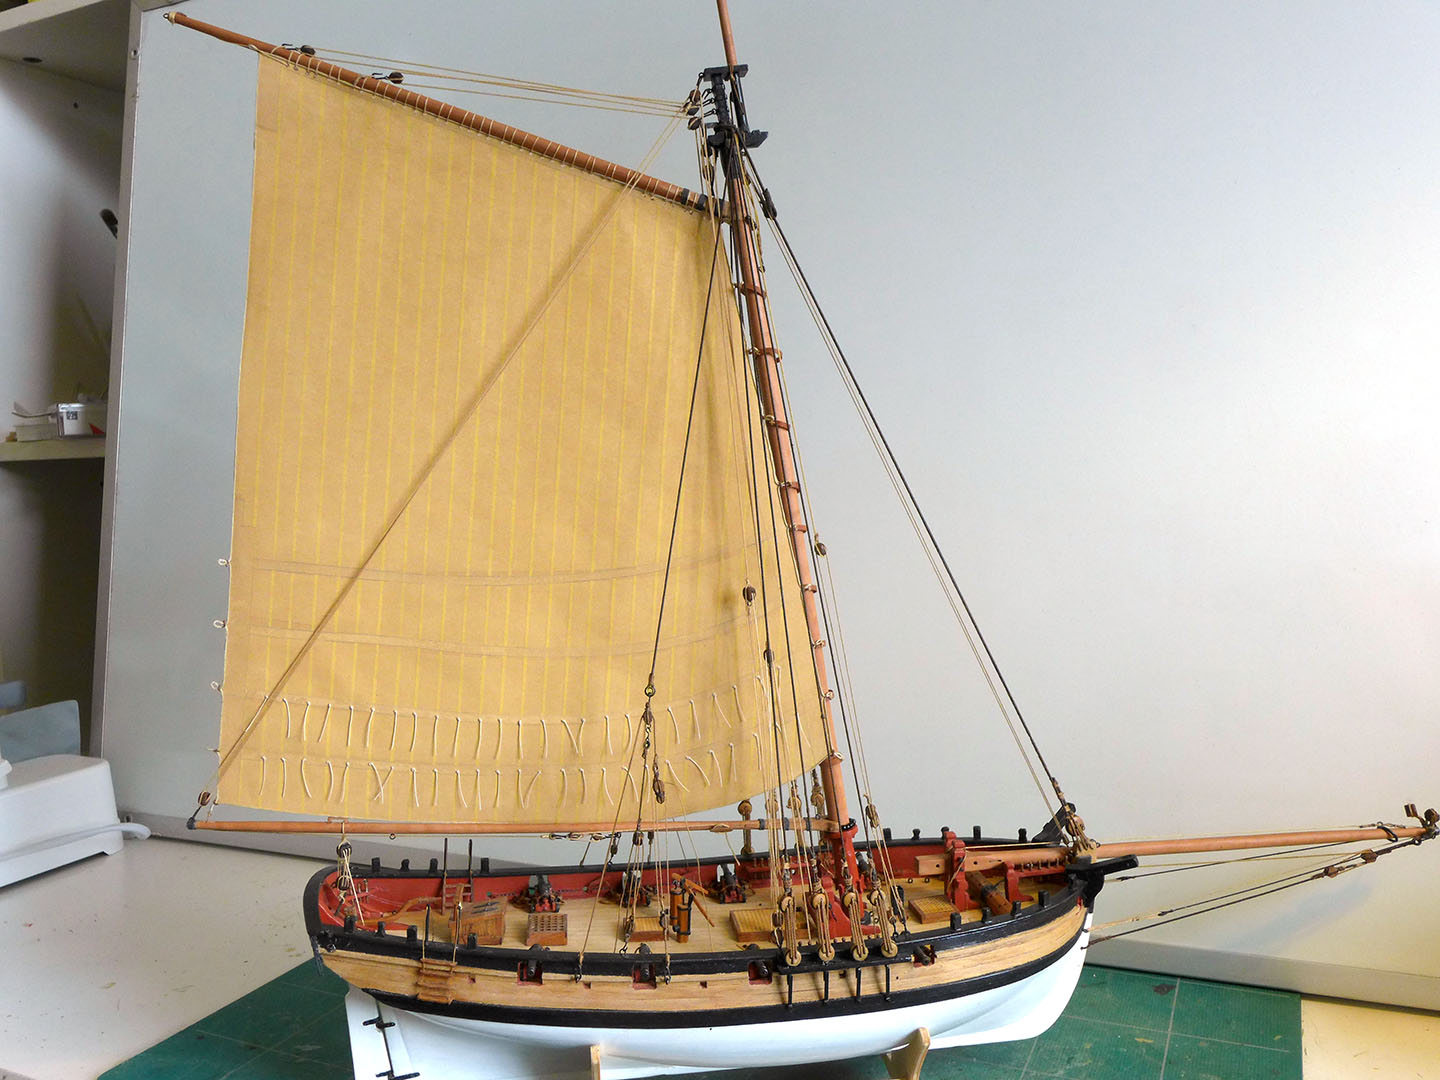
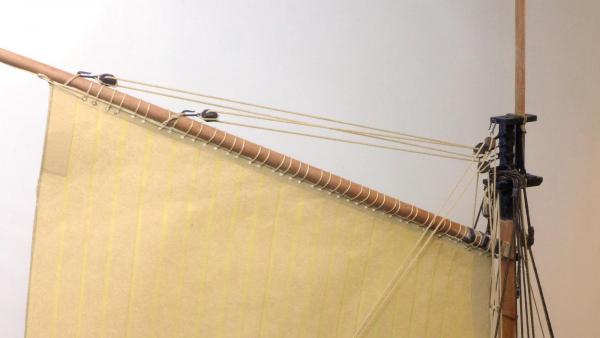
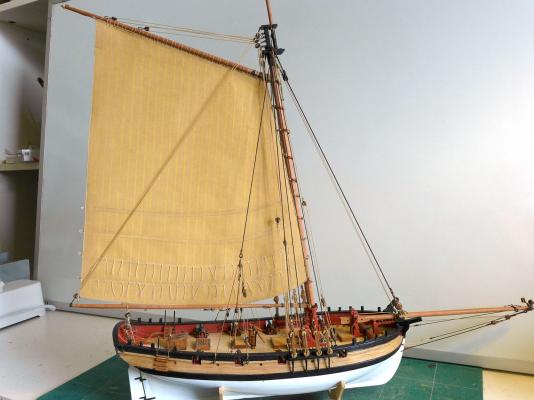
 Thanks, Per. That's what my wife said. In fact it was her question at the very beginning of the build ('Is it going to have sails then?') that made me think about whether I'd be able to do so. I started by thinking I'd follow George Bandurek's build with some sails furled, but I really wanted to see how a full mainsail looked in the flesh, so to speak. Tony
- 269 replies
-
- 1
-

-
- Caldercraft
- First build
- (and 3 more)
-
That's incredibly generous of you, Dirk, given the rough finish (as usual)! But I'll still bask in the pleasure of appreciation! Tony
-
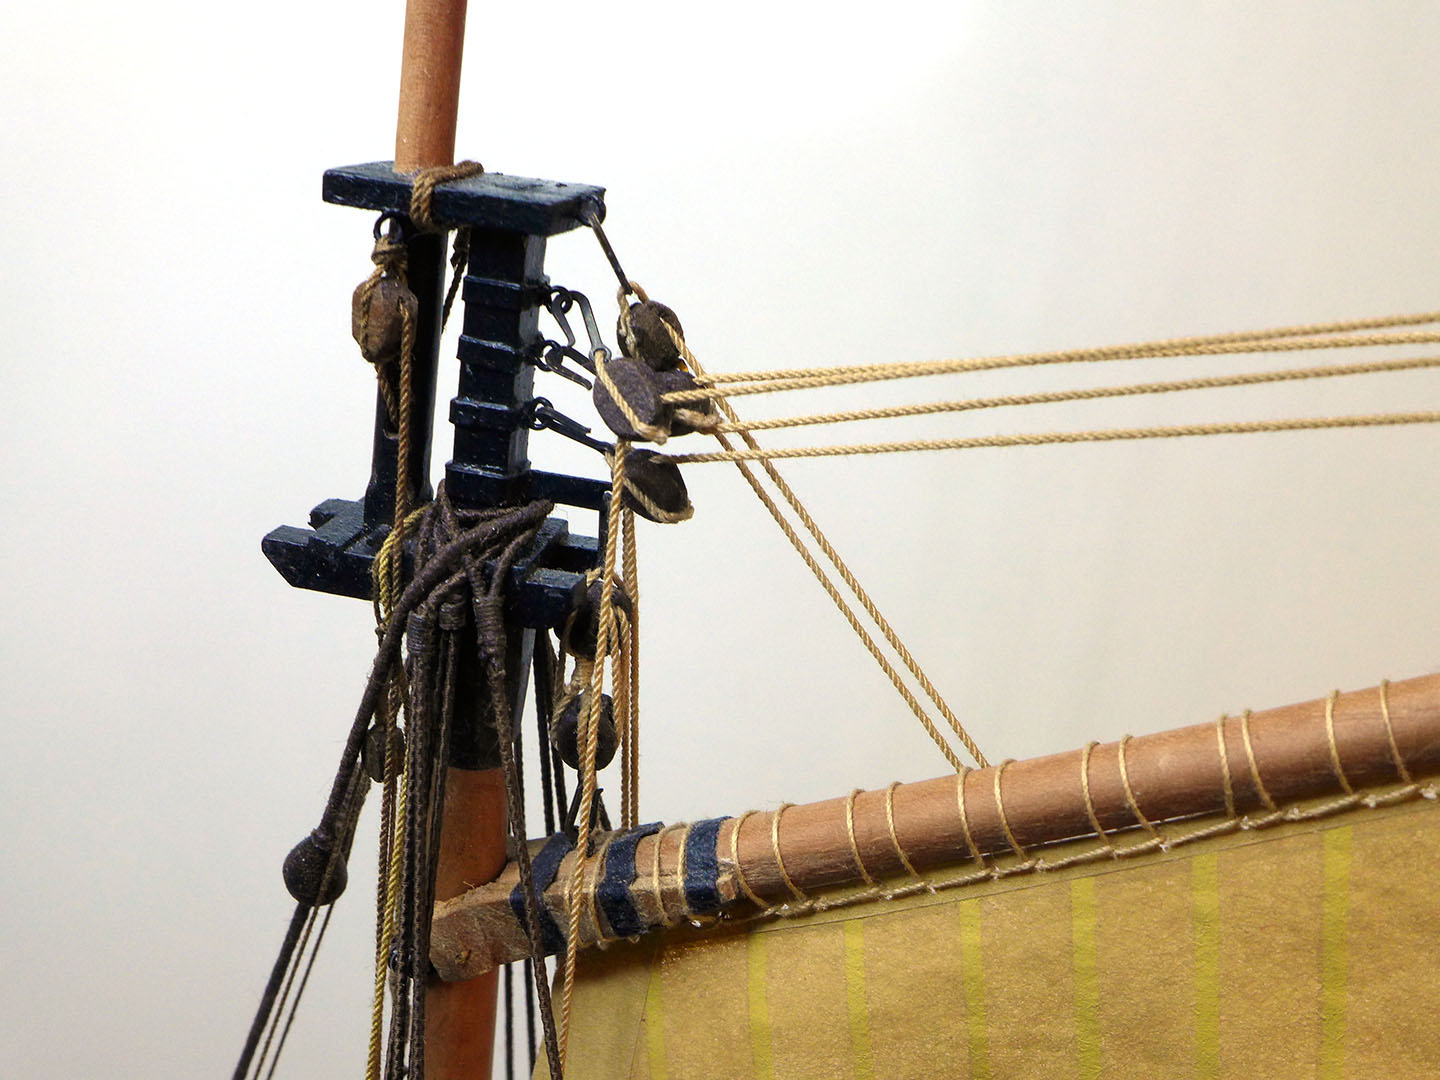
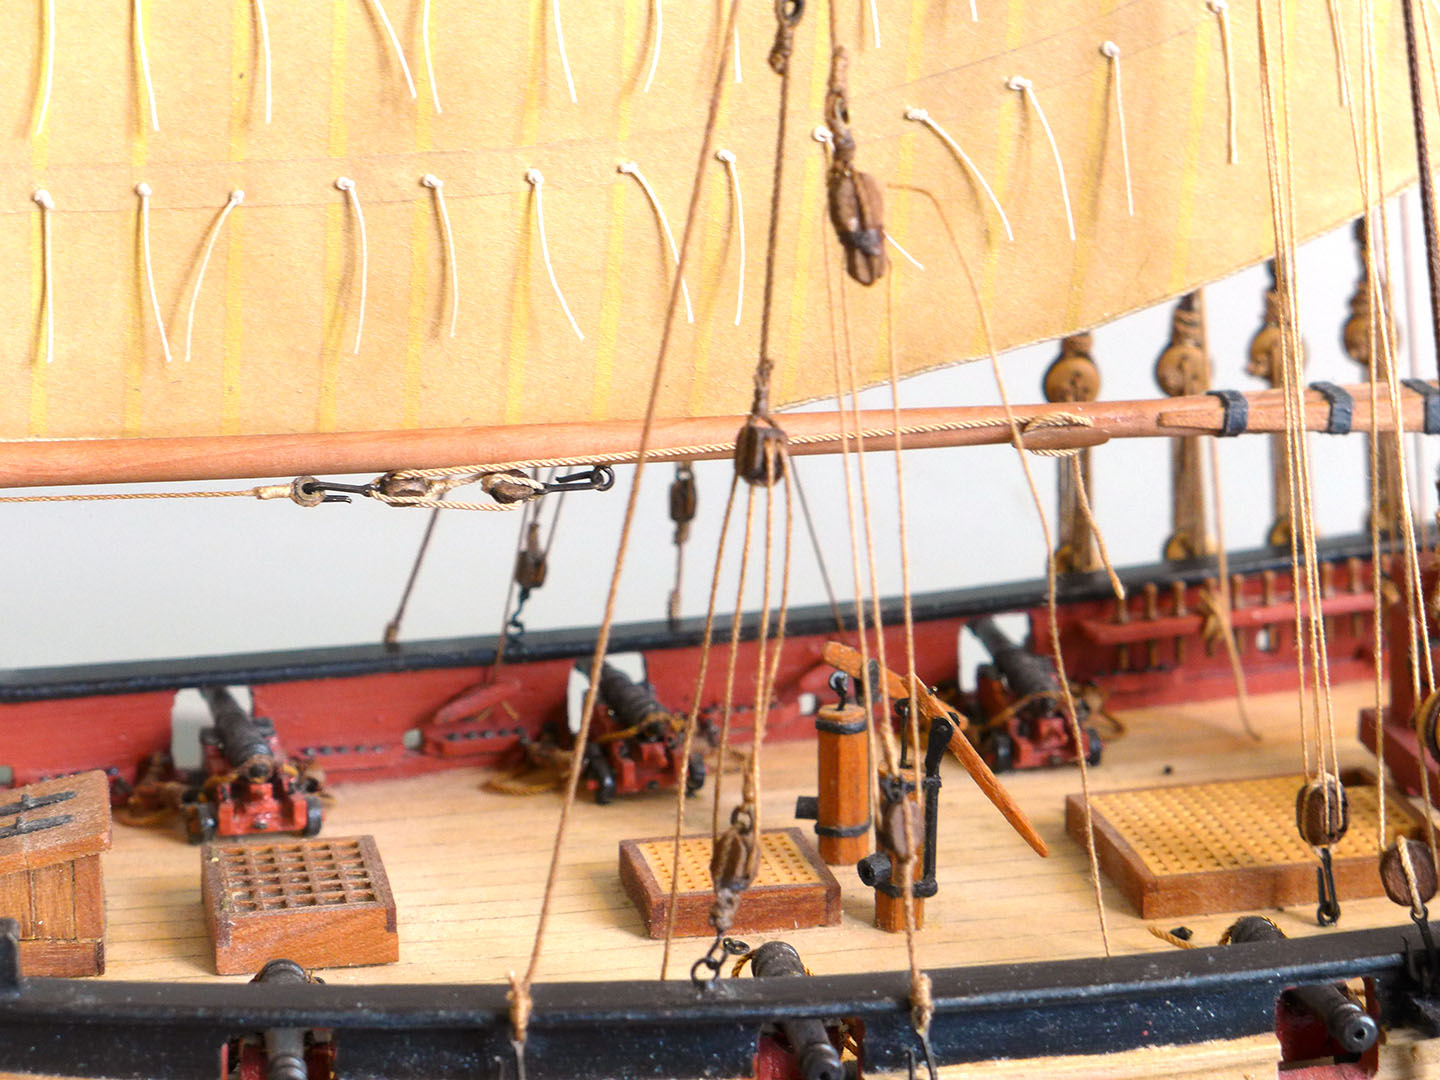
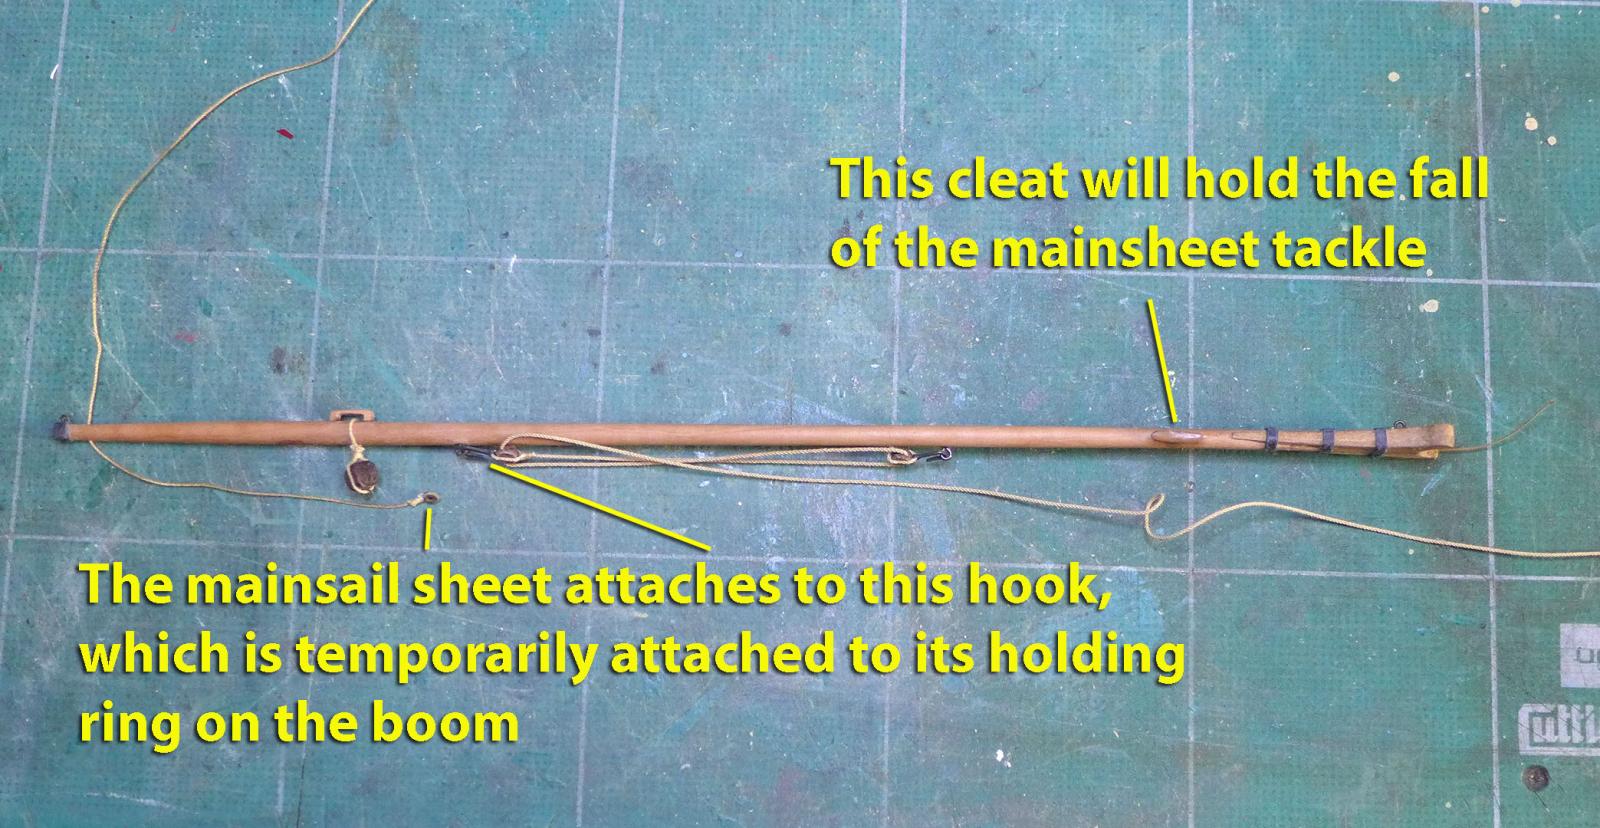
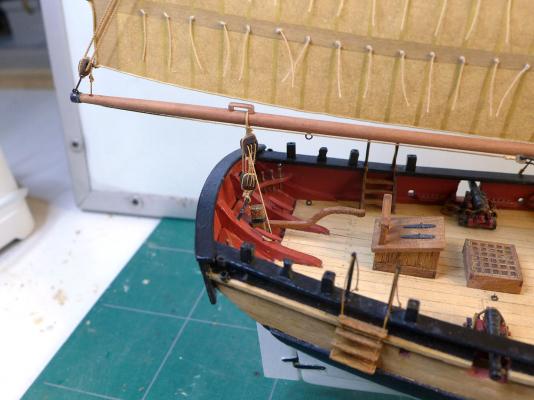
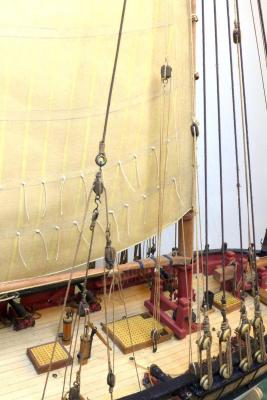
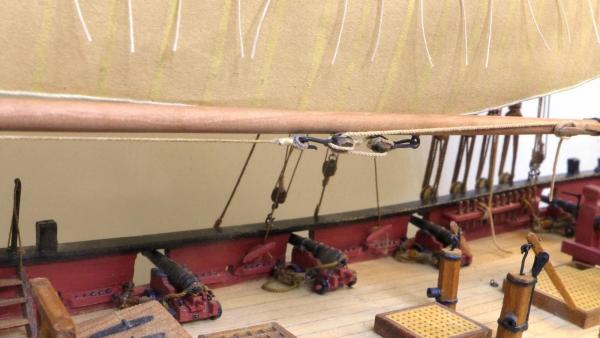
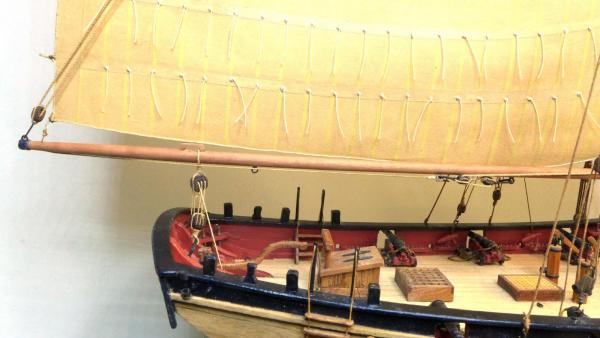
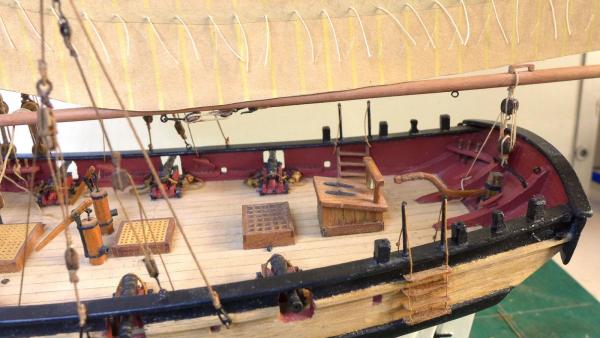
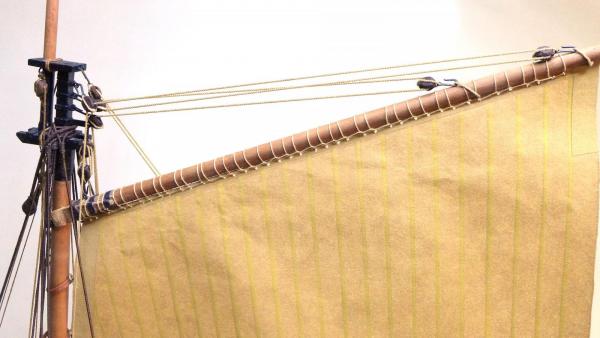
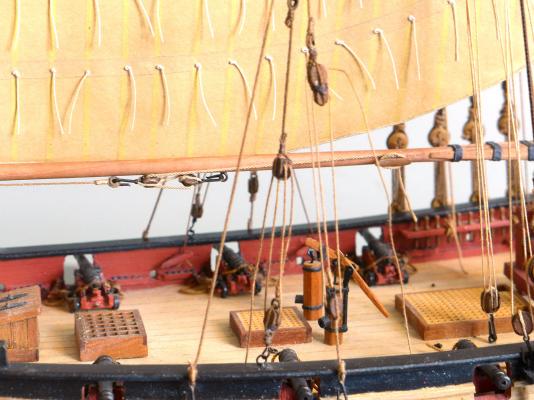
For the rigging I followed Petersson's book of Rigging Period Fore and Aft Craft and the AOTS book on the Cutter Alert as well as Marquardt and Steel in the references given above. The boom was prepared first by fixing the tackle for the main sheet with its pulleys and cleat. The sail was then bent to the gaff using running lacing, and to the hoops on the mast. The peak halliard, throat halliard and topping lift were then rigged as shown in the photos below. The only point of interest is that some may worry about the placing of the hook for the fall of the tackle of the peak halliard since Petersson does not show where it is fixed. Steel places it on the starboard channel at the rear, so I followed his very good advice. You'll note that some of the previous rigging is now a little less taut. This is simply because with all the hauling of the peak halliard, the throat halliard and the topping lift the mast was pulled back a bit. All will be readjusted, as will the ends of the ropes round their various belaying points much later in the build. The next phase will be the cross-jack and topgallant sails, followed by the foresail and jib. Then, down the line, the anchors and the swivel guns. Tony


- 269 replies
-
- 14
-
-
- Caldercraft
- First build
- (and 3 more)
-
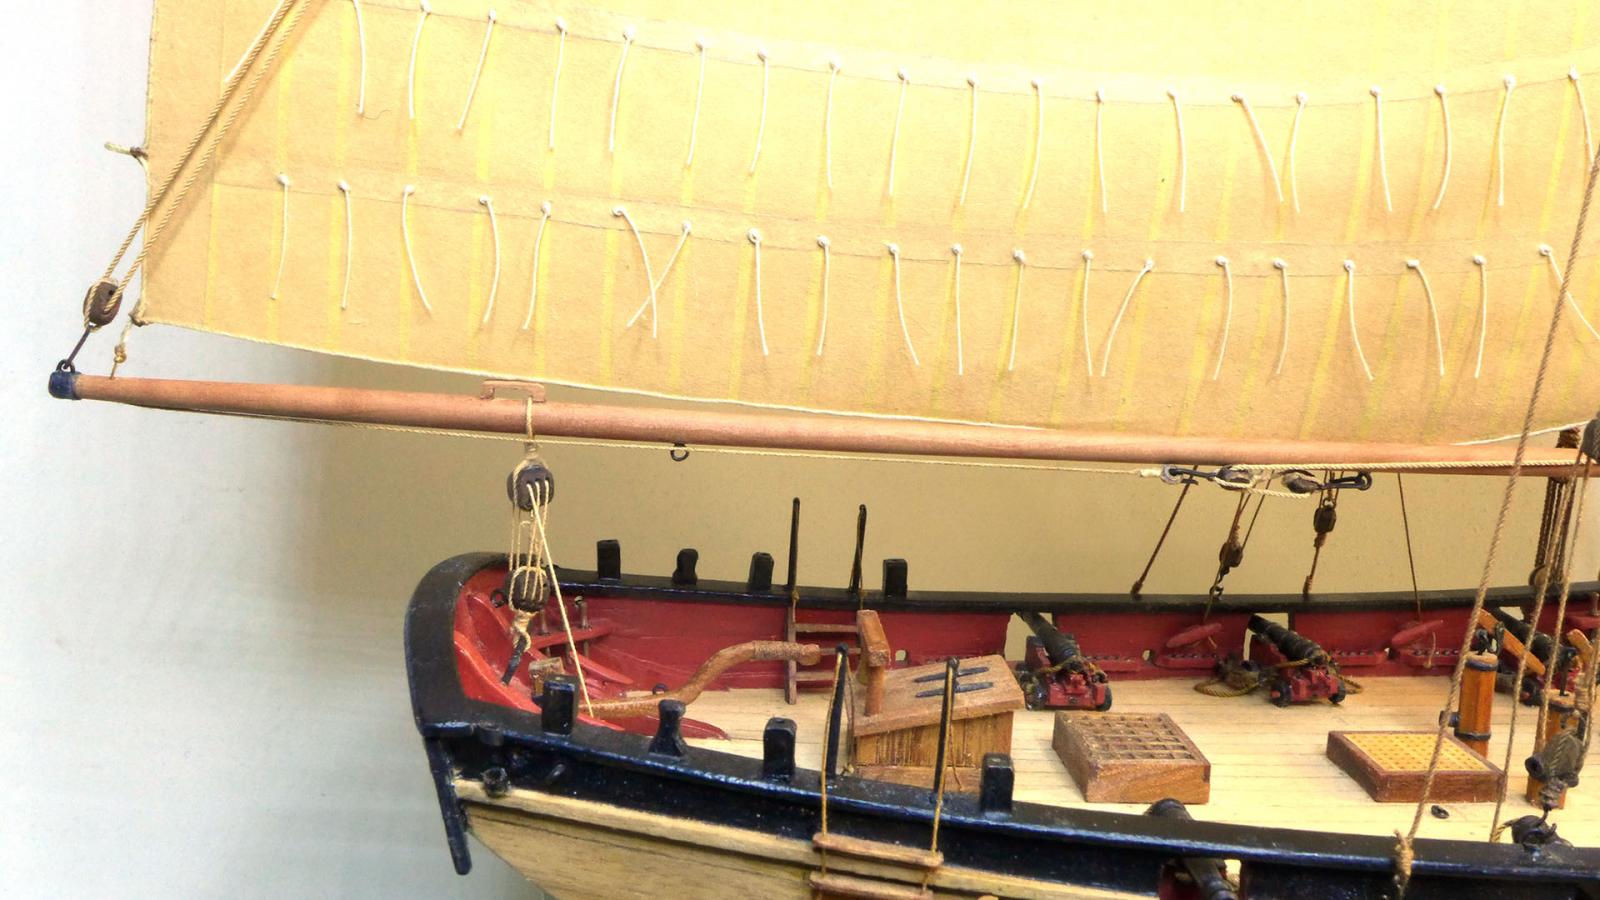
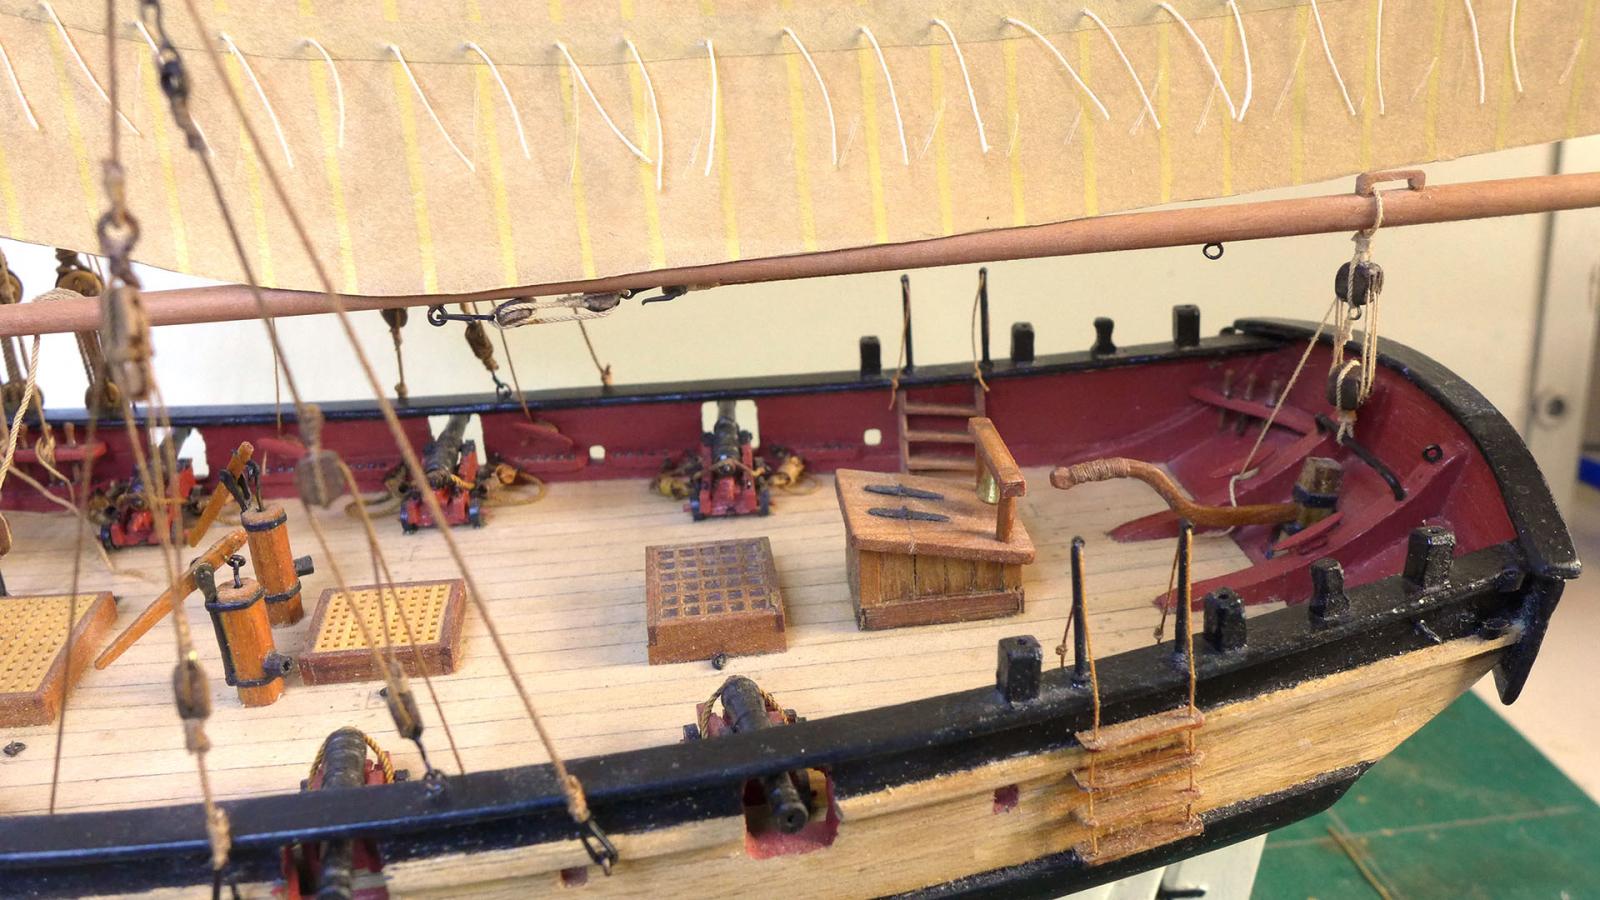
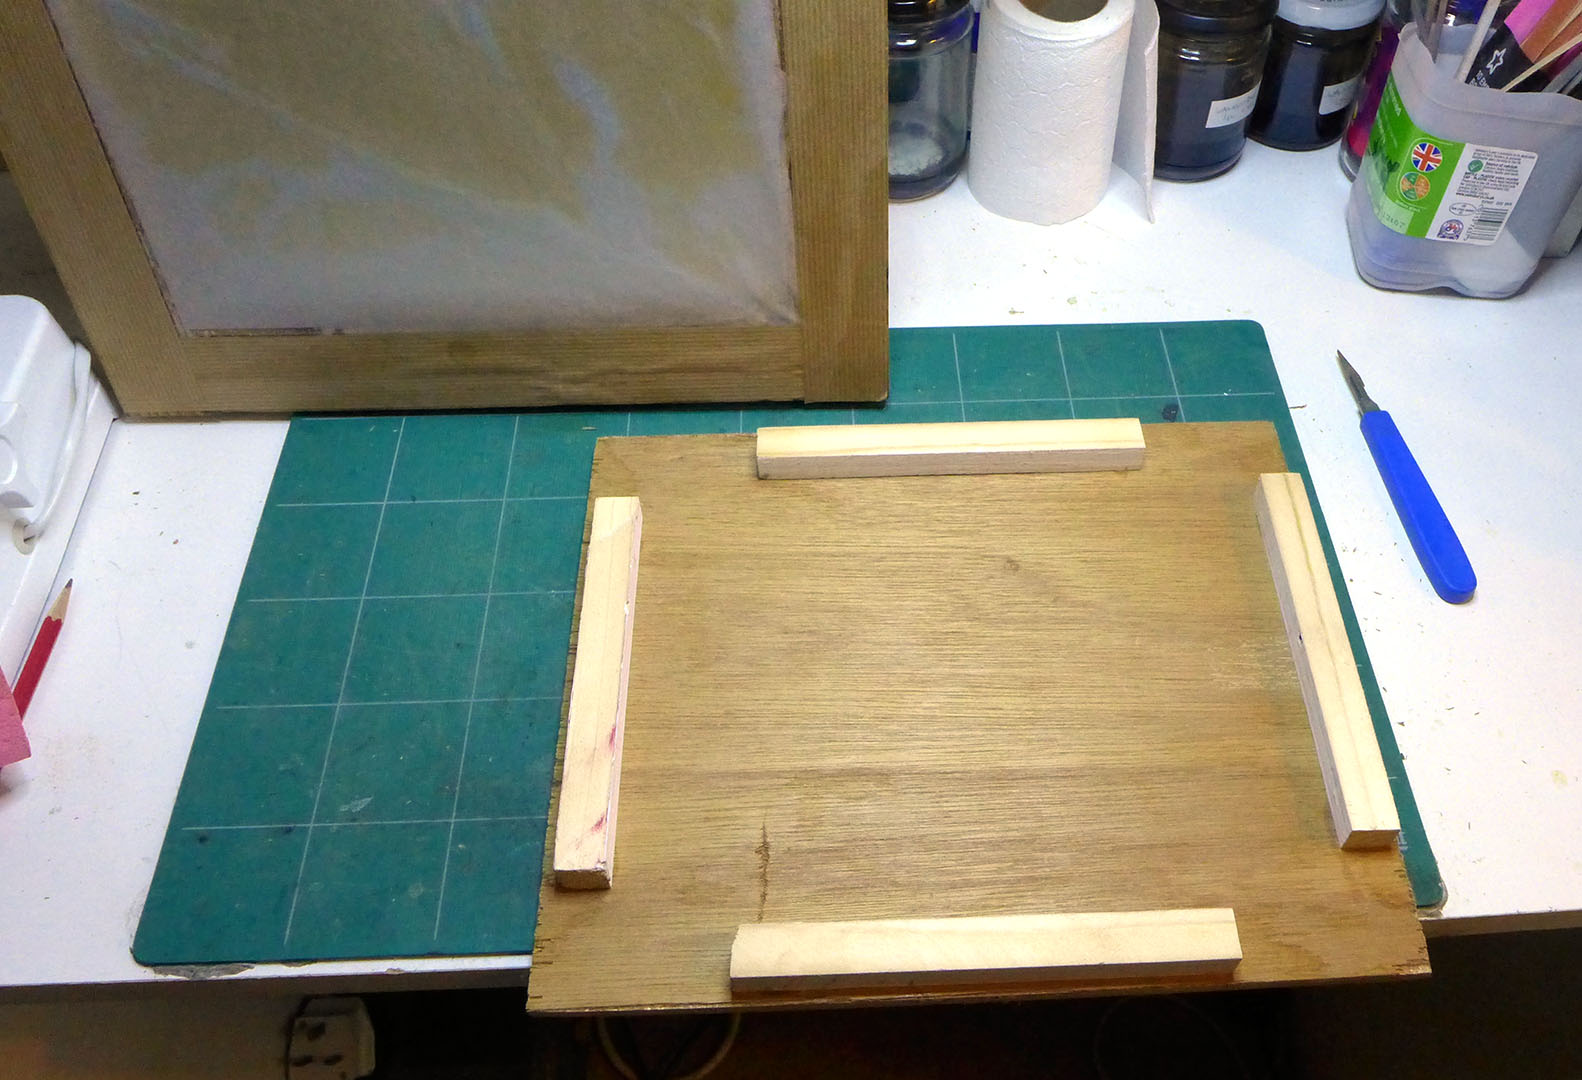
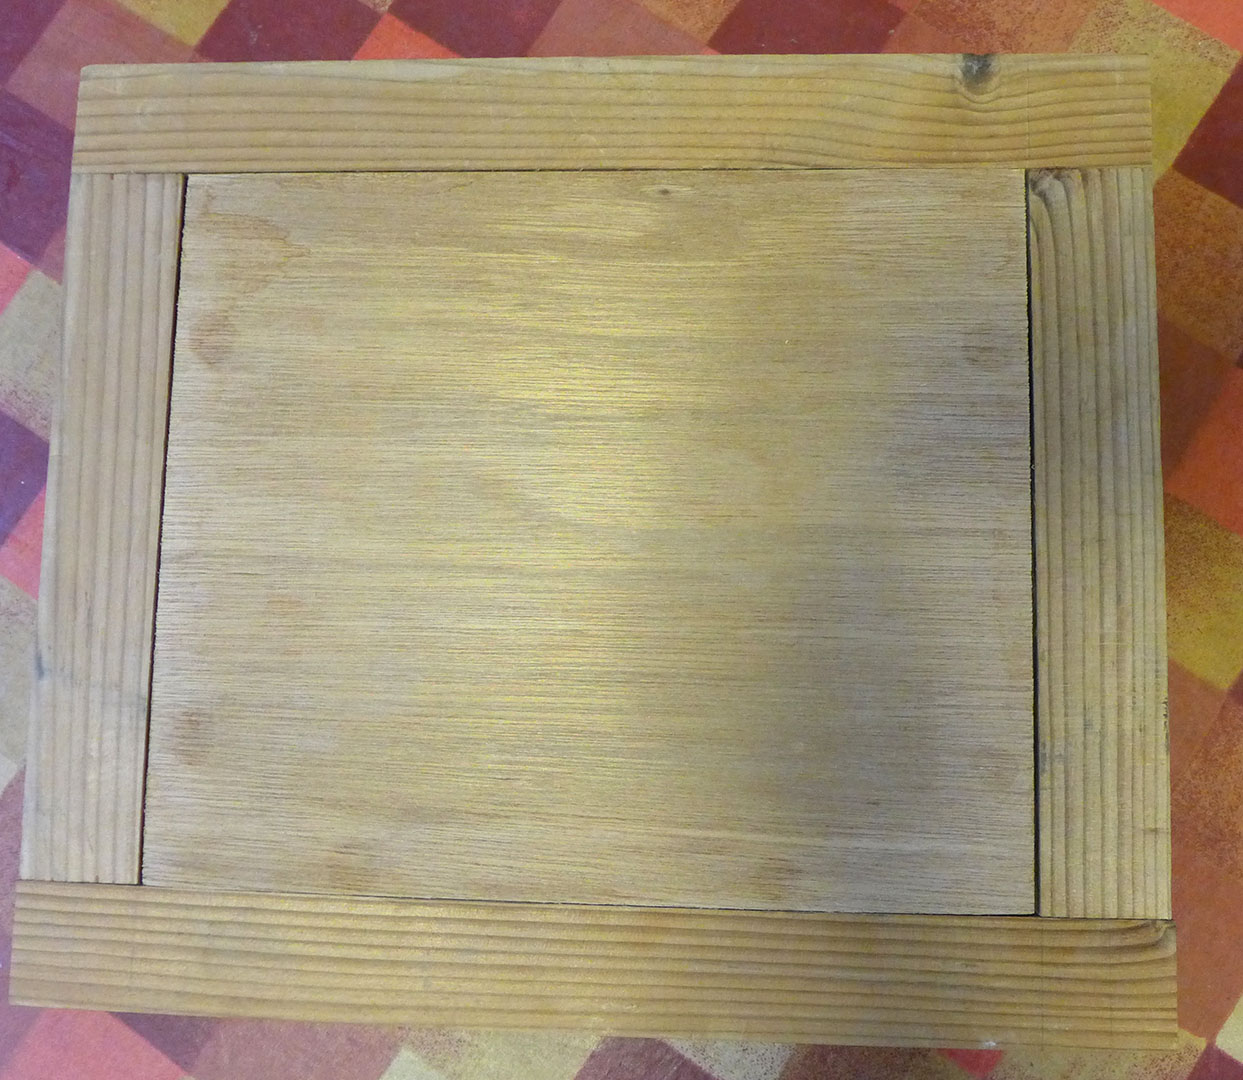
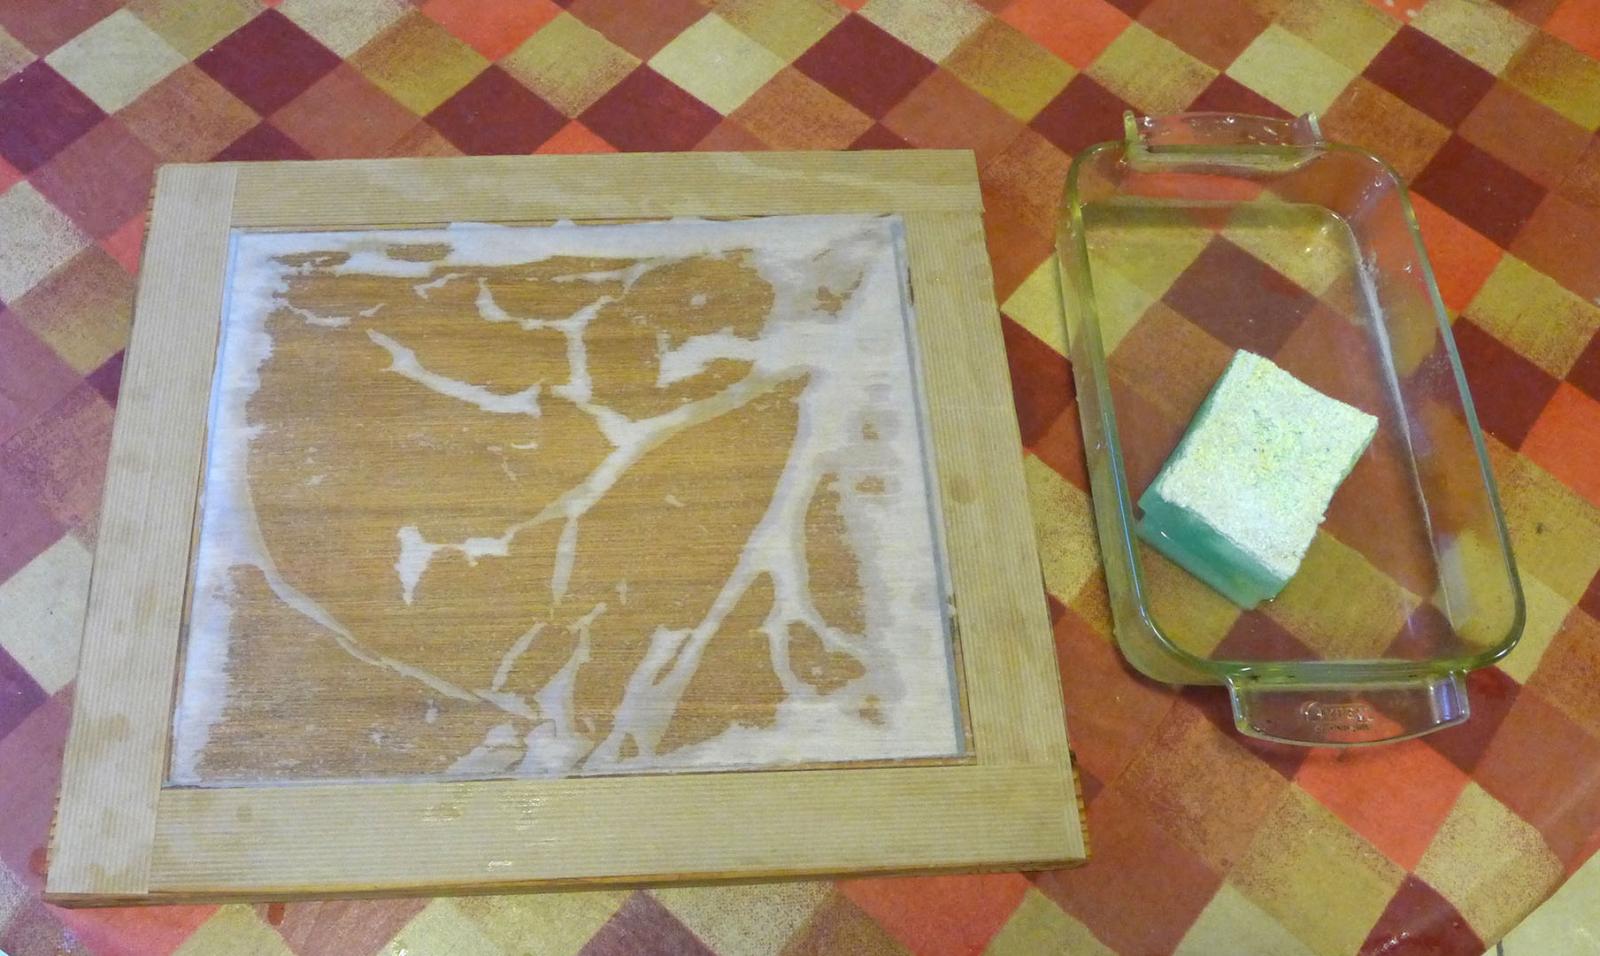
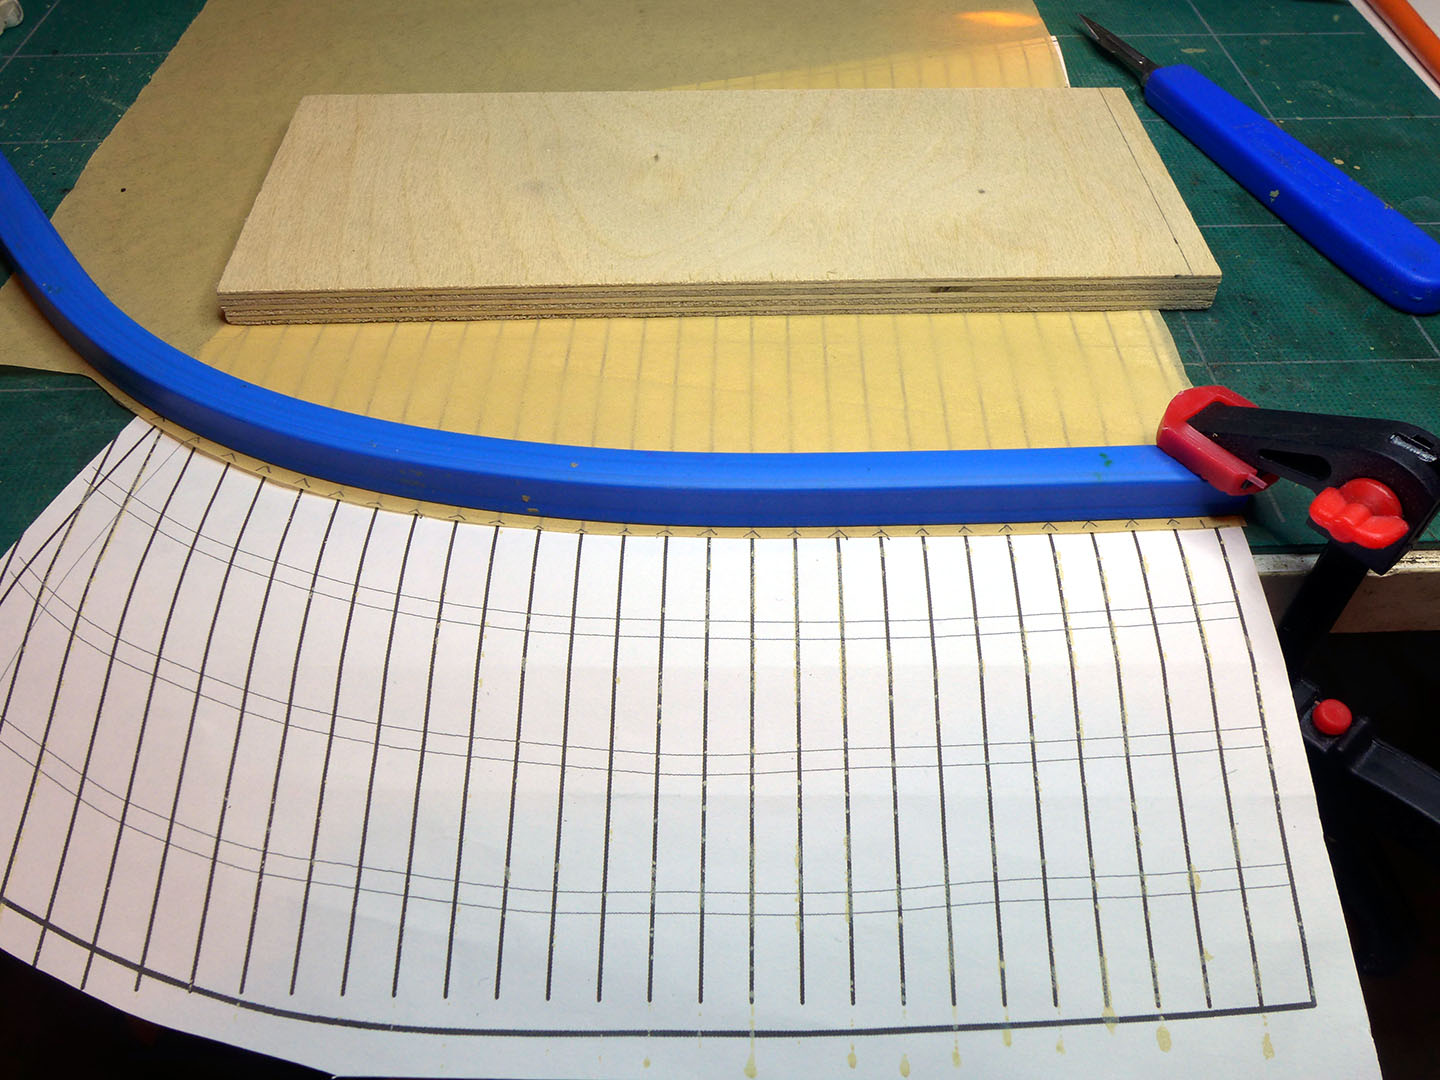
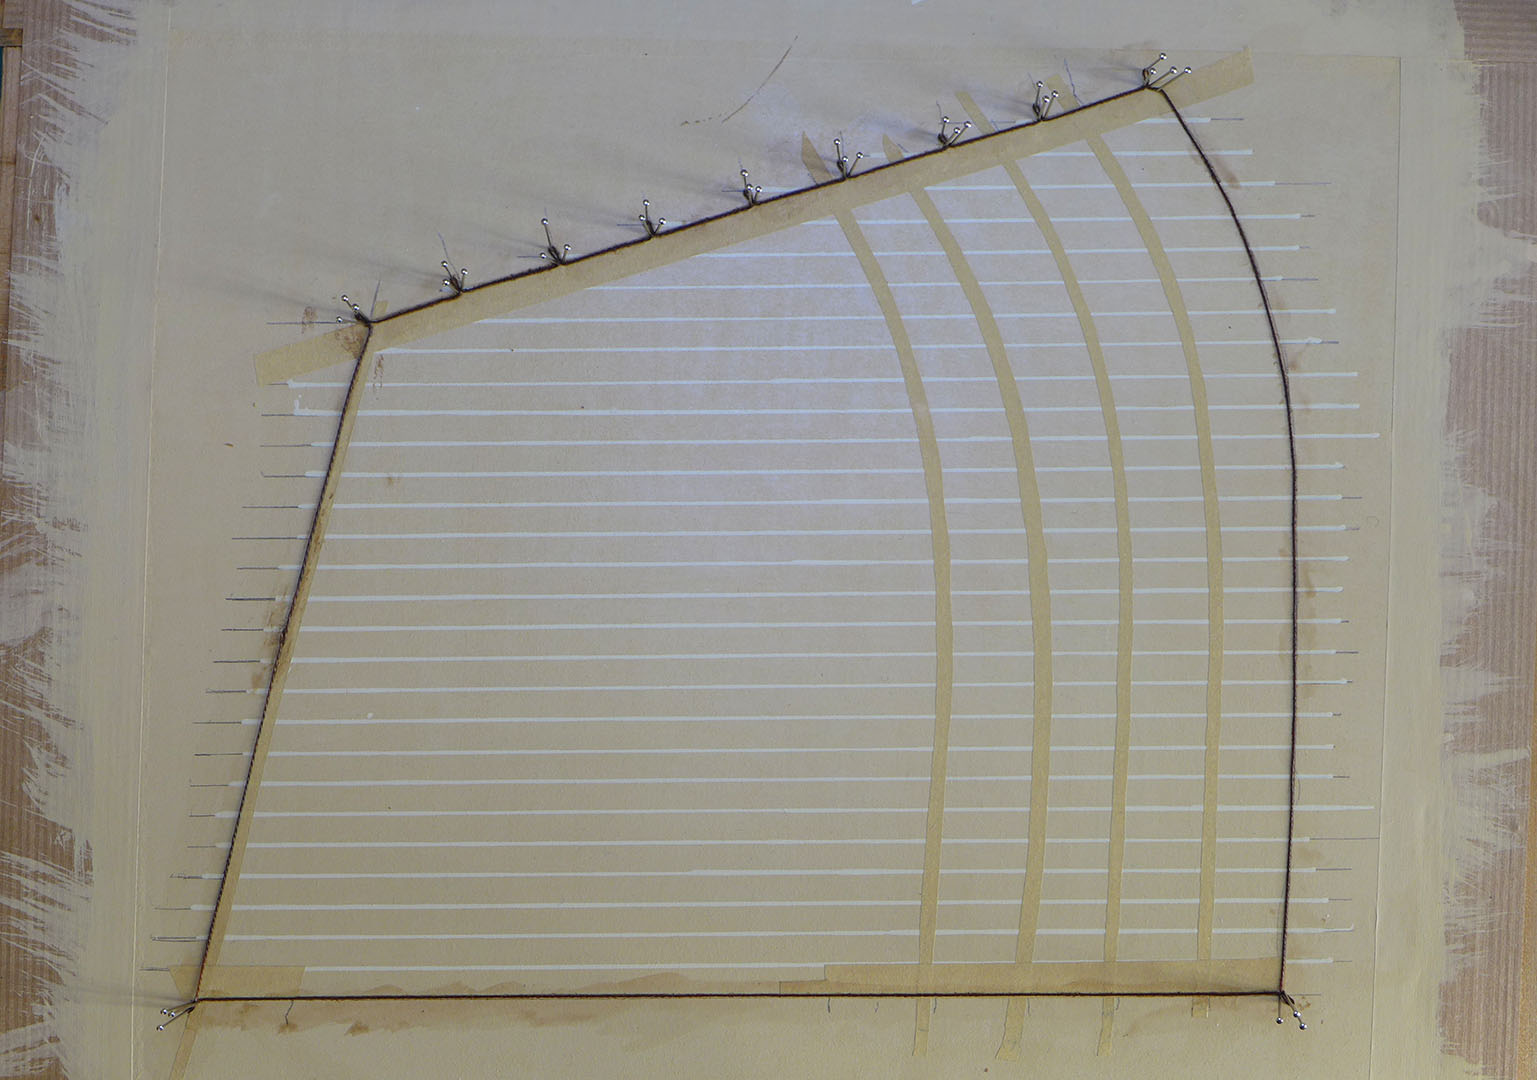
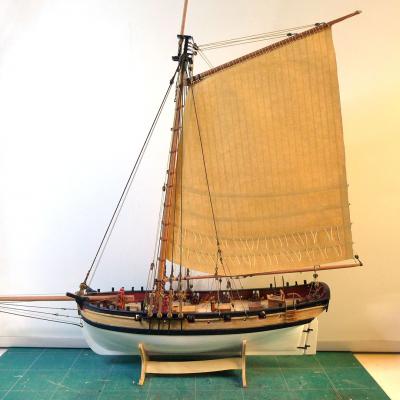
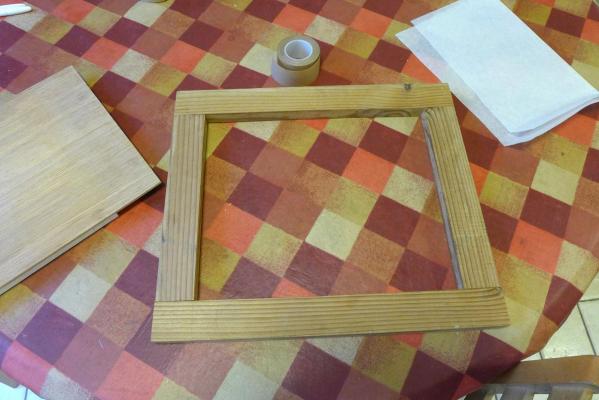
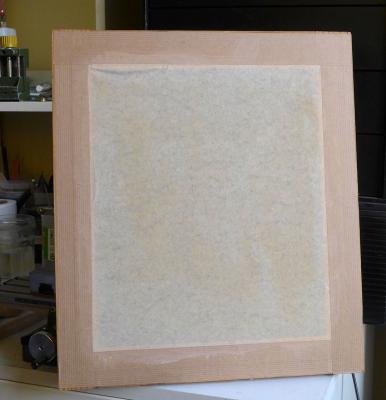
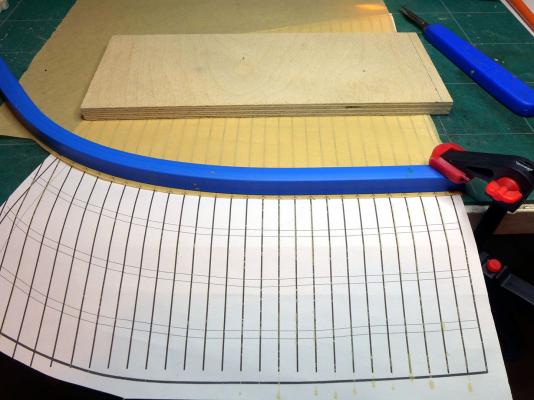
MAKING SAILS The first stage in this process was to study Steel’s Elements and Practice of Rigging, along with Marquardt’s book on 18th Century Rigs and Rigging so that I could understand the structure and making of the various sails. I then used the drawings in Steel to start with the mainsail. This may be the most complex sail to make for the Sherbourne because of its shape and the curved reinforcing bands that have to be fixed. However I thought it would make sense to start at the mainsail and work forwards because if I were to do it the other way I thought I’d be caught in a tangle of rigging whilst trying to attach the mainsail to the mast. I also decided that none of the sails would be furled, and that I’d be unlikely to shape them as though being filled by the wind. It will therefore be a ship that is not sailing, out of the water, and with a full set of sails waiting for a heavenly breeze to transport it to Elysium. The reason for this choice is very simple: as a novice builder I want to build my basic skill set and have a rounded understanding of the various parts of the ship and of the functions of the various bits of rigging. As a person who knows nothing about sailing, it’s all just part of the learning process. I followed Blue Ensign’s guides to sail-making in his log on this site of the Superbe build, as well as David Anscherl’s guide in Volume IV of his Fully Framed Model. This involves the use of Modelspan rather than cotton sheet. Modelspan is a paper that is very resistant to tearing even when wet, and comes in thicknesses that are very close to the scale thickness of a sail at 1:64. I decided that I would try this out first, and only if the result were unsatisfactory would I then have a bash at making the sails from cotton sheet. The first stage is to make a frame to hold the Modelspan. Blue Ensign used a cut out cardboard box, but I went Antscherl’s way and made a frame out of scrap pine. The sequence is shown in the following pictures First, the basic frame. Now the basic frame with its insert. Here, the wet modelspan is already fastened to the frame by gummed paper strips. Immediately after wetting, the insert is removed from the frame and the modelspan allowed to dry. Very quickly it shrinks to drum tightness as can be seen in the following photo (which shows the modelspan already painted with a wash made of diluted acrylic paint (a mix of unbleached titanium white, yellow oxide and burnt ochre). As advised by Antscherl, I used a drawing pen set to 0.6mm thickness to draw the seams using the same paint mix. I then cut out the reinforcing bands by using a flexible curve set on a drawing of the sail I had created in TurboCad. I traced very gently with a soft pencil around the curve onto the sail for the upper and lower edges of each band The bands were then fixed to the sail using dilute acrylic matt medium (again, following Antscherl). You can see a trial run of this method in the following photo: The next photo shows the bolt rope (0.35mm thread) fixed with the matt medium round the edges of the sail, along with the cringles made whilst fixing the rope. I then attached the reef points and drilled holes for the grommets. After this was done, I cut the sail from the frame with a scalpel. One deviation from both Blue Ensign and Antscherl is that I have placed the reinforcements on both sides of the mainsail as it proved not transparent enough. I thought nobody would ever notice since it is hard to look at both sides of the sail simultaneously. The attachment of the sail is covered in the next post. Tony


- 269 replies
-
- 5
-
-

-
- Caldercraft
- First build
- (and 3 more)
-
Proxxon TG125 Bench Disk Sander
tkay11 replied to pompey2's topic in Modeling tools and Workshop Equipment
You should have with the sander a clamp with a screw. This fits into a slot on the underside of the sander and clamps it to a bench or table top. Tony -
Proxxon Micro Mill vs. Drill Press
tkay11 replied to whaynes's topic in Modeling tools and Workshop Equipment
I modified my basic Proxxon drill and the basic drill press (together with an x-y table) to act as a mill. You can see how at http://modelshipworld.com/index.php?/topic/4539-how-to-modify-proxxon-mb-140-drill-stand-to-act-as-mill/?p=130660 It works quite well for me. As I have only worked with wood so far, it seems the sideways forces on the drill are not too much. The only thing is that although the height adjustment (z axis) has about 0.1mm accuracy (each division on the knob is 0.1mm), I find it better to use a template or a measuring device for really accurate height adjustment. In that posting, I said I'd make a block from Perspex, but although I did buy a block, I'm still using the wood one as it works so well. Also, although I did experiment with removing the depth stop and adding a ball race to make the action extra smooth, in fact I have left the depth stop in and it still works well with the screw from the wood block resting on top of the depth stop screw directly. By the way, the 'bamboo plug.jpg' in the posting is reference to a photo of a plug that I had put in the hole left by the depth screw. Since I no longer use that, it's redundant. The Proxxon MF 70 is probably the one to go for if you stick to wood, and it really is a very popular wood mill with modellers all over Europe who produce superb results. I'll probably get one as soon as I'm into serious milling as it is the only dedicated mill that I know of that has speeds up to 20,000 rpm. I had considered the mills that will handle metal as well, but some complain that the speeds of these machines are too low for satisfactory milling in wood (most only reach 2,000 rpm). Despite this concern with speed, there are a very large number of modellers on this forum and on others who use the standard metal mills and produce wonderful work without any apparent problem. I presume they just use slower feed rates for a decent cut. Some of the French modellers do swear by the heavier duty mill/drill system BFW 40/E which can go up to 6,000 rpm (I'm still thinking about that in preference to the MF 70), and there are some mills such as the Sherline which have accessories to increase their speeds to 10,000 rpm -- but of course all these are far more expensive and perhaps still a bit slow for the very small milling cutters that are used in small scale ship modelling (i.e. 0.6mm). One last comment about my drill stand. Although the head rotates, it is very easy to adjust it to a perfect 90 degree vertical when measured from side to side (use a set square to do so). However there is about 0.5 degrees deviation from the vertical front to back which can't be adjusted. For the depths to which I drill, that deviation is of course not noticeable, but it's worth mentioning or looking out for if you're a fanatic. Tony -
Sorry, Greg, to be a curmudgeon and to divert from Chuck's wonderful build on this log, but I'd like to throw in an alternative view. I know lots of people aged 15 upwards who devote their lives to improving their skills so as to achieve as perfect a result as they can (even if it's only to pass the endless exams that will take them to the next step). I certainly would include artists, musicians, engineers, a variety of scientists, amongst the many I know and have known who are like this. In the computing world they are often known as 'nerds' or 'geeks', in the musical world endless practice is regarded as the norm. I don't know on what evidence the 'most' applies to the quoted statement except insofar as model ship building is not a mainstream hobby or profession. We have thousands of members as do the groups in other countries, and there are probably others who make ship models with various degrees of skill, attentiveness and interest; and it may well be that the majority are over 40. Of course there are people old and young who are not going to be interested in ship model making with the degree of obsession, compulsion or mania that others may have. On this forum I have seen examples of the full range, and oft a time have I seen the comment that this hobby is for pleasure, not a competition, does not have a time scale, and is to match the skills and exactly those different degrees of obsession held by each one of us as individuals. 'Instant gratification' is hard to define. I have 'instant gratification' the moment I have found a way through a problem. Others have it for their own different reasons. Making love may well be included in the list. As for 'good enough', I have seen that phrase used many times on this forum, as in not bothering to fully frame a model because it won't be seen when the planking is on, or simply because no attempt at replication will ever be successful because it is not exactly the same as the real thing. I have also heard that phrase used by some people in commenting about their love-making. A final aspect is that many young people face enormous pressures in their lives just to make ends meet -- most especially if they have young families to look after. They quite often will be working 12 or more hours a day. I was chatting to a call centre person the other day during a query about my phone account, and she told me she was at the end of a 12 hour shift at 7pm, and was going on to do her other job. To find the time to do something as demanding of concentration as ship modelling after that and before having some kind of mindless break from the pressure might well be a demand too much. Note how many people on this forum have come back to modelling after breaking it off in their teens. I presume they broke it off not because of a sudden failure of their dedication to perfection. In short, I am definitely highly respectful of the skills many on this forum have, and I learn a lot from them, but I'm wary of statements that could be taken to be elitist even though I know that intention was not there in making the statement and was made only as a kind of compliment in response to Chuck's obviously wonderful skills. Chuck, I do apologise, and if you think this comment has no place on your log, I'll be happy to delete it or ask to have it moved to another topic. Tony
- 1,051 replies
-
- 18
-
-
- cheerful
- Syren Ship Model Company
- (and 1 more)
-
Proxxon TG125 Bench Disk Sander
tkay11 replied to pompey2's topic in Modeling tools and Workshop Equipment
At SAT Berlin it's going for €122 or £95. Their site is also in English. TBS Aachen is more expensive right now. Shipping will be on top. I bought mine from SAT Berlin in Jan 2014 (when it was €139.49). Spare sanding discs on top of that are useful to get as they are also much cheaper in Germany. There's no VAT or import duty when importing from Germany to the UK as it's all in the EU. I really like my TG 125. You can improve the precision by using a set square and a protractor. I've also bought stuff from Warco before. They have very good customer and after-sales service, and you might be tempted to try their cheaper sander, especially as it's a combo. Tony -
Thanks, Gregor. I guessed this is what you might have done. I'll probably use Ed Tosti's method of aligning the keel/stem/stern with the body (in his POB build of Young America). Thanks also for the link. Very useful. Tony
- 121 replies
-
- 1
-
-
- la jacinthe
- schooner
- (and 2 more)
-
Sorry to go back a bit, Gregor, but I've been looking at the rabbet. You said "The rabbet I cut was too small; it would have worked with planks of 0.5 mm, but it didn’t work so well with the 1 mm planks I used. They didn’t fit in completely." I can't quite work out how the rabbet should be cut at 1/64. At that scale, it runs at 1.5mm along its greater part (Boudriot suggests 2mm planks for the 1/48 scale, which would be easy to do). From what you say, it suggests three layers of 0.5mm, or 1 of 1mm and 1 of 0.5mm. For the Sherbourne (also 1/64) I put two layers of planking on the Sherbourne as per the instructions, but instead of two layers of 1mm, I used 1mm planks only for the first layer and the second was 0.5mm. I'd be really grateful if you could clarify how you worked on the rabbet and the garboard strakes. Did you put on only one layer of planking? If so, was that 1mm throughout? Or did you go for two layers? (I also note you used the same basic construction method on these models as the Sherbourne kit, with the keel, stem and stern added on after -- something I have also been working on on the mock-up I have been doing. I'd therefore also be interested in how you lined up and fitted the two sets of parts -- or was that easy because it was all laser cut? I'm just using coping saw and disc sander, hence the question.) Sorry if I missed this in case you explained all this already -- if so, put it down to early senility! But thanks for any guidance! Tony
- 121 replies
-
- 1
-
-
- la jacinthe
- schooner
- (and 2 more)
-
Tool for Shaping Brass Strip
tkay11 replied to mikiek's topic in Metal Work, Soldering and Metal Fittings
There was a discussion about the characteristics of copper, bronze and brass in 2013. See http://modelshipworld.com/index.php?/topic/2102-copper-bronze-and-brass-how-to-treat-them/#entry50895. Wefalck in particular made some good points. Tony -
This may not be the place to say this, but I too have been contemplating a scroll saw for a future build. I have been interested to hear about the different values of scroll saws and band saws, so have followed this discussion with much interest. Clearly for my purposes I would tend to a scroll saw. However, I have already a coping saw and a jeweller's piercing saw, but I was worried that these would be very hard work and possibly lead to inaccuracies. However, I thought it best to try it out before committing to spending such a large sum of money. So I took the plans of La Jacinthe and reduced them to 1:64 (not wanting to waste some scrap plywood that the local wood merchant gave me for a pound) and cut out the fore-aft bulkhead as well as a couple of the rear bulkheads. I left a millimetre or less around the edges knowing that I was likely not to be able to have a perfectly vertical stroke. Imagine my total surprise to find that it wasn't all that hard, and probably took as much time as it would have done to set up a scroll saw and cut to the same tolerance. This has made me do a rapid rethink. Do I really need a scroll saw? Certainly if I were only to make plank on bulkhead models I would probably say no. However, when it comes to making all those small parts for a fully-framed plank-on-frame model, then I could imagine the whole thing would be made much less tiring and easier with a scroll saw. In the end, I'll probably get a scroll saw, seeing that I want to do a cross-section and eventually a full plank-on-frame. However, that will be the future and I'm going to do a plank-on-bulkhead model with my coping saw and piercing saw -- partly to explore just how nicely it can be done, and partly just to say I did it! Tony
-
No hurry, Jan. Just make sure everything's ok. Models can wait. Tony
-
Thanks for the details, Gregor. I'll certainly watch out for the rabbet should I go ahead with this build. I too have been experimenting with sizing it all up on the computer, and my local timber merchant gave me some offcut plywood for £1 with which I can experiment before making any final decisions. Your own experience is invaluable for me -- as it has been with the Sherbourne. Tony
- 121 replies
-
- 1
-
-
- la jacinthe
- schooner
- (and 2 more)
-
Just as a matter of interest, Gregor, since I found a cheap copy of the Jacinthe monograph on eBay (and have therefore started considering to do this build as well once my Sherbourne is finished), I was wondering whether you followed Boudriot's suggestions of making the keel thinner and adding veneer to the outsides of the keel, stem and stern. When looking at this I thought this was a bit of a convoluted way of doing things, and thought it would be better to build the fore-aft bulkhead to the correct width. This in turn would mean cutting the slots in the cross-bulkheads to the width of the lengthways bulkhead, although it would also mean cutting out a rabbet. Your pictures suggest that you may have made the thinner version and added veneer as suggested, but I'd be very grateful for your opinion on this matter. I might have PM'd you on this, but thought it would be of interest to others who may want to make the model. Tony
- 121 replies
-
- 1
-
-
- la jacinthe
- schooner
- (and 2 more)
-
So mast tackles may not have been too far out a thought. Tony
- 121 replies
-
- 3
-
-
- la jacinthe
- schooner
- (and 2 more)
-
Thanks, grsjax and ofencer29350, for the links. I've joined the forum modèlisme naval bois as a result. I also like the Marine et Modélisme d'Arsenal forum. There are plenty of great builds in both, as well as the different range of models from this forum. It's wonderful to peek into the fora in other countries such as Russia, Germany, Japan etc as they also look great -- representing different styles, models and culture which all adds to the interest and contextualises our different conceptual frameworks and conventions in this hobby. Tony
-
Just catching up again, Mark. It's wonderfully encouraging to see you're about two models ahead of me in the same kind of plan for progress with skills -- since I too want to move to cross-section after perhaps one more build (maybe La Jacinthe or La Chaloupe Armée) and then a fully framed model. So I see it is indeed possible to achieve the same level of skill. Wonderful! I love the planking and the finish you have on the hull. Just one thought about the black spots. You were using PVA which is water based. Could there be a possibility of fungus? (As in humidity + warmth = fungus). Hoping 2016 goes well for you and your partner, most notably in health terms, Tony
-
I bought mine on eBay. You can get 500ml very cheaply. E.g. £6.79. Tony
-
Interesting discussion on the Jacinthe. I happened to buy the monograph by Jean Boudriot on La Jacinthe last week, and none of the plans of that class of ship show windlass or capstan. There is a lot of discussion about La Jacinthe on the French modelling forum Marine et Modélisme d'Arsenal at http://5500.forumactif.org/f82-la-jacinthe-1823-plans-jean-boudriot, so you might like to ask the question there. See my PM Tony
-
Thanks for the update, Ulrich. Sounds good. How about some photos? Tony
-
Harbor Freight Mini Wood Planes
tkay11 replied to grsjax's topic in Modeling tools and Workshop Equipment
Great resource! Thanks for posting from Hawaii! Tony -
Ron, as a further thought, you might be better served when you've finished the log to assemble it into a pdf file and ask the moderators if it can be posted in the Ship Modeling Resources area of this site. Tony
-
I agree totally with Mark. This will be a valuable reference log for a lot of people in this growing/emerging field. Thanks for the effort, and keep it up! Tony
-
Just for interest's sake, I have been using only three dilutions: 1gm:5ml water (served shrouds), 1gm:10ml, and 1gm:30ml. I can see my pack of crystals may well last for all the models I make. Tony