


EJ_L
-
Posts
2,246 -
Joined
-
Last visited
Content Type
Profiles
Forums
Gallery
Events
Everything posted by EJ_L
-
 Good start on those shrouds. Tying all those knots can become very monotonous and frustrating but as one of the most recognizable features of a tall ship they do make a great sight when complete.
 -
Never to late to learn something new. It seems that almost everyday I learn a new tip or trick to help me out. Some I use, some I don't but always learning. You are going to have a couple of nice ships sitting side by side. Getting a new model always gets me motivated to build!
- 75 replies
-
- 5
-

-
- scharnhorst
- dragon
- (and 2 more)
-
Filling and sanding, always a tedious and rather boring part of the build but a necessary one. Congrats on hitting 100 hours!
- 414 replies
-
- 4
-
-
- riva aquarama
- amati
- (and 2 more)
-
I do the same with the repetitive stuff. I'm also building some of the other misc. details that need to be done but are just one piece instead of 50. Speaking of the ships boat, that is coming up fast on the to-do list. I am going to attempt to build it completely from scratch. Never done that before so I am looking forward to the experience. Worst case, I still have the solid hull one that came with the kit.
- 608 replies
-
- 4
-
-
- la couronne
- corel
- (and 1 more)
-
Nice job on your first strakes. That first run is always the toughest and scariest as it sets the alignment for the rest of the planking. Since you are running your strakes as one long piece I agree that you don't need the fillers. They are mostly for when you are running individual planks that need more support at the ends of the joints. With one long piece, the entire strake supports itself and does allow for you to obtain that nice curve around the bow using just the bulkheads. Looking forward to the next update!
-
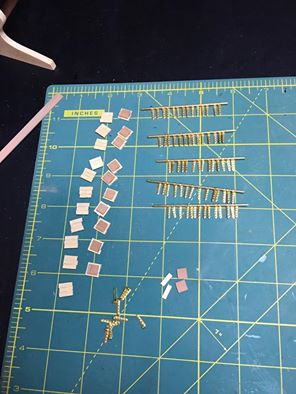
Started work on the gun ports. Roughing out the wood and hanging the hinges so I can blacken them. Also I will be making the eye bolts for the pull ropes as a big knot through a hole in the lid just does not look very good. 52 of them for this ship in three different woods depending upon location. All but four of them in the open position. This will take a little while.
- 608 replies
-
- 8
-
-
- la couronne
- corel
- (and 1 more)
-
I am actually reading those books myself right now. About midway through the second. I did not think about listening to them while I build. That is a great idea. May have to give that a try.
-
Model ship kits are no different than any other type of model kit. By using the parts and directions provided you will end up with a nice model. However, if a person takes time to research the model to learn about how it should look in real life, how it was built and find those missing details a kit can become much more than just a nice model. This will mean either modifying or replacing many of the kit provided parts with custom built pieces and reading between the steps on the instructions. That is where this site is a goldmine. If the effort is taken to search through and read many of the build logs not only for the ship you are building but others of similar style you can learn ways to vastly improve the model. Of course this is all relative to both a persons experience and skills with modeling and there is absolutely nothing wrong with building a basic kit especially the first time out. I have stated before in other posts that I do not compare myself to others but to myself. With every model I have done since I was 7 years old I always try to make the next one a little better. As long as I am progressing in what I build I am happy as ultimately I model for my own enjoyment and that is, in my opinion, what this hobby is about.
- 49 replies
-
- 5
-
-
- sea witch
- Scientific Models
- (and 2 more)
-
Again, excellent work! The rust on your anchor chain is incredible and I love the cargo wrappings. They add another interesting detail to a ship full of interesting details.
-
Thank you for the compliment Frank and welcome to the build! Had to take a short break as my chair gave up the ghost Friday morning. Bought a new one today and took some time to clean uo the work area. Tomorrow I will start to build the gun port lids and some of the other detail pieces that go on the hull. I will post some progress pics as I get things done.
- 608 replies
-
- 5
-
-
- la couronne
- corel
- (and 1 more)
-
Tools and Supplies for My "Shipyard"
EJ_L replied to daveward's topic in Modeling tools and Workshop Equipment
I actually have and use both types of lighting and magnification. I have the magnifier and light on a swivel that is mounted to my table that I use for my primary illumination. I used the magnifier for years but I admit that it often got in my way and made working difficult. Recently I purchased the optivisor with the LED attachment and that has been a great decision. I still use the swivel light to light up my workspace but the visor allows me the freedom to work easier and provide extra lighting directly at the part I'm working on. I have found that you can never have too much light or too many options for magnifying for small parts. -
Looking real nice Frank! Good recovery on the planking wouldn't have known there was a whoops if you had not said anything. Your painting looks excellent too. Looking forward to seeing more as you progress.
-
Ok, I think I see what they are wanting now. I would glue your stem piece on before the forecastle block for alignment purposes. It looks like the point of the forecastle should be even or just back from the front edge of your stem. The flat portion is to allow room for the fish and the bowsprit to have a place to mount into. You will need to shape the block at the point to slope back into the hull as shown on the drawing. As to the side to side just split the overhang evenly and then you can sand down the sides to match the hull's contours.
- 49 replies
-
- 1
-
-
- sea witch
- Scientific Models
- (and 2 more)
-
I believe the forecastle is raised slightly so my guess is that it may be larger to fit the space as the bulwarks widen outward the higher up they go. Is the forecastle made as a solid block of wood or multiple pieces? If solid then once glued in place you probably have to sand it on an angle to match the contours of the hull. They probably gave you the oversized piece to allow for the multiple angles that the hull takes. If it is multiple pieces then you might look ahead and see if the instructions show how the other parts fit together. With wood it is always best to be oversized and have to cut/sand down then be too small to start with.
- 49 replies
-
- 3
-
-
- sea witch
- Scientific Models
- (and 2 more)
-
Thanks Don! The griffin and rider are very shiny with the gold that was put on them. It does make photos harder to take at least with my phone. I will take some better ones with my good camera probably this weekend. That is one of the big reasons why I am not satisfied with the cast pieces that were provided. Once we move into the new house and my new shipyard is up and going I am going to focus some more time into practicing my carving skills. That is one of the big pieces I would really like to replace. That shelving unit keeps me in good "spirits" while I'm working on my ships. Especially while I'm reading and doing research on them.
- 608 replies
-
- 6
-
-
- la couronne
- corel
- (and 1 more)
-
With the extreme curvatures found in these areas the wood will take a good amount of bending to get it to the correct shape. The fillers help by giving you more attachment points to help hold the planks in shape. Another reason for this depends on how you are planking. Since planks did not run the full length of the ship in one piece there are two ways to model the individual boards. The first is to make each strake one piece and cut in the ends of each plank with a knife later. The more common and accurate practice is to cut each plank to a scaled dimension and install the one at a time. The fillers at the bow and stern help with this as these are the two areas where you will get odd lengths that will need the extra support. All that being said, it is possible to plank a hull without the blocks as that is the actual way a hull would be planked. If you can get planks to bend to the right shape they should just lay down nice and neat with no excess pressure making the fillers unnecessary.
-
Looks like you are off to a good start with your planking. A little advice I will give is to consider putting filler in front of the first bulkhead if not the first two bulkheads at the bow. The extreme curves that the bow has combined with the thinness that planks get reduced to in this area makes having a solid surface to secure them too a nice thing. You also may want to consider doing the same at the stern as well. These two areas have tricky planking and the fillers definitely help to make it easier. Keep up the good work! You are doing a great job!
-
I will follow along on your journey and try to help you out when I can. I would plan on not using those decals and either making or painting your self depending on what they are a decal of. I cannot think of any model ship I have seen to use decals of any sort but as you said this is an older kit so that was probably more normal when it was made. As to the sails, I have used artificial sails on my plastic Constitution models, see link in my signature if interested, and although they were fine at the time I built those models, my skills and personal standards have grown since then and I no longer really like the look. Sails are a tricky part to model right. A lot of builders leave them off completely as bad looking sails can ruin the overall appearance of a model. Also not having the sails allows for a better showing of the ships extensive rigging. You have plenty of time to decide what you wan to do for that so I would spend the time reading through the site to see what others have done for sails. There are a few great models with them. Take your time and plan several steps ahead as you go. Make sure there are no hidden parts or pieces that need to be installed before a certain point or that are fragile and should wait a while longer before installation. There is no rush as we all understand the time it takes to build these ships. We want you to succeed in your build and to be satisfied with it when done. Best of luck and I look forward to seeing your Flying Fish come together.
- 49 replies
-
- 1
-
-
- sea witch
- Scientific Models
- (and 2 more)
-
I think to that part of the reason that the testimonies given sound so up beat is partly due to the honor of the sailors to tell a truthful account and also of the respect for good seamanship. They felt confident that early on they had if not a clear advantage then at least an equal opportunity to prevail in this fight. Disabling the Constitutions navigation was a confidence builder for them and they had that momentum to carry them forward and ready to board till they became out maneuvered and then lost their forward rigging. The tide had turned and they lost. I think that although they were surely unhappy about their loss, they still respected the enemy enough to give them the respect of an accurate report. Also, what advantage would there be to lying if they ever wanted to improve? The downfall of any military is to ignore the truth behind a loss or the abilities of a superior enemy. If self image become more important than the truth then the war has already been lost. During that time the British Navy was no fool. They would not have wanted a false report to make them look good and ignore the facts. That being said, they were not just going to tuck tail and be shamed. They fought with honor and bravery and they were going to show and tell that to the superior officers questioning them. A defeat was bad but an honorable defeat could be stomached and paid. To admit cowardice would be the end of the officers on that ship and likely any pay the sailors had coming to them. Regardless of the rules of combat, respect for an enemy and personal honor that the officers were required to live by no sailor in his right mind would say anything but how great their crew was and how they did everything exactly as it should have been. They wanted their money and a place on another ship.
-
Excellent job on the planking. Once you get her all sanded out and smooth and the finish applied she is going to be one sharp looking boat. I can see her shining already!
- 414 replies
-
- 3
-
-
- riva aquarama
- amati
- (and 2 more)
-
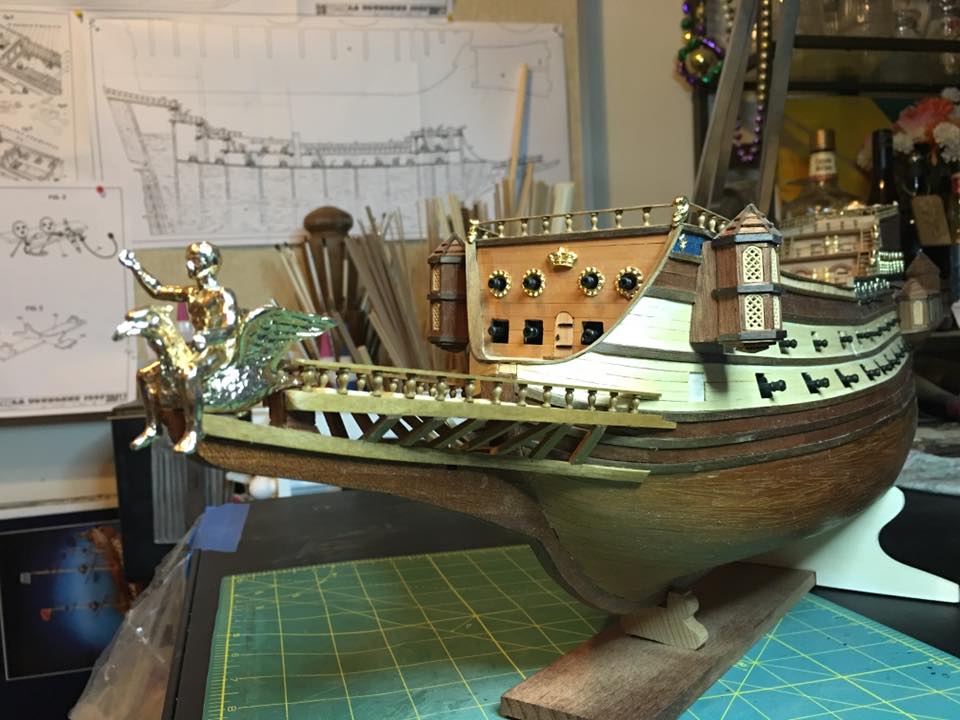
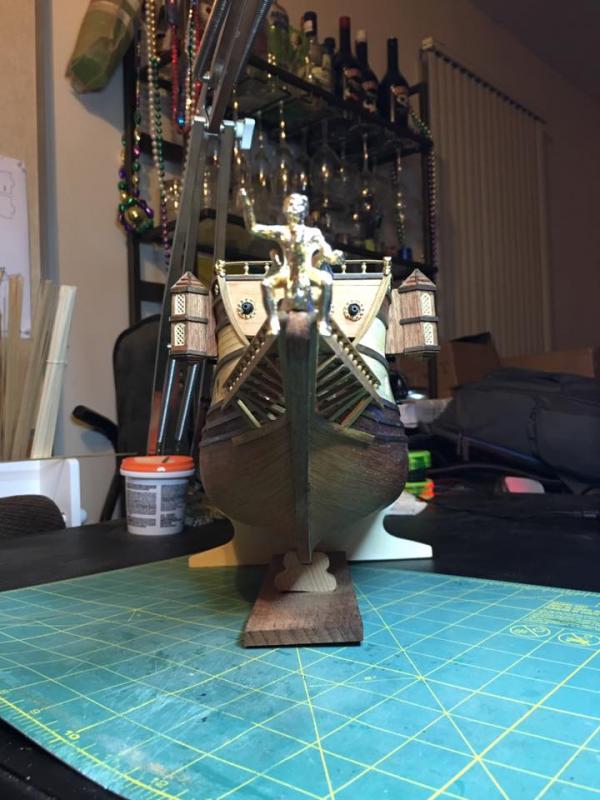
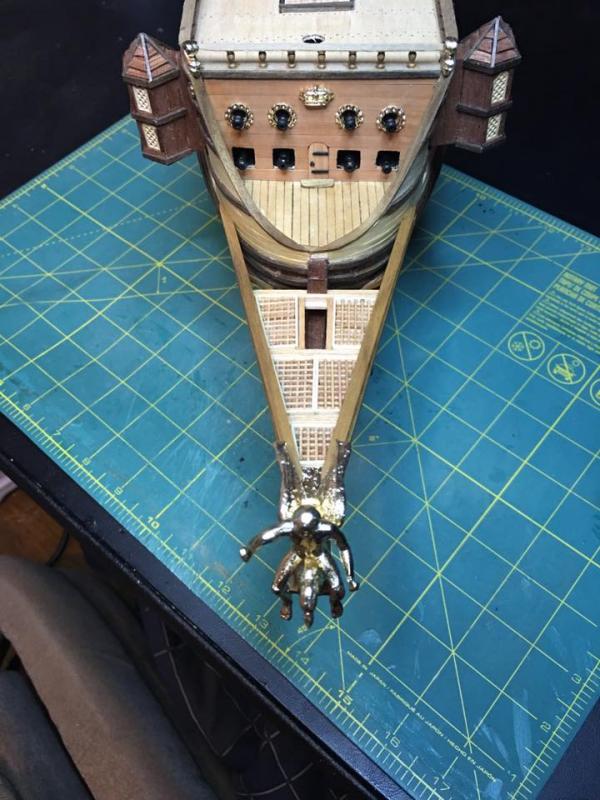
Been working on the ram this week with a lot of good progress made. A little touching up here and there and then on to the 50 gun port lids that I have to make and install. Went ahead and used the cast griffin and rider provided. This is another piece I would like to replace one day but that day is still a long way off. Till then, this one will work. Enjoy the pictures!
- 608 replies
-
- 13
-
-
- la couronne
- corel
- (and 1 more)
-
Rob welcome to MSW! I won't repeat to much of what has been said here as they have given you a lot of great advice. Also I am more of the exception rather than the rule when it comes to starting on difficult ships and finishing them. My first ship was the Constitution but it was the 1:96 plastic version by Revell. I built a few plastic ships before switching to wood. My first wood ship was the Rattlesnake by Model Shipways. I did complete the Rattlesnake and I am proud of it being that it was my first wooden ship and I did it largely without any guidance as I did not know of this place yet. However, while it does sit proudly in a case I am not happy with a lot of the way it looks. Particularly my planking job is simply horrid. So while I do not discourage building whatever ship peaks your interests, I do encourage starting with simpler ships and progressing. Even if all you build is one simple ship first, you will gain many valuable skills that you can then apply to a larger build and a smaller one may only take a few months and done vs. a few years and then you have a crappy looking model or burnout. Something else to consider is double planking. I would actually recommend this for learning. On a plank on bulkhead build, the bulkheads are spaced far apart, much more so than real frames on a ship. This makes it harder to create a smooth curve with your planking as you tend to get flat spots between bulkheads. Also the lack of attachment points makes securing each plank harder. Often this creates a very rough planking job. With a double planking, wood filler and lots of heavy sanding can be applied to smooth out that first layer and create the true shape of the hull. Once that is done, the second planking can then be applied much neater and easier than the first making a beautiful hull that would have been very difficult to achieve otherwise. Plus you get double the practice on planking which is always a benefit! Best of luck to you on whatever you decide to go with. I look forward to following along in your build log.

