
MORE HANDBOOKS ARE ON THEIR WAY! We will let you know when they get here.
×


gjdale
-
Posts
4,882 -
Joined
-
Last visited
Reputation Activity
-

 gjdale reacted to Cathead in NRG Capstan Project by Cathead - FINISHED - NRG - 1:24
This will be my take on the NRG's capstan project, sold as a set of plans to help modelers learn and practice scratchbuilding skills:
The project can be completed in Advanced or Intermediate mode, depending on the level of tools and skills the builder has. There are three build logs for this that I've found; the original by @tlevine, one underway by @gjdale and one completed by @usedtosail. If I've missed any, please let me know! My build will differ from those above in three ways.
First, I'll be following the Intermediate instructions whereas the other two are Advanced, so hopefully this will be helpful for others interested in that track. I have a Byrnes table saw but not the higher-end mills and other power equipment needed for Advanced.
Second, the assumed scale for the project is 1:16 and the builds above are all in that scale, though the instructions encourage builders to consider other scales as learning to read plans and convert measurements is part of the project's goal. So I'll be converting mine into 1:24 because I want to display it with two 1:24 Model Shipways naval cannon dioramas I've built previously:
Third, I'll be milling my own wood from material I've logged, milled, and cured on my homestead here in rural Missouri. I'll be using maple, cherry, and walnut, producing a similar color profile to my recently completed NRG half-hull planking project:
Hopefully these differences will make this build unique and useful to others considering this really cool project. Thanks to the NRG, and especially Toni Levine, for putting this together.
-
gjdale reacted to Blue Ensign in HMS Sphinx 1775 by Blue Ensign - FINISHED - Vanguard Models - 1:64 scale
Post Fifty-six
Upper deck fittings continued
Colouring the Coamings.
There is a lot of Red ochre on the model so I decided to paint the coamings black. I felt this would give a nicer contrast to the Pearwood gratings which I will lightly varnish using w-o-p.
The coamings were shaped on the underside to match the deck camber, and plank thick strips added to give the correct height above the deck planking.
These pieces took a lot cleaning up and removal of laser burn, before painting. Below the grating rebate the coamings were simply varnished.
Admiralty Brand Ironwork Black was used to colour.
1952
With a grating section removed there are glimpses of the Lower deck thro’ the Main Hatch.
1941
The trickiest part of modifying the main hatch/ladderway combo, is working a round-up to the head ledge between the hatch and ladderway.
Through this section pass the forward stanchions of the pump handles. (412) which continue through the Upper deck to seat on the lower deck.
The holes need easing to allow passage of the stanchions without stress, and a ‘round-up’ is cut to fit around the stanchions.
The Fore Hatch grating has been cut into two sections, and looks much better to my eye.
1939
0063
I now have the option to leave the forward section off giving a view down through the Lower deck to the Hold, and the ladderway to the forward platform.
The aft ladderway with Capstan step.
1938
1951
Looking thro’ the aft ladderway coaming down to the Lower deck ladderway to the Orlop.
1968
With these modifications the impression is thus given of a model with all decks represented.
1958
1956
The next stage is to glue the centre line fittings to the false deck, but a couple of the gratings are not as good as I would like so I will defer until I receive the replacements from Chris. It is easier to fine tune the gratings with the hatches off the model.
1959(3)
Overall it’s going to plan, so I’m happy with progress to date.
Happy New Year to you all.
B.E.
26/12/21
-
gjdale reacted to chris watton in Chris Watton and Vanguard Models news and updates
I am still unsure about the pear wood dowels. You see, I have to buy a lot of it in order for them to produce it for me, we're talking thousands of Pounds. I cannot simply order a couple of hundred, so I have to try and weigh up the pros and cons. I would love to offer this, as I feel it would be in keeping with the rest of the kits. But would customers pay the increase in kit cost - or do I offer it as an upgrade. If the latter, I still have to order a large amount, and hope that enough want it.
Having said that, I probably will go for it at some point soon, and I will ask about square dowel. I still have to be very careful about what I invest in.
I have attached some pics showing the final iteration of the new resin boat shells. These show the 16 foot cutter hull (but the 14 and 18 will be the same, just smaller and larger. I have left on the 'stumps' of the supports for when 3-d printing, so you can see what area needs slight sanding. Only the stern board requires cleaning up, as already mentioned, as these boat hulls are not cast. Downside is production time, 5 hours to produce (for the 14 foot, rising to 6.5 hours for the 18) and 30-40 minutes in post processing, but can do multiples at a time, so no big issue for me. Also in the pics is the smaller (slimmer, in beige resin - others are in white) 16 foot boat, which will be offered as an extra for the fishing boats kits.
I should get my shipment of Nisha and Erycina sail sets in the next week. In that shipment, I have a re-supply of pear blocks (mostly single sheave, 2, 3, 4, 5 & 6mm sizes) and three new sizes of the detailed lantern kits in 17, 19 and 22mm sizes, so I will have 5 sizes to offer. I invest in these as they will be used in all future kits.
Cheers!
-
gjdale reacted to Maury S in Emma C Berry by Maury S - 1:48 scale - POF - rigged as schooner
Some time on the lathe and mill. I'm a novice with these tools, but getting better. Starting with the simplest pieces, I center drilled a 1/2" block (1/8" then 1/4") for the two mast coats at the deck level)(that would have been canvas. Turned the block down to about 3/8" and tapered them. (upper two pieces)
The remaining pieces are parts of the windlass. The pawl wheel (or gear) was turned to the outside diameter and the block, still in the 4-jaw chuck was moved to the rotating table (set upright) on the mill. I used a 1/8" end mill, rotating 30 degrees every cut to make the cogs. After that was parted off, I sliced several spacers of various thicknesses that will separate the pawl wheel from the gears (not shown) and the bitts. The cylindrical pieces will form the drums. Whelps not made yet.
Maury
-
 gjdale got a reaction from Glen McGuire in NRG Capstan Project by gjdale (Grant) - FINISHED - Scale 1:16
Thanks Glen,
Apart from three requisitioned by the Admiral, all of the other reindeer were given away to family and friends, where they all received warm welcomes into their new homes.
-
 gjdale got a reaction from bruce d in Medway Longboat 1742 1:24 scale by fnkershner
Floyd,
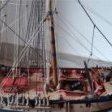
If you take a look at post #87 in my log you will see a photo of the top of the mast and it shows quite clearly where the line has been served, and then seized to form the loop. I’ve copied that photo for you below, but please feel free to delete if it is cluttering up your log.
-
 gjdale got a reaction from Nirvana in HMS Sphinx 1775 by mtaylor - FINISHED - Vanguard Models - 1:64
Well done on your victory over the PE Mark, she’s looking great!
-
gjdale reacted to hof00 in Bismarck by hof00 - FINISHED - Amati - 1/200 - Partworks
Hi All,
Bit of an update....
Working on more Aft Superstructure cladding, lots of doors, scuttles and wind shield thingies.
I feel that I can shortly start to assemble this PE and fix it to the Aft Superstructure, finally!! 🙂
There is one more "largish" piece of PE for the uppermost Superstructure tier. (t's one piece formed around the uppermost tier itself.)
This will have to go on fairly early in the piece to prevent fouling the second tier rails, etc.
Also been working on Barbette "Caesar" cladding. This was not too much of an issue but, the cladding needed to be shortened by approx. 1.5mm....
Central Aft Hanger PE assembled and installed, Hagar affixed to uppermost Superstructure tier.
(Note: Superstructure tiers are not glued to each other as yet, this comes some way down the track.)
Before I complete the Superstructure PE, I need to form the AA sighting towers, ladders, doors and railings.
I also have to clad a rear gunnery control thingy.
Hope you are all having a great Christmas!! 🙂
Cheers....HOF.
Photos:
-
 gjdale got a reaction from Ryland Craze in Medway Longboat 1742 1:24 scale by fnkershner
Floyd,
If you take a look at post #87 in my log you will see a photo of the top of the mast and it shows quite clearly where the line has been served, and then seized to form the loop. I’ve copied that photo for you below, but please feel free to delete if it is cluttering up your log.
-
 gjdale got a reaction from Old Collingwood in HMS Sphinx 1775 by mtaylor - FINISHED - Vanguard Models - 1:64
Well done on your victory over the PE Mark, she’s looking great!
-
gjdale reacted to mtaylor in HMS Sphinx 1775 by mtaylor - FINISHED - Vanguard Models - 1:64
I hope everyone is having a great Christmas. Quiet here with a layer of ice and snow.
After fighting with PE.... and winning, I'm at this point. Horseshoes, fishplates, and rudder gudgeons all mounted.
-
gjdale reacted to chris watton in Chris Watton and Vanguard Models news and updates
Happy Christmas!
Over the past few weeks, I have, amongst many other things, been working on trying to make small boat hull shells. I know that some have trouble making these with the small planks, and I thought they may make a nice alternative to the wood hull versions. Only the small boats, though.
What I have done is produce hulls for a 14, 16 and 18 foot cutter (66, 75 & 84mm long), with 2 versions for the 16 foot, a standard and a slightly slimmer version for small decks (27.5 and 23.5mm widths).
These are 3-d printed in SLA resin, so no mould separation lines and every hull is printed from the same master file, so they are always the exact same. I have tooled them so the supports are all on the flat stern board, and any slight support stumps are easily sanded off by simply rubbing the stern on a flat piece of sand paper.
For now, only the slim 16 foot boat (not shown) has laser cut pear seats and oars, with the others being just the hull - but I figured it is the hull most would have problems with planking, the rest is easy. The planks are clinker and scale thickness, too.
These will be available very soon, with the 14 and 16 foot versions being perfect for the fishing boats, and the 18 footer being for almost everything else.
ETA - the three hulls shown are not the final versions.
-
 gjdale got a reaction from Rustyj in Medway Longboat 1742 1:24 scale by fnkershner
Floyd,
If you take a look at post #87 in my log you will see a photo of the top of the mast and it shows quite clearly where the line has been served, and then seized to form the loop. I’ve copied that photo for you below, but please feel free to delete if it is cluttering up your log.
-

 gjdale got a reaction from Dave_E in Scale sizes for building
Dave,
A little research on your subject ship should tell you the actual sizes of the various blocks and ropes used. The Anatomy of a Ship series is often a good start. There are various other sources that can provide guidance on typical rigging sizes used for your size of ship for its particular time period. Once you have that information, just create a spreadsheet to convert the actual size to your chosen scale in the measurement units of your choice.
-
 gjdale got a reaction from Canute in Scale sizes for building
Dave,
A little research on your subject ship should tell you the actual sizes of the various blocks and ropes used. The Anatomy of a Ship series is often a good start. There are various other sources that can provide guidance on typical rigging sizes used for your size of ship for its particular time period. Once you have that information, just create a spreadsheet to convert the actual size to your chosen scale in the measurement units of your choice.
-
 gjdale got a reaction from FrankWouts in HMS Winchelsea - FINISHED - 1764 - by Chuck (1/4" scale)
I think you’ll find a HUGE interest in a POF kit Chuck. An offering of the quality you have produced with everything you have done so far will be head and shoulders above anything else available on the market today. Add to that your approach to building and documenting as you go (as in Winnie), and I think you will have a real winner on your hands.
-
 gjdale got a reaction from Radek in Medway Longboat 1742 1:24 scale by fnkershner
Floyd,
If you take a look at post #87 in my log you will see a photo of the top of the mast and it shows quite clearly where the line has been served, and then seized to form the loop. I’ve copied that photo for you below, but please feel free to delete if it is cluttering up your log.
-
 gjdale got a reaction from tlevine in NRG Capstan Project by gjdale (Grant) - FINISHED - Scale 1:16
Thanks for the kind comments Ben and Rusty, and for all of the likes. Life seems to have gotten in the way lately, so progress has been slow.
The Whelps (P/N 029)
Five Whelps are required and the particular challenge in making these is that they are tapered both top to bottom and rear to front. The first step was to cut some blanks and then glue them up into a sandwich with the basic profile outline on one face.
Toni’s advice in the instructions was to make a couple of spares, so initially I glued up a set of seven blanks. Unfortunately, when it came to milling the sandwich, I found that it was too wide for the mill travel, so I had to unglue them and re-glue with just five in the sandwich.
The basic profile was then cut on the mill by angling the milling head as shown by Toni in the instructions. Here is my set-up halfway through the milling process:
And here is the end result. Note that the blanks were left slightly long to allow for any chip-out during milling.
The blank was then taken to the Byrnes saw and trimmed to length prior to soaking in an IPA bath to separate the individual pieces.
Once separated, holes were drilled for the bolts and the individual pieces carefully marked out for the tapers. The top to bottom taper was tackled first, and is relatively simple to achieve using the Byrnes disc sander to freehand sand to the marked lines. The rear to front taper was a little trickier. After carefully marking out, the angle was measured using a protractor and the tilting table of the Byrnes sander set to this angle. With a little care, the correct taper was achieved. Here are the pieces after all tapers had been cut/sanded.
The next challenge was to cut the notches for the Chocks. Like many things in woodworking (or metal working for that matter), the hardest part of the process is working out how to hold the work securely for the operation at hand. Having carefully marked out each piece for the notches, I found that my home-made Moxxon style vise was able to cope with the tapers quite well to hold the work.
I then used a miniature square and a marking knife to score the vertical cut line. This then provided a handy registration for the razor saw to make the vertical cut.
A freshly sharpened full sized chisel was then used to pare the angled cuts.
Having worked out how to hold the pieces, the actual cutting of the notches went quite quickly. Here are the completed Whelps.
The Chocks will be next but will probably have to wait a day or two until after the fat man in the red suit has been.
-
gjdale reacted to Dr PR in Scale sizes for building
Dave,
The size of the masts was based upon the beam (width of the hull at it's widest point). In some cases a more complex formula was used based upon the length of the hull, the width of the beam and depth of the keel. But in most cases the beam will be good enough.
The sizes of almost everything in the rigging was based upon the diameter of the masts. The resulting circumference of the ropes was calculated from the mast diameter. And the sizes of the blocks was determined by the size of the ropes. Do not forget that rope sizes were specified in circumference!
James Lees "Masting and Rigging of English Ships of War" (Naval Institute Press, Annapolis, Marylend, 1984) is the most common reference for mast, spar and rigging dimensions. However, it contains nothing for smaller vessels and fore-and-aft craft. Apparently someone posted a spreadsheet based upon Lees' formulas somewhere else on the forum but it is said to have errors. Lees was repeating the formulas used by the period shipwrights.
I posted a spreadsheet with Lees' and Wolfram zu Mondfeld's ("Historic Ship Models," Sterling Publishing Co, Inc, New York,1989) formulas here:
https://modelshipworld.com/topic/25679-topsail-schooner-sail-plans-and-rigging/?do=findComment&comment=801356
It is in Excel format and PDF format. It also includes several sets of formulas for schooners from period sources. Both the text formulas and spreadsheet calculations are included.
Note that the left side of the spreadsheet lists all the formulas used to calculate dimensions, and in the spreadsheet version you can enter some information (in the green cells) about the hull size and the spreadsheet will automatically calculate almost all of the rigging dimensions. In the middle part you can enter the scale of your model and most of the scale dimensions are calculated.The right hand side is specifically for schooners. Schooner masts were only about 4/5 the diameter of full square rigged ships, so the resulting rope diameters are a bit smaller. But you have to enter your model's mast diameter in the green cells, so it can be used for any ship. However, it includes only the rigging found on topsail schooners, and is a bit abbreviated for full square rigged ships.
Also, both circumference and diameters are calculated, since some model rope suppliers (and normal thread sizes) list diameters.
WARNING: The calculations include many Imperial units conversions. Trying to change the spreadsheet equations for metric units will cause some strange errors. It is better to just convert the results of the calculations to metric.
For schooners I recommend Karl Heinz Marquardt's "The Global Schooner" (Naval Institute Press, Annapolis, Maryland, 2003. He is as thorough as Lees in descriptions of how the masts, spars, rigging and sails were made for schooners.
-
 gjdale got a reaction from mtaylor in Scale sizes for building
Dave,
A little research on your subject ship should tell you the actual sizes of the various blocks and ropes used. The Anatomy of a Ship series is often a good start. There are various other sources that can provide guidance on typical rigging sizes used for your size of ship for its particular time period. Once you have that information, just create a spreadsheet to convert the actual size to your chosen scale in the measurement units of your choice.
-
gjdale got a reaction from mtaylor in NRG Capstan Project by gjdale (Grant) - FINISHED - Scale 1:16
Thanks Glen,
Apart from three requisitioned by the Admiral, all of the other reindeer were given away to family and friends, where they all received warm welcomes into their new homes.
-
gjdale reacted to Glen McGuire in NRG Capstan Project by gjdale (Grant) - FINISHED - Scale 1:16
Beautiful work, Grant. Curious as to what you did with all those cool reindeer you made earlier?
-
gjdale reacted to giampieroricci in HMS PEGASUS by giampieroricci - Scale 1:36 - Swan-Class Sloop from plans by David Antscherl & Greg Herbert
Pete, your words fill me with pride, but I must give you a disappointment: perfection, if there is one, is only a dream to be achieved, perhaps in another life! All I can say is that I'm doing my best to build a model that lives up to David and Greg's work ... 🙂
a few more steps forward:
-
gjdale reacted to Trussben in HMS Winchelsea 1764 by Trussben - FINISHED - 1:48
Comings, hatchways, mast partners and capstan step almost completed.
-
gjdale reacted to Chuck in HMS Winchelsea - FINISHED - 1764 - by Chuck (1/4" scale)
Merry Christmas to all of you…and yes it is full steam ahead on Speedwell in 1:48
Drafting in progress…an hour or two each night while my wife watches her shows. This is in no way finished but enough to show you what I am shooting for.