DONATION DRIVE - SUPPORT MSW - DO YOUR PART TO KEEP THIS GREAT FORUM GOING!
×


Ian_Grant
-
Posts
2,142 -
Joined
-
Last visited
Content Type
Profiles
Forums
Gallery
Events
Everything posted by Ian_Grant
-
 Bill, you're really getting into electronic logic ....."diode OR'ing".....nice!
 -
This is a pretty large kit. Billings seem to take pride in their short-on-detail instructions. Looking good so far, look forward to more!
-
John, might be worth a quick message to @Kusawa2000 to ask our man-on-the-spot in Parks Canada's Whitehorse office building! 😏 She's looking very good! Cheers, Ian
-
Thanks Javelin: Interesting info on real ships. I always assumed a prop would push the same amount of water spinning in either direction. I had a couple of frights on the water because her turning radius is quite large too. I could at first try 75% "reverse power" with 1080's if I decide to buy them.
-
Yes, however much of the shot is in the inaccessible cavities at bow and stern. Unfortunately. I thought I'd left enough margin but apparently not.
-
@NavyShooter some weeks ago recommended the 1080 ESC for its programmability, specifically to avoid audible "whine". I have now had the ship on the water, at the club demo at the "Stewart Park Festival", with no discernible whine from the 1060 ESC's. So that's great,........ BUT!!! ........ I have now discovered that the 1060 provides less power in reverse than in forward, for RC car applications. This is a fixed spec, not programmable. Not sure how much but read on an old comment string that it's limited to 50% of max. In Lion, this is so low that it takes a lo-o-o-o-ng time to stop if one reverses when already going forward which gave me a couple of scares during the club demo when several ships were wheeling around the pond. Waiting around for "reverse" to eventually take full effect, it hardly moves backwards. You can hear that the motors are slower/quieter in reverse. I don't recall this effect with the old rheostatic controllers in the 70's. Looking again at the 1080 ESC, two of the programming variables are "forward power" and "reverse power" (25%-50%-75%-100%). DANG!!! I think I want that extra reverse power......which means buying two 1080 units (about $150 CDN), relegating the two 1060 units (about $100 CDN) to the "unwanted" pile which already includes a 6V Gel battery and its associated charger. If I pull the trigger on 1080's I'll need to sell this stuff on somehow.......the long-suffering Admiral will be displeased. 🤔 For all that, the ship was on the water for the first time in 49 years and looked good even though incomplete!! So there's that. Funnily enough, although the club has several warships mine is the only one painted overall in drab grey......also the only ship from the WWI era. One last comment - she's a little lower in the water than I'd like - a bit too much fixed ballast under the fore and aft decks - I assumed upper works weight would be negligible but it isn't - I can now see myself drilling through the bulkheads (!!) (a bit tricky in the stern) to let some of the lead shot spill out - especially as she was running without the extra weight of the timing gears and servos to rotate the turrets. Sigh. Thanks for following and for commenting! Ian
-
As always with Amazon, there are various vendors at various price points with the inevitable "straight to you on a slow boat from China" at the bottom. Of price and quality. I see six for $16 plus $6 shipping.
-
I was thinking the same thing....
-
Look at the reflection in the copper plating! Your fairing must be perfect..........very nice!
-
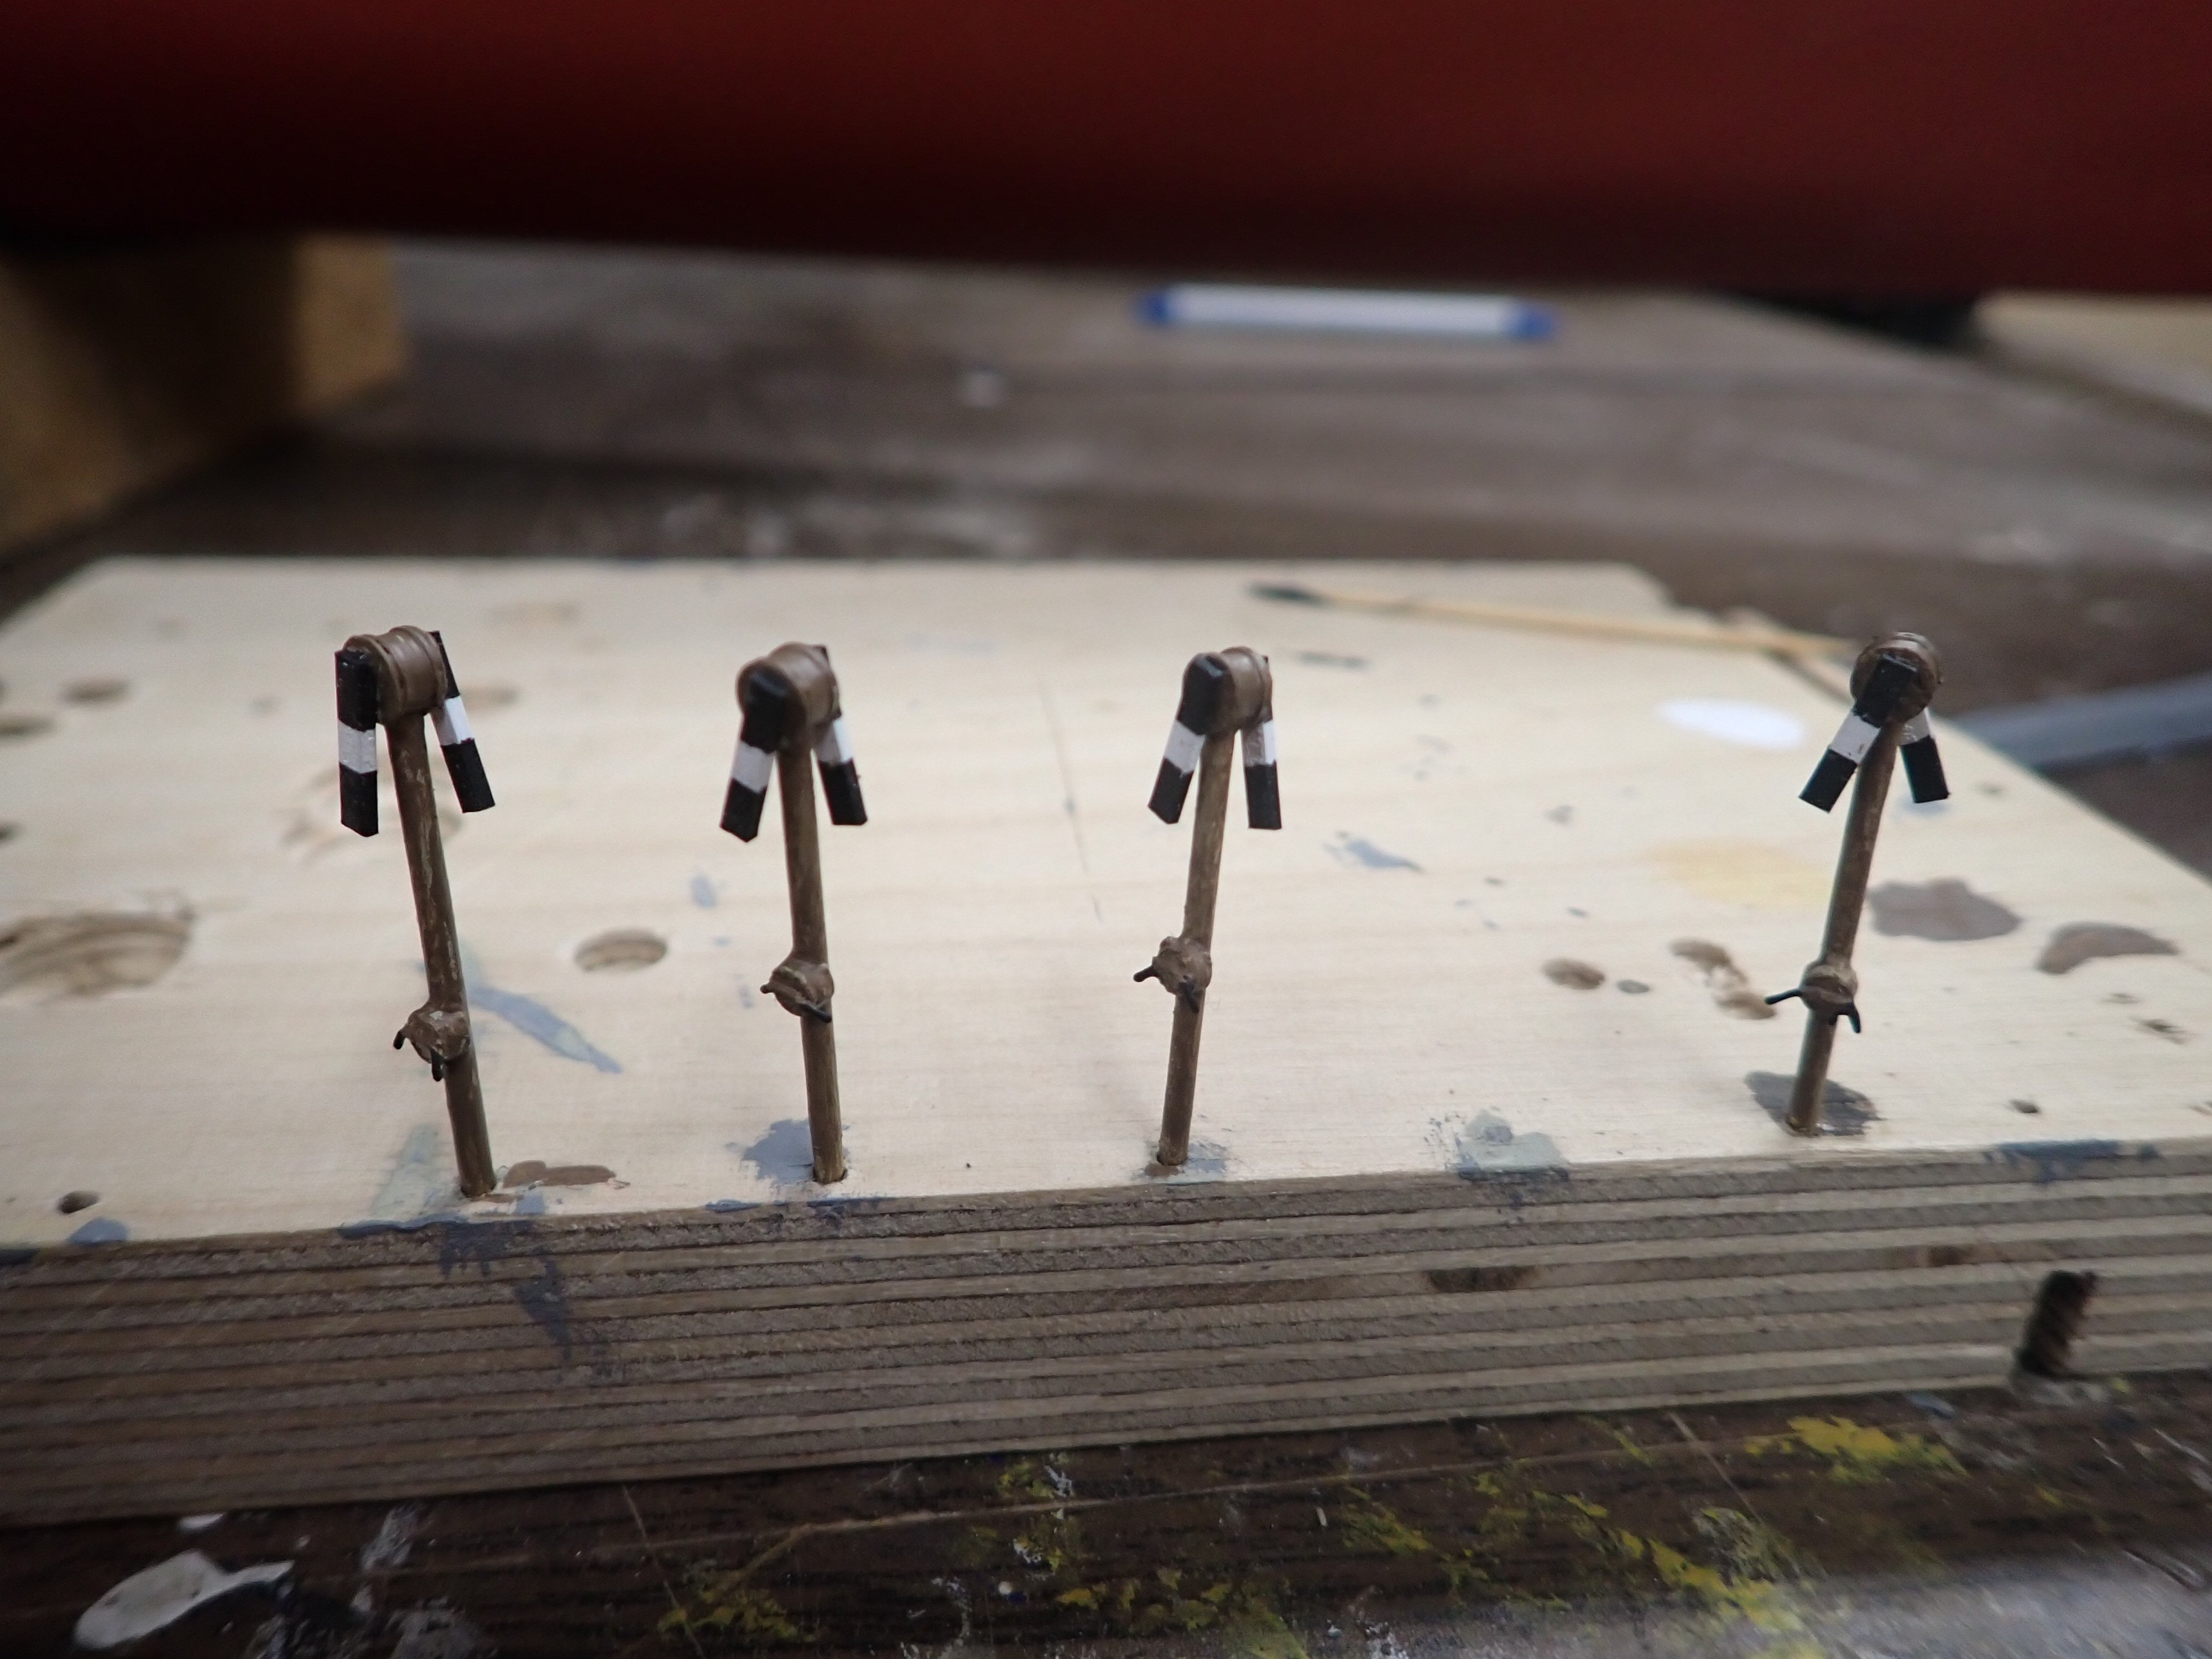
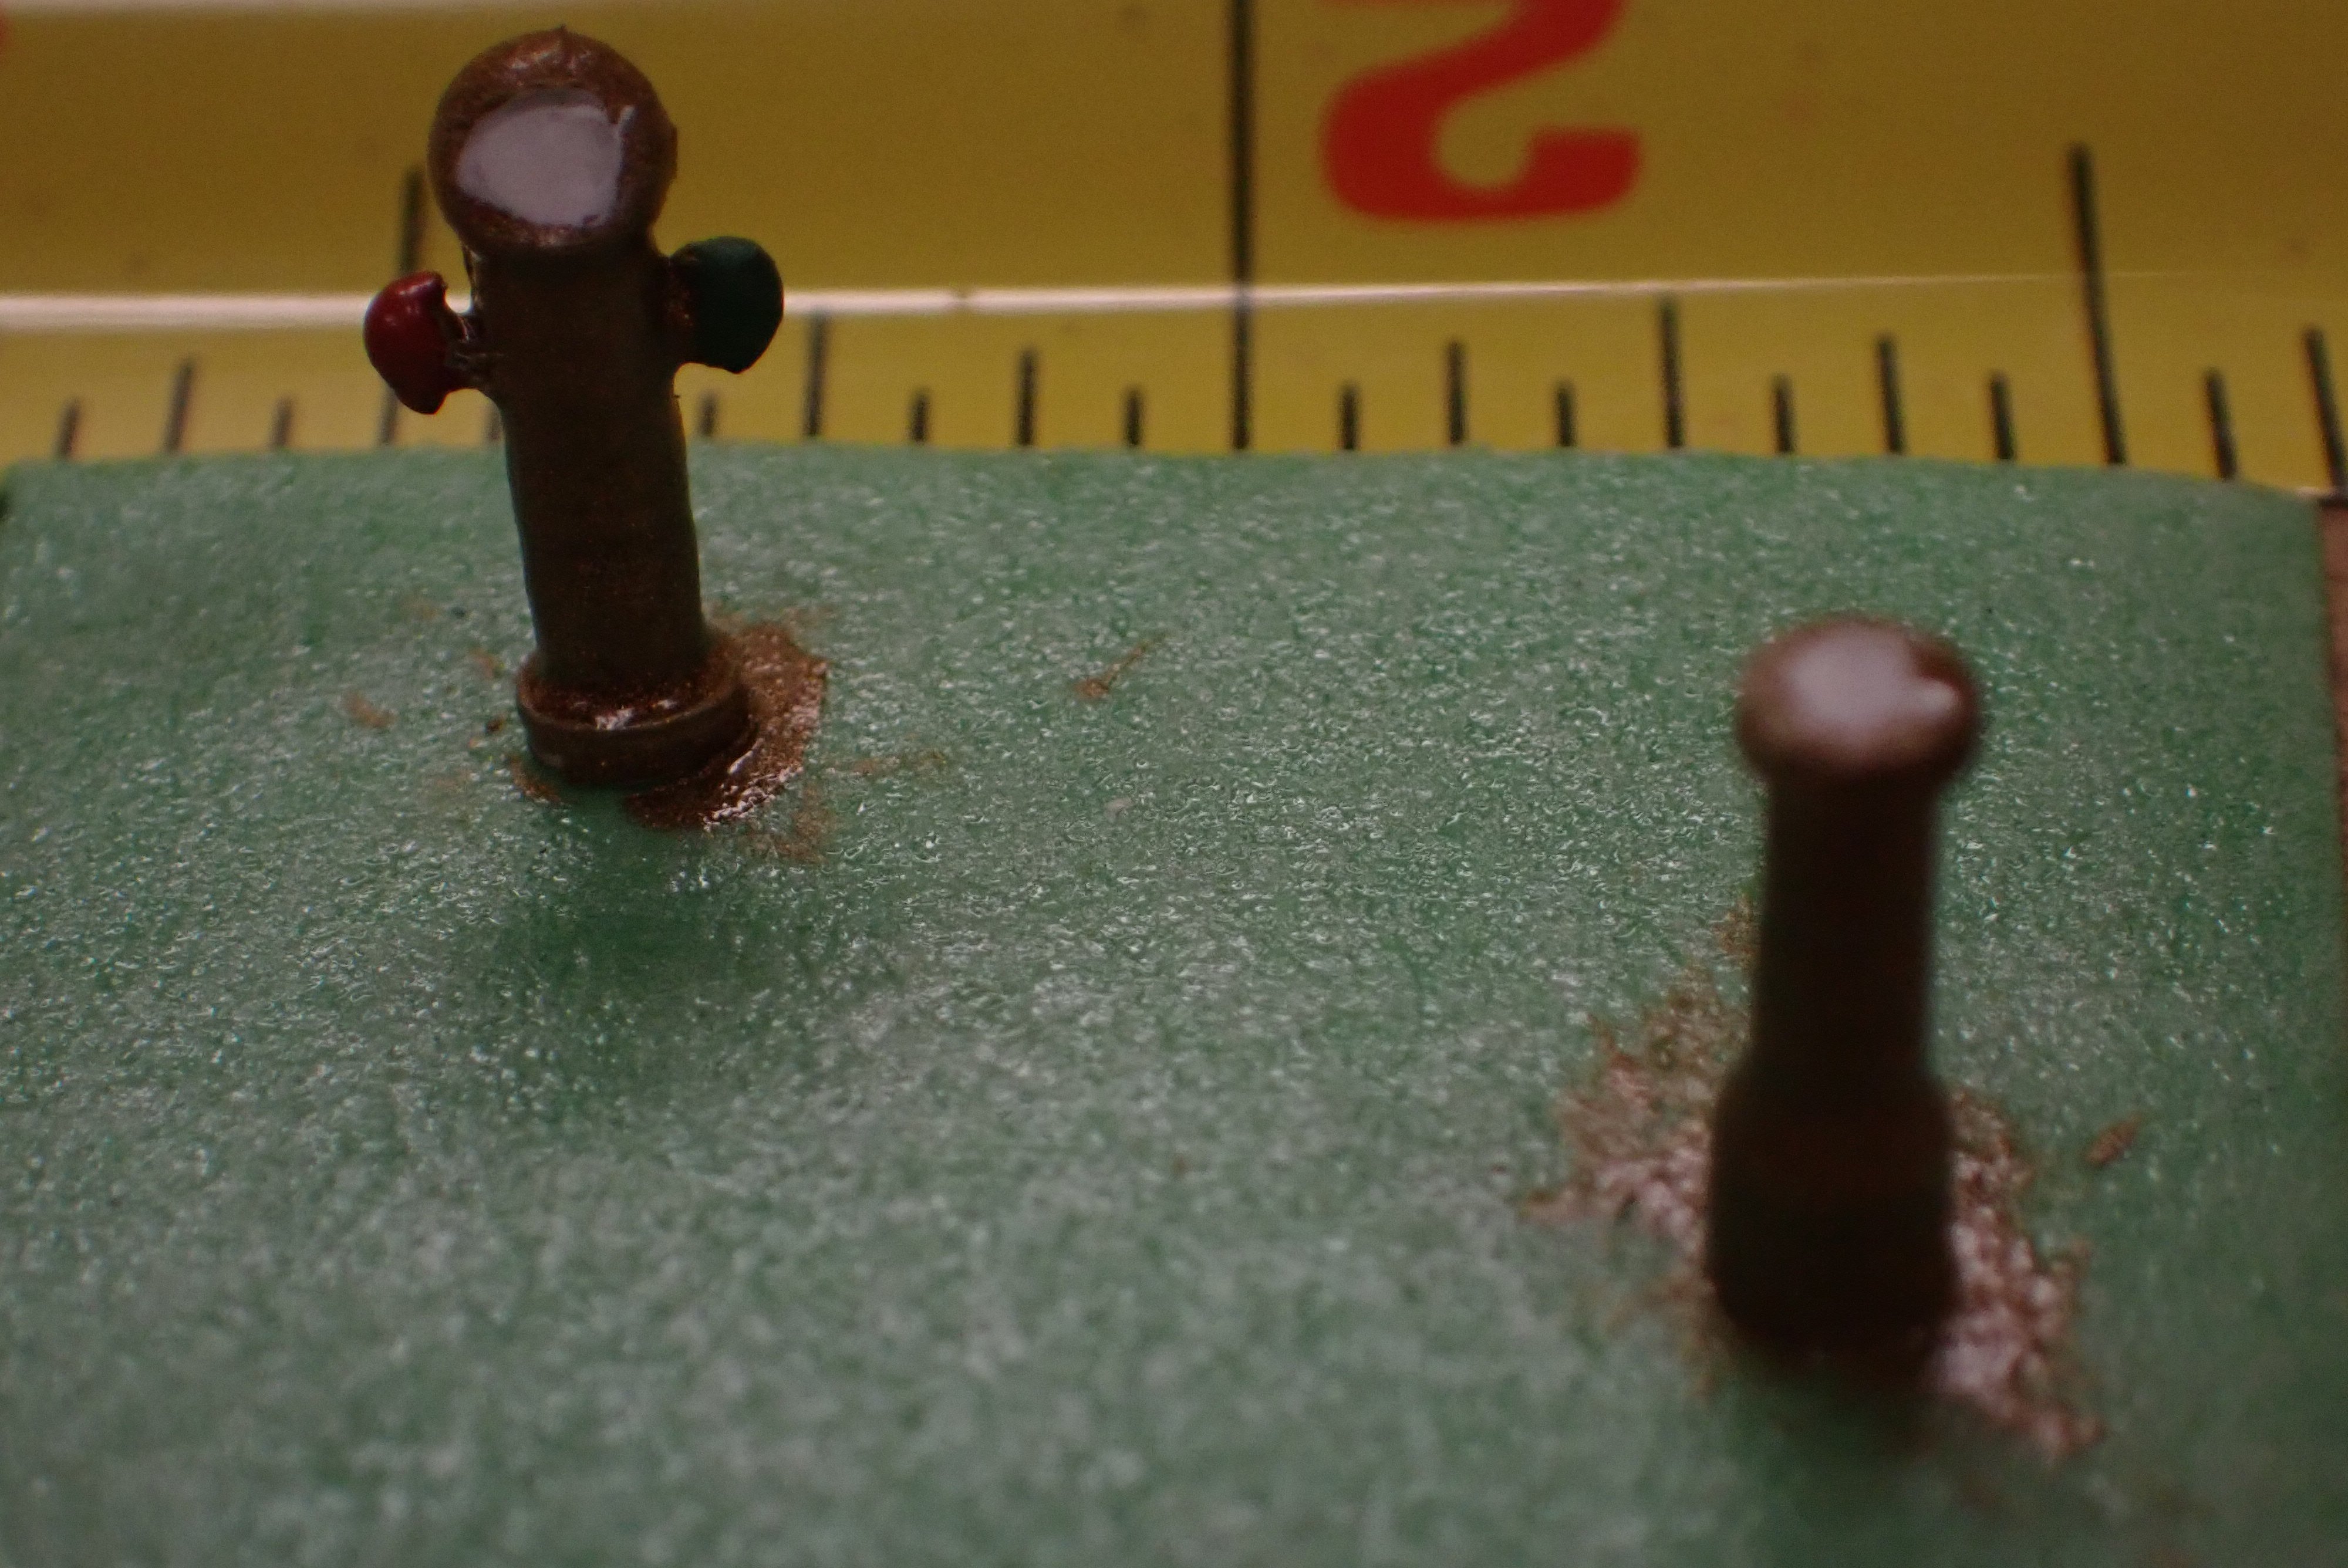
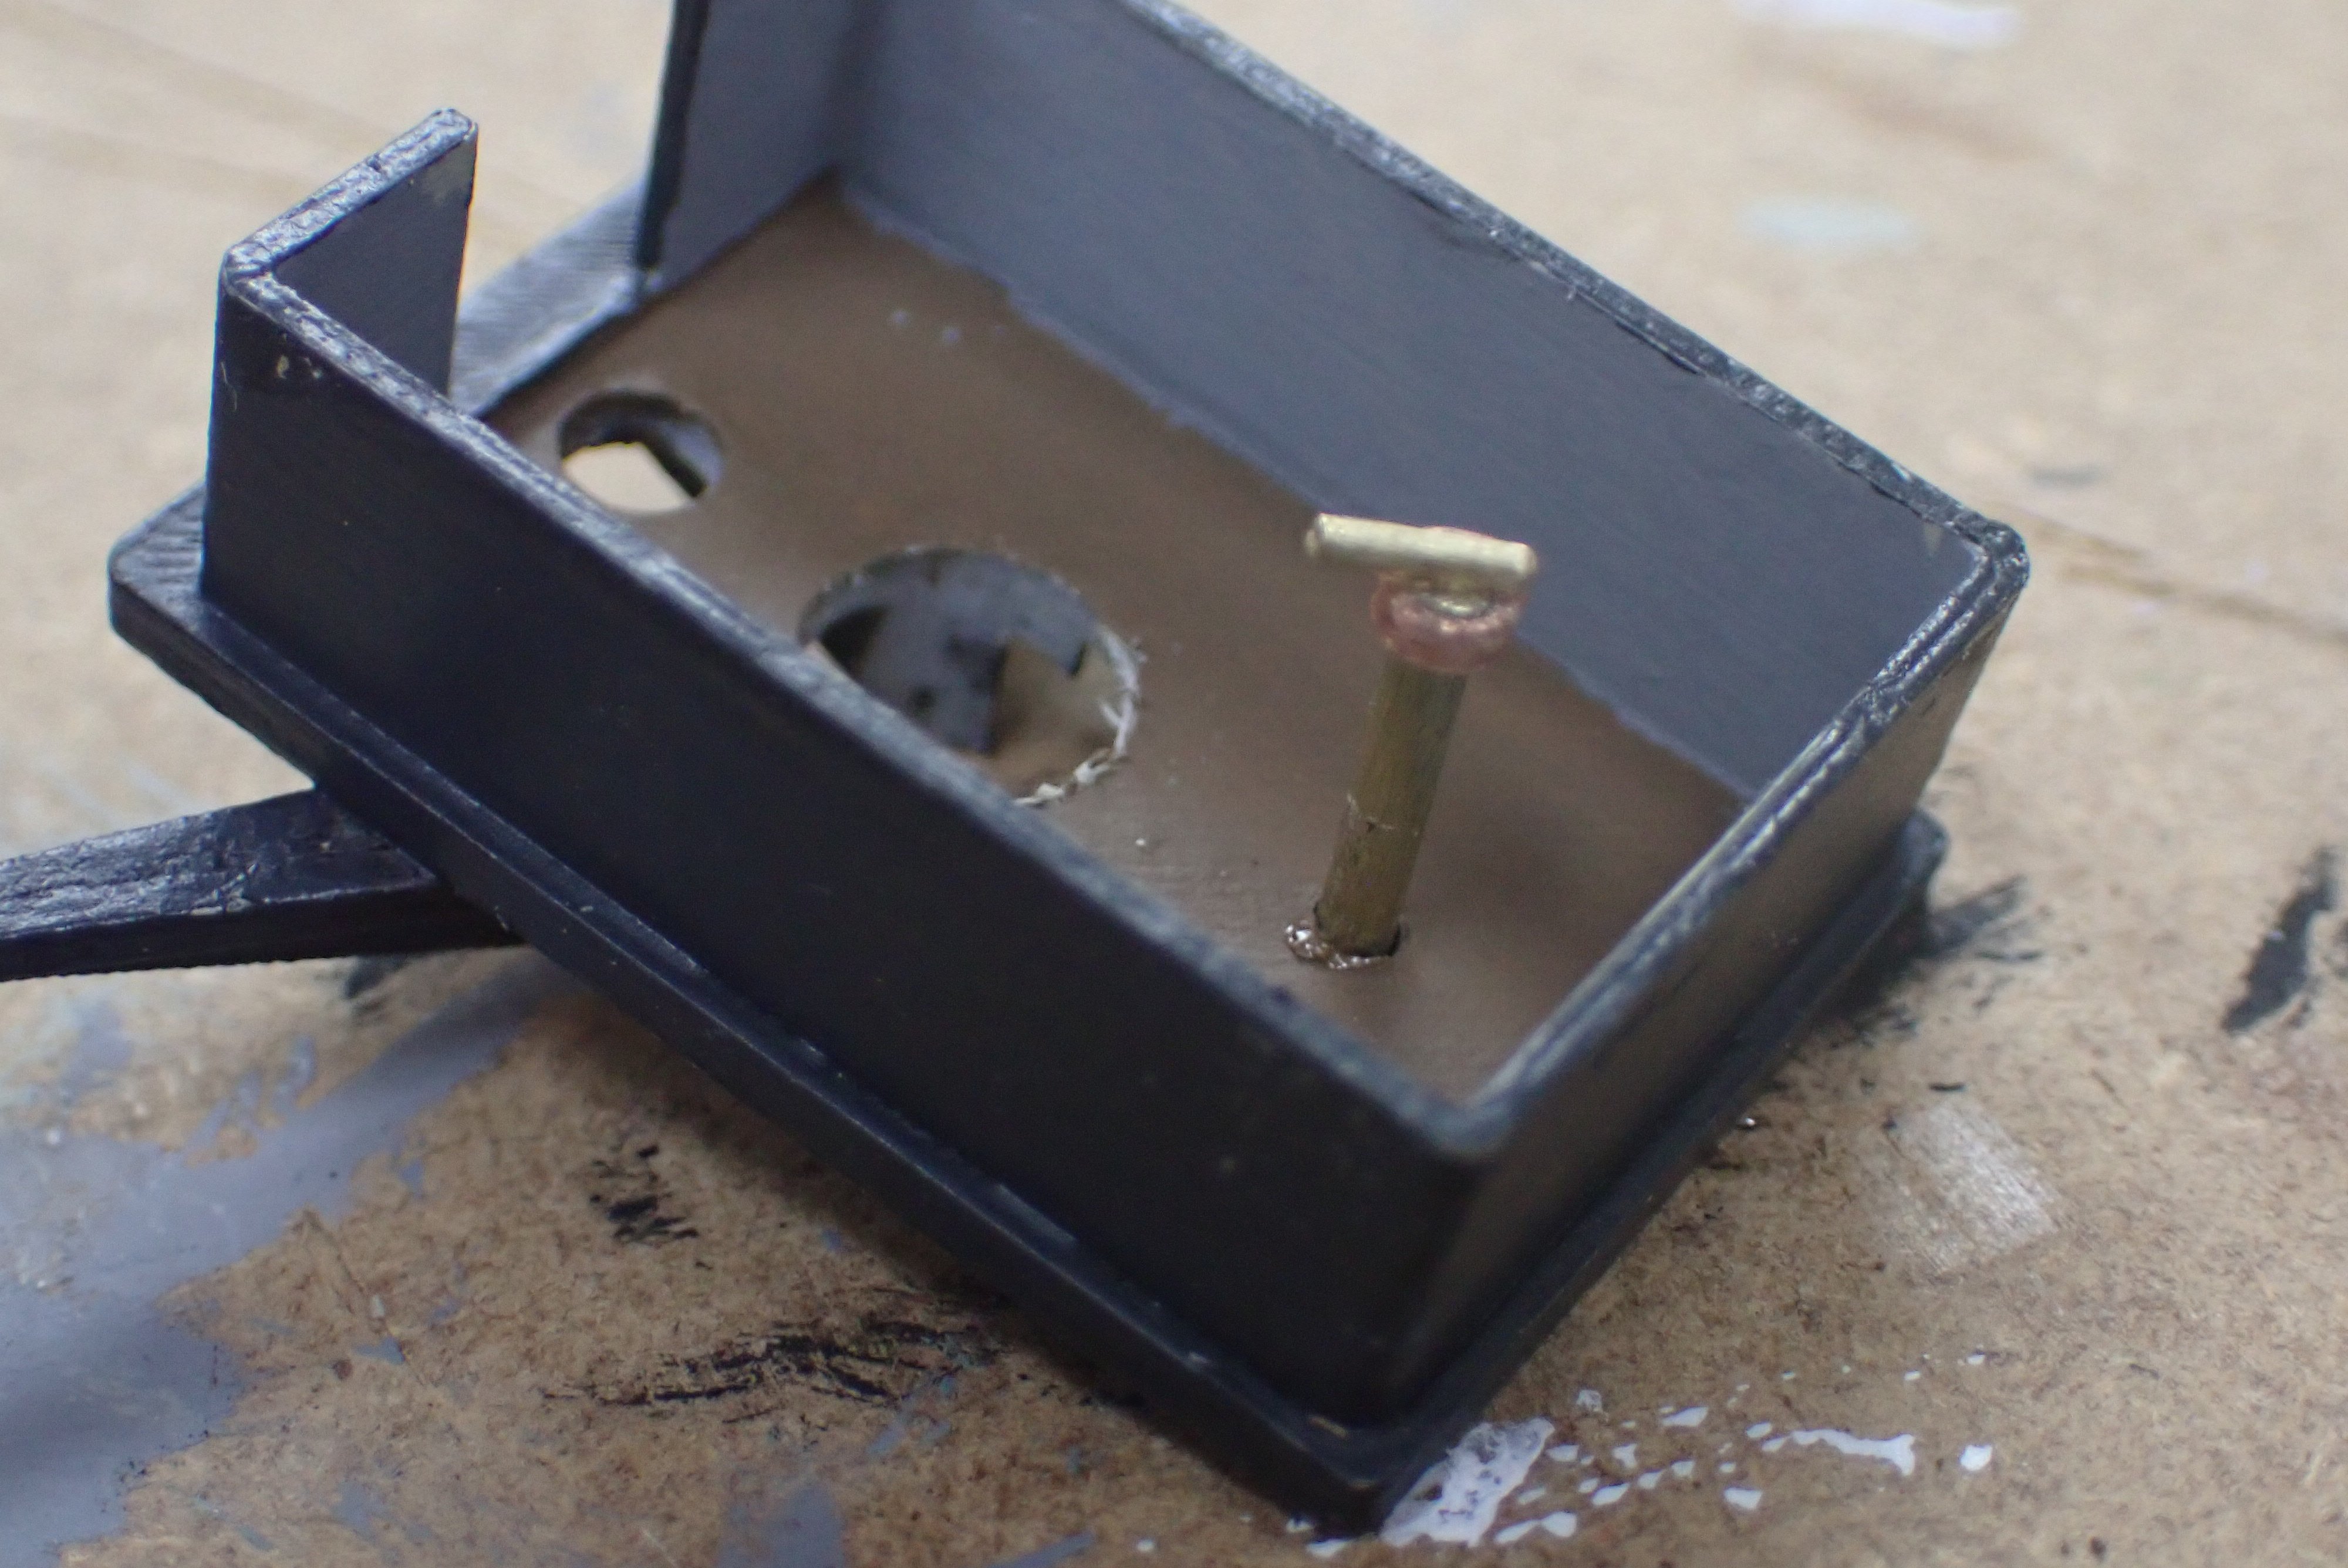
Torpedo net booms stuck into the starboard side. Each boom has a brass etch eye at the outboard end through which I will be threading some "rope". I discovered I don't have much natural colour thread left around so I'll be looking in the sewing shop tomorrow. Once the eyes are threaded I can glue the booms in. Also, I made the four mechanical semaphores. They turned out pretty good. A 1/16" brass rod with two 3d-printed parts, painted to look like wood; then two "EverGreen" plastic "arms" and some very small wire for handles for the signalman. I didn't actually rig them. 😏 I was amazed that the little part behind the "handles" printed faultlessly using a 0.2mm nozzle. Here it is in CAD; the disks are 0.109" DIA, 1/16" thick; with a 0.07" DIA semi-circular cutout for the brass rod to pass through. They printed flawlessly with no support required and stuck to the (textured) plate. Amazing machine..... The grid squares are 1/8".


-
I have re-installed the same pair of counter-rotating plastic propellers from the 70's.
-
Footnote: I looked up the motor manufacturer data. Using 385 motors instead of 540 would give me about half the torque, at half the current draw. Since the 540 drew zero additional current with the prop in water as opposed to air it must have abundant torque for the task. Sigh. Could have had half the draw and twice the cruise duration. I am going to try two identical propellers and if there are no adverse effects (I wouldn't expect any) then change the internals to drive both with one of my motors, thus doubling the duration. Maybe I could sell one motor and one ESC on to someone in the club? And my never-to-be-used 6V battery. 😞
-
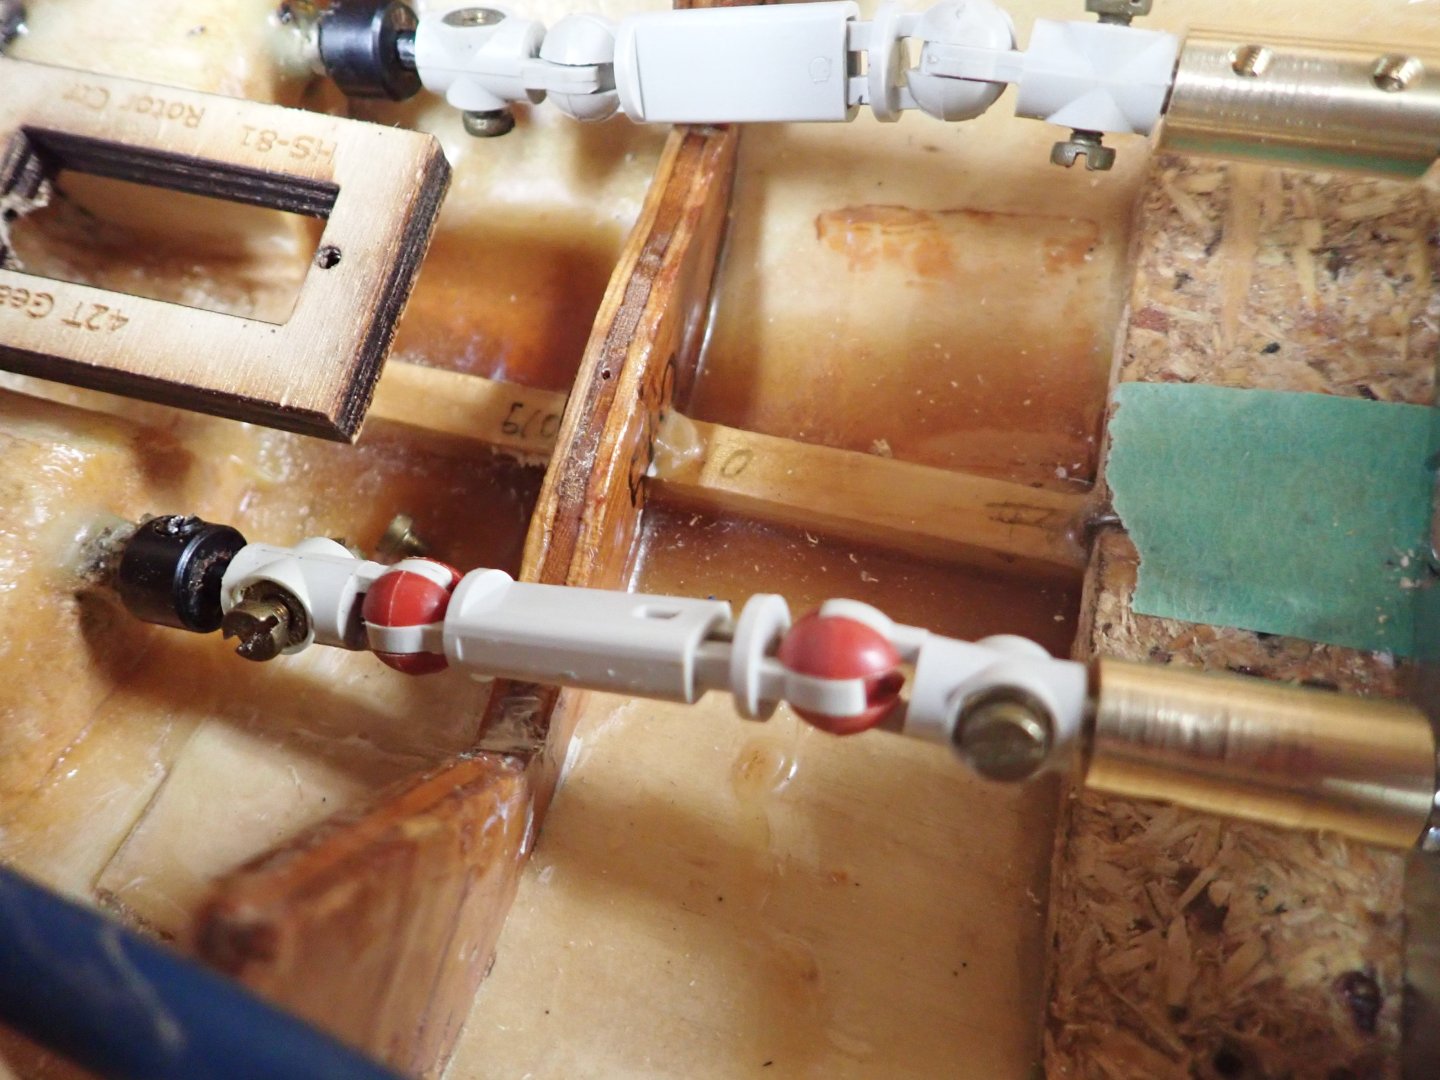
Hi ddp: Yes of course. The ESC units take care of that, reversing the voltage (or not) depending on whether I move the transmitter stick up (Fwd) or down (Rev). Rereading my post, I think you misunderstood when I mentioned "gearbox"; I only meant a metal box with two shafts connecting to the prop shafts and a single shaft connecting to a single motor, with internal gears to connect them and rotate the prop shafts appropriately. Not a mechanism with forward and reverse gears!
-
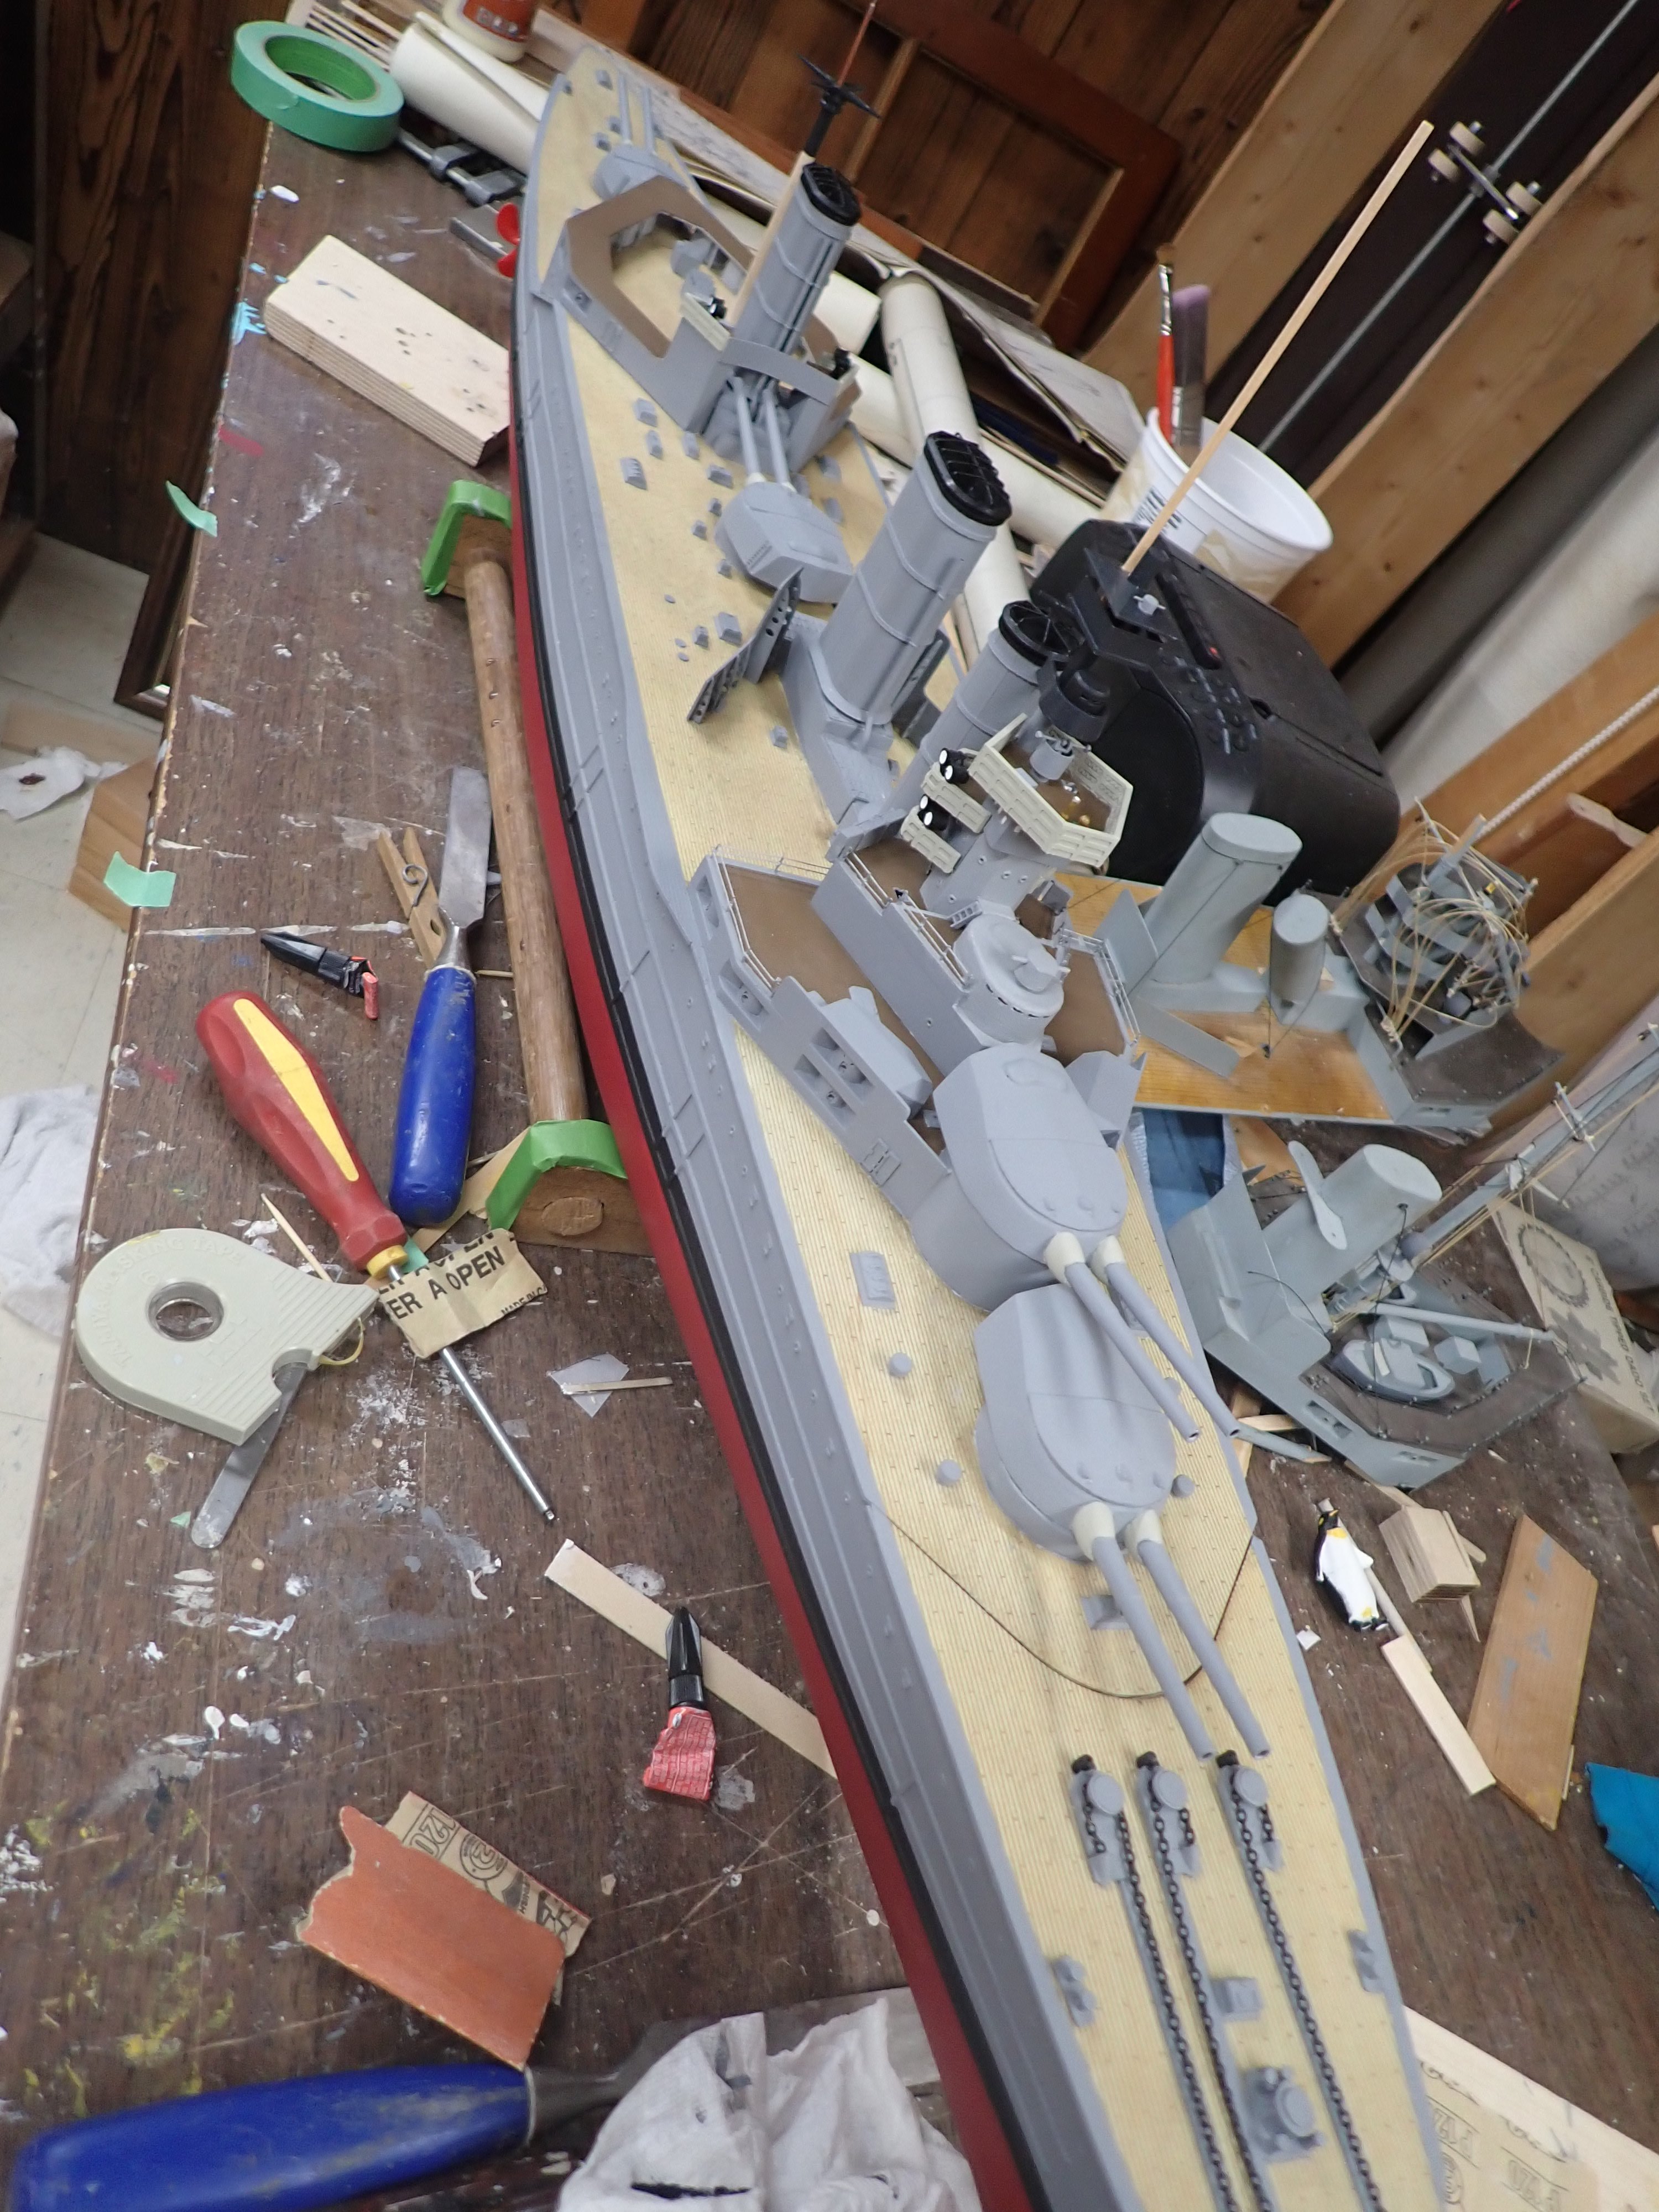
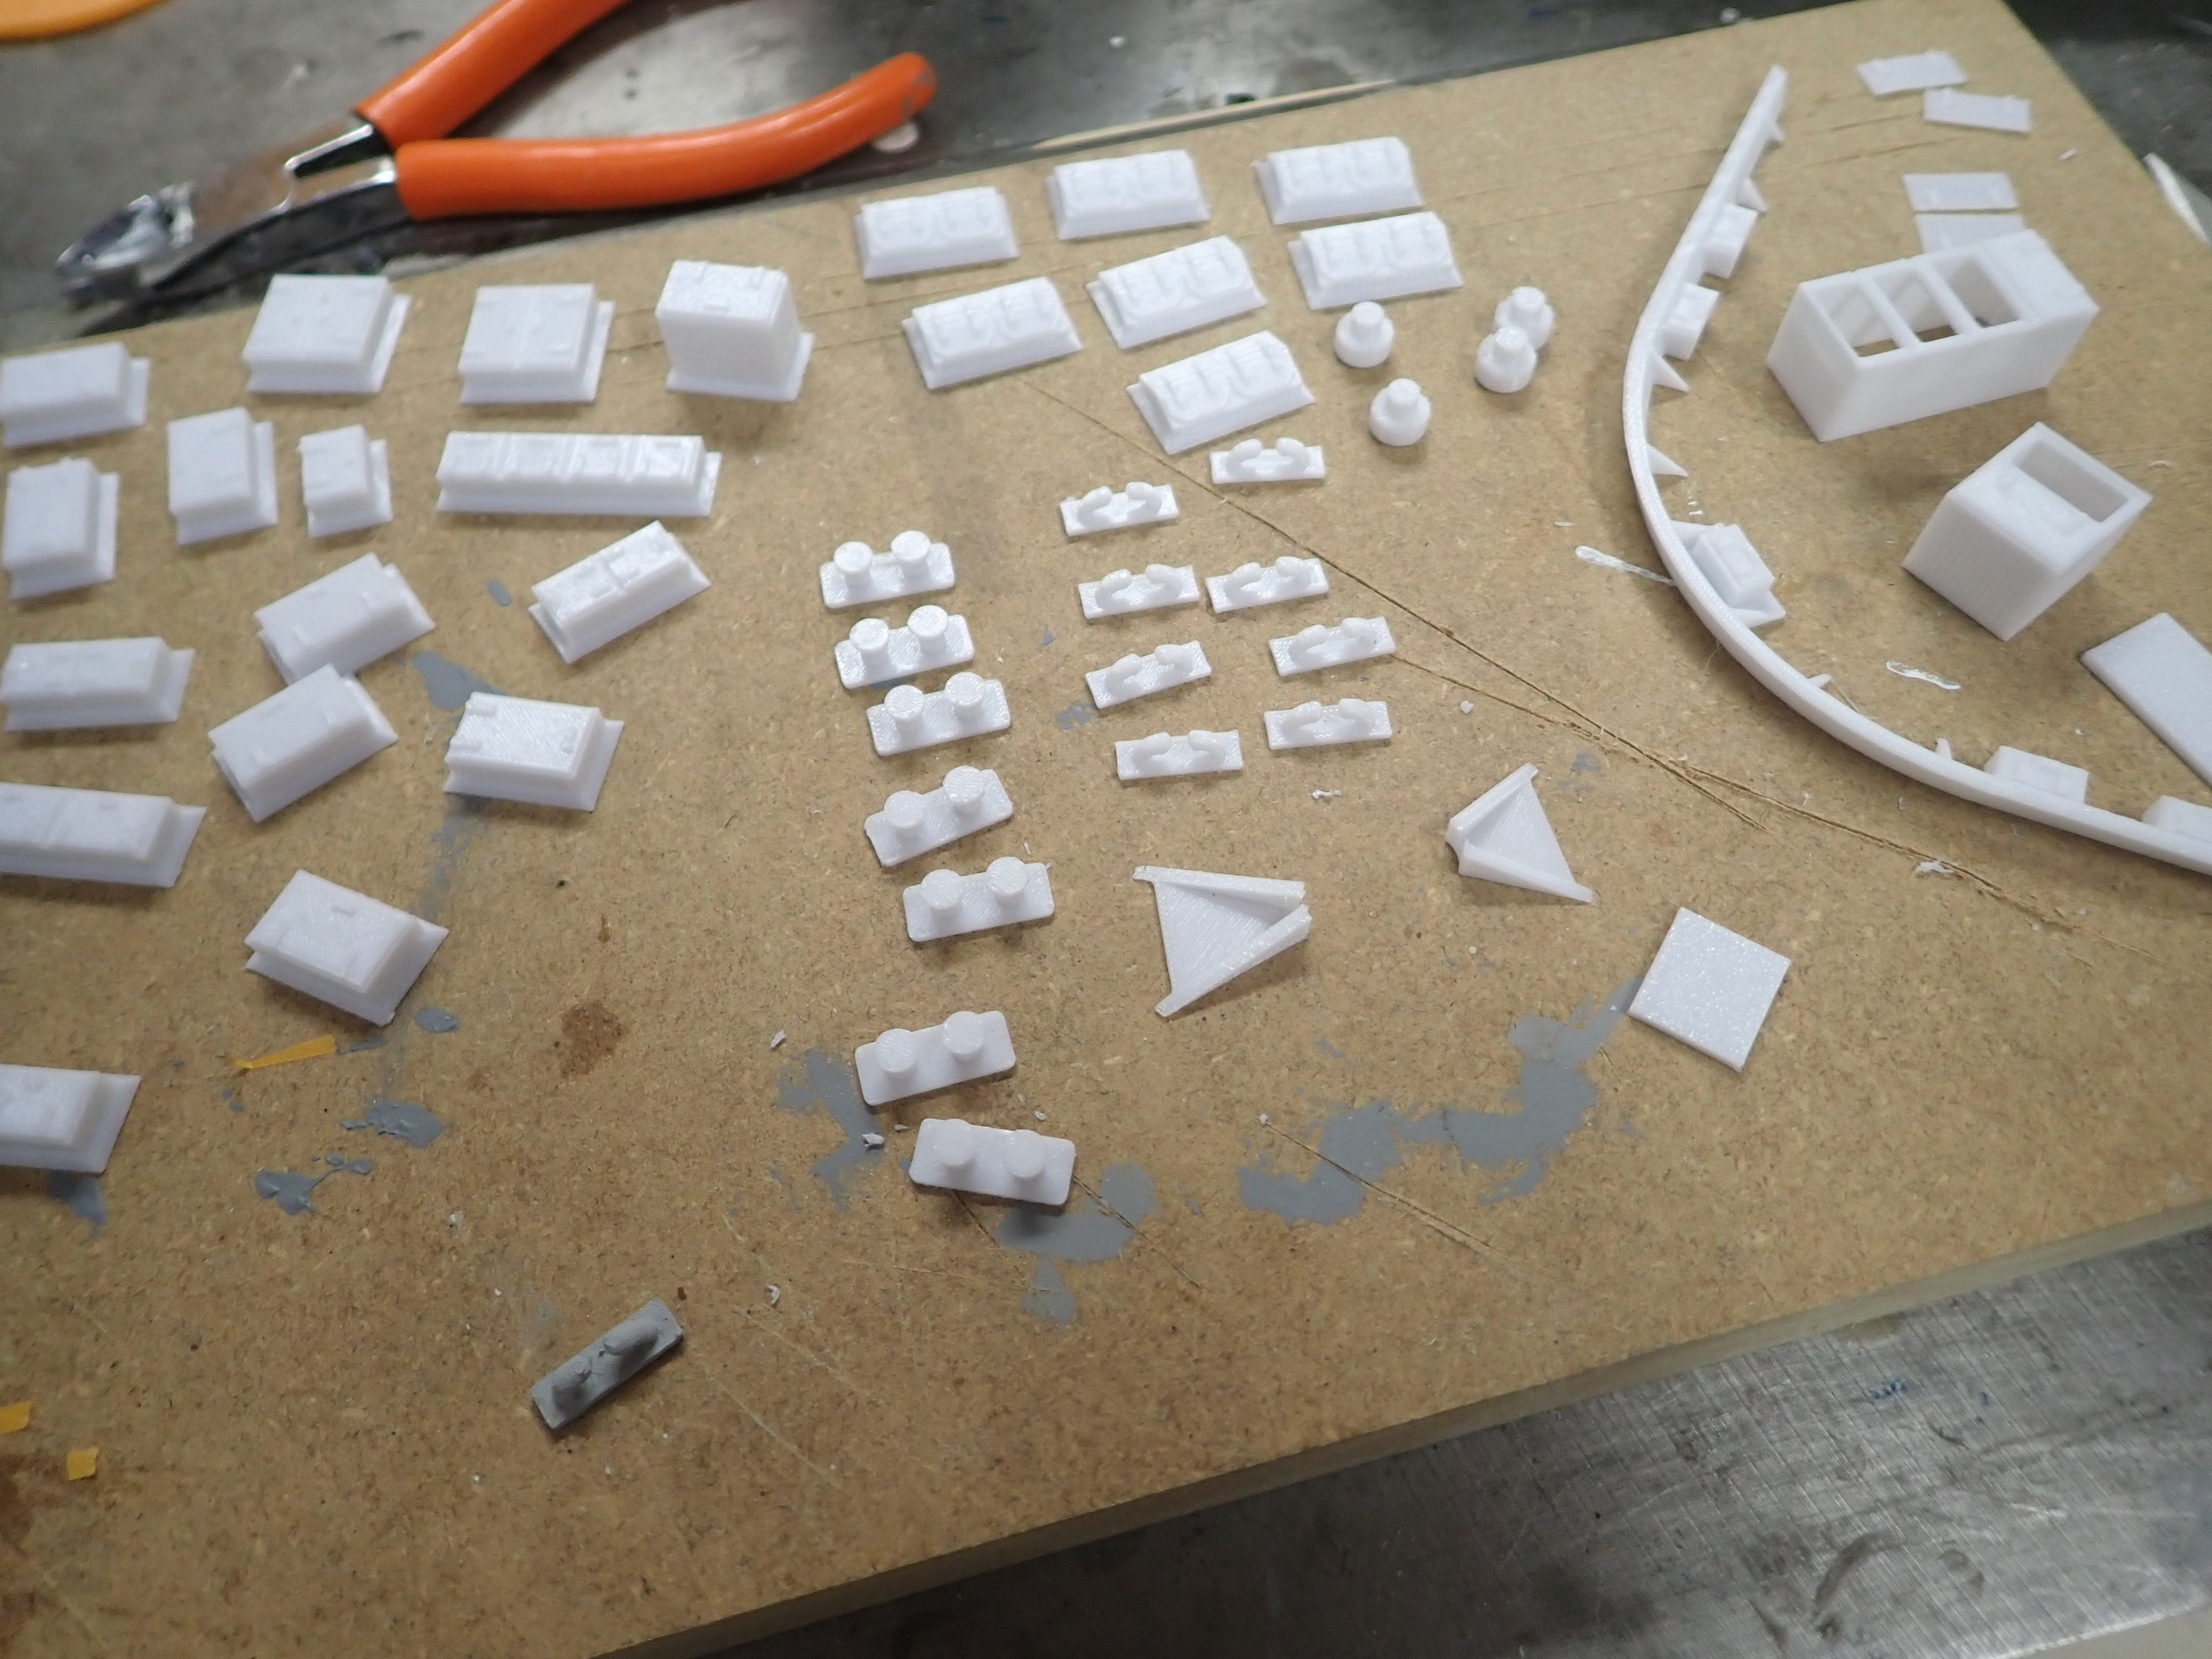
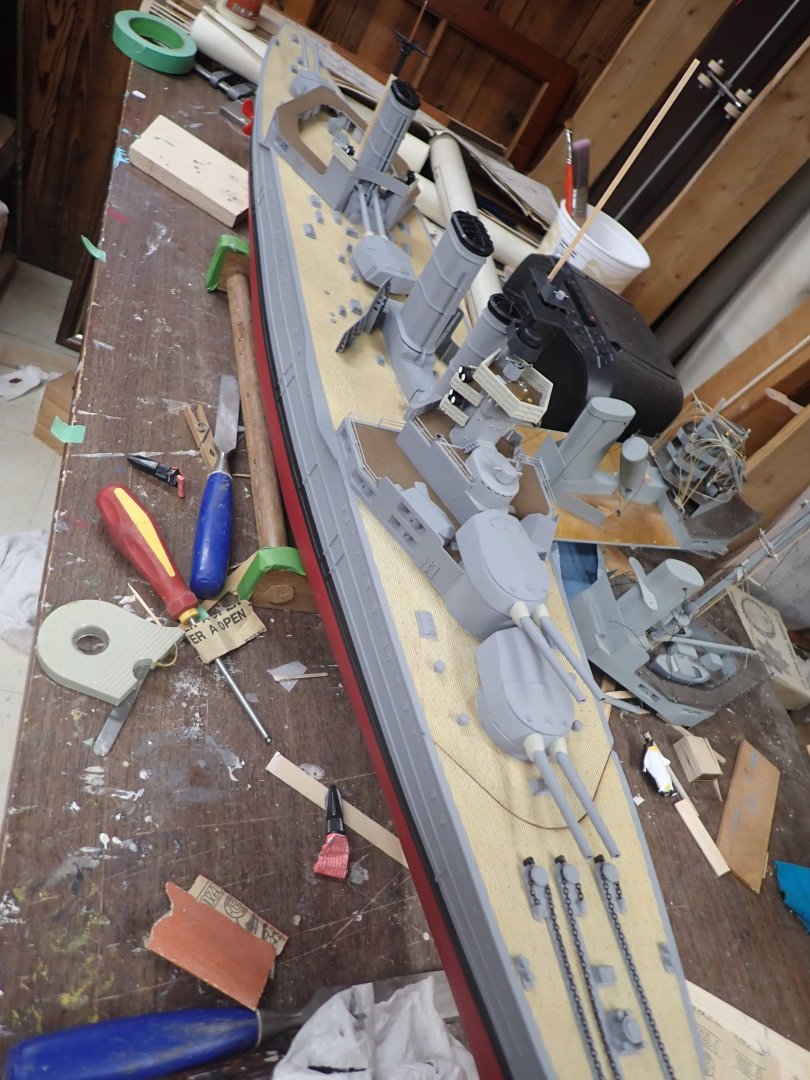
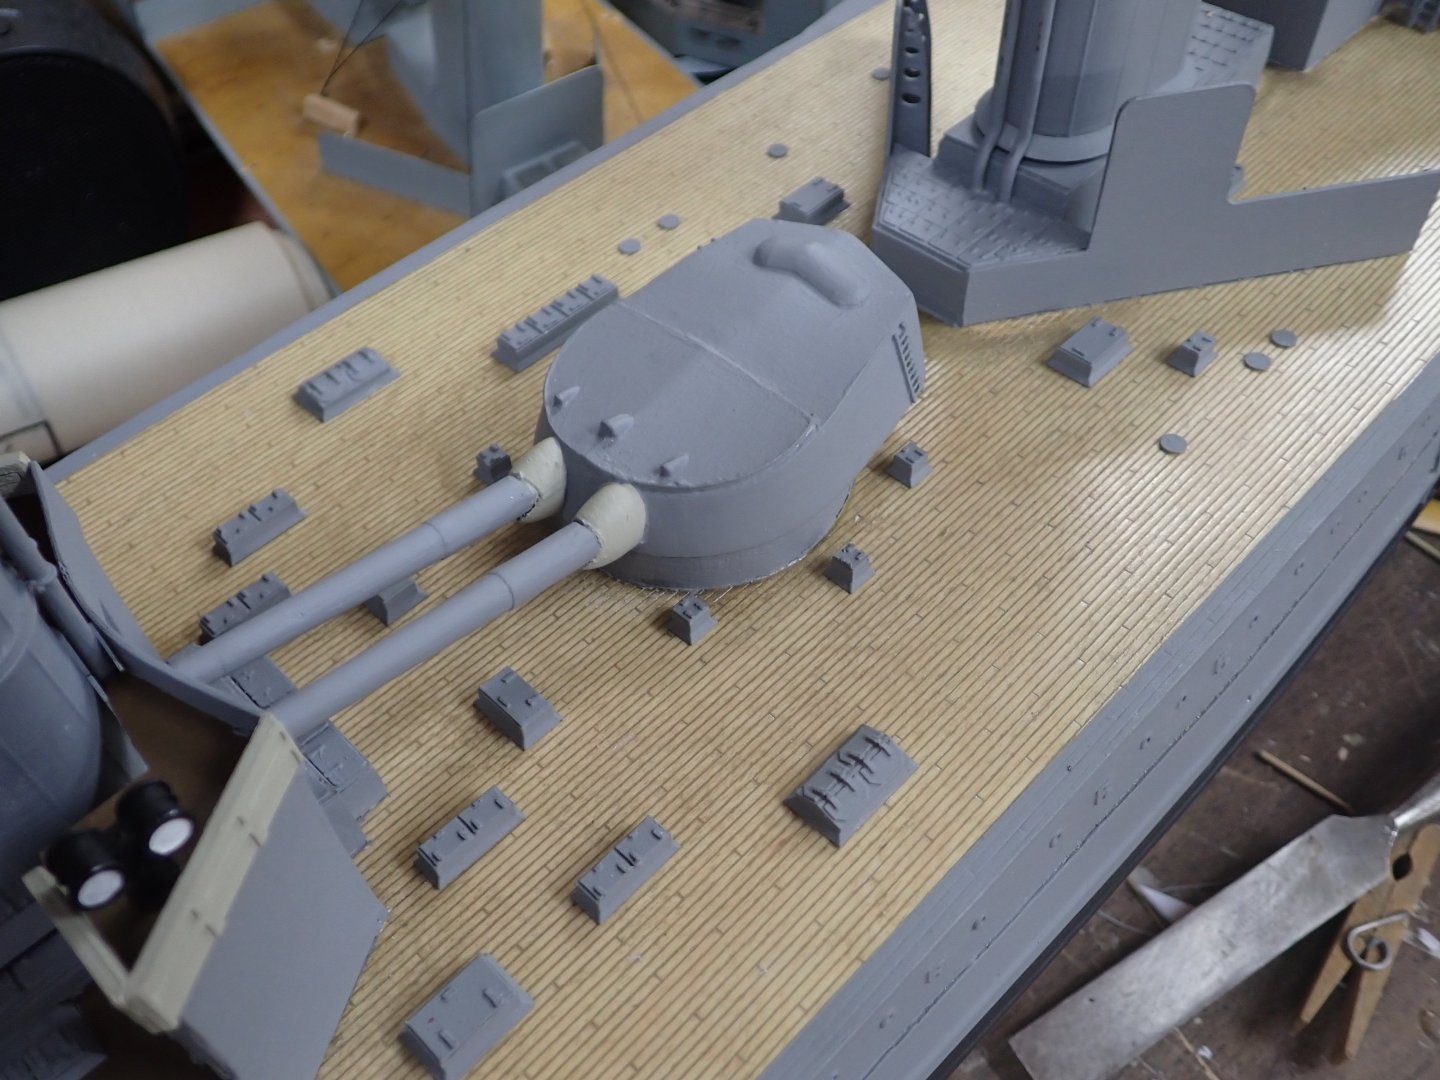
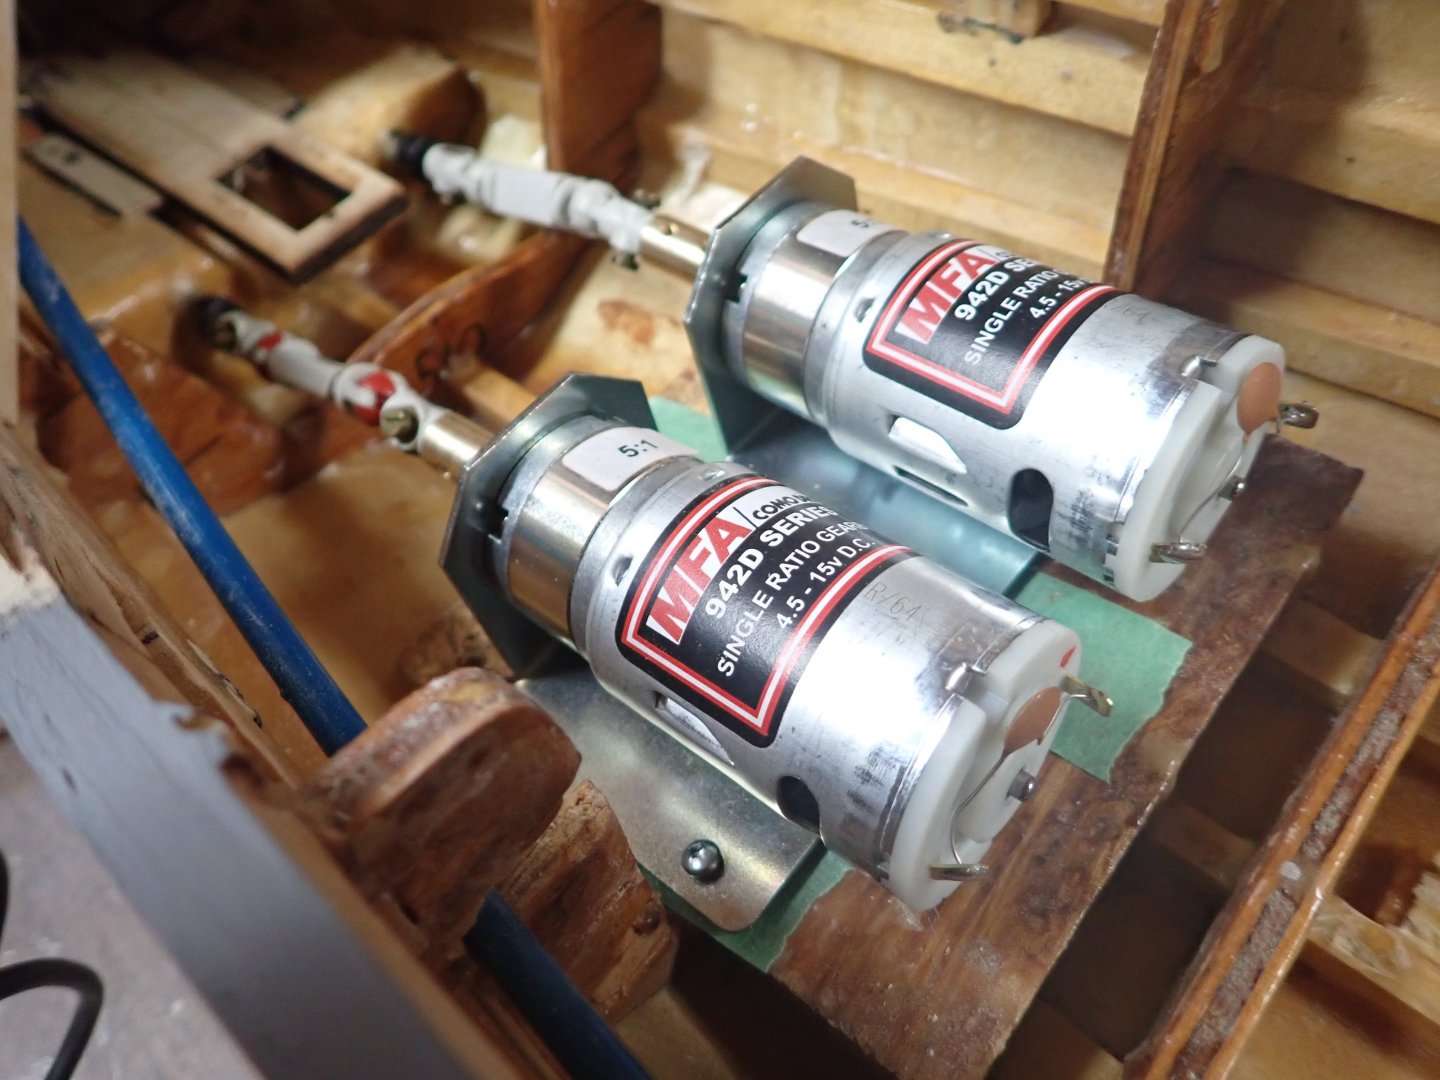
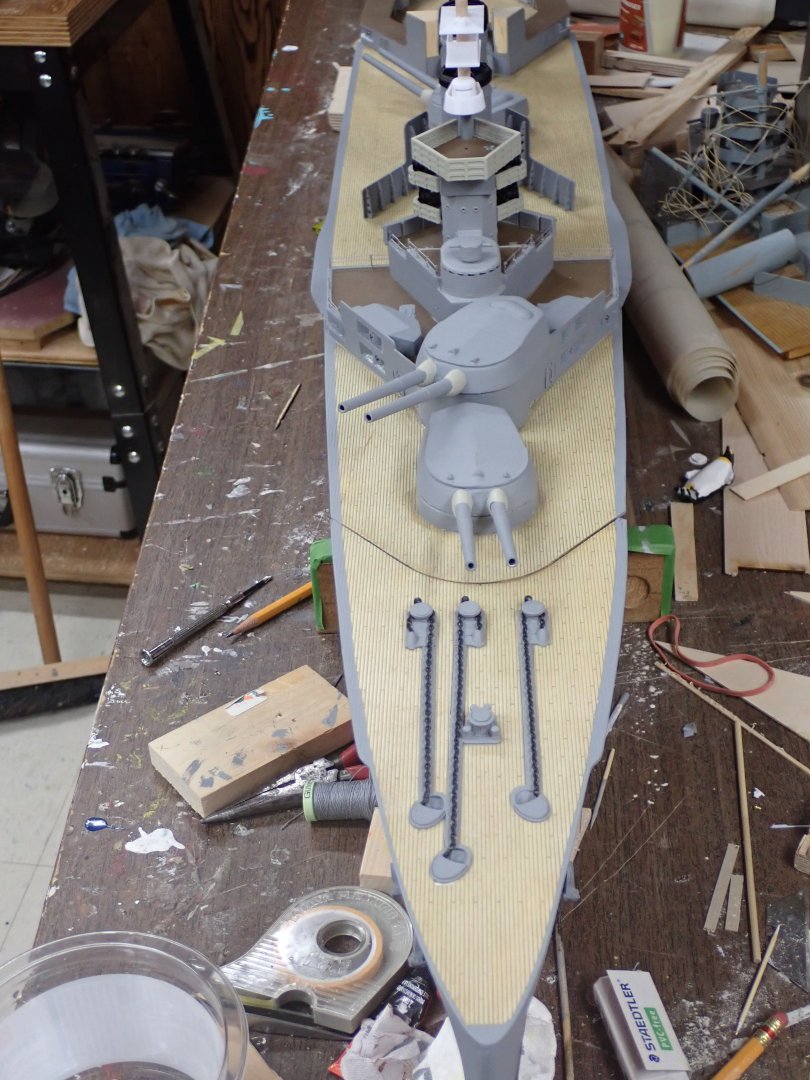
RC boat club has our annual demo at the "Stewart Park Festival" in Perth in a couple of weeks, conveniently located 8km from our cottage during our next stay. To this end I would like to get Lion on the water. I will probably take my sailboat too in case the wind obliges. I greased up the propeller stuffing boxes then mounted the twin 540 motors, along with 6mm-4mm couplings, and 4mm U-joints I had in my parts box from the 70's. 😏 U-joint close-up. I have a handful since I had several boats running back then. I like the two-ball joints since the motor and prop shaft axes need not intersect. Due to the greater distance from baseplate to shaft centre compared to my old Decaperm motors, I could not get the prop and motor shafts to align; dropping the motors lower would have meant almost nothing to screw into underneath them! Conducted a motor current draw test with my 5C NiMH pack. A single motor draws 620mA @ 6.3V on the bench ( almost exactly the manufacturer's no-load spec), and the same driving the propeller in the pool. It's obviously not feeling the load; I could probably have gone with smaller 385 motors😠. But anyway, 1.2A @ 12V, times two motors, 2.4A; I'd drain the 3Ah lead-acid down in about an hour at full speed (I think). A little more battery oomph would be nice. In fact, I'm sure a single 540 motor would deliver sufficient power for both props if only I could order a gearbox with my random shaft spacing. I could do it with belts and timing gears but it would be a trick to get counter-rotation. On the other hand, is it even necessary in a scale model boat at scale speeds? Also I am considering putting the twin ESC units on different channels so I can run on one motor only, most of the time. In future I could try fitting two identical propellers and drive both from a single motor via belts, to save battery draw. In the meantime I have added some detail. Main director, and spotting top glued and painted black. The masts above the funnel tops are black too. The fore topmast isn't tapered or painted or glued in so far. Aft searchlight platforms added, with more anti-splinter railing mats. Access is by ladders hidden in this view. Need to add some metal bulwarks behind them. Considering adding another searchlight each side; not historically accurate but it gives a nice balance between fore and aft searchlight groups and I like the look as seen in the 3D render (which is inaccurate in other ways too!). Extra searchlights in the 3D render. I've also been busy printing more deck furniture and gluing in place. Here is what surrounds "Q" turret at present. The flat circles are coaling scuttles. Bridge with rangefinder, chart table, both compasses, access ladder. Thanks for following and commenting.......👍 Ian


-
A lot of electrical work, Bill. The terminal strips are a good idea.
-
I was thinking fixed relative to the bow 🤔. I later thought, "Wasn't it just v-sights rather than an optical tube?". Oh well. Thanks for your comments and encouragement!
-
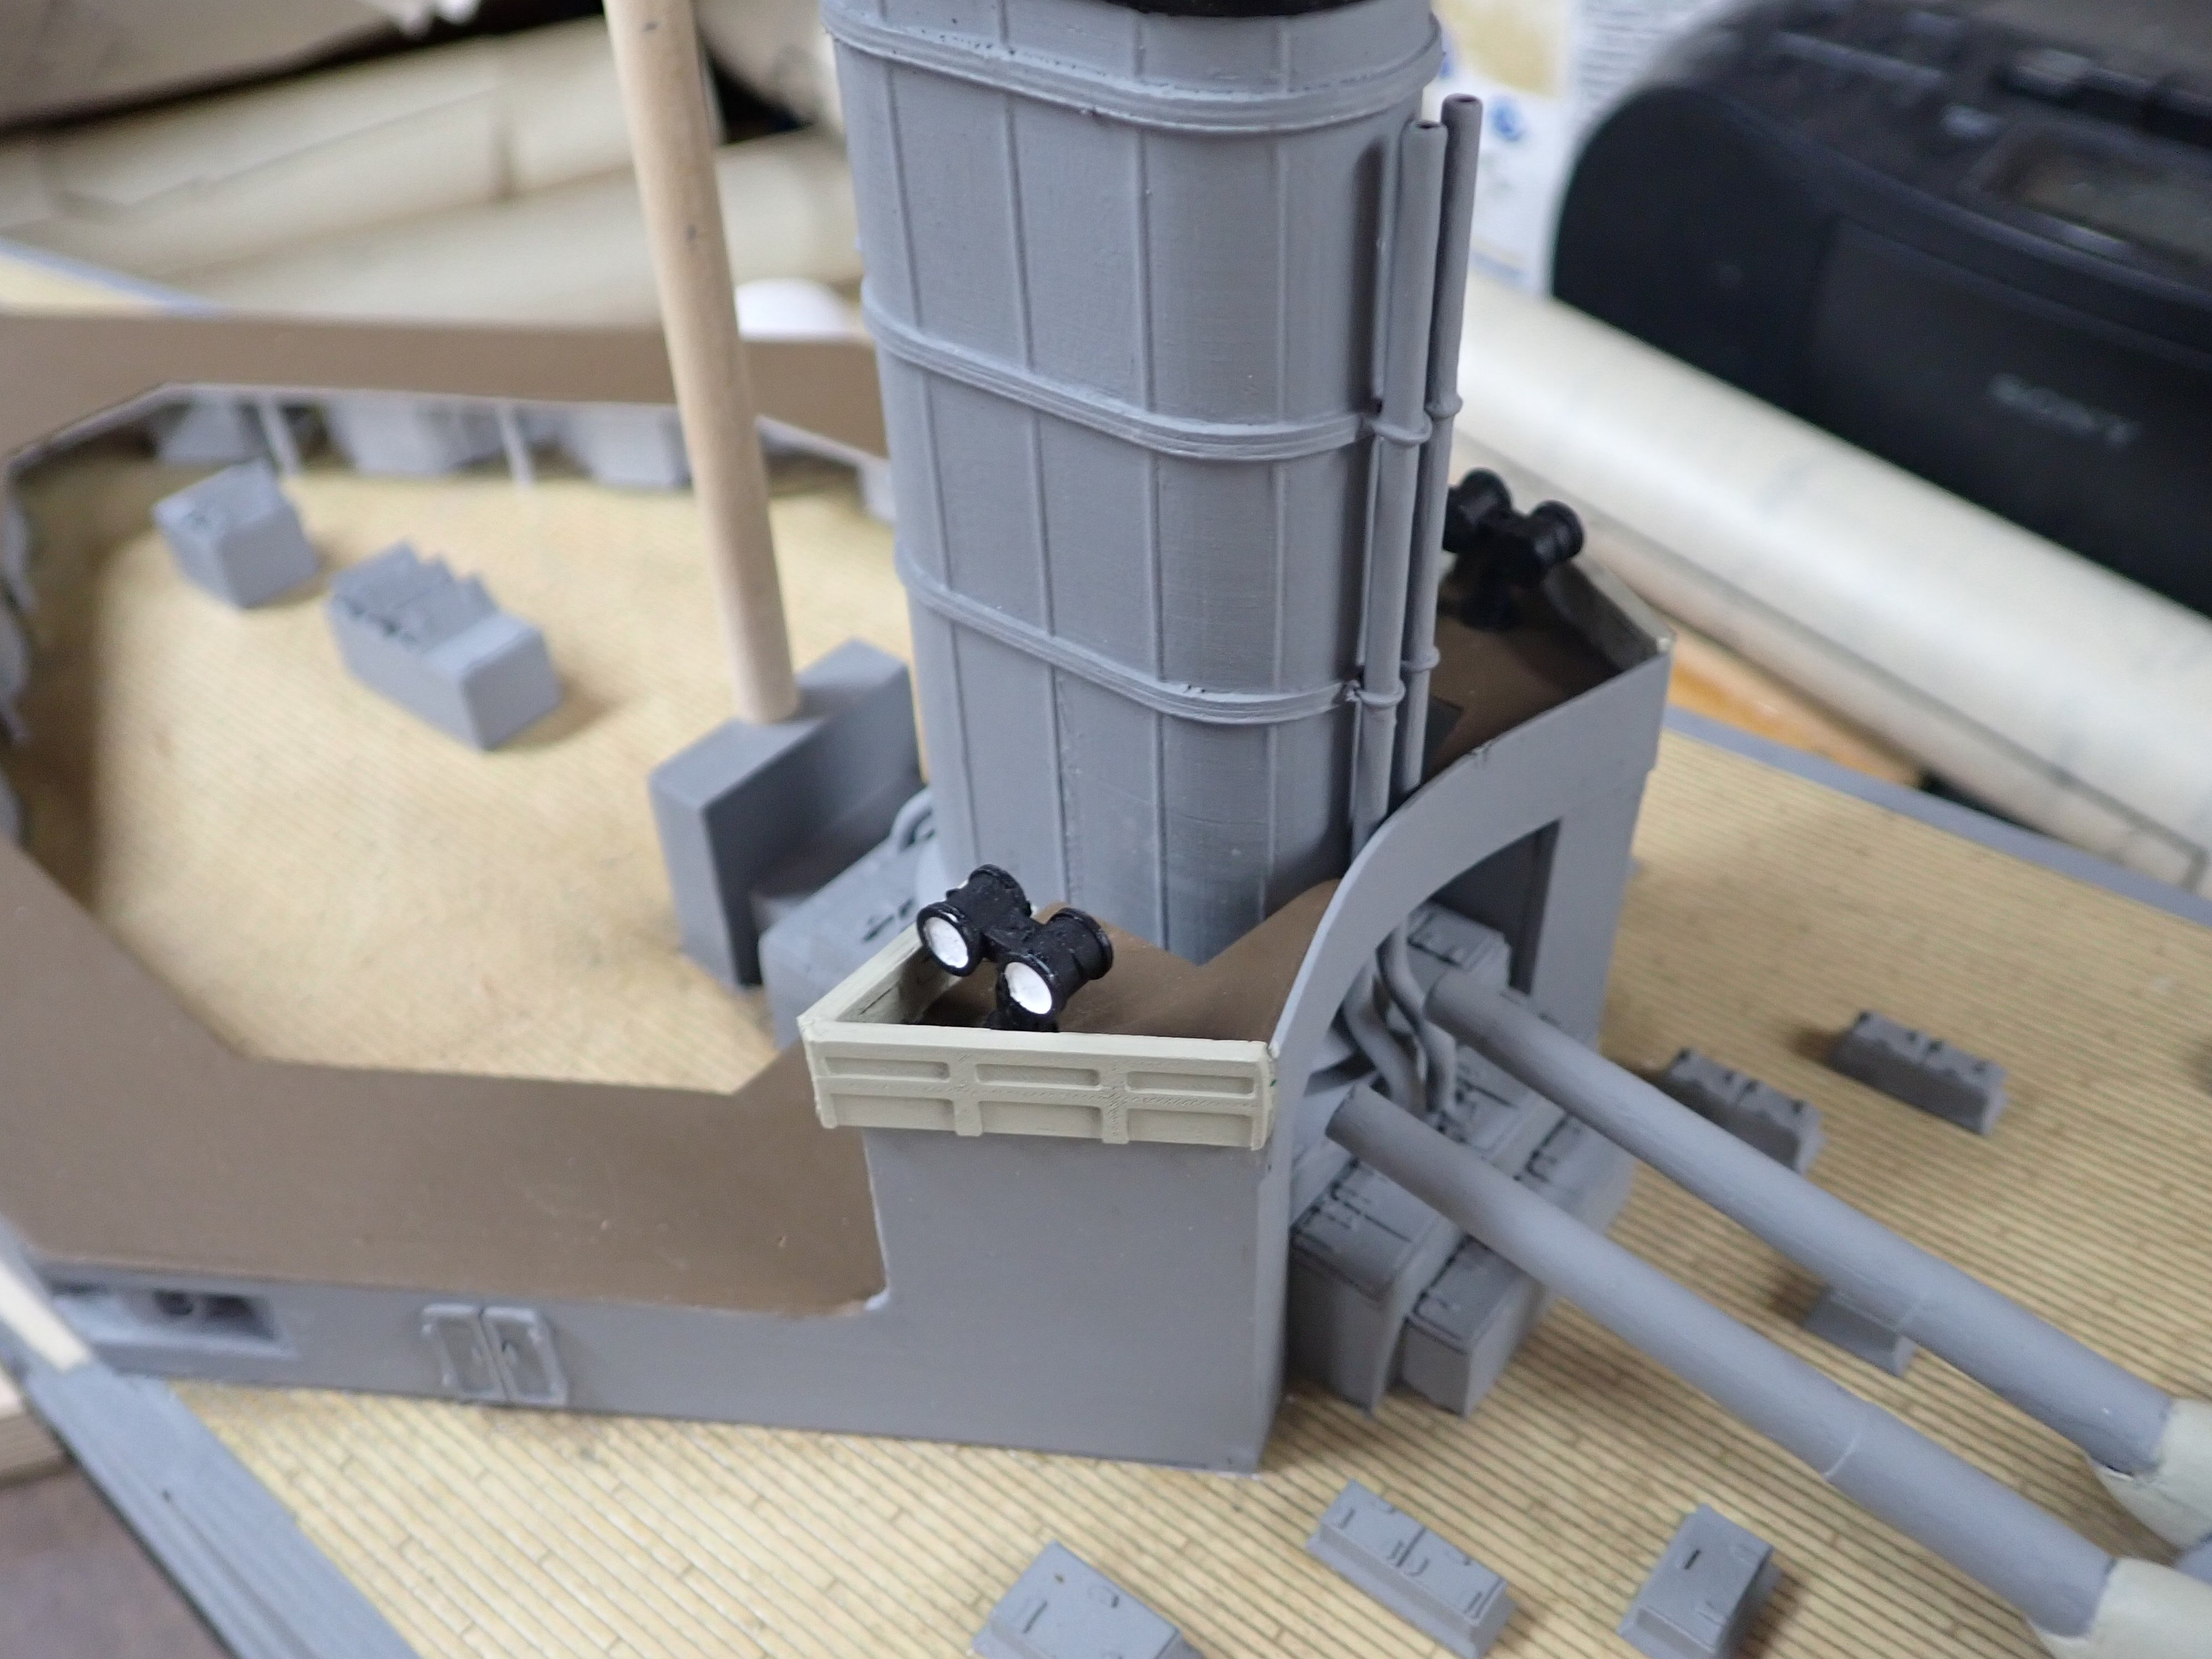
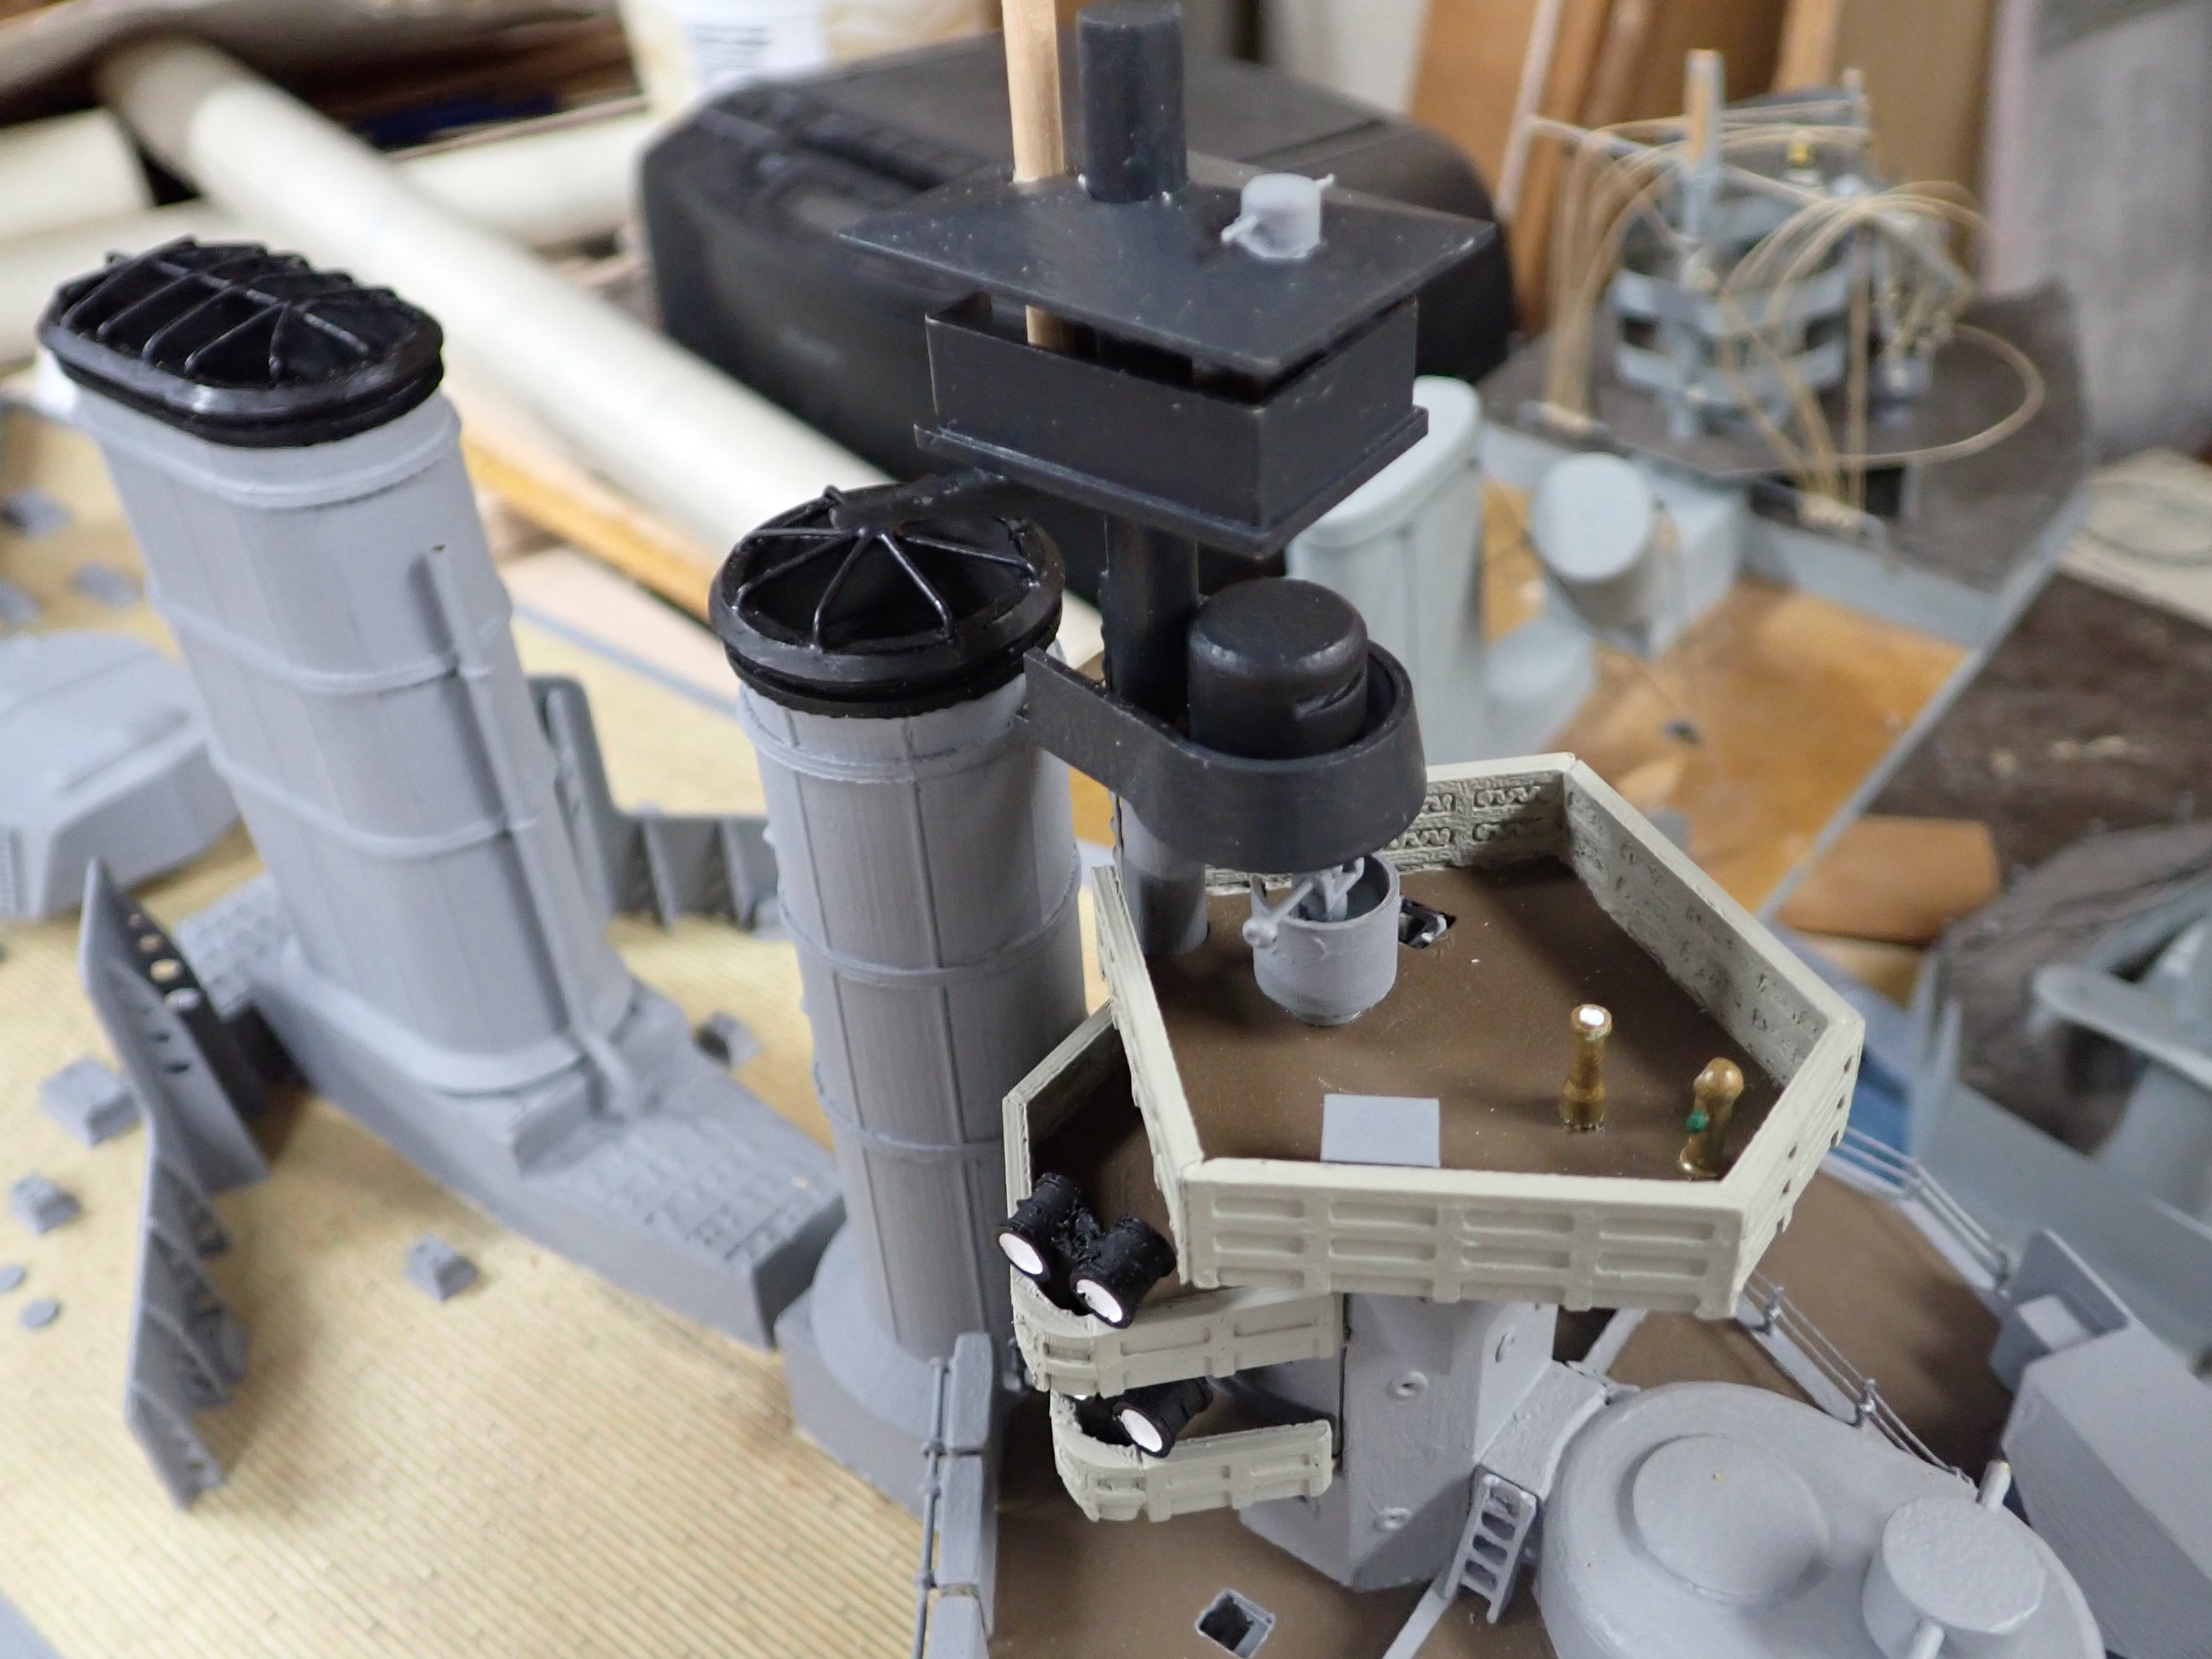
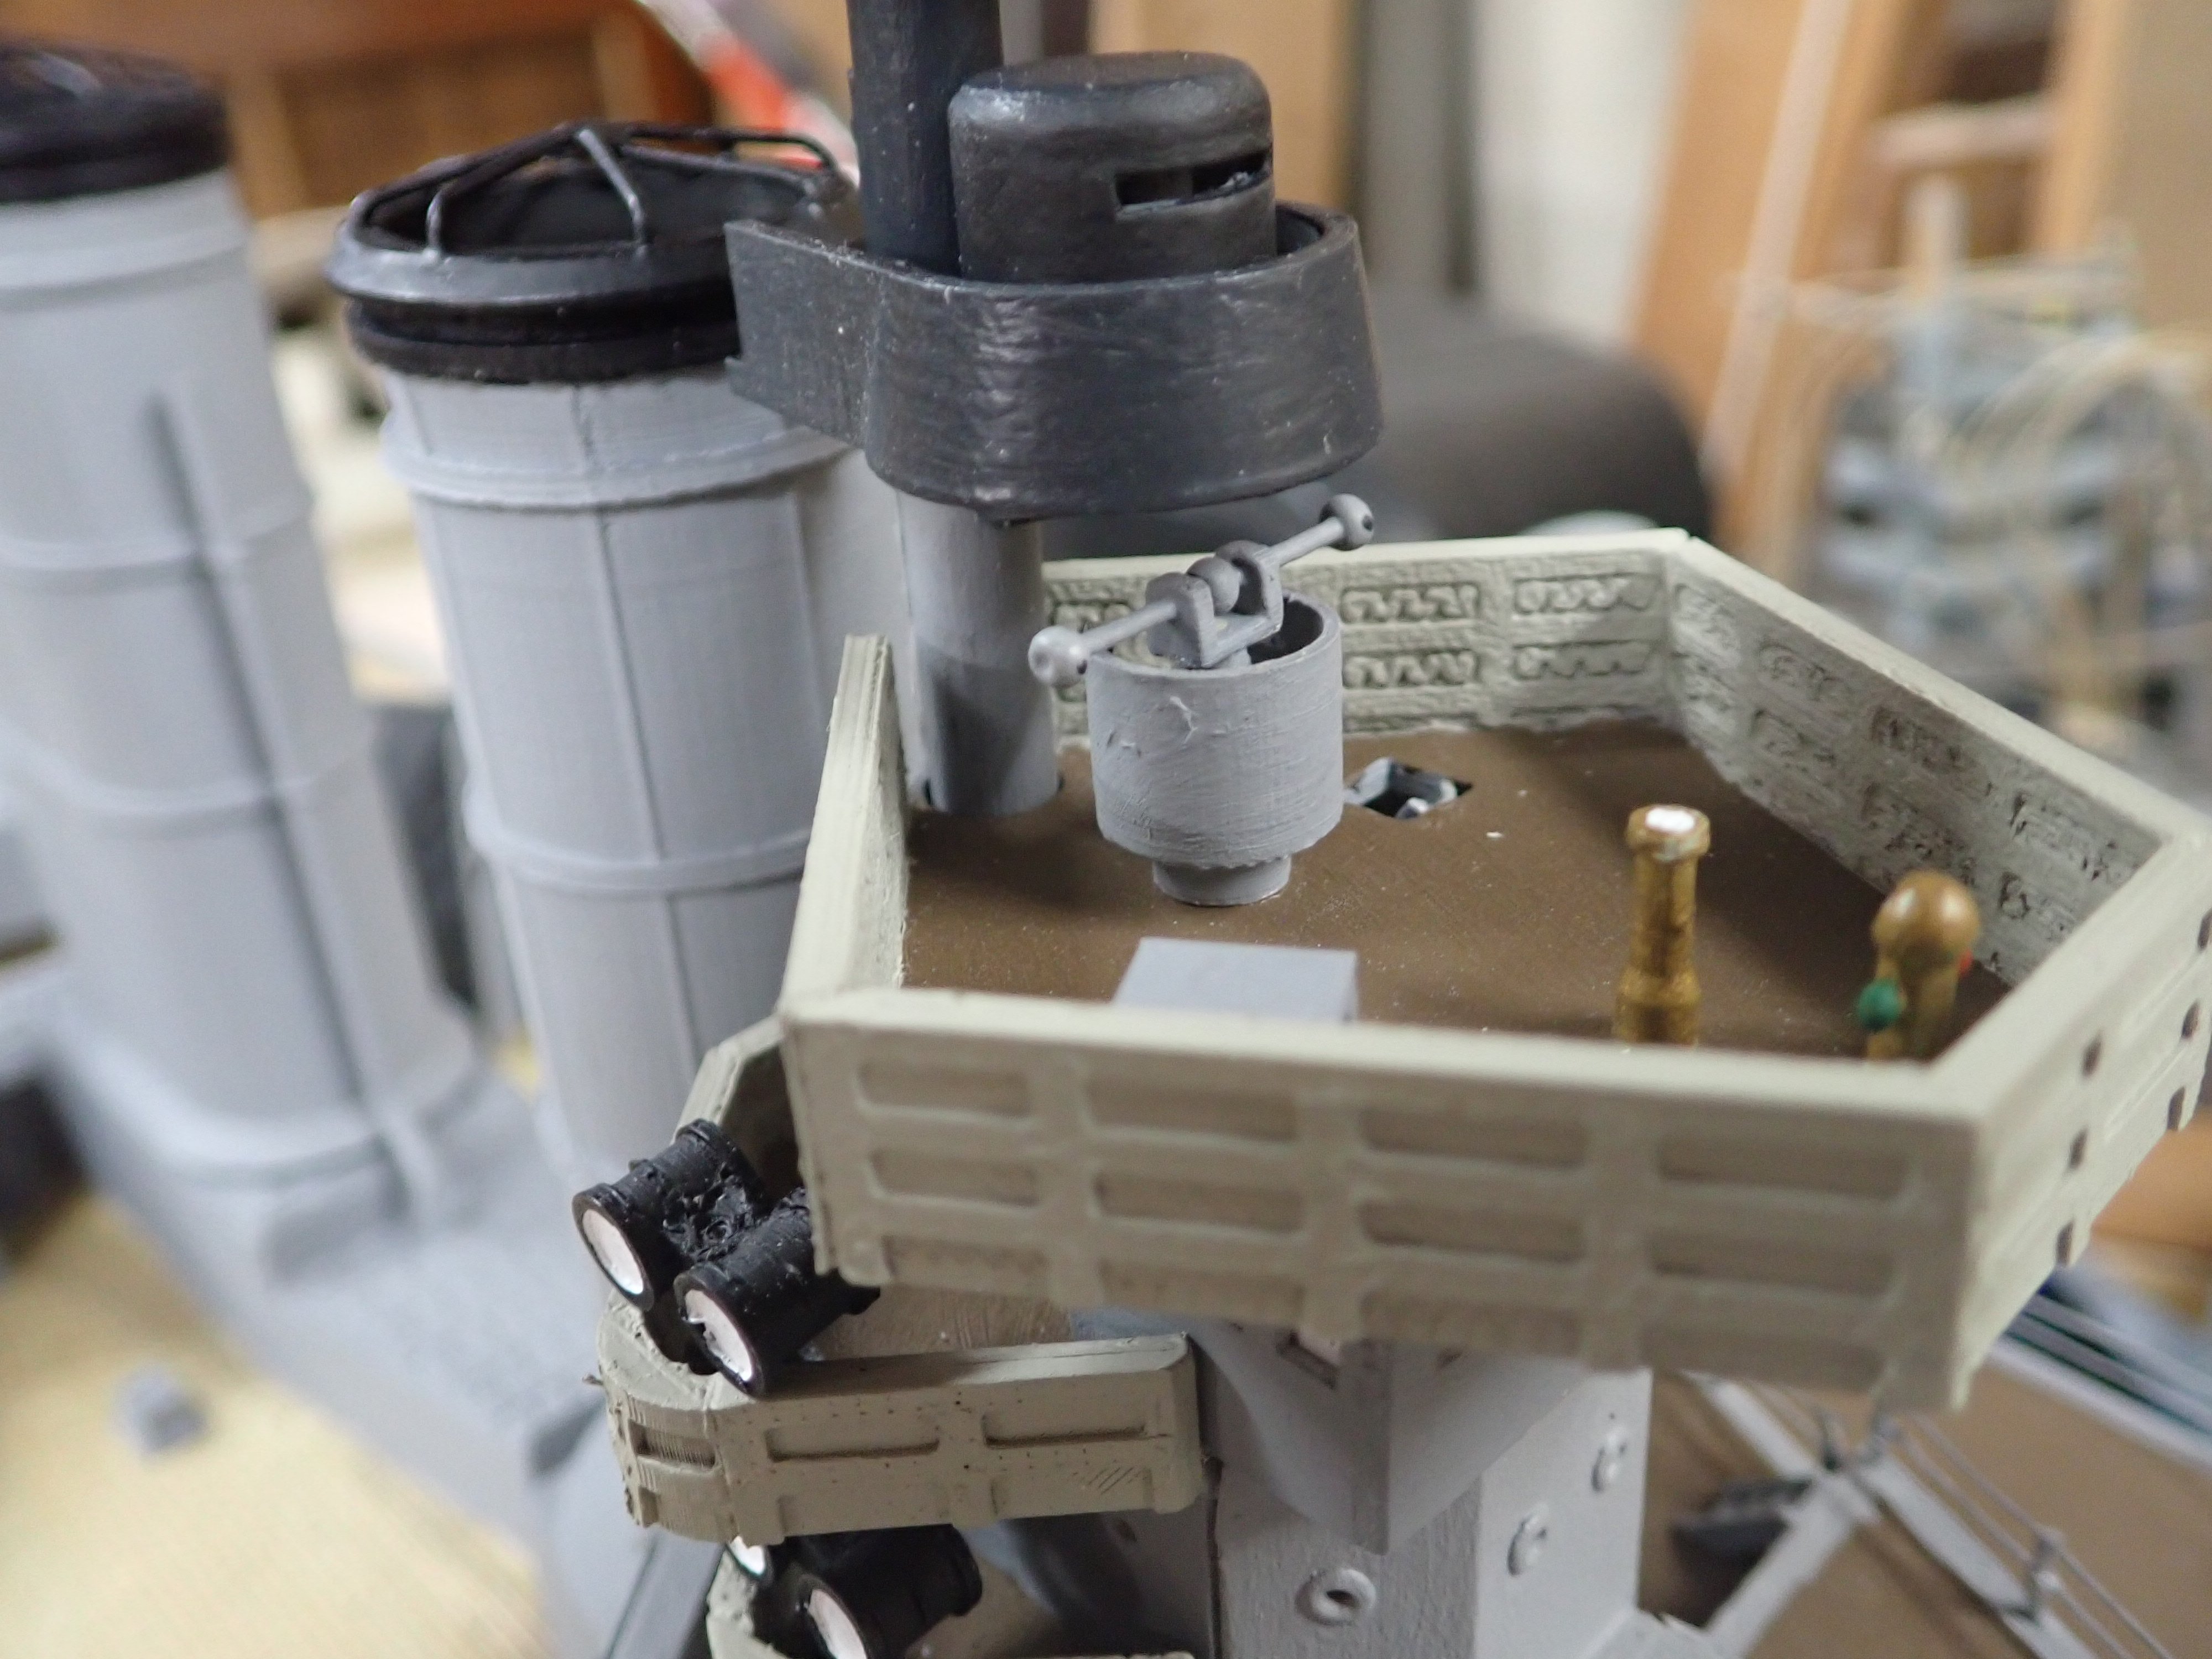
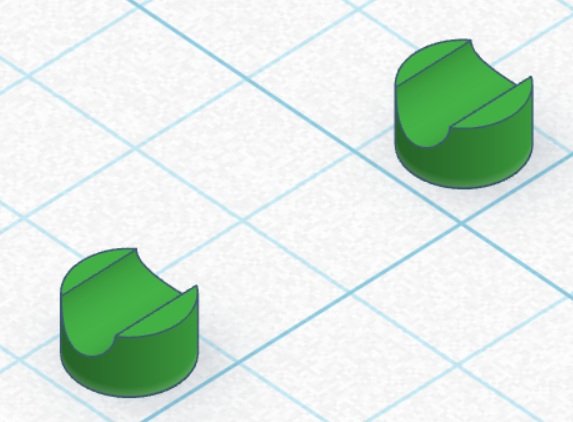
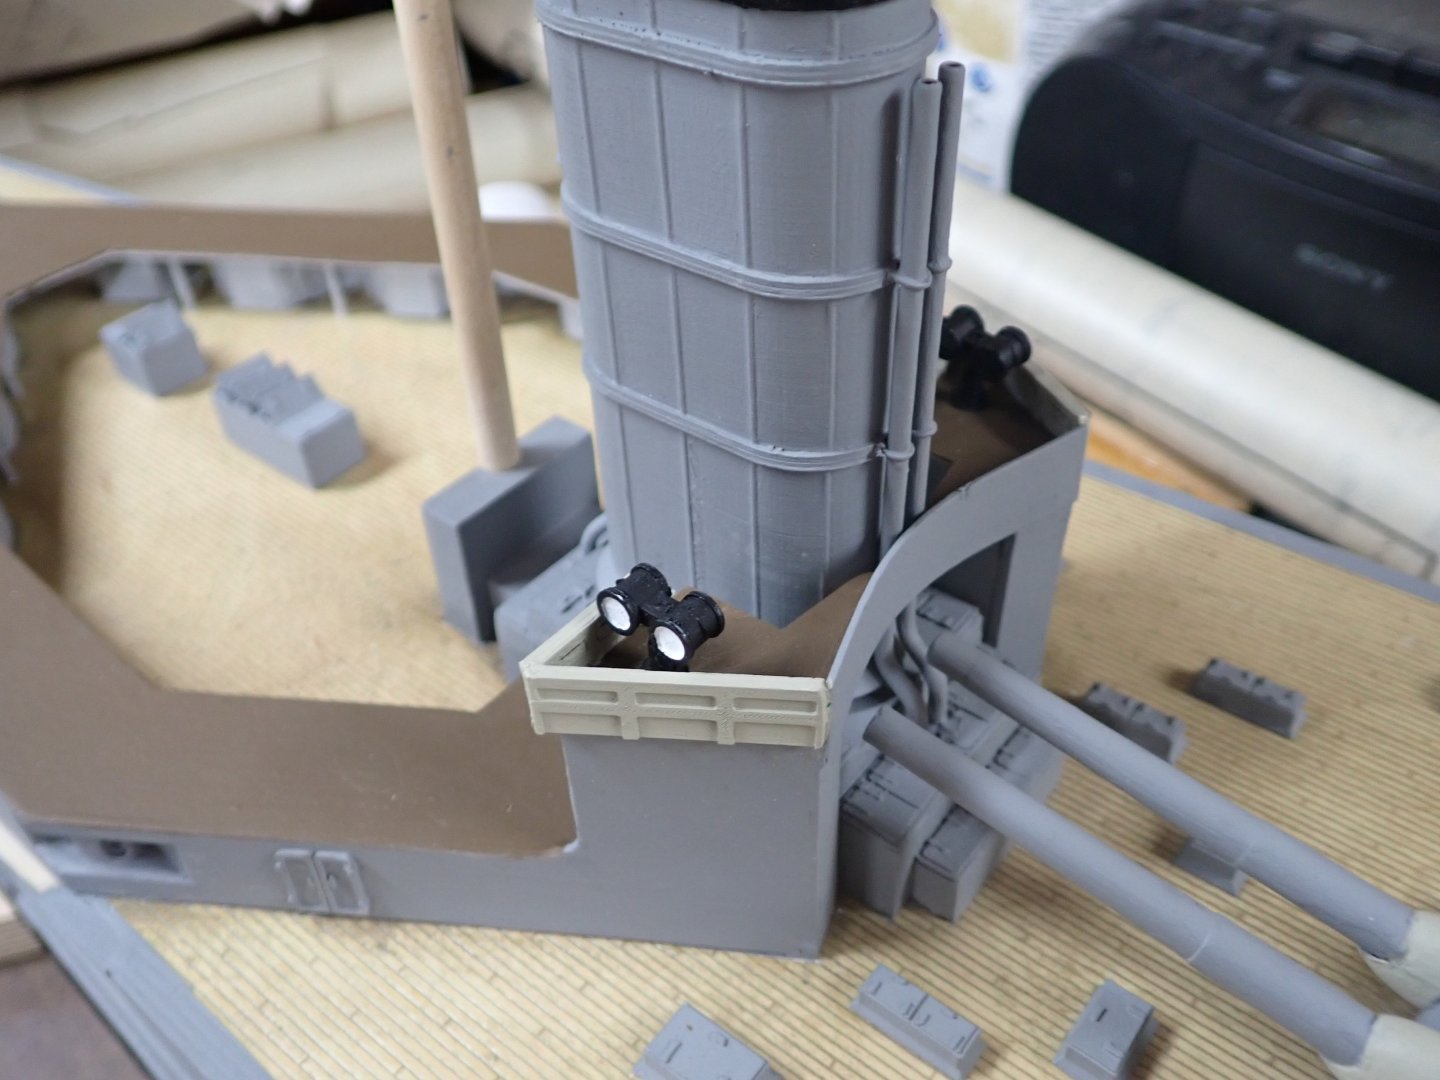
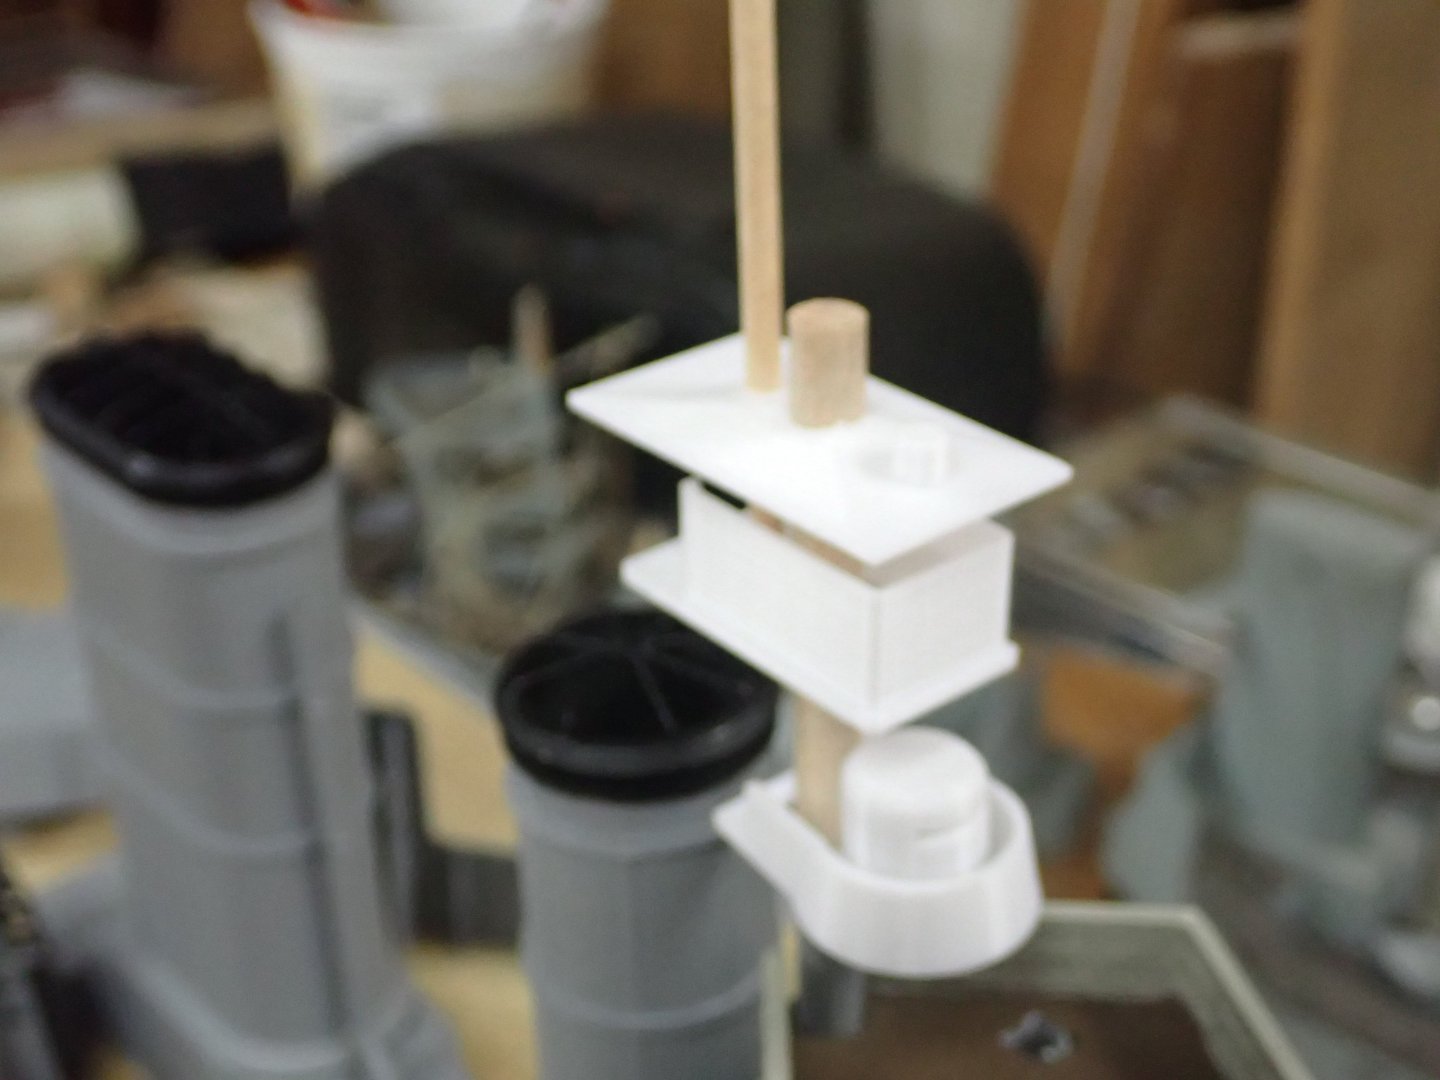
Just a quick pic or two. Printed the magnetic and gyro compasses for the bridge. Came out pretty good for such diminutive parts. I can't find any info as to equipment present in the spotting top. I felt certain there must at least have been one of those gadgets with a circle graduated in degrees, and an eye-scope one points at a distant object to read off its bearing. Here's my rendition, in the top. As it turns out, with the overlapping cover in place over the top, one can hardly see into it but I'll know it's there as well as those few who peer into it.

-
Very nice display for the gardens!
-
I enjoy creating the CAD drawings for stuff, and it's great to see the crisp printed parts, but in the back of my mind lurks the thought "is this true craftsmanship"? Perhaps it is just in another way. What is certain is my HMS Lion would not look nearly as good if I'd had to try to create all those small parts by hand in wood or plastic. I marvel at Marc's carved plastic pieces......
- 2,699 replies
-
- 2
-

-

-
- heller
- soleil royal
- (and 9 more)
-
Another absolute gem of a build, Siggi. I am in awe...........
-
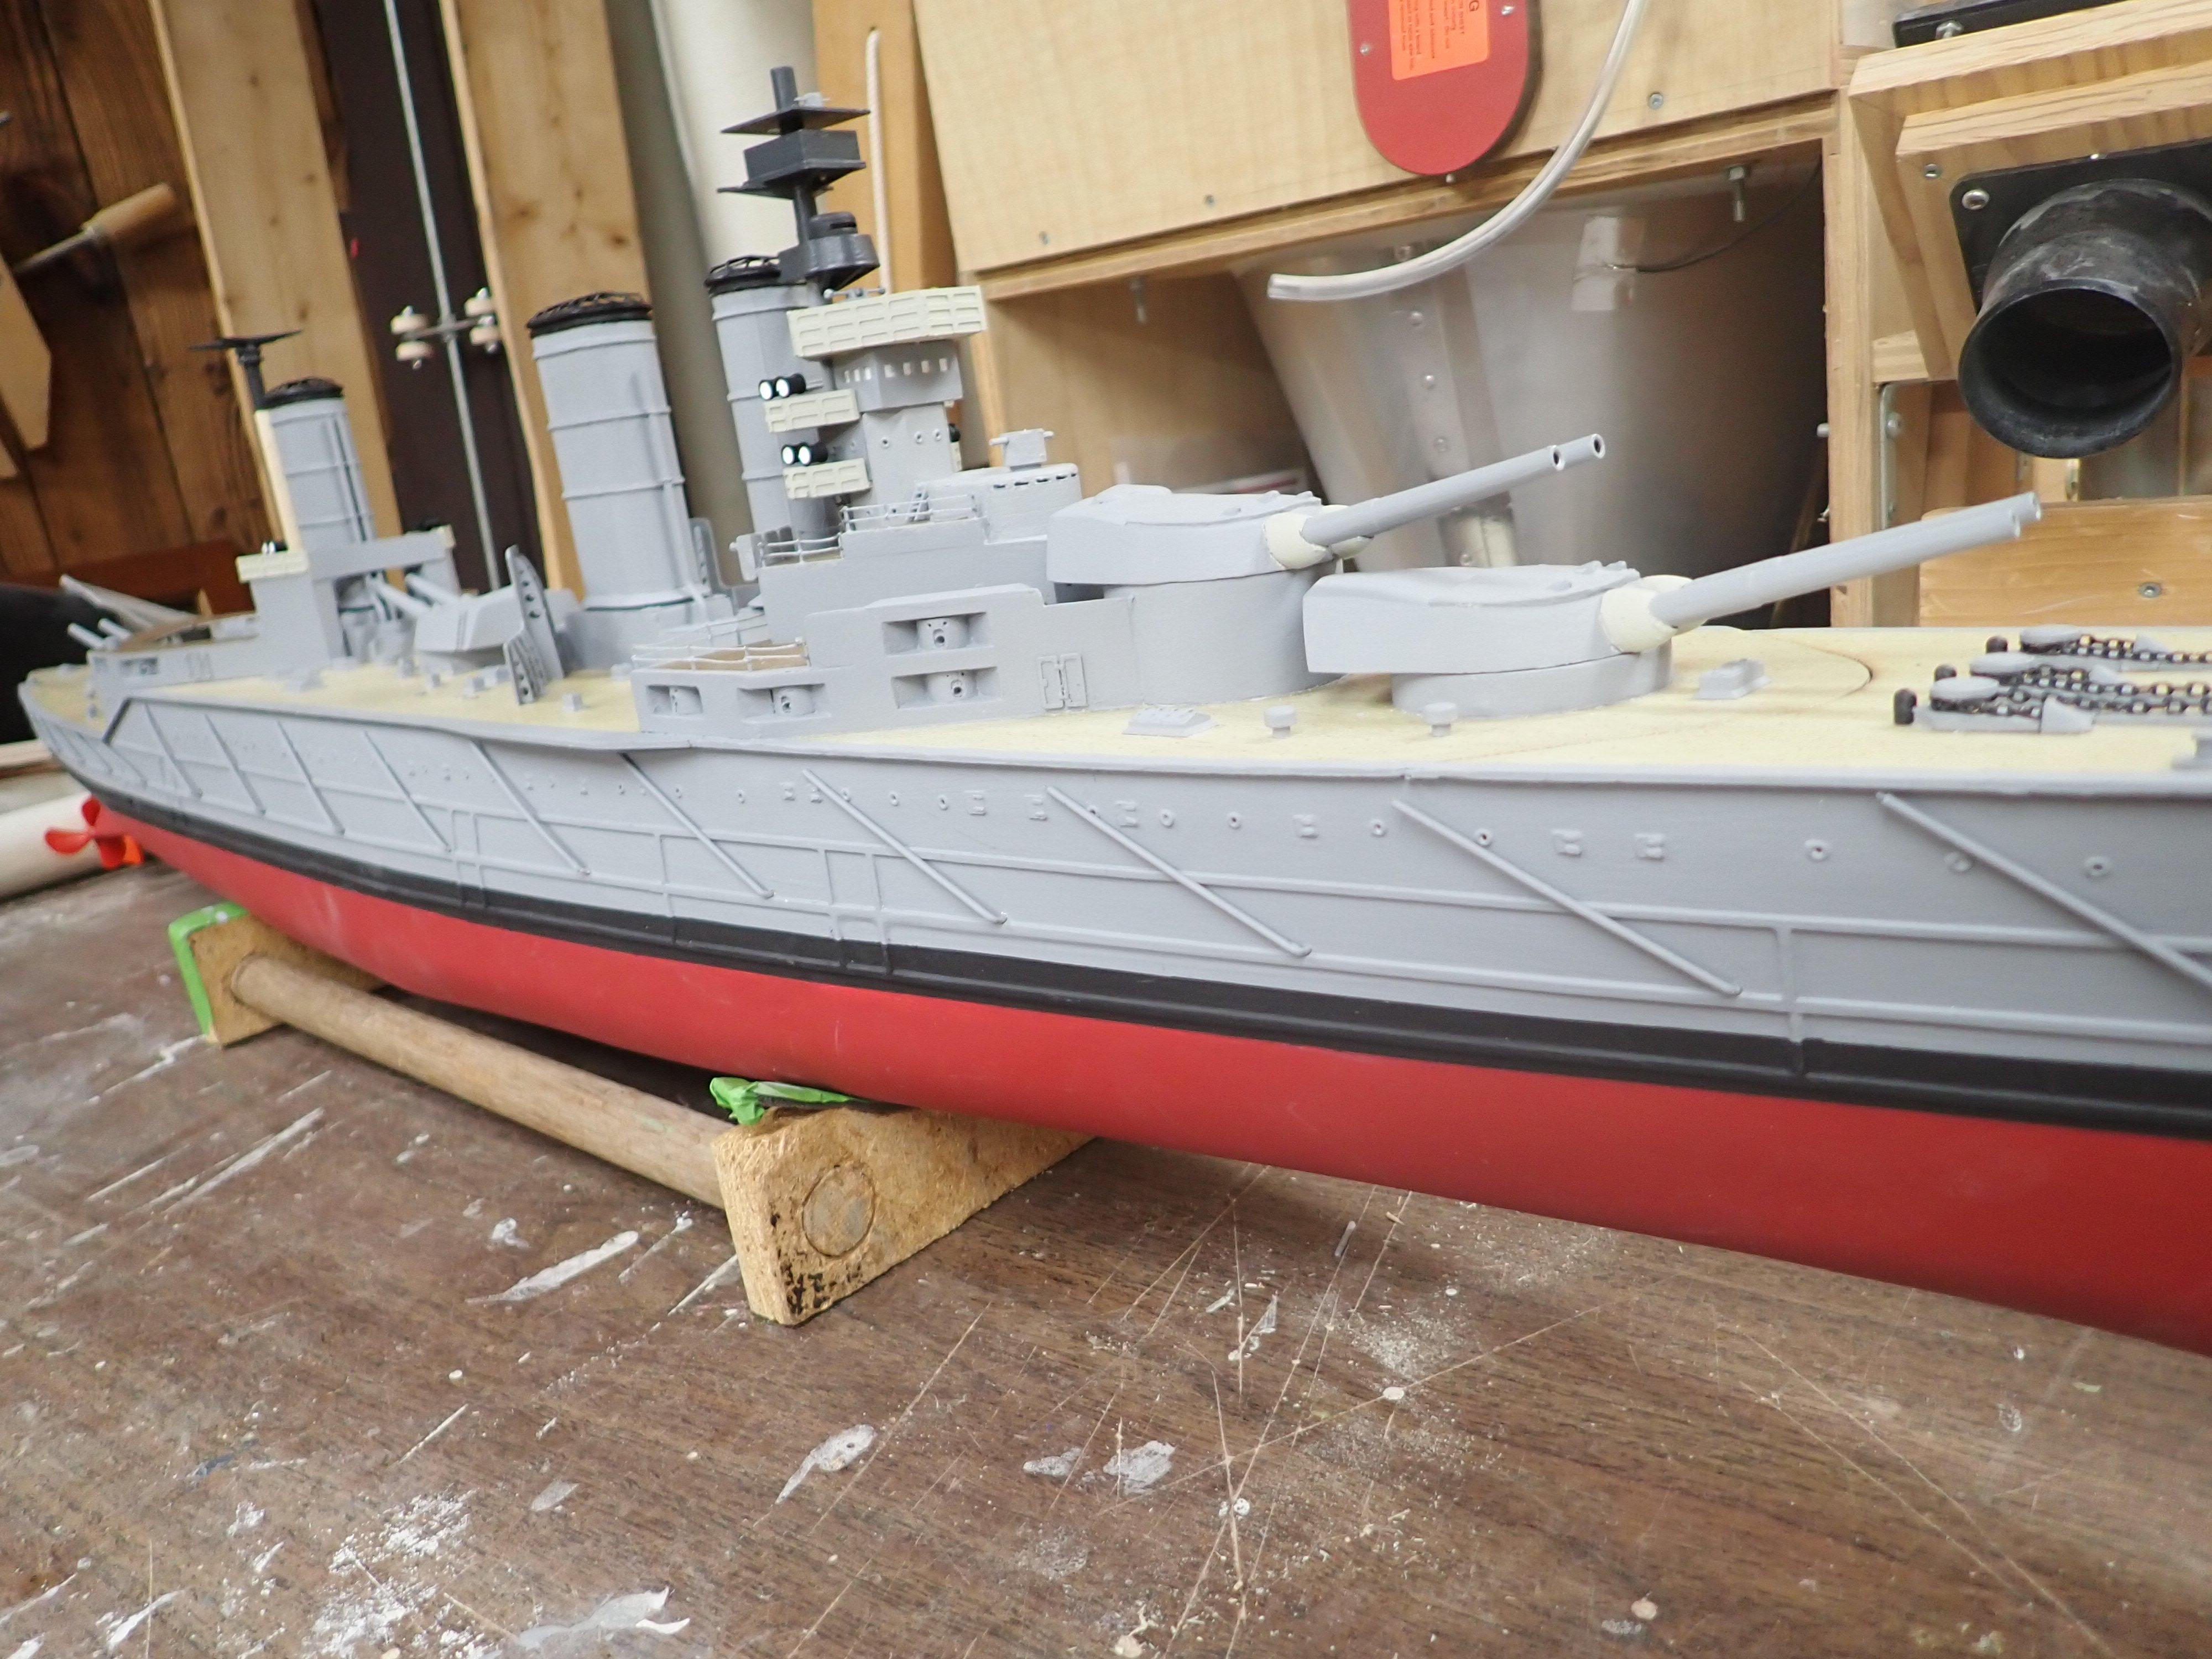
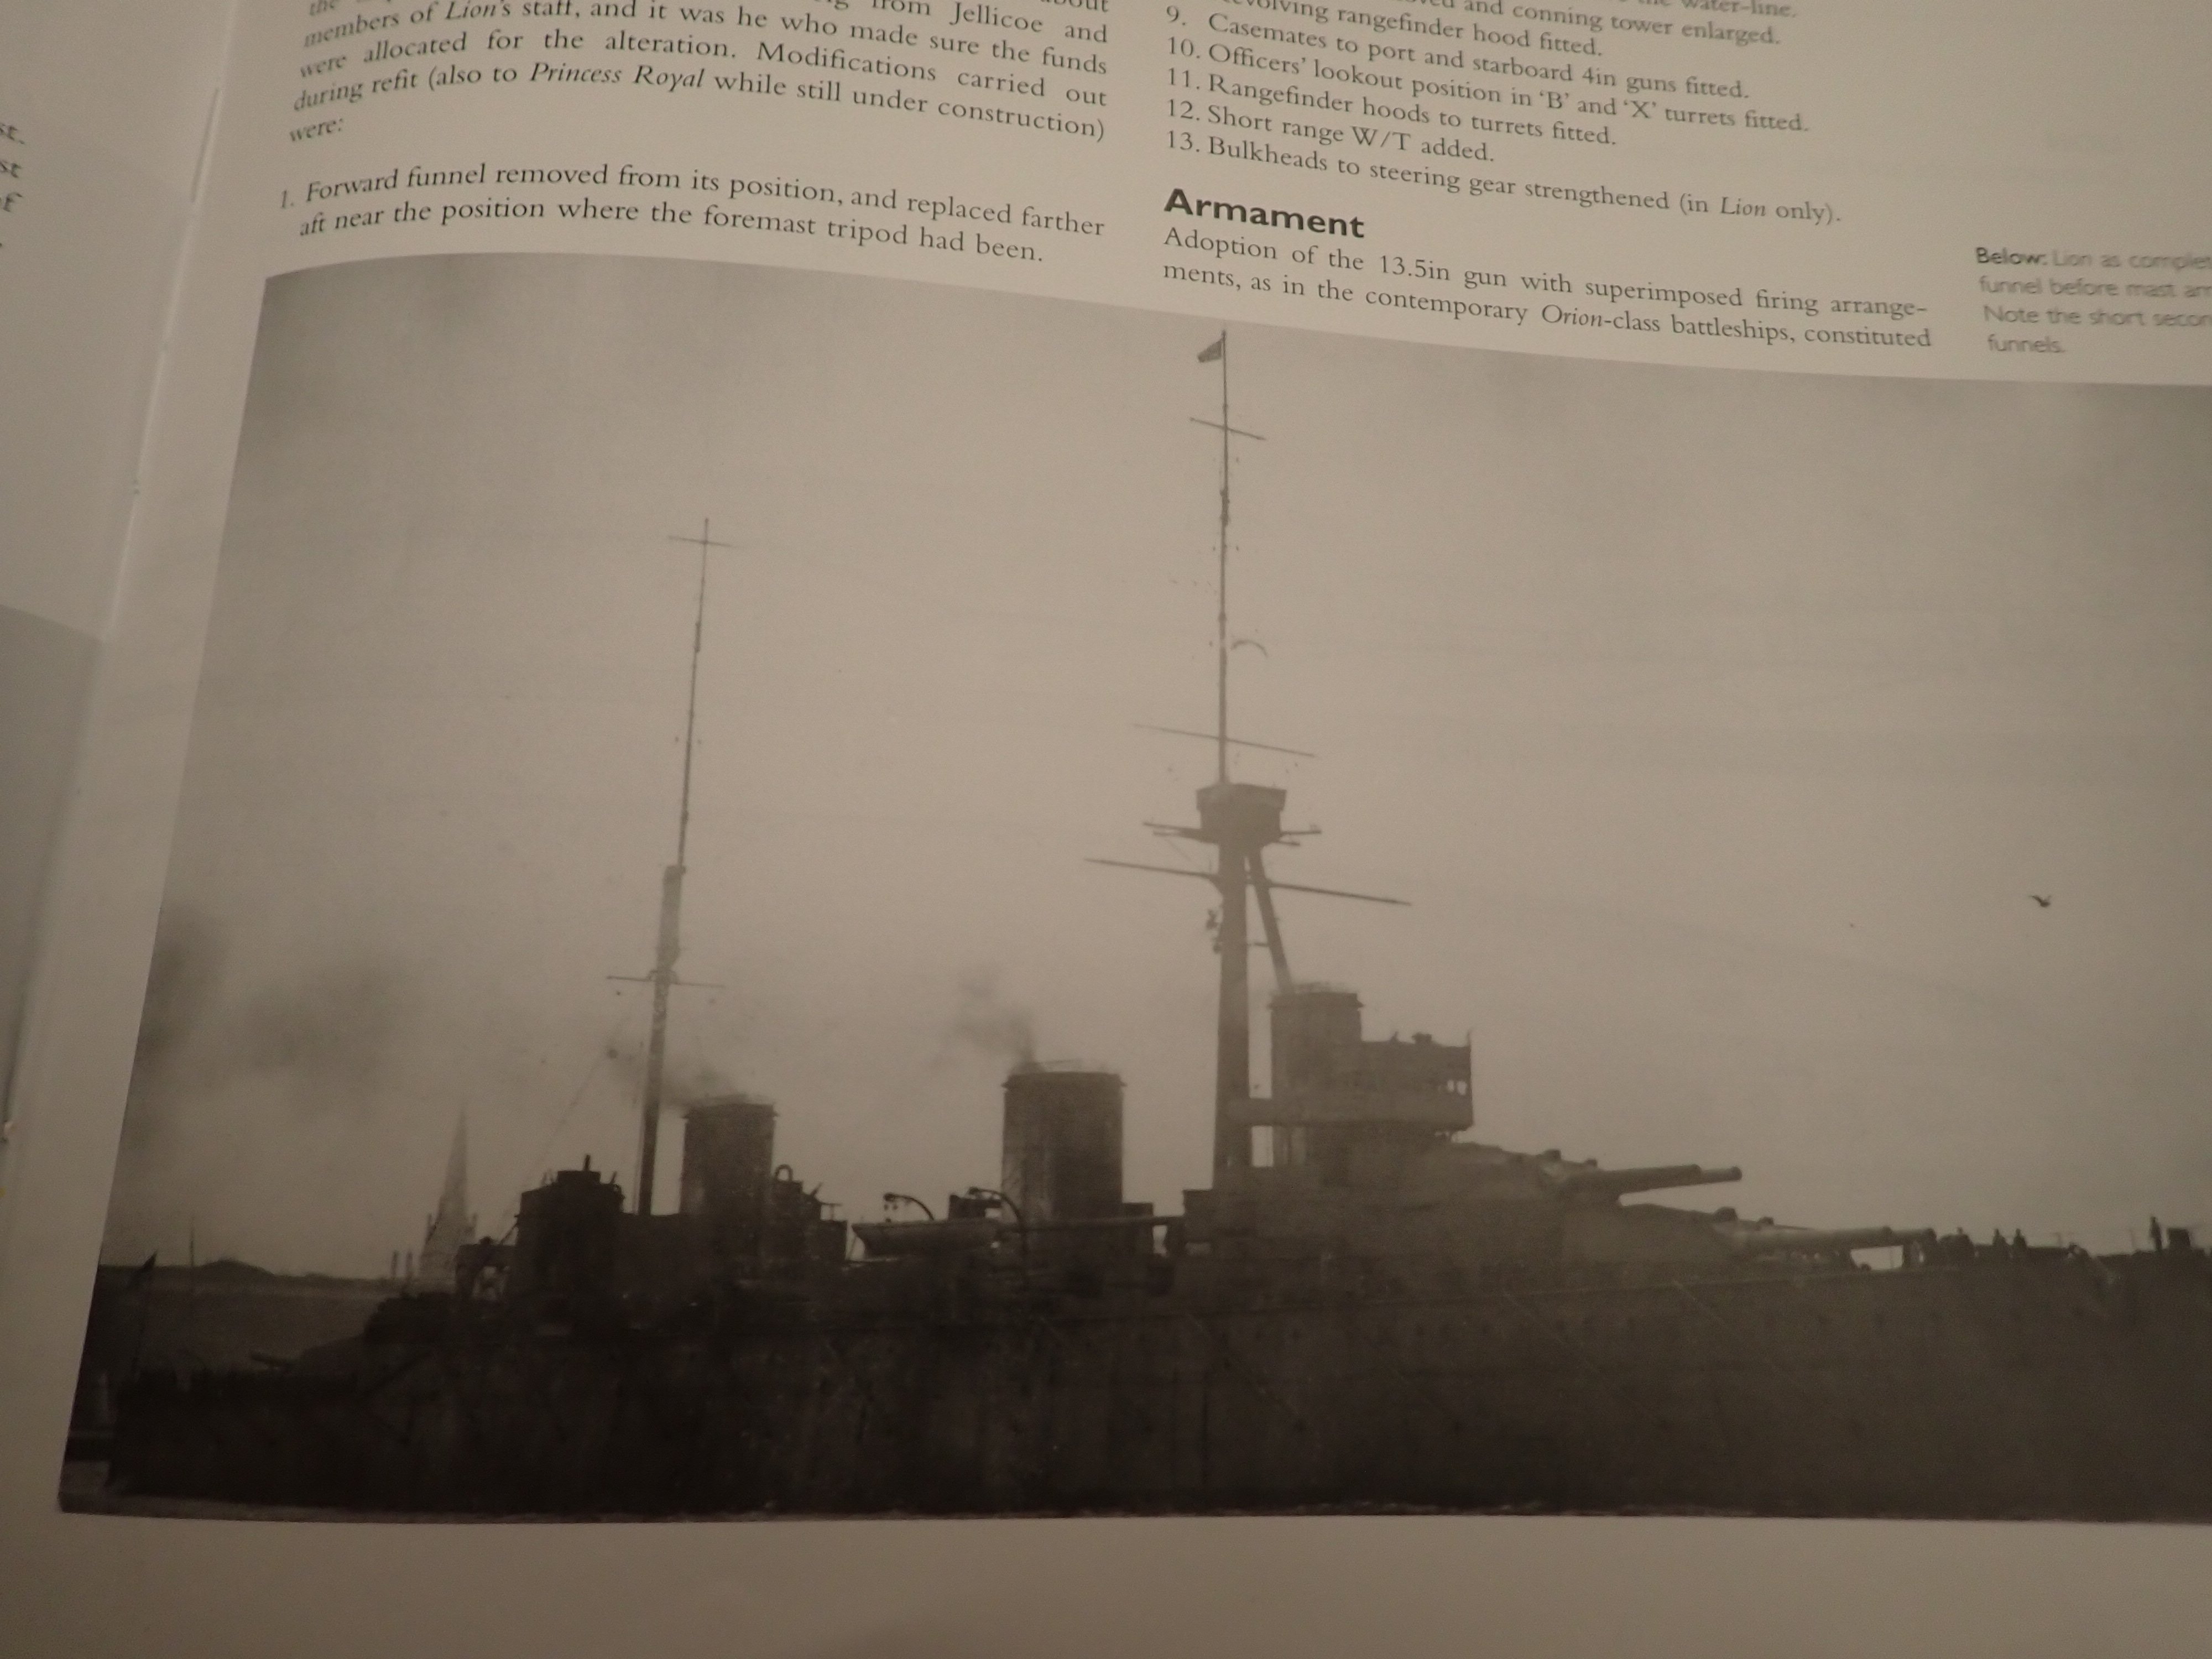
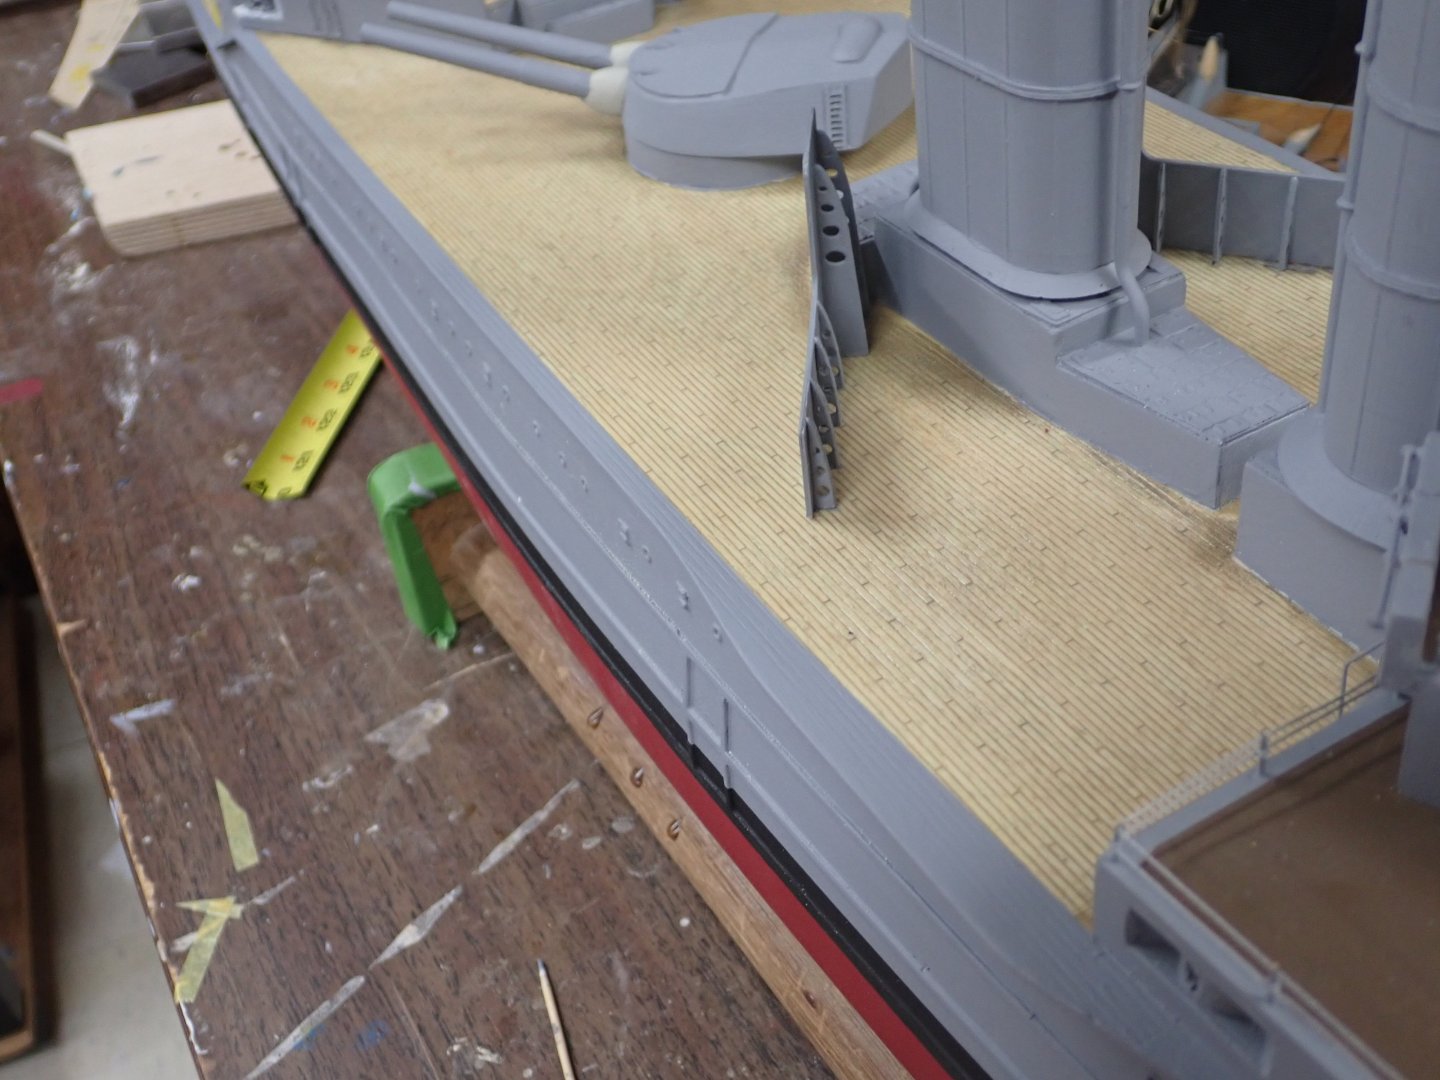
Rained today so no pool testing. I finished painting the grey around the deck periphery and on the torpedo net storage shelf. She has a much more finished appearance with that done. Also reprinted all my weather deck hatches, skylights, bollards, cleats, and breakwater with the smaller 0.2mm nozzle and everything came out nice and crisp. Drew the 13.5" director platform and "spotting top" in CAD and printed them too. Reprinted parts. Torpedo net shelf and deck perimeter painted. Director platform above compass platform; spotting top above that; fore topmast inserted but not trimmed to length yet. Sorry for the focus. It turns out my foremast is a little closer to the funnel than drawn so I will have to make some adjustments to the spotting top and reprint. I still, as when I was a teenager, have difficulty seeing in the drawings exactly how men climbed up to these platforms,especially as Norman drew the foremast with tripod supports from aft which is not historically accurate. Supports were deleted during a refit early in her career when they swapped the positions of the foremast and fore funnel --- she was actually built with the funnel between the supported foremast and the compass platform which led to embers falling onto the compass platform and the poor men in the spotting top living in the smoke stream from the funnel! They wisely corrected that....🤔...and deleted the mast supports while they were at it. Early photo of Lion as built. You can just imagine the smoke and heat from the funnel spilling up the mast. Apparently the mast got so hot one couldn't touch it. Note also the other two funnels are shorter. Spotting top is seen but the director platform was a later modification. Lowest yard was removed when director was added. Thanks for following!


-
Geez Marc, you gave me a scare!! Checked in for the first time in a while and saw this, thought you must be very ill indeed.......scrolled upto see that you're just a busy guy.....what a relief!! 👍
- 2,699 replies
-
- 2
-

-
-
- heller
- soleil royal
- (and 9 more)