Ian_Grant
-
Posts
2,156 -
Joined
-
Last visited
Content Type
Profiles
Forums
Gallery
Events
Everything posted by Ian_Grant
-
 John, great work on this small-scale model! What did you use for ratlines?......I too have a model which would need ratlines at 1/10" intervals but have not found something suitable.
 -
Looking really good! Your work is very neat. I have to put rolled up torpedo nets along the deck of my WWI RC battlecruiser and I thought of Tulle but didn't think it practical to try to roll up 4ft lengths, so I bought braided line which will represent the nets, when dyed black. Hey, it's only RC........😉
-
Sorry to confuse; yes this is a build log for an escort carrier but I was commenting on the castle class corvette (K488) behind the carrier in the photos. My two buddies in the RC boat club have flower class corvettes at 1/48 which are manageable at about 48", but printing the bigger castle class at the same scale would be 63".
- 51 replies
-
- 2
-

-
- Puncher
- escort carrier
- (and 1 more)
-
Beautifully precise, neat work. And, "my ruler messed up"....Ha Ha 😀
-
Hi Brad; just found this build log after googling for 3d printable ship files. Is that boat in the background the Castle Class corvette from Bensworx? Did you print it at 1/48 scale? If so, what is her ballasted weight to set her at proper waterline? Is she awkward to lug around at her length? I just bought the Castle files today (on sale 50% off!) from cgtrader. Not sure I can print the hull bits at 1/48 in my Bambu A1's build volume, without learning how to "cut" in Bambu Studio. Maybe 1/64 would be easier but two guys in my RC boat club have 1/48 Flowers so it would be cool to hang with them........
- 51 replies
-
- 2
-
-
- Puncher
- escort carrier
- (and 1 more)
-
Unbelievable.......your thread must be thin as spider webbing......fantastic model in any scale but beyond outstanding at this scale. I have one in a box; I know how tiny it is.
- 326 replies
-
- 2
-

-
-
- Sovereign of the Seas
- Airfix
- (and 1 more)
-
A LEGO Technique ropewalk! Very cool. In a similar vein, here is my meccano serving machine using parts I had as a kid: And let's not forget the LEGO Techniques drivable full-size Bugatti, powered by 2304 LEGO Power Functions motors ganged together. The LEGO car is the one on the right. 😏 Apparently they have also built a similar Mclaren P1 now.

-
Looking great! Did she have AA guns? Looking forward to the "on-the-water" video next spring....
-
Cameras are so unforgiving, but not a glue mark or paint error in sight. Immaculately built...
-
I saw those chronometers years ago, I think at the Royal Observatory Greenwich. I picked up a little book about him and them; loved the description of his "temperature testing" ie one room's window open in winter, to verify one cold unit against a second warm one. The genius of our ancestors always impressed me, particularly clockmakers and astronomers.
-
Is this the same John Harrison who perfected the chronometer?
-
I didn't realize how small this ship is until that shot with your fingers - wow great work!
- 166 replies
-
- 1
-
-
- Red Jacket
- Marine Model Company
- (and 2 more)
-
I was thinking that too - what did you use?
- 166 replies
-
- 1
-
-
- Red Jacket
- Marine Model Company
- (and 2 more)
-
Glen, given your praise of this film, how can you not select the whaler "Essex" being sunk by a sperm whale for your next SIB..........?
- 156 replies
-
- 4
-
-
- Queen Annes Revenge
- bottle
- (and 1 more)
-
Glen I am gobsmacked by its beauty and originality (and difficulty level)! And that stand design! Just clicking on "wow" doesn't come close to representing my awe......I say it every time you finish a build, but "how are you going to top this?"...........yet you manage to do so every time.
- 156 replies
-
- 4
-
-
-
- Queen Annes Revenge
- bottle
- (and 1 more)
-
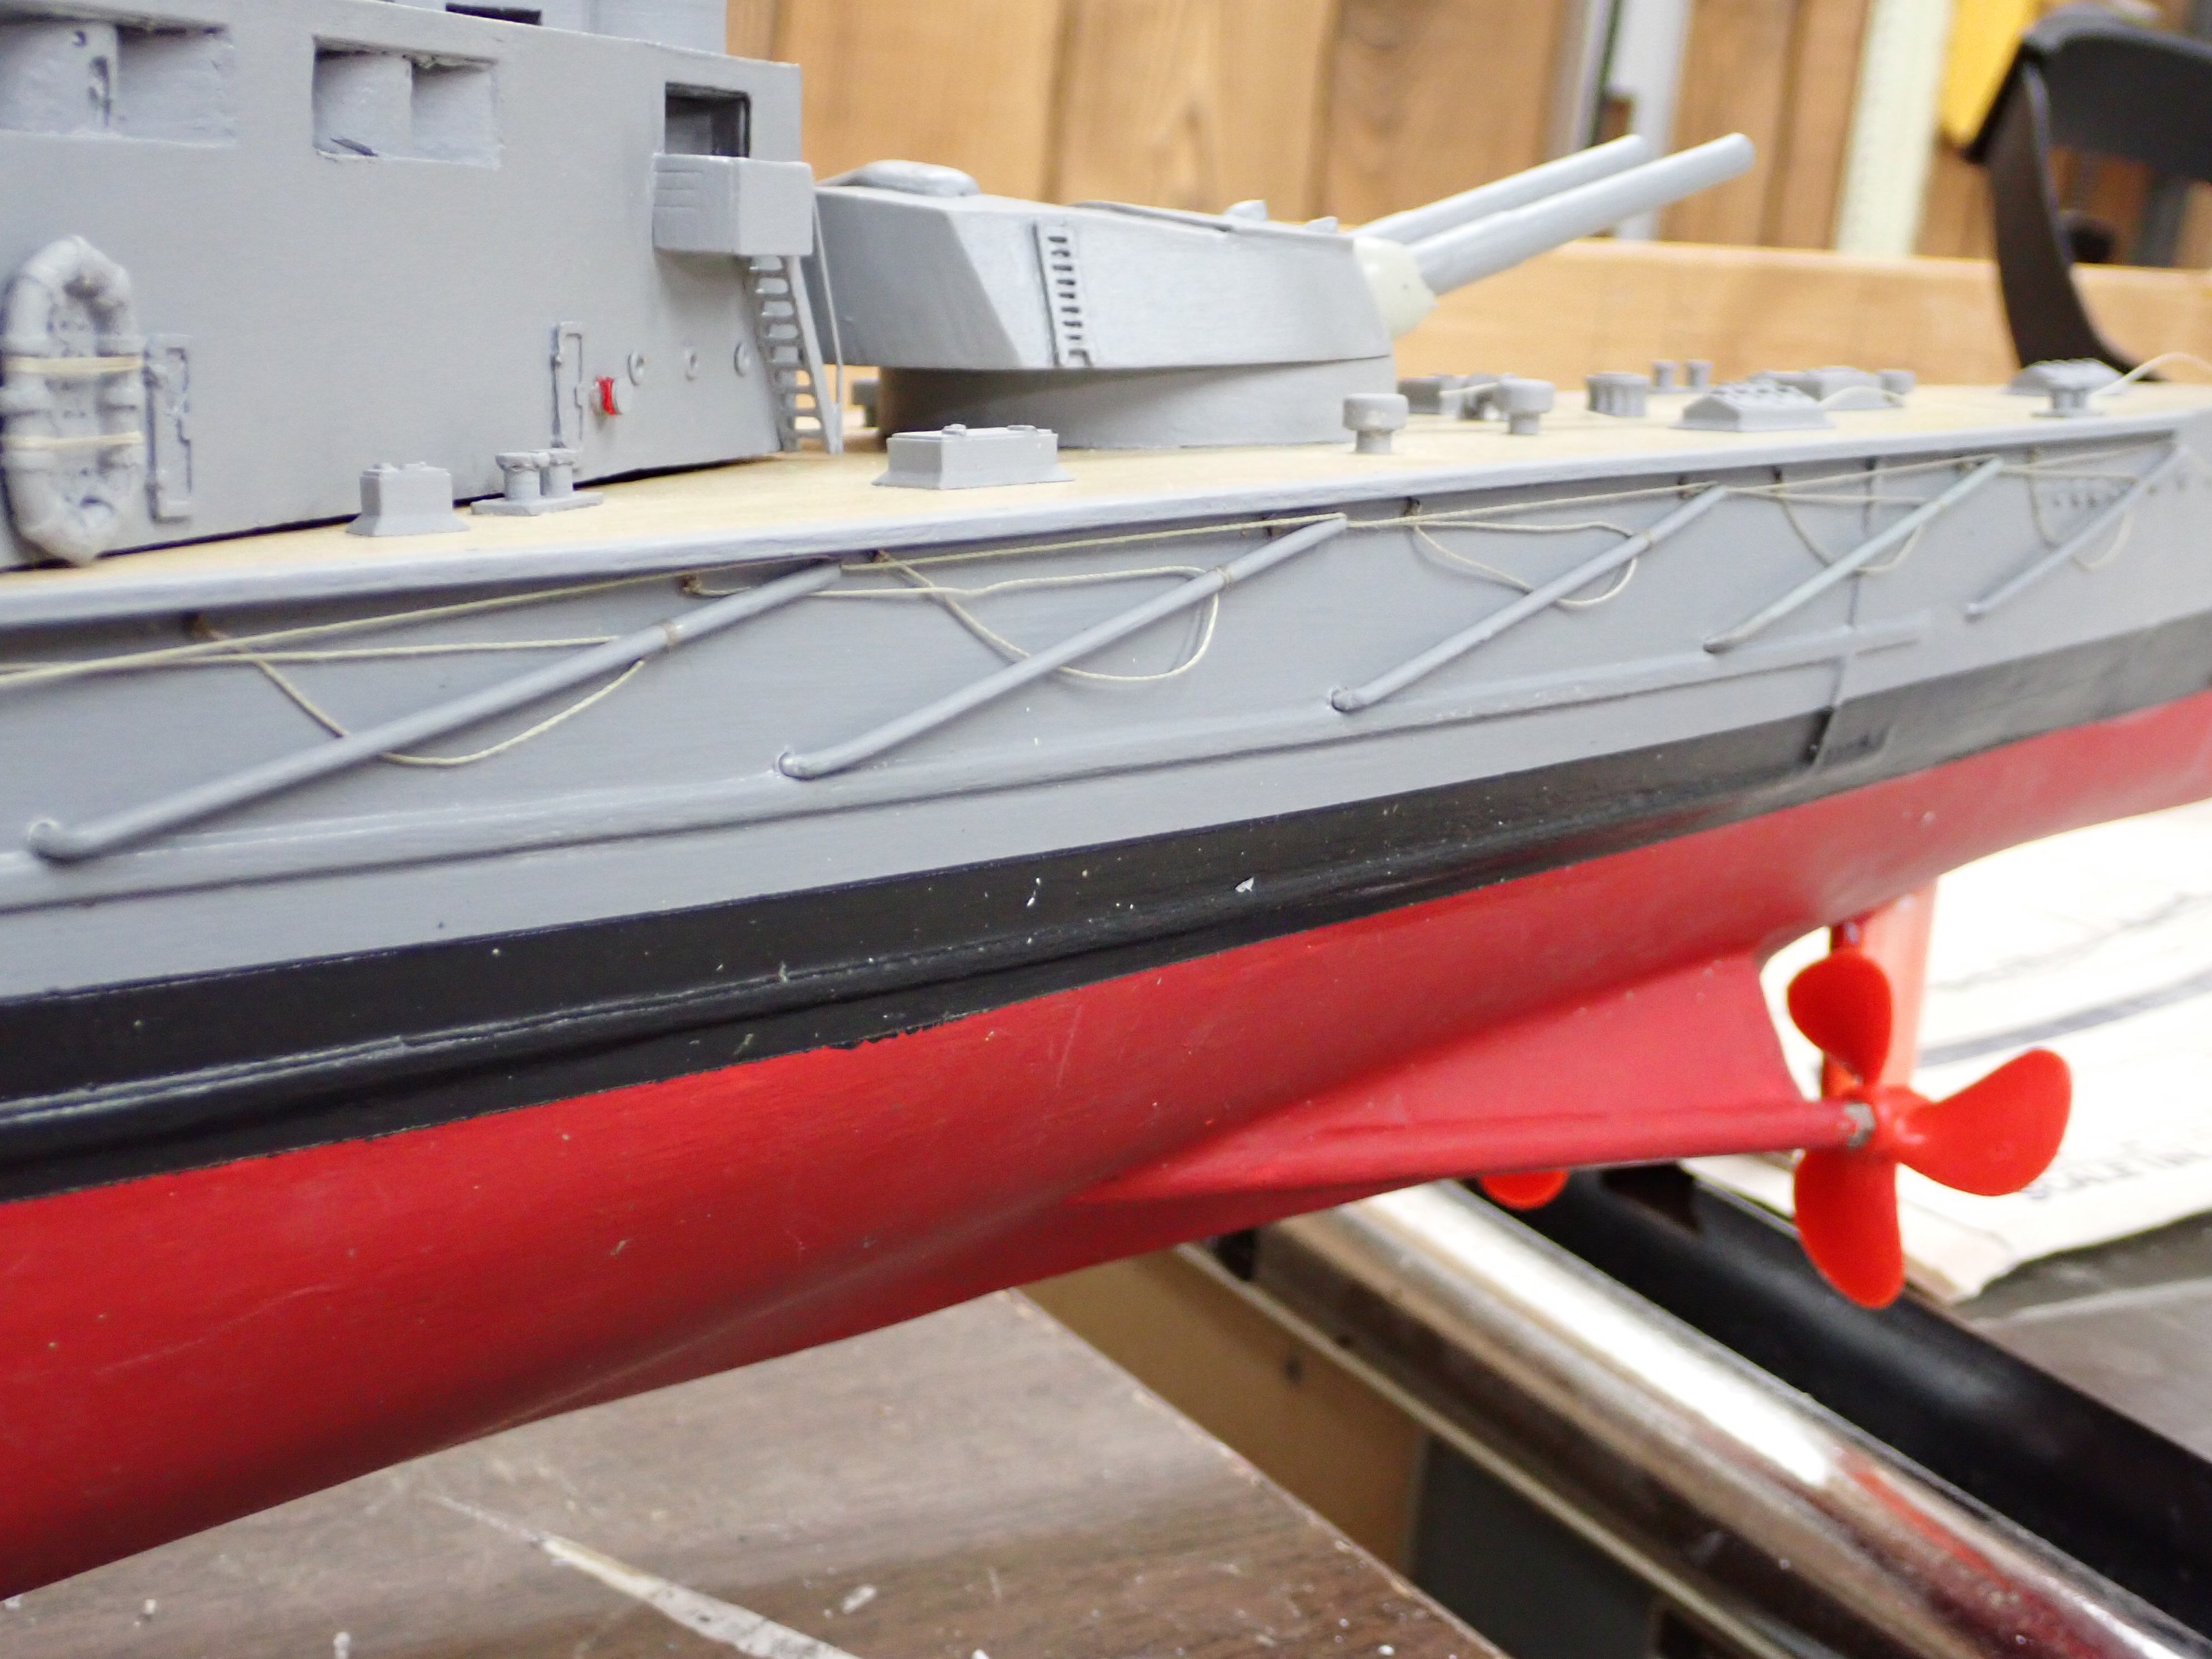
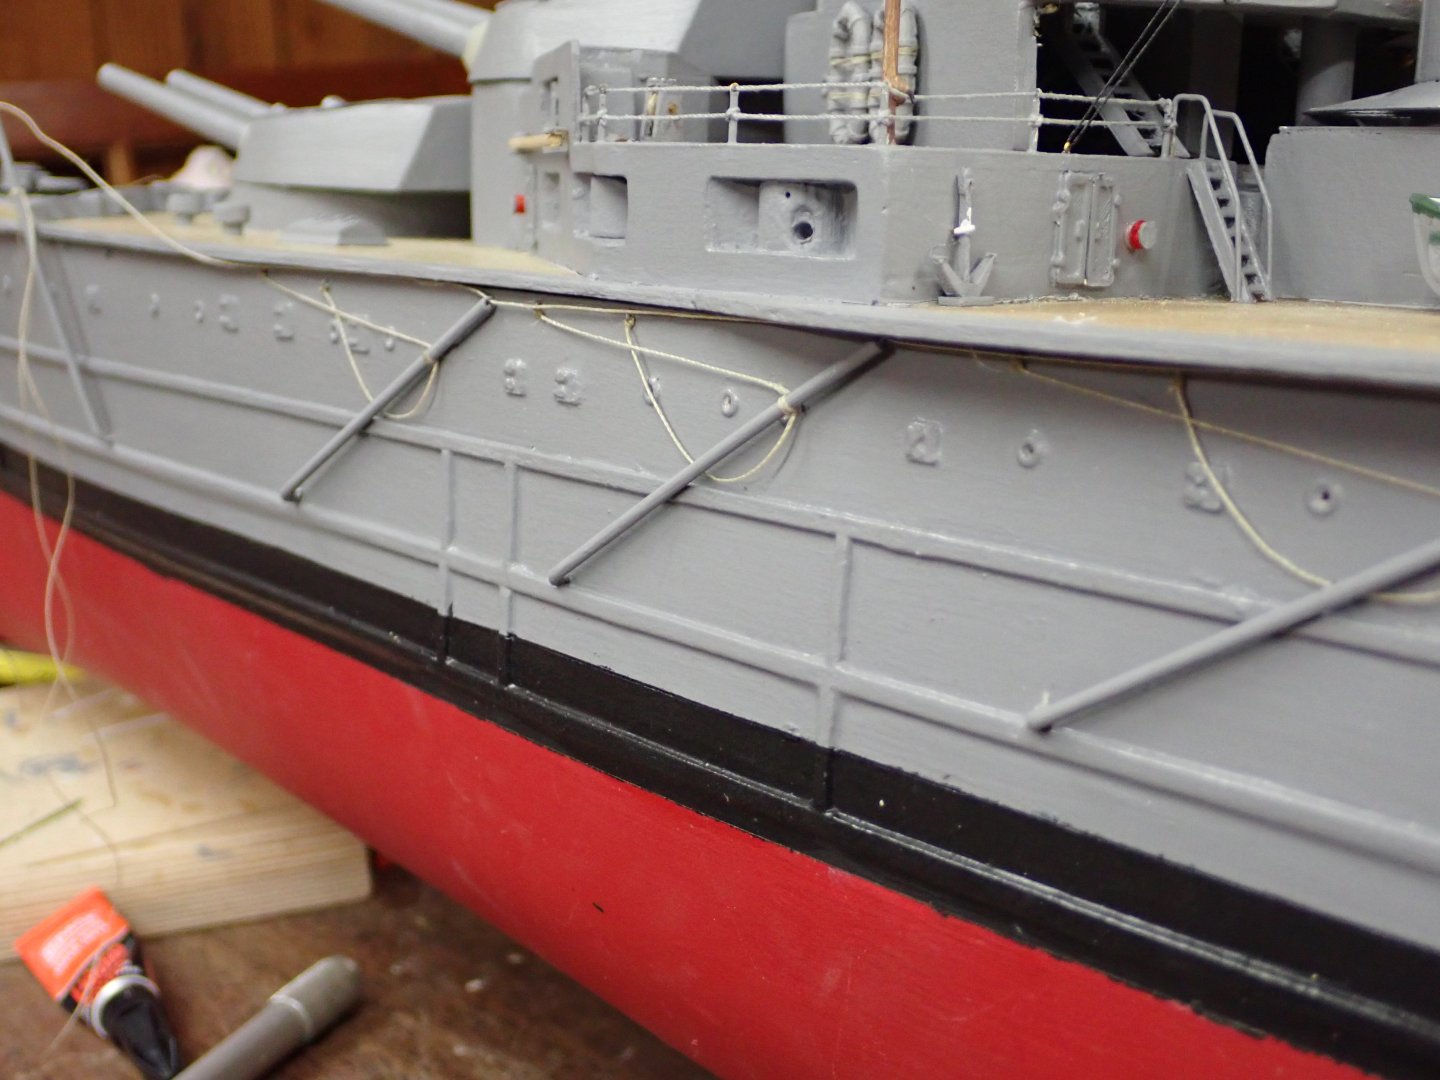
Working on the torpedo net booms and rigging. I've been putting this off for a long time and it is as tedious as I expected. Here are a couple of pics on the port side, with the booms' forward and aft topping lifts and jackstay rigged. I just tied the lifts to brass etch eyes glued into tiny drilled holes in the hull. Strictly speaking the booms' ends should reach right up to deck level since the torpedo nets were "always" laced onto the jackstays, but I need to lift off much of the deck for access and the torpedo nets will come with it, hence the booms cannot be attached. I copied teenage Ian's simple solution of bending the tubes 90 degrees and inserting into drilled holes in the hull rather than trying to produce a set of 32 tiny U-joints or such. I'm now down to a dozen brass etch eyes and ordered yet more which I will need for the starboard torpedo booms' rigging, and the main deck railings. Also made some prototype Hotchkiss guns out of brass tube, some scrap brass etch, and evergreen, to mount in the 3D printed enclosure. Also worked on QF-3 Vickers guns of which she had four. I made two prototypes of slightly different sizes, neither of which I can find now. They consisted of a micro brass tube barrel inserted through a 3d-printed base and a two-piece breech assembly. They looked pretty good, planning some additional brass etch detail, but the reason I made two different ones is I couldn't decide on the size appropriate for crew members. Difficulty is I have no dimensions for these Vickers guns. I searched yet again for some crew figures and this time found a lovely set of 10 resin-printed Royal Navy WWII bridge crewmen, available in several scales, on Etsy of all places. In my case the ship is 1/150, and the nearest of the many available scales are 1/144 and 1/160 representing men of 6ft and 5ft6in stature respectively. Decided on the 1/160 set. The CAD is very impressive; makes me wish I was making a 1/48 scale corvette. They would be awesome. Waiting to see how they look at 1/160.....🤔. They are from WWII not WWI but at this scale who's to know? I'll be lucky if I can paint them half decently. When they arrive I can decide on the Vickers gun size and whether to change the height of the Hotchkiss guns and/or enclosure. They are here: https://www.etsy.com/ca/listing/1424701804/wwii-royal-navy-the-bridge-10-figure-set They're pictured on a WWII Flower Class corvette. Speaking of which, there are two guys in my RC club with 1/48 Flowers. "CGTrader" has 3D print files for an entire 1/48 Flower, less some detailing, for $50, and the same for a "Castle" class corvette. I thought it might be fun to print a Castle class to cruise with them, but at 1/48 this larger ship would be 63" long with the concomitant weight - 9" longer and much less narrow than "Lion" which is already a bit unwieldy to carry. I might buy the file and print one at 1/64 ("S" scale) which would be 47-1/4" long, much more manageable. ........... If I ever complete already queued projects. 😏


-
That's really, really nice rigging thread. Who did you buy it from?
- 166 replies
-
- 1
-
-
- Red Jacket
- Marine Model Company
- (and 2 more)
-
Amazing! I must buy the multi-colour AMS Lite for my A1; didn't buy it earlier due to budgetary constraints. 😏 Oops! I see the black Friday sale is on - woo-hoo - must consult the Admiral.
- 34 replies
-
- 1
-
-
- Queen Mary 2
- 3d printed
- (and 1 more)
-
I forgot to mention Gregory Peck's "Hornblower" which does a pretty good job of merging "The Happy Return" and "A Ship of the Line" books. The only thing I did not like was his exaggerated "Ha-hm"; why couldn't he just clear his throat like a normal human??
- 156 replies
-
- 3
-
-
- Queen Annes Revenge
- bottle
- (and 1 more)
-
But seriously now, I'd like to recommend two excellent older classic movies; "Damn The Defiant"(1962) and "Billy Budd"(1962). The first stars Alec Guinness as a frigate captain having to deal with both the French and his socially connected but insubordinate first lieutenant played by Dirk Bogarde (one of his finest roles). The second stars Peter Ustinov as a captain who presses some seamen, among whom is Terence Stamp in his first role, as Billy, who falls afoul of the sadistic Master At Arms played by Robert Ryan. I had both on VHS (haha) but I believe I only have Damn The Defiant on DVD. Even my wife liked it. In fact, if the Jays weren't playing tonight I'm now in the mood to have watched it yet again......
- 156 replies
-
- 4
-
-
- Queen Annes Revenge
- bottle
- (and 1 more)
-
And the third type is those that can't recall the title or who was in it..........
- 156 replies
-
- 5
-

-
- Queen Annes Revenge
- bottle
- (and 1 more)
-
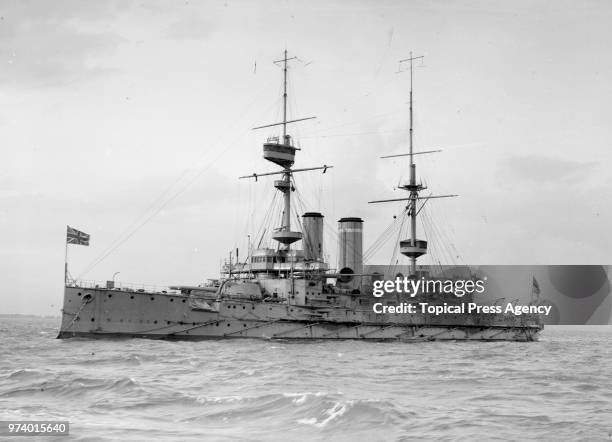
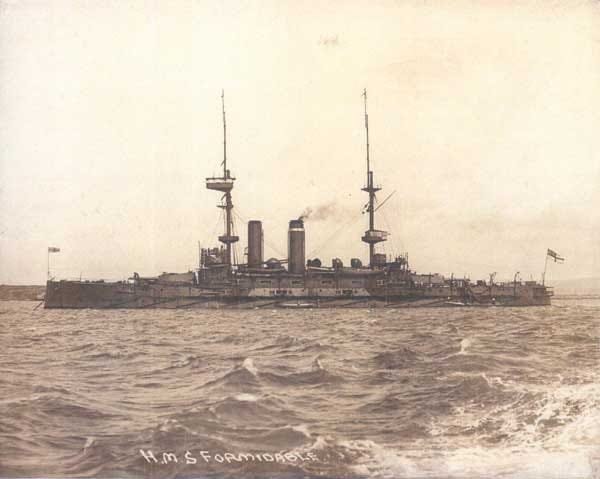
Yes it's a good example of boat boom usage, but this mid 20th century ship has no torpedo nets or booms to get in the way. I looked up a few more images of Formidable (commissioned 1904) as mentioned by @Javelin. The images below show that her torpedo nets were stowed on some sort of shelf running along her side well below main deck level, with the attached booms obviously reaching only to them. This leaves plenty of room to attach boat booms higher up. I dragged out my "British Battleships of WWI" tome and leafed through. It shows ship classes designed starting only in 1904 unfortunately. Like Lion, most ships' torpedo booms reached up right to deck level to where the nets were brailed up, meaning that any boom attached to the hull would be "clamped" in place by overlapping torpedo booms and their topping lifts. This has been a useful discussion; thanks everyone! I can now see why Ough depicts rear boat booms pivoting from the aft superstructure above deck level; I will have them follow inside the railing and I suppose provide a cradle to hold up their free ends. Still haven't decided whether to add the other booms shown in the perhaps errant 3D. They're not in any drawings in my book, at least that I have noticed.
-
Oh, now I see! Maybe..........Ough shows a boom mounted on the side of the aft structure which is perhaps for this. It's mounted at rail level with no on-deck support easily spotted but maybe this is that boom........Too many booms, I'm getting a headache.........🤪 Will make for lots of interesting detail though.
-
Good guess, but the long boom on the main mast seen in the rendering going off photo to the left is a large crane to handle the well deck boats. There are two smaller cranes for the forward boats.