Keith Black
-
Posts
6,700 -
Joined
-
Last visited
Content Type
Profiles
Forums
Gallery
Events
Everything posted by Keith Black
-
 Thank you and thank you for joining in, Glen.
 -
That would make for a challenging build but the story is worth the telling, Paul. 👍
-
This is such an amazing build, Matthias. Truly inspirational.
-
The Peg is looking fantastic, Bob. Congratulations on getting all the ratlines tied. 👍
- 261 replies
-
- 3
-

-

-
- Victory Models
- Pegasus
- (and 3 more)
-
She's a beauty, John. Great looking wheel. 👍
-
Welcome to MSW. Sternwheelers have almost zero rigging. Glad to have you aboard.
-
I love British canal boating. I'm subscribed to Cruising the Cut, it's one of my favs and David John is a hoot. Had I life to live over I would have emigrated to England long ago and found out what living is like aboard a narrow boat.
-
Geordie, I'm glad to have you along for the journey.
-
In doing research on canal boats for images that might suggest Engel's cruiser was a converted canal boat I came across this canal boat image. Looks pretty similar. The Erie Canal was an important part of American history yet very little of that history has been explored here in MSW. Hopefully someone becomes interested in that wonderful history and wants to model the great workboat subjects that ooze from the muddy banks of the Great Cut. I'd be that Huckleberry except my remaining time is too limited for an already full picnic basket. https://www.eriecanal.org/boats-2.html I think I'm going to model just Billy and not the barge and cruiser. I know that's telling just half the story but half the story is all that I'm really interested in and have time for.

-
Hello from the banks of the Tyne
Keith Black replied to Geordie Tyne's topic in New member Introductions
Geordie, welcome to MSW. Good looking builds, glad to have you aboard. -
Lynn, golf season is over. Time to get back to work on the Phantom.
-
Thank you, Phil. Never in Fulton's wildest nightmare would Billy have appeared.
-
Maybe, Bob. I thought it kinda looked like monkey rudders but I'm not sure. For me it's just one of the many curiosities I have in my collection of ugly sternwheelers. Oh my, Harvey.
-
Ken, I think Engel bought a couple of buildings and a chicken coop and cobbled them together on the main deck. Kind of a sternwheeler crazy quilt. The car ferry is just one of my many photos of ugly sternwheelers that was the closest one to grab and attach in answering John. It's not one I envision building but yes, what is going on with the wheels? It's gas powered but there are some extra large pieces at the stern of the wheels I'm unfamiliar with.
-
I can only try.

-
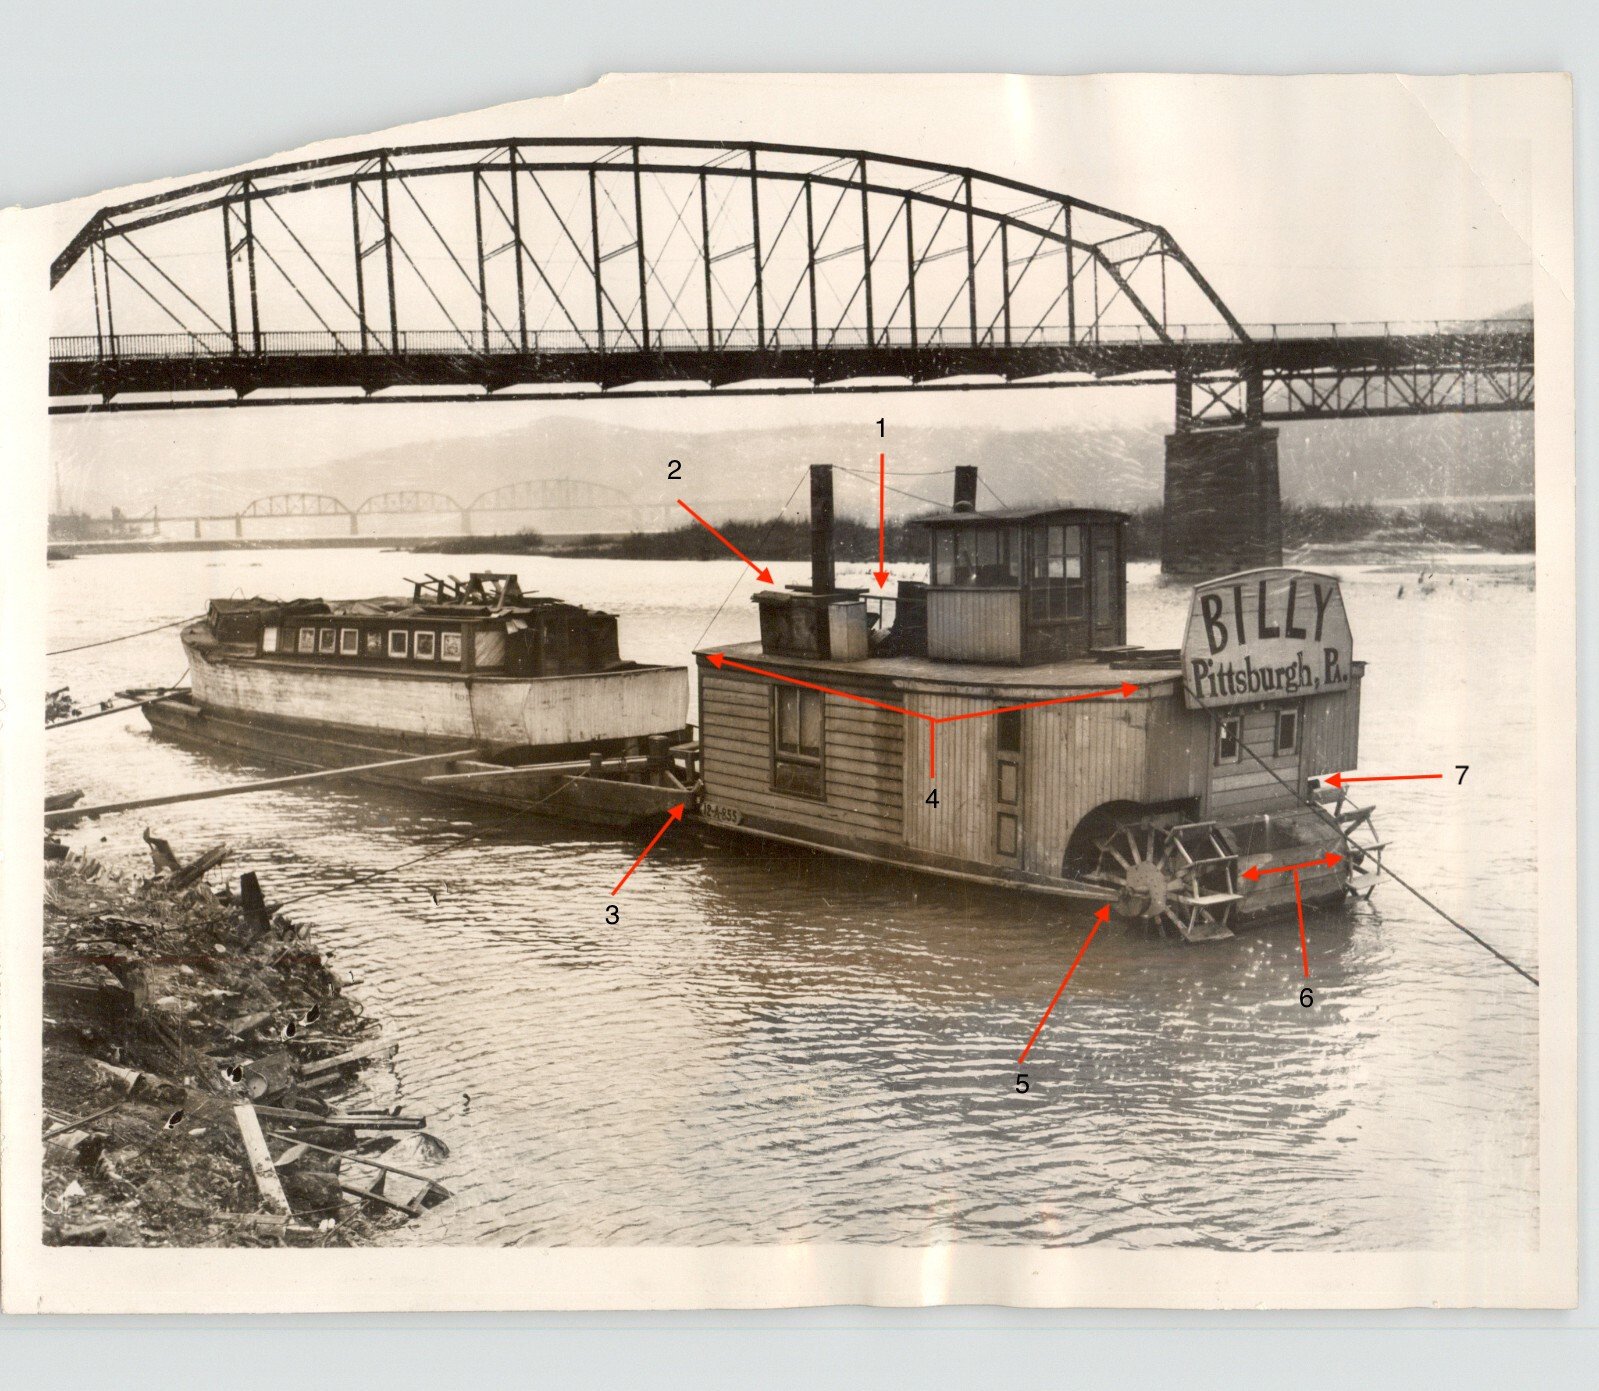
I'm having a devil of a time trying to figure out Billy's dimensions, Billy looks like a M.C. Escher creation. Is that a 7 foot door with 3 foot transom window or a 8 foot door in total. If it's 8 feet in total the wheels are super tiny and Billy is only about 14 feet wide. The window size offers no relief. I'm thinkin' Peyote is the only cypher to Billy's dimensions. 1. Appears to be a handrail but I don't understand the why of it? 2. This almost looks like a companionway to below. If this wasn't how to get below maybe the handrail was at a companionway opening to below? 3. Billy had a flat nosed bow and AO had Billy pinned to the barge. There wasn't any cutting the barge loose to save Billy, wherever the barge went, Billy went. 4. There was a upsweep to the boiler deck from the bow to the stern. 5. There was a upsweep appearance to the wheels but I think that's just aesthetics as there isn't and structural strength provided, IMHO. 6. The engine was placed between the wheels and sat inline with the wheel shafts. Engel built Billy as a oneway ride down the Mississippi. Once Engel reached his destination Billy's traveling days would have come to an end, IMHO. Billy's wheels were so small (3 x 10 feet at most) I don't know if she could have made two knots on flat water towing that barge? No way was Billy coming back up the Mississippi with or without the barge! This means the engine could have come out of a scraped automobile or it could have been a salvaged gas powered marine engine, Scripps, Hall Scott, or other. I kinda like to think since Billy was a oneway ticket AO stuck a salvaged six cylinder automobile engine and transmission between the wheels doing away with the radiator and running straight Mississippi water through the water pump. I'll not be modeling an engine so one is free to use their imagination has to how Engel had Billy powered. 7. Exhaust

-
Gus, welcome to MSW. Glad to have you aboard.
-
She's coming along nicely. James. 👍 Eyebolts are super easy to make. I searched "eyebolt" in MSW's search function and copied one of the first links in the many choices of how to make eyebolts that came up. It's a subject that there have been numerous discussions on. Try making some eyebolts, if you're successful you can add those breeching ropes.
-
Ian, wild guess here.......were those spars used to hold the torpedo nets (removed after the Battle of Jutland in 1916) and the barrels (which have domed tops) were used to store the netting when not deployed?
-
I bet you're right, Steve. I wish I'd looked. *see Keith give Eric a nod and a smile. Paul, the port side was the center of attention from day one so it's only fitting that it should be on the last day.
- 457 replies
-
- 5
-
-
- sternwheeler
- Hard Coal Navy
- (and 1 more)