HOLIDAY DONATION DRIVE - SUPPORT MSW - DO YOUR PART TO KEEP THIS GREAT FORUM GOING! (Only 24 donations so far out of 49,000 members - C'mon guys!)
×


lmagna
-
Posts
5,885 -
Joined
-
Last visited
Content Type
Profiles
Forums
Gallery
Events
Everything posted by lmagna
-

Bell UH-1H Huey By lmagna - Dragon - 1/35 - PLASTIC
lmagna replied to lmagna's topic in Non-ship/categorised builds
I keep thinking of that every time I work with the stuff. One of the reasons I am going with so much PE on this build is to get some experience. At some point I have my 1/350 Houston build that has a fair amount of PE and some of it like the 1.1" guns, makes this stuff look huge! That is where I loose most of my parts. One second I am heading to where the part is to attach and the next second the tweezers are empty and the part has shifted into the next dimension! No cure for that unless I build a Waldo cage like Heinlein described in Waldo and Magic Incorporated and handle the parts that way! Another way I discovered was is to have the part successfully installed and then have it broken off in the process of getting the next part positioned! Very frustrating stuff. -
I second that. We have Ivars out here that has built a business pretty much strictly out of clams over the last eighty something years. Possibly the best New England Clam Chowder anywhere!
-
B-25 Mitchell "Meet Miss Runyon" by Javlin-HK-1/32
lmagna replied to Javlin's topic in Non-ship/categorised builds
I was up late recovering from my nightly bout with flying and dropping PE and I had not thought of that Kevin. At least that is the excuse I am going to use! I did not think in terms of 6. I spent more than that for my after market pilots just because I didn't like the faces on the ones that came with my kit! Finishing up on my first cup of morning coffee now and things are getting better. Are we going to get to see a Mrs. Runyon crew happily heading off to debriefing after another successful mission? I would love to see how you do them, especially if you explain how you achieved the results that I am almost certain will be spectacular. -
B-25 Mitchell "Meet Miss Runyon" by Javlin-HK-1/32
lmagna replied to Javlin's topic in Non-ship/categorised builds
Those crewmen are exceptional. The price is a little hard to choke down though! -
I think you got some very nice results with what you had to work with Denis. Definitely a unique seldom explored subject. No problem with adding the Memphis Bell to the set. Just build her in flight and do the same thing they did to the real aircraft. Suspend her above the other two from the shelf above. They apparently did some fantastic restoration work on the inside of the real Memphis Bell but no one will ever see it because she is suspended from the ceiling. But then I suppose a B-17 is so big, even on the ground the work inside would not gave been that visible either. Your shelf display area is beginning to look pretty nice with your finished builds.
-
I might question the term "Gentlman" as a descriptive term for that guy. "Looney", or possibly "Whackadoodle" might fit better in my mind. At least he is wearing boots and long sleeves. But then many people around here must think they live in Florida and wear shorts year around. I can do it, If people don't mind being blinded by my pale skin that never sees a proper sun, but not normally when I am just standing about not doing anything. Back in my hiking days I had no problem, and even preferred hiking in shorts even when snow was on the ground but when I stopped or reached camp I had to get some pants on! By the same token I do not do well in heat either. I have lived in the PNW so long that there is little need for my metabolism to become adjusted to much outside of cooler room temperatures. We do not have a climate of extremes here.
-
Good to see you moving along again on this fantastic little model. I will follow with joy and ever constant interest on how you improve the kit you started with.
-
Bell UH-1H Huey By lmagna - Dragon - 1/35 - PLASTIC
lmagna replied to lmagna's topic in Non-ship/categorised builds
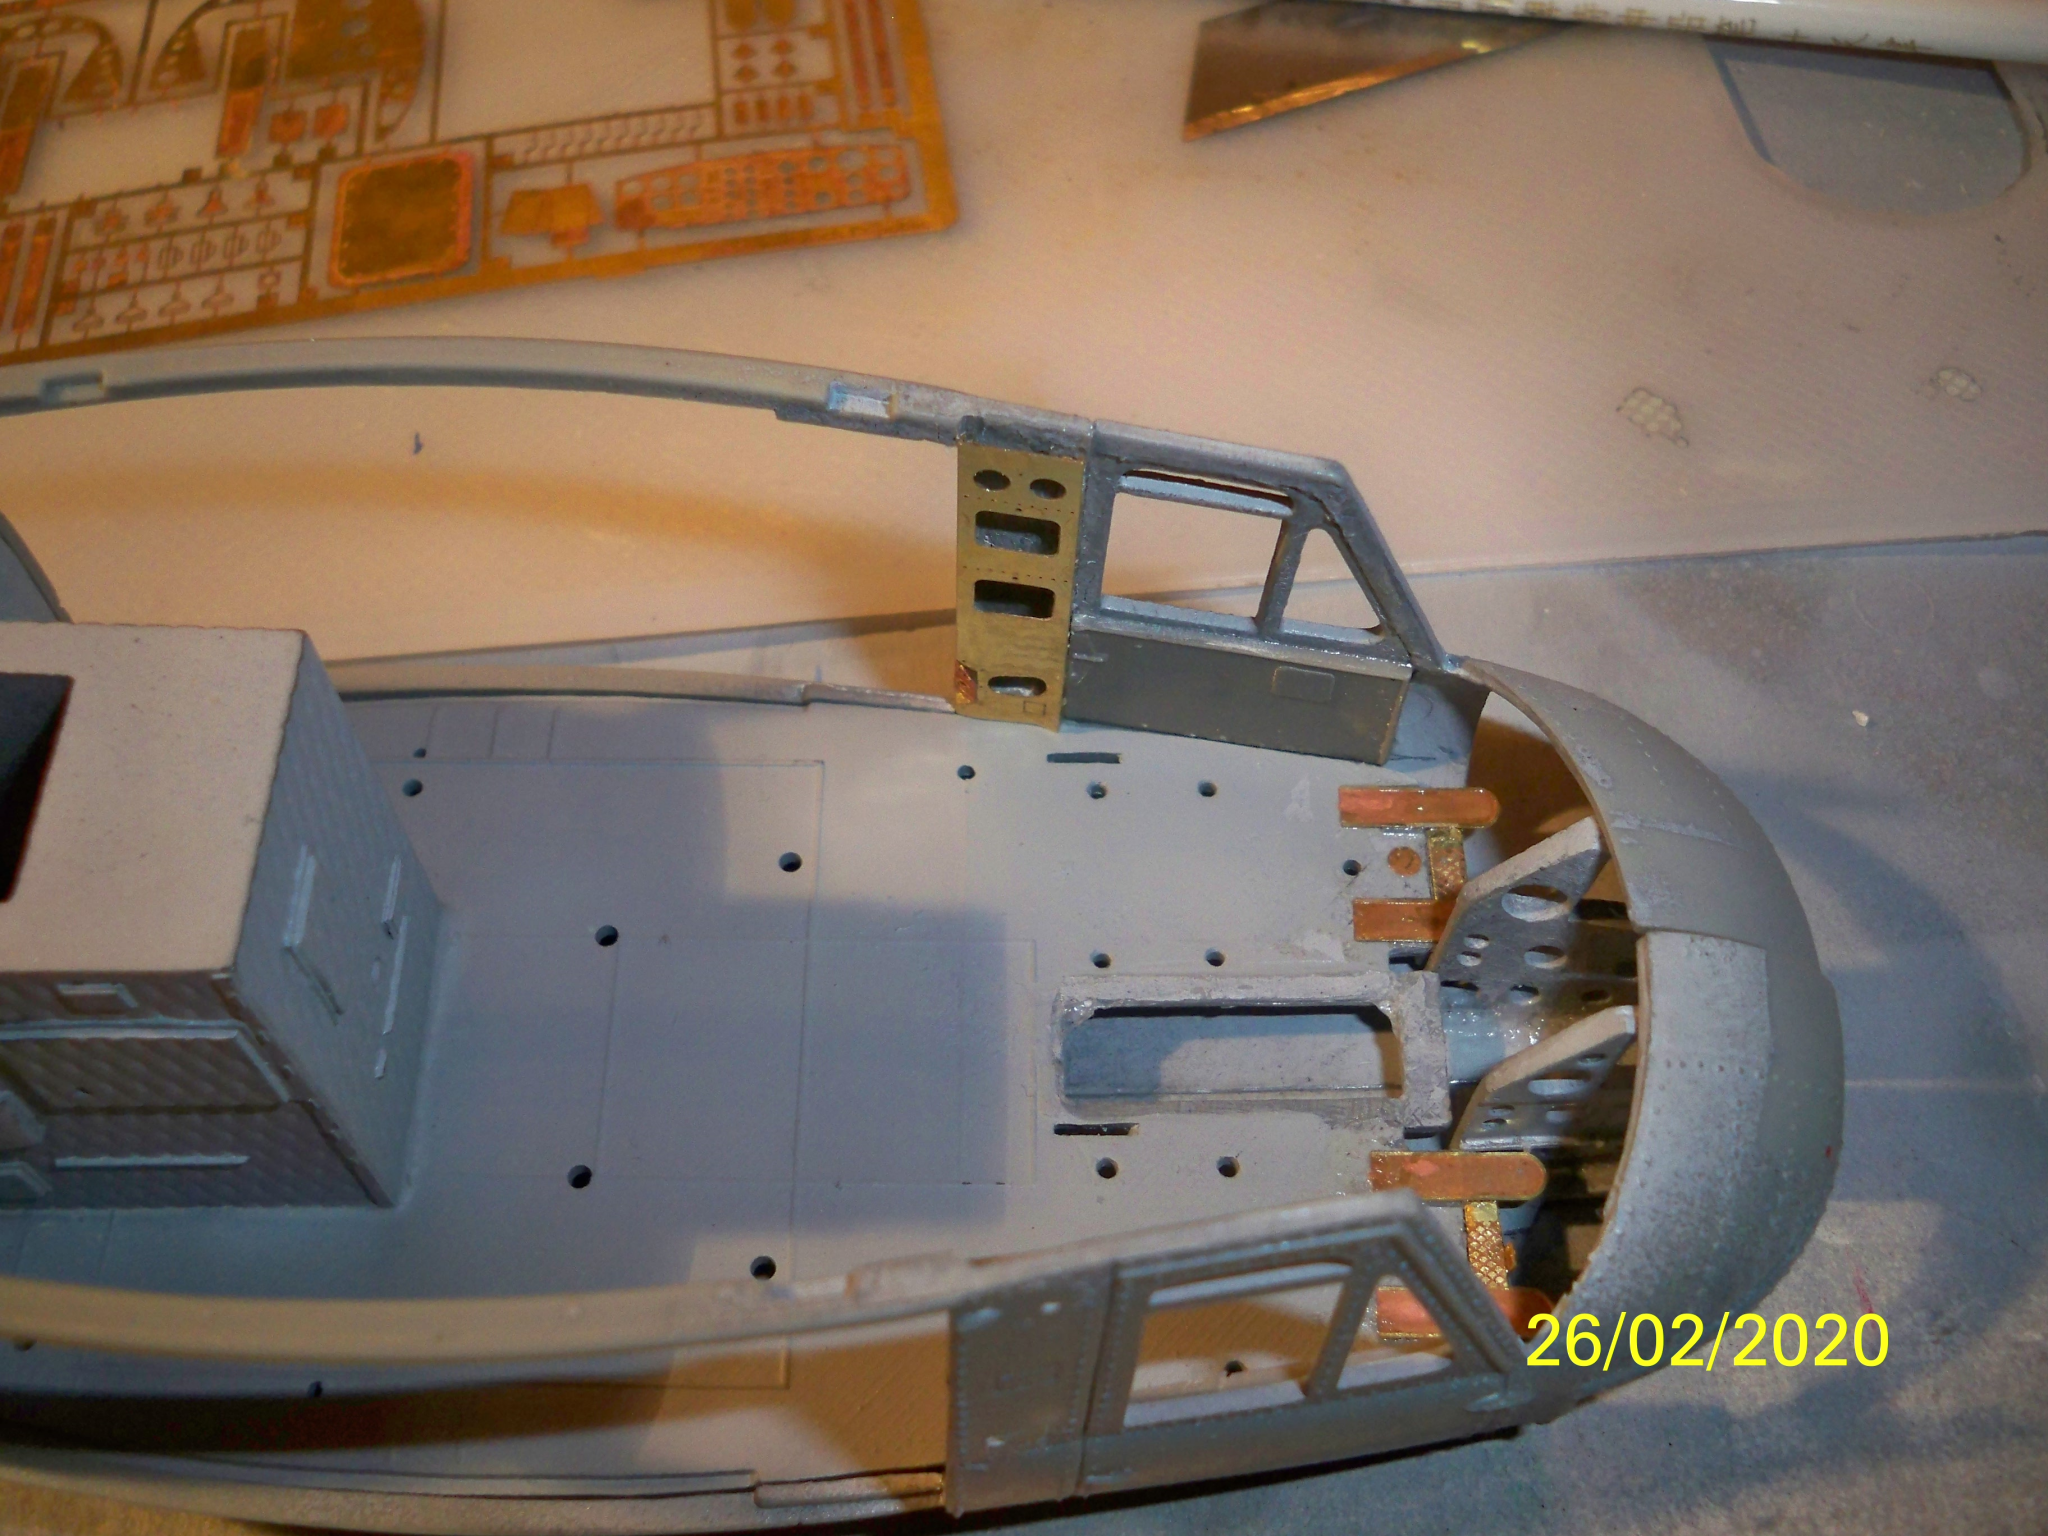
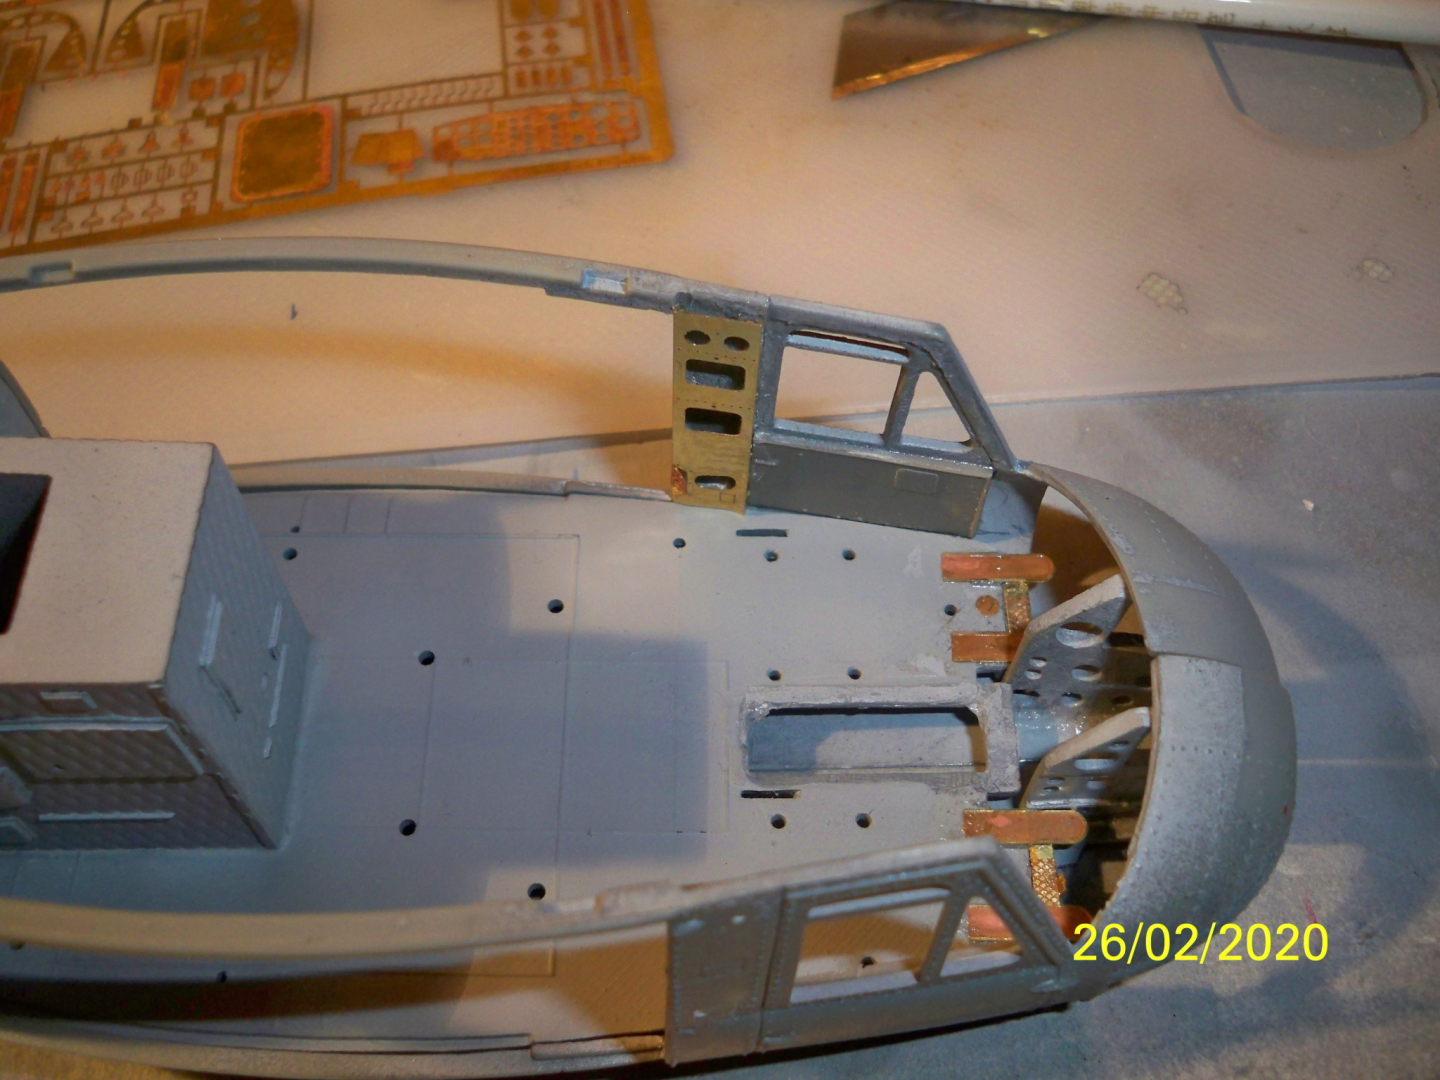
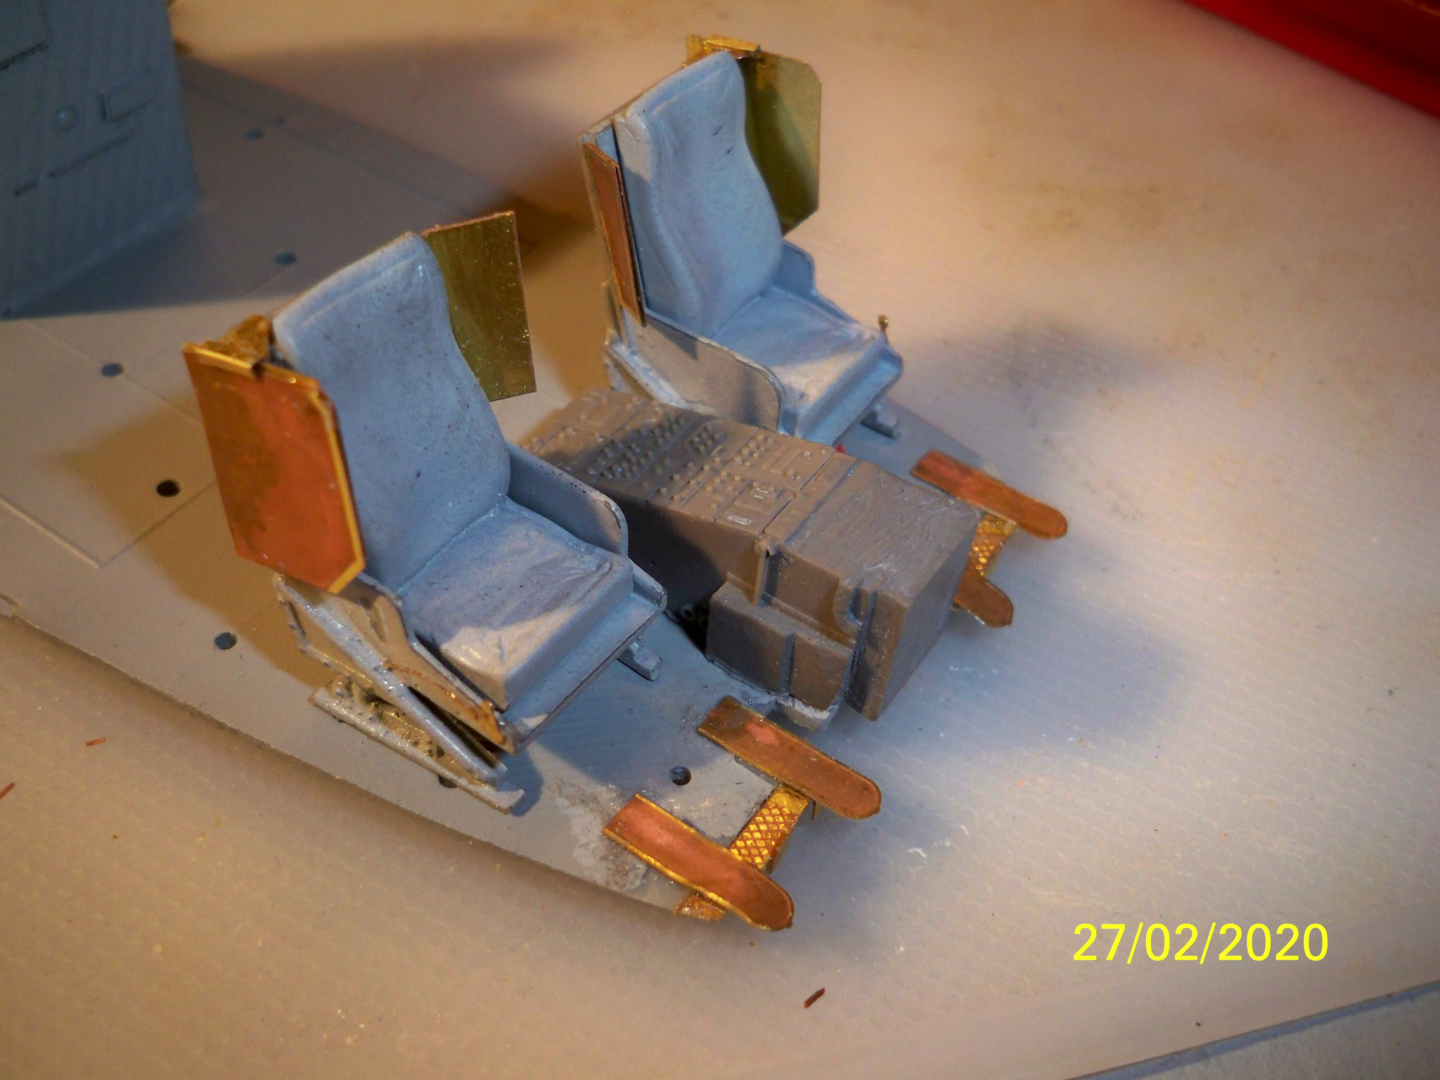
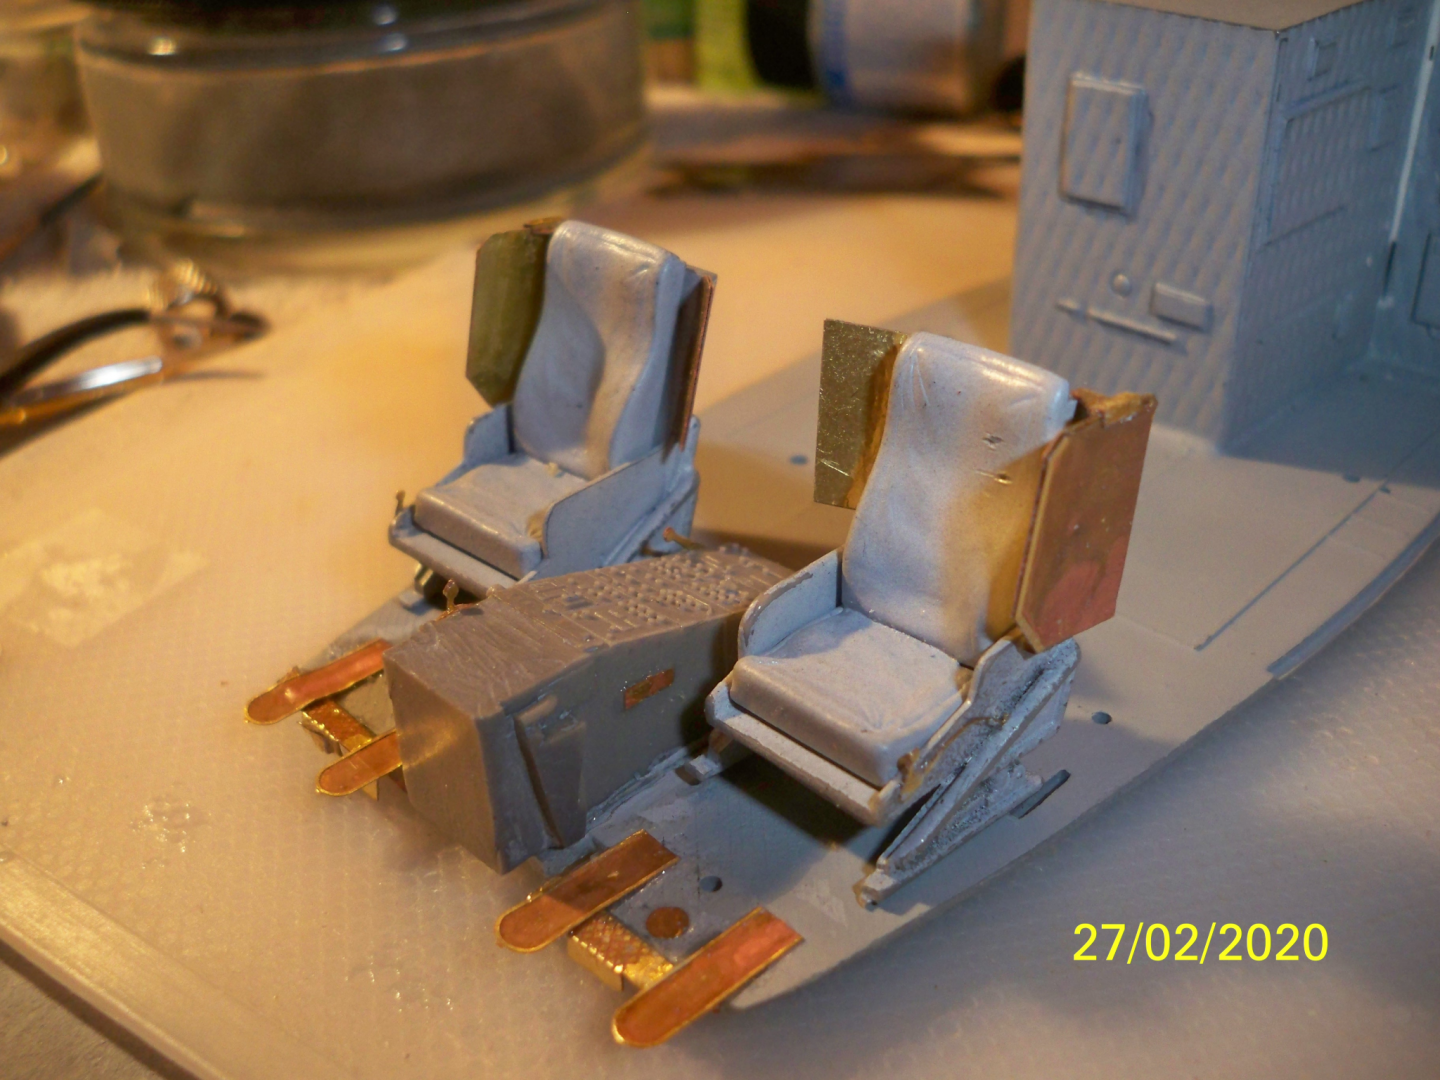
I have come to the irrevocable conclusion that I officially HATE PHOTO ETCH!😈 It is evil stuff invented by sadistic perfectionist rivet counters to scalp us normal humans of our hard earned cash while humiliating us at the same time! There, I got that off my chest! I have spent the last few days trying to follow pretty much non existent instructions to attach mostly almost invisible little gold colored parts so that when the time comes they can be buried within the fuselage never to be seen again! It started with the cabin support columns that were missing from the kit altogether and in my typical OCD manner could not stand! The more I saw that they were not there the more it bothered me. SOOOOOOOOOOOO out came the wallet and another purchase went out over the Ethernet and the mailman found me stalking him yet again waiting for the package to arrive. The only answer to the problem was to buy a photo etch set that was not designed for this kit but for the Huey C model in 1/35th scale. As the D and H models were pretty much just stretched Cs I figured I could make it work. When the sheets arrived I was truly shocked! Along with the few parts I needed there were other parts that could be used to assemble all kinds of other parts of the cabin as well! A great many of these parts are microscopic in size. Try a seat belt buckle in 1/35th scale! Or better yet the buttons located not only on the pilot's collective stick but the even smaller panel on the co-pilot's collective. We are talking about stuff that in real life is smaller than a pack of cigarettes! They expect you to assemble the foot pedals from 12 micro sized pieces that not only would have to be assembled to each other, but in some cases formed into the proper shape! I will gladly send the parts to anyone who wishes to to perform an act of masochism in their spare time! So I started out with the eight pieces that were supplied to make up EACH column. The first little piece of course went flying from my tweezers never to be found again! My VERY FIRST SMALL PIECE. No fear though, this was going to become one of the modeling practices I was going to become proficient in over the next few days. In fact if it didn't fly, it broke, or just dropped while the glue was drying. In fact just about any modeling torture the demonic piece could think of tended to happen. And if I did get it glued in place properly then it would just get knocked off when I was trying to install the next part. Eventually I was able not only to get the columns installed but finally the armor for the pilots seats and the foot rests and cabin floor extension in the main cockpit, along with a few small knobs and things that I just installed because by that time I was beginning to enjoy the pain! So here are my meager efforts. I know it looks pretty much like pure rubbish, but I am hoping the next step of painting and of course the eventual fact that almost all of this will be encased with a helicopter body will cover much of my learning efforts! First off the cabin support columns. They were not exactly like the columns I remembered as all I remember are round holes but after altering them to fit they were vastly superior to anything I could have made and I was happy. Then there was the torture test of the cockpit. AFTER MANY hours of work this is what I have come up with. As I used the after market center console I did not need to apply the other fifteen or sixteen pieces if detailing that had been intended for the less detailed kit console. I had to finally invent my own method of installing the armor plates but the result even though a little more banged up than when I started is still better and more accurate than what was supplied in the kit. It would have been a snap if the designers had not insisted on a design that required a half dozen small parts with minimal gluing surface! So now that I have shown the crappy "before" pictures I wail be painting over all of my efforts and hopefully convert the sows ear into at least a canvas purse if not a silk purse. At least I hope so. Then I will at least have to install the pilot's bodies to properly position the seats and peddles. When that is done then I will probably have to remove the foot rests and place them in the proper location for the pilots feet. Then it will be back into second class, the padded cell area, and all of the seating there. Thanks for looking in. Hopefully the next update will not take so long.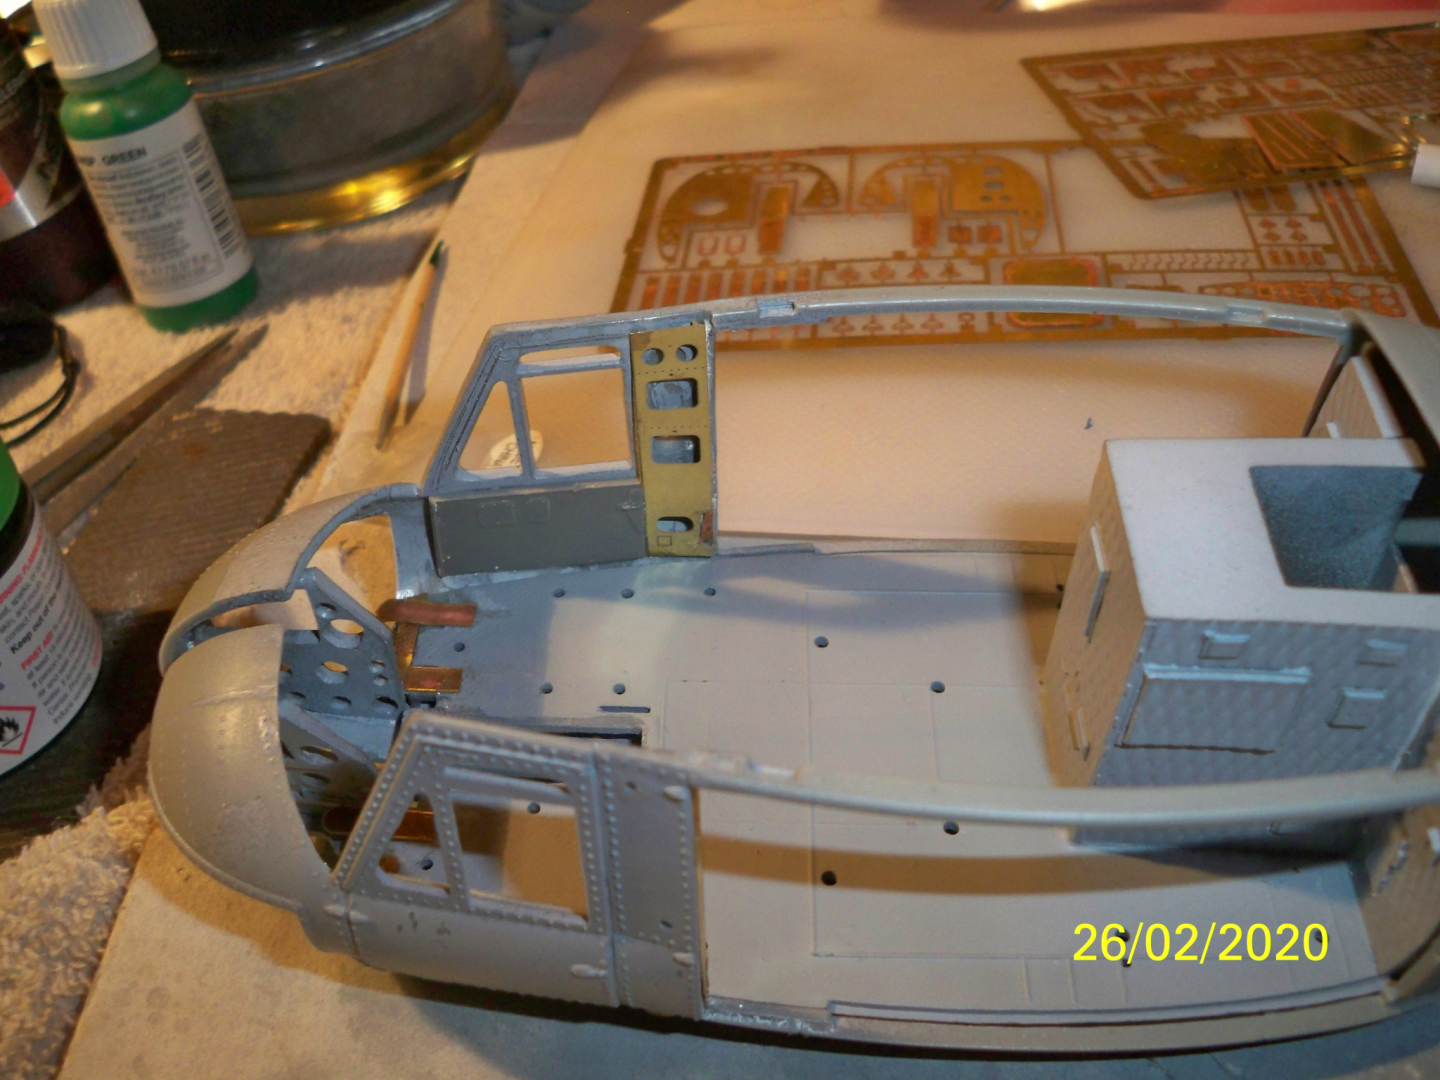
- 479 replies
-
- 12
-

-
Shouldn't you put the top up first Jack? It is looking pretty cold out there and you could end up with Pop- Sickle Kids! I am still shocked at how much the Future changes the finish and the looks of not only the paint but the unpainted plastic as well. Too bad about the windscreen. I have been having the same problem with my new nemesis, Photo Etch!
-
It is truly a hard area of the hobby to fill, as it seems everyone has a different desire and size wish. I personally wish you luck and success Tom, as I also enjoy having people on my models to help bring them alive.
-
Airfix 1/72 Mitsubishi A6M Zero
lmagna replied to SigEp Ziggy's topic in Non-ship/categorised builds
I can do even better. I can loose small, and even large parts even when working on one kit! -
I'm surprised that Captain Muller allowed that rust bucket to even get close to his magnificent cruiser! Great upgrade to a very needy kit. One would never guess it's humble beginnings.
- 45 replies
-
- 4
-
-
- orp ślązak
- mirage hobby
- (and 2 more)
-
Remember it is called "BASHING" not buchering! What are you thinking of "Modifying"?
-
It has been my experience that figures in this scale are very hard to find. Especially non English figures. Looking forward to what becomes available.
-
I personally doubt that anyone will be able to top this build for this type of subject anytime in the near future. It is truly a vision executed to perfection.
-
Nice looking build George. Both your build and your sailing location reminds me of my RC tug days and sailing my tugs here in the Pacific Northwest of the US. It looks like we live in similar climates.
- 90 replies
-
- 1
-
-
- fairmount alpine
- billing boats
- (and 1 more)
-
It was the same for us as far as the flooding part went. People around here keep building in the lowlands and next to the rivers. and every year they act surprised when half their house in under water. But this year it was worse than normal. W have had a number of mud slides, one of them is still moving and we have not had rain for a few days now. They even had to close a major freeway for most of the day because a mudslide covered it up and it took the rest of the day to clear it. Now watch it dry up and we won't have any rain at all for the Spring. We normally get quite a lot of rain in Spring.
-
Just more evidence that my mind is slowly going, well possibly not that slowly. Or maybe just getting soggy. We have had two months of rain with less than three days of non rain. That is unusual even for us. I know it was one of you guys out east somewhere but I can't remember who!
-
Only if you are buying Jack! Last I heard you were covered in snow with Spring nowhere to be seen! Besides it's a long drive.
-
Looks like in spite of the setbacks you are still moving right along J. Congratulations on getting it fixed.
- 211 replies
-
- 2
-
-
- agilis
- steingraeber
- (and 1 more)
-
That's what happens when you leave your build log unsupervised for so long. No need to answer to me about color or finish. It only took me two weeks just to get the paint to STICK on my Huey build! I have no place to even mention anyone else's painting abilities or efforts! In fact you were the one who taught me about using Future to create a gloss finish from whatever surface you were using as a base. It's is an obvious use for Future therefore it was too hard for me to figure out on my own! The seats look perfect. The color is exactly the same as the brown part of my seats in my Mini Cooper. I think Mini calls it camel. Either way I like the color. I think in the real engine the head would not be chromed, (Or in those days Nickel plated) but probably painted the same color as the rest of the engine. Same for the oil pan. I don't think pimping out the engine compartment was ever a big aspect of cars back then. Most people who owned cars like this probably never even opened the hood themselves anyway.
-
I like the effect of the "Texturing" of the OD finish Mark. I don't know if you intended it to look this way but I think it is much better than a more evenly sprayed finish that it would have been if you had used an airbrush or rattle can. I hope I can obtain something like it when I get to that stage. But at this time I am still stuck in the cabin. My new after market PE parts arrive tomorrow, and hopefully I will start making progress again soon.
-
I know the feeling.
-
SBD-3 Dauntless 1:48 Hasegawa - Edwardkenway-FINISHED
lmagna replied to Edwardkenway's topic in Non-ship/categorised builds
That will teach you not to watch the masters we have here do builds! Welcome to the (VERY) dark side! -
Nice progress OC. At this rate she will be going on missions in another week or two!