hollowneck
-
Posts
1,591 -
Joined
-
Last visited
Content Type
Profiles
Forums
Gallery
Events
Everything posted by hollowneck
-
 I'll go with your hunch, druxey. and... or ...perhaps nothing more than "breaking wind." 🤣 This unexplained anachronism persists even with the kit's designer. I had no reservations about deleting this door/screen arrangement on my build. Ironically, most everything else about this kit is very precise. The oven screen definitely obscures, especially when you're not opting to build an open reveal, quasi-Dockyard model. Perhaps in 1775 there was still a Ministry of Silly Doors at the Admiralty? Ron
 -
Precisely. I get that they could be moved or opened. You and I still want to know WHY not HOW... Ron
-
Ducati 1299 by Moonbug - Pocher - 1/4 Scale
hollowneck replied to Moonbug's topic in Completed non-ship models
Hey Grant, The photography trick gave me grass stains, but it was worth it to blow my good friend's mind with my texted photos of my birthday present. The car, the angle, the other car in the background- all are so distracting most people never notice how out of scale the asphalt bumps are! Ron -
Good question! I'm also building the HMS Sphinx, but don't have the answer. Perhaps the purpose was to fool the ship's crew about where the food came from? I'm sure someone here will tell us. The little bricks are a good touch, but these doors - replete with hinges and doorknobs? After contemplating the same question and thinking that the answer was a Zen koan*, I discarded them. Ron * What is the sound of one hand clapping?
-
Yes, great tip, druxey. How do I know this? ...uh, by having to start over on a boxwood mast in the past! My experience is that pear grain and coloration is slightly more forgiving than box, but knifing-in a stop (ever so gently!) is still a good idea no matter the choice of hardwood. On more open grain woods I would suspect dye bleeding would be very problematical. I've never tried it and likely never will. "Testing. Testing...Yikes!" no dye here! Test on a scrap: always a good idea - like measuring twice and cutting once. Ron
- 542 replies
-
- 3
-

-
- Sphinx
- Vanguard Models
- (and 3 more)
-
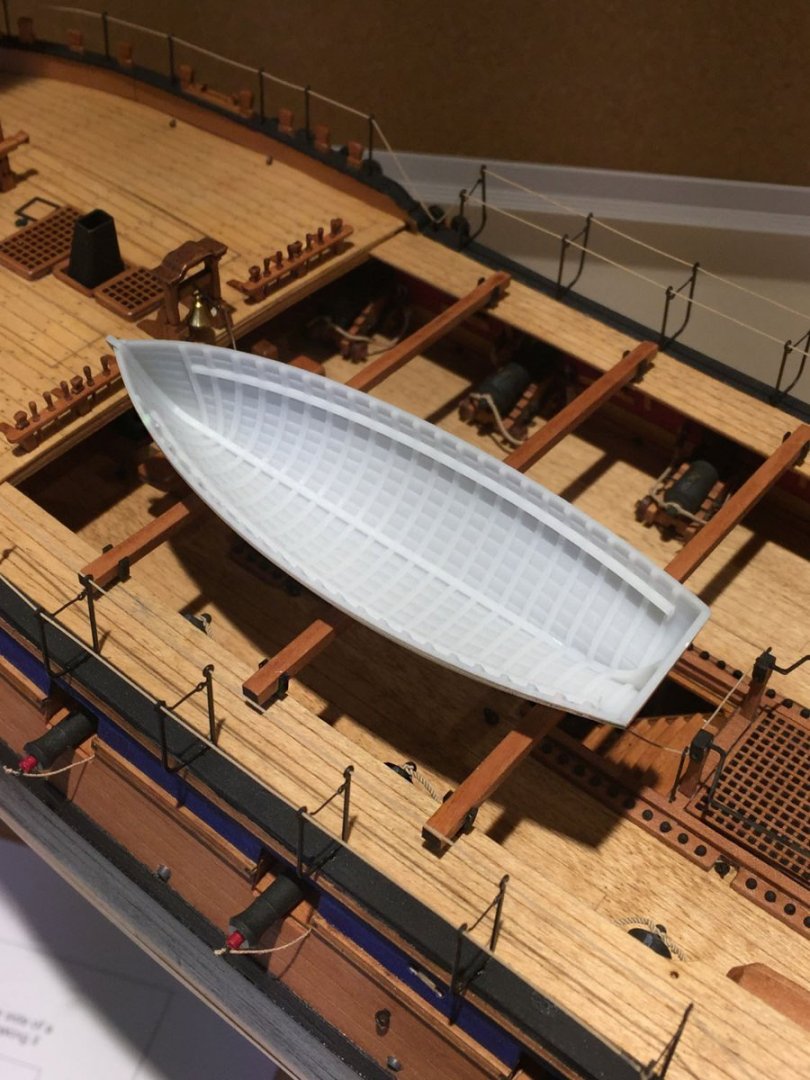
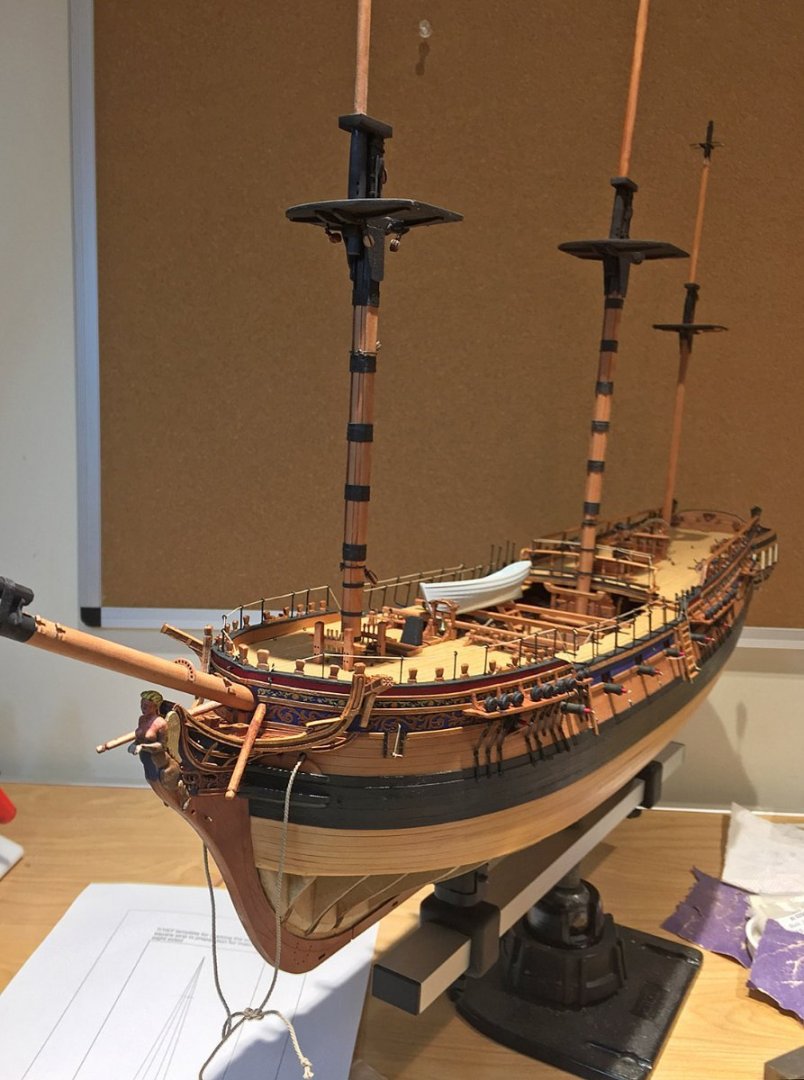
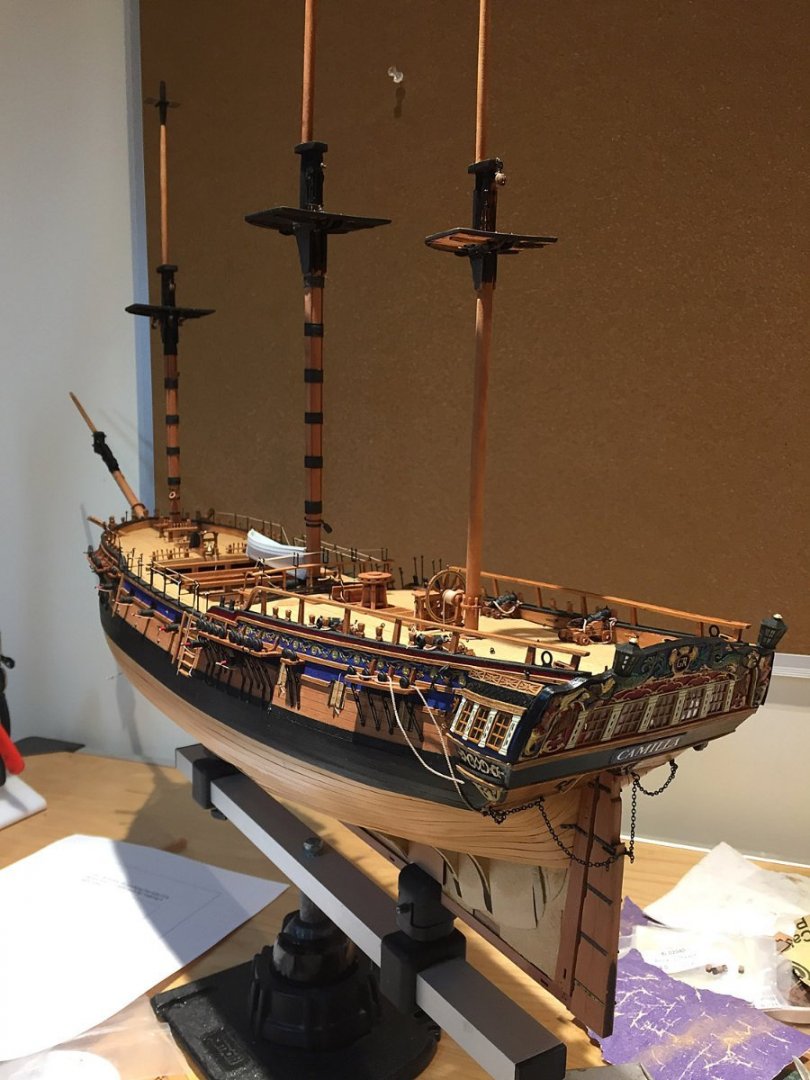
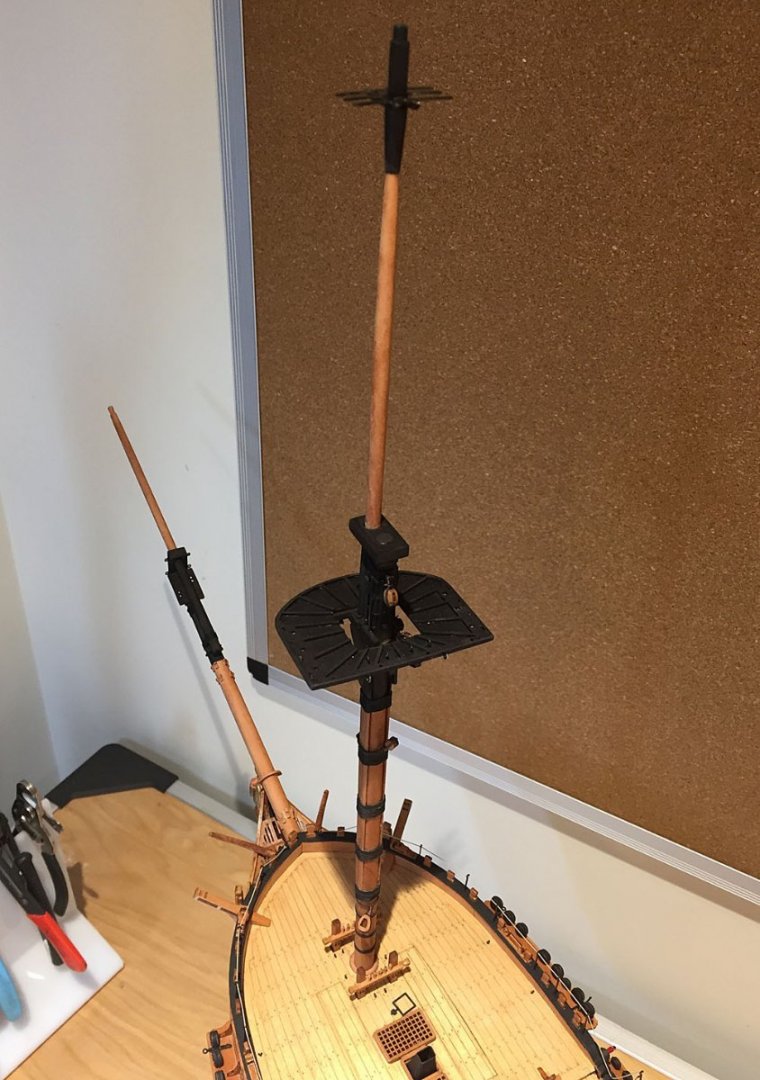
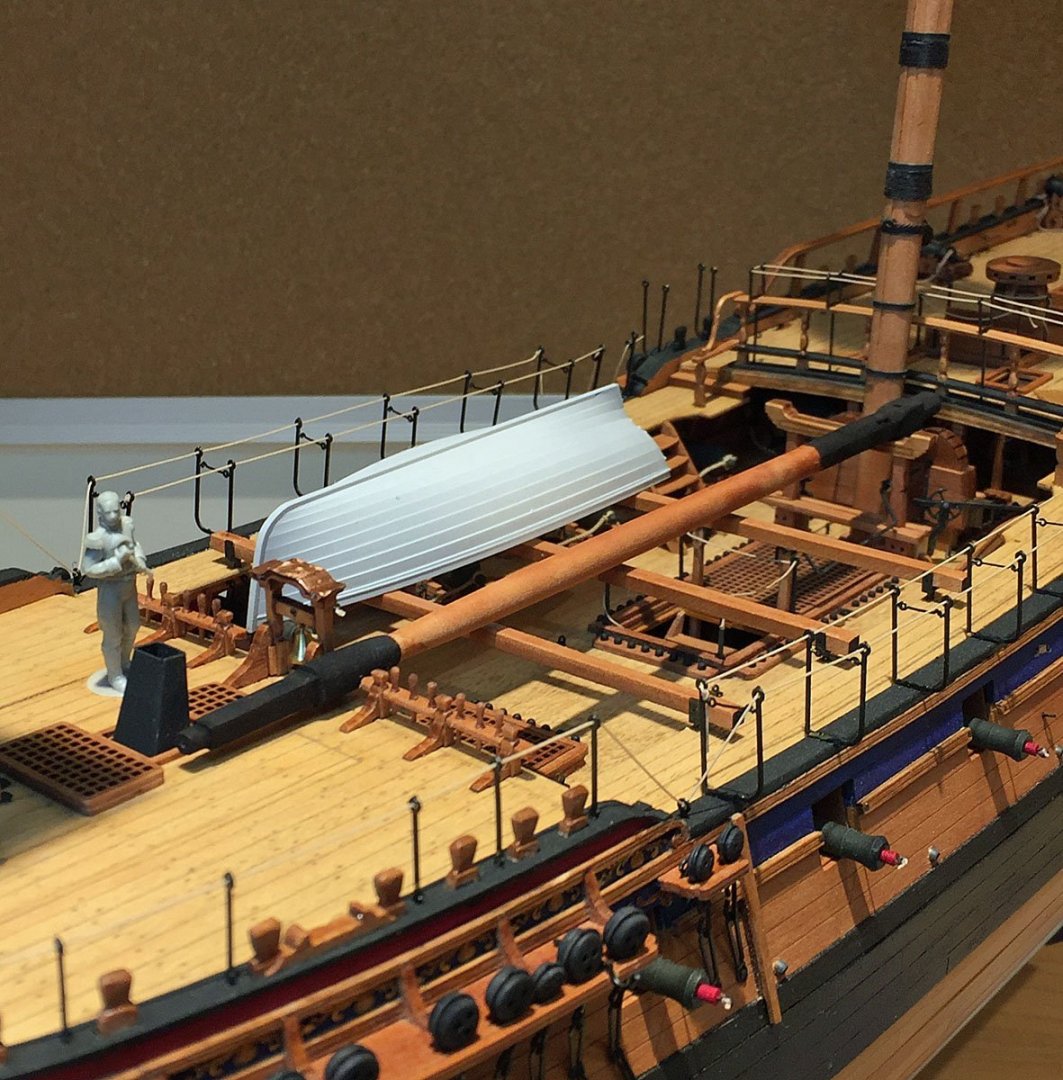
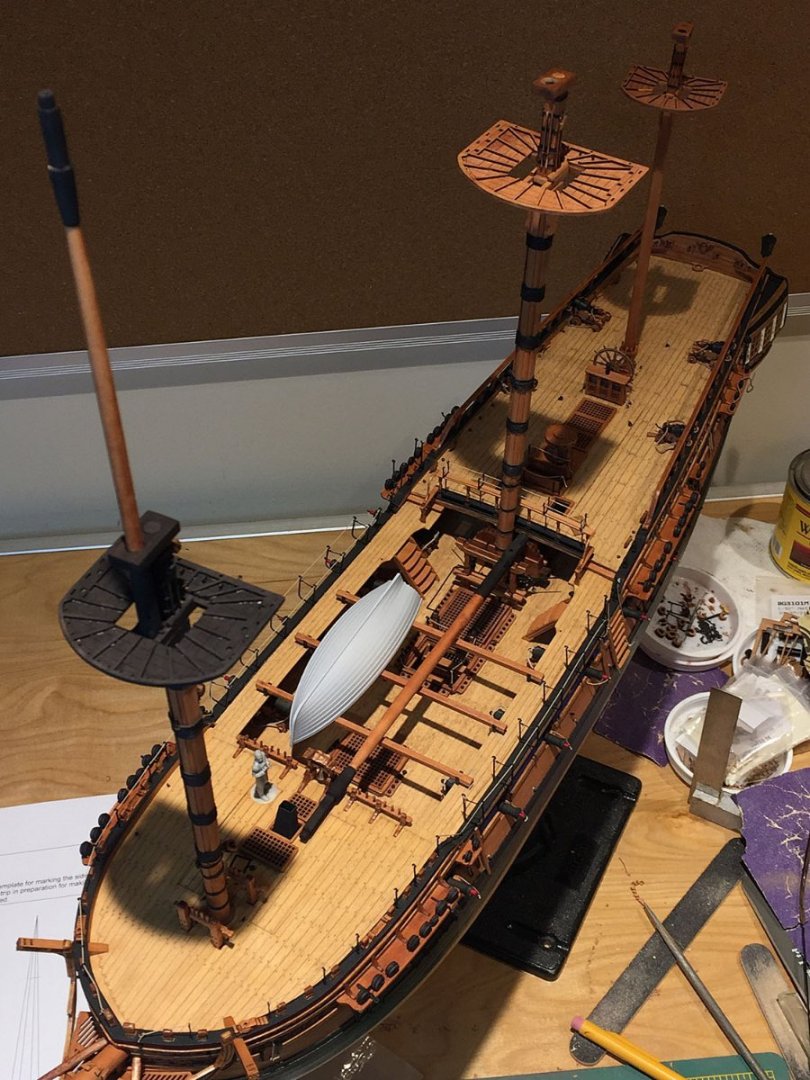
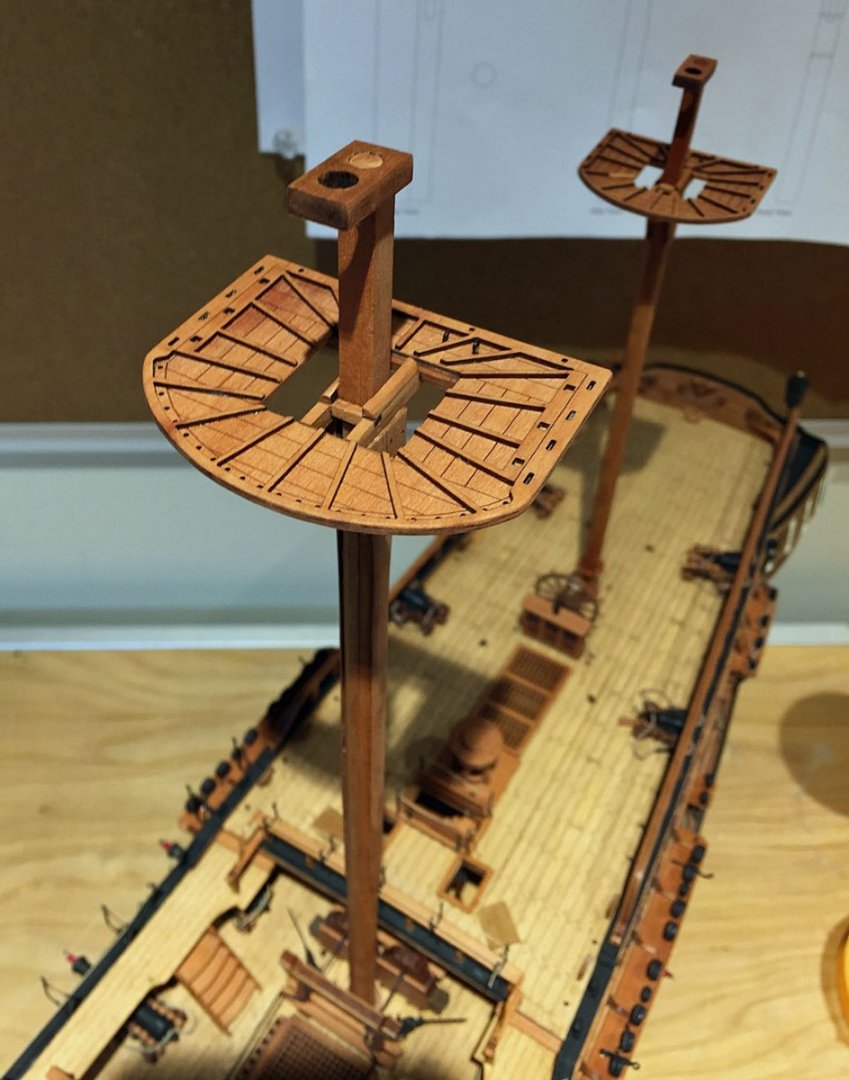
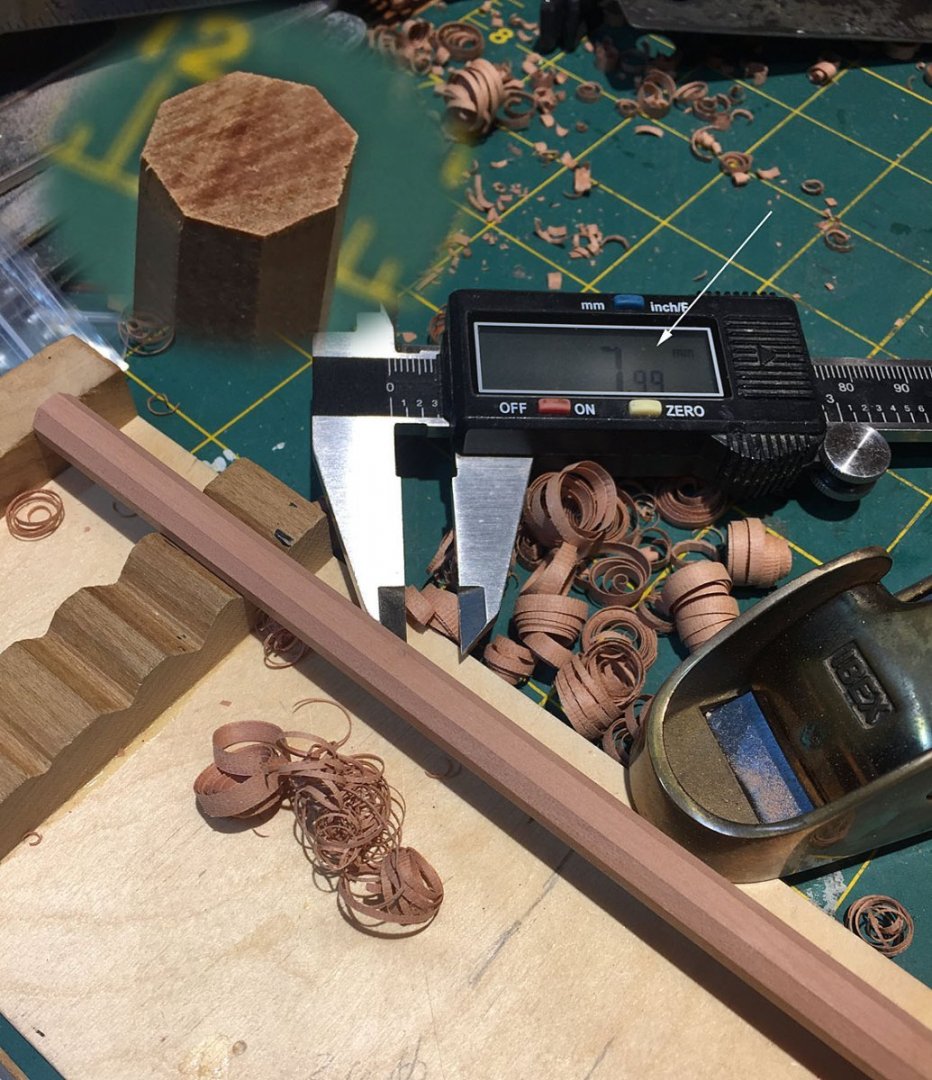
Here is a close-up interior photo of Chris' 3D resin yawl I've chosen for my model. Very nice detail indeed, like the outside clinker hull that I'll display upside-down. For ya'll * who want to show it open like this, you'll need to scratch thwarts, knees, rudder, etc. and of course, appropriately paint it to resemble wood. The Vanguard site has details on the full range of these tasty little boats. *yes, a really bad pun. I may yet change my mind on Camilla's boat mounting. The detail is quite nice and would look even better with scratched pieces and then nicely painted and finished; another decision that doesn't need to be made quite yet. Three quick progress photos to show all the masts completed - up through their topmasts. The topmasts alone (four including a spare main) took a full week to accurately make. A 7-10-7 square-to-octagon template for shaping the masts can be seen on the bench. The final topgallant masts are next and compared with the topmasts are much easier and straightforward to scratch. All three final topgallants will begin with 3mm square stock and be shaped down to about a 1mm to 1.5mm taper to accept the top trucks. "She's got a hole in her bottom, Sir!"... Well, don't just stand there sailor, ..."Man the pumps!" She's starting to look like a sailing man o' war from the eighteenth century. I'll go to all the mast stays first, and then on to the shrouds and pendants soon after the final mast pieces are complete. The Build Manual has anchors next, but I think I can wait a month (or more) on making these... Some may note that I have some additional blackening (dye) to do on the mizzen top as well as some touch-up on the main mast bibbs n' hounds. Fore and bowsprit masts are properly aligned. With the Vanguard design, the tolerances to achieve this necessary alignment are notable. Follow the build directions on the basic hull and deck assembly and you'll end-up not having to struggle with this aspect later...it can be a tricky part of fully rigging a ship of this complexity. BTW: my solution for ready reference to large plans is right behind my main assembly workbench: the luxury of a big cork board. Next up for the pushpins? Standing rigging. As indicated earlier, there are several sheets supplied in the kit for all the normal model rigging. Ron
- 542 replies
-
- 15
-
-
- Sphinx
- Vanguard Models
- (and 3 more)
-
Heat-shrink tubing over the tip of the rudder to simulate the iron banding. Clever. Would never have thought about that as a solution. Black card and even ChartPak artist's tape, but not rubber tubes! I'm assuming you have a selection of tubing sizes to draw from. Your work is really informative, clever. I like it! For your stern columns will you paint these in a white or off-white color? I also decided to color my window sashes in a natural wood color rather than stark white. Restrained, sophisticated are a couple words that come to mind when it comes to these embellishments. The gold Vallejo painting overall - as indicated in the Vanguard build manual - is OTT (especially on the stern) IMHO and although I retained some of this color, I've reduced it significantly in the interest of visual moderation. Ditto the figurehead. I'll be anxious to see what solutions you come to for her presentation. I also like your decision to 'reduce the red' and extend your blue field shade to match the painted paper stern applique.´ I trust the Right Honourable Captain Grim is good with all this too. Sphinx's stern is looking great. It's going to be superb when it's completed. Ron
- 857 replies
-
- 5
-
-
- Sphinx
- Vanguard Models
- (and 1 more)
-
Ducati 1299 by Moonbug - Pocher - 1/4 Scale
hollowneck replied to Moonbug's topic in Completed non-ship models
Ah-ha, Bob. I guess the seller liked to pet his fish with those sliding front doors on the stacked tanks, but for some reason they may have all died!😂 Ron -
Ducati 1299 by Moonbug - Pocher - 1/4 Scale
hollowneck replied to Moonbug's topic in Completed non-ship models
Bob, That's some serious $ on display... custom cabinet...kool. You gonna' make a bid? Check this link out: https://www.ebay.com/itm/265193437103?epid=13028312997&hash=item3dbec2b7af:g:cYwAAOSwgqJgb0Wq Ron PS If I can find it for considerably less than this eBay price, I'd love to build the Slime Green Huracan and place it alongside my Orange Lambo.
-
Ducati 1299 by Moonbug - Pocher - 1/4 Scale
hollowneck replied to Moonbug's topic in Completed non-ship models
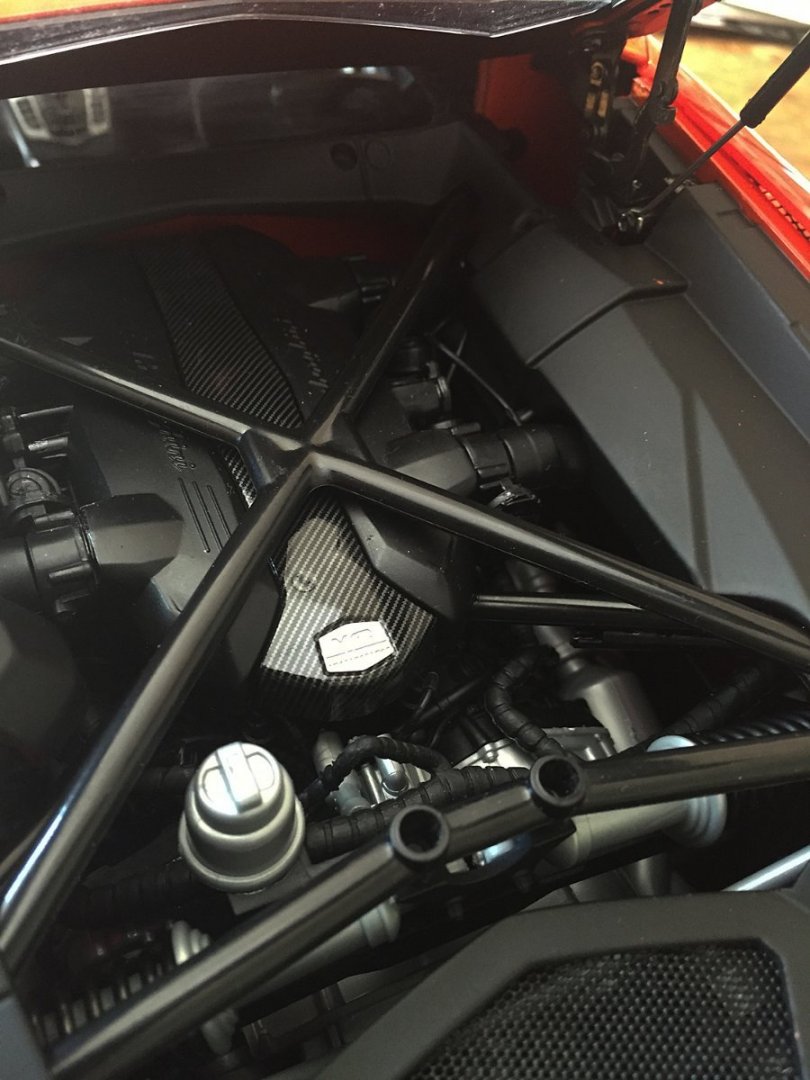
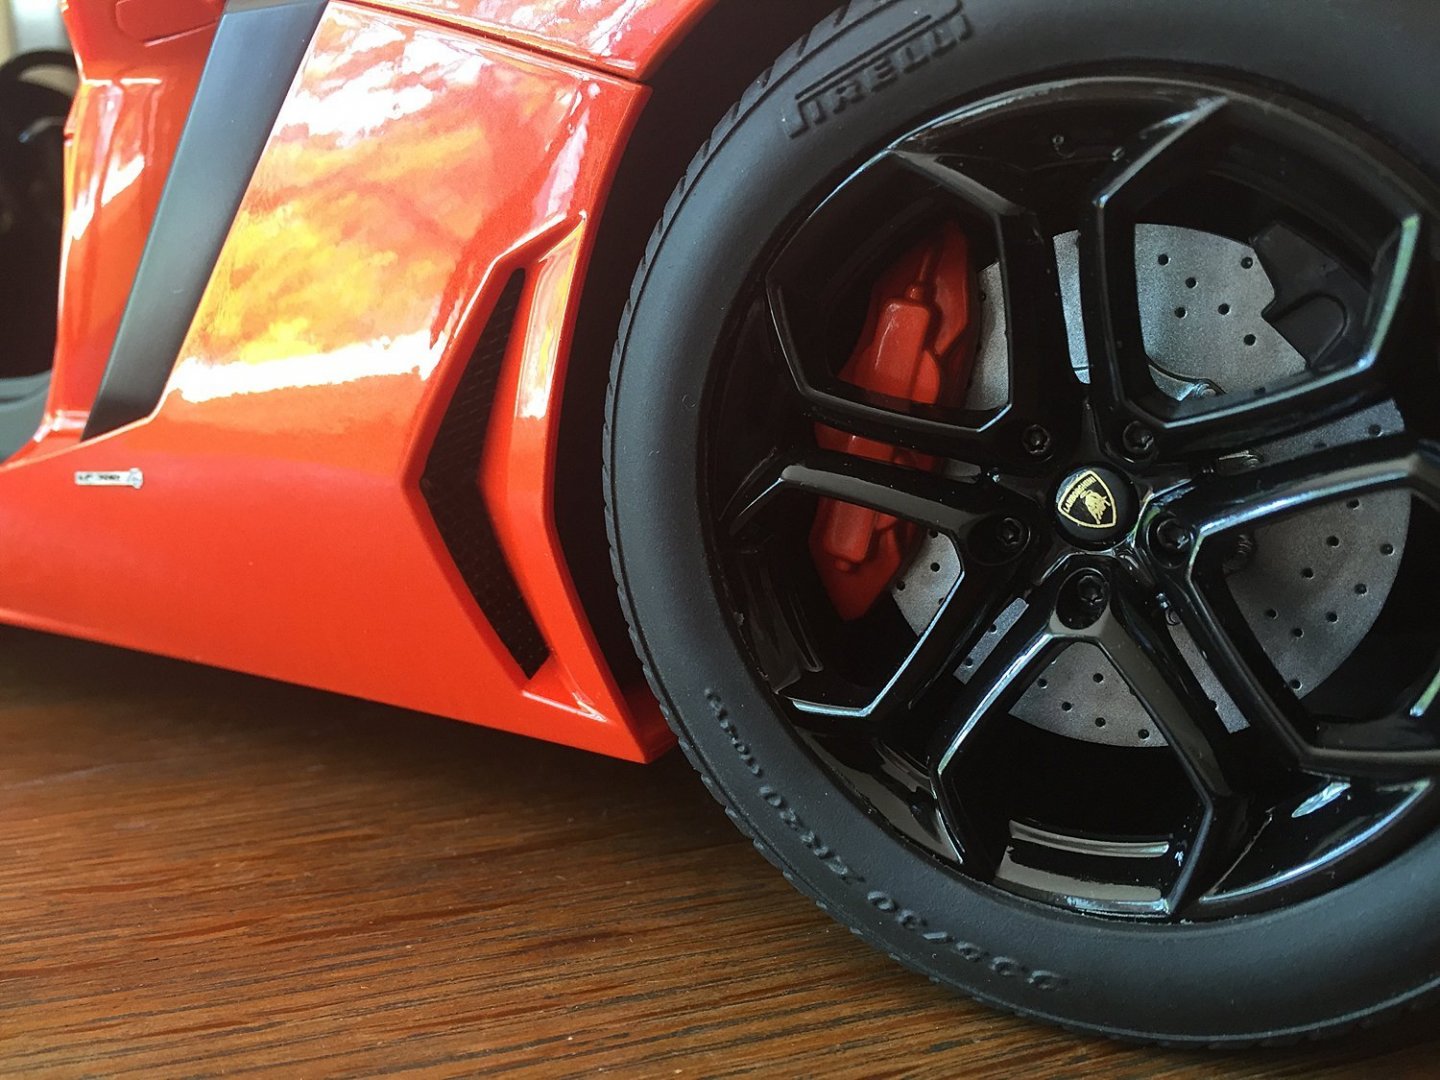
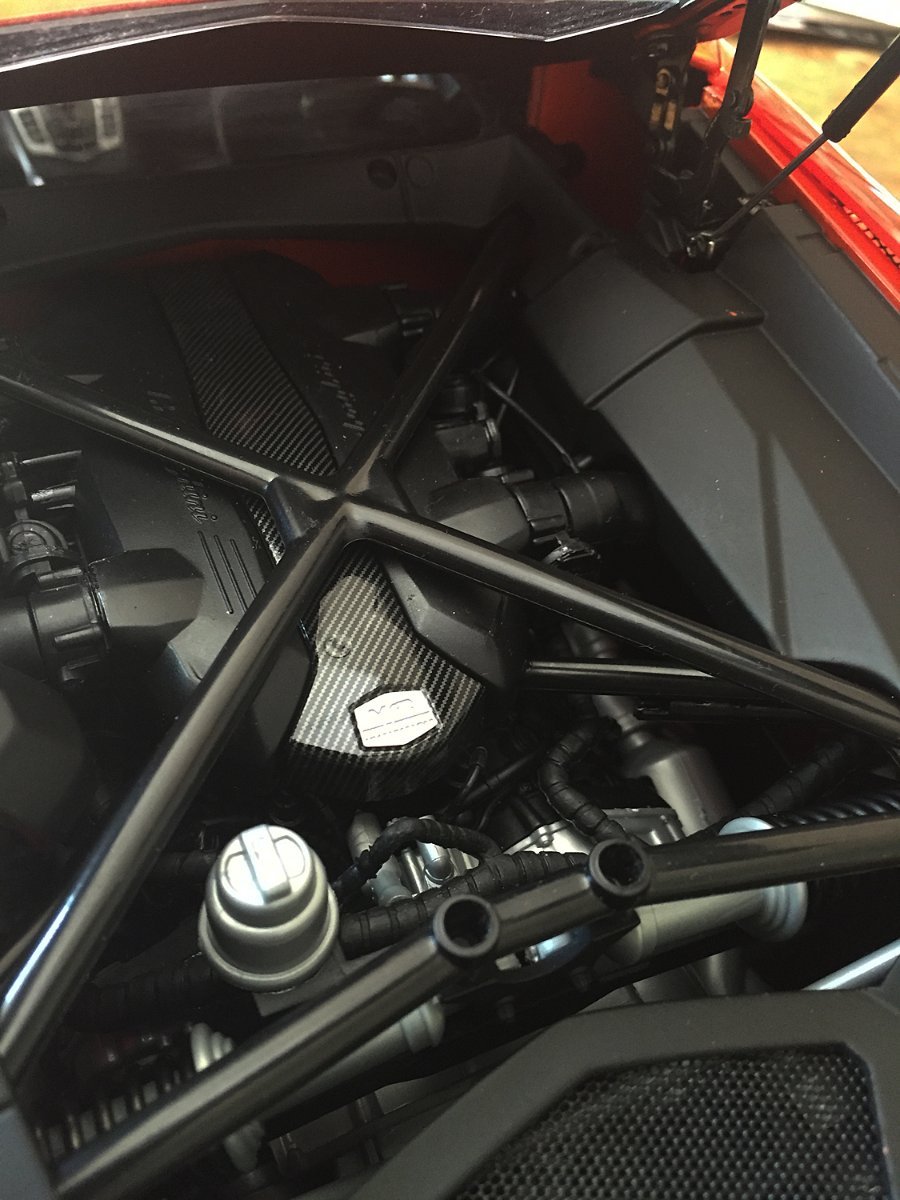
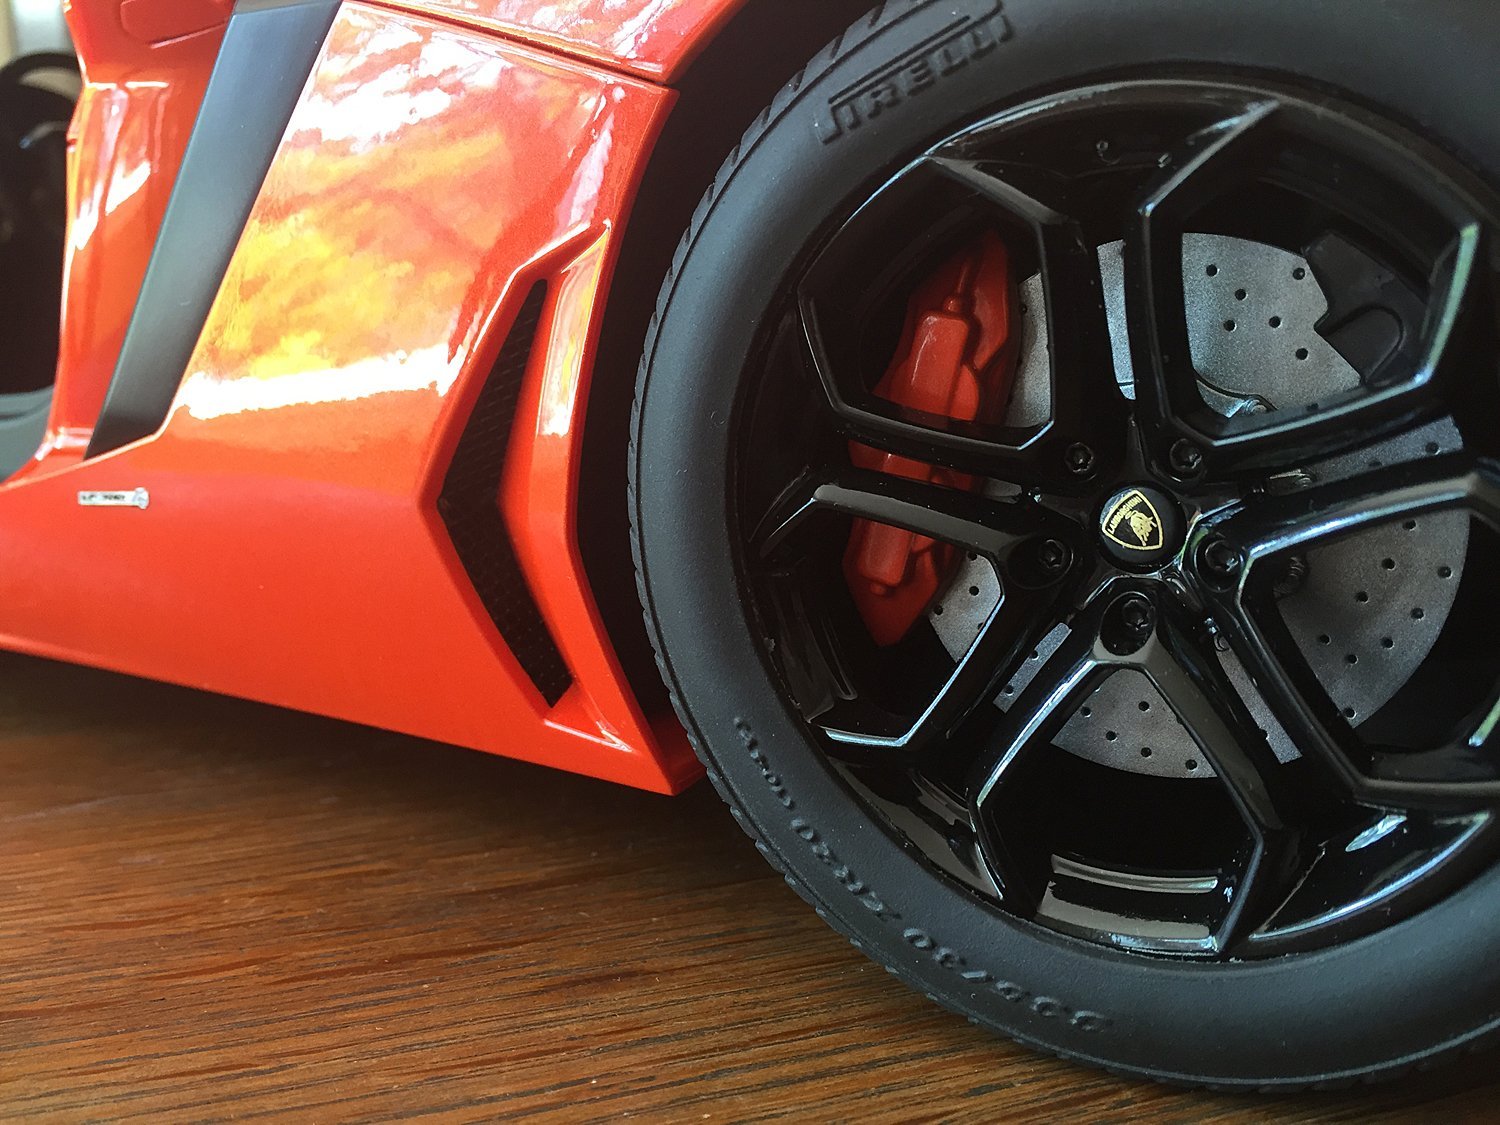
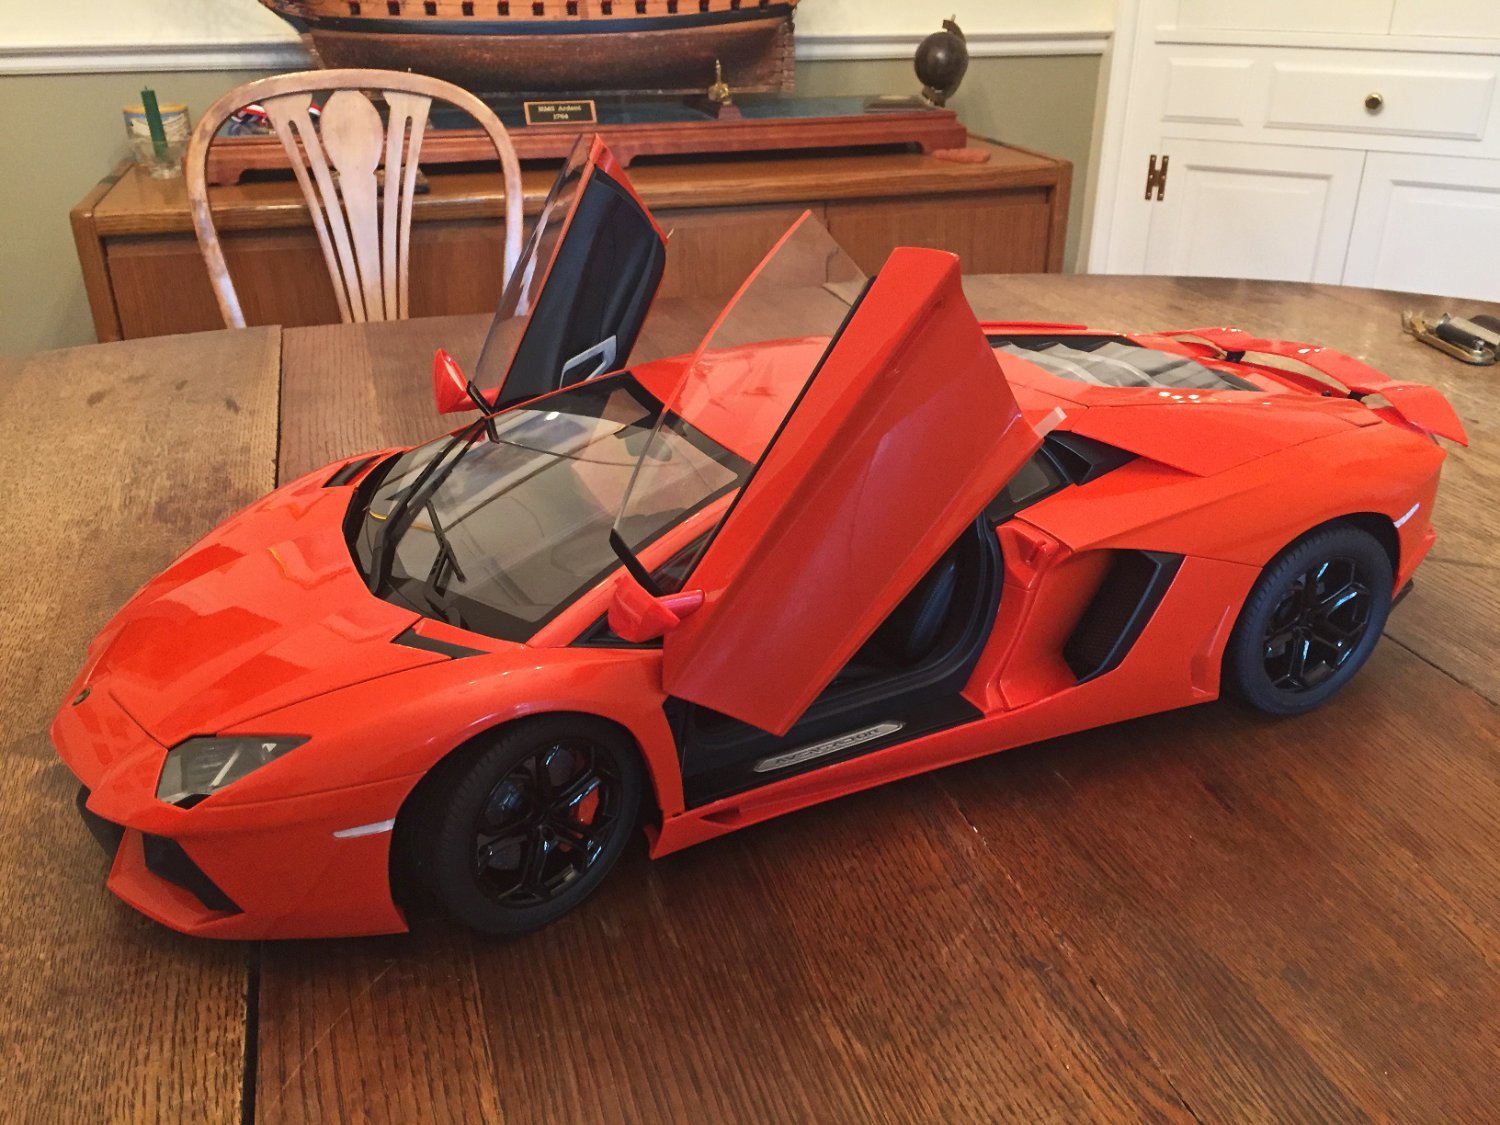
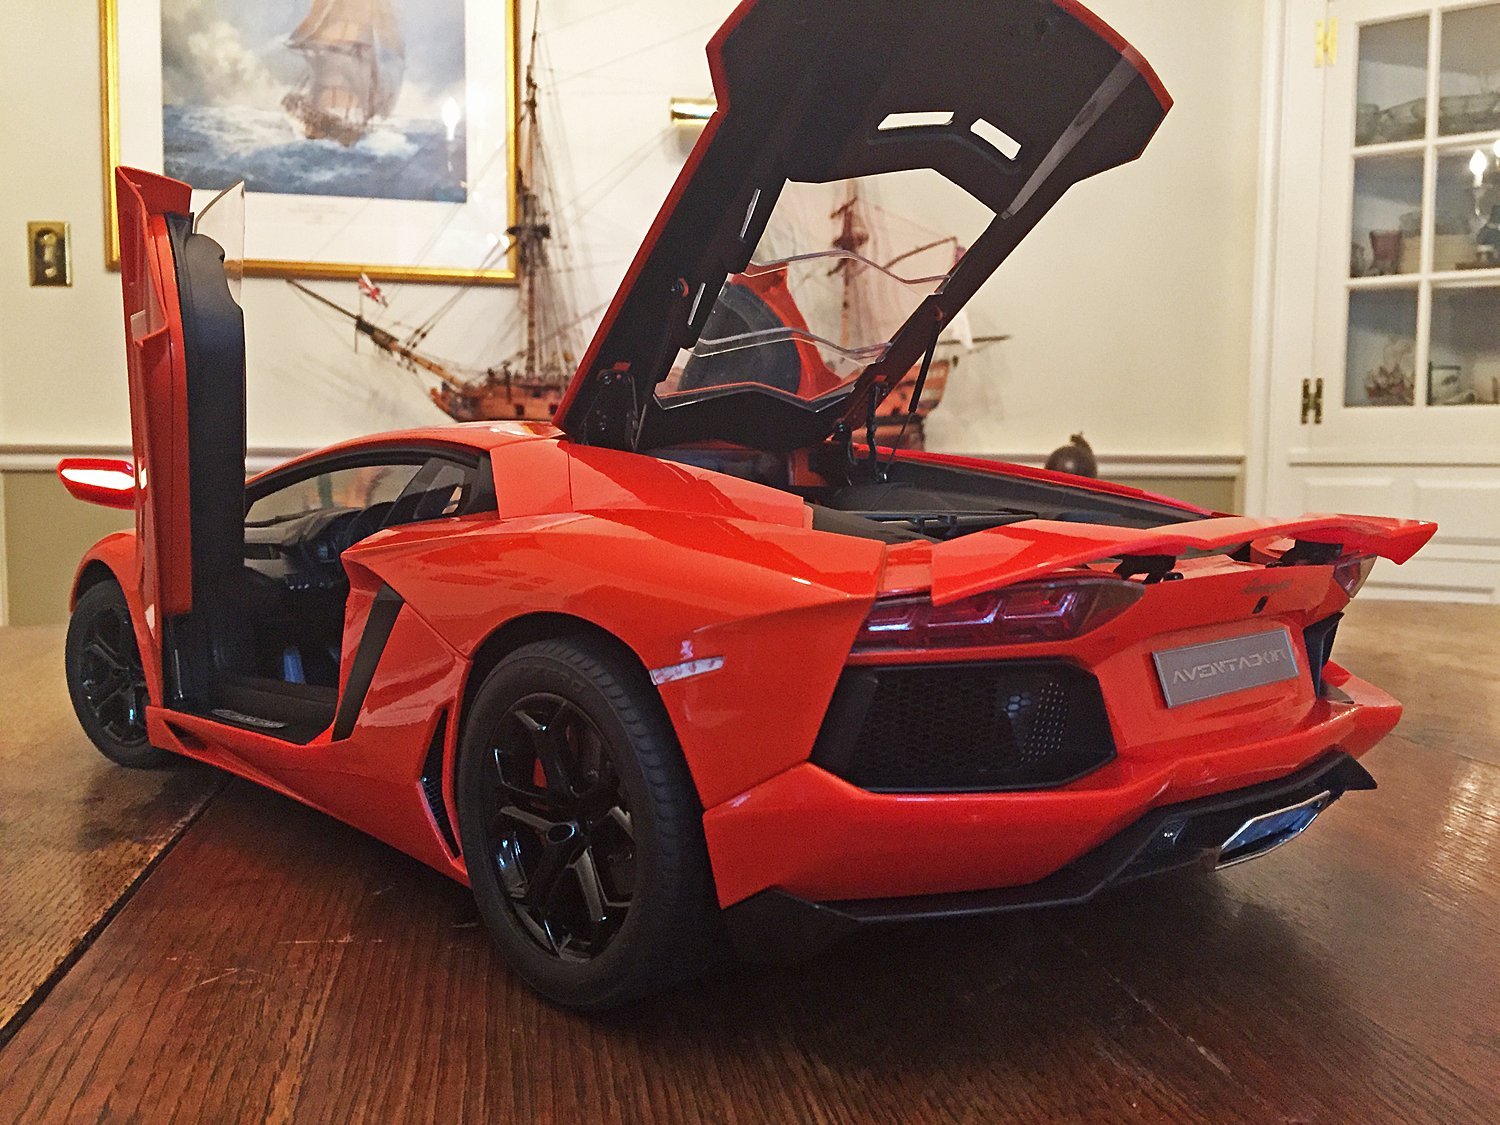
Bug, I bought my Pocher Aventador kit on eBay at a knockdown price a couple years ago. It was going for approximately one-third of the "Suggested Retail" at online hobby dealers. As you know, if you're interested in Pocher models you need to go "International" on your searches as well as do some risk analysis on transactional things. I recall my kit came from Hong Kong (pre-shakedown). Shipping wasn't inexpensive (weight of 25 pounds, boxed!), but heck - I got the kit for an amazing deal. Related to all this, I've kept an eye out for the current Pocher Lambo kit (Huracan), but so far, no luck on a good price; they're hanging tough at about $2K. You may be aware that Pocher car kits come with decent plastic tires - nicely molded, but shiny and given the level of execution and detail in these amazing kits = lame. There is an aftermarket for genuine rubber tires for the model supercars and I went for it: low profile Pirelli's in genuine rubber. $100 for the set, bought with lots of spare $ on the kit steal. These 255/R20's even sit correctly with a little "squish" from the actual weight of the model! I have a good friend from my former ship modeling club who built a Pocher Rolls - made years ago and it's stunning. Here are a couple more pics you may appreciate. Driveway & Dining Room Table moments. ..and three with my Bright Orange Babe Magnet and my HMS Ardent (1764- 64gun) in the photos for the MSW bots. Any guess which one the ladies go for gjdale - the model ship or the car? Cheers, Ron


- 25 replies
-
- 14
-

-
-
Ducati 1299 by Moonbug - Pocher - 1/4 Scale
hollowneck replied to Moonbug's topic in Completed non-ship models
Moonbug, Take your pick: Ducati, Lambo...a couple more Pocher photos to inspire. The company has some nice looking models.😆 I've not seen the Ducati model in person, but I'll wager it's awesome, like the bike. Too bad a Build Log here won't work... Ron

-
Ducati 1299 by Moonbug - Pocher - 1/4 Scale
hollowneck replied to Moonbug's topic in Completed non-ship models
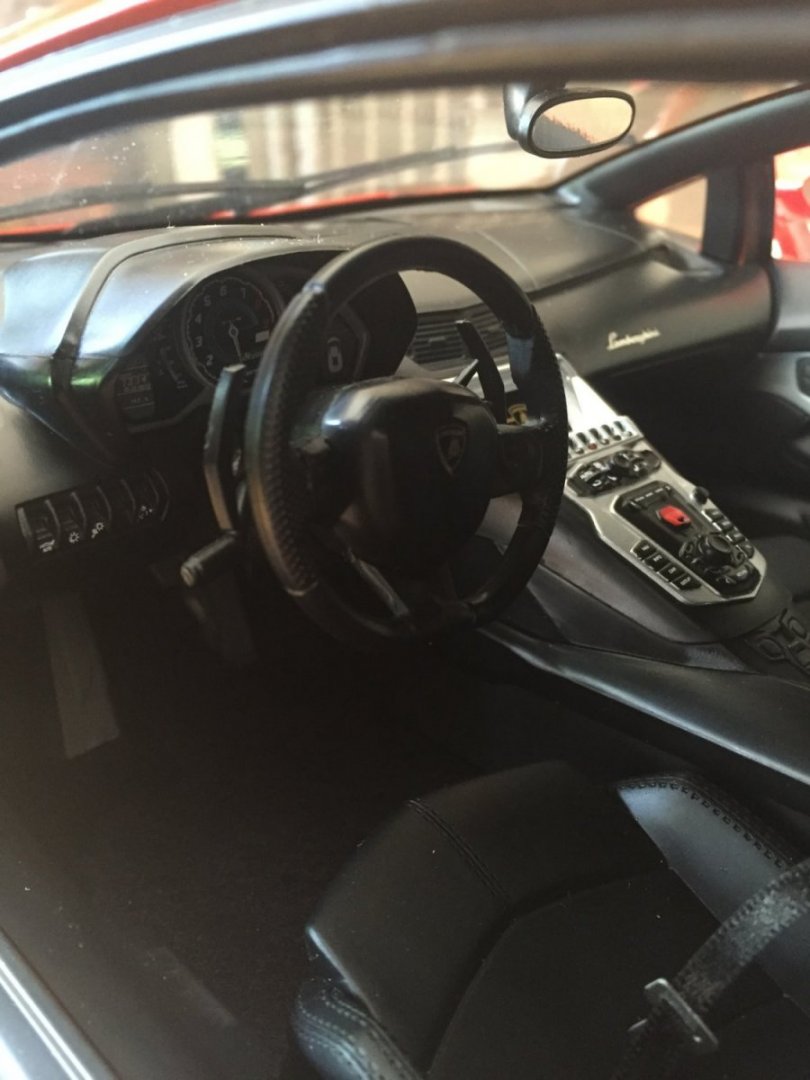
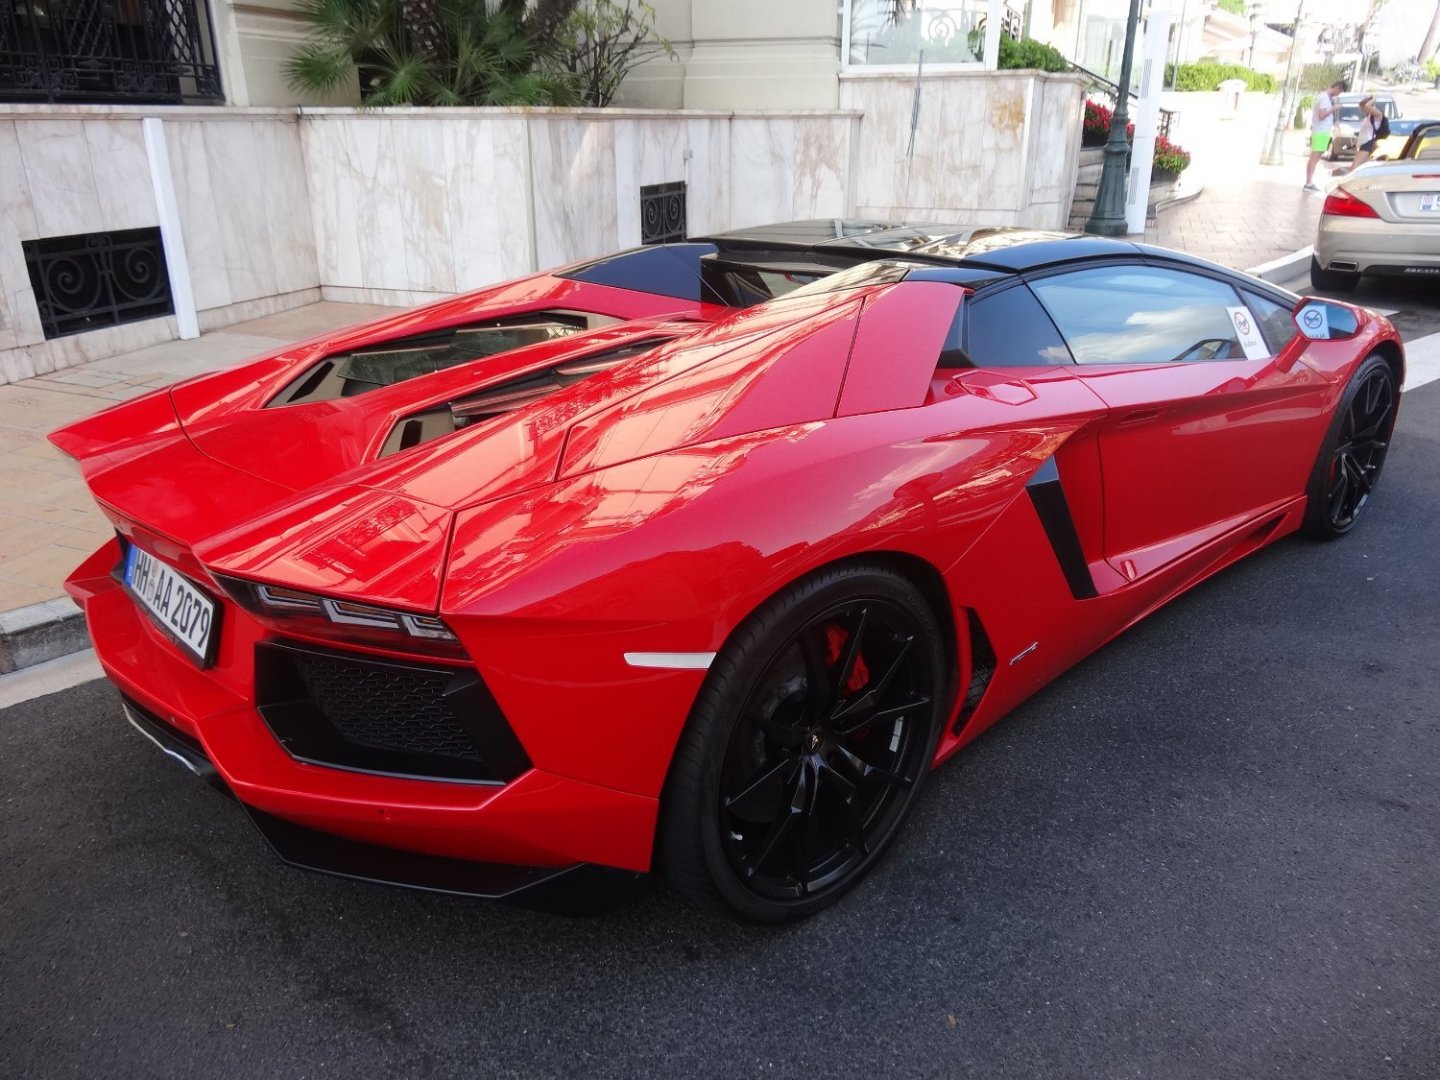
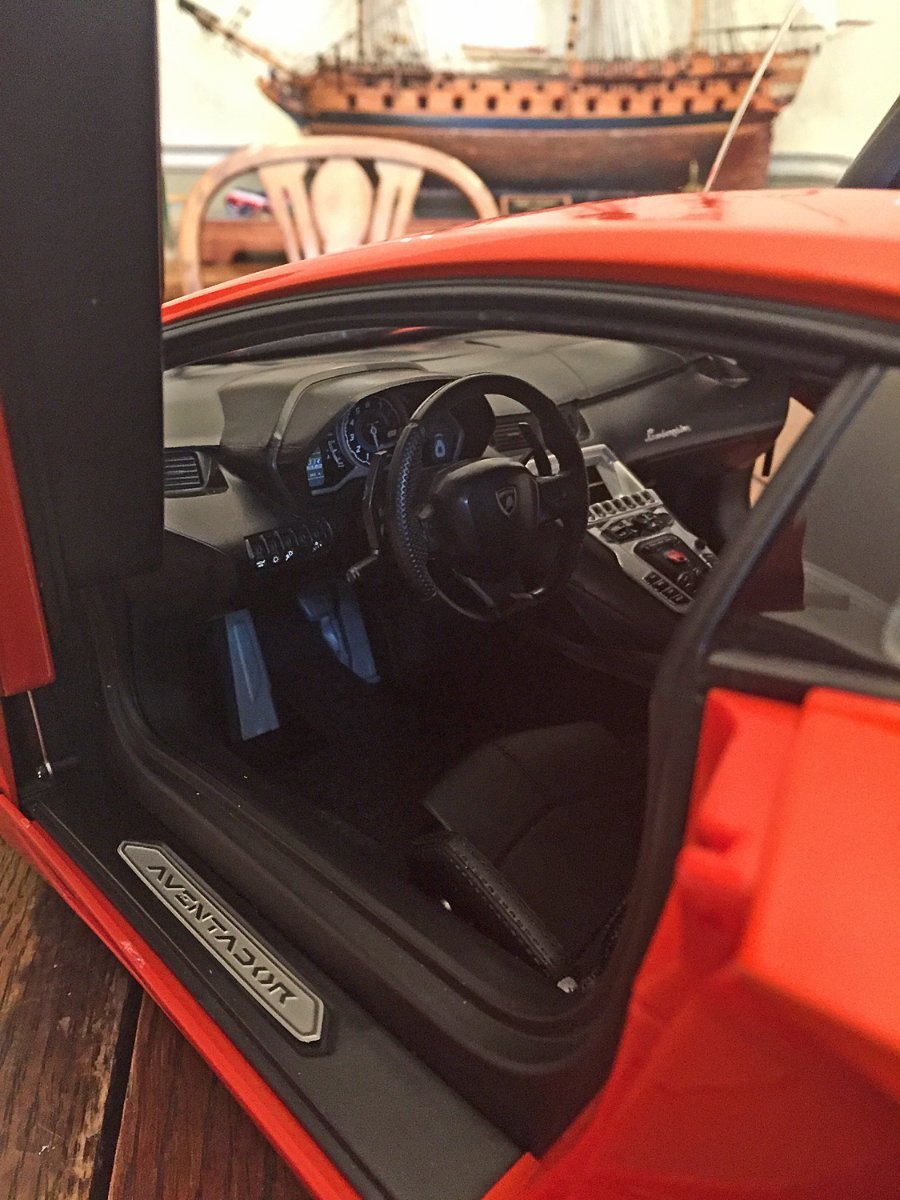
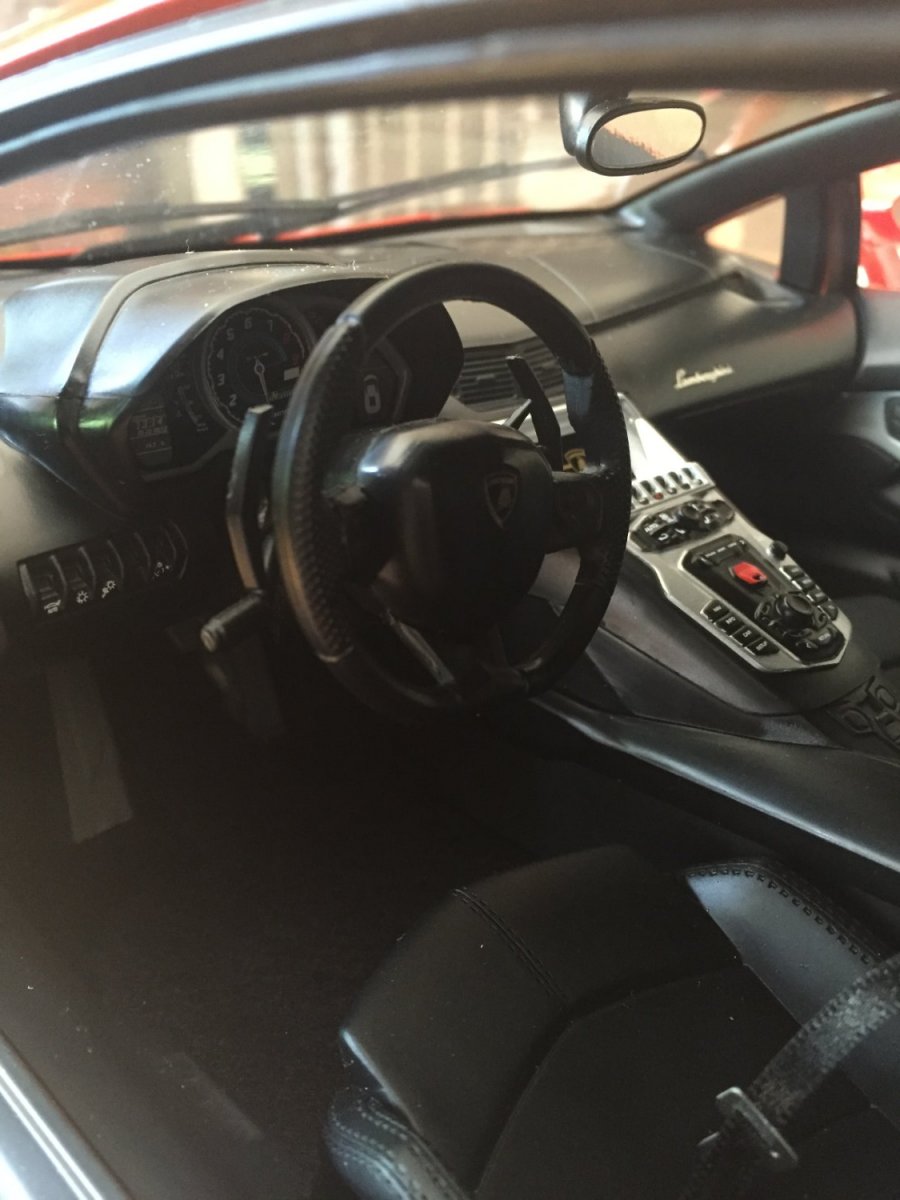
Hey Moonbug, I'm a Pocher fan. I asked my wife if I could get a Lamborghini for my 70th birthday. When I told a friend I was granted my wish he was flabbergasted when I texted him these photos of my new, screaming orange Aventador (the first two pics here). The Pocher kit is superb. A real treat to build. I understand that part of the deal with copyright permissions with Lambo was that Pocher could also use the same paint on their kit models as the actual car. Not sure this is true, but damn! - that paint job is amazing on the die cast parts of the kit which has 1,500 parts BTW. The engine, all suspension bits are included (talk about hidden details!) First two photos below are of my completed model which I photographed lying sideways on my front lawn. I waited for a real car to appear in the background not too far from my driveway. The interior is just as detailed and amazing as the exterior. The next two photos are the Real Deal. The last one is a Pocher Kit pic. Cheers, Ron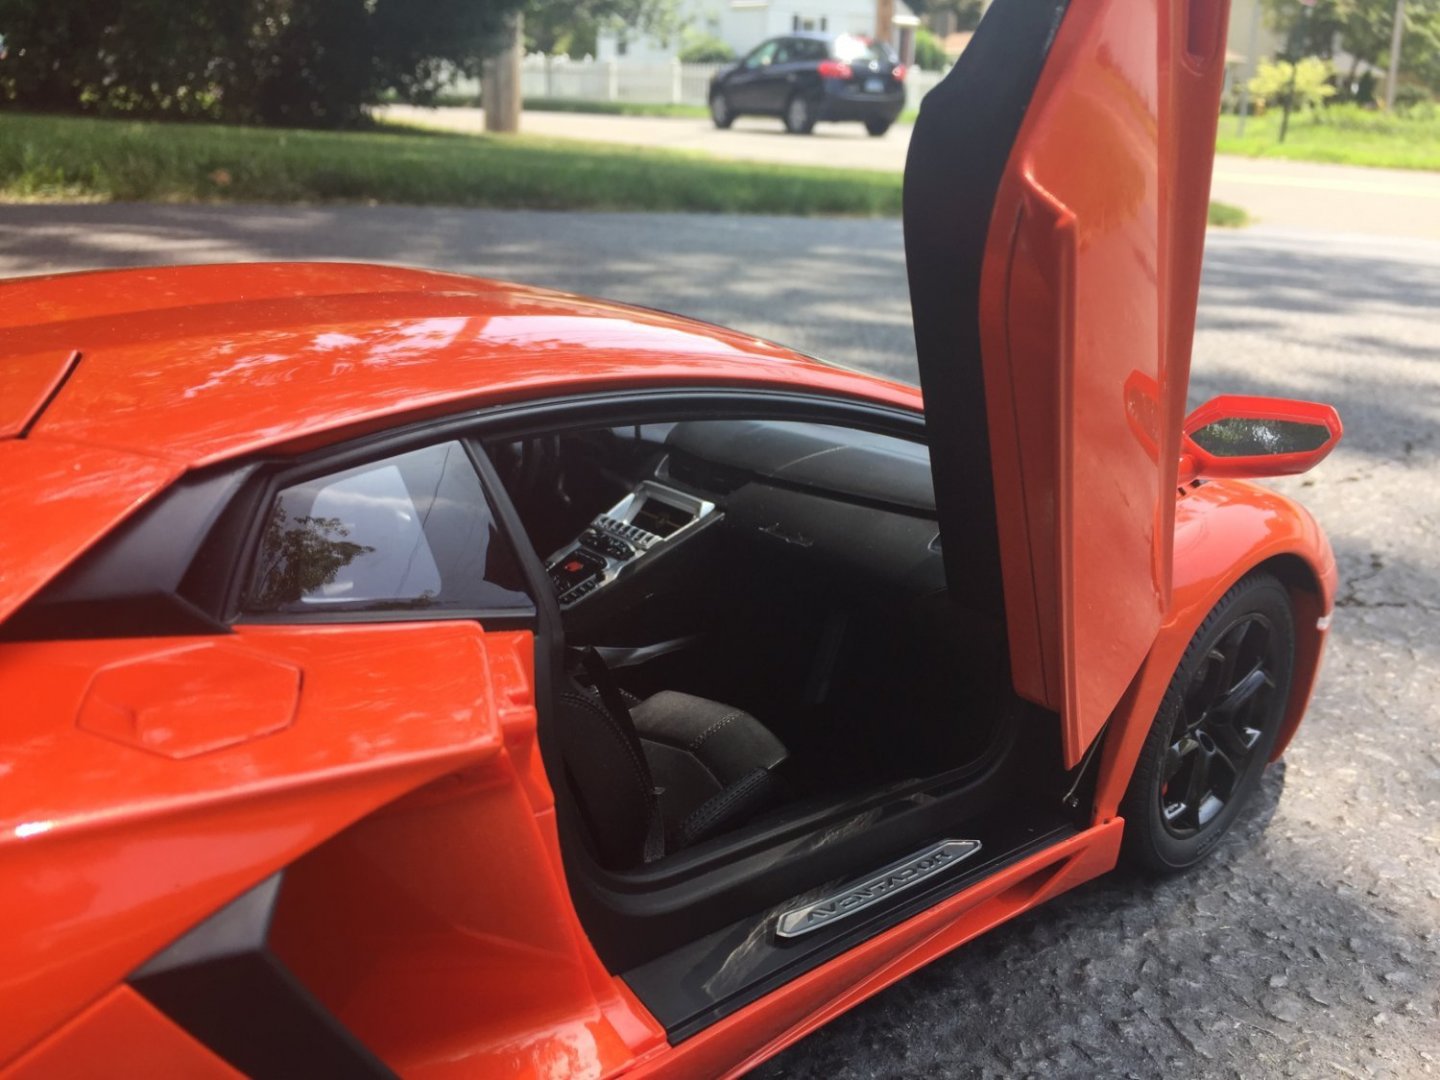
.thumb.jpg.f54a216bf5b10603aa2f3395c403c02c.jpg)

- 25 replies
-
- 10
-
-
-
Thanks for everyone's comments, questions, suggestions. Much appreciated. This is the type of feedback that makes online participation with other MSW member's so rewarding. First, Quoting Allan: The Vanguard yawl hull looks really good. (I assume it is a yawl as it is clinker built) As the boat will be sitting right side up, are the thwarts, knees, supplied with the hull or will you be making and installing them? I looked at the Vanguard website but only see the hulls. Will you also be including the longboat and pinnace which 6th rates carried in her time? My boat is the yawl which I partially went for BECAUSE it shows the "clinkered hull" detail nicely. The Vanguard hull doesn't come with the interior bits, however, the three boat builds supplied in the Sphinx kit has everything one needs to detail them. I'd like to also suggest another possibility: were I the ship's bosun, I'd make my boats ship-shape with tight, tarpaulin covers so they don't fill up with water when it rains in a sudden squall. Depicting three, bare-naked, open boats is a ship modeling convention I'd wager. What say others, here? I decided early-on that HMS Camilla would carry only one boat, a medium-sized one. My modest yawl will ferry crew and provisions as well as transport a French captain back to Camilla to negotiate terms of his surrender. So, no inside bits for the yawl since it will be lashed to the skid beams upside down, despite the casting's details being outstanding. I'll take a photo of the interior - post it on this thread - it really is quite tasty (see next post!). When I examined the little yawl firsthand, I have to admit I had thoughts about switching plans to add the interior goodies and display it right-side up. druxey Lovely progress. However, you might consider 'softening' the edges and corners of your mast caps. Here is the advantage of dye: once you have rounded edges off, simply re-dye the exposed wood ((I use a Q-tip) and buff. Thank you for the suggestion; I'll do just that, break the hard edges of the mast caps ever so gently. And, absolutely, if the native wood gets revealed I'll just touch-up with some more black dye. DelF More great work, some of which I'll shamelessly copy. I'll try that wood dye as an alternative to spraying, which I find a pain - especially the cleaning up. I'm also seriously tempted to get one or two of Chris's new boats. As I've noted - and another comment here attests - the black dye is messy and you need to carefully control where you want it as it tends to migrate throughout the grain. Again, the main reason to use dye over paint is that it doesn't hide details and actually does quite the opposite. To prevent "grain bleed" I painted a thin band with flat black acrylic where the dye would meet-up with it so I avoided this possible disaster; so far, so good. This "combo" technique seemed to have worked well despite there being a minute reflectivity difference between the two finishes. We'll see how a poly coat applied to some areas that have black dye will work, after I do some testing on this approach. I recommend Chris's boats wholeheartedly. At 1:64-scale and with several size options from which to choose, they are a brilliant, better-looking solution than trying to build these little guys. I acknowledge that some will enjoy building the three boats in the Sphinx kit; I'm just not one of them. I'm moving on to masting, rigging, sails and...oh yeah, H2o. Blue Ensign Just a curiosity Ron, I have seen inverted boats on 19th c Clippers but never seen one as I recall on an 18th century warship. Is this just a bit of artistic licence on your part? that clinker finish on the Yawl does look good tho'. ps: I like the finish on your mast tops, very nice effect. Totally artistic license here. I imagine myself and my mission as captain of my own ship; this is all part of my motivation in building these art objects - if you will - my time travel back to the 18th-century, my favorite. In HMS Camilla's case, I'm a post captain and my assignment from Whitehall is to harass and capture as many French ships in the Channel as I can, then maybe speed to North America or the Sugar Islands to help with KIng George's cause. For the mission, I only need one boat but I really need more provisions - including munitions. I also need a spare topmast (or two). Three boats is an unnecessary luxury when I 'm counting pounds (not currency ones) burthen. Wait until I finish that upward facing yawl hull! It is going to look really nice. I agree, the decision to blacken the masts, as conventional as it is, was a good choice. Even my 8 yo grandson agrees. glbarlow I believe the boats are always sitting up to make them faster and easier to launch, but i could be wrong. The leather dye is an interesting choice, but I recall from using it back in my time the army as being a total mess to work with. No matter how careful I was it wound up in places I didn’t want it and near impossible to remove. Still a nice effects, you seem to have kept it in control. Yep. Your points are well taken: Fast n' Furious on the boats. I've drilled my crew well; I guarantee they'll get Camilla's single yawl off the skids and in the water in record time after we capture those illegal vessels operated by belligerent frogs and insurrectionist Yanks! I've worked with Fiebings dyes for other components on my build and I am watchful on where and how I apply it. Tricky bizness, fer sure. ------ I'd like to offer the thought to my modeling colleagues that I try, to the best of my abilities, to present realistic portrayals of all my models, but stopping short of full-on "weathering" and embellishment with things like: broken spars, hull barnacles, cannon splintered bulwarks, dead sailors...you get the idea. Like the majority of others here, I like to create models which, at the end of the day, elicit from onlookers a response of: "Wow. That really is a big, beautiful boat. It looks so real." There are many different motivations and goals, challenges and pleasures to our modeling passion(s). As I previously noted here on this thread, one of mine is to hopefully create an ART OBJECT, crafting a ship model with the beauty of their simplicity and complexity at the same time. Ron
- 542 replies
-
- 9
-
-
- Sphinx
- Vanguard Models
- (and 3 more)
-
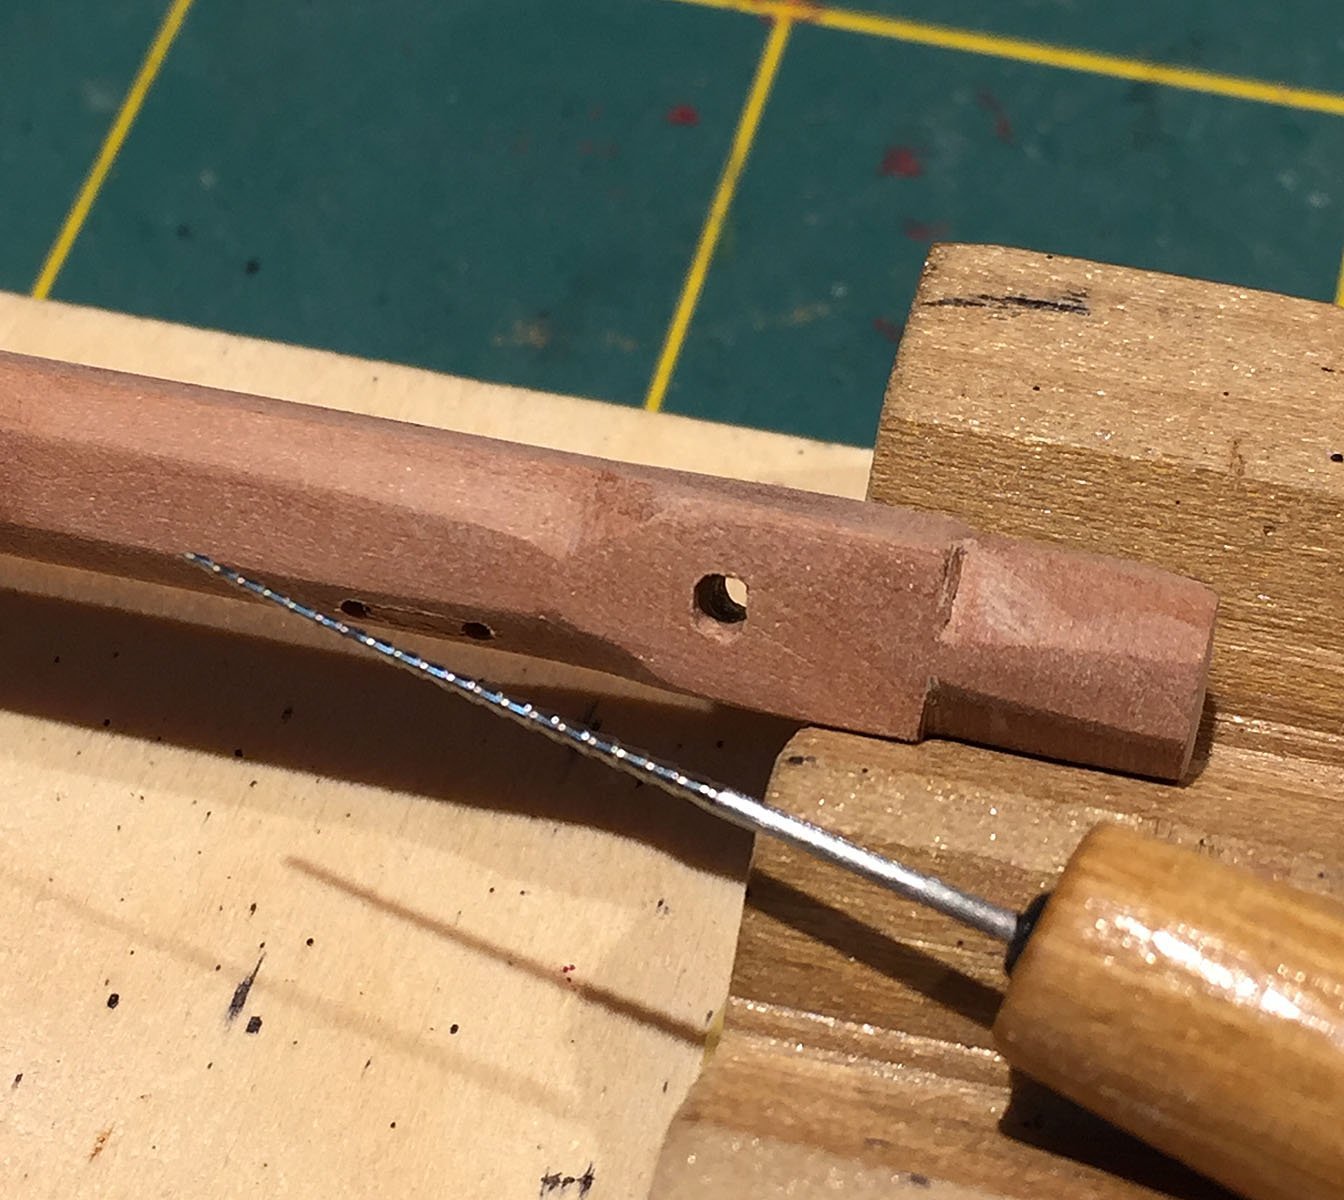
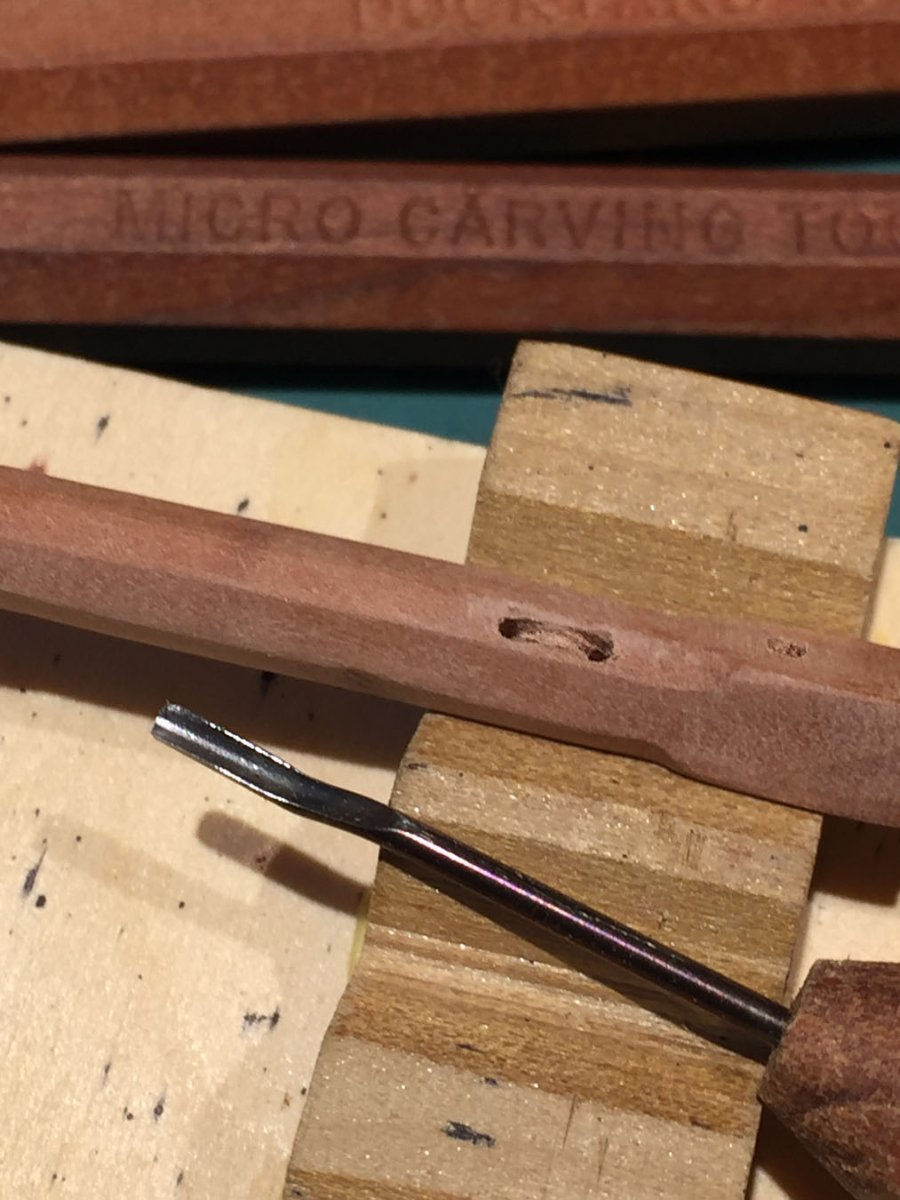
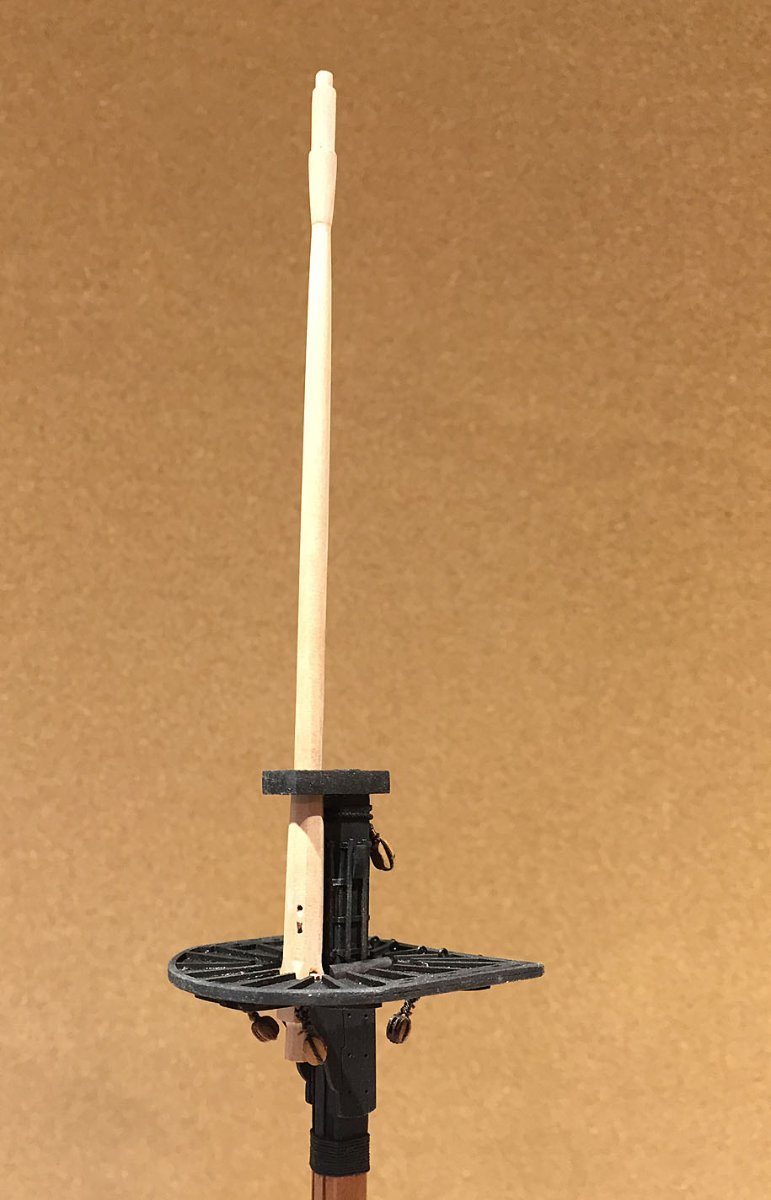
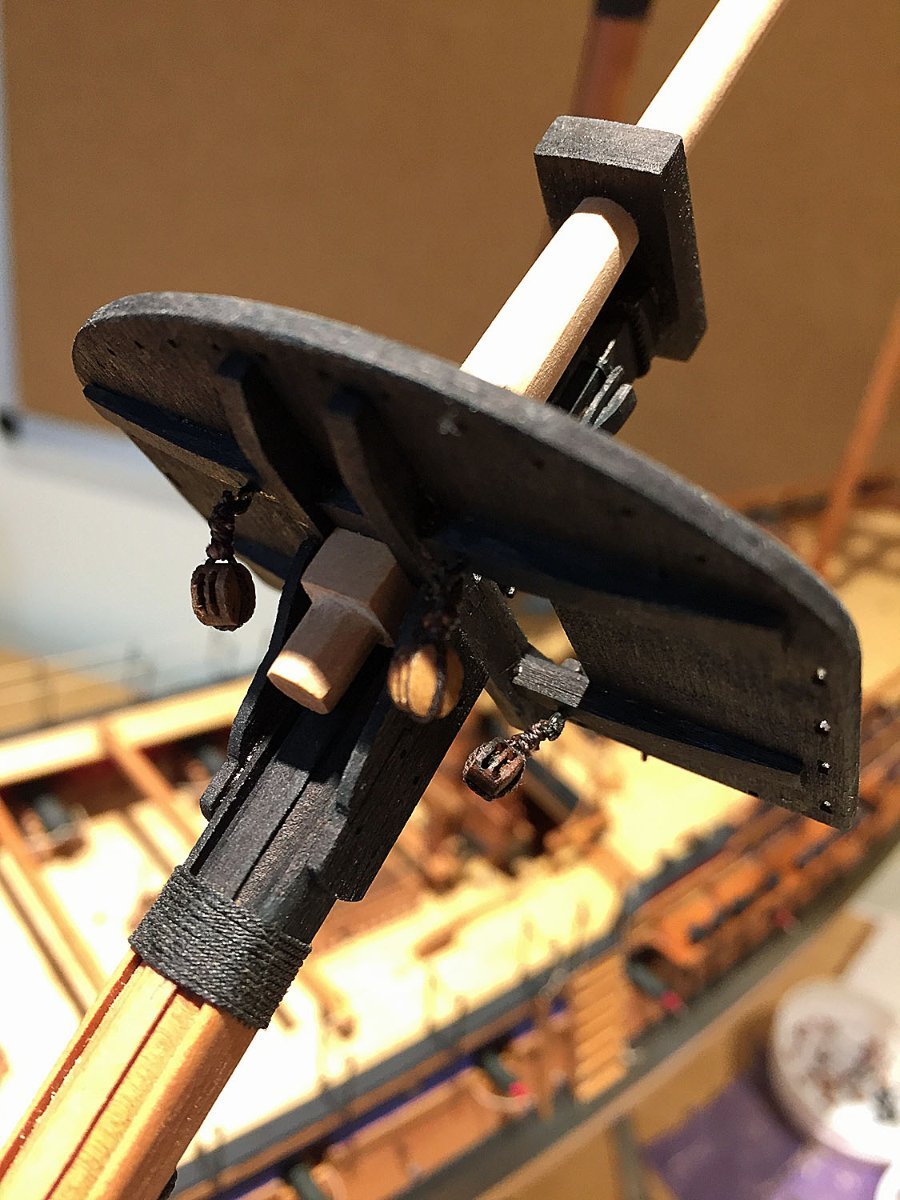
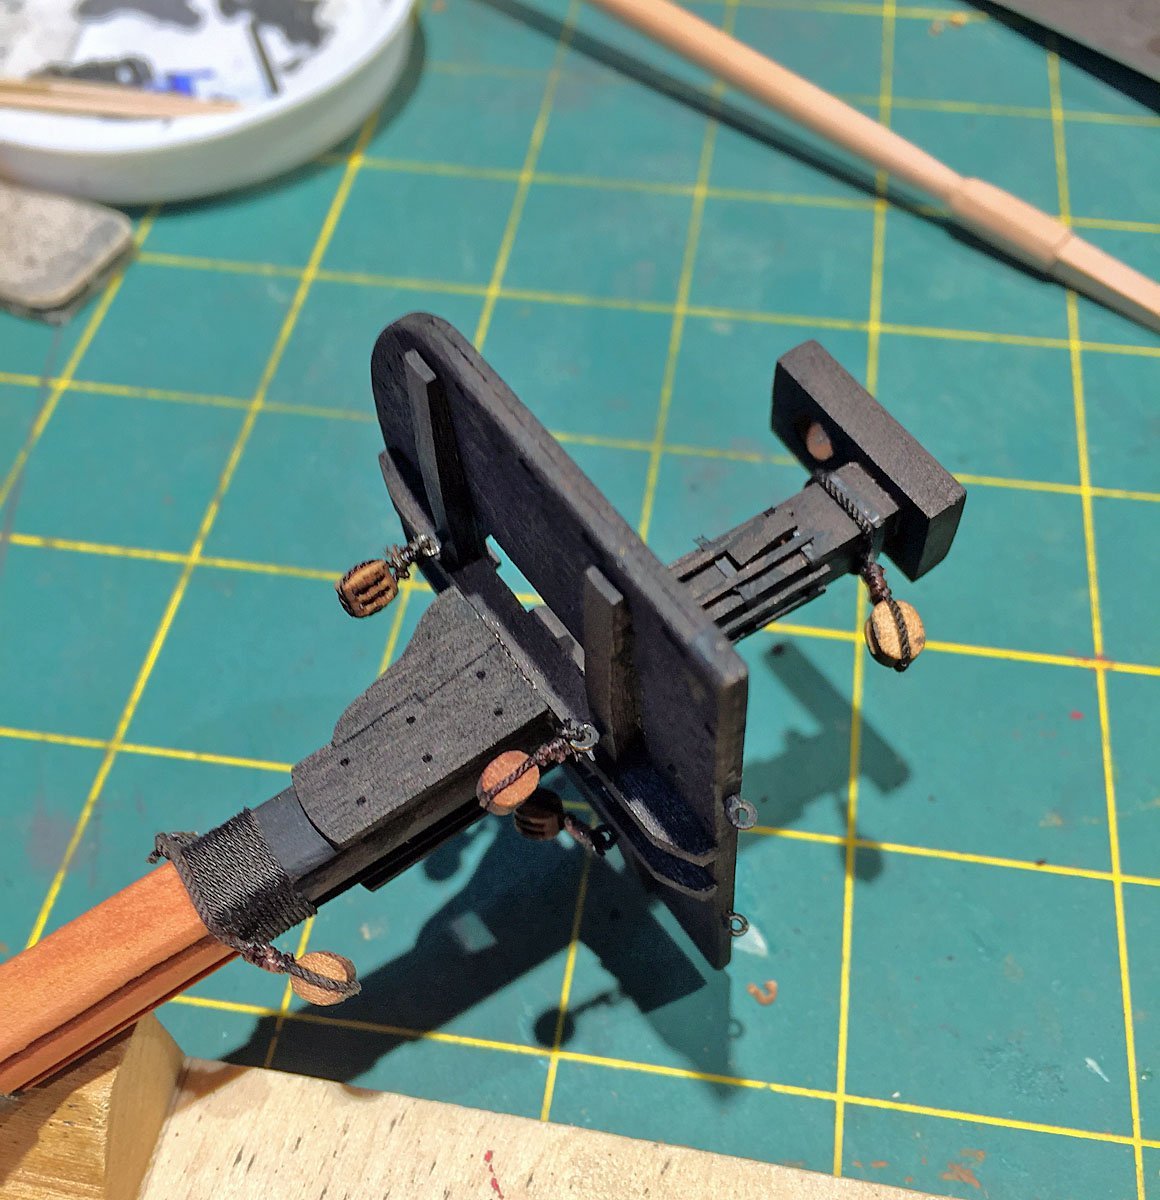
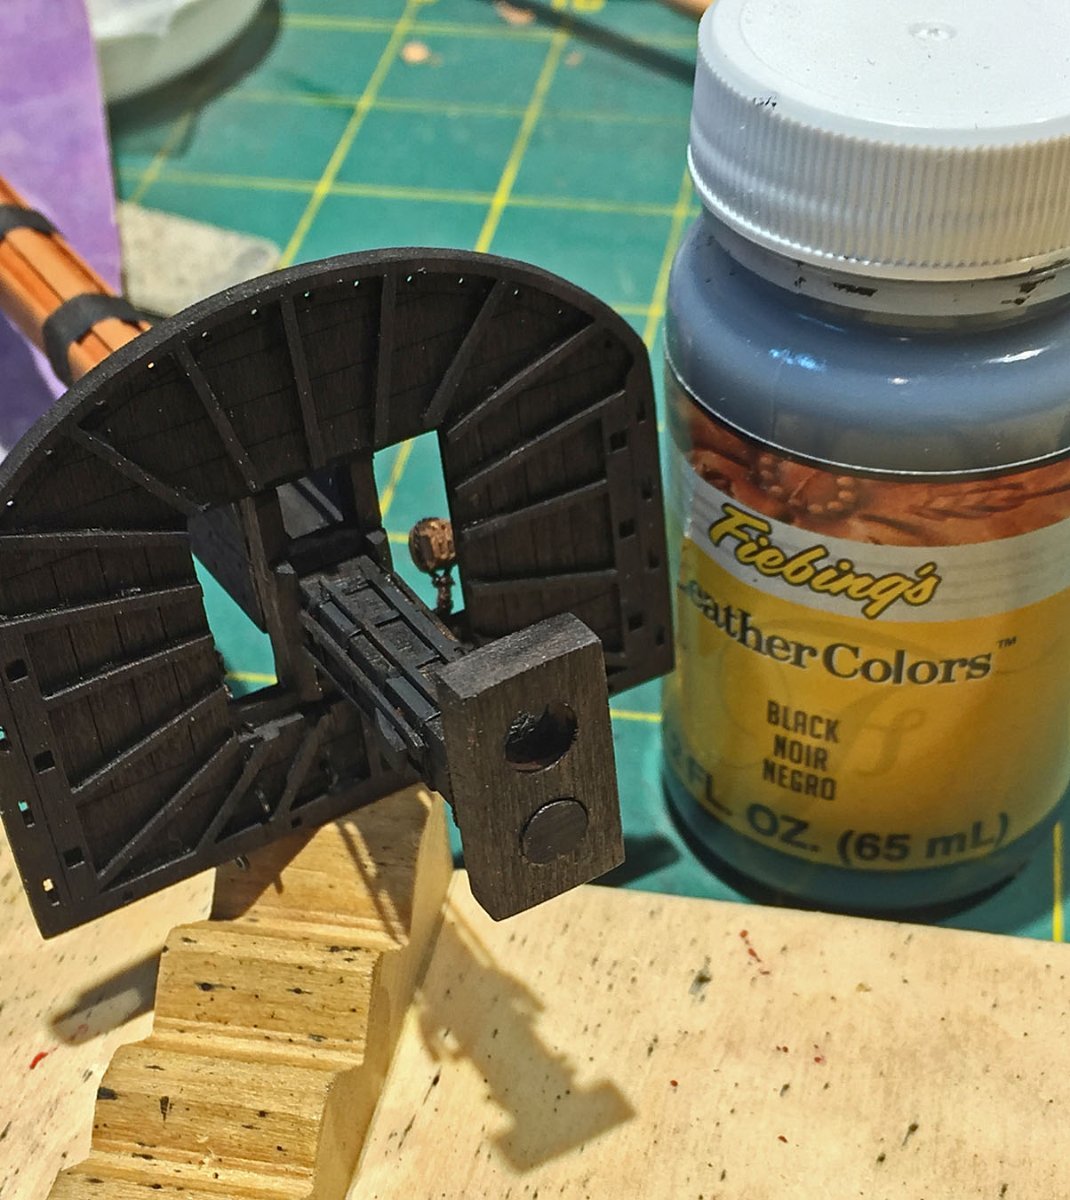
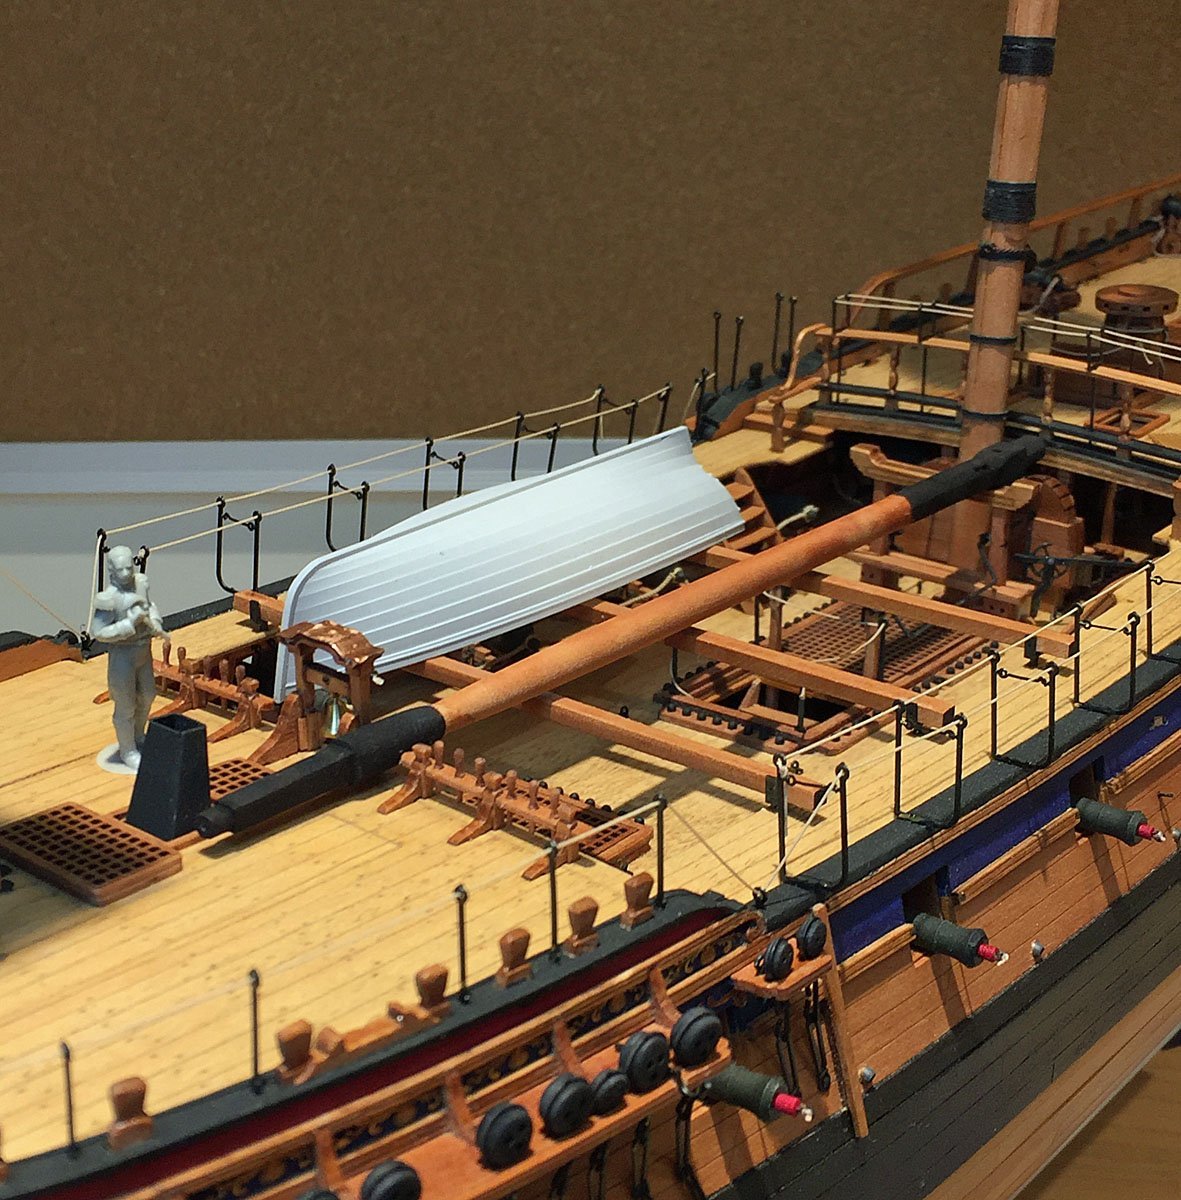
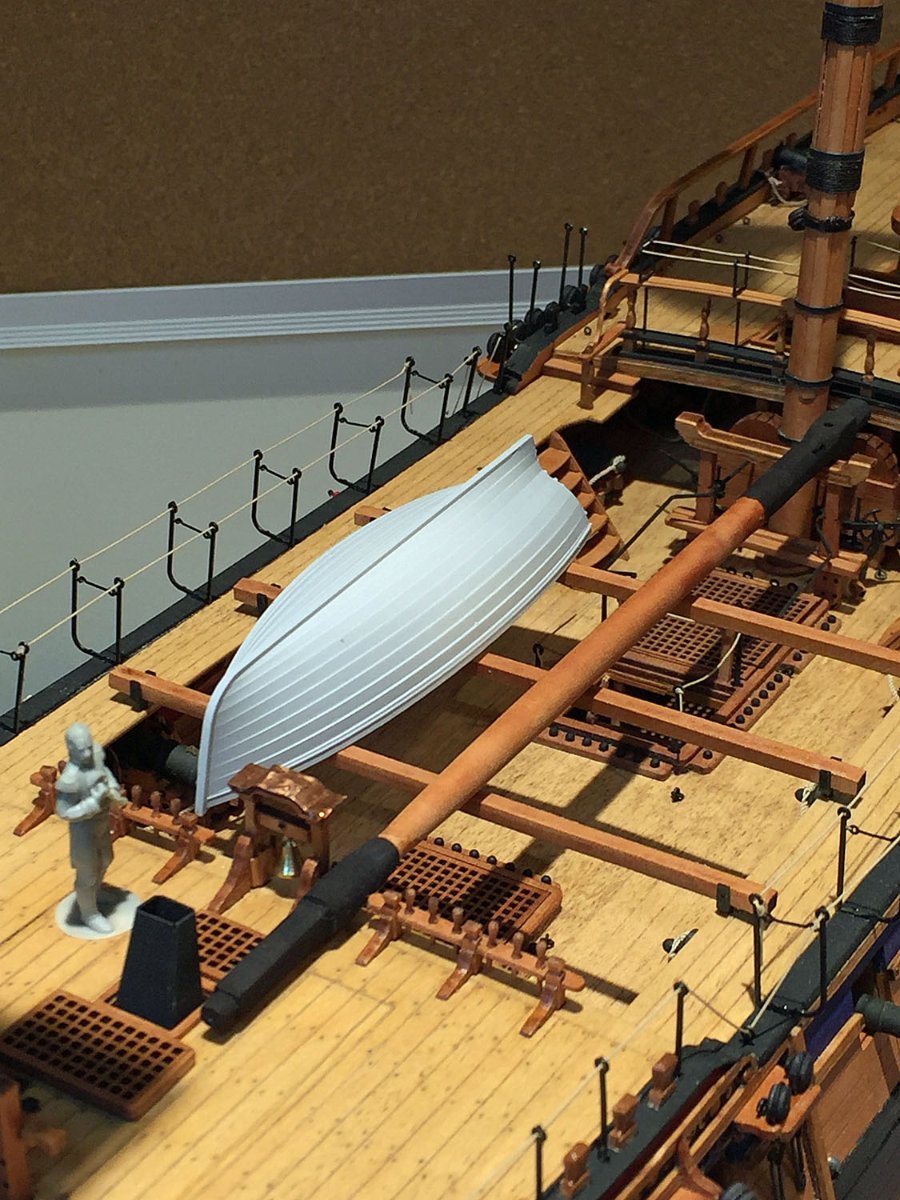
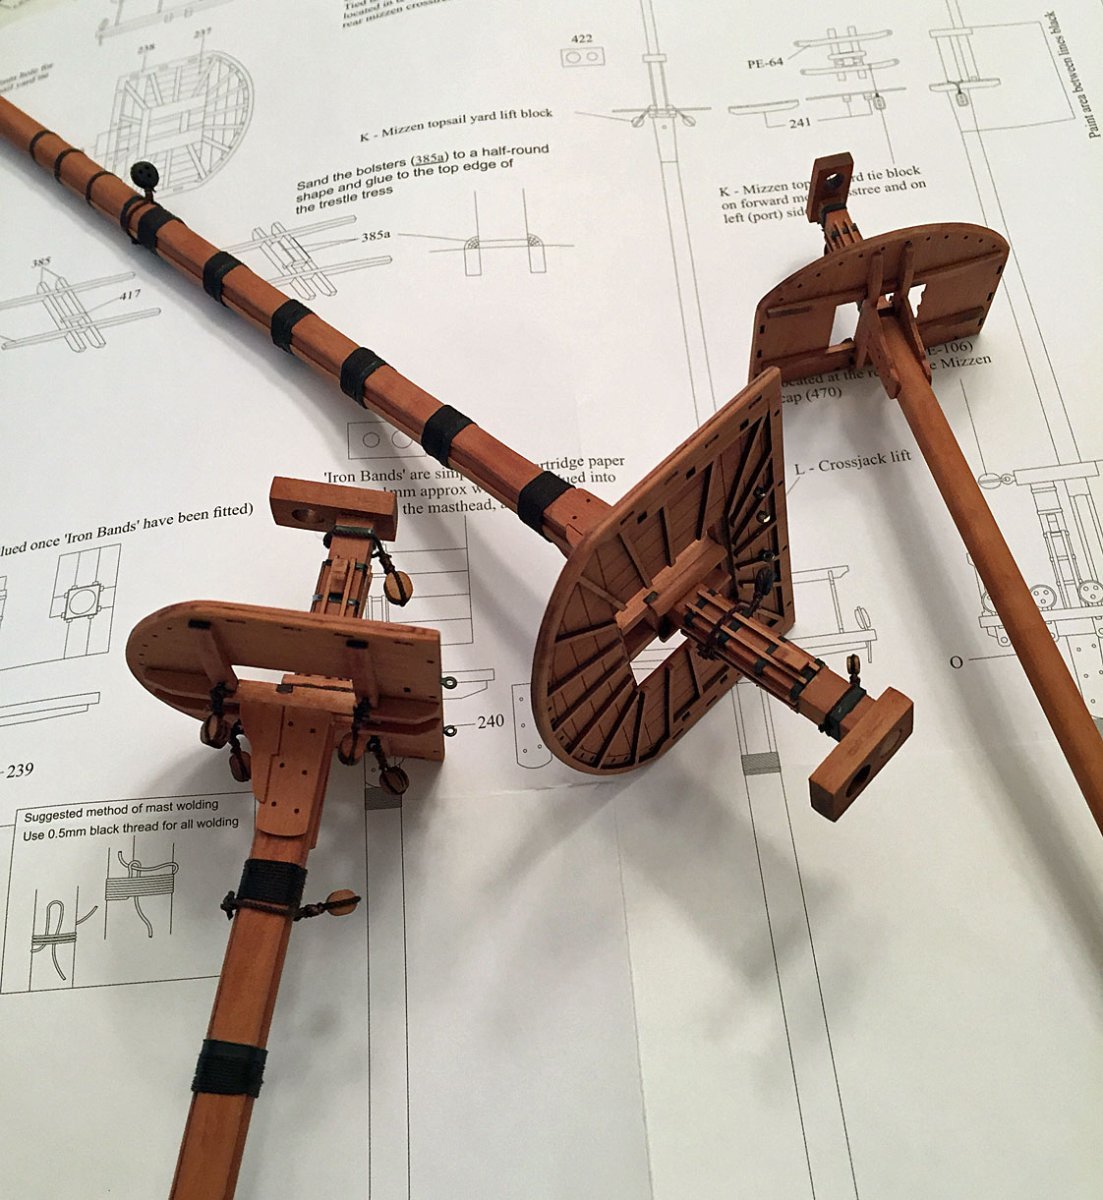
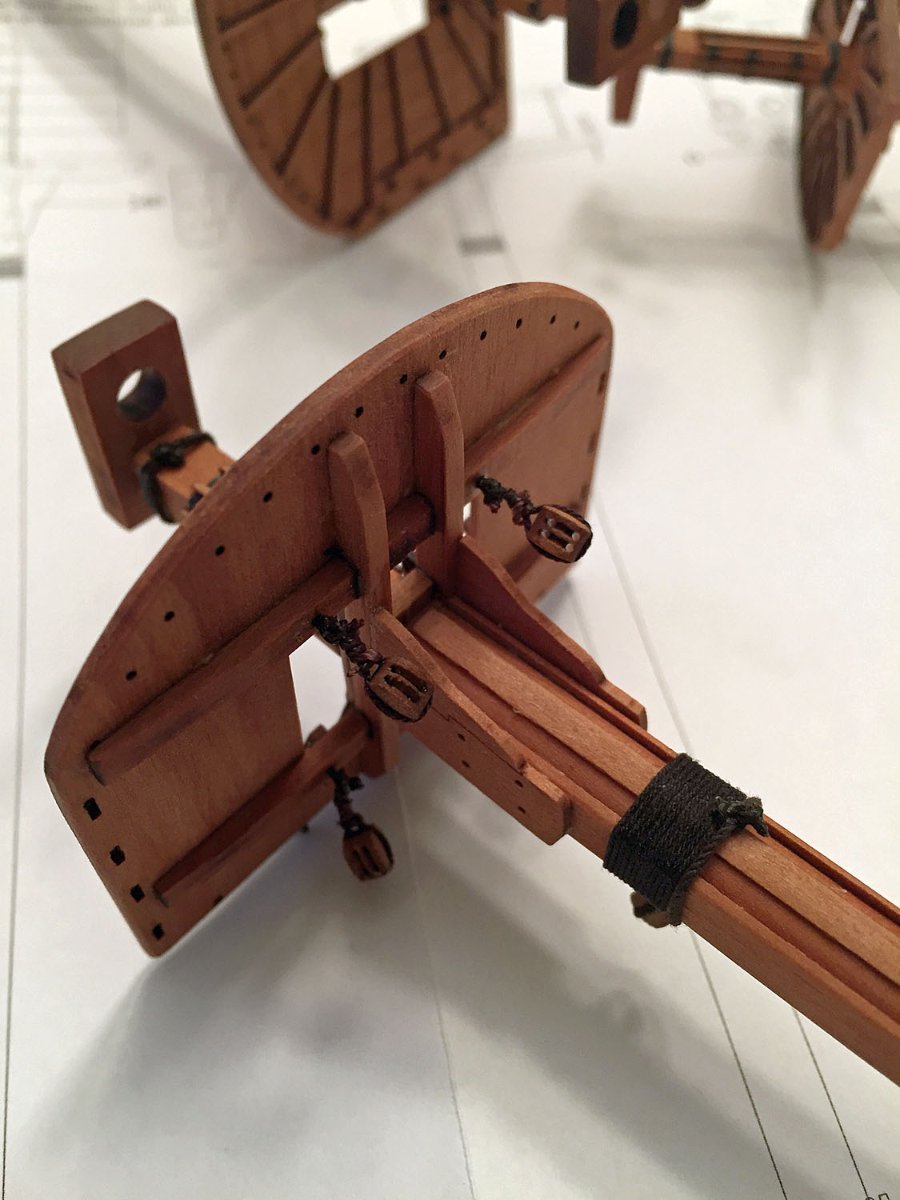
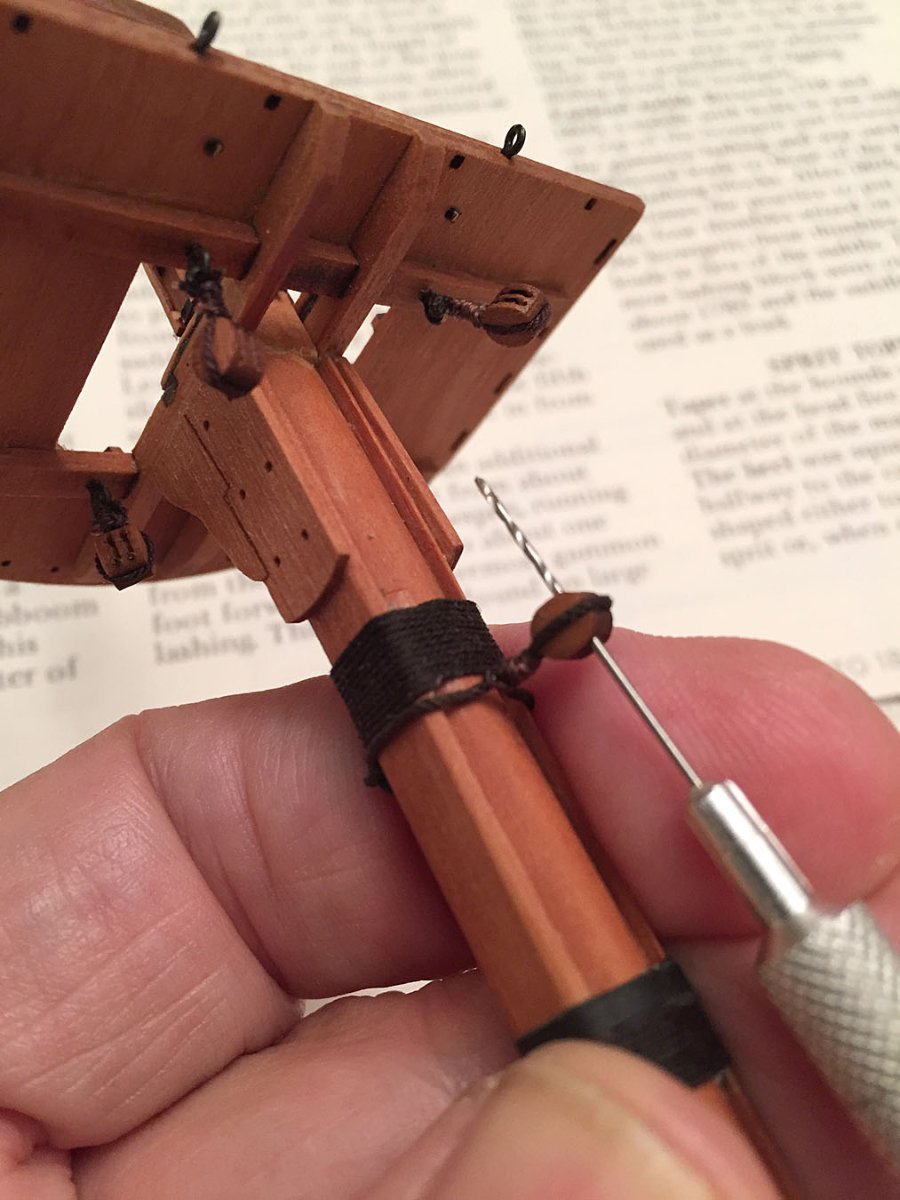
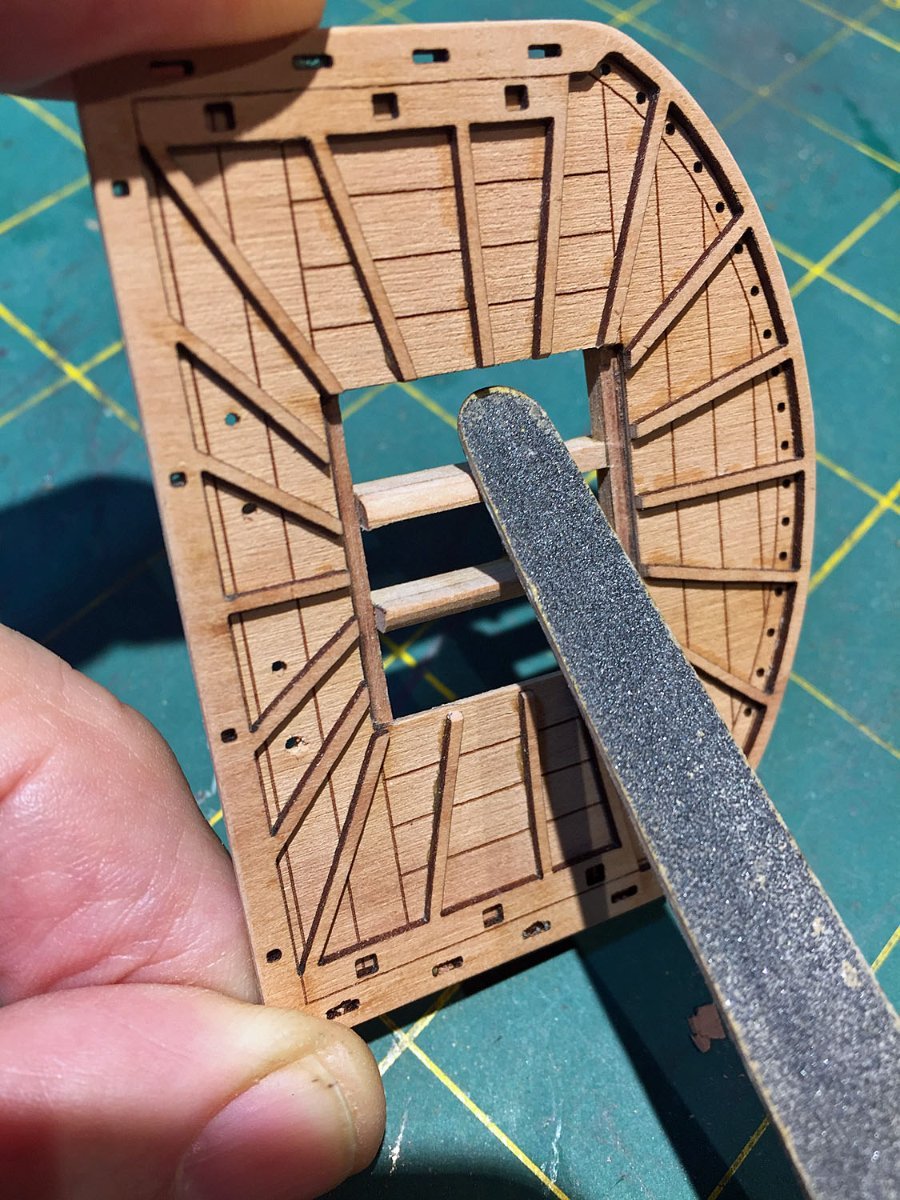
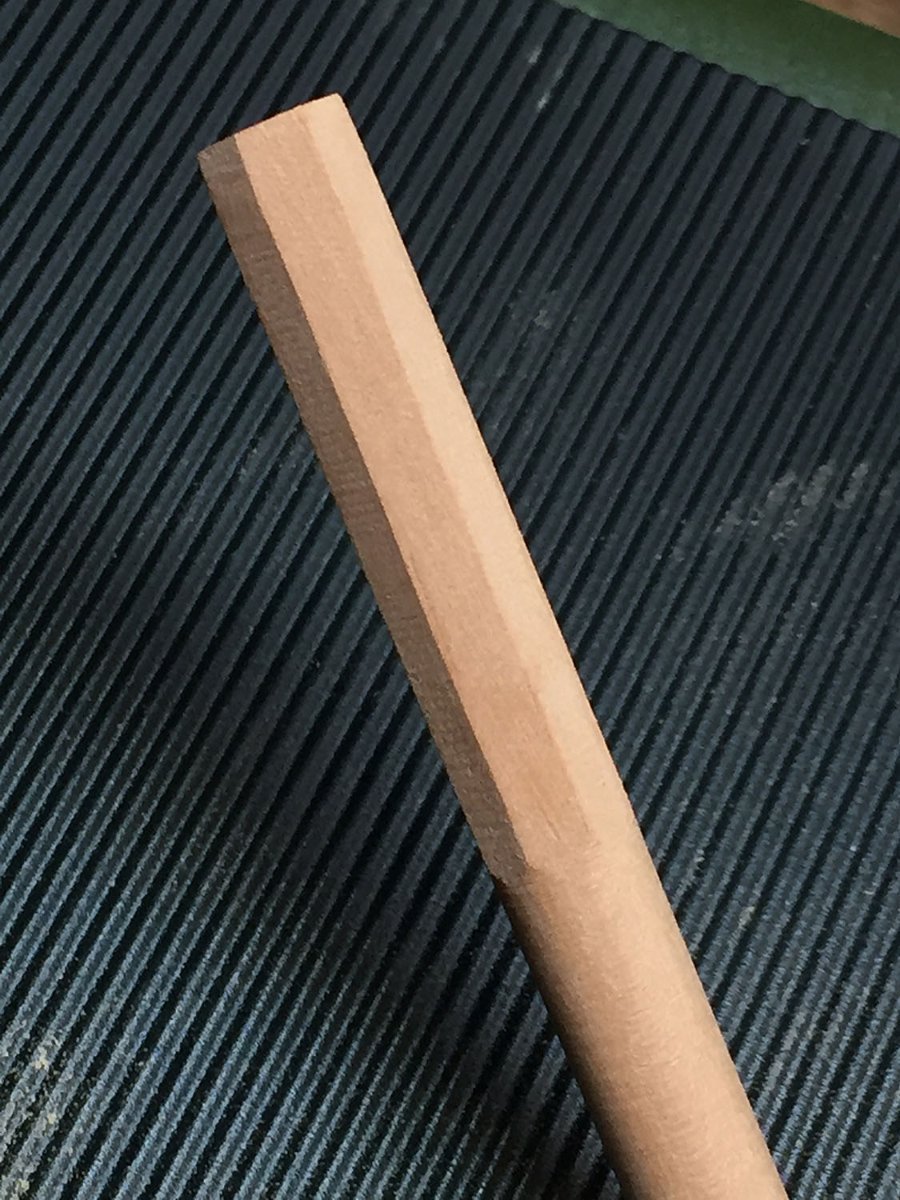
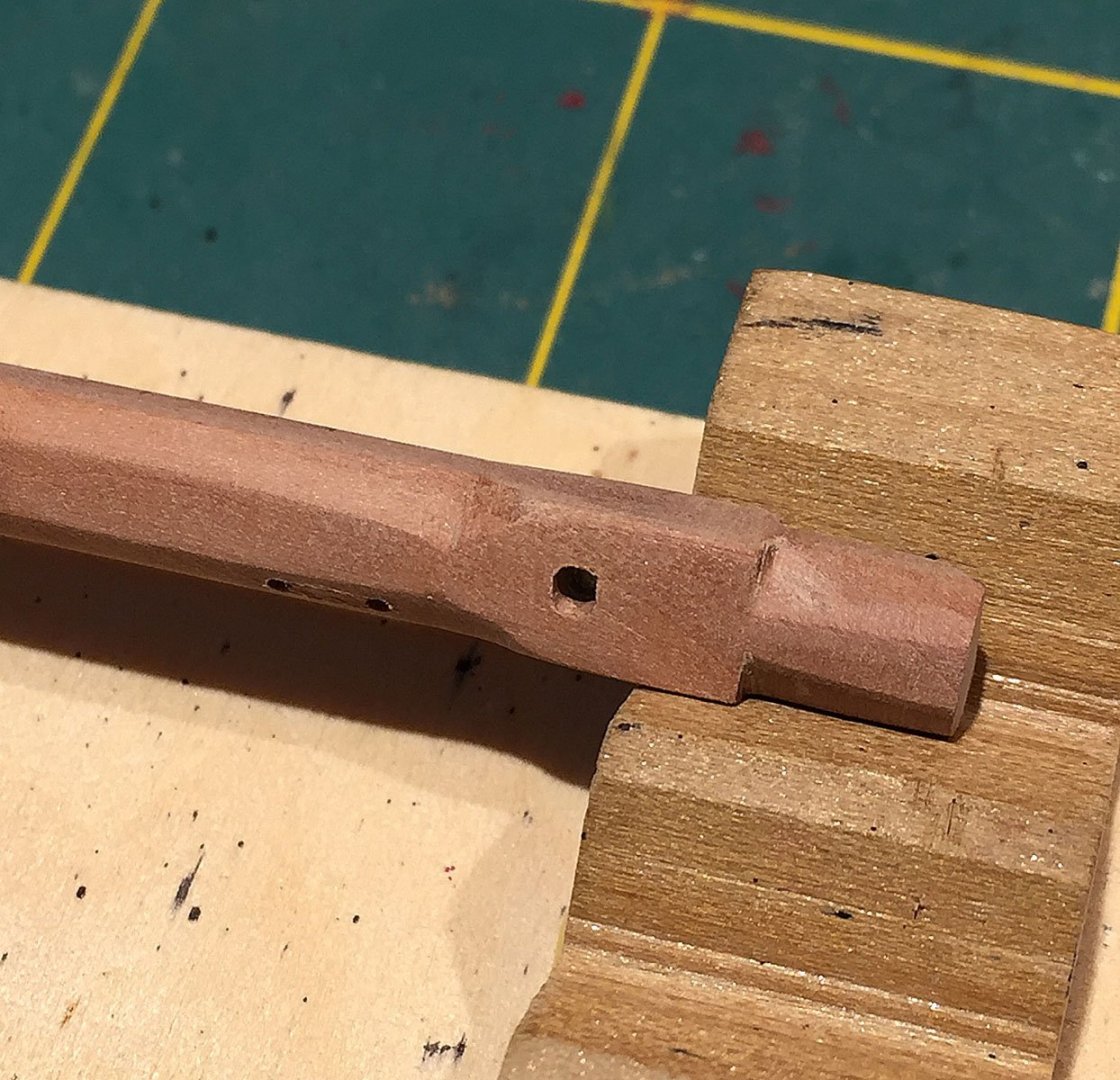
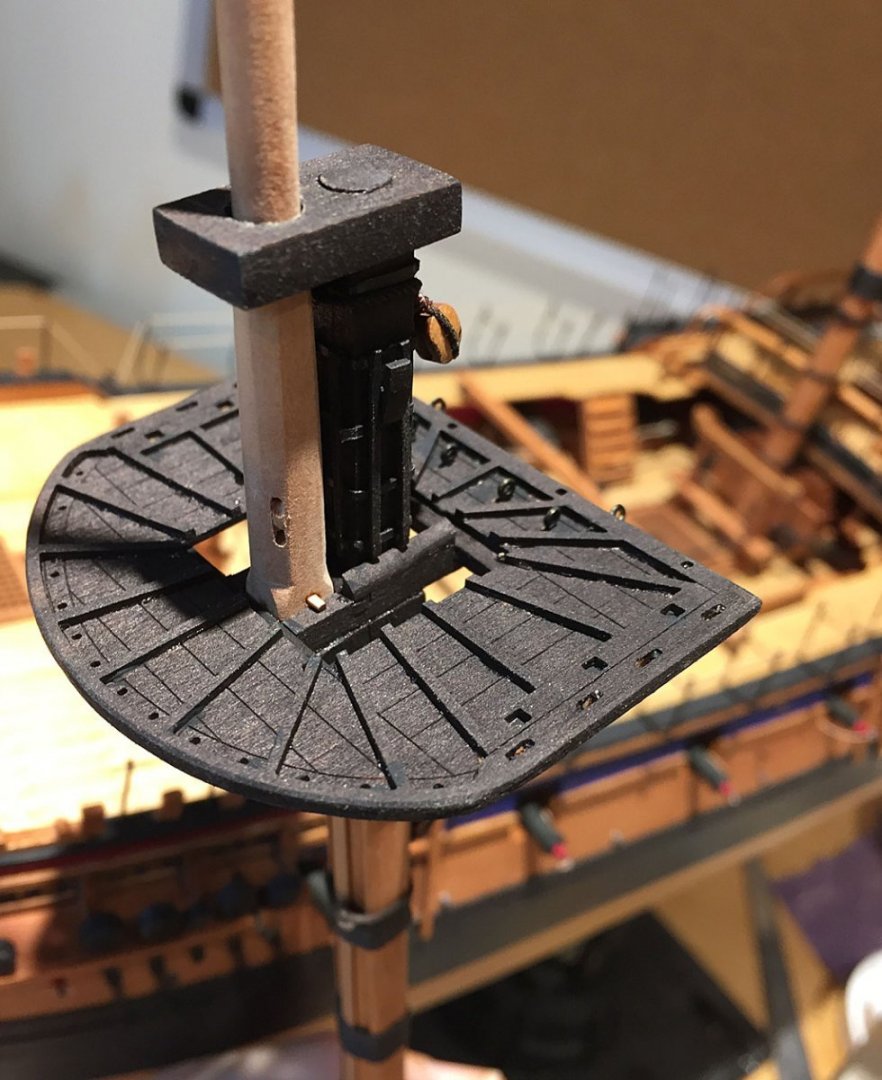
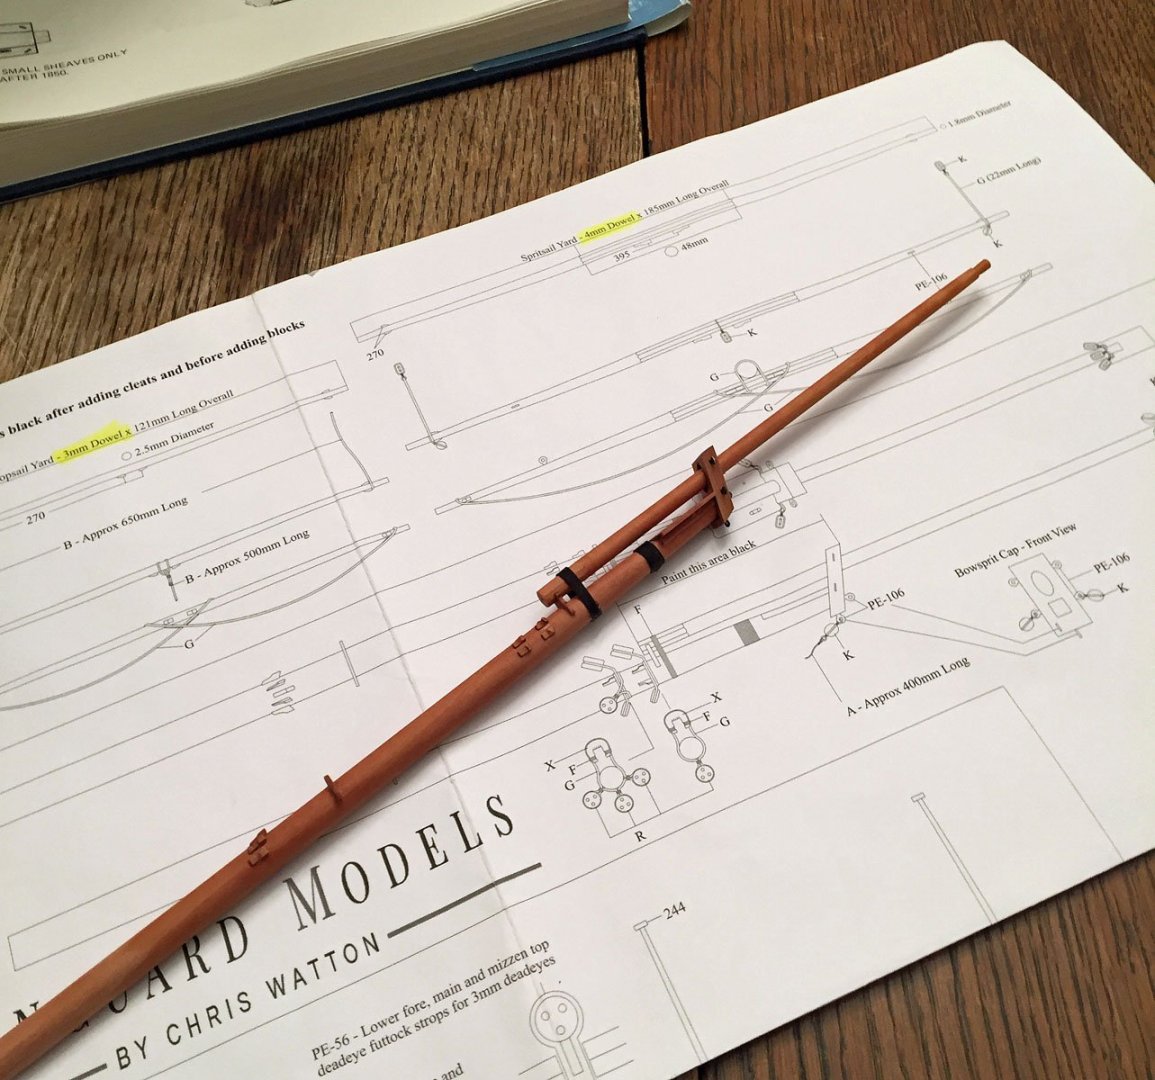
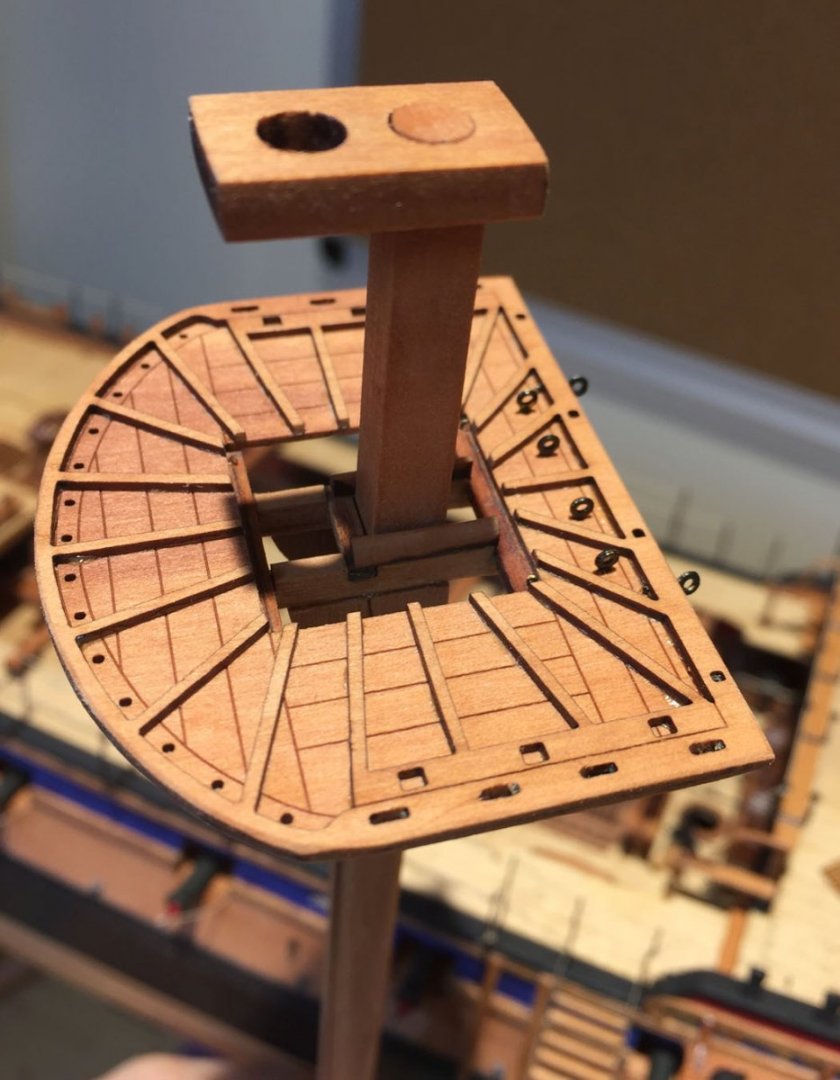
Some progress on masting details this week. The "fid" hole. Drill a hole, then square it off. Tricky, but doable, if... ....one has a tapered broach cutting tool. This, if carefully used, will shape a round hole into an approximation of a square one. This is necessary to fit the tiny square "Fid" (essentially a supporting stop piece) through the hole where it rests the topmast across the lower crosstrees. You can also see the "faked" sheave (rigging pulley) on a side face of the octagon. Note there are three (3) different profiles at all three of the topmast's areas that fit into the lower masts and through the tops; from the bottom and upward: an octagon, a square (with the hole) and another longer octagon section. Above the last octagon the mast turns into a round shape and tapers to the upper support. A micro chisel (1mm diameter) to fashion the fake sheave. At 1:64-scale, I'm o.k. faking this rigging detail in the topmasts. Were I building in 1:48-scale, I would take the time to insert a real pulley here (wood or brass). A completed fore topmast in position. My lighting is too over exposed in this photo, but MSWer's should get the picture. There are no fewer than eight (8) different profile transitions to successfully make all the square-rigger topmasts. These difficult pieces take quite a bit of time to get right - and, as such need to be scratch-built. A round walnut dowel is on a far, far shore from a convincing, completed topmast. I enjoy building high-quality ship kits, using the best of what's provided but also super-detailing and modifying them - as is evident by now. However, to complete most sailing ships to my satisfaction, I choose to scratch all the masts and spars. These get me to the fun stuff: the myriad challenges of all the rigging bits. I do understand this is NOT the choice of many sailing era ship modelers! The followers of my thread will clearly note that I decided to blacken my masts and go "Kosher" (per my historical accuracy choice). A topmast is test- fitted to the lower foremast. The lower octagon, the square section that fits into the crosstrees, and the upper octagon that will support the mast shrouds are clearly visible here. The wooldings (rope) hold the front fish and side pieces (cheeks) securely to the main mast stick (they're also glued with white glue). Dual-sheave pear blocks are prepped and mounted , ready to do what pulleys do. Another view of a semi-completed topmast affixed to the lower mast. The fid (inserted through the square section) and the fake sheave are easily seen. This lower portion of the topmast will get "blackened." The lower foremast and its top now "painted" black and ready for its topmast to be mounted. Rigging blocks (pulleys for mast rigging) are seen on the backside. I've chosen to "paint black" with Fiebing's black leather dye. This is very messy stuff to work with as it dyes everything - including fingers and possibly your shop wardrobe - and a permanent dye that soaks into the wood and thusly, its unlike a paint that coats. It also imparts a very flat looking black hue to whatever wood it colors; I plan to use a satin poly on most blackened portions - but not all. Black dye - as opposed to black paint (even flat matte) - emphasizes your woodworking details nicely. Another finishing option is to use a coating of wax applied to the dyed wood to impart a delicate sheen to these components. Chris Watton's beautifully 3D-cast small boat arrived! Not bad: about a week from the U.K. to Pennsylvania. I opened the box (Thank God it wasn't crushed by the U.S. Post Office), and after studying this little £18 gem, I grabbed my Tamiya grey primer rattle can and coated the clinker hull side up since this will be how I mount the 22' launch on my model. Of course, it will be painted to look like wood and lashed with the appropriate-sized rope at some not-to-distant point. No oars, no thwarts, no rudder necessary. Camilla's captain is supervising the boat mounting dry-run so nothing gets damaged amidships... Another bird's eye view of the captain and his launch. He's ready to take prizes! Board and capture! The launch will suffice for this latter activity, as well as to bring the ship's officer's aboard and shuttling some supplies to end up in the ship's orlop. In both these photos you can see a spare topmast (either fore or main, Captain's choice). Like the launch, this lifesaving "spare" will also be lashed to the skid beams at the right time. Even small frigates like this Third Rate warship carried spare topmast when they were on post ship duty, patrolling, escorting or raiding. In some cases, more than one topmast was placed in the ship's waist. Think of it as an 18th-century spare tire, without it, you're not going very far. This photo is to show the difference with the blackened tops vs the unpainted, natural version(s) - main and mizzen at this juncture. I still like the natural naked pear, however I chose to go the traditional, historic route for my masts and spars. This is close to the last time an uncluttered view can be had of HMS Camilla's open deck. Future images will have stays and shroud rigging and then all the running rig for the spars and gaff. Lastly, once sails are formed and bent, their control lines added, a clear view like this will be a thing of the workshop past... The bowsprit and jibboom got the Fiebing's blackening dye too. Once all the masts are completed, I'll hang the rigging bits onto the bowsprit for the many stay blocks that inhabit it. Onward dockyard workers - there are more skinny top masts to make- the thin, spindly buggers that present their own challenges to scratch. I love my DB250 Proxxon mini-lathe and various wood turning accoutrements. I couldn't do a very good job with this mast and spar work without them. Ron


- 542 replies
-
- 17
-
-
-
- Sphinx
- Vanguard Models
- (and 3 more)
-
Thank you, gentlemen. Bottomline: I'm hoping the details here are informative and will migrate across to other high-quality kit builds for MSW'ers. Chris Watton's plans are excellent and there are lots of them! The HMS Sphinx kit has no less than seventeen (17) B"-sized prints with eight (8) dedicated to masting and rigging alone. For my build, I will develop a "sail plan" (not included) and I'll use some excellent reference books for making a full complement of Camilla's sails - as well as their required management lines. Her sails will be bent (furled and set) to their respective spars (and mizzen/gaff) prior to hanging them. A majority of my first models were from the Caldercraft and Amati/Victory ranges and their plans (all drafted by Chris) have always been robust, clear and never skimpy; I recall large "C"- sized prints for HMS Agamemnon (1:64 1764 - 64gun). These early kit plans were "old school," hand drafted and before Chris generated later ones that are now in nicely-delineated CAD. I would venture to say that if the HMS Sphinx Building Manual disappeared, an experienced ship modeler for this era could quite successfully build this kit with only the supplied plans that include detailed identification of parts for all the lasered as well as P/E frets and patterns. As I mentioned early-on in this thread, I believe the manual and plans alone exceeded five pounds!..as in weight, not currency. Which is to also say, they're both of considerable value to the builder for this milestone of a kit. Thanks Again for watching. Ron
- 542 replies
-
- 7
-
-

-
- Sphinx
- Vanguard Models
- (and 3 more)
-
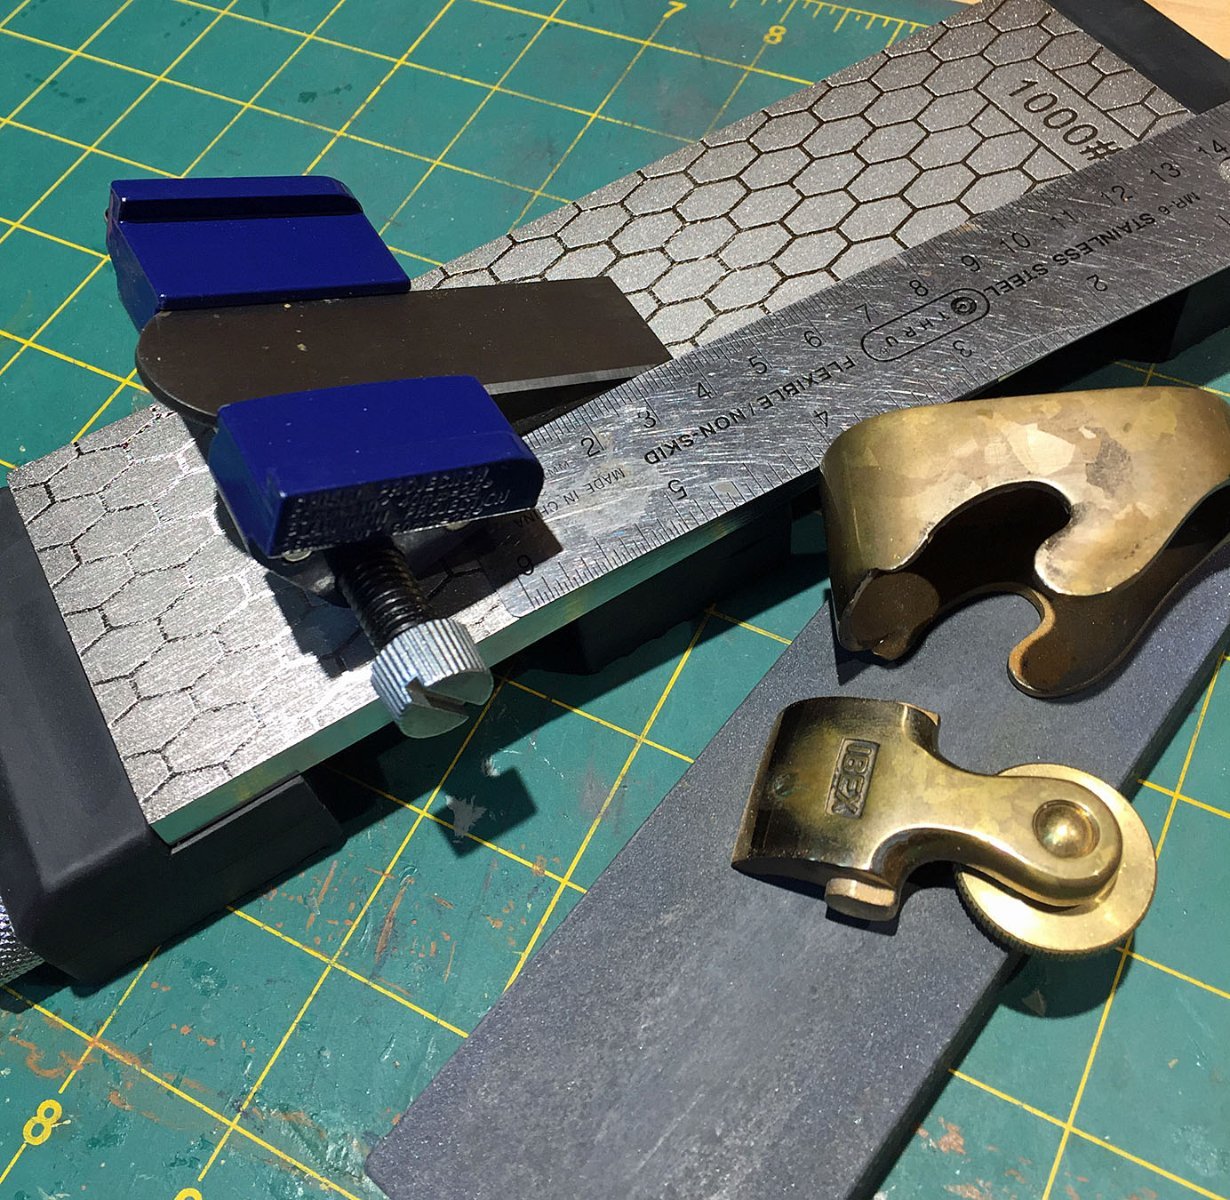
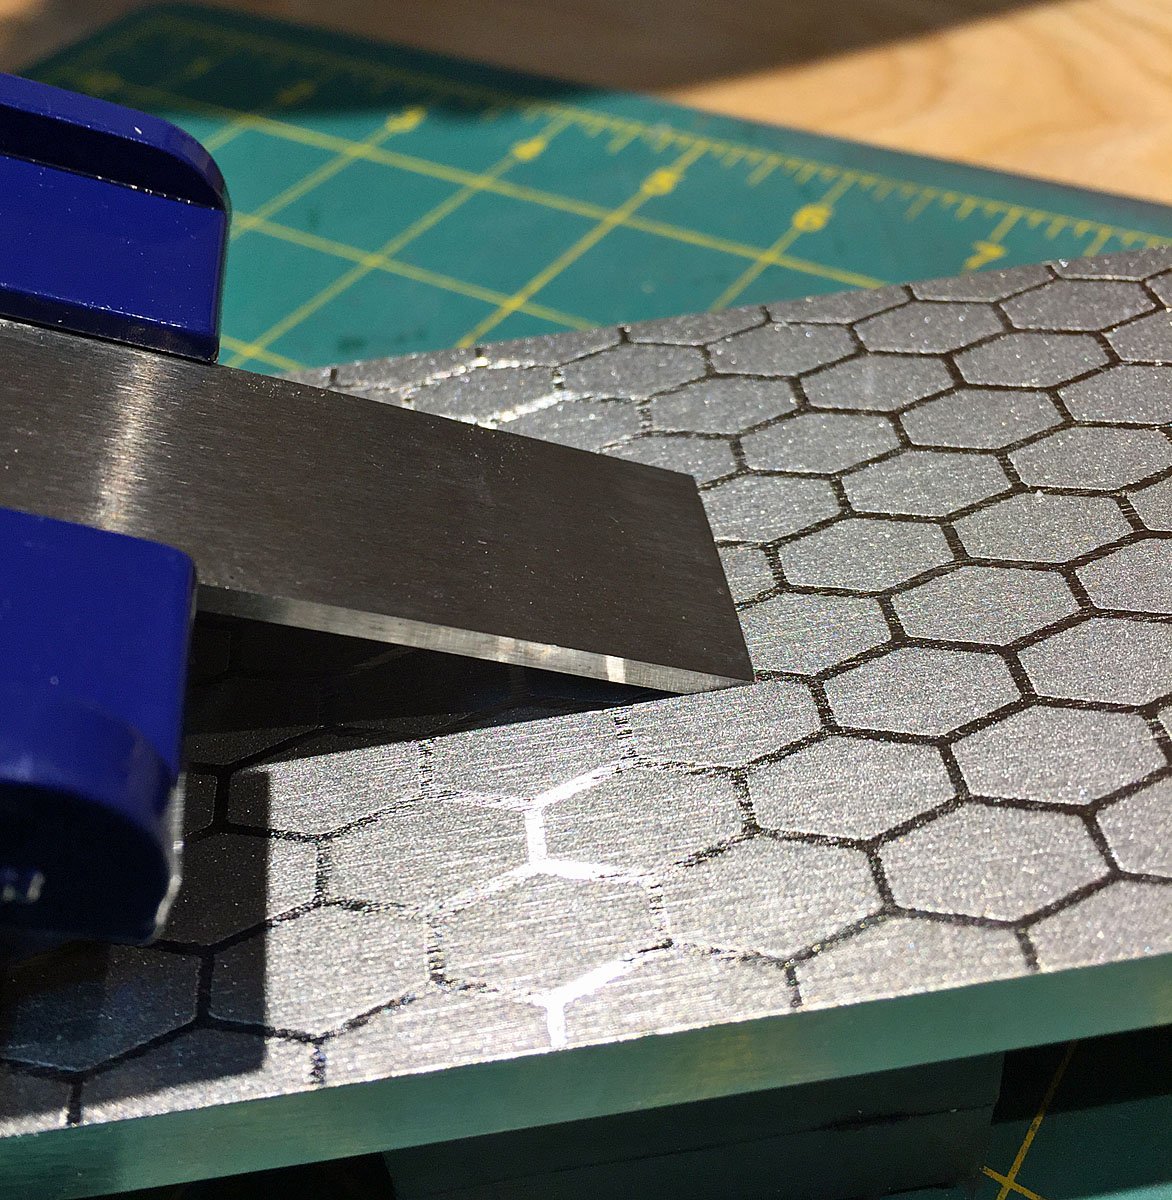
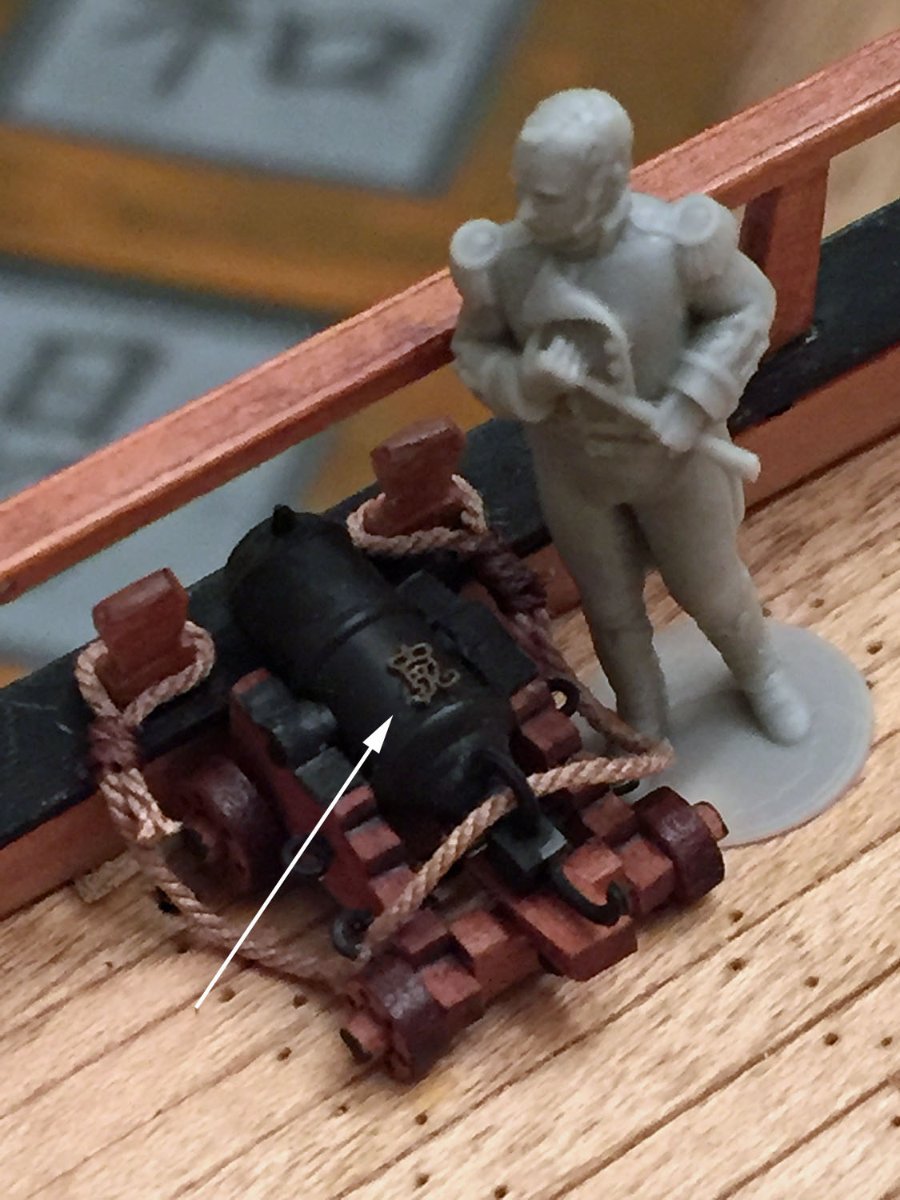
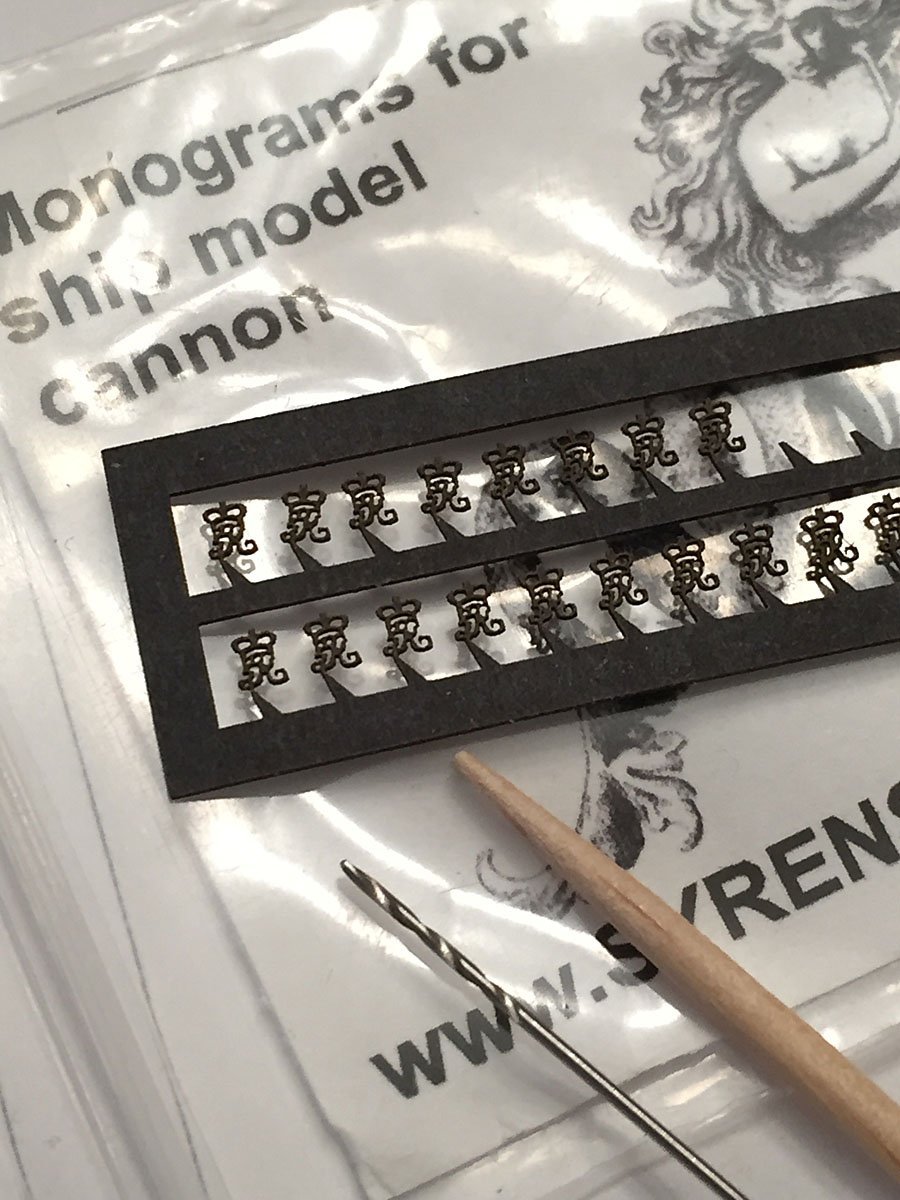
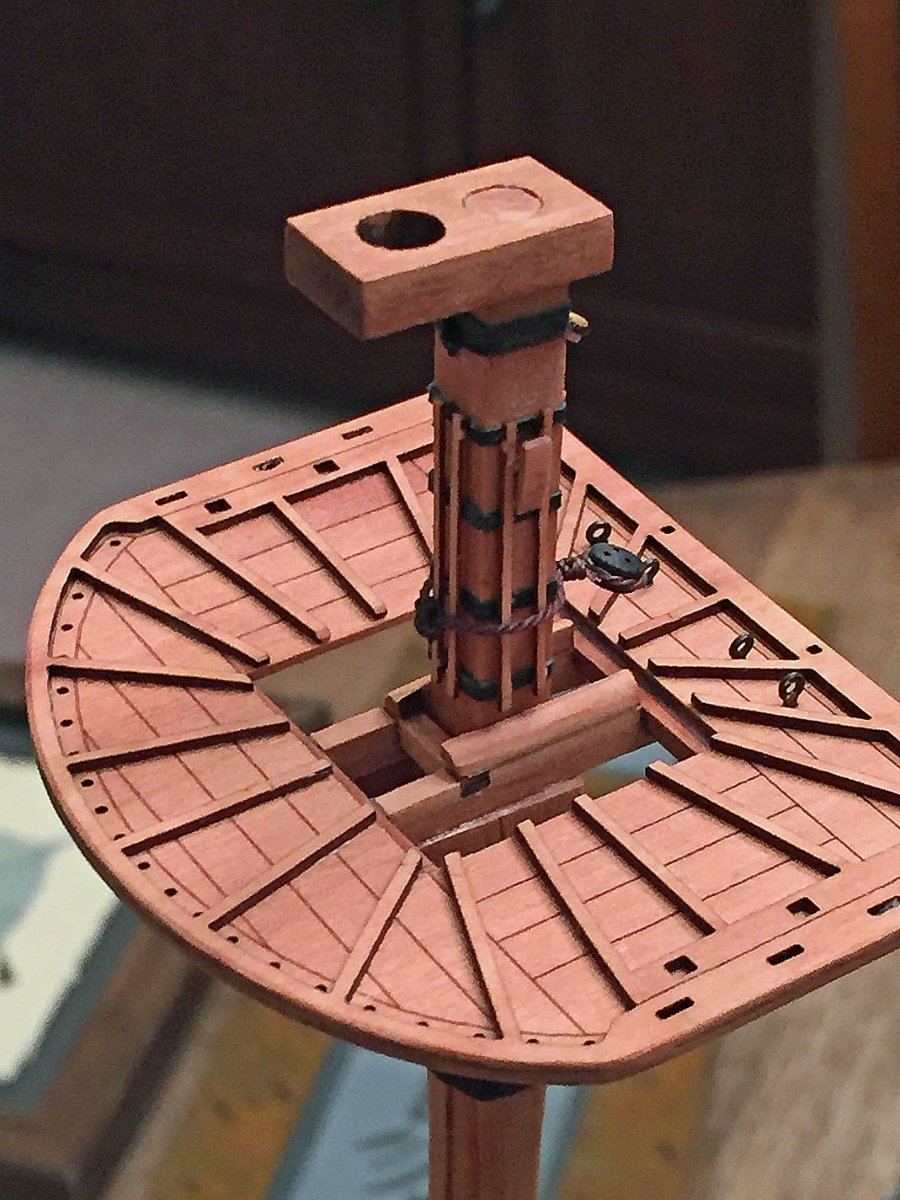
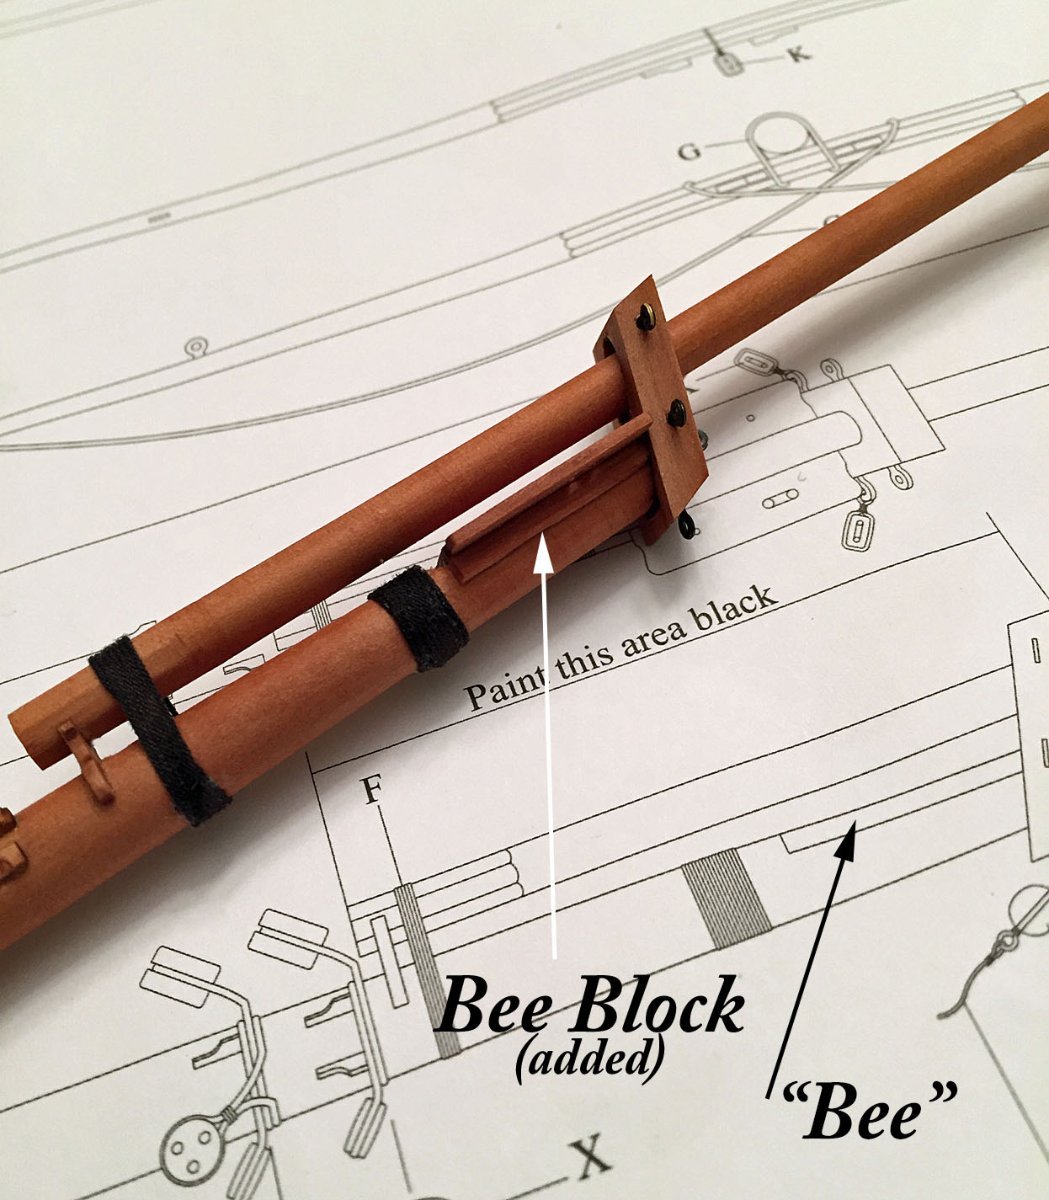
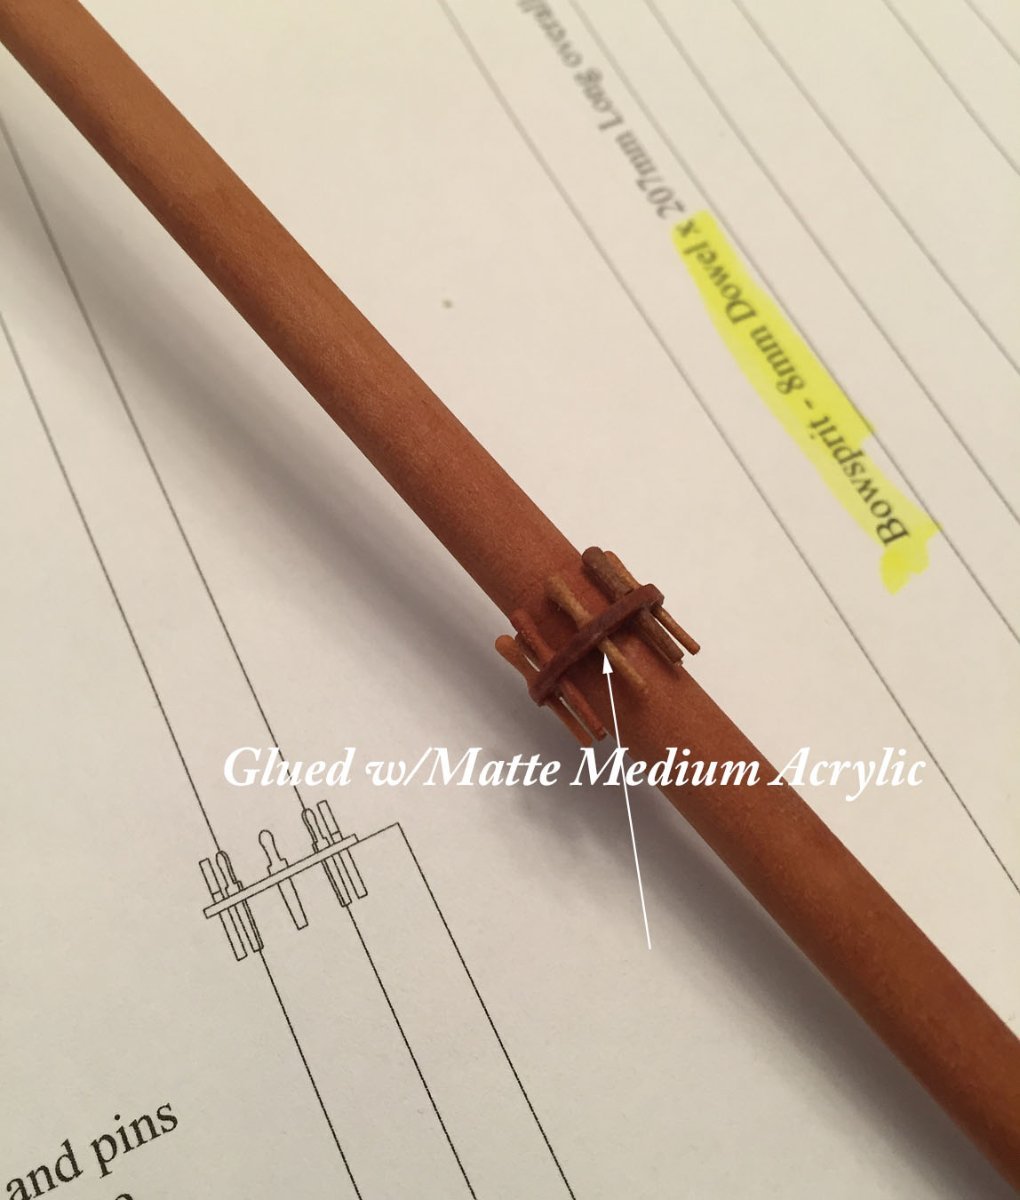
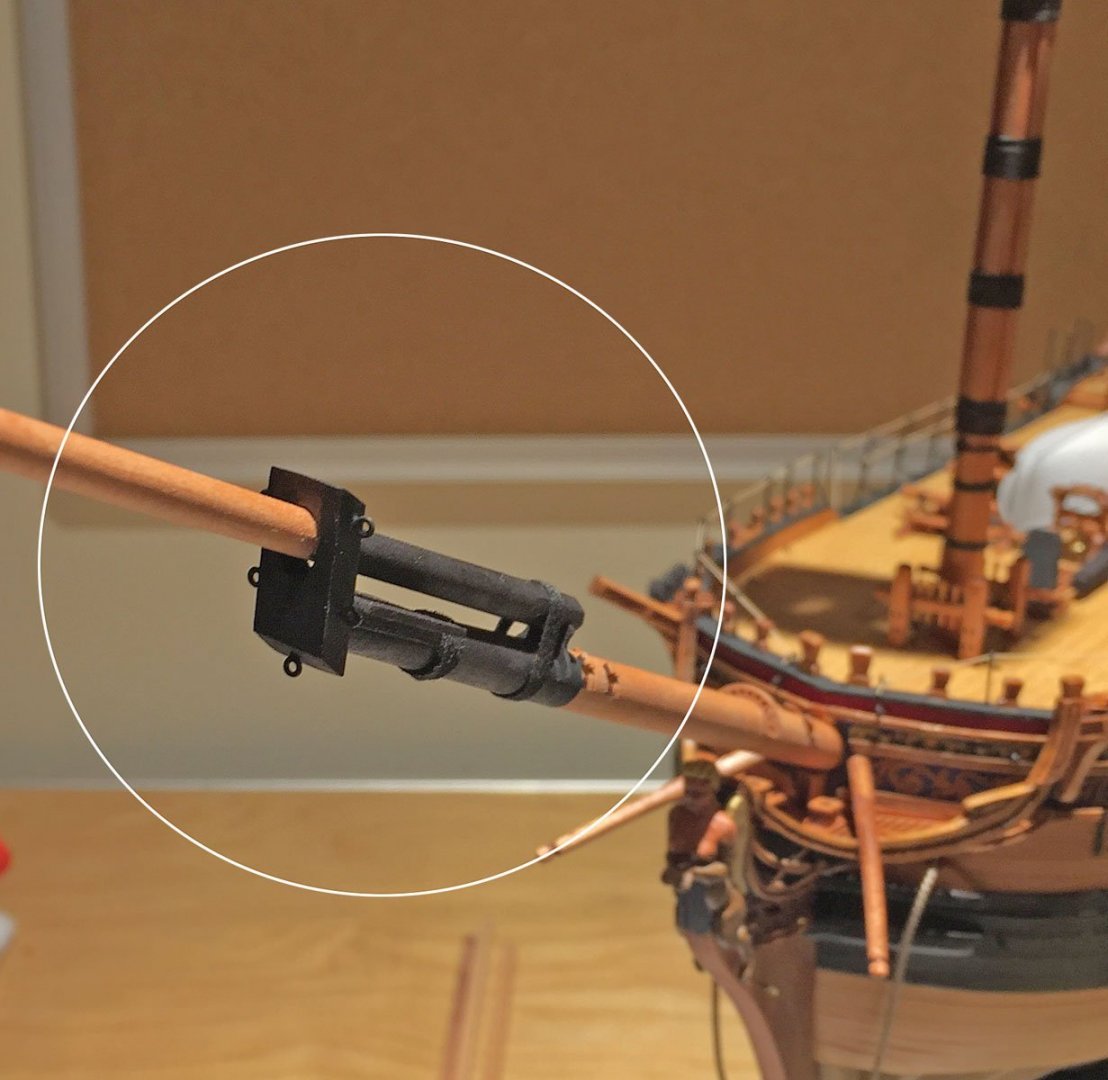
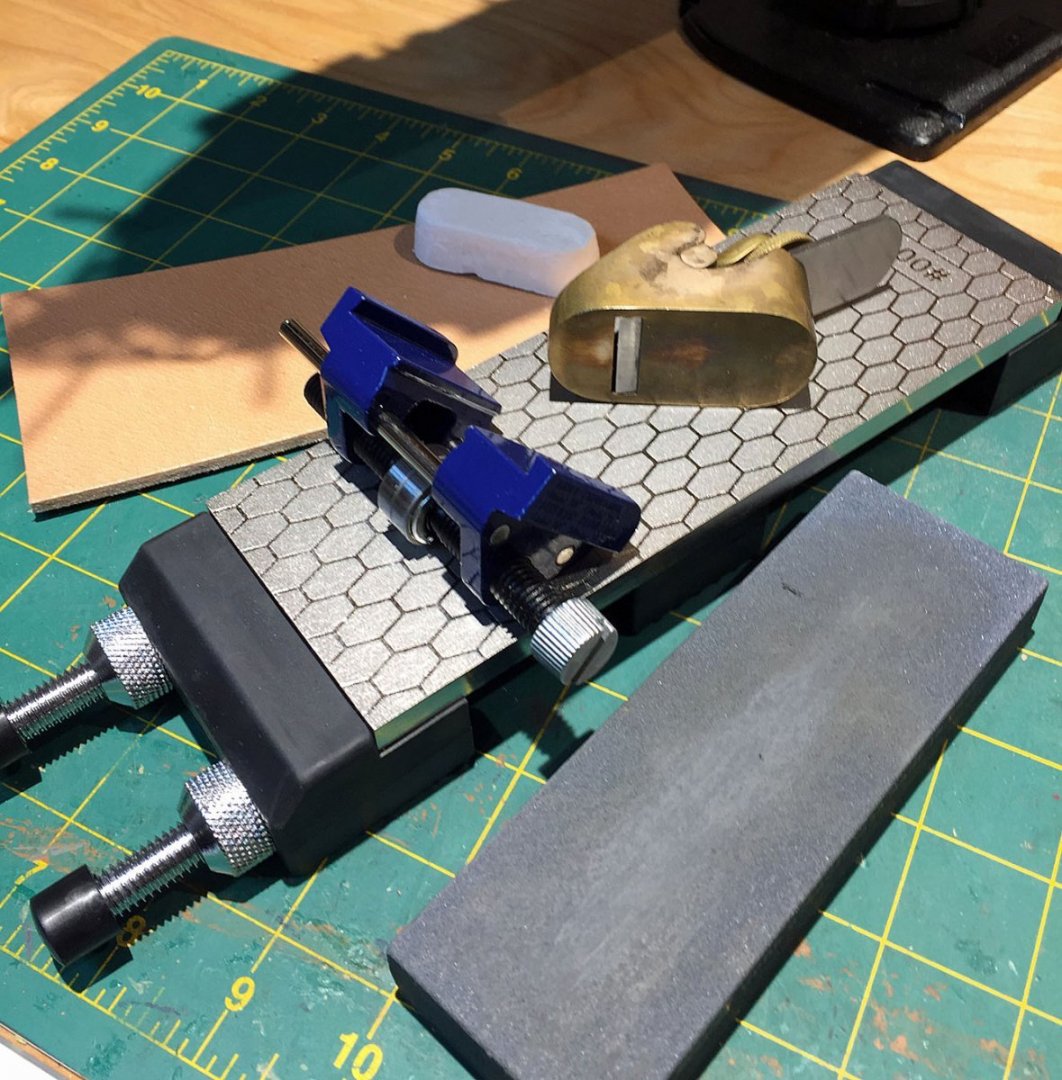
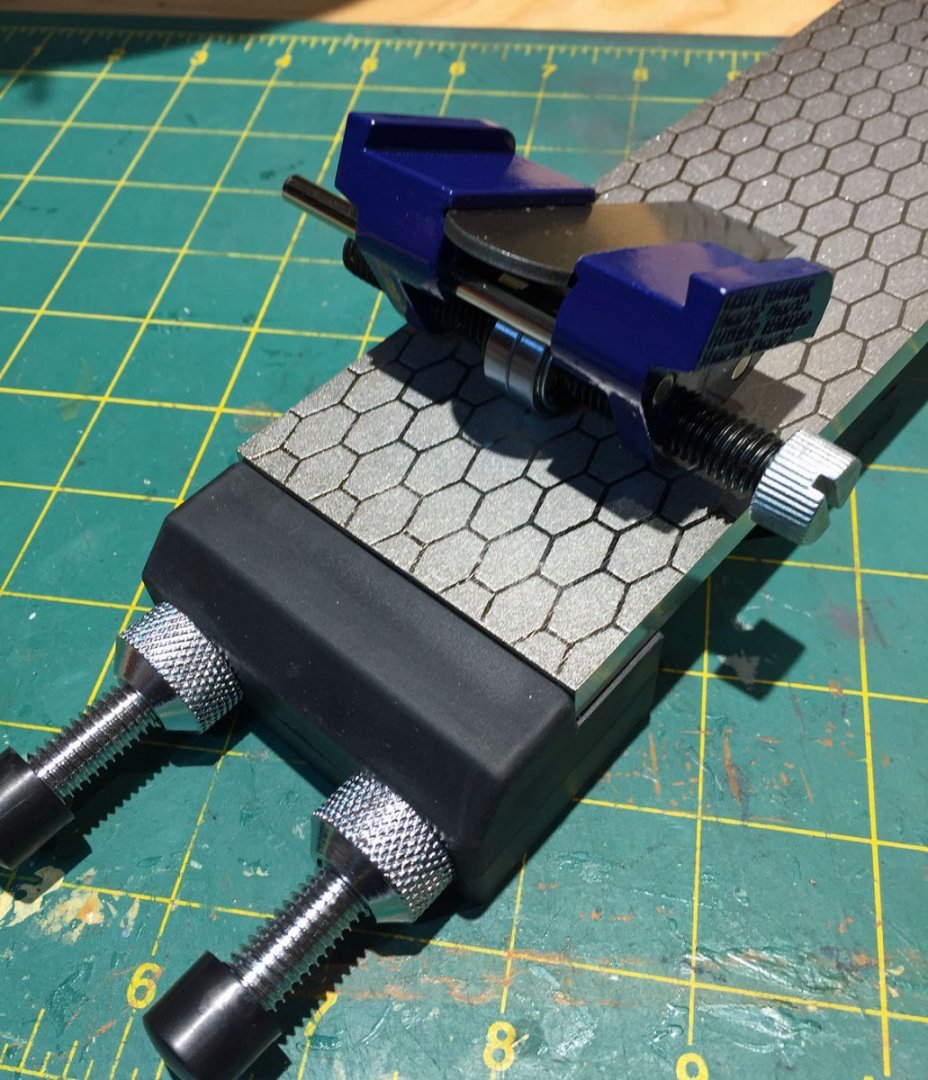
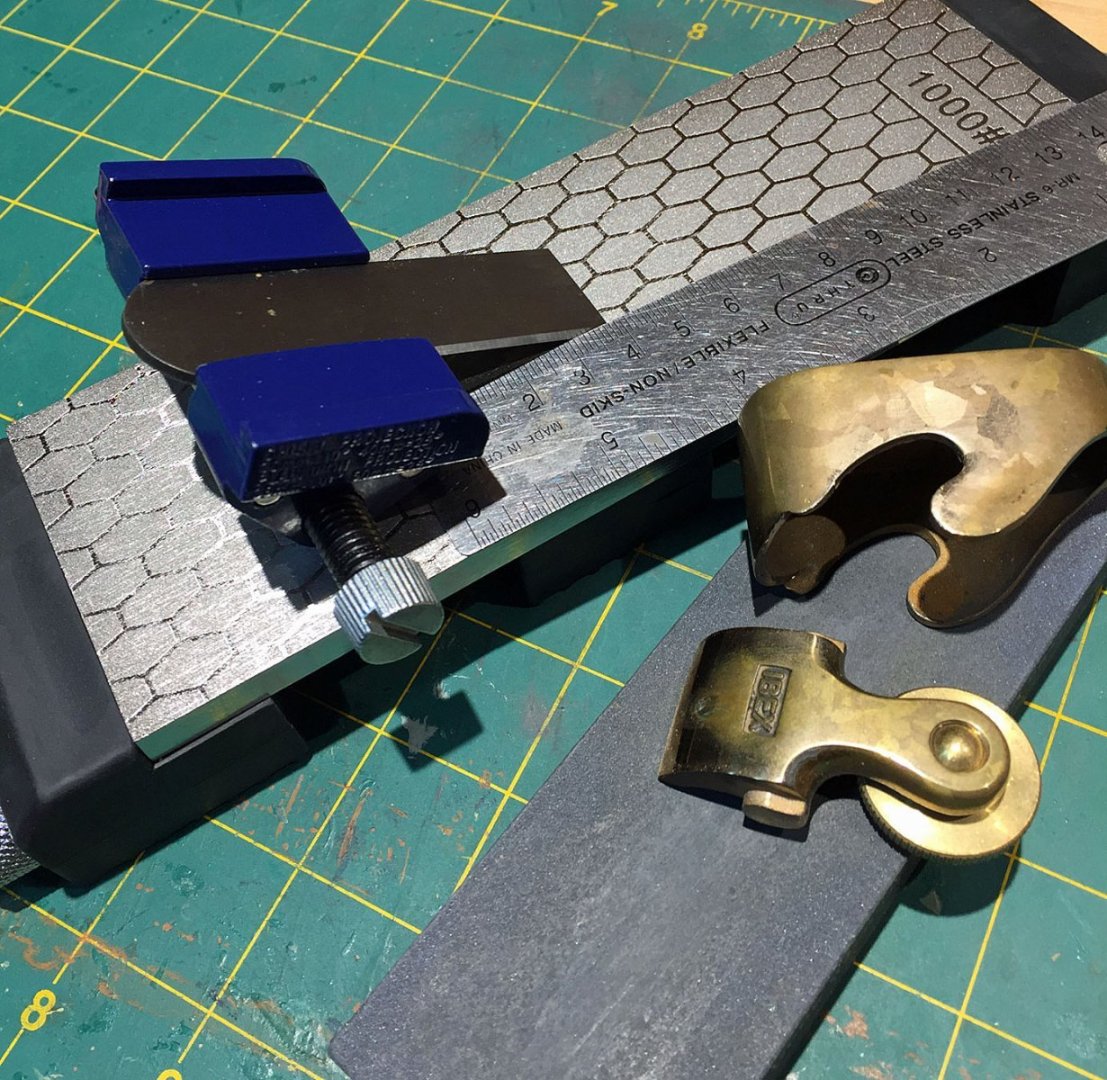
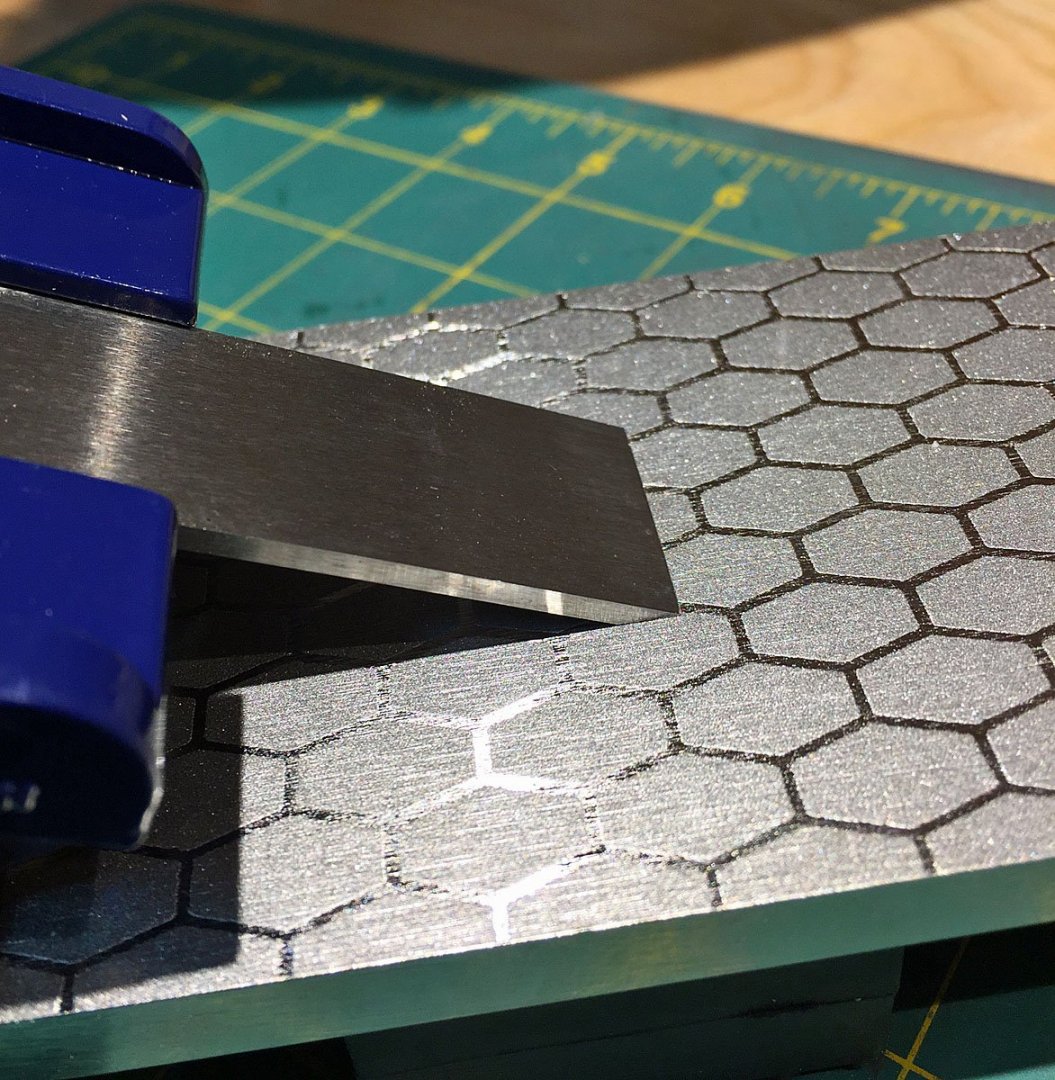
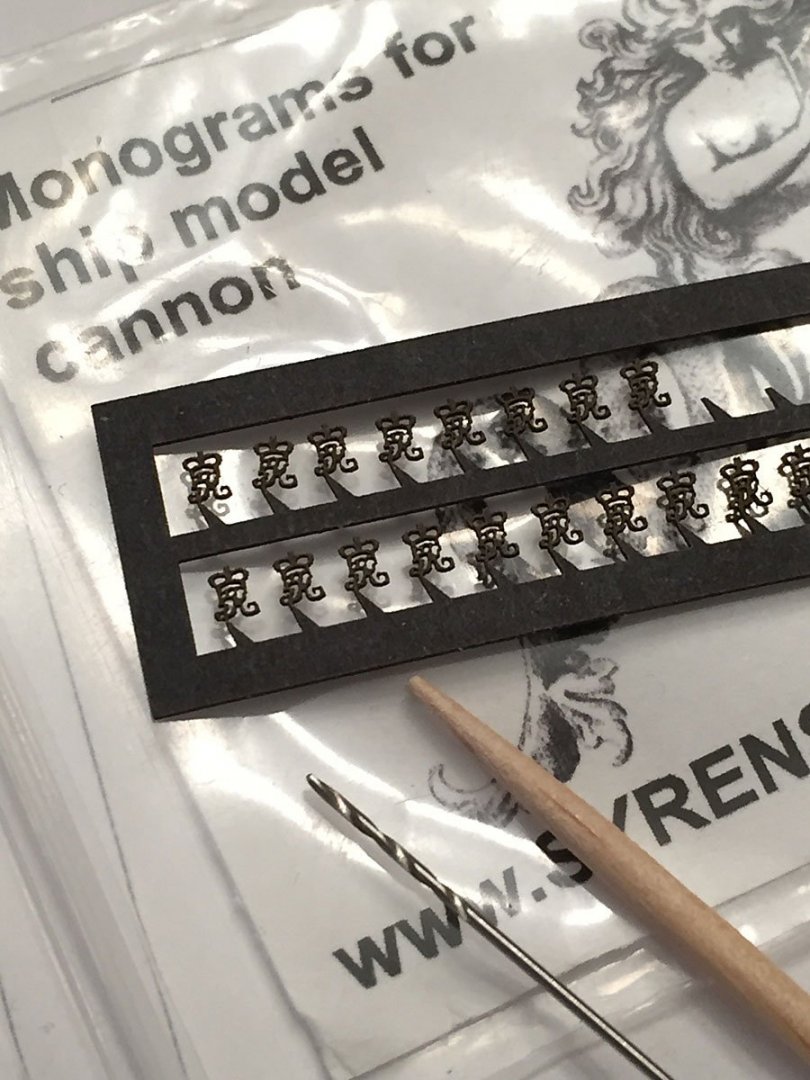
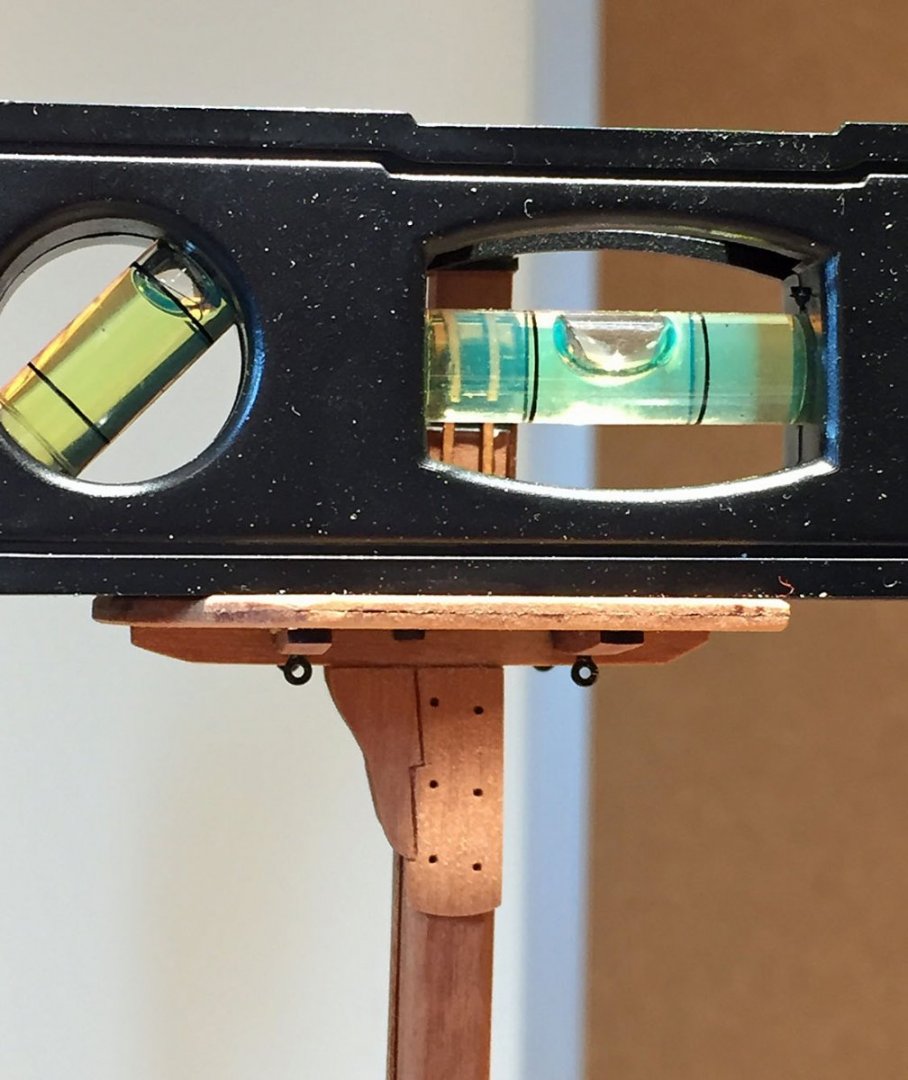
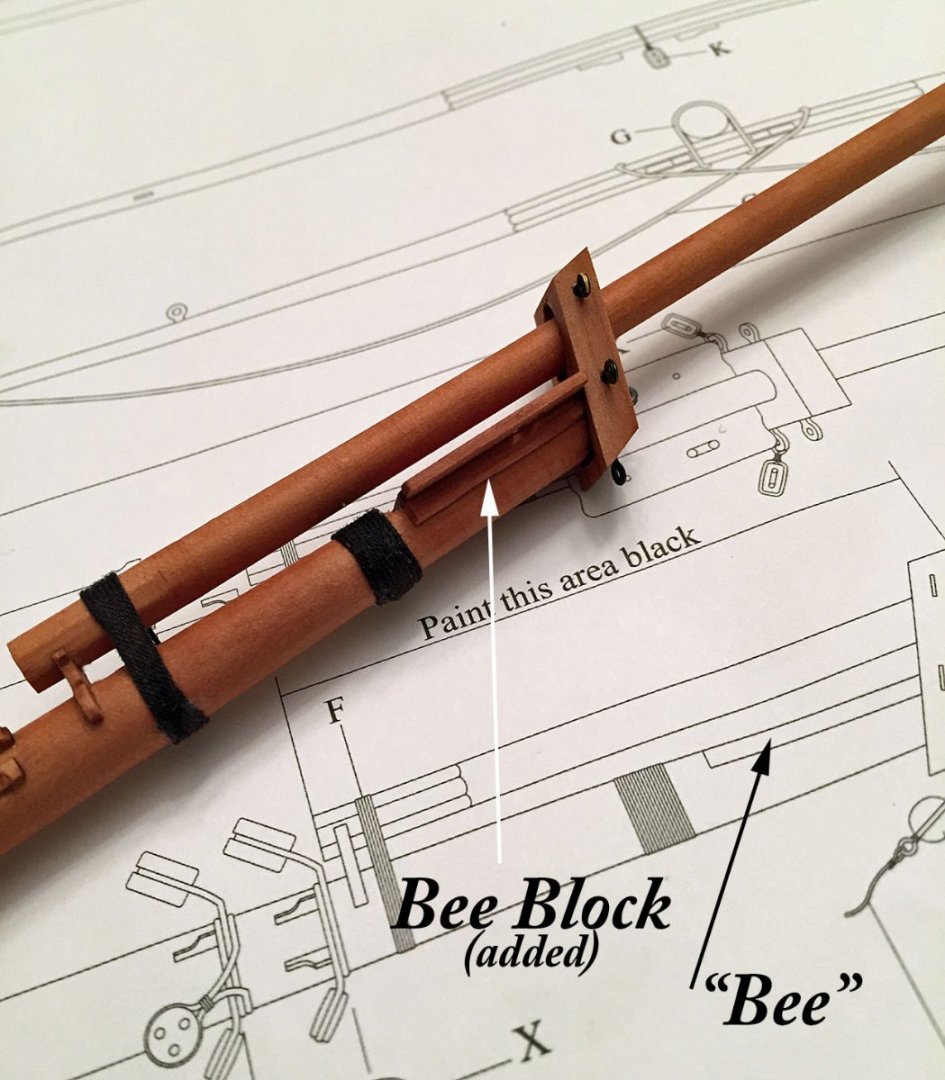
A major update on mast making, and as promised, some photos and info on keeping my plane and chisels sharp. My steel Ibex plane blade has been removed from it's two-part brass carrier assembly and securely mounted into a honing guide at the proper angle (30 degrees). The shiny, hexagonal pattern is a diamond sharpening (honing) stone that has two surfaces at 400 & 1000 "grit." This is the 1000 grit side which is the principal one I use on my finger plane and some small chisels. Here is the arsenal for sharpening my plane blades and small chisels: a diamond honing stone, a smaller conventional two-sided sharpening stone, the honing guide and behind these a leather strop and honing compound. My favorite small finger plane sits atop the diamond stone. Note: always "rest" your block planes on their sides if you can, never on the shoe. My plane's blade is mounted in the honing guide at the proper angle (blade protrusion where it contacts the stone surface at a flush angle and evenly across the blade's width). The diamond stone is held tightly within a heavy steel and rubber bed with thumbscrews that clamp the honing stone material with thick rubber blocks (essentially, non-slip feet); this beefy arrangement keeps your stone stationary once you begin blade honing. This particular honing guide has the amount of extension for your blades imprinted on one side; in this instance, I've set my blade - clamped it into the guide - at 38 mm from the honing guide's face (per the ruler's measurement above). This extension will position your blade's cutting edge at the proper flush angle to the stone surface for full sharpening contact. Once the blade is firmly clamped into the guide (a single thumbscrew), one simply presses down with two hands on the guide to hone the blade's cutting edge on the stone. I use a small amount of water to "slurry" the metal particles that result from the back and forth honing action. The water and the metal particles simply wipe off the stone with a rag. A Tip: if you don't use water to accomplish this necessary by-product, don't use an oil that has a lubricant in it like "3-In-1." These oils will defeat the purpose of honing since they will leave a thin film residue on the honing material and prevent good contact of your blade against the sharpening surface. Oil is messy too. Water is best in my opinion (it's is NOT a lubricant); having a fluid "slurry" also isn't necessary for the types of tools we typically use. NOTE: there is an "up market" honing guide called a Veritas Mark II which is coveted by many toolheads. It's about $50-$100 for the precision guide which has a built in "blade angle setting fixture" (depending on the model); if you have a number of conventional chisels and flat plane blocks - and do a lot of wood carving and planing - it's probably worth the investment. For me, my honing guide was $14 (blue item), and the diamond stone (and its kool holder), the leather strop & compound (Schaff) were all about $50+. These work a treat for my small block planes (but not my micro chisels which have no guide, but I do employ all the other honing items noted here). There are numerous informative YouTube videos on honing that are worth watching. It is absolutely a truism that the quality of one's woodworking is only as good as the sharpness of one's cutting tools! While on the subject of useful (essential) tools, I use this simple, little plastic jig a lot when it comes to making masts and spars. I need to find the exact center of square stock so I can chuck an octagonally-planed "stick" into my small lathe, on-center (the free, rotating tailpiece). I forget where I got this handy little, inexpensive guide; should I recall I'll post it later on this thread. I use my "deadly" pointed awl (in the background on my cutting mat) to scribe two intersecting lines across the stock's corners, and on one end of the square. Where these lightly scribed lines cross, I prick a tiny hole smack in the center of the end grain and thus, form a small starter hole for the lathe's tailpiece. Believe me, if this starter hole isn't located exactly on-center, it's miserable to attempt shaping the round section from the octagon! Here's Chris Watton's Lord Cochrane inspecting one of the new-fangled carronades on the quarterdeck of HMS Camilla. "Jolly good!" I heard him exclaim as he reminded me that the King will be pleased Camilla carries the officially-branded mark - a monogram insignia that shouts-out: "The Crown Reigns." (the crown profile and fancy script letter "R"). I'm speculating that this raised, cast mark on the weapon was to show sovereign ownership and remind everyone who was boss. I've mounted these tiny insignia to all of my visible cannon, carronades as well as the long cannon on the midship's gun deck. I used Liquitex Matte Medium Acrylic adhesive which is easily applied with the end of a toothpick. It dries transparent and isn't shiny, unlike CA, aliphatic or epoxy glues. The monograms, laser-cut micro-beauties from SyrenShipmodels. The #72 drill (.079mm) and a toothpick to show the scale of these tiny pieces. Three sizes are available from the company's online store. In this close-up you can clearly see the (Royal) crown and "R" image (Reigns) entwined. All lower masts test positioned for HMS Camilla. The three vertical masts have their rigging hardware and blocks pre-mounted. DO THIS BEFORE you do any standing rigging! The bowsprit is mounted but will get its stay blocks soon, but also prior to any standing rigging attempted. MSW'ers with Eagle eyes will note that she stands on a hardcover copy of "Lees." I frequently use this book - along with two others* - when I'm diving into square sailer rigging and I have questions or need a reminder of some detail I've forgotten. *Lennarth Petersson's "Rigging Period Ship Models" and SeaWatch's Swan Series, Volume IV by David Antscherl. All three lower masts are complete with their blocks. The wooldings (rope windings along the length of the fore and main masts), were accomplished with Syren's new "Ultra" rigging rope which is a dark brown hue. It appears nearly black when contrasted to the lighter pear but on closer inspection the color is a really good approximation of "tarred" rope. The tops, trestletrees, top supports and fish pieces (three of them) come together quite nicely once the proper flat profiles to the mast's sides are created. This is a result of the exacting manufacturing tolerances in this kit; the precision laser cutting continues to be very precise at this later building stage where the pear pattern pieces are provided to create all the masts. However, as thread reader's have already noted, I set aside the kit's walnut dowels for the masts and yards into a spares box. The walnut dowels will still work for making masts but I preferred to shape my own pear stock to capture more accurate details as well as to keep the finished color of the kit's pear hardwood consistent. Fashioning the masts (I've only shown the lower sections on this update - as well as the completed bowsprit) is a wood-shaping task that requires many critical steps to accomplish with any degree of accuracy. Rounds, octagons, squares, angles- all present carving and fitting challenges that are not enumerated in the kit's excellent manual. But the good news is that the kit's provided plans - multiple large sheets devoted to masting and rigging - offer very well drawn and dimensioned guides to what you'll need to accomplish with your "scratch work", but not HOW to do it. To state this observation in another way: a separate and quite extensive set of detailed instructions could be created just to guide one's building of this model's masts, spars and the many intricacies of accurate and convincing square sail rigging. Two suggestions come to mind for some HMS Sphinx builders who will complete her as a fully-rigged model: if available, refer to author David Antscherl's excellent Swan Series books, particularly the fourth (and final volume, IV) - or - alternatively, spend time reading through MSW's sub-forum threads and posts here under resources - "Notes, Tips, Techniques & Research." The main mast is ready to slip into position. A rigging stay block (the deadeye) is pre-assembled, as are the eyebolts for other rigging blocks. Earlier, I mentioned shaping the bolsters; here you can clearly see the half-round section of one. These (and the thin wood battens on the upper square section) will take the force of the shroud lines and in practice would reduce the amount of chafing on these ropes as well as give them proper purchase when multiple lines overlapped around this post. The topmast(s), when completed, are dropped through the mast caps openings and secured adjacent to the bolsters and trestletree supports. On the level: it is critical to set the proper angle on all three mast tops when one finally glues the assemblies together. Here I've lined-up the top of the main mast to be perfectly level with the ship's waterline. When mounting the various blocks to the tops of the lower masts, I used a thumb drill to ensure there is sufficient clearance in the block's holes for rigging lines. Regardless of the blocks one uses in rigging (in my case, aftermarket pear ones from Falkonet and also, Syren), it's a good idea to take the time and do this now and not later when you'll find it difficult to accomplish this simple task. How do I know about this seemingly insignificant step?...haha. Try to access and drill-out these tiny block openings to fit a balky line of rope when most of the standing rigging has been accomplished and is in your way! A gulls-eye view of the Main Mast top, ready for a topmast to be dropped into place. I won't mount the safety rails (rear edges of all the tops) until all the shrouds (lower and upper) have been rigged. I usually attach safety netting to my rails too; this is considerably easier to do once most of the primary (standing) rigging is completed. The rails - and the netting - also interfere with some of the rigging processes and are prone to being damaged if they're done at too early a stage. The completed bowsprit. With the mast making process, this assembly is the most difficult to create. It involves numerous steps to fashion both pieces (bowsprit and jiboom). The identical rope I used for the lower mast wooldings is also used here. One of the trickier steps - a seemingly innocuous one - is to properly locate the tiny cleats that will meet the gammoning lines that attach the bowsprit to the stem as well as the tiny forward cleats that keep the stays and preventer ties - open heart blocks, deadeyes, etc.- from slipping. The fairlead (just above the gammoning area) also requires precise placement for optimum arrangement of the running rigging lines. I will add all the standing rigging blocks to the bowsprit BEFORE I mount it and secure the gammoning rope. I'll use a slightly heavier, larger diameter Syren "Ultra" brown rope for this task. When creating the bowsprit assembly, I noted that the kit only provided the "Bee" at the tip of the bowsprit; I added the "Bee Blocks." This isn't that big a deal, however the naked Bee didn't look right to me. In practice, this flat piece that guides critical standing rigging lines needed reinforcement with additional carpentry pieces to either side. Also, these Bee Block support pieces carried built-in sheaves for handling thick foremast rigging lines. I omitted adding sheaves here since they really won't be easily seen, but the bee blocks will be noticed on close inspection. A detail compromise, but what the heck, this isn't a 1:48-scale model either. A separate and important personal building consideration: the plans specify the painting of tops and the corresponding carpentry to be black. This also applies to the yards (all of them) and portions of the bowsprit (per the above spec on the kit's plans). I'm not certain I'll do this to my model, although the black paint is historically accurate. One argument is to stay "kosher" and go for the black which presents a quite dramatic image to one's model. On the other hand, the beautiful pear woods and the delicate lasered details look very attractive to this modeler's eyes. The satin poly-finished pear wood on the majority of the hull looks especially nice to me too - and I rationalize: "why not stick with this look with the masts and yards?" Decisions. decisions. I've got a couple weeks to think about all this and complete the masting and yards. I'm nearing the point where the "strings" need to be strung! And...I just can't wait to do hundreds of ratlines...mmmmmm The mizzen mast has a belaying rack (ring) and I've placed the belaying pins into the holes (after drilling them out). I attached the pins with Matte adhesive so the pins don't "disappear" during the rigging process. I did the same with the belaying pins on the foc'sle bitts and mid-deck belaying rails near the belfry. None of the belaying pins need to be removed during rigging; after the termination of lines are made to these, rope coils will hang from these pins. The next stage is fashioning the topmasts with some of the same techniques I've already described in earlier posts. Thanks to all the forum members who have commented on this Build thread. Much appreciated. Ron


- 542 replies
-
- 17
-
-
-
- Sphinx
- Vanguard Models
- (and 3 more)
-
Nice ashes on the brick, B.E.! You've added a great detail that will be seen (and for some, appreciated) with your superb build for this exceptional kit. What about a roast on the spit of the rotisserie?...😉 Ron
- 857 replies
-
- 2
-
-
- Sphinx
- Vanguard Models
- (and 1 more)
-
I Like it! Very nice work. Can't wait to see what you'll do with the Sphinx. ...don't forget to place a period after "Bob." - when you add his (?) name to the transom. Ron
- 840 replies
-
- 2
-
-
- winchelsea
- Syren Ship Model Company
- (and 1 more)
-
When I retired fifteen years ago, in 2006, I had lots of free time to read for leisure. I picked-up Patrick O'Brian's "Master & Commander" on a friend's recommendation because he knew I had lived in England. I got hooked, totally consumed for a couple months reading the entire Aubrey/Maturin series; absolutely brilliant writing, storytelling of epic proportions (and really stunning artwork on the book covers). Three years later, Peter Weir made one of THE classic films for us shipmodelheads! Master & Commander: The Far Side of The World. About ten years later in 2013, an embryonic ModelShipWorld was launched. I give my "high fives" to Mr. O'Brian, Mr. Weir and the many, many Tars - and Officers - of MSW for introducing and then guiding me in this fascinating, engaging and challenging world of model ship building. Ron
-
Indeed, SHARP is Good, Tom. I'll show a few photos of my sharpening guide, stone and the honing strop & compound I use to keep my favorite plane in tip-tip condition. The same sharpening and honing tools work for my conventional chisels too, but not my tiny (2-3mm) carving ones. Keeping razor sharp blades takes some attention and time but the tools I use to help achieve this are neither fancy nor expensive. Ron
- 542 replies
-
- 2
-
-
- Sphinx
- Vanguard Models
- (and 3 more)
-
Excellent work, B.E. Scratching the coamings and gratings was such a worthwhile effort for your model. Your extra, accomplished detailing is especially important for an Admiralty-styled build. Ron
- 857 replies
-
- 2
-
-
-
- Sphinx
- Vanguard Models
- (and 1 more)
-
Thanks B.E. & dodgeyhack (love your alias!)... your look-ins are much appreciated. The Ibex planes are essential tools in my bench arsenal. I'm quite lucky now that I have a separate work area where I can make clouds of sawdust (my lathe, a mini tablesaw, a disc sander, etc.). The double work rooms are a fortunate (and unplanned) result of a major house move this past summer where my wife and I agreed we needed to "downsize." 😳... I'm certainly not complaining...who gets to have TWO workshops a few feet from each other?!😁 Of course, my "sawdust room" has a portable room vacuum as well as a large air filtration unit. I'll take photos of my air cleaning solutions in a future post. They are not too expensive and work quite well for ship modeling's small stuff. I'm NOT making big furniture or cabinets - or turning Zebrawood fruit bowls. Ron
- 542 replies
-
- 2
-
-
- Sphinx
- Vanguard Models
- (and 3 more)
-
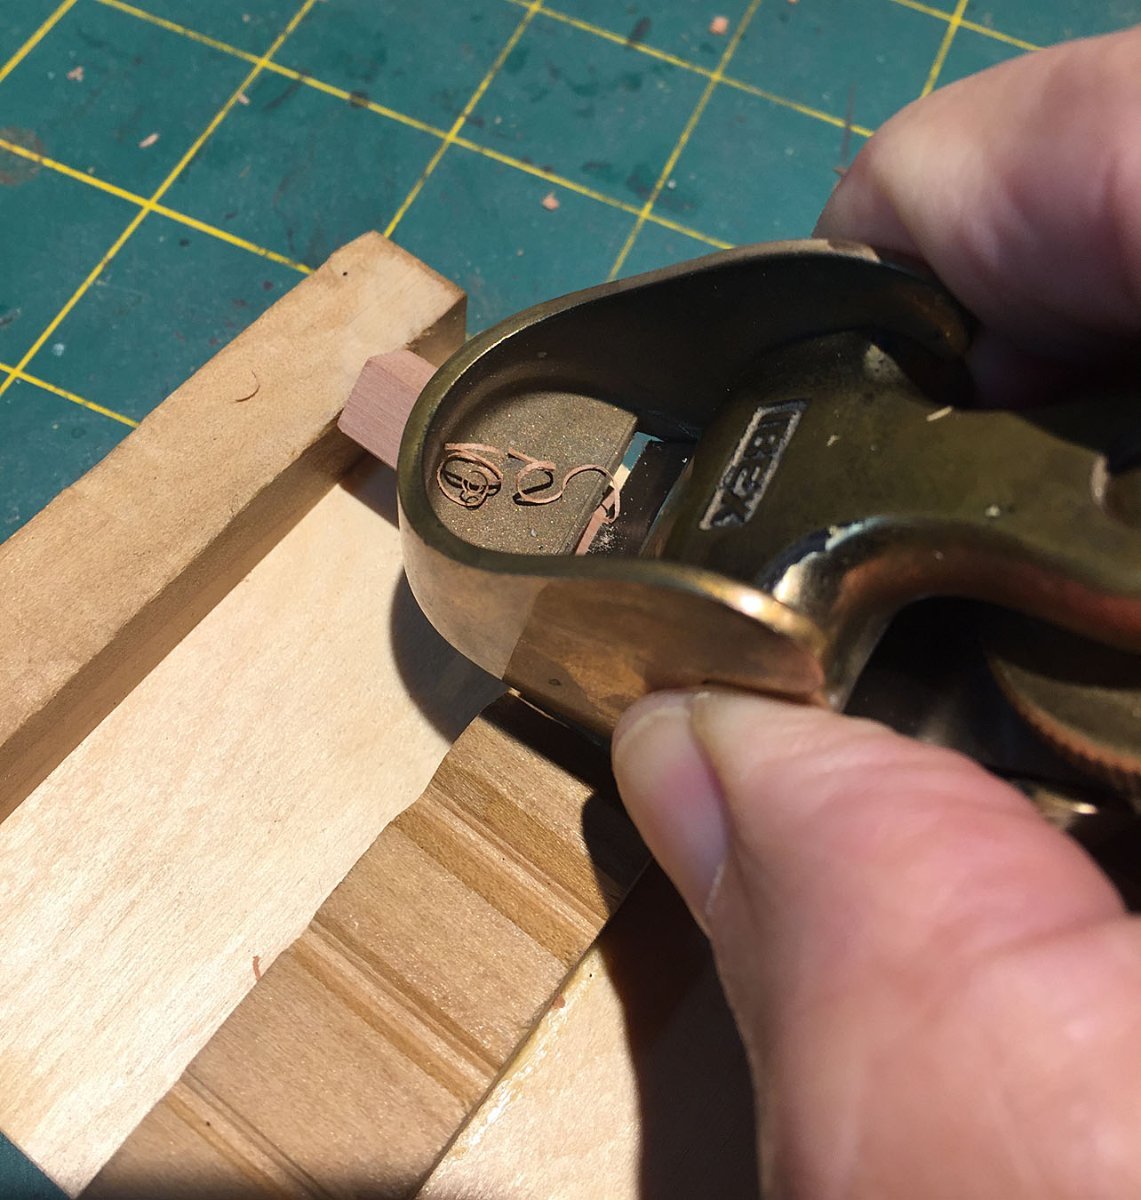
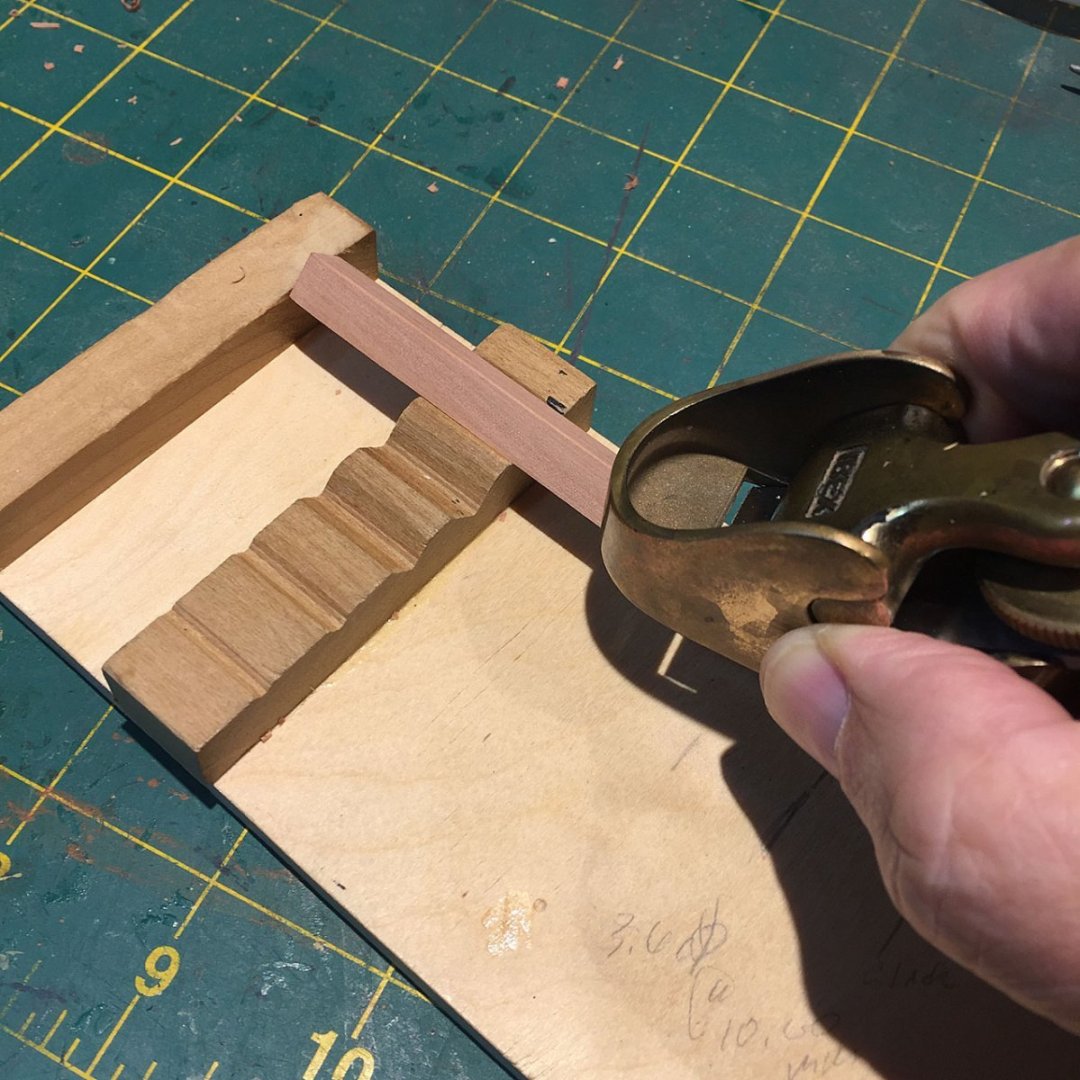
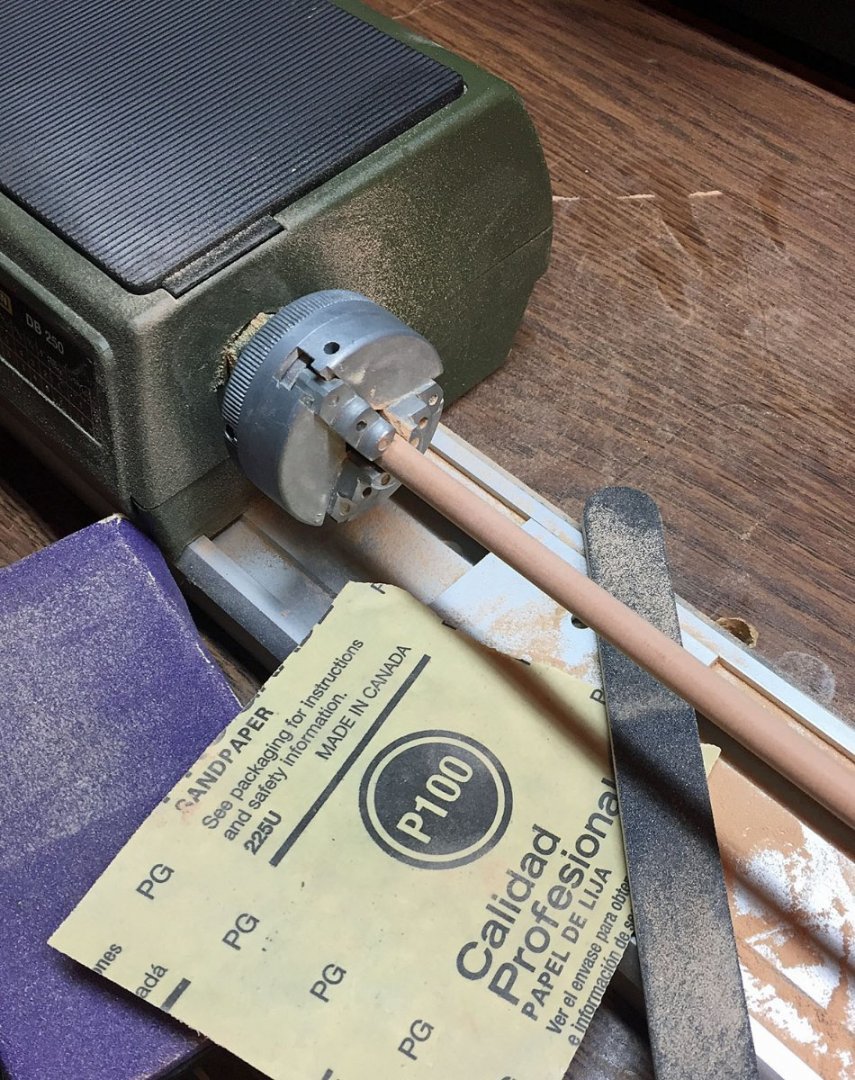
More scratch mast making details in this update...these photos focus on shaping the foremast. The processes here will apply across all three lower mast sections (the bowsprit will have some of these steps too). Shaping the crosstree bolsters on all three masts is an important step. These two, symmetrical rounded-off pieces are fitted to the tops and will support the shroud lines that wrap around the square mast post above the top landing. I have found it considerably easier to file these small square sections down AFTER they have been glued to the crosstrees below them. Take your time doing this to give both bolsters a smooth, evenly rounded profile. Also, insure the inside edges are perfectly flush with the crosstrees before gluing. There will be a little "tweak sanding" before the lower mast section can be "press-fit" inserted between the tree opening in a later step. I've used a thin, tapered nail sanding file (with a higher grit of 4 or 500) since the sanding angle is alternately steep and shallow. Larger files are difficult to properly form these bolster pieces and you don't want to remove too much material. Here the foremast top has been mounted to the built-up, completed lower mast. The mast cap has been fitted to the rounded section carved at the very top of the square section (that didn't get the octagonal planing and subsequent rounding-off). Note the position of the bolsters mentioned in the previous photo. I also recommend mounting all the eyebolts to the tops BEFORE mounting them to the lower mast assemblies. On the foremast there are ten (10) eyebolts for various blocks;. I'll rig the blocks after the top is firmly mounted. Pay attention to the profile angle of these tops; they should be parallel with the waterline since the masts have aft-leaning rakes. Don't forget to subtly "break" all the edges on the tops, above and below. Same goes for the square section edges up to the capping piece. An 8mm square pear wood "stick" has been cut to length and here you see how planing will shape the majority of its length into an octagonal shape. A closeup to show how the first passes of the finger plane removes very small, even curls of material. The plane is held level to the upward-facing square corner and when one pass is made the required length, the piece is rotated and each presenting corner is planed until all four have been reduced; this step is repeated until a perfect octagon is formed from the previous four sides. The plane's blade has been honed to razor sharpness, which is quite critical even with high-quality hardwoods like pear and boxwood. I've learned how to control the finger plane shown here (Ibex 7/8" wide blade), but some builders who use this mast making technique use a chisel, bevel side down. The plane works in a normal bevel up position and each successive pass removes more material until quite wide strips peel off the stock as long as the blade remains razor sharp. Here is the resultant octagonal section from the previous planing steps and how turning the octagon shape on a lathe will round it perfectly; this process works for the lower mast as well as for the topmasts (lower post section that inserts into the crosstrees and is supported by a "fid."). Note the transition from octagonal to round shape. The "lands" are even and when shaping the stock you'll need to double-check measurements quite often while planing to insure uniformity of all eight sides. I use a Proxxon bench top lathe (DB250) to turn the octagonal shaped pear into a perfectly round, smooth mast. I use a couple different grits of normal sandpaper to gradually work down the octagonal section. The sanding nail file is great to get into transition areas between square to octagon and/or round shapes. I run the lathe at its lowest speed setting. This particular lathe will chuck up to about 10mm of material and the length of material - from chuck to maximum extension on the moveable tailpiece - is more than adequate for all mast and yard turning, up to about 15". Here is a completed 8mm octagonally planed pear lower mast section; all eight sides are even the entire length. My calipers show the measurement of the planed lands to be 8mm across all sides. By making these lands consistent along the entire length, very little material will need to be removed when reducing the octagon shape to a round one. From this stage, the pear piece is put into my lathe for rounding-off. Note the various sizes of pear shavings, tiny-to-large "curls" of material. Next update I'll show closeups of the built-up lower mast showing the three fish pieces (fore & main masts) as well as the iron banding and wooldings. Also, I'll add the battens and align the capping to ready the lower mast assembly for the topmast which is considerably more involved to make correctly. Ron


- 542 replies
-
- 20
-
-
-
- Sphinx
- Vanguard Models
- (and 3 more)
-
Thanks for sharing these photos Eric. I really like your finishing choices. Nice job! Ron
- 12 replies
-
- 1
-
-
- Lowell Grand Banks Dory
- Model Shipways
- (and 1 more)


.jpg.9377e5c98d74c0b2c57749ea91bcf5c7.jpg)