
HOLIDAY DONATION DRIVE - SUPPORT MSW - DO YOUR PART TO KEEP THIS GREAT FORUM GOING!
×

.jpg.d84ec4dad1d7791e855dca06210ab6f3.jpg.40b7a0ea2cc62bf0a3ec2a716005383a.jpg)
hollowneck
-
Posts
1,583 -
Joined
-
Last visited
Content Type
Profiles
Forums
Gallery
Events
Everything posted by hollowneck
-
Dr PR, that's the material I use most.
-
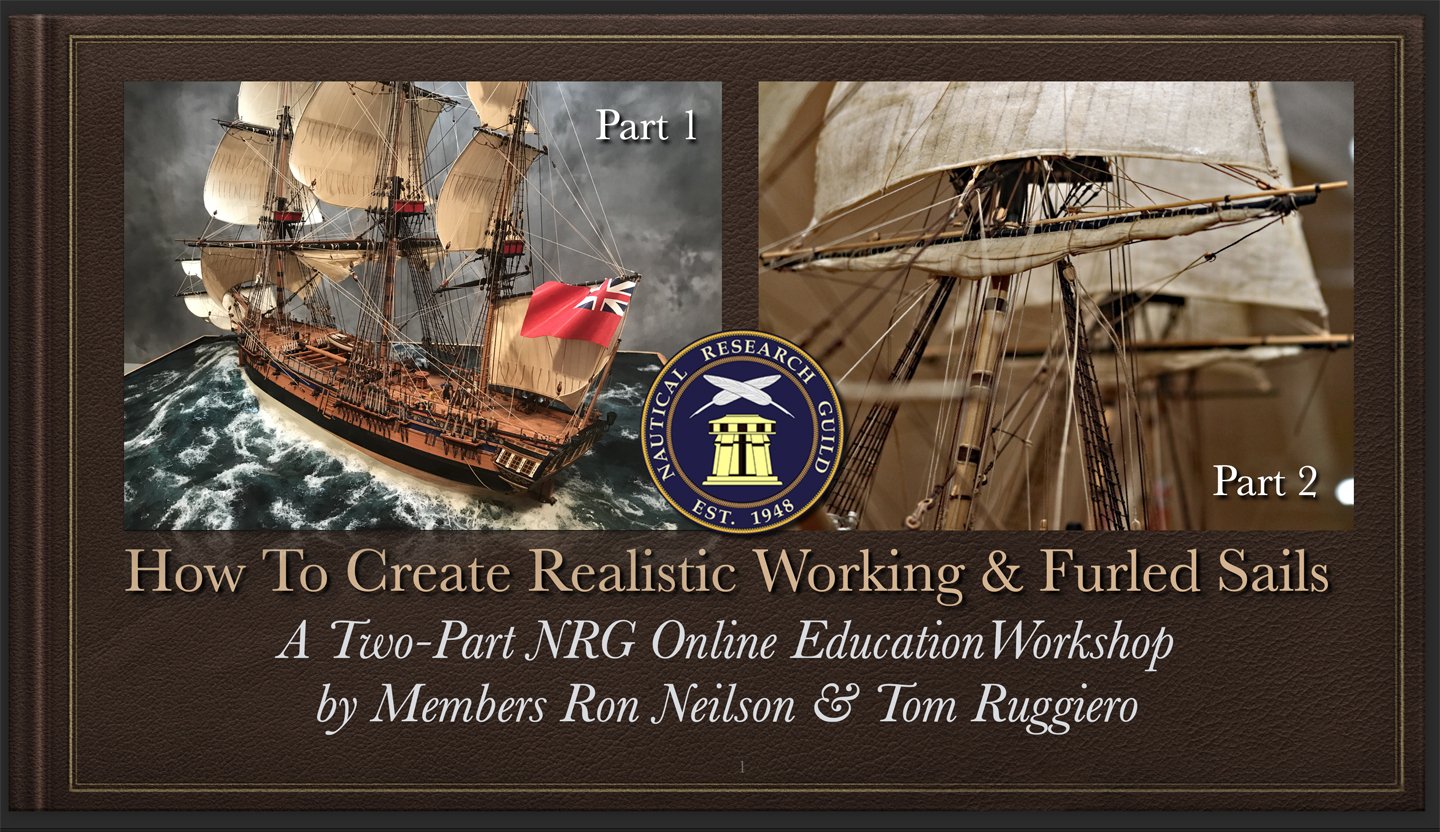
For all NRG members there will be a virtual "ZOOM" workshop presentation on crafting silkspan sails this Saturday morning, June 15. You should have received the ZOOM link information by email; check your inbox. In this two-part presentation, I will be presenting a method for creating realistic working sails while my colleague, Tom Ruggiero, will cover furled sail techniques. We both use silkspan. For the curious, you can click on the footnoted "Completed Builds" links below to my gallery photos that show several models with this material.

-
.jpg.d84ec4dad1d7791e855dca06210ab6f3.thumb.jpg.f45209242e851d4409eca1a09293165b.jpg) The new 3D molds look really good, especially with the inclusion of the windlass and davit. The resin does paint well with only a simple base acrylic primer. I use a Tamiya rattlecan (grey) for this and it's compatible with Vallejo paints. ----- iPad screenshot: press the "Home" button and the "Power" button simultaneously and then release; a thumbnail will appear in the lower left corner which can then be tapped on to enlarge it with various file options (Save, share, delete, etc.). No "snipping tool" required.
The new 3D molds look really good, especially with the inclusion of the windlass and davit. The resin does paint well with only a simple base acrylic primer. I use a Tamiya rattlecan (grey) for this and it's compatible with Vallejo paints. ----- iPad screenshot: press the "Home" button and the "Power" button simultaneously and then release; a thumbnail will appear in the lower left corner which can then be tapped on to enlarge it with various file options (Save, share, delete, etc.). No "snipping tool" required. -
Good Job, Bob! Thank You - I'm pleased you have been inspired by my workshop on water crafting. Once you detail wave highlighting, add some "foam" - and place your model in her H20 "cradle" you will have a great presentation for your Viking boat. Arrrrggh!
-
Saturday – June 15, 2024 Sign up information will be sent to all NRG members on or about June 1. The workshop will explain materials, techniques and tools for creating realistic-looking sails for ship models. The first presenter’s section focuses on crafting working sails while the second presenter will explain techniques for creating furled ones. Both approaches use an inexpensive and adaptable paper-like material called “Silkspan.” The Virtual Workshop is open to all NRG members to attend the ZOOM event on Saturday, June 15, 2024, at 10:30 AM CDS time. 11:30 AM – Eastern 10:30 AM – Central 9:30 AM – Mountain 8:30 AM – Pacific 4:30 PM – Greenwich
- 2 replies
-
- 11
-

-
Touché, Chris. A cut above.
-
Brilliant, Glen. I also like your branding of "Star M" on the spooky cedar branch. You Texans sure know how to identify your stuff! 🤙
- 109 replies
-
- 6
-
-

-
- Ghost Ship
- Jenny
- (and 2 more)
-
Yes, but be aware that digital editions of the Journal are relatively new. Send a query to our editor, Paul Fontenoy, he'll have a good handle on when the Journal went digital (nrjeditor@gmail.com). Also, check out www.thenrgstore.org for Back Issues, Articles, etc. You'll discover yet another treasure trove of all things ship modeling there.
-
Sadly, yes; the same situation prevails with nautical museum exhibitions being curtailed in the U.K. and in the U.S. Not a new trend but a continuing one. Many museums are struggling to keep their doors open.
-
You should, Tim; well worth the dosh. Very nice publication if I say so myself* And allow me to suggest the digital edition that arrives promptly, unencumbered by two postal entities... *Full disclosure: I'm a Director of the NRG, the owner/operators of ModelShipWorld.
-
Yep. The print edition has shipped late to subscribers; I had my digital edition 2 weeks ago.
-
Sehr Ausgezeichnet, B.E. Eine Kutter kommt..
- 648 replies
-
- 2
-
-
- Indefatigable
- Vanguard Models
- (and 1 more)
-
I Hate It When That Happens. No biggie. Only you will miss the "extra" boat, B.E. If you insist, I'd recommend getting one of Chris' superb 3D ones; a mix n' match selection...save the pear wood pieces for Christmas Holiday kindling.
- 648 replies
-
- 3
-
-
- Indefatigable
- Vanguard Models
- (and 1 more)
-
Congratulations, B.E. A stunningly beautiful model. Your plinth is an excellent platform for her display.
- 648 replies
-
- 3
-
-
-
- Indefatigable
- Vanguard Models
- (and 1 more)
-
Steve, a very nice model indeed. Will you be adding sails?
-
Can the applicant do this job at home on ZOOM?
-
Apple's ecosystems are indeed created to be First World problems.
-
I've lost it....need a refresher to get my confidence back
hollowneck replied to bigcreekdad's topic in Wood ship model kits
I highly recommend your thoughts about going with (another) Vanguard kit. Over the past two years, Chris Watton has created a number of smaller, reasonably priced kits including fishing vessels; you will also note on the Vanguard site a "rating system" for one's level of building skills. Planking is never easy and requires patience: Vanguard has implemented numerous kit improvements that help a modeler with this challenge. Welcome back! - Good luck - You can do it. -
I agree with B.E. You've added personal "touches" to this model that are excellent. I've looked into your build frequently since I considered building this model too. Your Trial is going to look really nice once it's rigged (from a fan of fully-rigged models). However, those clunky, waaaay out-of-scale belaying pins made my eyes pop out on long stalks! There aren't many sources for accurately shaped, small belaying pins (and the best, a Russian company, is now off-limits/inaccessible unfortunately). One source is here: https://modelexpo-online.com/belaying-pins MSW Followers may have other suggestions that I'm unaware of. These brass pins are not ideal since one needs to paint them, however the smallest ones (5mm) offer much more realistic scale on a 1:64 build. As stated, I much prefer the beautifully-shaped Russian pear ones but the brass at least offers an alternative - inexpensive too since you won't need many for the Trial. Once I start my build of the Vanguard "Adder" in a few weeks I'll likely dip into a old stash since I've exhausted my supply of pear ones.
-
Bravo, B.E. - strike while the iron's hot, says Gromit! If your Indy won't fit on your wife's bedstand, try her chest of drawers.
- 648 replies
-
- 3
-

-
-
- Indefatigable
- Vanguard Models
- (and 1 more)
-
We all understand that family is #1. I also wish you and yours the best in the months and years to come.
- 419 replies
-
- 4
-
-
- Victory Models
- Pegasus
- (and 2 more)
-
Well reasoned and stated, B.E. My inner OCD recommendation got the best of me: fly specks amongst the pepper.
- 648 replies
-
- 3
-
-
-
- Indefatigable
- Vanguard Models
- (and 1 more)
-
Me too! Loved watching the female mouth brooders! Welcome Eamon - you will find this virtual spot the best one in the world for ship modeling info and colleagues.
-
Thanks Allan. David's Vol 2 is the one I don't have!
- 648 replies
-
- 1
-
-
- Indefatigable
- Vanguard Models
- (and 1 more)
