HOLIDAY DONATION DRIVE - SUPPORT MSW - DO YOUR PART TO KEEP THIS GREAT FORUM GOING!
×


src
-
Posts
2,300 -
Joined
-
Last visited
Content Type
Profiles
Forums
Gallery
Events
Everything posted by src
-
Looks great Dennis. Whats you plan for the lighting? Any plans to light position lanterns/lights? I would imagine there were outdoor lights for Leo and Winslette to take a romantic stroll at night. Some fiber optics maybe?? I'll go back to my corner now. Sam
-
Thanks for the comments and likes everyone - Slog, I haven't seen you around in a while, I hope all is well with you. Augie, baby steps, but I will finish - one day. Carl, you're right, that .00025" overhang has to go man! I think I will throw it in the incinerator and start all over........NO! Sam
-
Rich, Not that I am an expert by any means, but I have been rigging my canons like Peter detailed above. When I fraped/lashed my breaching rope to the rings I had off on the CA, I little gentle teasing and I could adjust the length. Those smaller rings look much better to my eye. Hope this helps some. Looking forward to more. Sam
-
We are a patient bunch Mark - fortunately Sjors is work OT right now - take your time. Sam
-
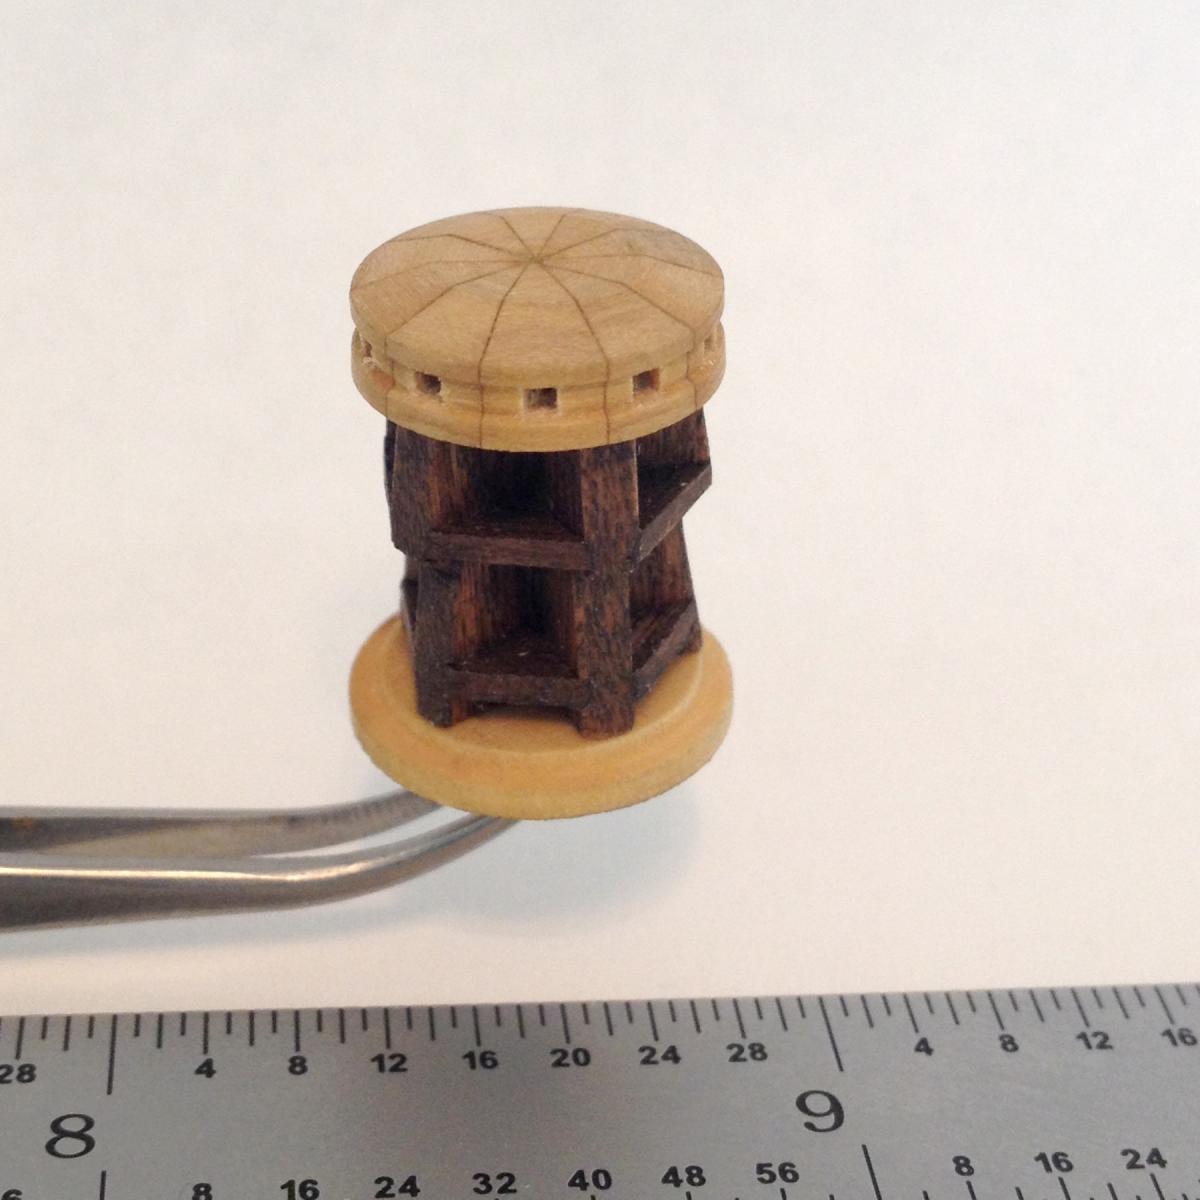
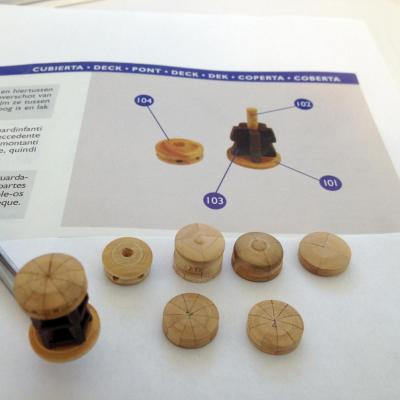
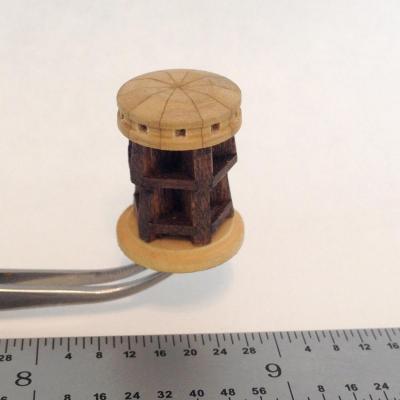
A small update - aren't they all anymore??? I finally got a trundle head I am satisfied with; points centered, no major voids in the joints etc. Below is the progression of parts as I figured out what I wanted it to look like and how to do it as well as a closer shot. The close up shows that I missed slightly on placement, from a foot away its not noticeable though. I need to pick up a felt point for the dremmel and get some more finish rubbed out. I've also finished a rigging couple more carriages. I thought with work slowing down I would have more time to build but it hasn't been the case, all the little things that were put off over the last six months have to be taken care of.
-
Very nice work on the rails Dennis, we have some super fine stranded wire at the shop if you suddenly get a bout of OCD inspired S&M and want to get all three rails in, pm me and I'll send you a length. When it comes to buying new toys I have always found that a pointed look at my better half's collection of footwear a very strong persuader. That and telling her she is the most beautiful woman in the world to me never hurts either. Sam
-
Great work like alway, enjoy your trip. Salmon, I am jealous! Sam
- 2,191 replies
-
- 3
-

-
- confederacy
- Model Shipways
- (and 1 more)
-
Sjors, like the others said, take your time, we aren't going anywhere, even when we do poke you for not posting, we're just having fun with you. Sam
- 1,616 replies
-
- 4
-
-
- caldercraft
- agamemnon
- (and 1 more)
-
I see you're slacking off again..... Kidding of course. Watching this build reminds me of that old US Army recruiting commercial; "We do more by 9:00 A.M. than most people do all day" Looks really good. Sam
-
Rich, Are you gluing one ring at a time or multiples? A 90 second epoxy might kick to fast to do more than one ring at a time. If you want to do several canons at once see if you can find a 30 minute epoxy it will give you about 4-5 minutes of work time before it gels on you and is no longer workable. The longer curing epoxies are stronger also. The small dabs of epoxy your going to use may take a while to cure completely even the 90 sec stuff since there isn't the mass to generate the heat needed. I have been placing my parts in my oven with just the pilot light on for an hour or so and they cure up real nice. If you don't have an oven with a pilot light, you might try preheating the oven to low and then turning it off when you put your parts in. Naturally experiment first with scrap. Cannons look good BTW. Sam
- 414 replies
-
- 1
-
-
- caldercraft
- victory
- (and 1 more)
-
Rich, I would imagine it needs to be nice and clean and then use either epoxy or CA. Sam
-
Very nice work, at the rate you're going you'll be done in no time. I dint know about the clear vs colored styrene. Is it possible they ran out of room on the other molds and it was cheaper to do those two parts in clear rather than create a whole new mold? Sam
-
Jaxboat, Disolve, disolve disolve! Point taken I have similar peeves; Clip vs Magazine is one, or, "Let me be honest with you." So all this time I have known whoever said that, they have been lying to me?!?!? Based on what I am hearing here, I may just go with beeswax DISSOLVED in some turp. I have no kids and my nephews are not likely to be interested in my build(s). I have already used beeswax on the hull, deck and furniture so I guess if the beeswax causes trouble it won't do any good to have the rigging survive and the hull disintegrate in 75 or 100 years. Jhearl, interesting point regarding mummies. Landlocked, I agree. Oil and wax is one of the easiest and most attractive finishes for furniture. A little elbow grease and you have that beautiful "gotta touch it" look. Sam
-
Jaager, thanks!! I have a couple of art stores near work ( about 30 miles from home) I'll try them first than Amazon. Sam
-
Mark, we did stockpiles also. Now, Michaels and Aaron Brothers didn't have conservation wax. Anybody have recommendations on where to get it? Sam
-
Druxey, Dwaing, thanks, JCF see Druxeys reply. What is the best way to apply? Rub the line across it? melt it into some turpentine? I have heard something about running the line over a 100 watt bulb, although incandescent bulbs are becoming a thing of the past here in California. Sam
-
Thanks Mark, To Quote Augie, "I just keep learning new things here" Sam
-
Augie, not sure what I taught you, but your welcome. Sam
-
Mark, bucklers?
-
I've read that beeswax can cause problems and that conservation wax is a better alternative for waxing rigging so I am out to go buy some. When it comes to applying, do I treat it the same as beeswax? IE melt it into some turpentine? Thanks in advance Sam
-
Nitromethane!!!!! um.... OH? Best not to use that then. I'll go back to my corner and be quiet now. Sam
-
Augie, correct. Lashed and running at sea, something different. No gun ports though, well the kit didn't indicate there were to be port covers and I never researched to see if it was correct. Pretty much have built to the instructions, just "upgraded" parts as I went. Sam
-
Popeye, been following along quietly the last couple of days. I haven't touched a plastic kit since my 20's this is bringing back memories. For your paint striping, maybe I missed it, but couldn't you use your brake fluid? I seem to recall getting brake fluid on my first car as i teenager. Cox engine fuel might work also although I am not sure what it would do to the plastic. Just thoughts. Sam
-
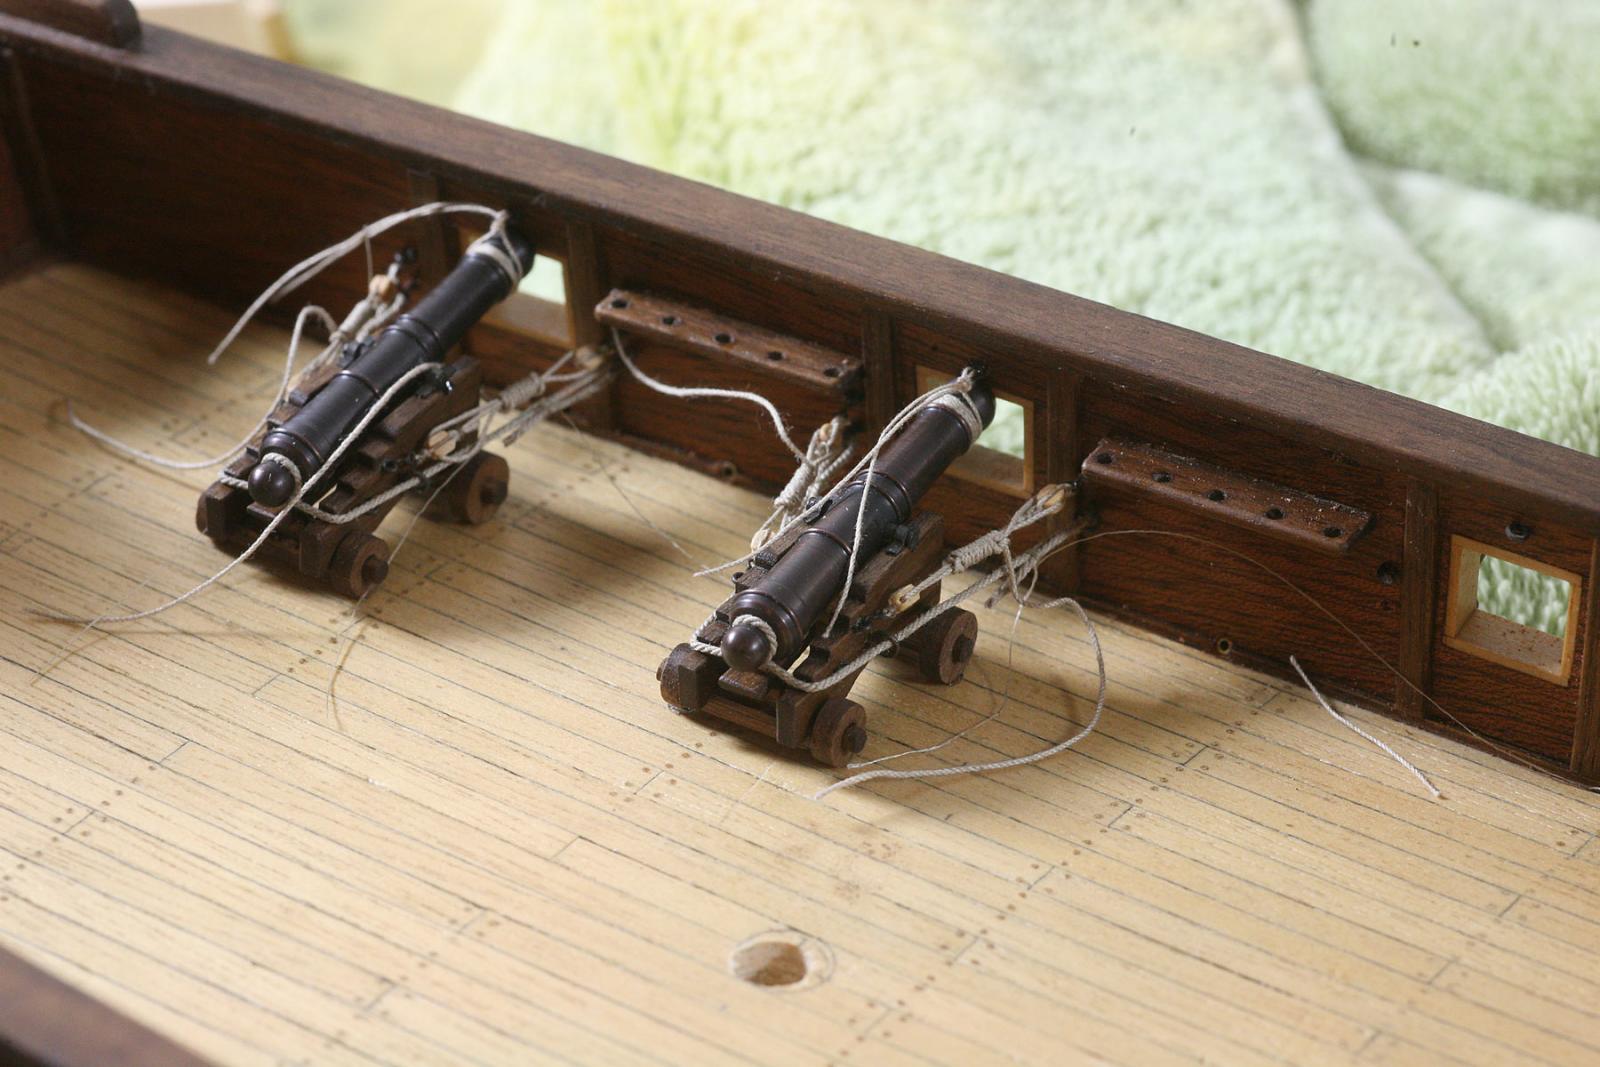
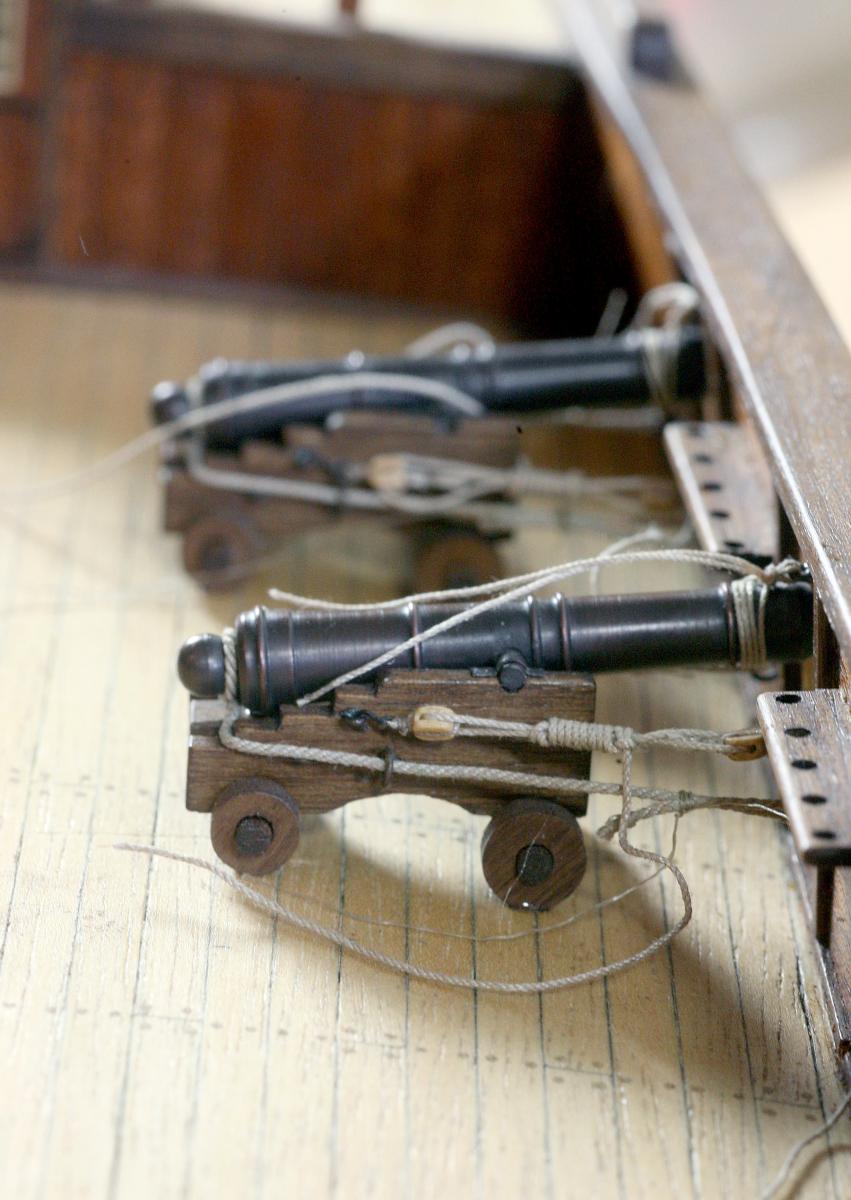
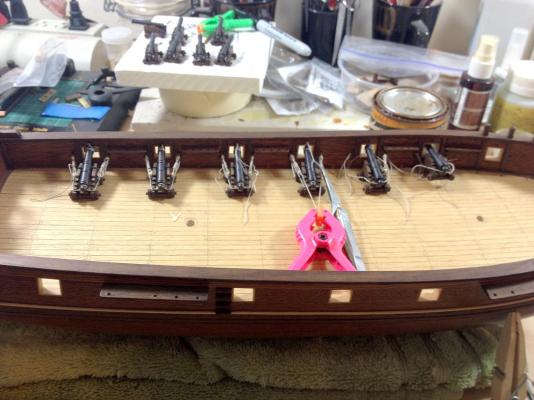
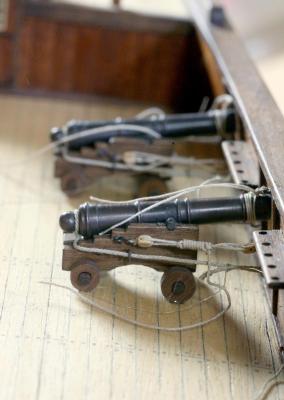
She's growing some teeth! The same client that kept us so busy from November through April decided they didn't like a couple of items they had us make so contracted to redo them, which meant more 10-12 hour days. Now we are done and we have no work to speak of. I should be more careful when I say I need a break!! The good thing, I have had some time the last couple of days to figure out how to mount and rig the carriages. Over the last several months I pre-frapped all my training tackle to make install easy, only to find out there is enough variation in the distance from ring bolt to ring bolt to make them mostly not fit! (Get outta my life Murphy!! ) I retied my frapping and started rigging and am pretty much satisfied with what I have. I used "Fully Framed" and "Arming and Fitting" for inspiration and direction. I had to modify things somewhat to my skill. I used half hitches to finish the frapping instead of mousing the hooks and also used a half hitch on the muzzle wrapping instead of seizing like shown in "Arming and Fitting" They need to be trimmed and cleaned up a bit but overall not bad. Sam

-
Those filler blocks look like fun Capt. Watch the "gesticulating" though, Ye be a-spillin yer rum!! Sam