Check out our new MSW Sponsor Innocraftsman
×


src
-
Posts
2,300 -
Joined
-
Last visited
Content Type
Profiles
Forums
Gallery
Events
Everything posted by src
-
She just gets better and better Mark, I think you're short selling yourself on your skills Mark. My suspicion is we are ALL a bit psycho here, you have to be to take little tiny pieces of wood, cut them into smaller pieces of wood and then glue them back together into new, more different tiny pieces of wood, all with the aid of a lighted magnifier! :D Merry Xmas to you and your Admiral. Sam
-
New mini-mill... CNC and impressive
src replied to mtaylor's topic in Modeling tools and Workshop Equipment
That and the computer to run it, then tooling. We recently purchased a CNC router where I work and it has been a game changer for us, but at a cost. We are way beyond the initial cost of the machine with running power ( new panel since we were out of capacity), software, computer to run it and bits, etc. etc. But, I can sit all day and watch it make aluminum chips and saw dust! Cool stuff. Thanks for posting Mark. Sam -
Clare, Thanks for the information. Whatever I do I will have a log, its just going to be a while ince I only get a couple of hours a week of real build time. Sam
- 51 replies
-
- 3
-

-
- wasen
- thermal studio
- (and 1 more)
-
Clare, Watching this and your other builds has peaked an interest, I may make one of these my 2nd build. I have a couple of books on Japanese joinery, could you recommend a book on Japanese boat building techniques? Sam
-
Mark, That looks great! Regarding steel wool, Druxy beat me to it. Try a maroon scrubby pad instead of steel wool that way if you do put a second coat over it you dont run the risk of the steel rusting and causing stains. You can get various grades of pads at Rockler. Home depot caries the maroon, you may have other options where you live. Sam
-
Siggi, If you plan to enter in a contest then I would think you should go with what you can document. If however your goal is to look at it and know you did the best you could than go with what looks better to you and justify it with the "refit" back story. Just my thoughts. Sam
-
Sjors, I think about the Admiral all the time, Murphy he can just go somewhere else!! Thoughts were on terminating the stays, I am leaning towards just running parallel with the center line of the bowsprit which would leave them just below the wale. J, depends on your definition of "lovely." Thanks for the kind words though. I should probably have added that the Bees were not included in the Constructo instructions, that's a bash. Sam
-
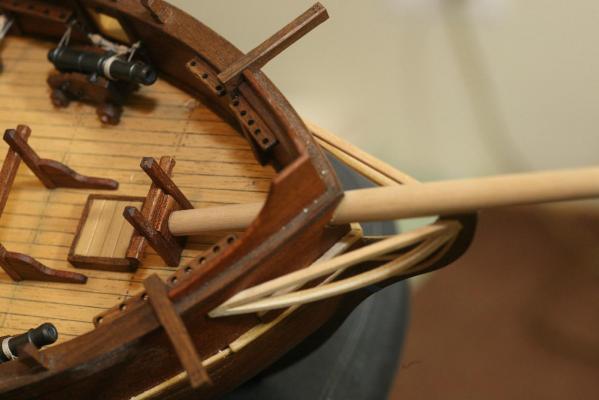
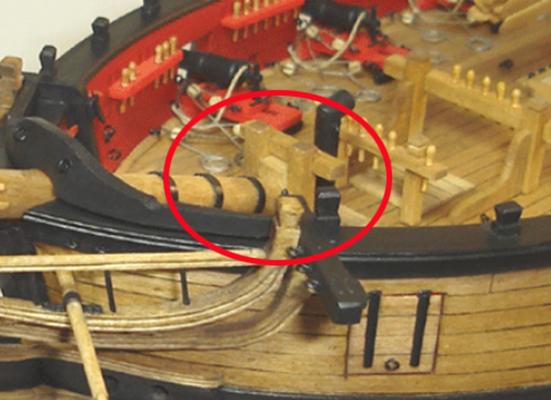
Joel, Thank you, that's more or less what I figured. Sjors, Its always a pleasure to make your life interesting my friend!!! So, life slowed down a bit for me and I thought I would have time to get a whole lot of building done this week since I had Monday and Tuesday off. Murphy however had other plans for me. We have a roll up style garage door and it chose Sunday night to explode. Better Half was bringing in Christmas ornaments to decorate, I was in the house moving stuff around when I heard this horrible mechanical screaming and Better Half cursing like a sailor (amusing if it was different circumstances as she is rather petite and ladylike) Come to find that two rollers on one side of the door fell off and the other side bound up and the balancing wheel and cable were all spun off, the bracket that holds the opener was twisted off and several panels off the door were slightly buckled. So, Monday was spent moving several shelving units and everything on them - 30 plus years of accumulated hand and bench top carpentry tools as well as 20+ years of her accumulated broadcasting stuff. Needless to say I accomplished very little in the way of building. I did manage to get a block built to anchor the Bowsprit as well as the Bees shaped and glued on. Now of course since I have once again charged full speed ahead with out really considering the ramifications I realize I have put myself in the position of deviating from Constructos rigging plan. The rigging plan shows the Fore Top Mast Stay anchored to the end of the Bowsprit and no Fore Top Mast Preventer Stay at all. From what I can gather based on Chucks Syren instructions and Fully Framed these stay will terminate to lanyards either at the hull or the wale just below the cap rail? I cant imagine the splash guard would be strong enough, besides the angle created from the Bees to the splash guard looks totally wrong. Thoughts? Sam
-
Grat to see you back at it Sjors. Well done. I am jealous of your new hobby room. Sam
- 1,616 replies
-
- 4
-
-
- caldercraft
- agamemnon
- (and 1 more)
-
Well Done! Whats next? Back to the Niagra? Sam
- 105 replies
-
- 1
-
-
- picket boat
- model shipways
- (and 1 more)
-
I go away for a few days and come back to a completed planking job. Perhaps I should go away more often? Looks great Mark, cant wait to see the scraped and finished pictures. So, you start masting tomorrow then? Sam
-
Rich, Youre leaving as I come back!! Merry Christmas. Build is looking great, I see you applying the lessons learned from the Enterprise. Good job. Sam
-
Mobsie, Thanks for stopping in and the kind words. The block does make sense doesnt it? Its going to be a few days befroe I get any build time in, work calls. Sometime after the 14th I should get some bench time....I hope. Sam
-
Greg, thank you, youre too kind, and thanks for stopping by. Pull up a chair. Mark, Somehow I figured that, but, I always like to know my options before I make a decision. thanks. Sam
-
Carl, that was my thought. But I figured I would ask the more knowledgeable out there. I have wondered about what held that end down so it seem reasonable that it's a common practice. The question for me is will I do anything about it. I have time to think about it, we have a project due on the 11th of this month so I don't see me getting much build time in over the next couple of weeks. Sam
-
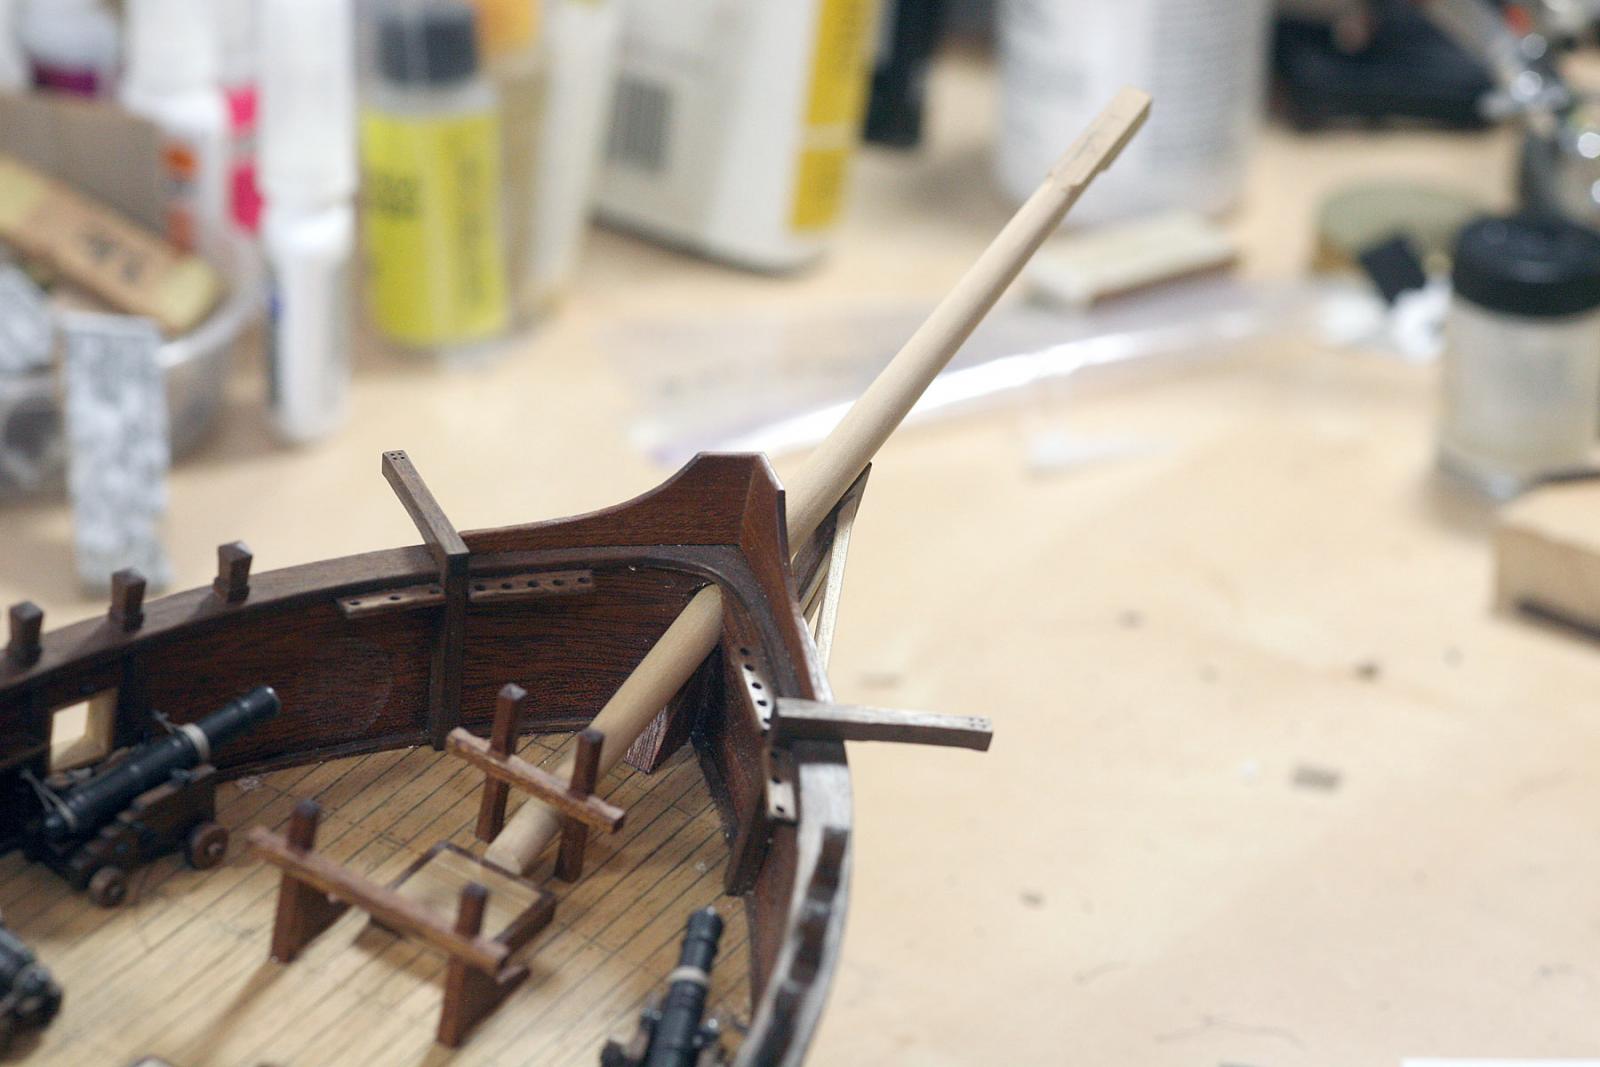
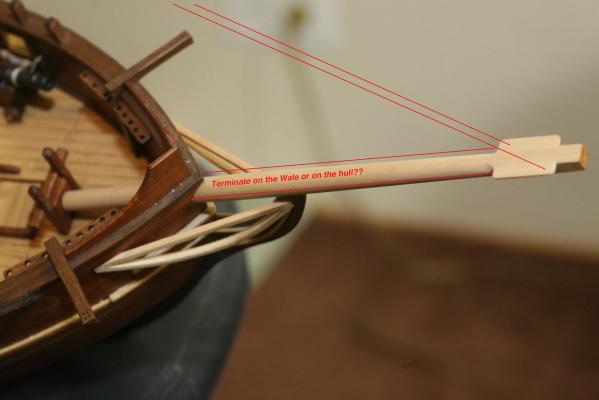
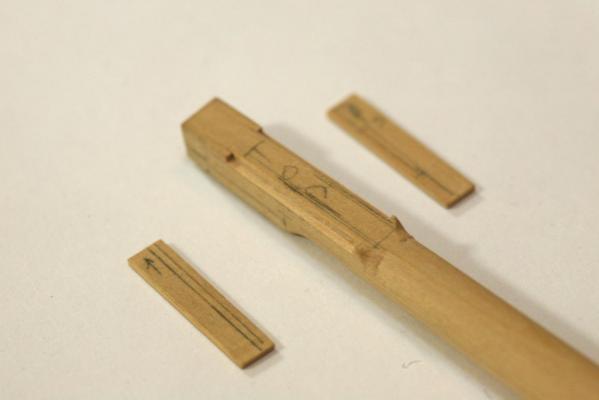
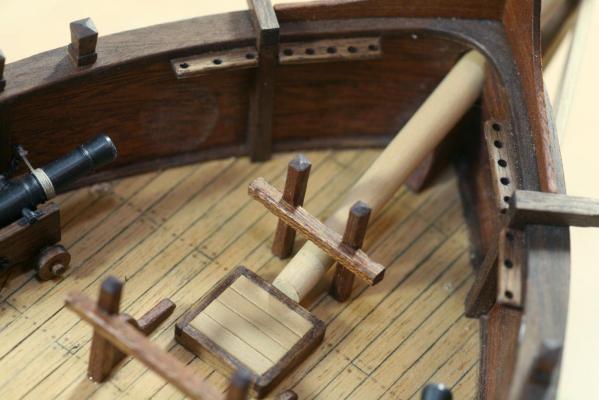
Ok, So I finished the netting this weekend and started in on the masting. Since I scrapped my roller coaster shaped dowels I am making masts from square boxwood stock I purchased from Hobby Mill sometime back. I started with the Bowsprit and was using Chucks Syren instructions as well as Fully Framed for direction and inspiration. I had planned on using DanVads masting spread sheet but that doesnt include schooners, unless somebody knows what the ratios were for schooners I am going to stick with the lengths given by Conbstructo and continue using this build as the learning exorcise it has become. One thing I have come across is how the rear/base of the bowsprit is finished. Constructo has me just terminating the end with a cut perpendicular to the water line, both chucks Syren instructions and Fully Framed indicate the Bowsprit was tennoned into a block built into the bits. I am certain Chuck and Mr Antscherl are correct for the ships they are illustrating, but what about a smaller ship like the Enterprise? This is how Constructo indicates I should install the BowSprit. This is how Chucks Syren and Fully Framed detail the Bowsprit. Chuck, I hope you dont mind me using your picture to illustrate my question. I'll find another way if it is an issue. Sam

-
Wow Rich, great work! I have some masts you can turn if you want! Sam
- 414 replies
-
- 1
-
-
- caldercraft
- victory
- (and 1 more)
-
great to see you back at it Robbyn. LOL, if you cant fix it, Duct it!! If the duct tape doesnt work, try a set of clothes pins epoxied to your board. Sam
-
Thanks for the reply, so the country of manufacture wont make a difference? I see youre from Quebec, please dont think I am picking on your home country. Sam
-
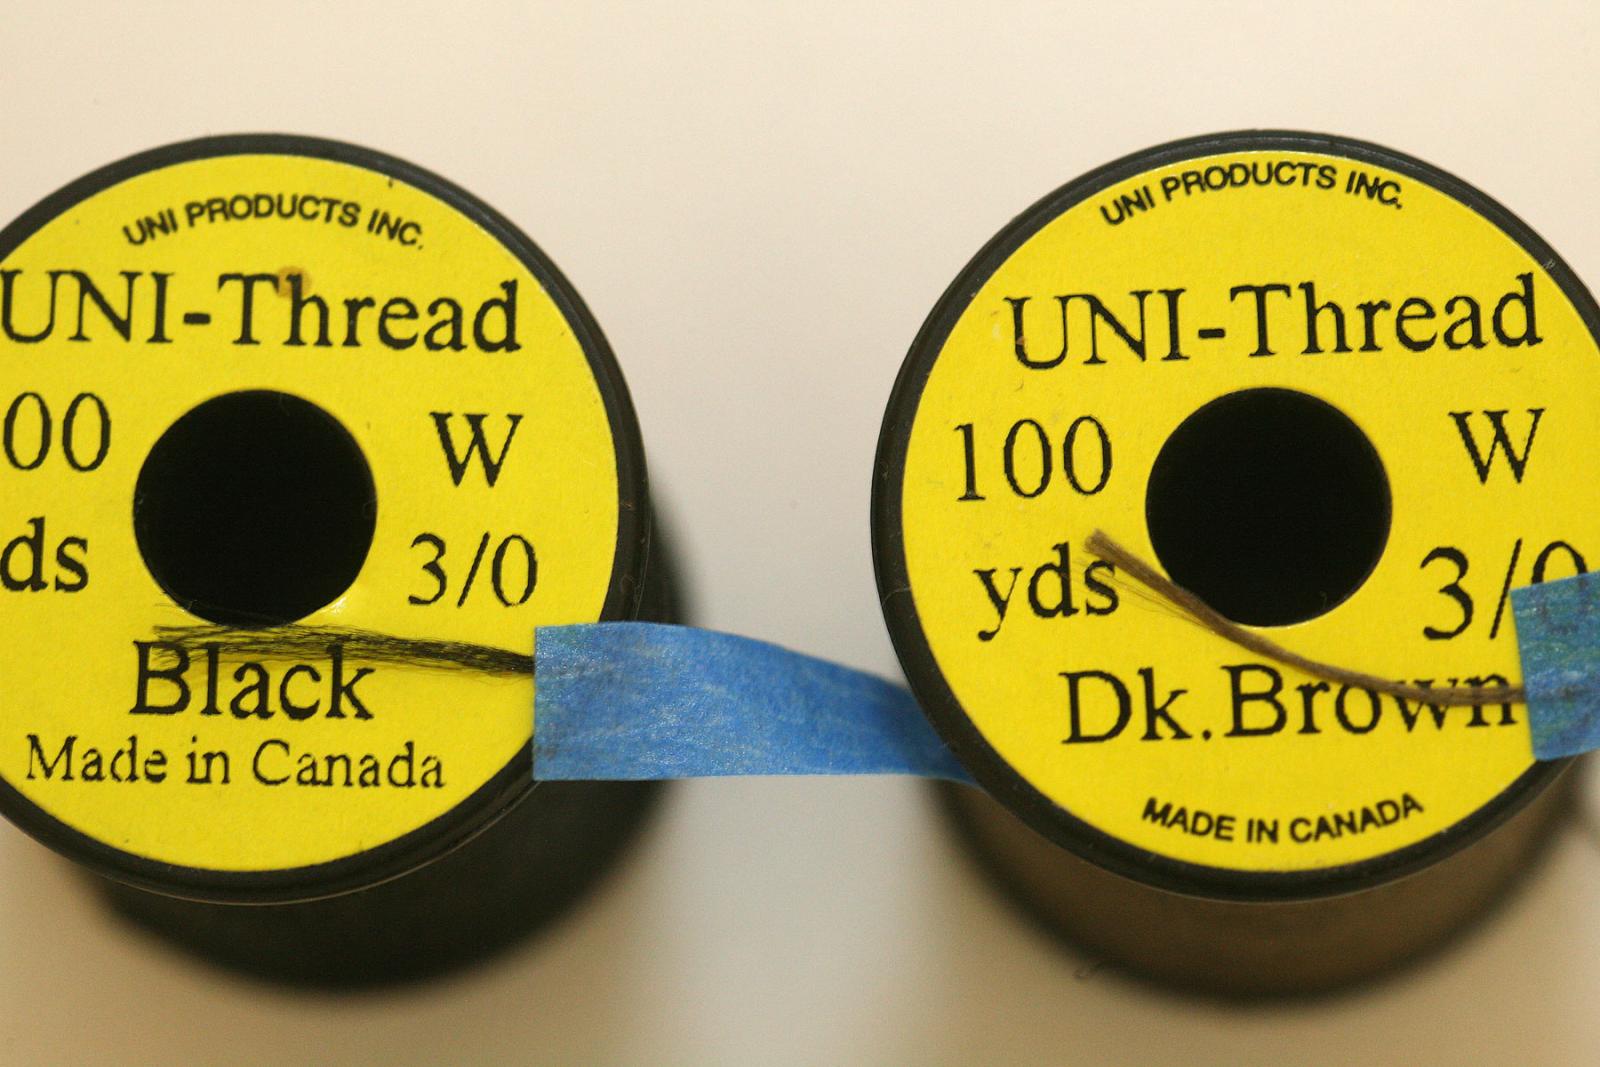
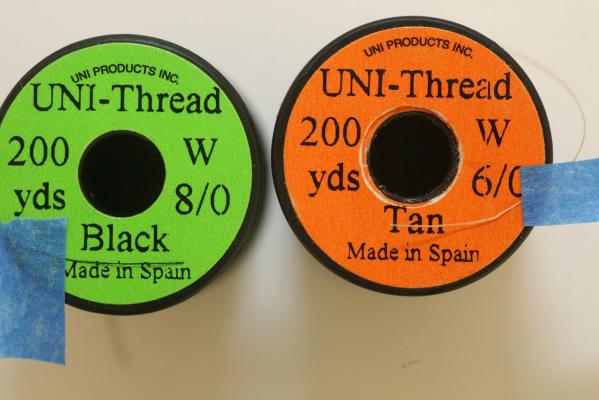
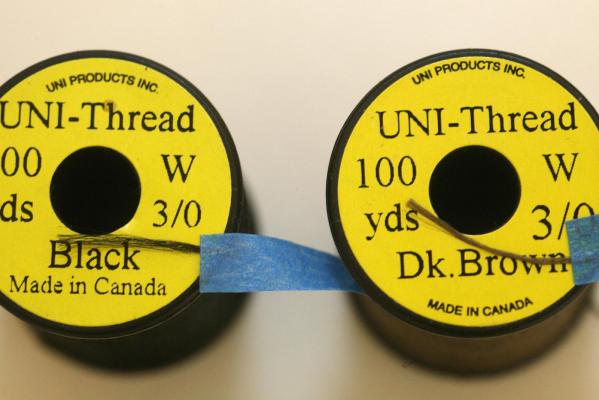
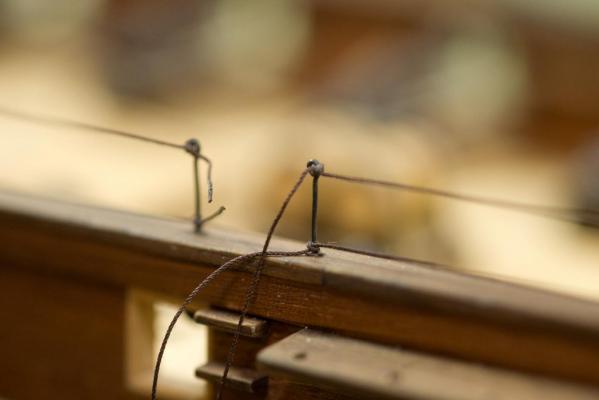
I have been using UNI-Thread for my strops as I learn rigging. Sometime last year I bought 3 different sizes in a couple of different colors figuring I would find what looked good and what size worked and buy more when I was ready. I noticed that the 3/0 thread unravels very easily and wants to hang up as I form a knot, the 6/0 and 8/0 stay together well. I also noticed the 3/0 is made in Canada and the other two are from Spain. So my question is, is it the gauge that is the issue or is it the location of manufacture? I am ready to buy more in the colors I like but before I pull the trigger on an online purchase I thought I would see what others have to say. Pictures below to help illustrate what I am talking about. Thanks in advance, Sam You can see here that the thread is frayed, it also catches very easily when I try to form a knot. These thinner gauges don't have this problem (feature?)
-
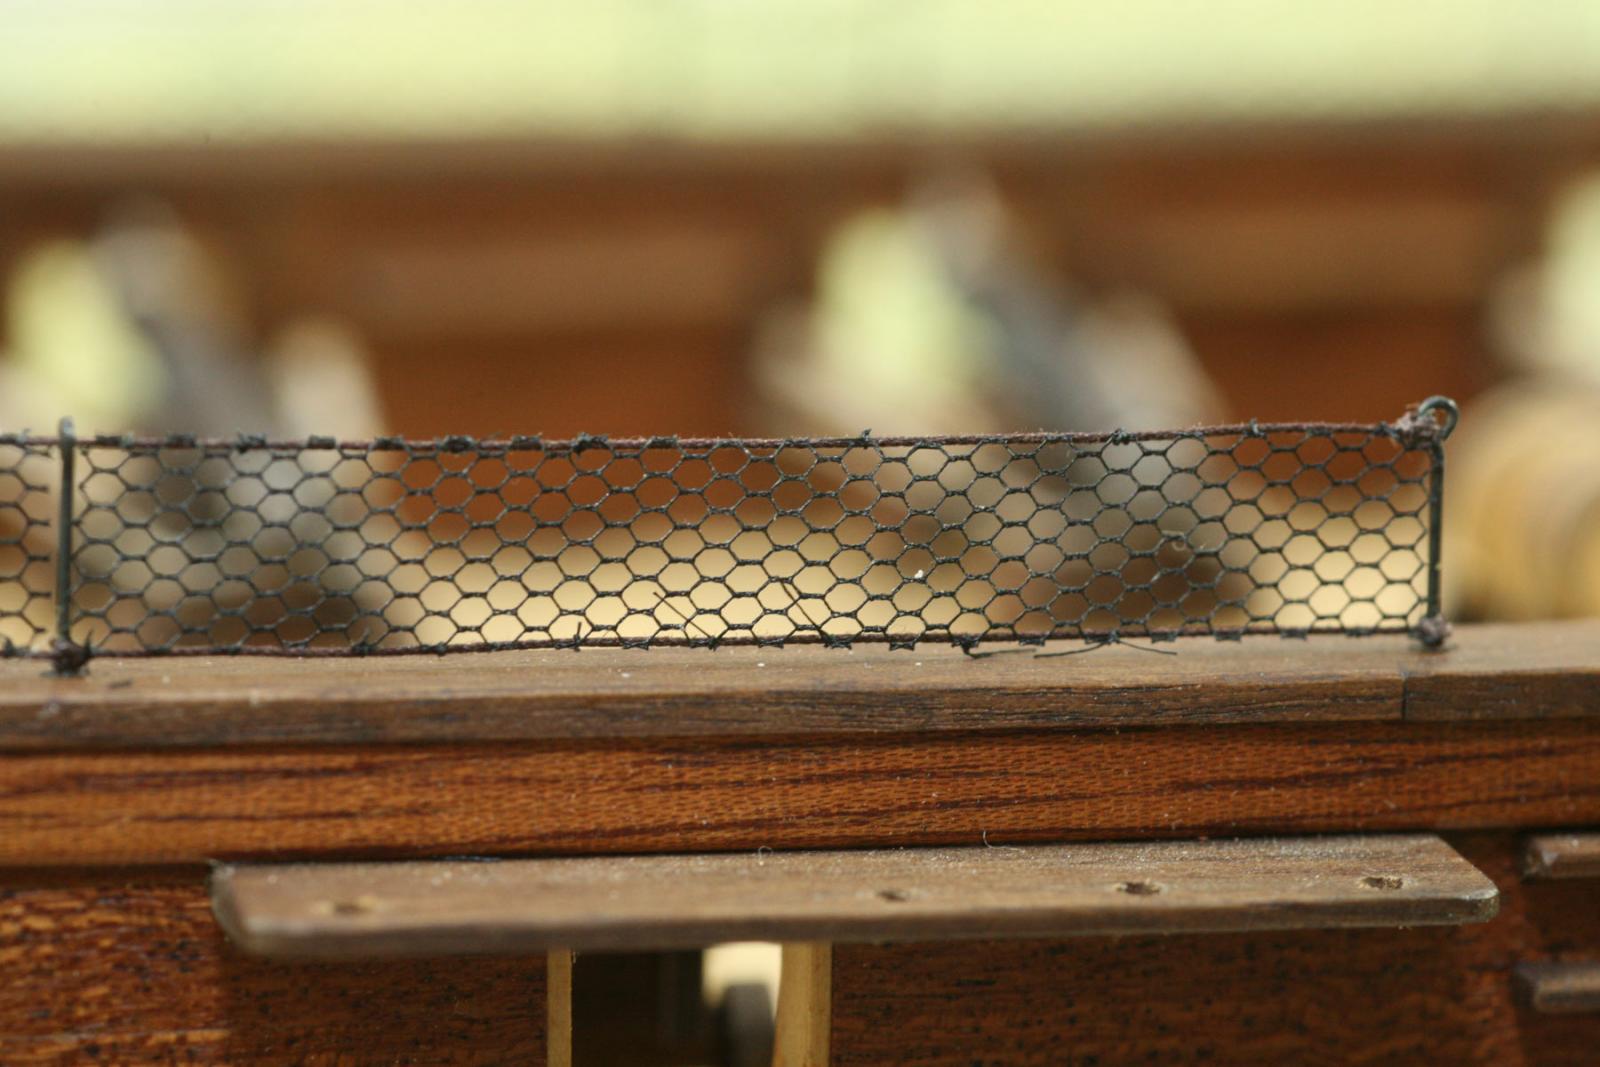
Thanks everybody. Good to see you back Robbyn!! I am kind of surprised the netting fits as well as it does, it never crossed my mind to make the height correspond to the flats on the netting. Happy accident!! Hope everybody had a great thanksgiving, those of you who celebrate that is. i need to walk the dog and take a nap. Sam Edit - Brian, sorry to hear about your computer issues, understand that Win 10 is a real pain.
-
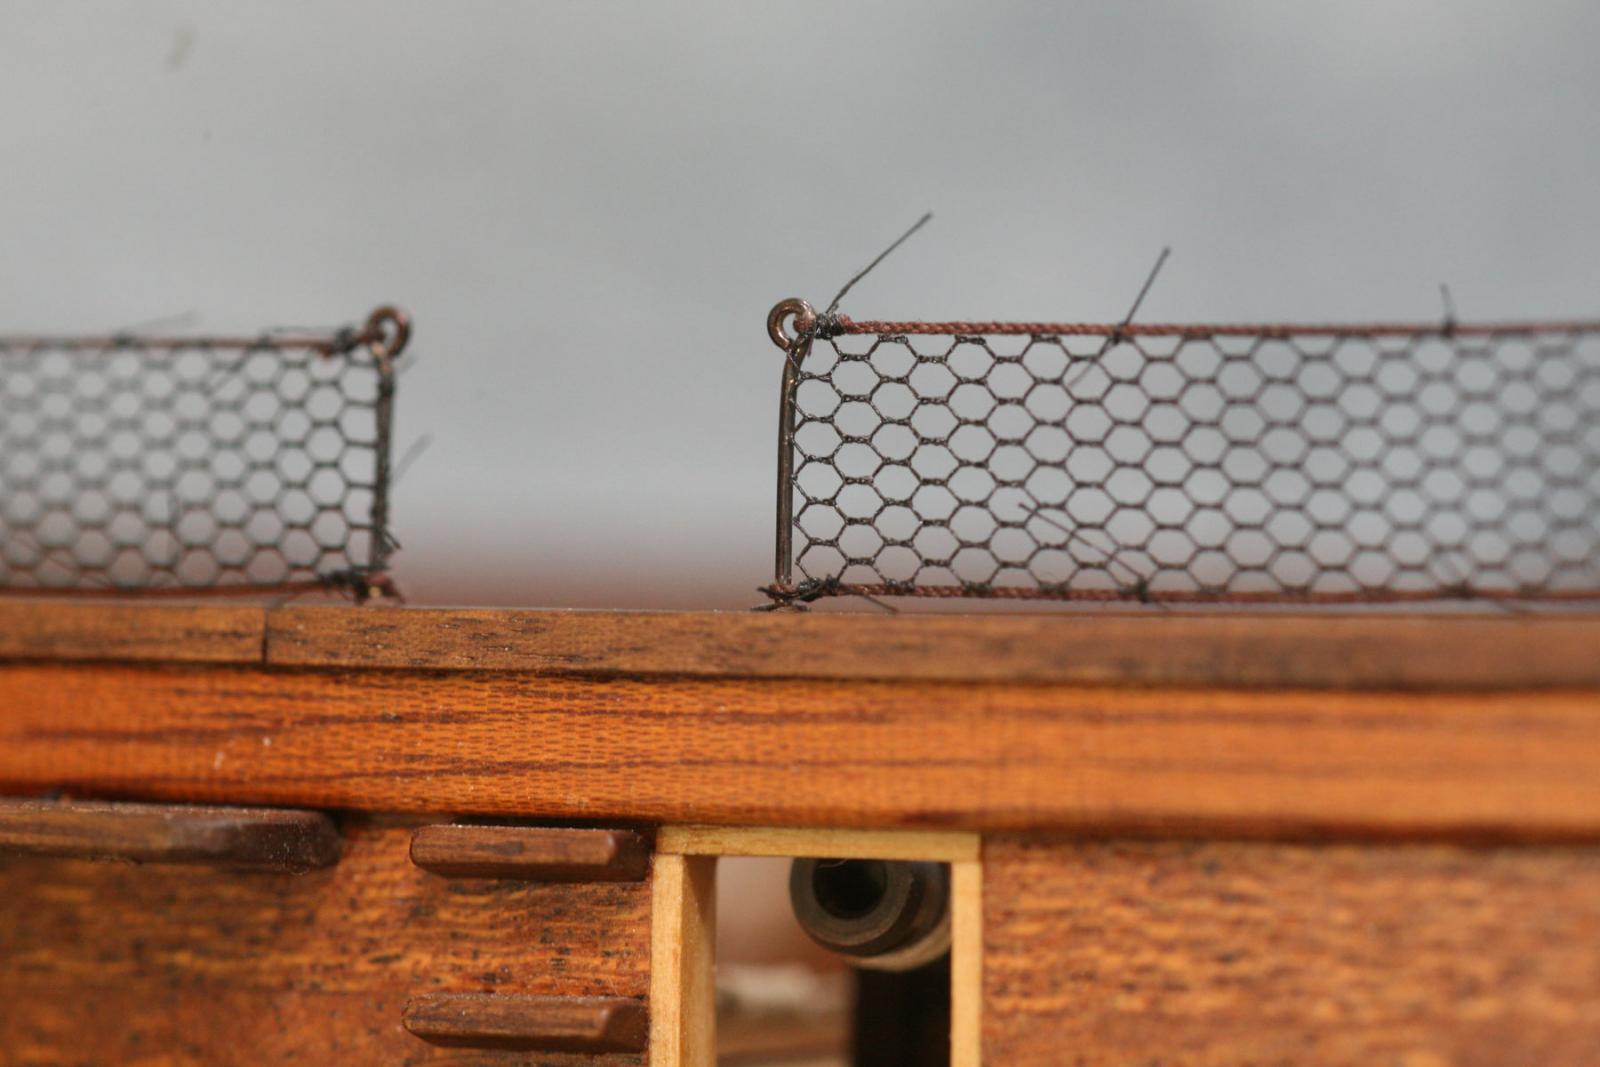
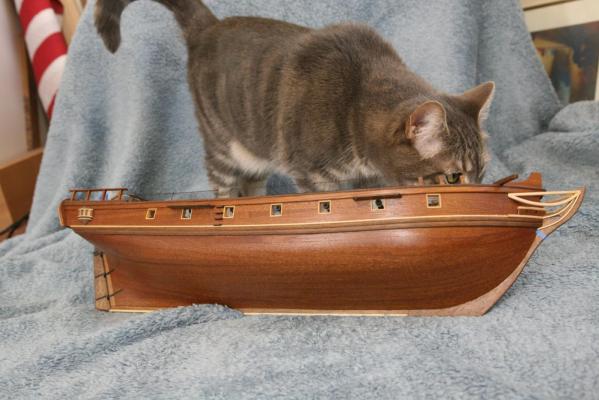
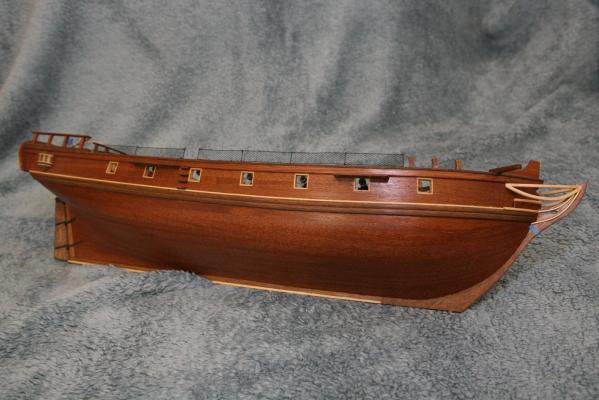
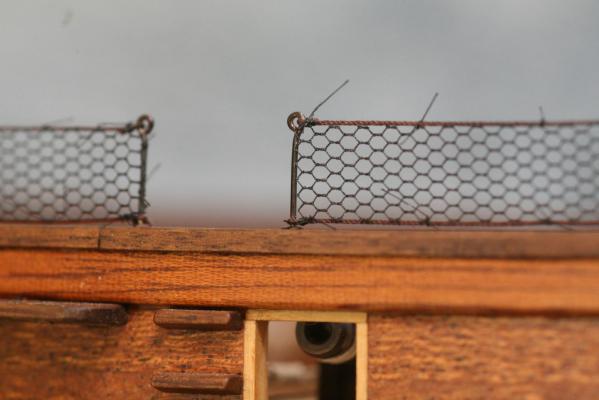
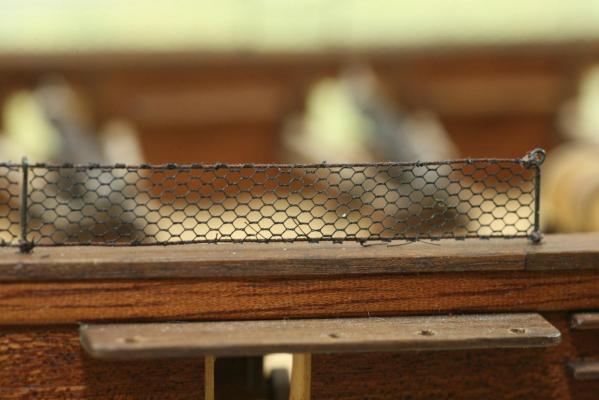
Yes Sjors, interesting-er and interesting-er, its the Constructo way. Small update, I replaced all the kit stanchions with scratched parts. I was able to use some brass tube to recreate the flange at the base and then made simple eyes at the top and soldered everything together, epoxied them all in and started tying string to run the netting. I started out trying to tie first a constrictor knot and when that wasnt working out I switched to clove hitches. No matter what I did the 8/0 thread I was using would hang up on the plastic netting and would not cinch up properly. I would get to the end of a run and the knots I had tied just a few minutes ago would be undone. GGrrrr!! I went with square knots, they are more bulky than the others but they're staying tied at least. I think the only way I would be able to use the other knots would be to make my own netting. NO!!!! hush up! It AINT happening!!! Hmmmm...... I wonder how hard it would be........... I finished up the port side and realized my lines were not parallel to the cap rail AND the knots I used to anchor to the stanchions were REALLY bulky looking, so, off they came. I seized the ends this time and not only do they look less bulky, but the netting laid a bit better. I tied off every fourth full column, I may decide to go back and do every second. we will see, the better half went to Denver for the weekend so I should have plenty of time to play and get it right. (Silly girl, its SNOWING!) Thats all for now. Sam Tied off with hitches and constrictor knots, I couldnt gt the constrictor to tie through the loop, should be the same procedure, but I just couldnt make it happen. All tied off, the knots that tie to the stanchions look kind of bulky. Replaced with seized ends, tidier and the netting lays better. While shooting the shots above this jumped into my viewfinder, other than the blackening rubbing off I like how the barrels came out. How she sits right now. Of course Commander Lorcan had to get into the picture and give her blessings.

-
J, I can just imagine the words that came out. We feel for you, looks like you made a good save though. Sam
- 105 replies
-
- 1
-
-
- picket boat
- model shipways
- (and 1 more)
-
robbyn, thats good to hear, hopefully the feeling comes back in time. The couple of times I have sliced myself bad enough to loos feeling in a finger, the feeling took a couple of years to come back completly. Now then, SAW DUST!! Sam