HOLIDAY DONATION DRIVE - SUPPORT MSW - DO YOUR PART TO KEEP THIS GREAT FORUM GOING! (Only 53 donations so far out of 49,000 members - C'mon guys!)
×


src
-
Posts
2,300 -
Joined
-
Last visited
Content Type
Profiles
Forums
Gallery
Events
Everything posted by src
-
J, How is it missed this?? Pulling up a chair. Nice save on the bulkhead. That engine looks to be really fiddly. Looking forward to seeing it complete. Sam
- 105 replies
-
- 2
-

-
- picket boat
- model shipways
- (and 1 more)
-
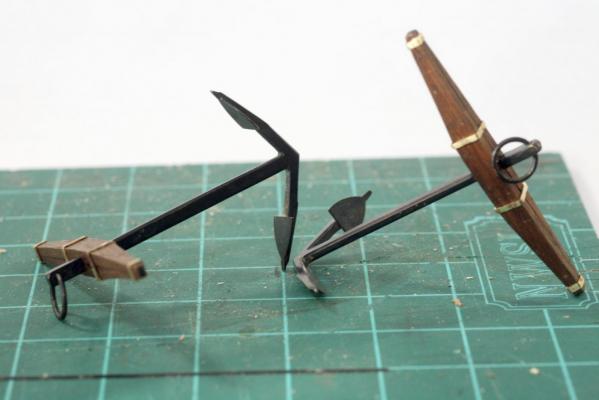
Thank you everybody for the likes and the encouragement. Brian, that day is getting closer and closer. Getting excited as well as nervous since rigging is a whole new world. Rich, thank you.I have some shoes to fill following along in you and Brian's foot steps. J she certainly is, thank you. jbshan, thank you. I thought I had the name wrong. what I was referring to was the two openings just behind the chimney, the instructions refer to them as "Open Chocks" I believe they would be the point that the actual anchor cable enters the hull for stowage. As far as the puddening, what you show and described is pretty much what I am attempting. "Fully Framed indicates the puddening would be 2-2.5"c rope. I have been using a 0.018"d rope from Chuck in a dark brown. What I am finding is I can only do a couple of wraps then I have to secure it with some thinned PVA and let it dry. I am assuming the stop lashing/seizing would be tared also, but I may use a lighter colored thread just to show off my hard work. We shall see. Ok, its turning black outside and the dog wants his walk, I better take care of that before it dumps on us. Sam
-
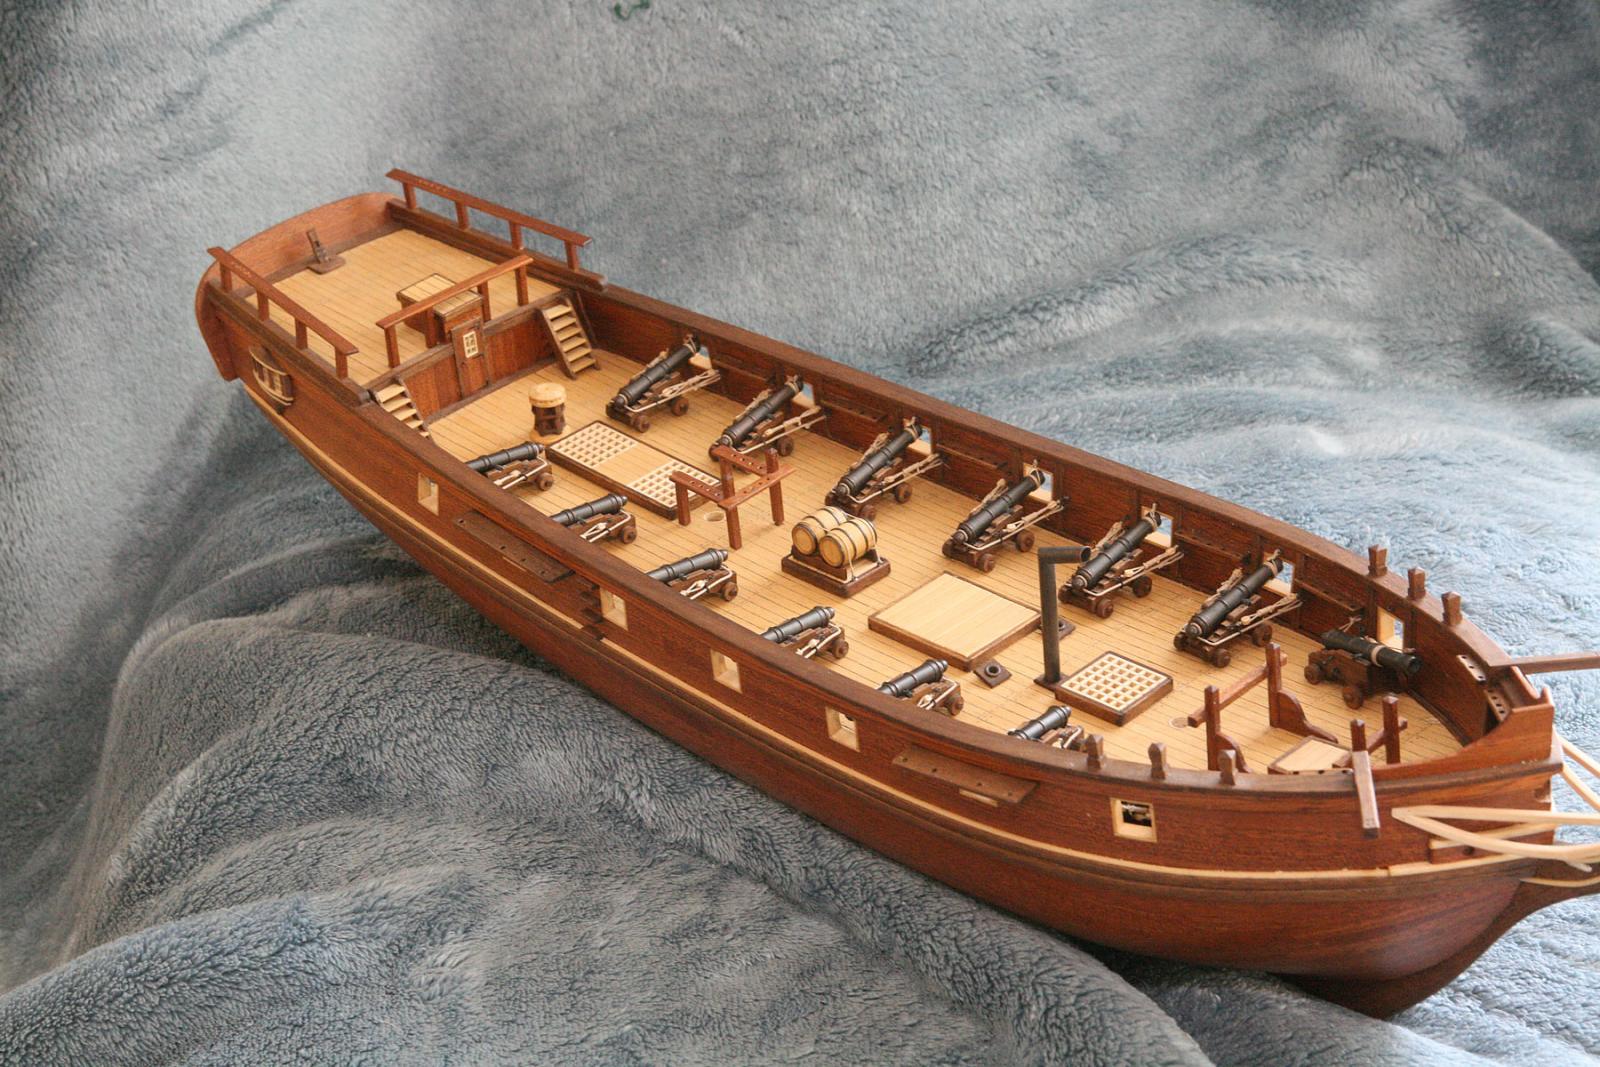
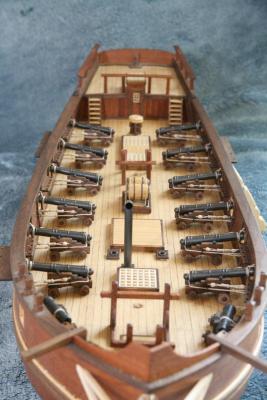
Woo Hoo!! She looks different. The pictures below have the furniture resting in place to check alignment and fit of the brass dowels. Everything but the Main Bits, the chimney and two Haws Holes(?) on either side of the chimney are now glued down. I had to do some work to refit the ladders as they were splayed out due to the deck camber - forgot all about that as I built them. They are better now, still a small degree out of alignment but I can live with it, it's really not noticeable unless you sight down the hull. Now. back to puddening my anchors..... for some reason that is really challenging me. Sam

-
I thought that was a prerequisite for ship building? I think you're on to the solution with V5.0 Mark. Will be watching closely, I would like to add a ships boat or 3 to my next build. Sam
-
Welcome back Capt. Just got caught up here and cant wait to see your stern modification. Sam
-
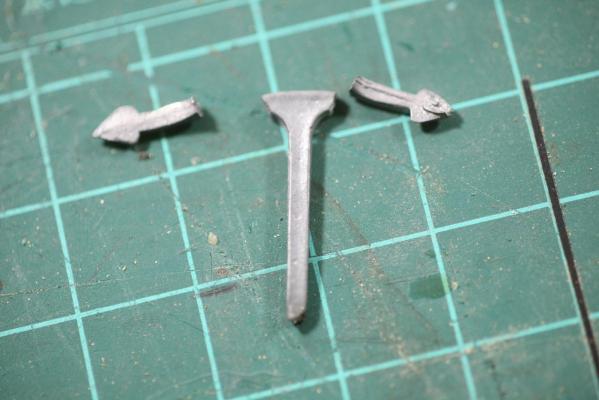
Makr, Carl, thank you and thank all of you for the likes also, it is very much appreciated. Carl, SALTED BEEF?!?!?! Those barrels have only the finest Tequilla Anejo and single malt Scotch in them (no Laphroaig though, to me that stuff tastes like medicine. Peated Scotch just doesnt work for me) A note for the future. I forgot to mention one of the errors in the Anchor Trials and Tribulations. If your going to use muratic acid to clean your parts, DONT soft solder them. I figured since the flukes of the anchors would not be under any stress I could cheat and use plummers solder instead of silver solder. It was faster, easier and cleaner. That is untill I plunked them in some dilute Muratic Acid, after 10-15 minutes I cam eback came back and my nicely soldered flukes were resting on the bottom of the dish!!! Thanks Murphy. Sam
-
Brian, Thank you. It was boxwood from hobby mill. I bought several planks a while back to make my masts out of since mine are warped from poor storage on my part. I just cut strips off at 15 degrees flipped the plank and cut a strip to make knife shaped planks. After cleaning up the saw kerf with a micro plane I glued them up. Other than picking the straightest and cleanest parts there want a whole lot of work in choosing. Jed's JEFFS material was always so nice that there wasn't a whole lot of picking through parts. Sam
-
Thanks Augie! Even with all the issues with the anchors I enjoyed the process. I am becoming more comfortable working with metal. Shhh!! Don't tell our metal shop foreman where I work, we have an ongoing debate over which is the superior material, wood or metal. Sam
-
Cannon tackle II
src replied to jdbradford's topic in Discussion for a Ship's Deck Furniture, Guns, boats and other Fittings
Jeff if you go the rout of making your own go to a jewelers supply and get your self a pair of round nose pliers. http://www.amazon.com/Beadsmith-Jewelry-Round-Pliers-PL513/dp/B000SNBC74 Sam -
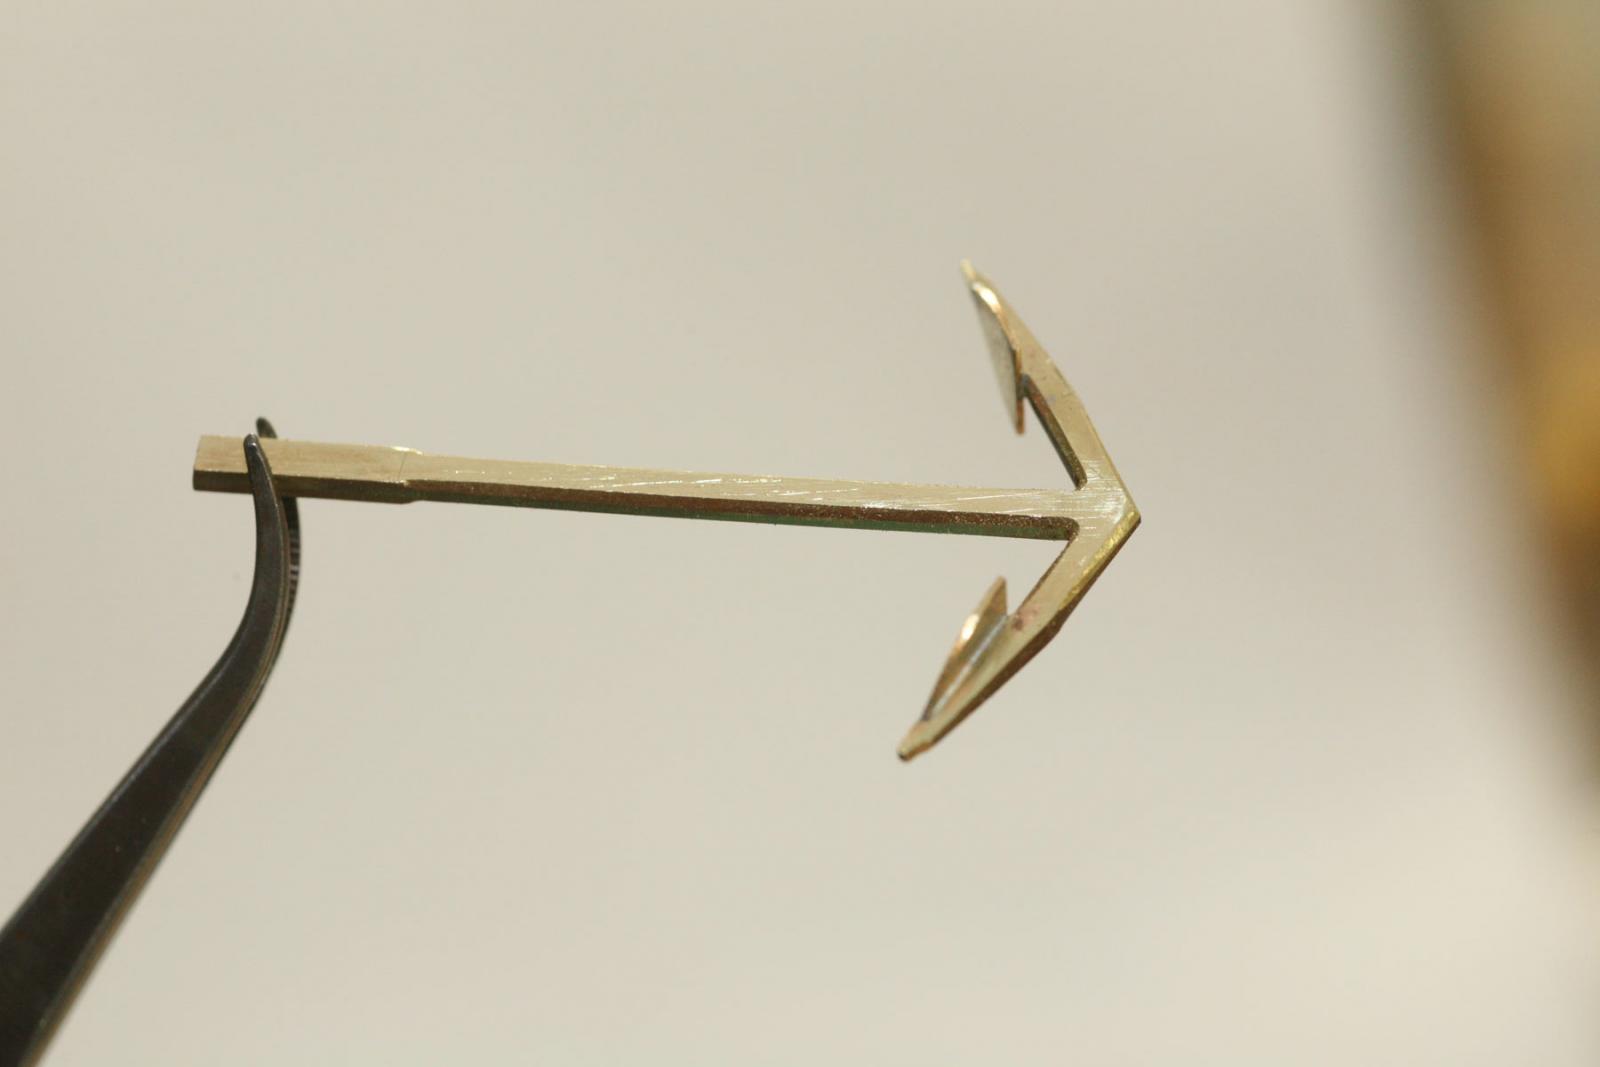
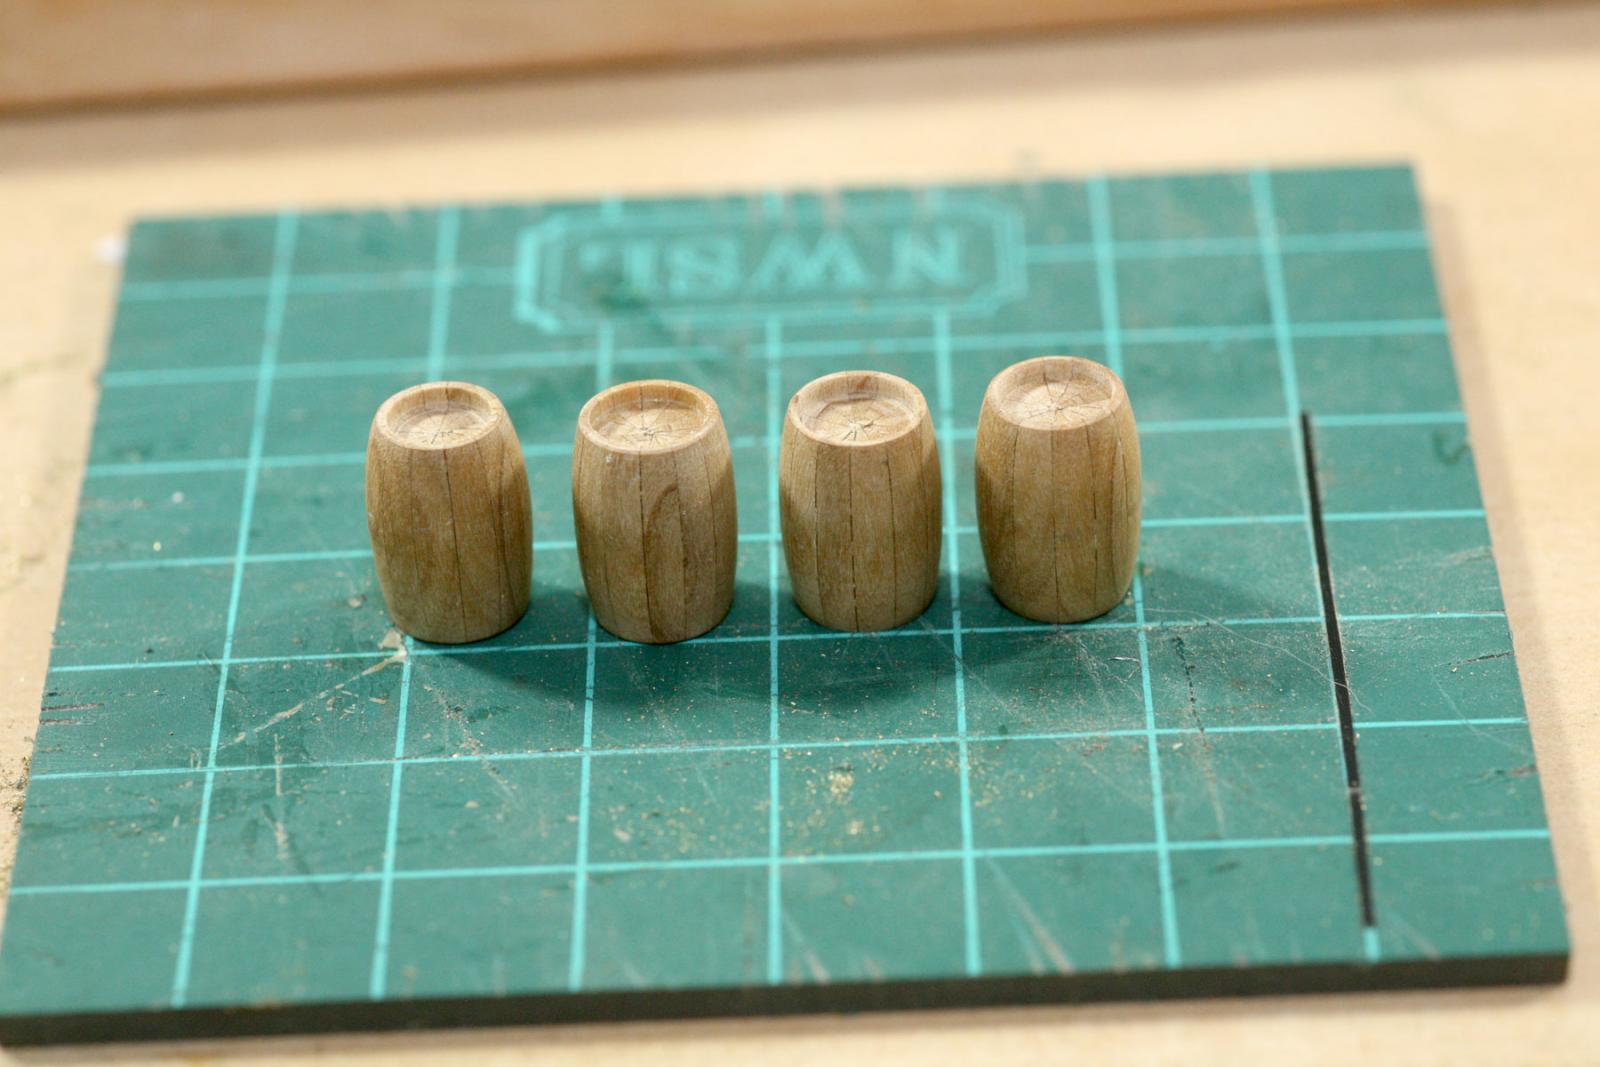
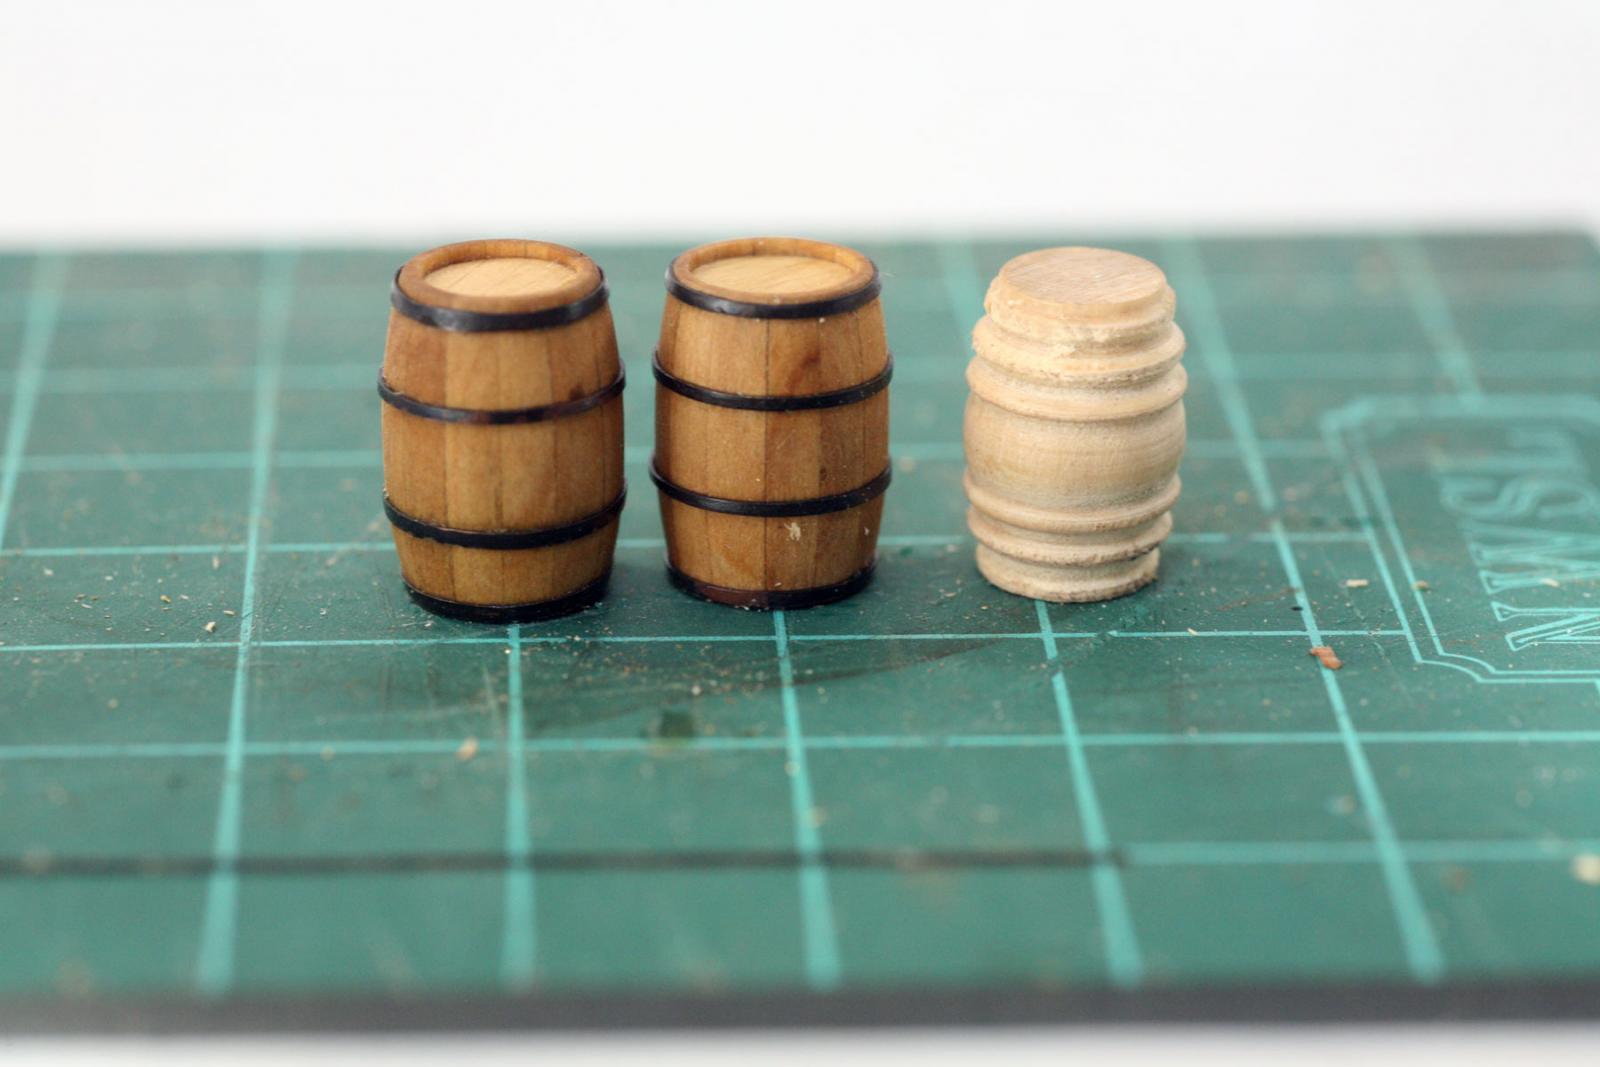
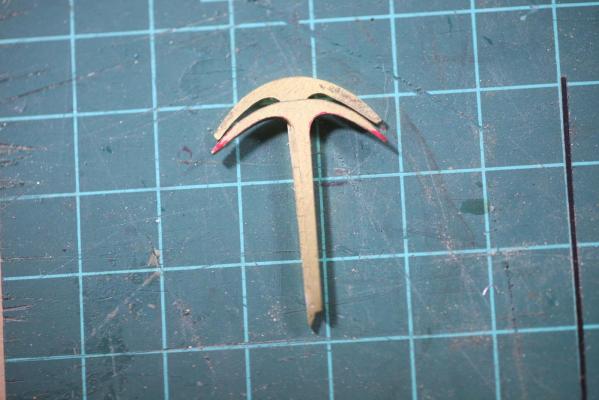
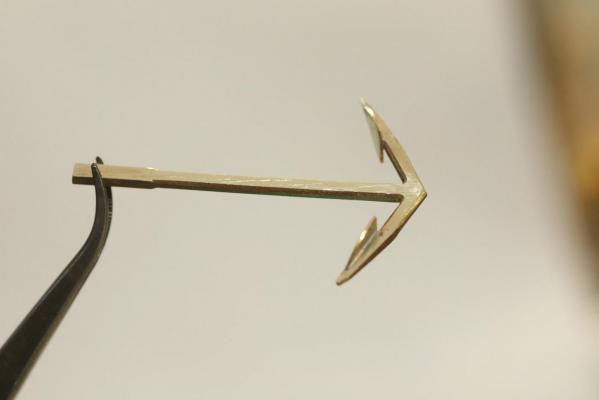
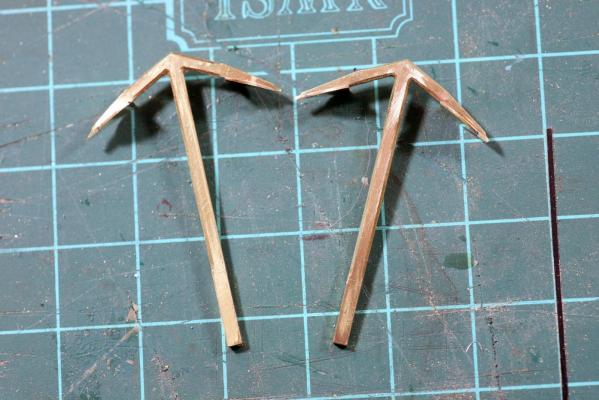
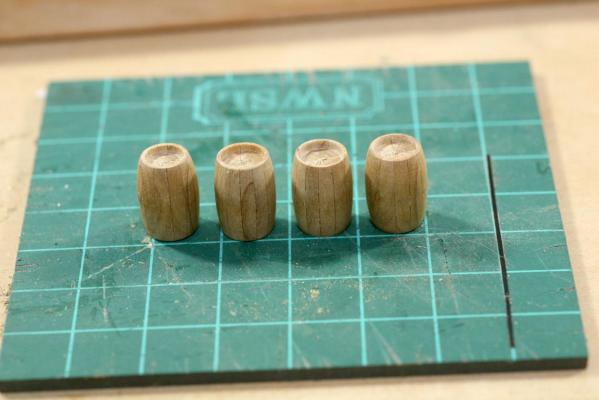
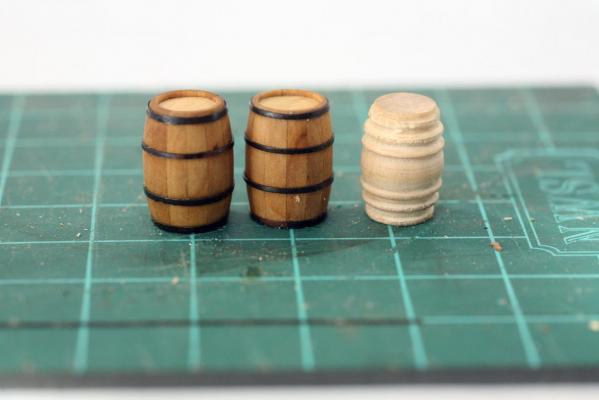
Steve, Thanks for the drawings, I have saved them for future reference. Wow, 2-1/2 months since my last post!!! Work has got to go. Or I need to win the lottery, one or the other. There hasnt been a lot of free time to build recently but I havent been totally neglecting my Enterprise. For some time I have known that the barrels were just not going to work for me and new scratch built barrels were in order. I just didnt know how i would go about it. In the end I did what I always do and just dove in hoping to not make too many mistakes. I wanted to make 48 staves at 7.5 degrees but I just couldnt make that work so I settled on 24 at 15 degrees (30 degree included angle) after cleaning up the saw kerf with a micro plane I glued them up into a roll about 6" long then chucked them up in my little wood lathe. I turned 4 more or less identical parts and then cut them off the main dowel. After that I had to figure out how to re-chuck each one and get them centered AND not destroy them in the process. We had some 1/2" ID tube at the shop, a length of that worked well to protect the surface from the jaws of the chuck. re centering them was easier than I thought it would be, just took some playing and adjusting. They were never perfect but close enough to cut out the ends for the covers. I hollowed out the ends .060" deep and left about an .030" lip. Next time I will get some Stainless steel tubing that is the right OD and make a hole saw, then turn the waste after. Another tube that sleeves OVER the first will be used to make the covers. That will be much easier than the way I made my lids. File, file and more file until they fit. Live and learn. I tried to make the bands out of black tape but just couldnt get it to stay till the glue set so I hammered some .019" brass wire flat and hard soldered some circles then epoxied them on after blackening. All in all I am very pleased with how they came out 4 more or less identical barrels Need some touch up but I like them My anchors now, THAT was a comedy of errors that worked out in the end. I started out planing on using the kit anchors, they just needed some clean up and paint. One of the rings was just a tad bent/warped so I thought " I'll just tweak it into place......Murphy being my constant companion gleefully rubbed his hands together and said "Watch this!!" Just a little bend....SNAP!!! grrrr! ow well Ill just epoxy it together. Whatever I did it didnt work, the epoxy wouldnt stick well, neither would CA. "I know! Ill soft solder it!!! That will work!" Nope, little blobs of white metal.... "OK Ill scratch one and use the other" While I was trying to copy one by laying it on a brass sheet and tracing it it would move. I tried a small clamp, not tight enough. Grabbed one of my sheet meta clamps, Too Tight!! Numerous fragments! Sigh. No matter what I did I couldnt copy the curve of the kit anchors correctly and consistently. Went looking through "Fully Framed" and came across some drawings of Andmiralty Anchors in 1:48. Since I have no idea what size or shape anchors the Enterprise would have had I went by physical size, the drawing of a 3cwt 2qtr anchor was just a bit larger than the kit anchors so I based mine on those dimensions. Drawing straight lines and angles ended up working for me. I am very pleased with the results. They need some blackening on the banding and touch up on the main parts but otherwise I like them very much. Tonight I will attempt puddening for the rings. White metal is...um...fragile... I drew them the same I swear!!! More better And they match!! That is more like it!! Sam
-
Mark How bad is the char? You mentioned rubbing alchohal(?) to clean up most of it? Do you by any chance have one of those cheapie sand blasters? http://www.harborfreight.com/21-oz-hopper-gravity-feed-spot-blaster-gun-95793.html We use something similar at work to sandblast detail into foam for plugs with corn starch or baby powder. Turn the air down low. Just a thought, again I think what you have looks great. Sam
-
I think they look great Mark. Like you said, none of us have macro eyes, well all except maybe my boss but his eyes arent human. I dont think you need to change anything, but if your goal was to have the letters stand proud, could you set the laser to remove everything but the letters? Sam
-
She is looking great Rich. Arent do-overs fun?? At least you caught it and were able to fix it. I'll trade you some 100+ degree California days for some of the English summer if you want. Sam
- 414 replies
-
- 1
-
-
- caldercraft
- victory
- (and 1 more)
-
Great looking anchors Matt. I wish I had seen that thread trick earlier, I spent what little build time I had yesterday making brass bands out of wire hammered flat and soldered together!! Sam
-
I too hit "like" for support. Doll house looks great. Sam
-
That is great news. Good to hear. Sam
-
Jay, Just coming aboard, Well Done! You have overcome a lot of challenges. And a happy birthday to your daughter. Hand built toys are becoming a thing if the past, it doesnt matter if you think its a work of art or not, she is going to treasure it, and most likely your grand kids will too. Sam
-
3D printer at Home Depot
src replied to twintrow's topic in CAD and 3D Modelling/Drafting Plans with Software
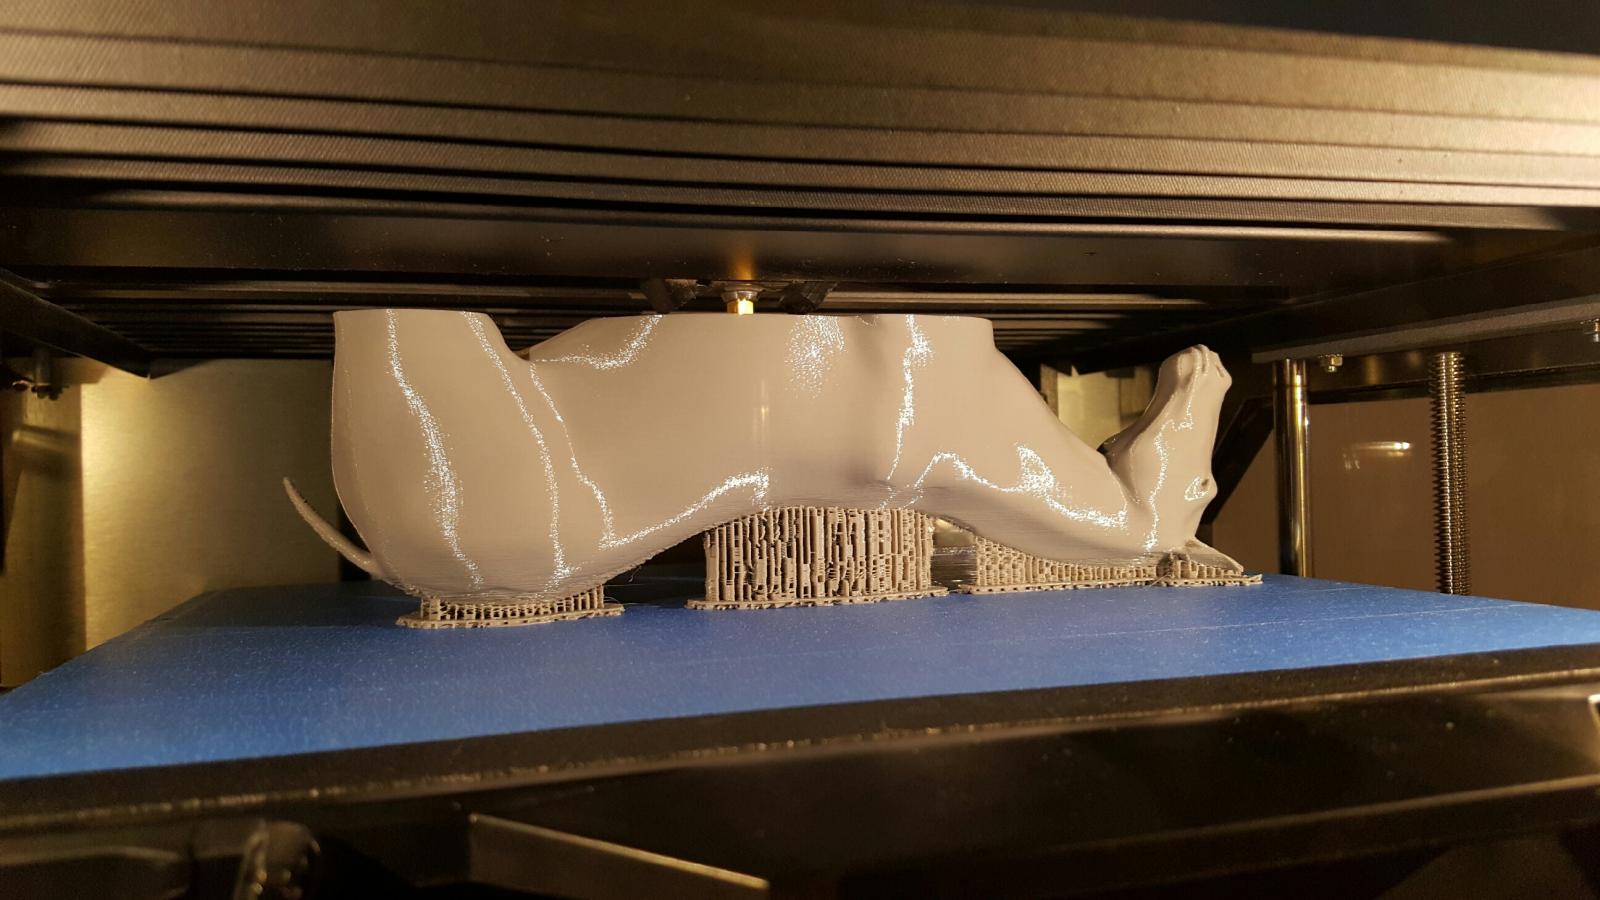
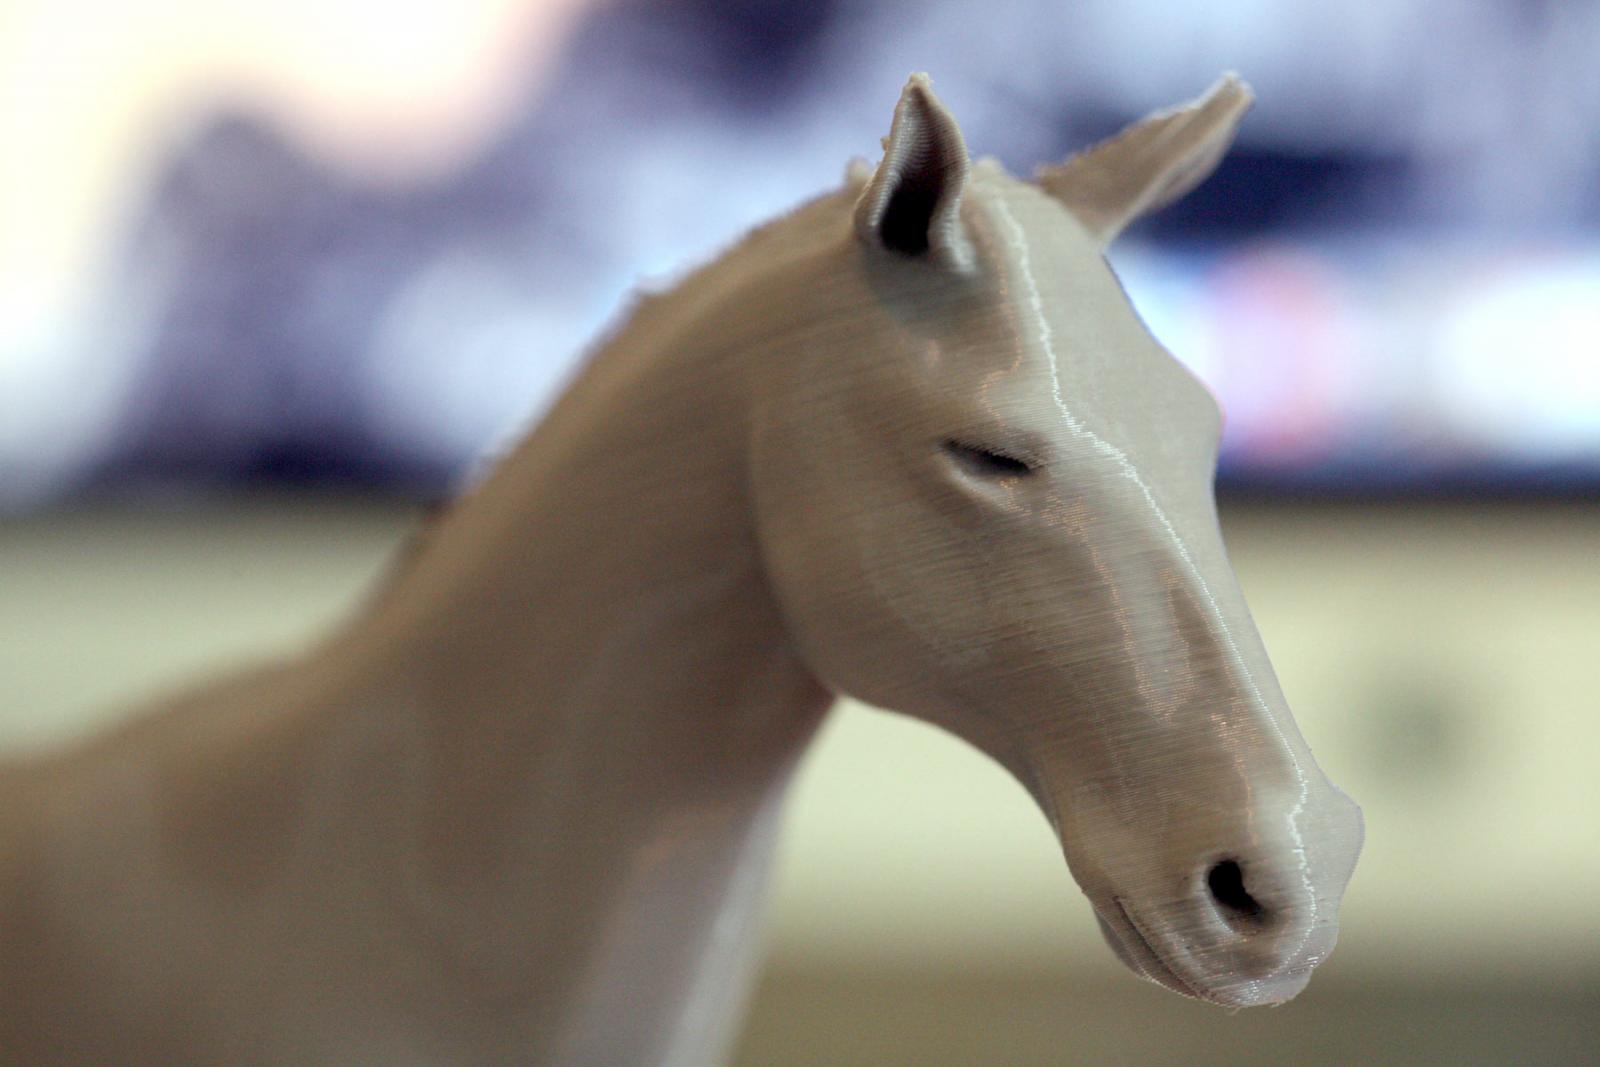
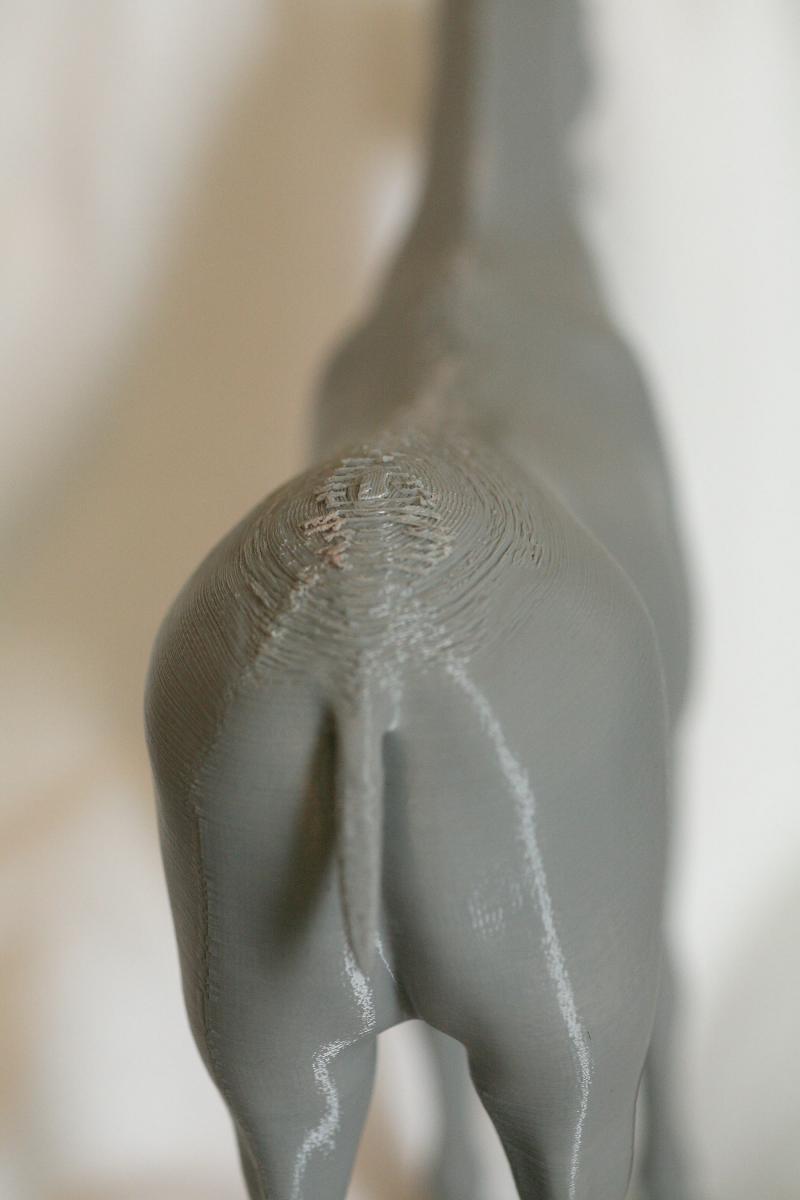
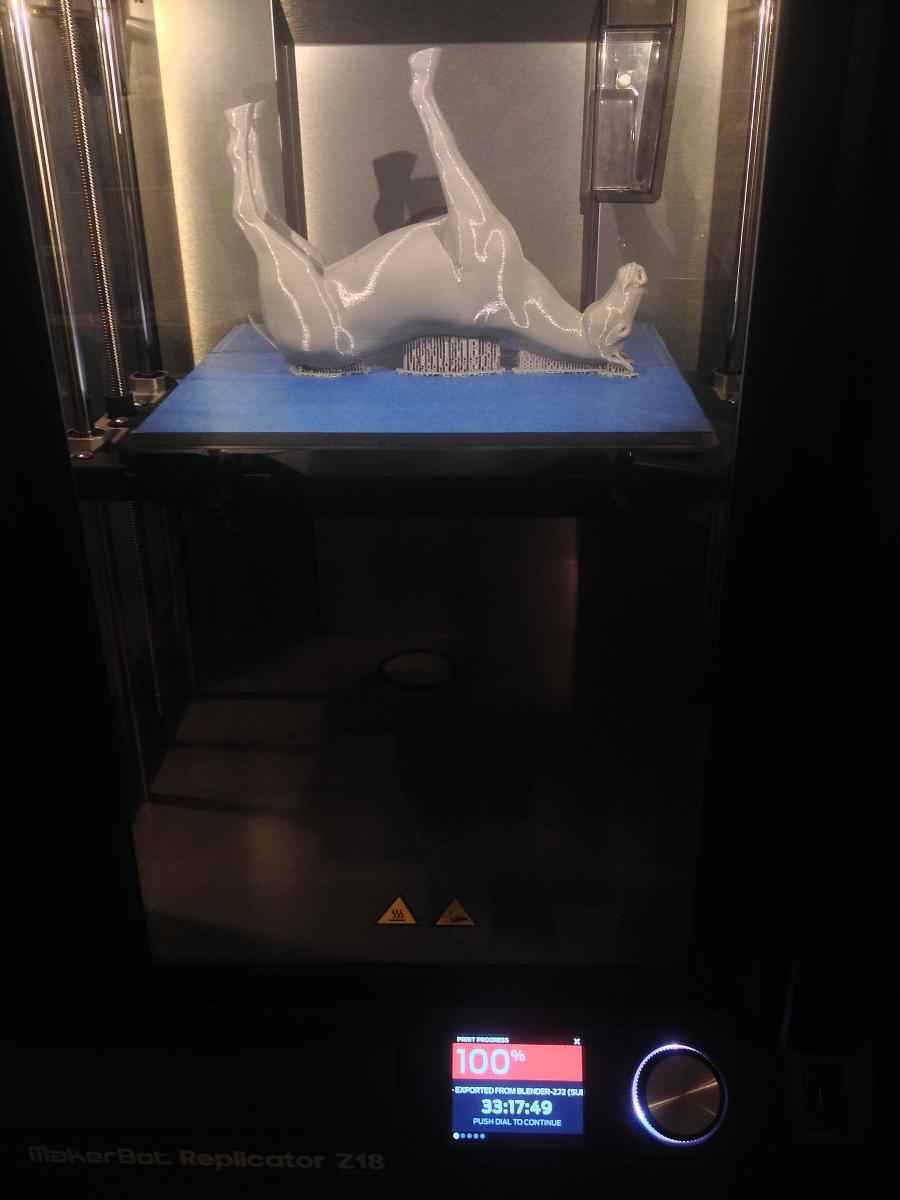
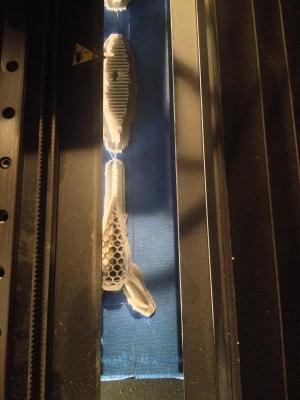
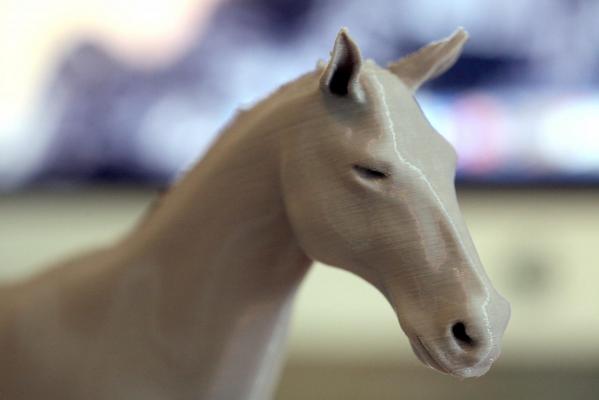
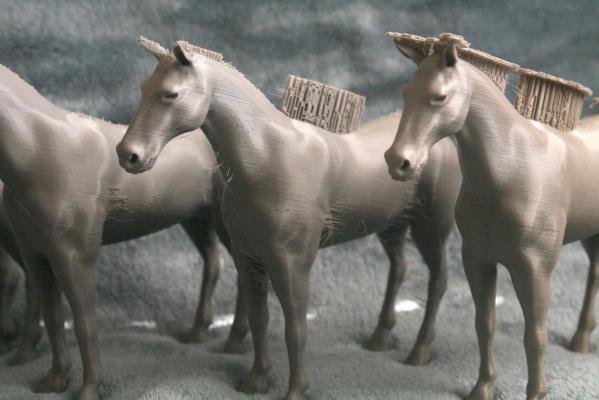
Been following this topic casually from work and now have a minute to jump in. Last December the boss purchased a Makerbot Z18. Assuming your 3d file is clean it does a very respectable job although there is cleanup involved. Based on what we get out of a $6k printer I cant imagine the Dremmel printer would be good for much more than the novelty of it all. You might get a decent hull out of it but detailed parts? I am very skeptical. Now, a print from a printing service? If your file is good absolutely. A couple of weeks ago we received some prints from a client that were done on a much higher quality printer than ours, the output was night and day. Almost like a ceramic or porcelain figurine. Amazing detail. I wish I could post pictures but I am not allowed to take pictures of our work - Non disclosure and all that. We build theme park attractions and our clients get very fussy about their product being posted online. Below are some prints I was allowed to make at work for an offline collaborative effort with some other MSW members. G's 3d file was superb which made all the difference in getting a decent print. The prints are considered "Hi-res" and took better than 36 hours per horse - something else to think about if you buy a printer, the budget machines are SLOW. Also Makerbot recommends you replace the print head after 200 hours of use. They are $180.00 US last I checked, do the math for cost per hour just on the print head. Add in the cost of PLA plastic and a print can start adding up depending on your budget. One of the issues with the printers that use melted plastic - perhaps higher end printers too, is the need to support overhangs. In the case of the horses, we determined that it was better to print upside down so the bridges were in easy to clean up areas. With that there were still places that required a fair amount of cleanup. Had we printed right side up there would have been extra clean up under the chin, neck and belly, we felt the rump would be the easiest place to work on. Also, after and incident Saturday, if you print a part hollow - without what is called "infill" - the parts are fragile. I was removing a part from a jig I used to bore out for some animation and broke it into 3 pieces. Had it not been for 5 and 30 minute epoxy as well as a Sculpy like material we (I) would have been looking at close to 100 print hours wasted. The break started at an access panel we cut in and traveled more or less along the natural cleavage plane where one layer of PLA ended and the next began. There is also a pretty steep learning curve not unlike what I have read here about laser cutters. Both for the drawing software as well as the print process. One of the reasons the boss said yes, is it gave our tech some time to play with out deadlines and art directors watching every move. After much talk back and forth between the 6 of us regarding size, quantity, color etc, the boss said he!! yes do it! Just my 2 cents, not trying to talk anybody out of experimenting, just dont expect outstanding results right out of the box and maybe never with the lower end printers. Where our printer is becoming very valuable, for our work at least, is we can print up a mackette for our sculptors so they, and the client, can see the part before we sculpt full size or if the end product is small enough we have even used prints as a mold plug after clean up or sometimes a bit of Polygem work (Sculpy) This is a good shot showing the infil mentioned above This is in process, you can start to see the beginnings of a horse. Completed and still in the machine, click on the image to see the time it took to print just one of four horses. EDIT - The 33 hours you see is the ESTIMATED print time, not the actual print time. We are learning that the actual print time is up to 2.5x LONGER. As I recall each horse took over 60 hours. 60 hours of listening to the sounds of R2D2 meets the 'Twiggy" character from the 1980' era Flash Gordon series. "beeeeb beeep! wirrrrrrr...click click" Completed horses, you can see the areas where some clean up will be required. Close up of the face, this is where your 3d modeling skills will shine or fail. We were fortunate to have a very good file to work with. Even the boss was impressed. Usually the best you get out of him is "That looks pretty good" This got a "Wow"As good as this looks the service prints we received for the job mentioned above were even better. This shows just where the budget printers need improvement. Even with the extra bridging there were areas where the plastic sagged. Some of this can be cleared up by adjusting print speed and print head temperature. Even after 9 months this is something we are still figuring out. Hope this helps somebody, Sam


-
And a belated Happy Birthday from Sunny (and HOT) California! Hope you day - and the ice cream & cake - were great. Sam
-
CAtching up here, Horray for Lighting!!! Looks great. As far as the light bleed through, how often will she be lit in complete darkness? I would imagine most of that will drop off with room lighting on. Sam
-
Sjors, I turn my back for a few days and look what happens, you sneak an update in on me! Those gun port lids look great. I wont be turning my back again for fear Ill miss the finish Sam
- 1,616 replies
-
- 1
-
-
- caldercraft
- agamemnon
- (and 1 more)
-
Getting caught up. Looks great like always. Interesting that the fourth is the shortest funnel, is this the false funnel I have heard about? Sam