Supplies of the Ship Modeler's Handbook are running out. Get your copy NOW before they are gone! Click on photo to order.
×


src
-
Posts
2,300 -
Joined
-
Last visited
Content Type
Profiles
Forums
Gallery
Events
Everything posted by src
-
Health comes first. Take care of yourself. Of course I am being selfish. We want to see more work from you..... Sam
- 831 replies
-
- 5
-

-
- Armed Virginia Sloop
- Model Shipways
- (and 1 more)
-
I was going to add to marks comment about falling and tell you to gte knee pads then remembered the X-Acto Chronicles, how is the hand? All better? Sam
-
Welcome home Robbyn! Its like anything, it all comes back as you get into it. Nice work shop, I am jealous! Sam
-
Jeff, Toms10 beat me to it. I think they look great, but what do YOU think? Sam
-
Thanks Dan, I dont think I put my question correctly, what keeps them from rolling (pitching?) side to side? I dont see what keeps the entire assembly from tilting to one side or the other. D@mn, I know what I want to ask just dont know how to ask it!! Sam
-
Dan, That looks really good! I am not sure how to ask this question but here goes. I can see how your jig keeps you square to the keel (looking from a plan view) as well as plumb (looking from a port/starboard elevation) but what about keeping the tops of the frames the same height as in looking from a bow on view? Am I making sense? Sam
-
Ken, That looks really good, I too like the contrast. The others who have built this are right I am sure, you will never notice the nick. If you think it may bother you in the future though, fix it now, maybe just a light dab? Even if its darker it will tend to fade away. Either way, it looks great. Sam
- 481 replies
-
- 2
-
-
- rattlesnake
- model shipways
- (and 1 more)
-
J, That looks really good. I tred to make one like that for my Enterprise and it fell short. I went back to a straight one, yours is much nicer. Have you thought about a pin to reinforce the glue joint? Sam
- 105 replies
-
- 2
-
-
- picket boat
- model shipways
- (and 1 more)
-
J, Thats some nice miniature plumbing there. As for posting pics, yea I have been doing them one at a time, there have been a few times where the order they went when I let the web site do it were not always in the order I wanted, and I like to add text as I go like you did. Sam
- 105 replies
-
- 2
-
-
- picket boat
- model shipways
- (and 1 more)
-
Capt, isnt that the sub-definition of ship modeling? Looking forward to the update. Sam
-
Jaw dropping work once again Siggi. As far as forgetting something, where would a captain clean his fire arm? or perhaps polish his sword? Maybe play a little music? Sam
-
Jay, Looks great. As far as the loading of the pictures, I usually choose "Add to post so I can make the decision on where and what order to place the images. Sam
- 105 replies
-
- 1
-
-
- picket boat
- model shipways
- (and 1 more)
-
Brian, I replaced all the rope with Chucks rope a while back. I plan to sew it on like you did. I dint think about wrapping the rope around the head of the kit stanchion like you did, if I wasnt 1/2 way through making new parts i just might have gone your rout. Sam
-
Wow, brian, stand up and take bow! Well done. Sam
- 831 replies
-
- 5
-
-
- Armed Virginia Sloop
- Model Shipways
- (and 1 more)
-
A birthday?!?!?! Happy Birthday! Party at Augies house!! Hope youre feeling better and you have agreat day. Sam
- 2,191 replies
-
- 6
-
-
- confederacy
- Model Shipways
- (and 1 more)
-
Looking good Sjors. Me-thinks you need to talk to the gnomes though, that foreward most lid on the port side looks to be about 1.2º off from the rest. Sam
- 1,616 replies
-
- 6
-
-
- caldercraft
- agamemnon
- (and 1 more)
-
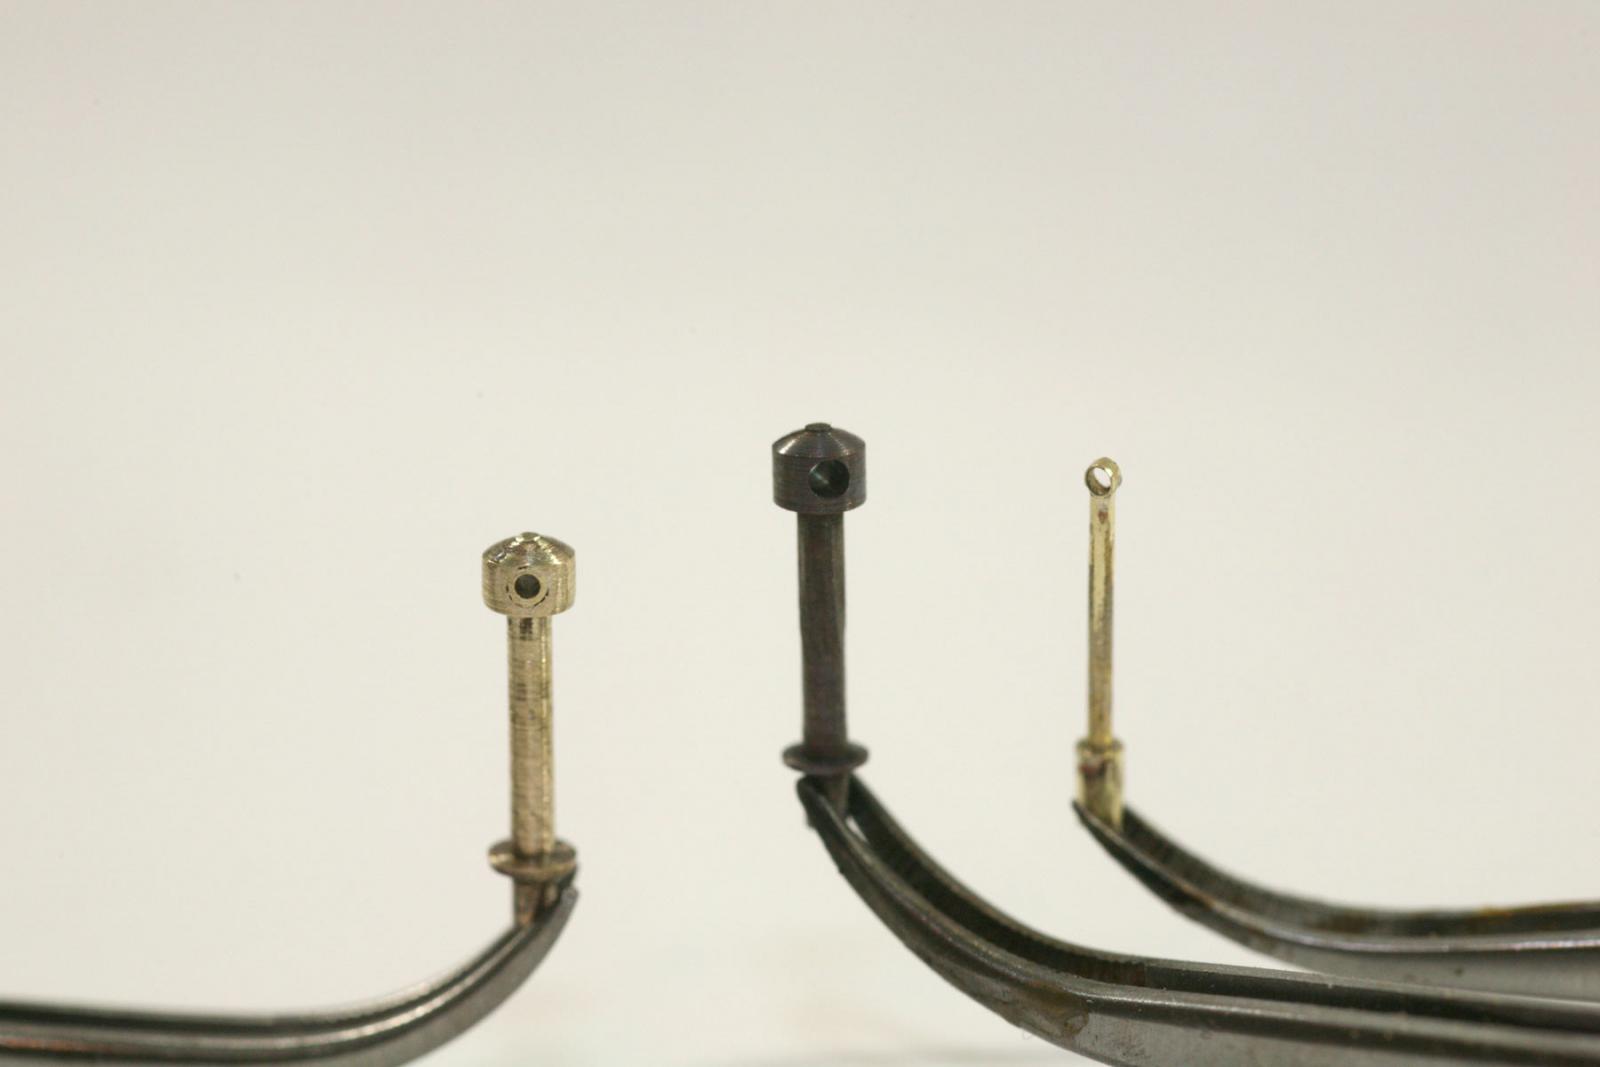
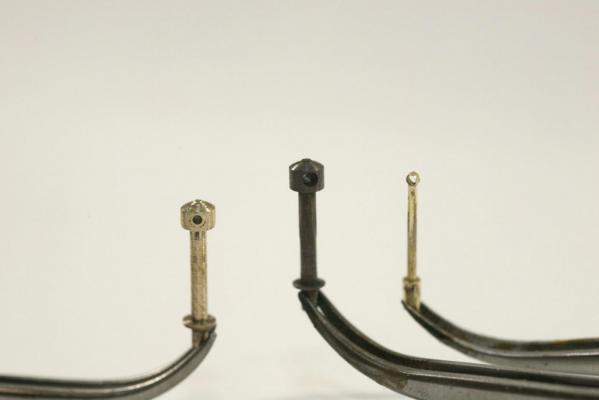
Capt, Yes, the center is the same unmodified kit part (blackened) The left I have filled the oversized hole in a kit part with some tube, all the blackening either was filed off or was burned off when I soldered the tubes in. The far right part is a 'quickie" I made to see 1) if I could do it and 2) how it would look. At the moment I am leaning towards that one also. My dilema is, if I go to the trouble of fabricating new stanchions, what would be more correct, a simple pole with an eye for the rope to hold the netting or a U-shaped stanchion to hold hammock netting? Sam
-
I found some brass tube at the LHS from a company called Albion Alloys, they have some very nice brass tube in really small sizes with VERY thin walls: 1mm o.d. X 0.8mm i.d. Lots of sizes. There are also some slip fit kits; 4 pc that fit one inside the other, very smooth, hinge/bearing smooth. Anyway I found a couple of kits that would fill the over size hole in my stanchions and leave me a 0.8mm hole about 1.625" at 1:51. Much more better than three inches. Filled one stanchion and said to myself, "Huh.." I soldered up a ring on top of a 1/32" post with several layers of the slip fit tubes at the bottom to create a flange to fill the hole already drilled in my rails and said "a-huh.."Ok, I think I need some advice here. Such a minor thing, stanchions...... What kind of stanchions would be on a small ship of this period? Chucks Confederancy has some stanchions capped by a wooden rail: http://modelshipworld.com/index.php/topic/1395-downloadable-instructions-for-the-model-shipways-confederacy-kit/?hl=%2Bconfederacy+%2Binstructions I have seen U-shaped stanchion on the Constitution but really dont know if that would apply to a smaller ship. When all is said and done I may have no choice but to go with the modified kit parts because I have already drilled holes in my cap rails but before I do knowing what my other options are would be nice. So in my long winded way, do I Adapt, Improvise or Overcome???? Sam
-
Ken, Reheart was a great choic for your carriages, looks good. What do sons know anyway? Dosnt he realize Dad is always right? Freapping the training tackle must have been fun. Sam
-
Thought so, thanks. sam
-
Nick, "Trapped Loop?" is that the same basic method Jay showed in his video? Sam
-
Nicely done Matt. In the secodn picture there is a small curved part with a cap on the end, what is that? Sam