


src
-
Posts
2,300 -
Joined
-
Last visited
Content Type
Profiles
Forums
Gallery
Events
Posts posted by src
-
-
Mark has a good idea there. Sometimes its better to ask forgiveness.
")
Sam
-
Mike,
I took the last of the kit parts, including the instructions and threw them in a box somewhere. Everything is new lumber for masts and new rope and blocks from Syren.
As far as the order of rigging goes I downloaded a copy of the Syren instructions from Model Shipways and I have TFFM vol4, Rigging as well as Lees Masting ad Rigging that I am using for inspiration. It has got me on trouble in a few places but I think I am getting a better education that will pay off when I finally get around to a more adventurous build.
Looking forward to your photo updates.
Sam
-
Jo,
Congratulations on laying your first two planks. Dont be ashamed to show a mistake, we all make them, yours may help another avoid the same fate.
So, now that you are an expert, are you done yet?? 😀😀
Sam
- popeye the sailor, cog, BETAQDAVE and 2 others
-
 5
5
-
Grant,
That looks great! I had no idea how big it was. I assumed 8-10 wingspan. At 40 inches it would take up most of your desk.
Finding a place for it shouldn't be too hard. Wait till SHMBO is out with the girls and put it in its place. When she comes home make sure she has her preferred adult beverage and tell her, "Gosh honey, that's been there for years! Oh! and look at these cool diamond earrings I found!"
Sam
- popeye the sailor, gjdale, mtaylor and 5 others
-
8
-
What a neat project Dennis. You are one of the most prolific builders I have seen. Watching you build this reminded me of the train museum at the Pomona Fair grounds in So Cal. The last time I was there the fire boxes were open and you could climb right in some of the larger ones. A bit dirty but kind of cool walking around on all the dampers(?) and liners on the floor.
Sam
-
I feel your pain, Dennis. Those kind of issues are so frustrating. I do that with illustrator all the time. I’ll get comfortable with a technique then won’t need to do it for months, it takes just as long to relearn as it did the first time.
- mtaylor, Canute and popeye the sailor
-
3
-
-
Dennis, Thanks. I might try your trick of running the line through the hole. Right now I have run out of alligator clips!
Still haven't sat down and re-tensioned my back stays. Hopefully this weekend and then I can get back to building.
Sam
-
-
Enjoy a well earned day off! I am Not jealous. No, I am not....
Sam
- mtaylor, lmagna, CaptainSteve and 4 others
-
7
-
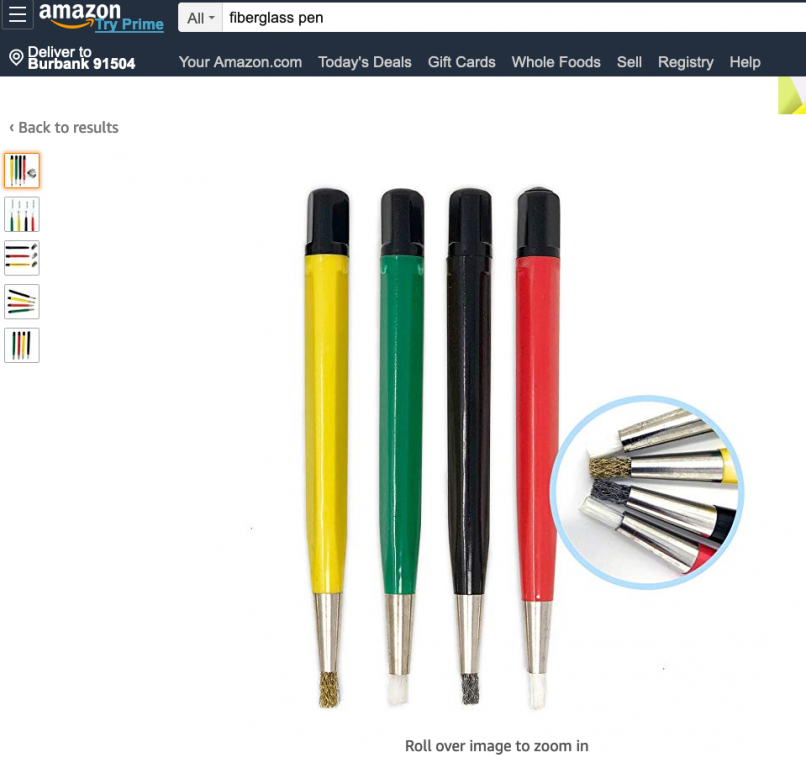
I will take a look at both the Sparex and citric acid. I have a small min crock pot laying about somewhere. Citric acid shouldn't be too hard to find, even in California. There used to be a place near where I live called TRi S Sciences, they sold very small quantities of most any chemical you could think of to students. Sadly they went out of business some time ago.
Are these the fiberglass etching pens mentioned above?
- mtaylor, Canute, Roger Pellett and 1 other
-
4
-
Roger,
Never thought of acetone as I assumed the annealing process would burn it off. We have many gallons of the stuff at work as well as other chemicals not available to the general public.
As an aside acetone, at least in California, is not considered a VOC. I understand chemically it is but legally it is not. One of the automotive finishes we work with is considered "zero VOC" although as I understand it acetone is a main ingredient, go figure!!
Sam
- mtaylor, thibaultron, Canute and 1 other
-
4
-
Thank Carl, that really would have been unfortunate if she took a tumble. the second attempt was because I was trying to forestall the tumble by moving things around before the glue dried, it all came undone.
Refund??? Not at all, there was a clause about "diverting for safety reasons."
Sam
-
Really enjoying your attention to detail.
Sam
-
Mark, I might try that. I need to find out what is in the powder that came with the cleaner first.
Vossie, I have been doing something similar; dropping the parts in a small amount of agent letting them sit for a few minutes and agitating regularly, taking them out rinsing them off in distilled water. After they dry a quick buff with a clean dry cloth for camera lenses. back in they go for two or three cycles.
Roger, that might be something to try at some point. Although I see Murphy hiding behind me with a little hand card reading "Watch this guy demonstrate the Bernoulli Effect!!" 😂 Murphy thinks he and I are good pals.
Most of the parts I have had issues have been parts made from K&S brass. Even after annealing and a good scrub with a maroon scotch bright pad I have had inconstant results. After reading Pats comment I think those issues might be related to the brass itself. I don't know. It sounds like I don't need to try the tumbler though from what I am hearing. That's good, I have enough other things to keep me busy without adding more steps to the process.
Sam
- thibaultron and mtaylor
-
2
-
Mark, that will have to be close enough for me. At 12 mm its just a hair over 2', but they dont fall through my holes and filled with rope nobody but us here will know.
I managed to retie the hook to my Gaff Peak Halyard. Its was moderately easier than I expected, it only took 2 tries. I was able to move things around and get my fly tying vice close enough to hold the block. The scary part was the stern was hanging off the end of the work bench. I had constant visions of knocker her off to the floor. 😧 I ended up tying the hook to the strop with a constrictor knot and then looping the strop around and tying that off with another constrictor. Then soaking the whole mess with 50/50 white glue and water. After that I walked away it can dry overnight. I will wrap some hitches of fly thread around the join then see how well it holds under tension.
Back to where I was last Saturday..😂
Carl, Our "honeymoon" last October was blown off course by hurricane Wilma. 2 hours after we left port the captain came on the PA and announced a change and why. We could still see the hills of above the Port of LA we were so close to home. So, instead of the Mexican Riviera we cruised our home state of California; San Francisco, San Diego and Ensenada just over the border from San Diego....Two cities we go to at least once each year......... I told Better Half right then "this isnt our honeymoon". We still had a great time, good food, good wiskey, all was well. Just a lot of money to see two cities I have been to and a third I can drive to if I had the urge.
Sam
-
Mark, Pat, thanks.
I have a small ultrasonic cleaner from Harbor Freight. I have been using it on hooks and eyebolts but assumed I needed to scuff the surface first with a file or fine sand paper. Am I reading correctly I don't need to do that with a ultrasonic cleaner? That's encouraging, it was why I considered the tumbler and sand in the first place. I will try that before I go to all the extra effort.
Sam
- thibaultron, mtaylor and Canute
-
3
-
I just received a bunch of brass belaying pins to replace my kit parts. Now I have to clean them up to either paint them or blacken them. I know I can put them in my Dremmel or drill motor and spin them against some fine emery cloth, scotch brite or even a file but I am looking for a more efficient way as I have close to 50. I have a bullet tumbler in my garage that has sat unused for many years (too many) and am thinking of using that. My thought is thoroughly clean the bowl out to remove any polishing compound then replace the corncob media with fresh clean #60 sand from our our sand blaster at work and then tumble away for a couple of days. After that I would soak in vinegar and then then a good scrub with soap and water or an ultrasonic cleaner before blackening. rinsing with distilled water first of course.
If this works it would be great for cleaning things like eye bolts, hooks etc as I have had inconsistent results blackening small parts like this.
My question, has anybody tried this? Am I wasting my time? Any other thoughts about batch cleaning of small parts?
Sam
- lmagna and thibaultron
-
2
-
Jim, This is a really old post but I thought I would jump in anyway.
I agree with Duff, a reamer would be best. you can get a set from Micro Mark. I use mine all the time for enlarging holes in wood and brass that a drill would otherwise cause problems. They have two styles Cutting and Smoothing. THe cutting are great for enlarging holes. I use the smoothing like a Marlin Spike to undo knots, or even enlarge a stropped eye before I apply adhesive to lock it in.
Sam
-
Lou, sand might be a little harsh but considering it has sat in a box for more than 15 years I think it's safe to say I wont do it any harm. Heck, it may not even work anymore. and yes, not having to pay $5.00 for 50 or more pounds of sand when all I need is a quart or two is a plus. I dont know about kitty litter, we use the clumping kind, I wonder how that would be absorbing the excess polishing compound in the bowl.....
Jo, that Carl's a smart feller aint he?
Sam
- popeye the sailor, lmagna, cog and 1 other
-
4
-
Lou, yes, mine is the same way. I figure I would have to clean the bowl out with denatured alcohol and then soap and water. Then use Some #60 sand from our sand blaster at work. I don’t think corncob or walnut husks would do it. I have not had good luck with just a chemical dip for cleaning, I have had better results with an abrasive cleaning followed by soap and water then an acid like vinegar to get the last of the impurity’s off. Even then small parts have never really come out the way I would like.
Carl, that’s good to know because at some point better half and I are supposed to take our “real” honeymoon to Ireland.
Sam
-
9 hours ago, SHIPSCAT said:
you are a master builder.
HAHAHAHAHAH!!!! Jo, you should be a comedian my friend! Thanks for that, I needed a laugh. I do appreciate the well intended comment though thank you. 😀 While I am very pleased whith what I have built, I know where the skeletons are and know I can do much better on my next build.
Carl, I will try your trick, I thought all purchases from EU no matter where they shipped had VAT applied?
Size wise they are close to the kits and I will most likely go with them. In my bumbling way I was saying I dont really know how tall a belay pin should be; I have been too lazy to look it up. I will most likely blacken them as there is no other paint on this build. prepping them for either is going to be a chore, has anybody here ever tried putting brass in a bullet tumbler to clean them for blackening? Might be time to take my own advice to others ond go spend some time in the help forums....
Sam
- mtaylor, CaptainSteve, lmagna and 2 others
-
5
-
Jo, in addition to what the others have said, it helps to get your hull in some good side light and look at it from all angles. when you have a nice fair curve you will get a smooth even gradient of light to dark. any highlights/shadows interfering with the transition of light to dark indicate an area that either needs more sanding or some filling in.
-
Lou, they are about 6 scale inches taller than the kit parts. Not sure if that is more or less accurate height wise. They certainly look better.
Now cleaning these up to either paint or blacken them.
Sam
- lmagna, SHIPSCAT, popeye the sailor and 1 other
-
4

Hannah by jct - FINISHED - somewhere between 1/72 ish and 1/60 ish scale
in - Build logs for subjects built 1751 - 1800
Posted
Great idea J, never thought of that. I have a couple of stain glass stores in reasonable close proximity to me, will have to try them out.
Sam