HOLIDAY DONATION DRIVE - SUPPORT MSW - DO YOUR PART TO KEEP THIS GREAT FORUM GOING! (Only 36 donations so far out of 49,000 members - C'mon guys!)
×

Rik Thistle
-
Posts
864 -
Joined
-
Last visited
Content Type
Profiles
Forums
Gallery
Events
Everything posted by Rik Thistle
-

McLaren M8B by CDW - Accurate Miniatures - 1:24 Scale
Rik Thistle replied to CDW's topic in Non-ship/categorised builds
There is this one as well https://www.youtube.com/watch?v=S7pheKy5apk Ah, missed that one 😉 I don't think I'd spend $2.5m (even if I had it) on that particular car. I suspect that it would require more than the bearings being heavily greased to ever get that car out of it's current location. Richard -
Theodosius, Yes, the transom needs to be bent around something with a smaller radius to get the required curve, as you did on the 2nd go. PROBLEM: I realy managed to put it slightly out of its needed place. Perhapw 1/10 of an mm I wouldn't think 0.1mm is an issue at all. The rudder hole is a little off centre but I don't think that is too much of a worry. You can slightly sand it out to make it more central. Main thing is to make sure that the other items in that area (rudder etc) can pass through the hole OK. Once the ship is finished no one will notice a slight imperfection. Just to be clear, I'm no expert myself...still a noobie 😉 ....and I make loads of mistakes as I work my way through a build. Part of ship building 'fun' is solving the puzzles of how to correct my mistakes so that no one can tell they happened. One way of judging the effect of a mistake is to read further through the manual to see what happens in the area of the mistake ...it may be that another part is fitted over the mistake so no worries, or the other part can be sanded to compensate. Richard
-
Tomasz #11 "...did not have cursor anywhere in post to place pictures" Yes, you must place the mouse cursor in the post field where you want a pic to appear. So... position cursor>insert first pic> cursor positioned below first pic> insert second pic> cursor positioned below second pic etc ect. Of course you could upload all the pics to the initial cursor position and then add carriage Returns between each pic to make space for text entries. Either way is fine. I use Firefox v86. Richard
-
James, They seem to be duplicates of pics already appearing in the post. It may well be finger trouble of my part although I have tried to be very careful in clicking only once on each pic from the collection of pics below the post. Ah, you said 'uploaded'...maybe I was uploading some extra pics (eg same looking but different resolutions) to the website? So any pic that gets 'uploaded' will be inserted in the post - clicking on a pic from the collection of pics underneath the post only selects the order in which the pics appear. And any unclicked pics, when I Save the post, get automatically added underneath the post. Hmm... that might explain it. Richard
-
I upload photos one at at time. As James says, I place the cursor where I want the first pic to go, then put the cursor a couple of lines below the first pic (to leave room for text), then click on the next pic to be inserted and so on. I have to say that sometimes I end up with a couple of unwanted repeat pics at the end, under my post. Not sure why that happens, and I can't seem to delete them. But it's not a showstopper. Richard
-
That internal door with the fish types on it, and the usage stains on the door handle etc is actually a full sized door...isn't it? Otherwise I have an impossibly looong way to go in the model boat building world! Seriously though...what a start. Richard
- 79 replies
-
- 2
-

-
- Fifie
- Victory Models
- (and 1 more)
-
McLaren M8B by CDW - Accurate Miniatures - 1:24 Scale
Rik Thistle replied to CDW's topic in Non-ship/categorised builds
An interesting story on an elusive McLaren F1 - Part 1 ... My hunt for the El Chapo McLaren F1 https://www.youtube.com/watch?v=Yn742vmAbEA and Part 2 .... An update on the El Chapo McLaren & other lessons learned in 2020 https://www.youtube.com/watch?v=Y8orbC7KoWc- Richard -
Theodosius, For those of us who haven't built model ships before it can, at times, be a bit of a steep leaning curve. But if it was easy then it wouldn't be a challenge nor would the sense of achievement on completion be as great 😉 You'll soon be approaching 'the planking stage' ...and that's another whole set of new but interesting challenges... The 1st planking layer provides a base (for the 2nd planking layer) that follows the contours of the hull determined by the bulkhead sizes and bevelling. You can get away with a lot of 'tweaking' on that 1st layer since it will eventually be covered by the 2nd layer. Some things to look out for on the 1st layer are... - as you have noted the bulkheads (by sanding) determine the path the 1st layer planks take. - some of those 1st layer planks will need bending and twisting to follow the bulkheads path . This is achieved by heating the planks so that they permanently take on the necessary shape/path. - the 1st layer planks need thinning at their bow and stern ends, Otherwise the thickness of the 1st and 2nd layer planks, when added together, is much greater than the keel thickness. Basically you want both layers of planking to blend in smoothly to the keel. - Some of the 1st layer planking will not only need bending, but also tapering at the bow and stern ends otherwise the accumulative width of the planks will add up to more than the depth of the hull at the ends. You might also find that even with maximum bending and tapering you still have visible gaps between planks - these gaps can be filled in with mini planks cut to fill in those gaps (I think they are called Stealers). - Then you glue the planks on. I'm still juggling ideas as to the best way to keep the planks in place whilst the glue dries. I believe the optimal solution is to make sure the planks are perfectly bent to their path so that they sit unaided in the correct position allowing PVA glue and 30 seconds of finger pressure to achieve a perfect fixing....I've a little ways to go on that one 😉 - Finally, the 2nd layer, which is usually quite a bit thinner than the 1st layer (so easier to twist and bend) is added and can be given a smooth sanded finish and even a coat of paint. That was just a brief planking heads-up. Feel free to post questions...there are many others on here that understand 'planking' far better than I do and will jump in. Regards, Richard
-
Theodosius, Sorry if I mislead you about the markings. I was sure either my VM Flirt or Fifie had some indicator lines on them. Anyway, James' build of HMS Flirt .... (which is very similar to Speedy) has good pics of the amount of sanding required and where it is mainly needed - see his post #14. Stringers - yeah, I think I broke one also but PVA'd it back together and it was fine. All the best, Richard PS: I've just had a read of the downloadable .pdf for my Flirt manual at https://vanguardmodels.co.uk/product/hms-flirt-standard-edition/ ...and pg7, pic 13 says ... " A small number of parts must now be bevelled before installation. These parts have engraving lines etched on them. Bevel bulkheads 2 and 3 that you previously removed from the MDF sheet, and also the two Bow Pattern Inner parts (17) and the two Bow Pattern Outer parts (18). These can be bevelled using either sandpaper, files or a rotary tool. For the prototype, we used a Dremel set on a safe 9000 rpm" So some of the bulkhead parts do have thin engraving lines (guidelines) for bevelling on them, at least on Flirt. And I've had a quick scan of the Speedy .pdf and it doesn't mention guidlines. Flirt was a released after Speedy so perhaps the guidlines were a new addition?
-
As Glenn says, "thanks for sharing"...lots of useful info in your posts. Richard
- 725 replies
-
- 1
-
-
- vanguard models
- speedy
- (and 1 more)
-
Theodosius Well done on a good start and good choice of kit. I think some kits do come with a hairline indication where to sand down to. And I think at least one of the Vanguard models I have does have those markings, at least where the planking approaches the bow and stern. I'm not in the shipyard at the moment so can't check. I wouldn't sand down exactly to those lines until I got to the planking stage...maybe leave 0.5+mm spare on the bulkheads so you have some meat to play with when fine tuning the contact between the planks and the bulkheads. Richard
-
Thanks Bob. She's my favourite so far, out of all 2 1/2 ships I've built 😉 I've a hunch if I ever get to 10x ships built she'll still be a favourite. The build was not too difficult/not too easy ...and just the right length of build time. I'd recommend her in a flash. Regards, Richard
- 49 replies
-
- 1
-
-
- Lady Eleanor
- Vanguard Models
- (and 1 more)
-
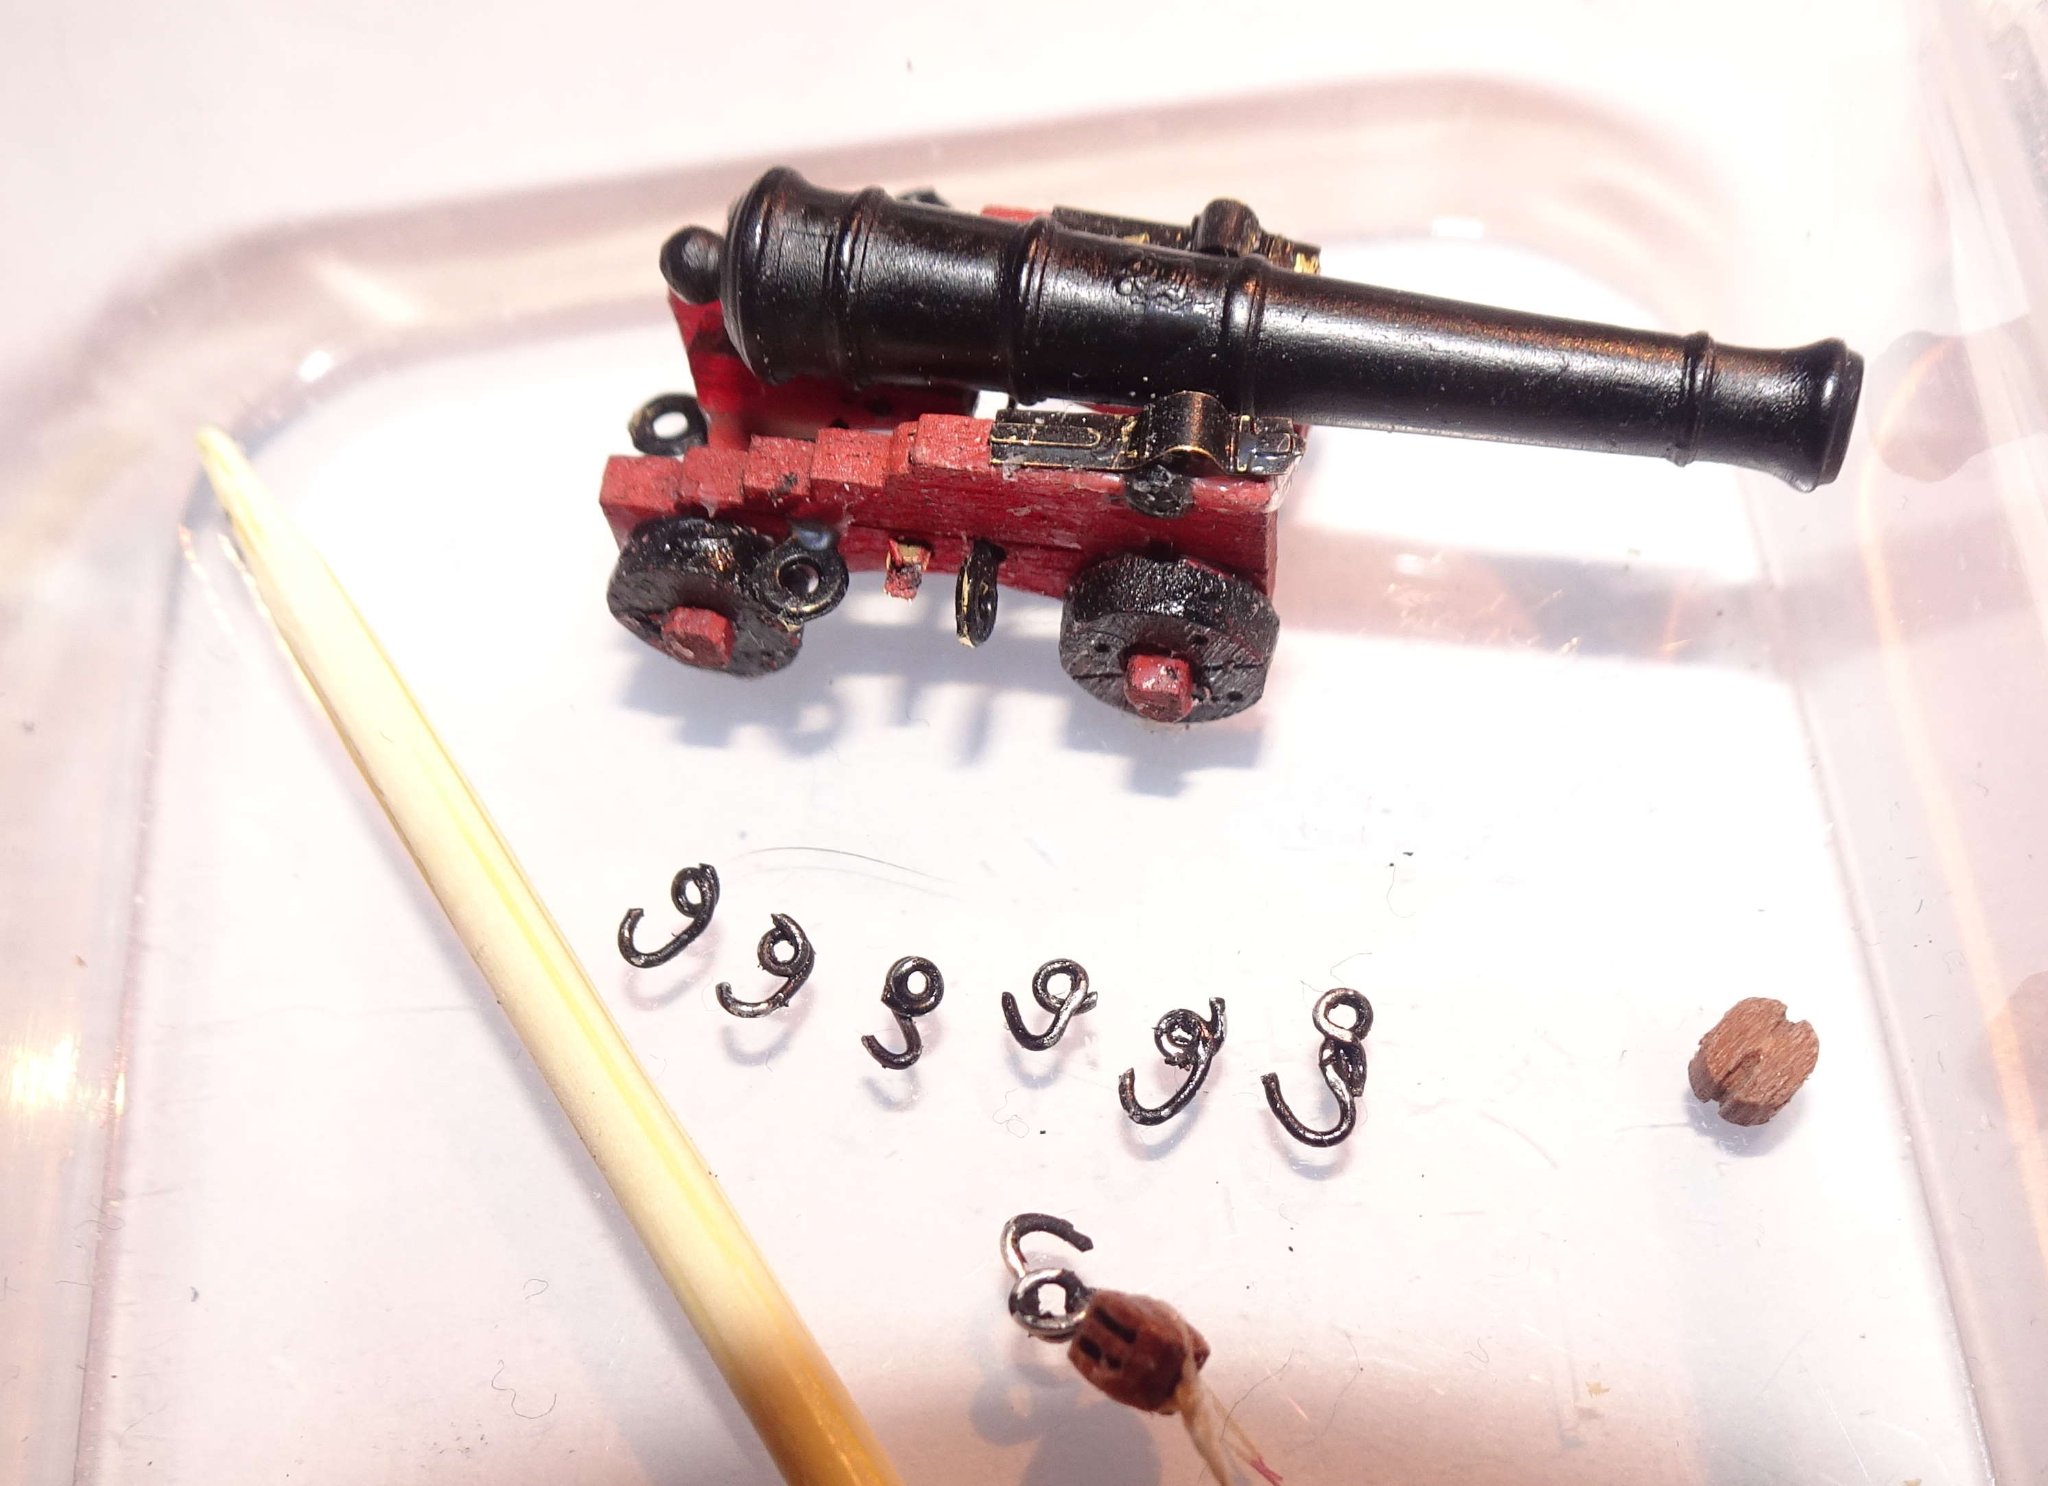
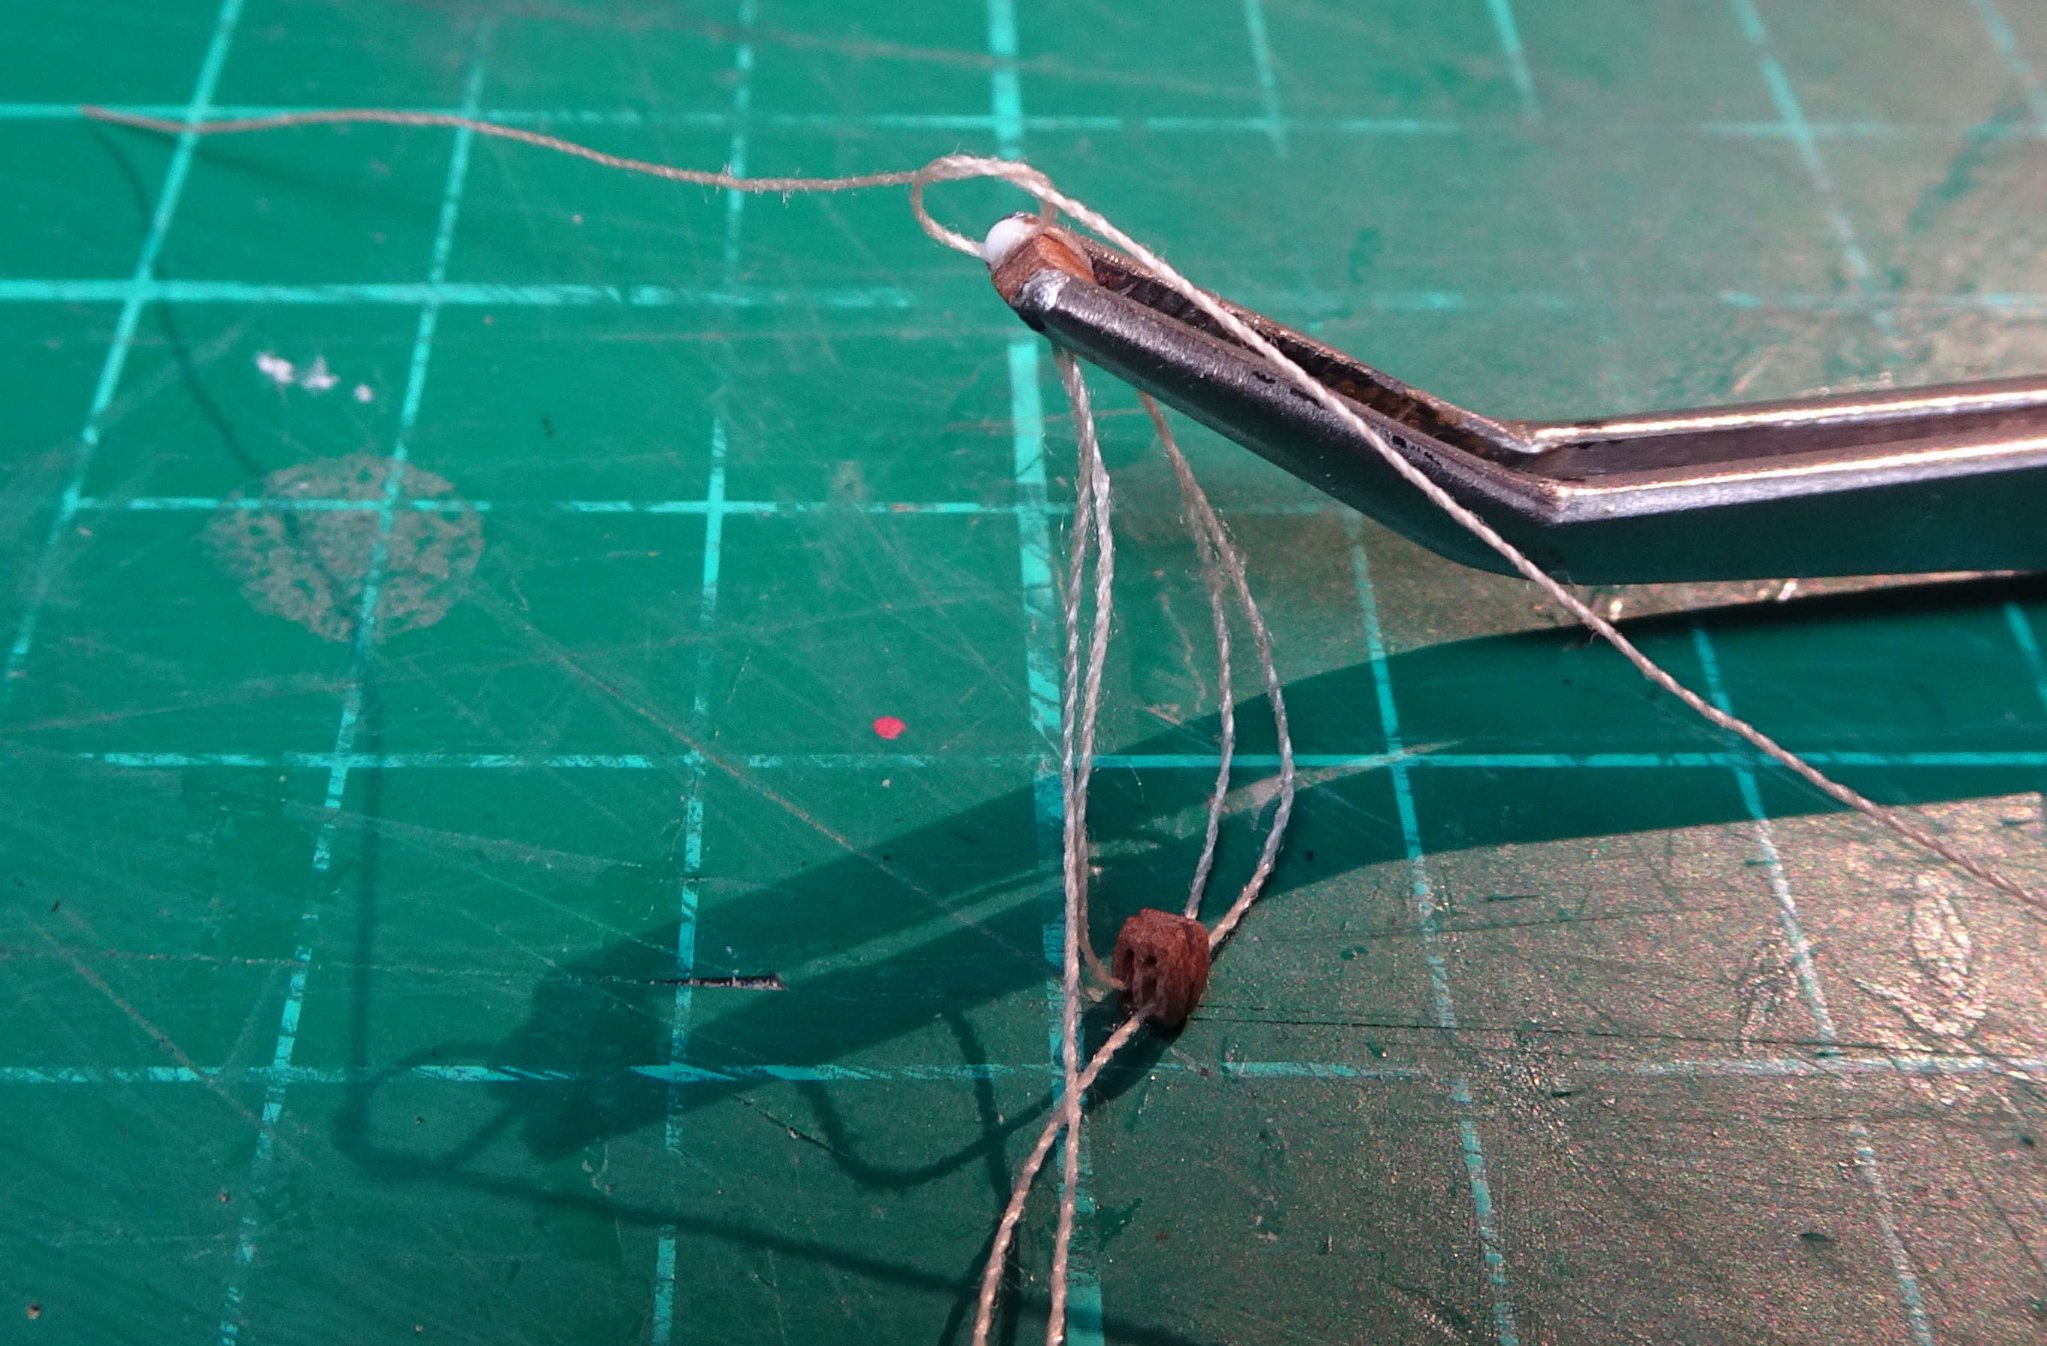
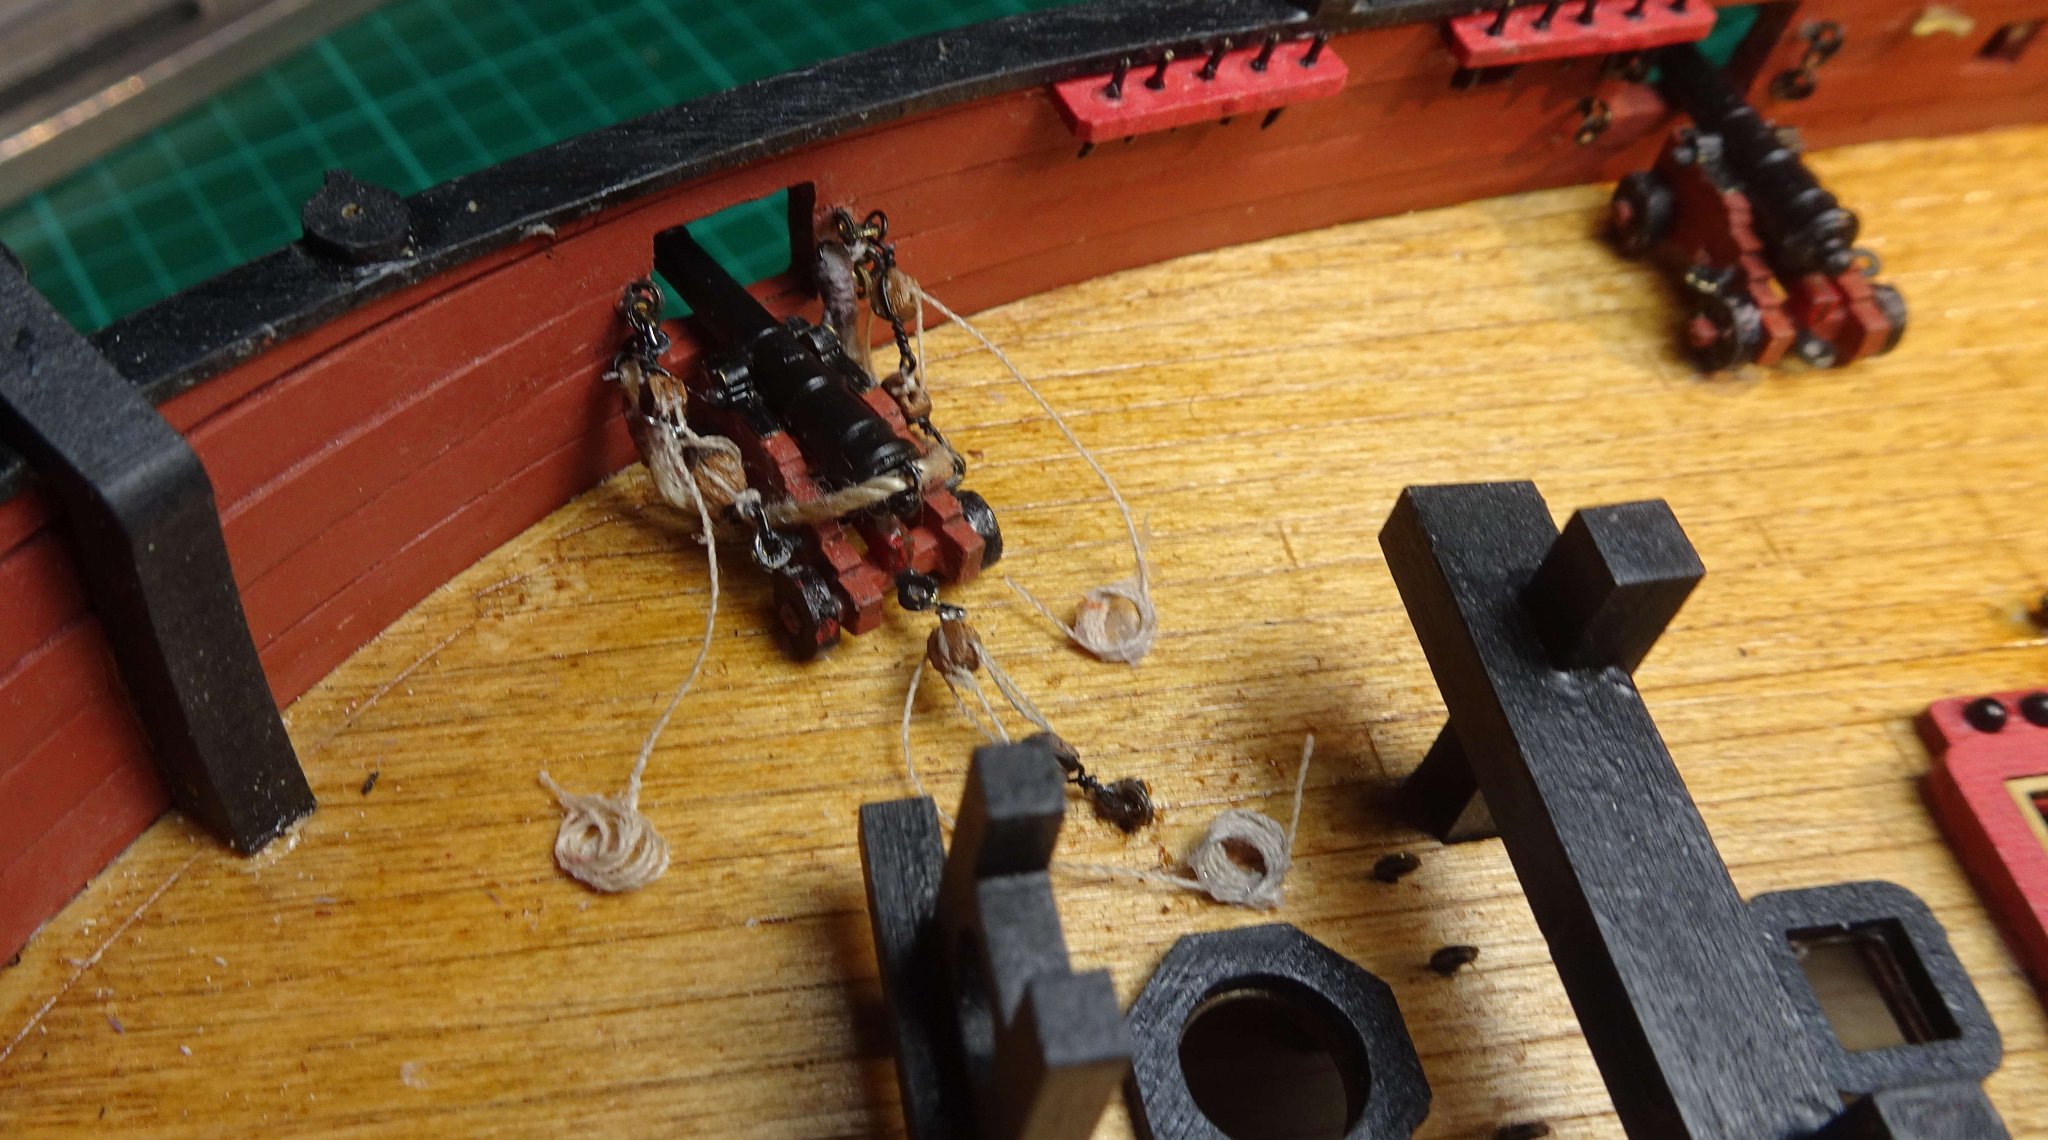
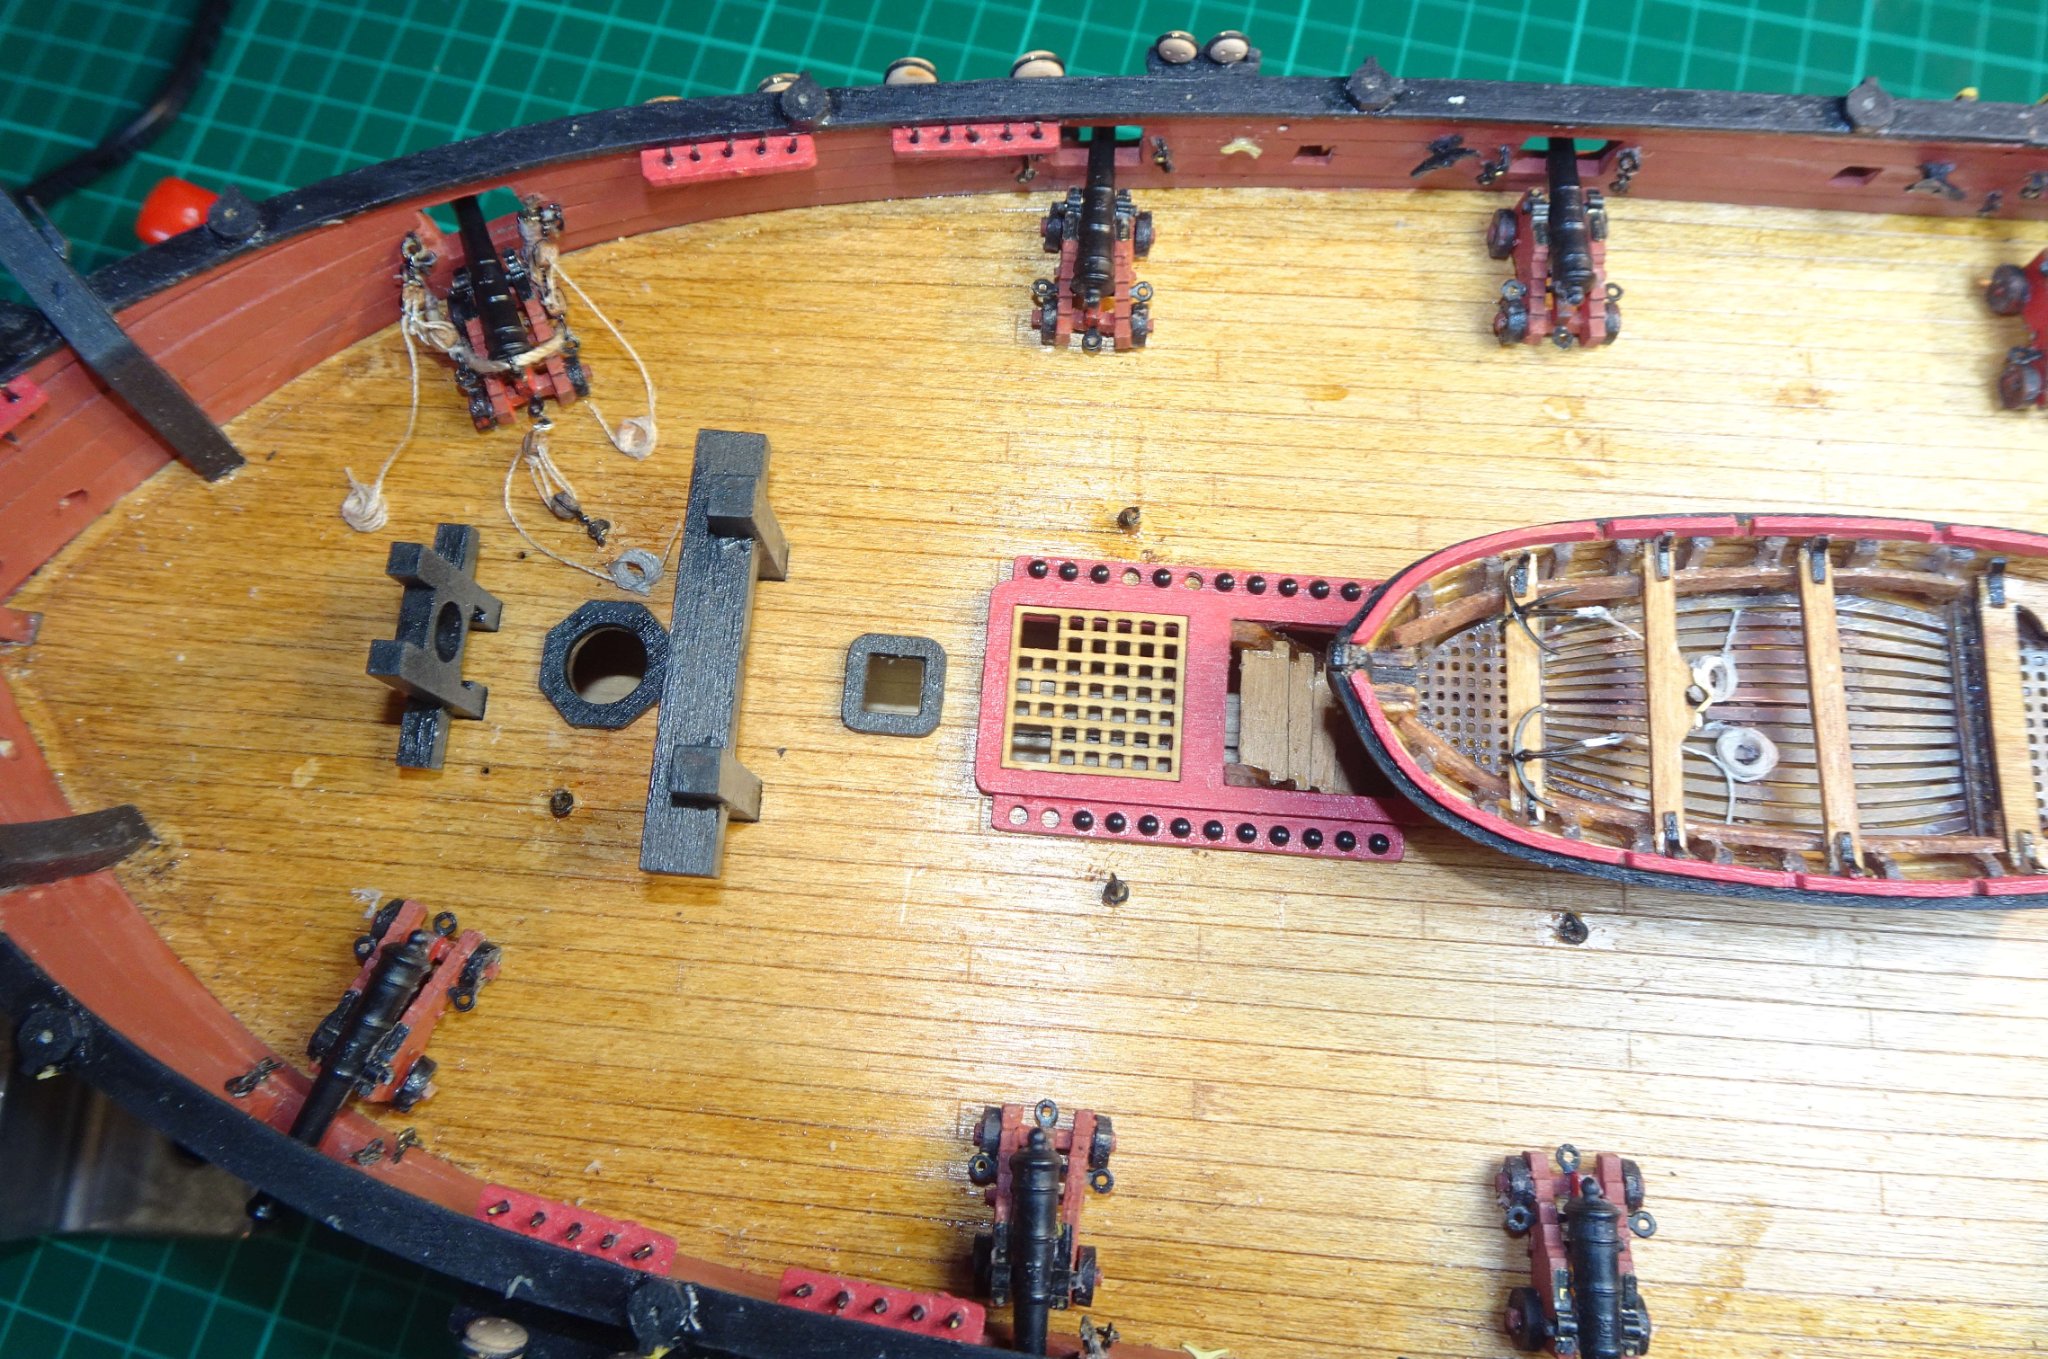
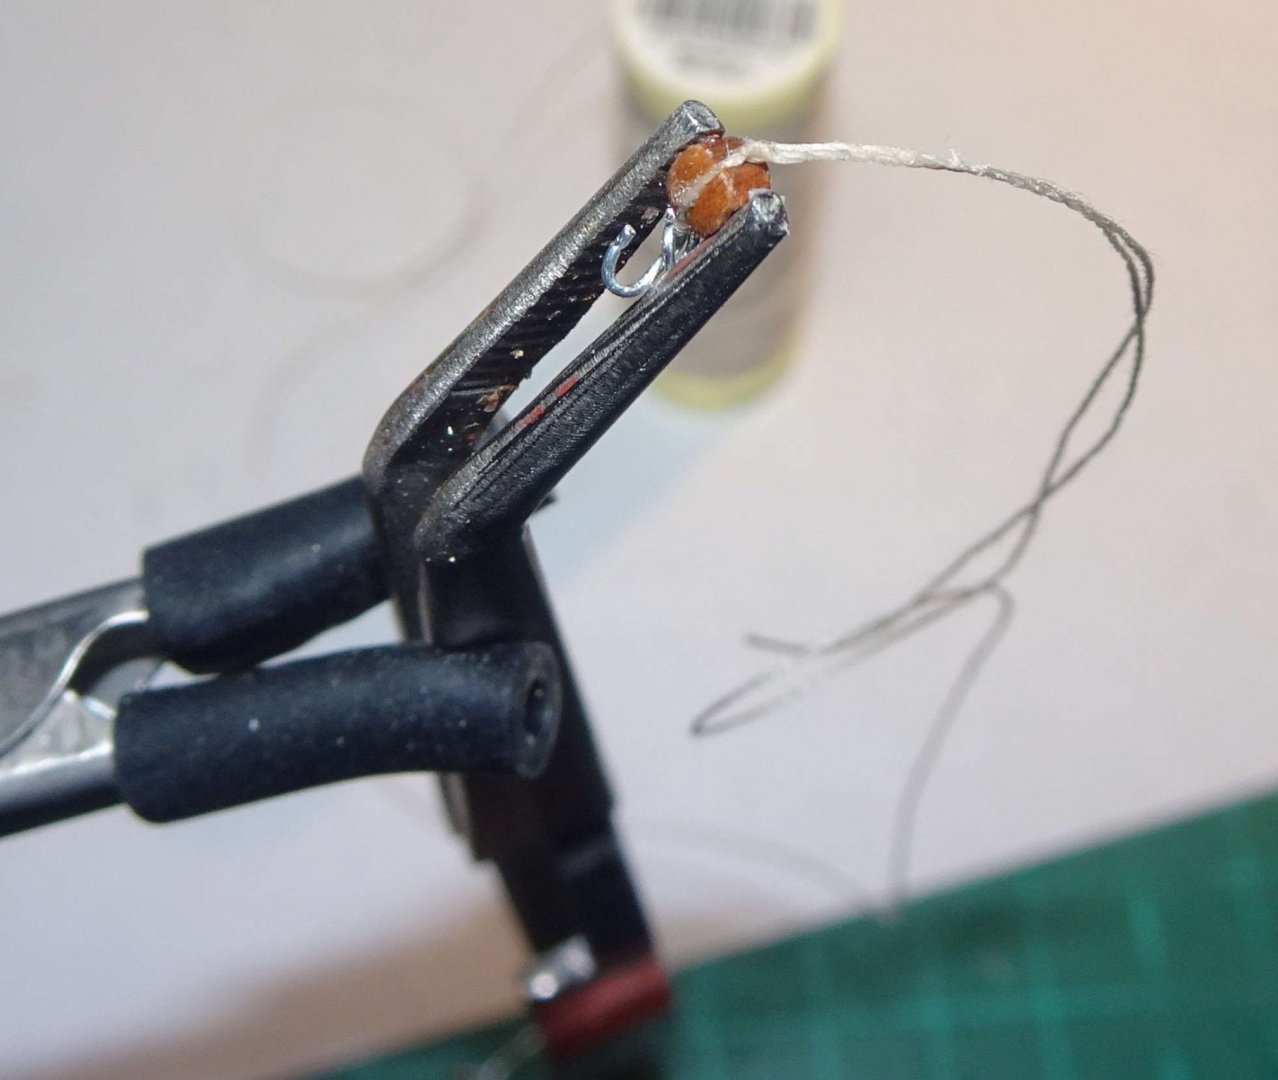
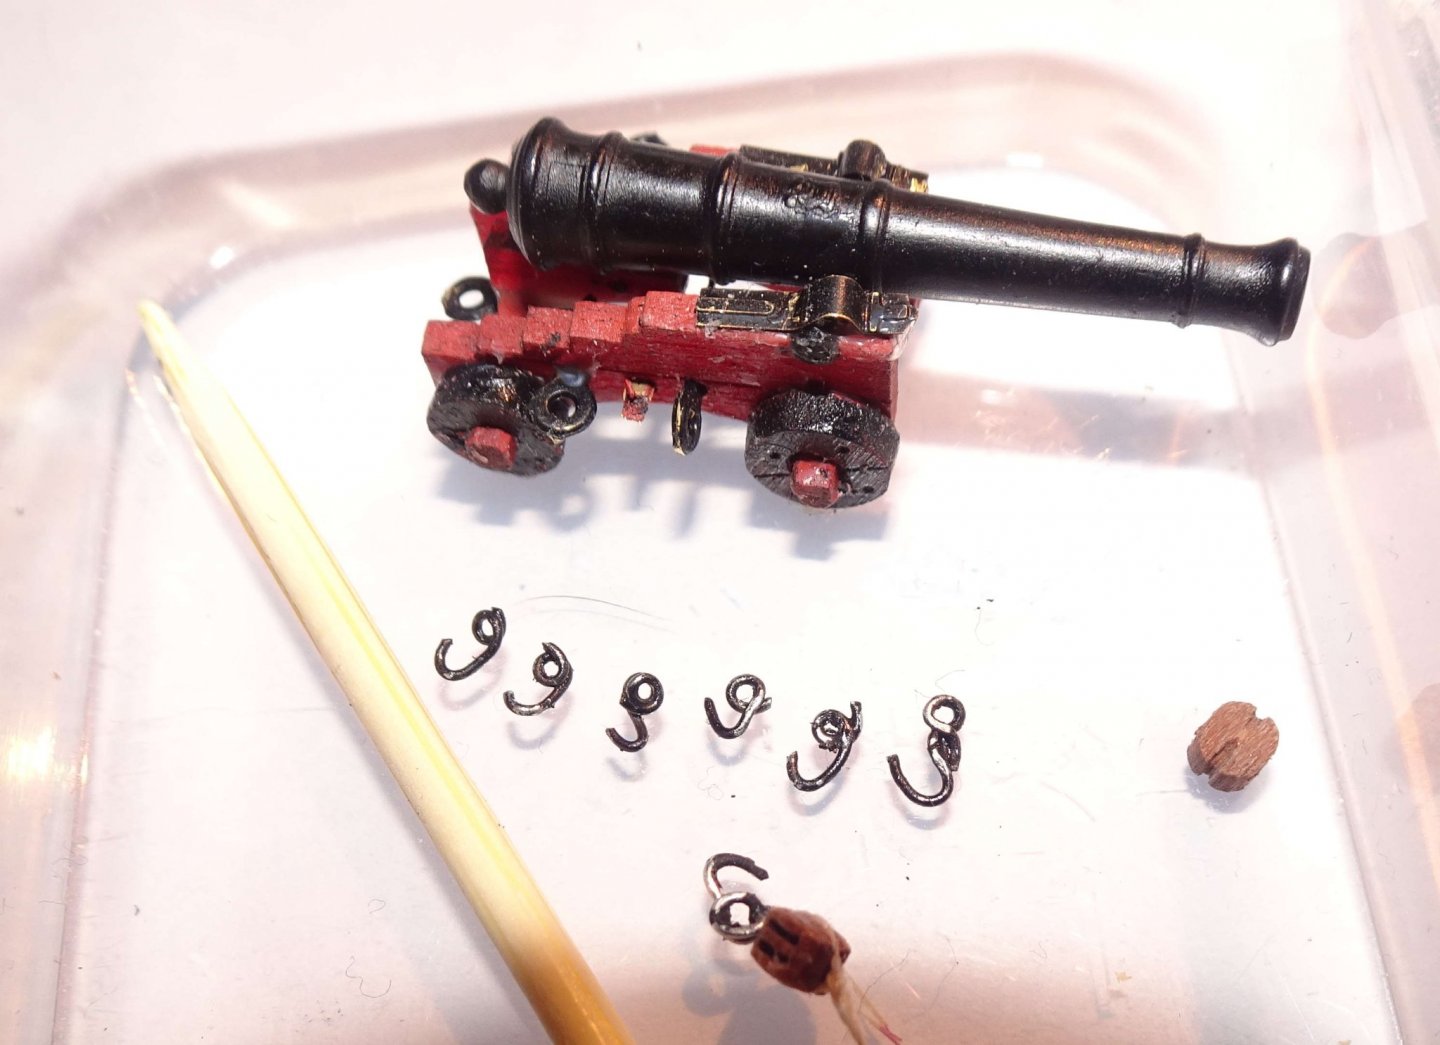
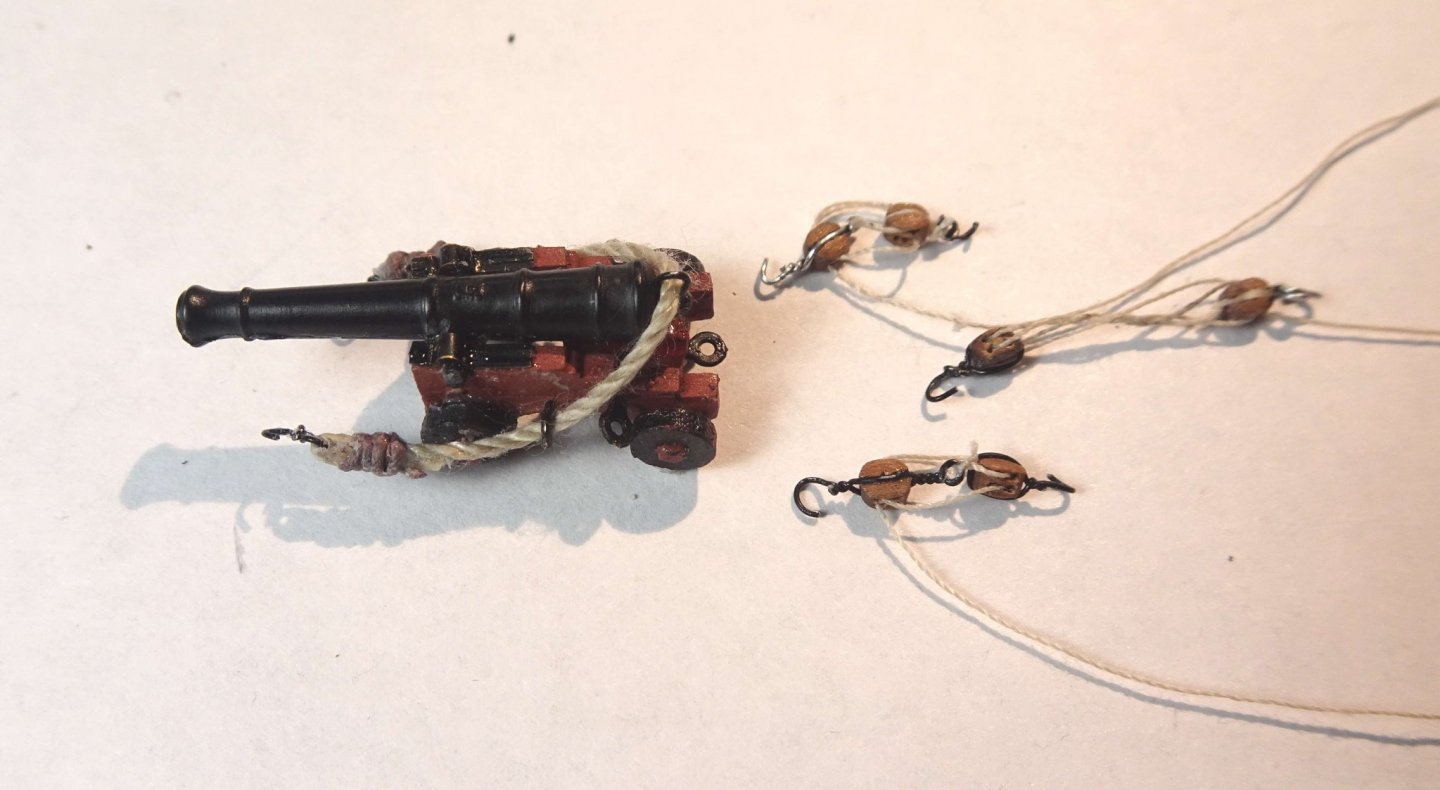
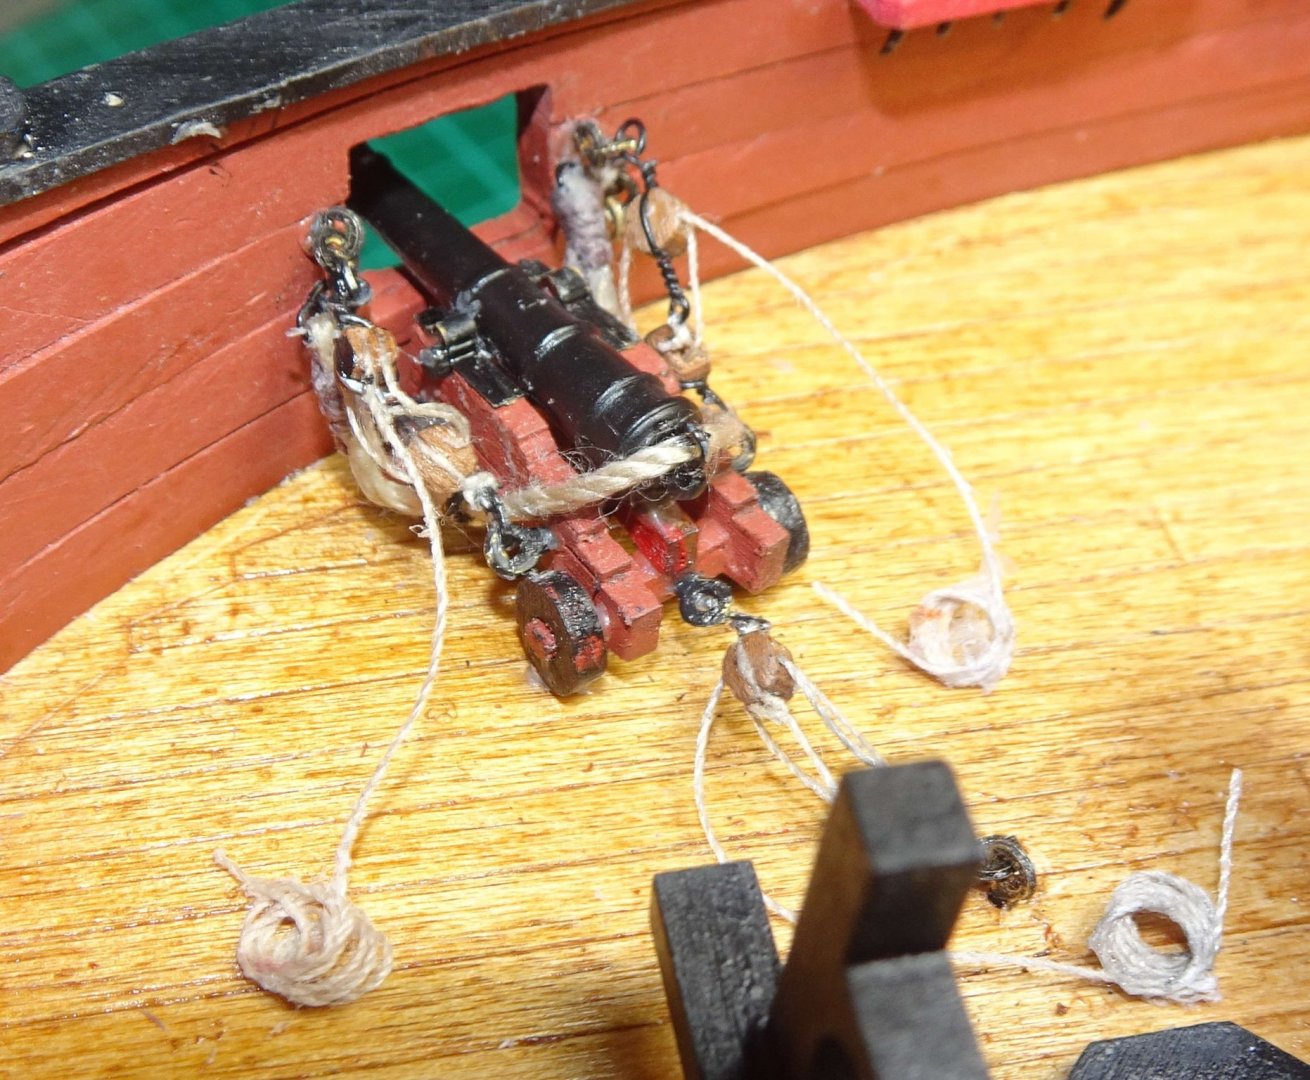
Hi all, My posts are getting farther and farther apart probably due to 'rigging' incoming, nicer weather outside, some other odds and ends, and taking a bit of a breather. Anyway, for now a little post on my first attempt at cannon (singular 😉 ) rigging. Below, attempting to rig a 2.5mm block and add a hook. The hook wire is silver in colour and 0.35mm dia...the wire is quite flexible but just about stiff enough to form the hook. I have since taken delivery of black coloured wire, 0.3mm in dia, but it was too late for most of the first cannon's 'metalwork'. Below, a tray of parts. Some quite dodgy looking hooks that had been painted black ...yup, the paint doesn't stay on after a bit of handling. Threading up a couple of the 2.5mm blocks, with a dab of PVA glue to help keep things under control. Below, three sets of training tackle completed. I've also fitted the breech rope and threaded it through a glued metal hoop at the rear of the cannon. A finished first cannon. All four sets of ropes fitted. It kinda looks OK but it was a fair faff getting all the hooks to engage with the bulwark rings. I need to rethink the manufacturing process eg is it better to attach the bulwark rings direct to the ropes and then glue those rings into the bulwark. A close-up reveals how fuzzy the ropes actually are...from where I'm sitting they looked pretty sharp! But I've received a beeswax block which, I believe, helps keeps the fuzziness downs, so I'll use it on future ropes . I can't say I totally enjoyed fully rigging the cannon, probably because I was in uncharted waters. However I have learned a bit about the process and have to decide do I really want to fully rig the remaining 13 cannons or just fit the thick breech rope to them. Hmm... In parallel I had started doing a little work on the masts but ended up concentrating on the cannon. I've had my first Covid jag (Oxford AstraZenica one) with little side effect like most folks, although some report extreme tireness for 24 hrs. Catch you all soon...or, failing that, 13x rigged cannons later 😉 Richard


-
#4 I know what you mean about their website. They have some really wonderful stuff They sure do, including figures you never knew you needed to finish off a diorama.... 1/35 British Armoured Car Division Officer on Tea Break - https://www.artscale.eu/135-british-armoured-car-division-officer-on-tea-break-1 Richard
-
Mario, There are excellant Vanguard Zulu builds on this website, with some of those builds having many extras added by the builders. You will not be disappointed in your choice of Lady Isabella...looking forward to your 'build'. regards, Richard
-
Welcome Alan, Everyone here is very friendly and helpful, and even more - there are loads of Fifie and Zulu builds on here. Some of those builds are stock but there are others that have been bashed into something even more wonderful. Chris Watton's Vanguard Models is a great source of such kits and can even supply sails. There are also other very good manufacturers of similar kits, some being steam powered. Your big problem will be that you will probably spend weeks trawling this site wandering from one great build to another before you ever get round to starting a build! Best regards, Richard
-
Well, that was excellent...what an insight into the making of the movie. Thanks. It's a crying shame market conditions stopped them making any others in the series. Richard
-
#114, #115 & #116 .... I did more research on the winch/capstan.The ones shown for the Fifie were made by Elliott & Garroods Very interesting and great video also. Preston Services sell a lot of old steam powered equipment ... https://prestonservices.co.uk/item/elliott-garood-capstan-steam-engine-2-12-x-5-cylinder/ including steam powered models .... https://prestonservices.co.uk/category/miniatures-models/ ...and full sized steam ships .... https://prestonservices.co.uk/item/hms-bullfrog-steam-ship/ .... https://prestonservices.co.uk/item/steam-dinghy/ Richard
-
Ah, OK. Thanks.
-
It so happened Jaws was on TV last night so I watched it again, keeping in mind to eye the mast shape. As others have said, it seems to be a circular cross section near the top. But closer to the the deck the mast has a 'rectangular' section but with the corners rounded off. There are many good moments in the movie but the part where Quint is sitting still whilst holding the rod watching the line in the water, and the reel suddenly gives two or three little clicks ...Quint's head stays still but his eyes slowly look down to the reel.... and you can tell he is thinking "hmm...we may have something here"....well, that's my new favourite moment.
-
FlyingFish, Your pics have now got me wanting to watch the movie again 😉 I've probably watched it at least half a dozen times over the years but (in my mind) it's a classic that ticked a lot of boxes ie great script based on a fairly simple but powerful story line, exciting and scary, three lead actors at the top of their game and great cinematography. Richard
-
VTHokiEE, She looks perfect. Your pictures are top notch and the painting, colouring and cleanliness of the build is way up there. Will she be harboured in the 'shipyard' or perhaps find calm waters in a living room? Richard
- 436 replies
-
- 2
-
-
- vanguard models
- alert
- (and 1 more)
-
'Lothian Lass' is looking very good, with lots of very interesting and creative features. Part of my family also comes from Leith and I have many fond memories of spending time there with my grandparents. Richard
-
Erik, I think 'weathered sails' would look good. Most of the old Zulu pics I've seen are B&W but still give an impression of the weathering pattern eg ... https://www.chroniclelive.co.uk/lifestyle/nostalgia/gallery/old-pictures-of-north-shields-7312242 Maybe even more recent coloured pics of restored Zulus are beginning to show how sail weathering presents itself. Only thing is, if you weather the sails do you then have to weather the rest of the boat? It's something I'd love to see - a fully weathered Zulu built from a new kit. It's on my wishlist...in fact, not just weathered but well used and worn and patched up and repainted etc. I have no weathering skills but it's a skill I want to learn. Richard
- 222 replies
-
- 1
-
-
- First Build
- Lady Isabella
- (and 2 more)