Rik Thistle
-
Posts
864 -
Joined
-
Last visited
Content Type
Profiles
Forums
Gallery
Events
Everything posted by Rik Thistle
-
 Tom, Thanks for the nice words. I'm quite happy with the way the cannons eventually turned out, although if I had to do them again (and with the knowledge I've gained) I think I could make them look a little neater. But 20:20 hindsight is a great thing 😉 Tom, YOU may be looking forward to the mast rigging etc but I know someone who isn't! Another steep learning curve ahead for me. I'm sure I can find numerous other things to do on Flirt to delay the start of the rigging....I'm an expert at delaying. Cycling is a wonderful activity. Fortunately I live in a small town surrounded by lovely countryside and great cycle runs. I used to do a lot of mountain biking but my left knee can no longer handle that. One day I'll be getting an eBike but hopefully that's a good few years off. All the best, Richard
 -
Hi all, I recently bought some new photography equipment to try to improve my build pictures.... - LED light ... https://www.amazon.co.uk/gp/product/B07V7JRTM6/ref=ppx_yo_dt_b_asin_title_o05_s00?ie=UTF8&psc=1 - White backdrop ... https://www.amazon.co.uk/gp/product/B01CZM177K/ref=ppx_yo_dt_b_asin_title_o05_s01?ie=UTF8&psc=1 The backdrop is fine. It has a smooth surface on one side and a matt surface on the other. It arrives rolled and tries desperately to retain the 'roll' when being laid flat. Time should cure that. The LED lights although cheap work fine. However I feel they are not that bright but possibly just about good enough for model photography. Brighter = larger camera aperture = narrower depth of field (eg only the ship's wheel is in focus). I'll update how I get on with these. Richard
-
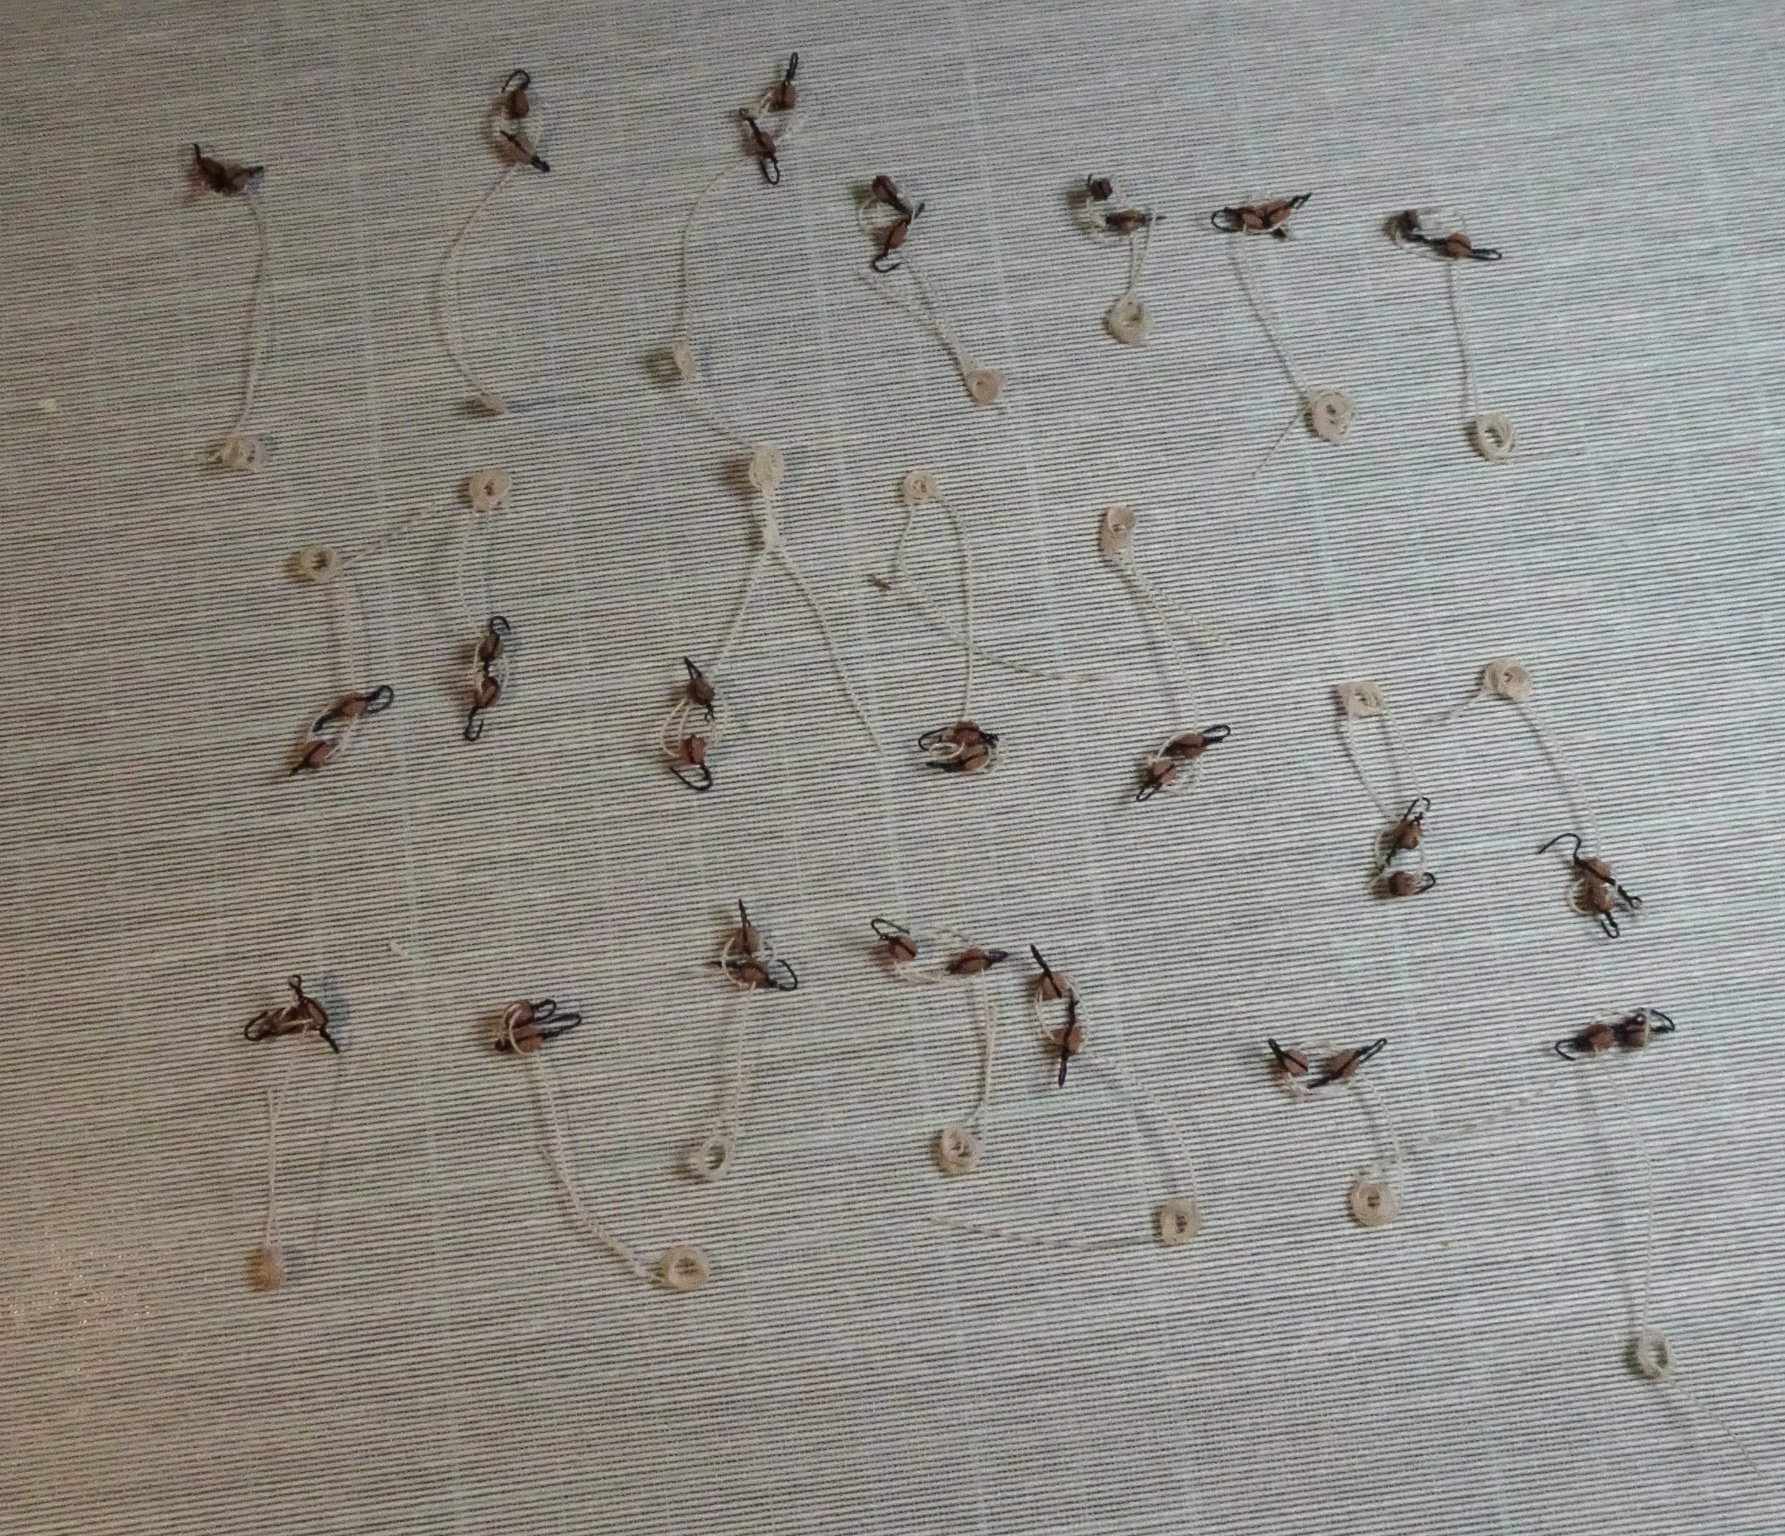
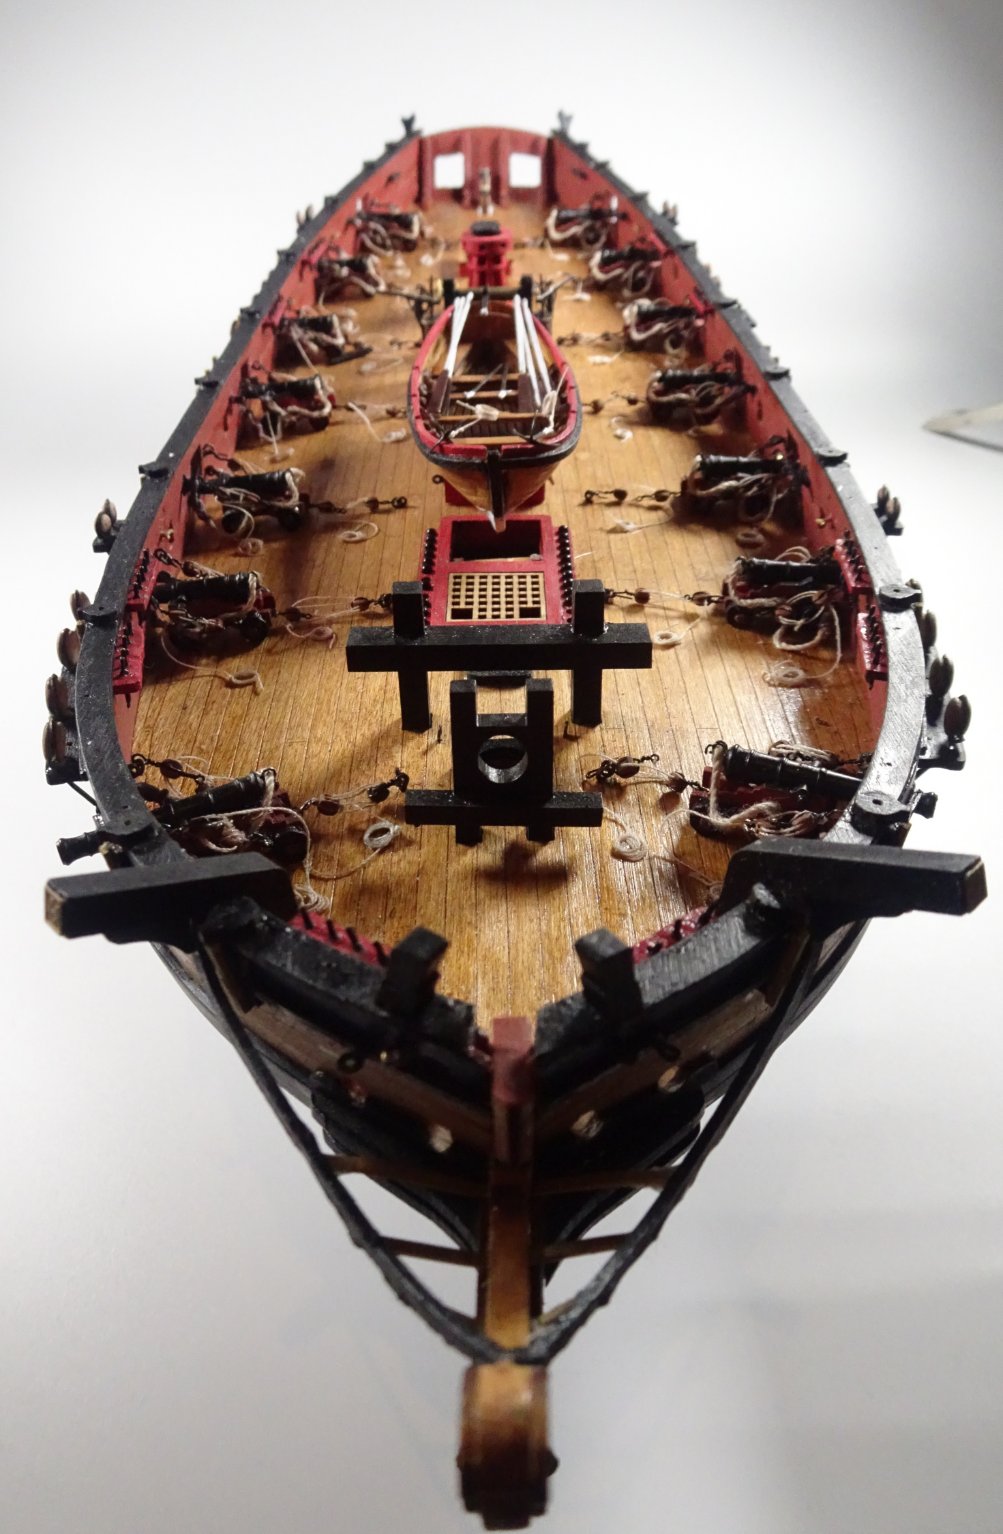
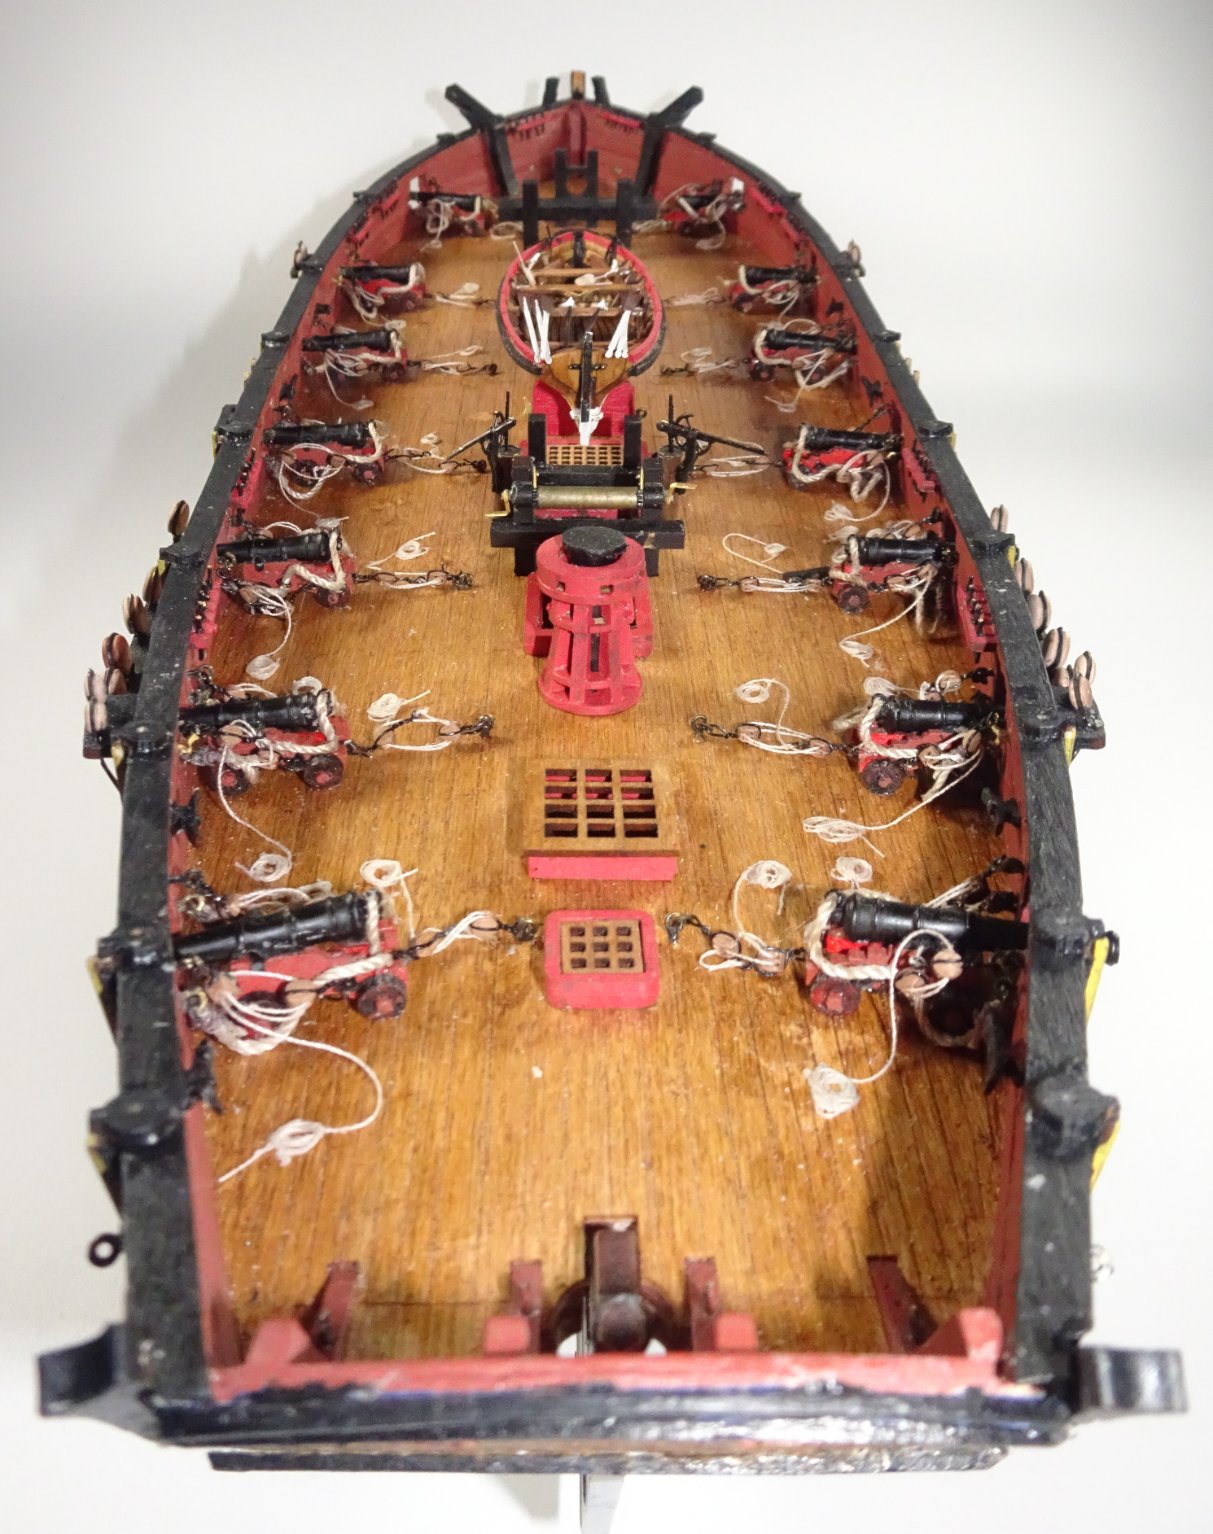
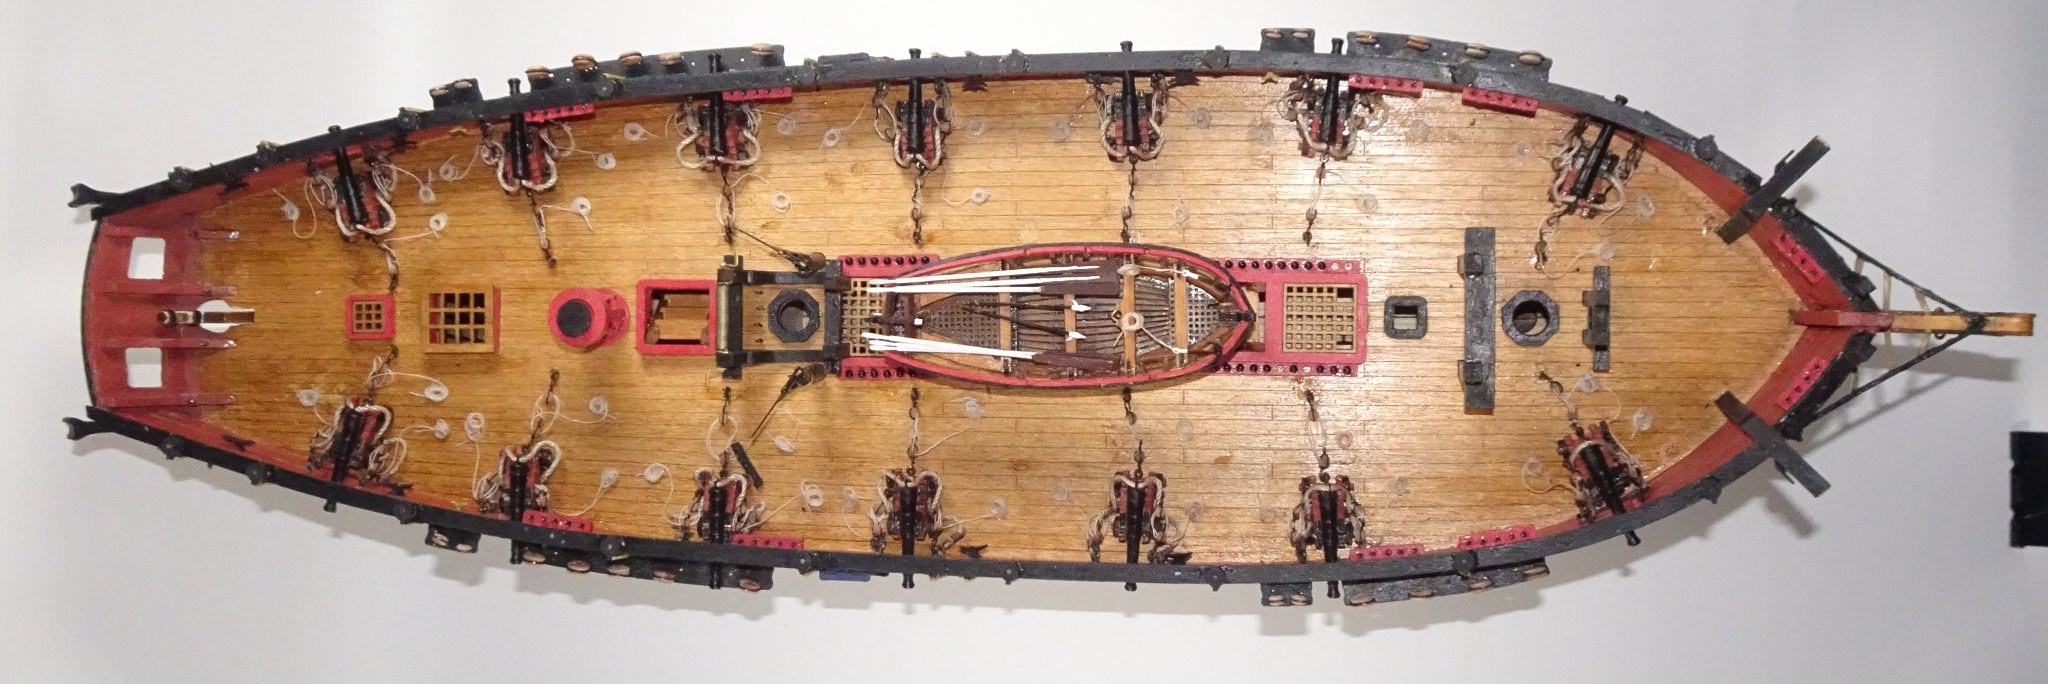
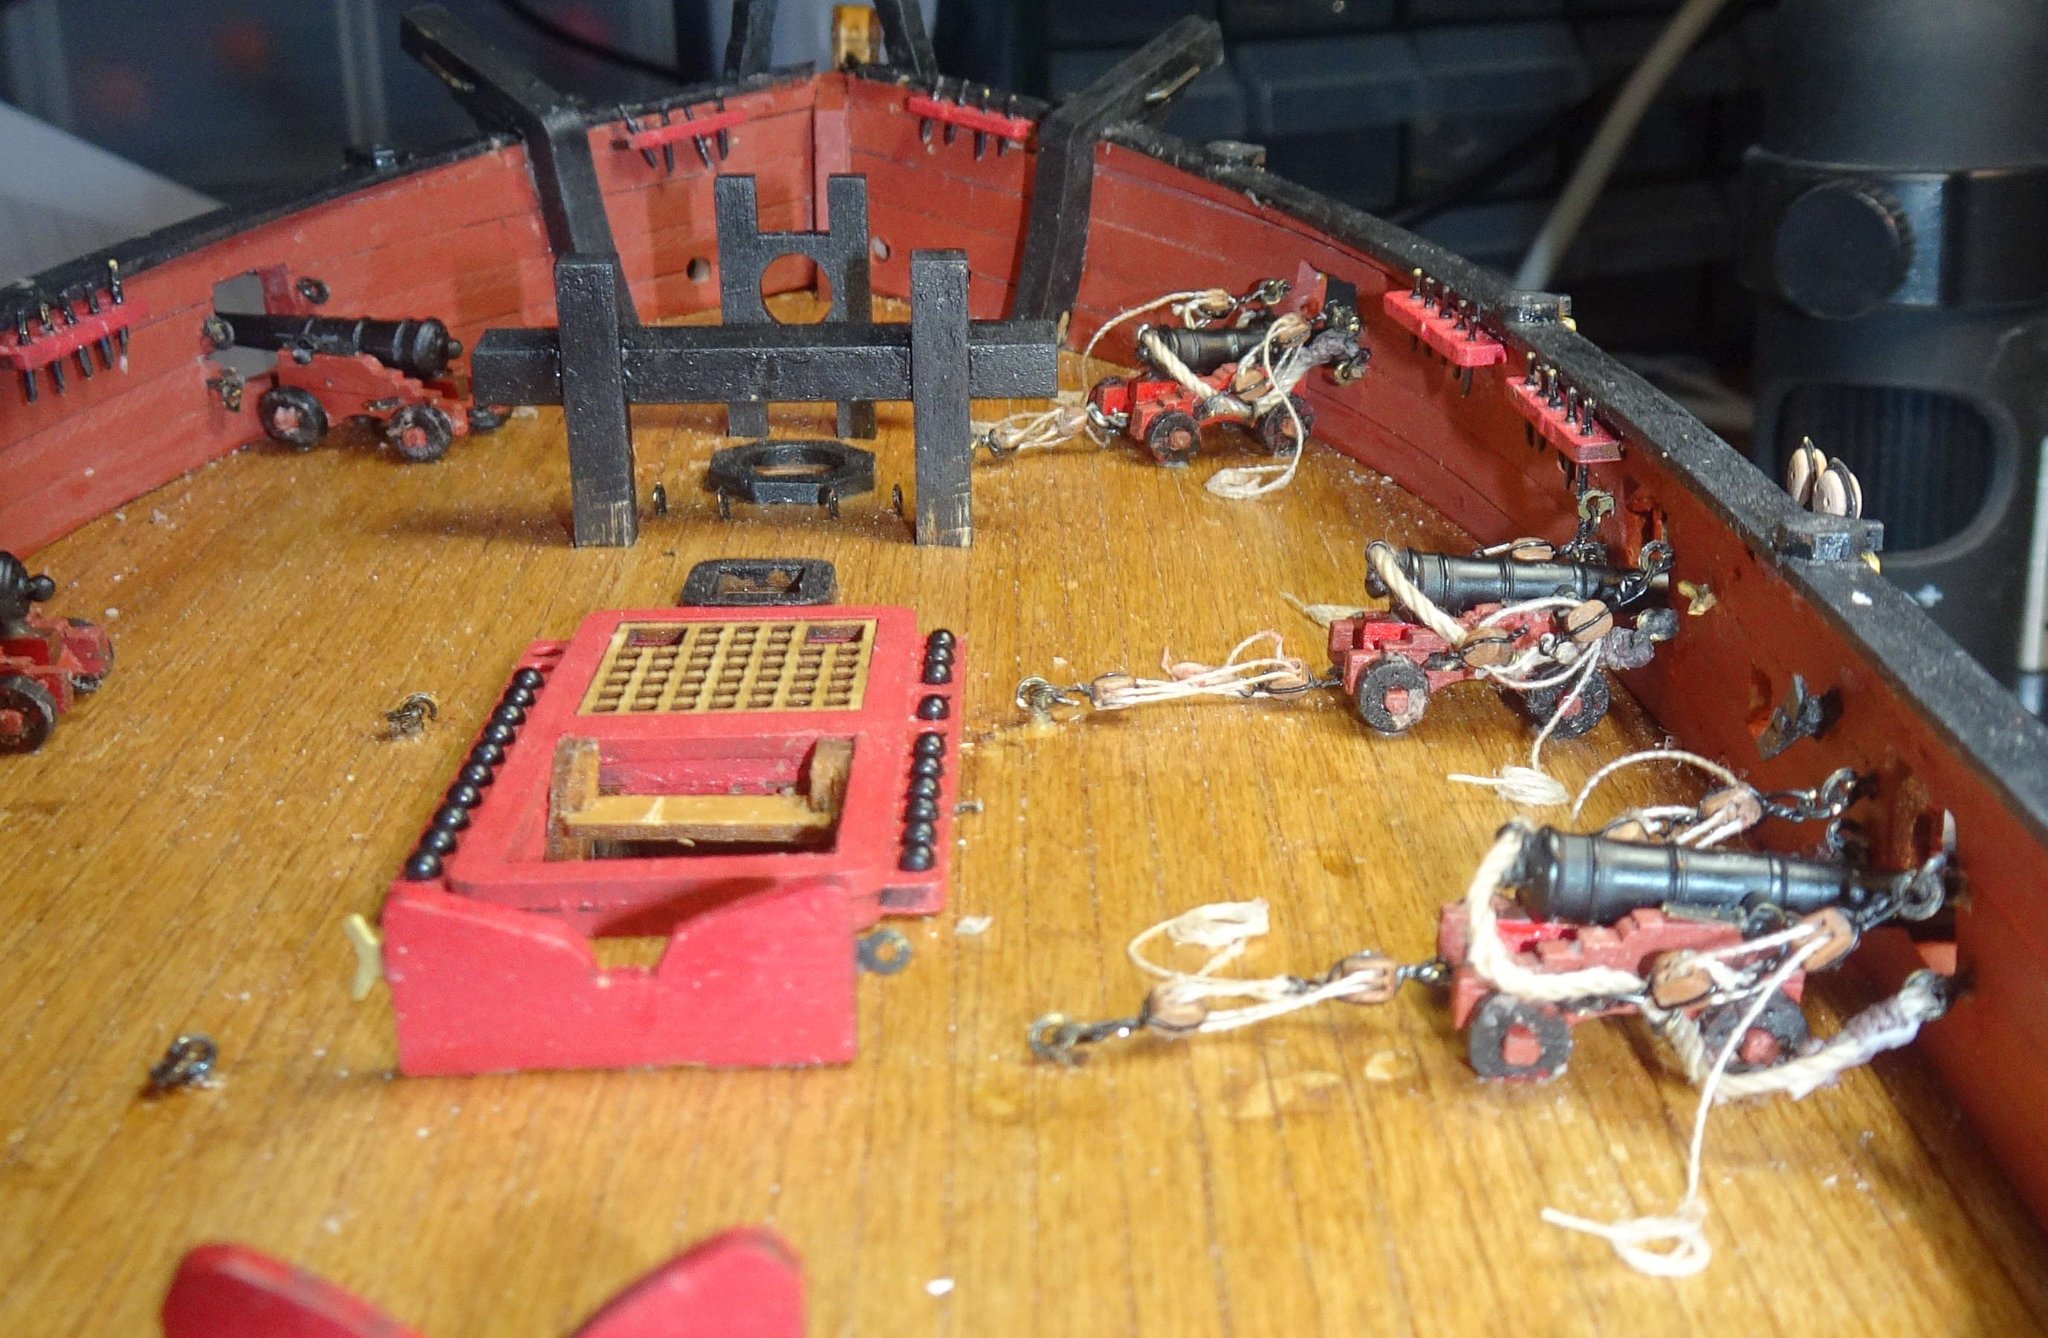
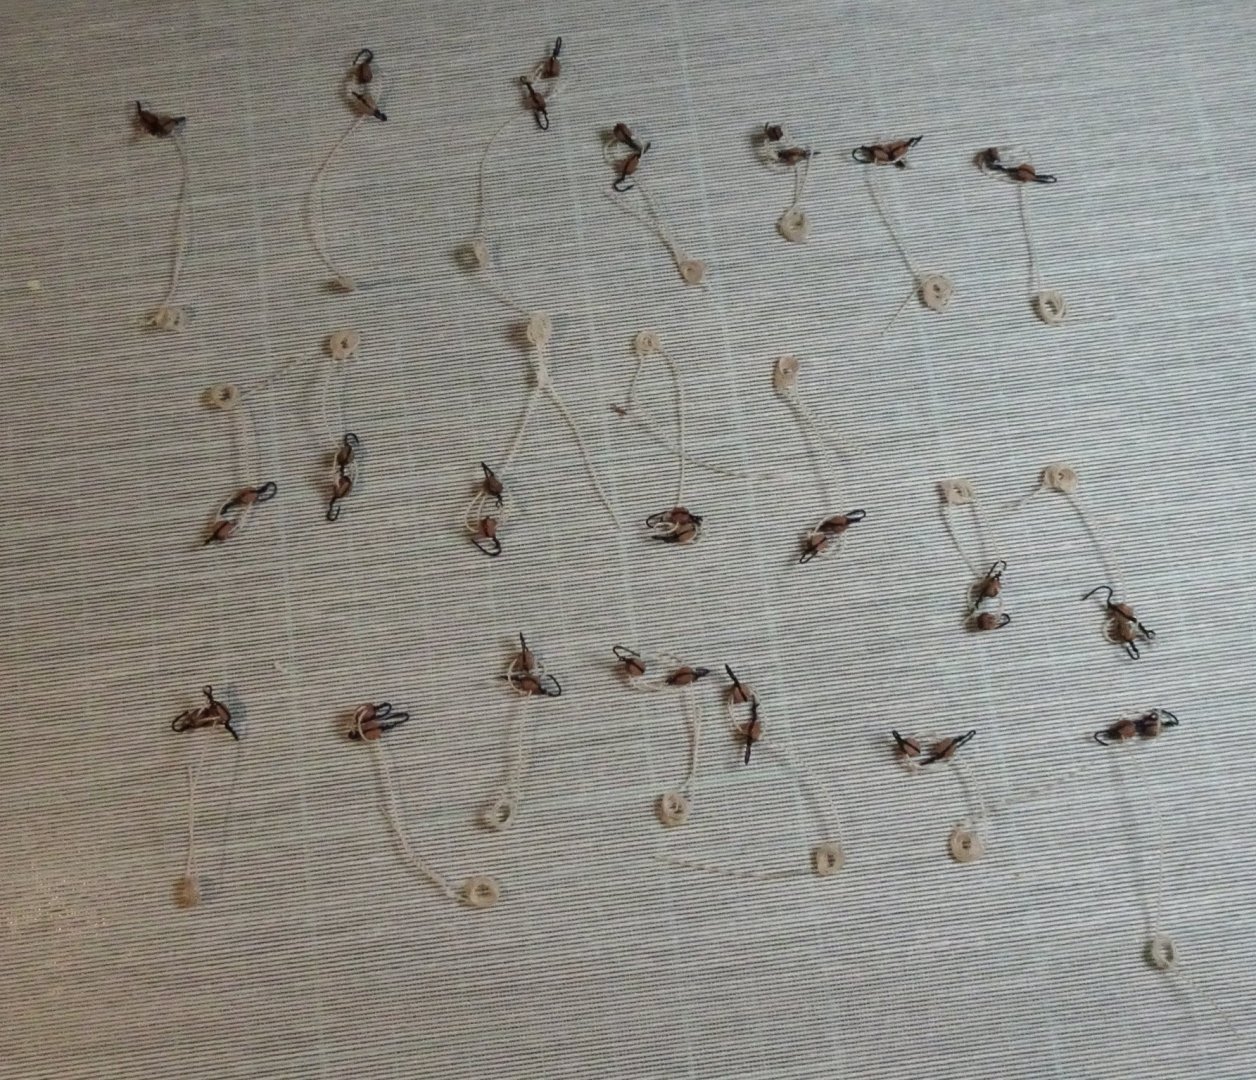
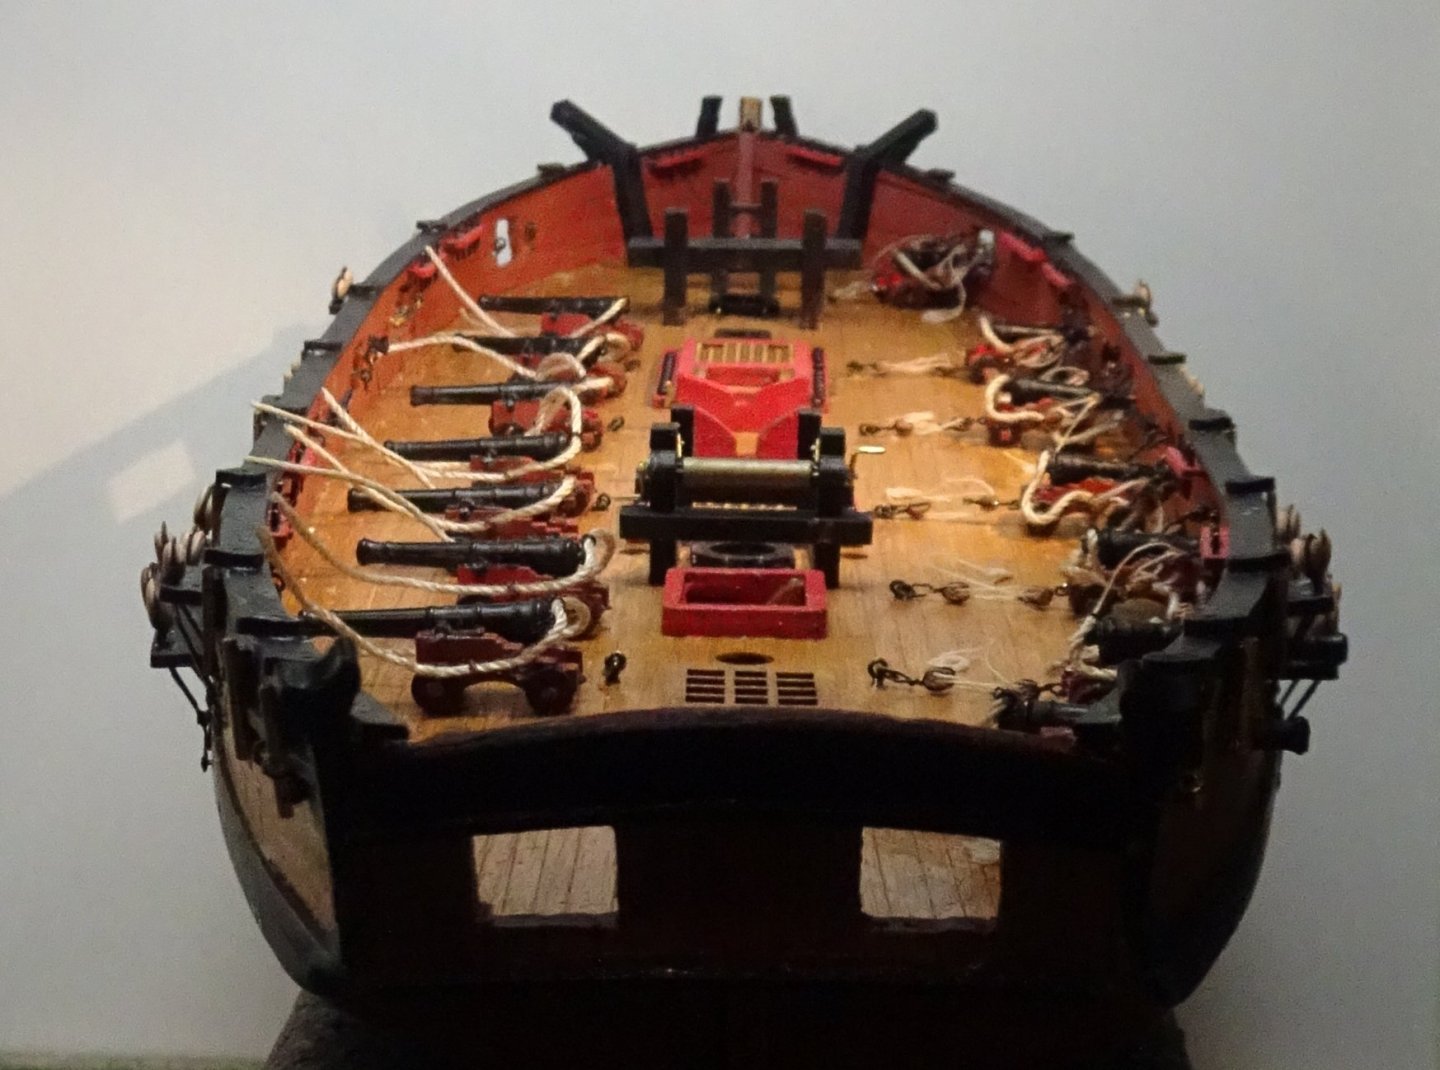
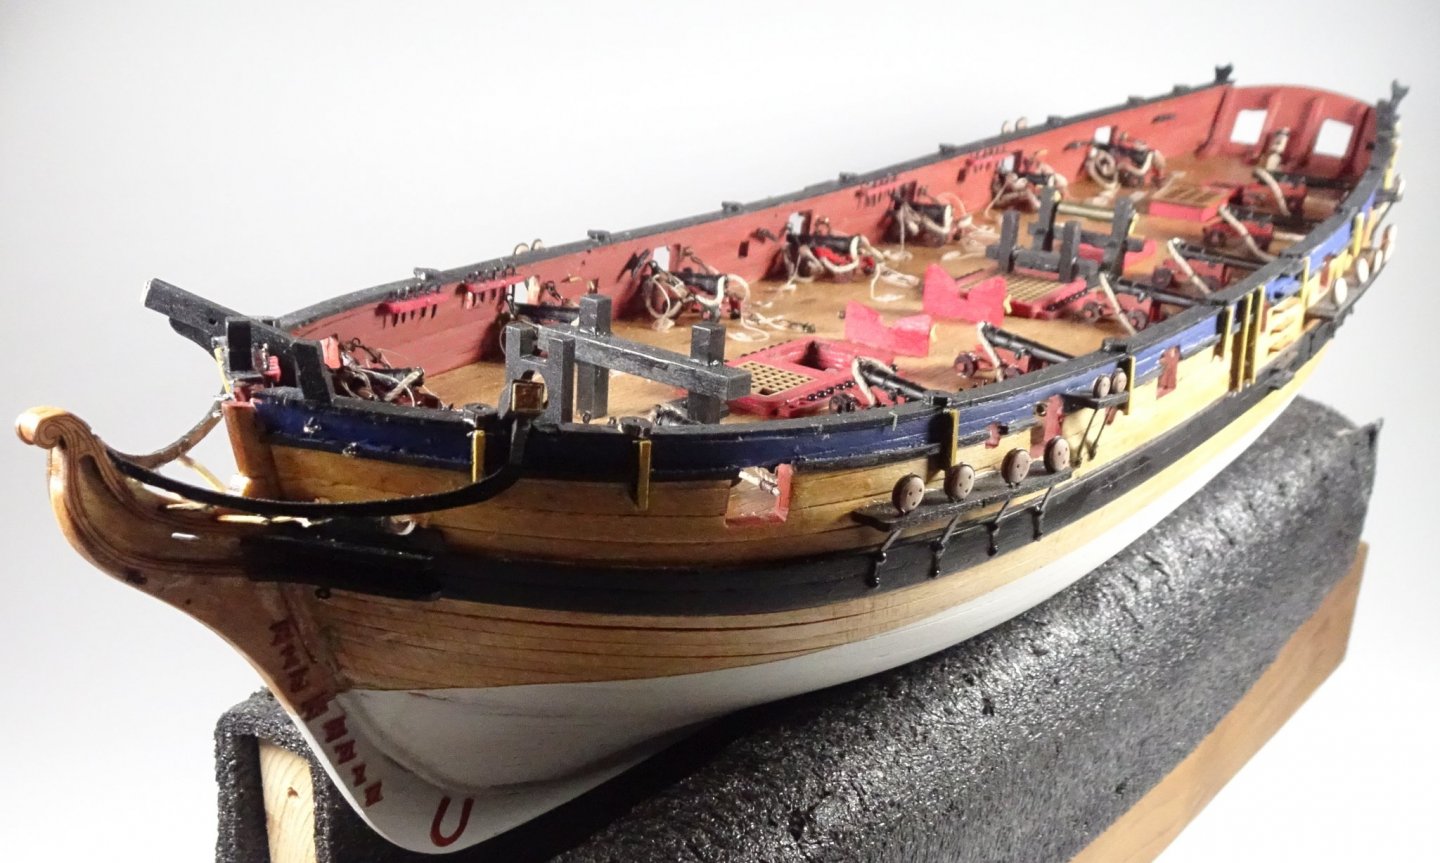
Hi all, After a break of quite a few weeks I have now completed the rope work on the 14x cannons. What I've learned is that - a) no eyelets should be glued in to the hull before work starts on the cannons b) paint cannon parts c) the woodwork + metalwork on the cannons should be completely assembled before any ropework is started d) add all rope work to the cannons whilst they are free to pick up ie not attached in any way to the deck or bulwarks e) add all eyelets and rings to the cannon rope work f) glue into the deck and bulwark holes the five eyelets associated with each cannon rope. g) glue the cannons to the deck I had initially made the mistake of firstly gluing the eyelets into the deck and bulwarks, and aslo glued the unroped cannons on to the deck. That all made it very difficult and fiddly for attaching the rope work to the cannons and eyelets. Others may have different methods for doing all this. As usual, any advice/thoughts are very welcome. Below - Firstly I made up all the 2mm blocks and ropes (x21 off for the 7 unfinished cannons). And then coiled the ropes over a 1/8" screwdriver blade, added a touch of PVA to the coil and then carefully slid the coil off the screwdriver and squeezed the coil flat. I then added the breech ropes to the cannons. I added a ring to the cannon rear for that rope to pass through. Below - a collection of pics of the 14x finished cannons. Aerial view of the deck with completed cannons and launch. Summary - I think I hit a bit of a brick wall with the cannons since I didn't have previous experience of cannon rigging, the thought of doing it 14x times over was a bit daunting and Spring arrived 🙂 Yup, Spring, gardening, cycling, visiting friends (now that Lockdown has been lifted, for the moment), some good health news and goodness knows what else are incoming distractions to model building. I've a hunch my build may slow down for a while but will strive to keep at least some momentum up. I think the masts are next on the agenda and I do like turning (...I've got the mini Proxxon wood lathe) so that might egg me on. Take care, Richard


-
Great kit and parts source
Rik Thistle replied to JohnU's topic in REVIEWS: Model Shipwrighting Tools, Parts and fittings
When I was a youngster I vaguely remember a model/toy shop down Edinburgh's Leith Walk. There was (still is?) one up Lothian Road. Then in later years there was Marionville Models (MM) - a large shop in a perfect location at Edinburgh's Maybury roundabout. You could spend hours in MM roaming amongst the Airfix kits, Balsa a/c kits, wooden ship kits, RC cars, ships, planes and helicopters...it was wonderful. And plenty of spare parts and raw materials. The owner would offer you a cup of coffee and the staff loved a good chat. Then drones arrives...and from my POV the drones + accessories rapidly become the main source of income. MM is no longer at Maybury but has moved slightly further West to smaller premises, is mainly online and carries a different product line. I think most shops/stores of this nature need to do the bulk of their business online to survive...walk in traffic is a thing of the past as everything is more and more delivered to your front door. But there are still clubs, forums and exhibitions to help bind us hobbyists together...possibly more than there ever was in the past. So the hobbyist family may have lost shops/stores as a meeting place but gained other new means of socialising. Richard -
Erik, Congratulations on a top class finish. She really looks the part and the colour scheme is very fitting. The minimalist setting in the last pic draws the eye in to her, and (in my mind) creates a diorama of her sailing out into a wide open sea....quite absorbing and relaxing. Richard
- 222 replies
-
- 2
-

-
- First Build
- Lady Isabella
- (and 2 more)
-
Proud owner of a Dremmel drill stand
Rik Thistle replied to DaveBaxt's topic in Modeling tools and Workshop Equipment
Dave, If you are looking for a cheap, functional bench drill press then a £102 Machine-Mart (MM) one would do eg .... https://www.machinemart.co.uk/p/clarke-cdp102b-bench-drill-press-230v/ With a bit of Googling you might find it elsewhere for £80 or so, but with MM you can actually have a look at the drill in their local store and drive it back if not happy. Always bolt the drill to your bench. The drill looks very similar to the one I've had in my garden shed for 20 odd years. Belt driven, chuck takes 1.5mm - 13mm drills. You might want a basic, £10 vice also... https://www.machinemart.co.uk/p/clarke-3-inch-vice-cdv30c/ This drill is based on a Chinese design that is re-badged the world over. MM also do a very similarl looking £84 bench drill ... https://www.machinemart.co.uk/p/clarke-cdp5eb-5-speed-bench-mounted-pillar-dri/ .... but the On/Off switch is to the rear of the left side of the drill body...idealy it should be up front and centre. Richard -
She's looking very neat indeed Erik...quite classy in fact. I feel that these small working vessels are bursting with personality and your's is no exception. And your ropes look good also. At the moment I'm winding my rope coils on a 1/8" screwdriver shaft, squidging in some PVA to bind the coils and then gingerly coaxing the coils of the end of the blade, and then a squeeze between fingertips to make the coils lie flat'ish. But always looking for new methods 🙂 Richard
- 222 replies
-
- 1
-
-
- First Build
- Lady Isabella
- (and 2 more)
-
Theodosius, Very practical and clever solution to the problem. I see you tried putting packing under some earlier planks but the pic above is the 'no messing about now' solution. And the resultant sanded finish is perfect. And you've still to add the 2nd planking to make it even better 😉 You're on a roll now....well done. Richard
-
Theodosius, That first planking is looking very good, and you've got lot of neatly tapered planks at the bow and stern...impressive. I bet you got a nice buzz from looking at the that hull after all the hard work 🙂 When you are sanding that 1st planking in preparation for the 2nd planking make sure you thin down the stern 1st planking to almost nothing....that way the 2nd planking will blend in to the keel thickness. Richard
-
kit review ENDURANCE by OcCre - 1/70 scale
Rik Thistle replied to ccoyle's topic in REVIEWS: Model kits
That looks gorgeous. I need to stop reading 'previews/unboxings etc'... Richard -
Electric sanding belt file
Rik Thistle replied to Don Case's topic in Modeling tools and Workshop Equipment
Low labour costs have to be matched with a low cost of living, otherwise the business model isn't sustainable. And China and certain other Eastern countries did have low costs of living. Another major, and possibly the crucial factor, was the arrival of the Shipping Container.... this really drove down transport costs and made it financially feasible to transports goods from one side of the world to the other and still return a profit. A great read on the history of the shipping container is The Box: How the Shipping Container Made the World Smaller and the World Economy Bigger https://www.amazon.co.uk/Box-Shipping-Container-Smaller-Economy/dp/0691170819/ref=sr_1_1?dchild=1&keywords=the+box&qid=1617722118&rnid=1642204031&s=books&sr=1-1 In spite of severe resistance from invested interests the shipping container eventually became the standard way to transport goods, by ship, train and road. Another factor is that certain Governments demand the production and sale of certain goods abroad and at a loss, to capture that market. Nasty, but it happens. Also, I think in the 70s, 80s and 90s Western companies were tripping over themselves to do 'technology transfer' deals with foreign powers just to win orders. Once that genie was out of the bottle it was a one way slide downhill for the West. Richard -
Electric sanding belt file
Rik Thistle replied to Don Case's topic in Modeling tools and Workshop Equipment
Bob, #4 Remember reputable brands like "Bell and Howell," (movie cameras,) "Emerson," (radios and TV's), and just about every tool company you've ever heard of? Times have changed. Today, the brand names themselves have become commodities, monetized for their "customer loyalty" and established good reputation. The business model is 1) buy out a brand name with a good reputation, 2) "value re-engineer" the products by reducing the quality, plastic parts replacing metal where possible, etc., 3) close domestic manufacturing operations and move manufacturing to low-labor-cost Third World factories, 4) slap the reputable label on "generic" offshore products, 5) flood the market with advertising touting the brand name without disclosing the change in ownership and manufacturing origins, and 6) reap the profits for as long as possible until the consumers finally, if ever, figure it out. You still get what you pay for, to a large extent, because the higher priced units will generally have better quality control, warranties, and customer service, although, sometimes you get lucky and find a lower-priced brand of the same unit, built in the same factory in China by the People's Patriotic Power Tool Collective which just happened to be assembled "on a good day." Absolutely spot on. A couple of thoughts - 1) I wonder what was the real driver for cheapening down quality...eg was it the rapid growth in the home DIY'ers who weren't as knowledgeable about quality tools? I know a lot of CEOs (not all) like to gouge their customer base but that needs a susceptible market. 2) Does a list exist anywhere of reasonably priced, quality tools/manufacturers? And perhaps a list of tools/manufacturers to avoid? I realise those lists may be moving targets. Richard -
Kit Review Harbor Tug WARATAH 1902 - HMV - 1/250 - CARD
Rik Thistle replied to ccoyle's topic in REVIEWS: Model kits
Ah, thanks Chris....I hadn't spotted that. Still feel the impulse buy urge though 😉 I already have a cardboard model of HMS Alert stashed away that was part of a 'bulk purchase' to see me through the Great Lockdown of 2021/2022. So I really should complete that one first to see how I get on with cardboard models. However the harbor tug may somehow find it's way into the stash when I'm not looking. Richard -
Kit Review Harbor Tug WARATAH 1902 - HMV - 1/250 - CARD
Rik Thistle replied to ccoyle's topic in REVIEWS: Model kits
That looks really neat and for less than Euro13 it's an impulse buy 😉 Richard -
Charlie, thanks for asking the question and Allan thanks for the link ... https://www.youtube.com/watch?v=g_m_VWzk4w8 It was very an interesting video. I'm a long way off from ever making my own sails but at least I now have an idea of what to prepare for 😉 Thoughts - - there was a lot of effort went in to making the wooden sail proforma - Pt 2, with the sail cut to size, jumped to Pt 3 with the sail already fixed to the mast. I'd have liked to have seen how the sail is properly attached to the mast. - IIRC, I've watched his turnbuckle video in the past Tom Lauria - https://www.youtube.com/channel/UC7JA3n2QuMoR2b68BzfxSoA/videos .... has a lot off good videos on his channel....sigh...here goes another day watching videos 😉 Regards, Richard Edit: Tom's website, for more interesting stuff ... Thomas J. Lauria http://tjlauria.com/galleries/
-
Hi Reynard and a warm welcome also. I've got a 'tram' on my ToDo list...the Istanbul version...so if you decide to do a Build Log of your tram on here I will follow with interest. Regards, Richard
-
Theodosius, 1) I see in this pic... ...that the Bow end of the bulwark isn't tight up against the deck level. I wonder if you need to consider doing a little more sanding of all the parts the bulwarks are glued to? I also wonder if the Stem Post isn't fully seated into the deck notch? 2) And as Spyglass has mentioned, you need to interlock the front ends of the two bulwarks before the glue has set hard so that the two bulwarks support each other, at least at the bow. 3) I suspect the bulwarks have become a bit warped with all the reheating, exacerbating the 'wave' appearance. The bulwark plywood , as you note, is made of three (?) thin veneers glued with their grains at 90 deg to each other. With all the reheating that glue will have softened and the veneers will perhaps taken up different relative positions when cooled. If you do decide to remove the bulwarks again perhaps try ironing them flat and letting them completely cool down so that they remain flat before trying to get them to curve with more heat. 4) I still feel that at the end of the day, once the planking that goes on the inside (one layer) and outside (two layers) of the bulwarks, the bulwarks will take the curve of the planking and the 'waves' will be insignificant. And don't forget to take a break of a day or two here and there ;-)... a change of scenery works wonders for recharging the batteries and clearing the mind 🙂 Richard
-
Very educational talk, and Q&A session. What a profound effect these boats had on the areas they travelled through and visited. Thank you. Richard
-
Theodosius, Thanks for dropping in. Once I have all the cannons rigged I'll probably go back round them all and try to make their ropes drop straighter to the deck (as if gravity is pulling them down under their own weight). At the moment, some of the ropes tend to curve unnaturally up to the sky, so I may damp them with some watered down PVA to direct them downwards. Well, that's the theory 😉 Richard
-
Theodosius, Regarding the 'waves', if you look at where the bulwarks follow the deck, there are no waves. But where the bulwark rests against the bulkhead tabs there are waves. This is particularly noticable at the foremost bulkhead tab. Maybe that tab needs a bit more sanding - however, as you note, the tabs will later be snapped off so the bulwark waves will not be so prominant, and probably fade away over a few hours. Richard
-
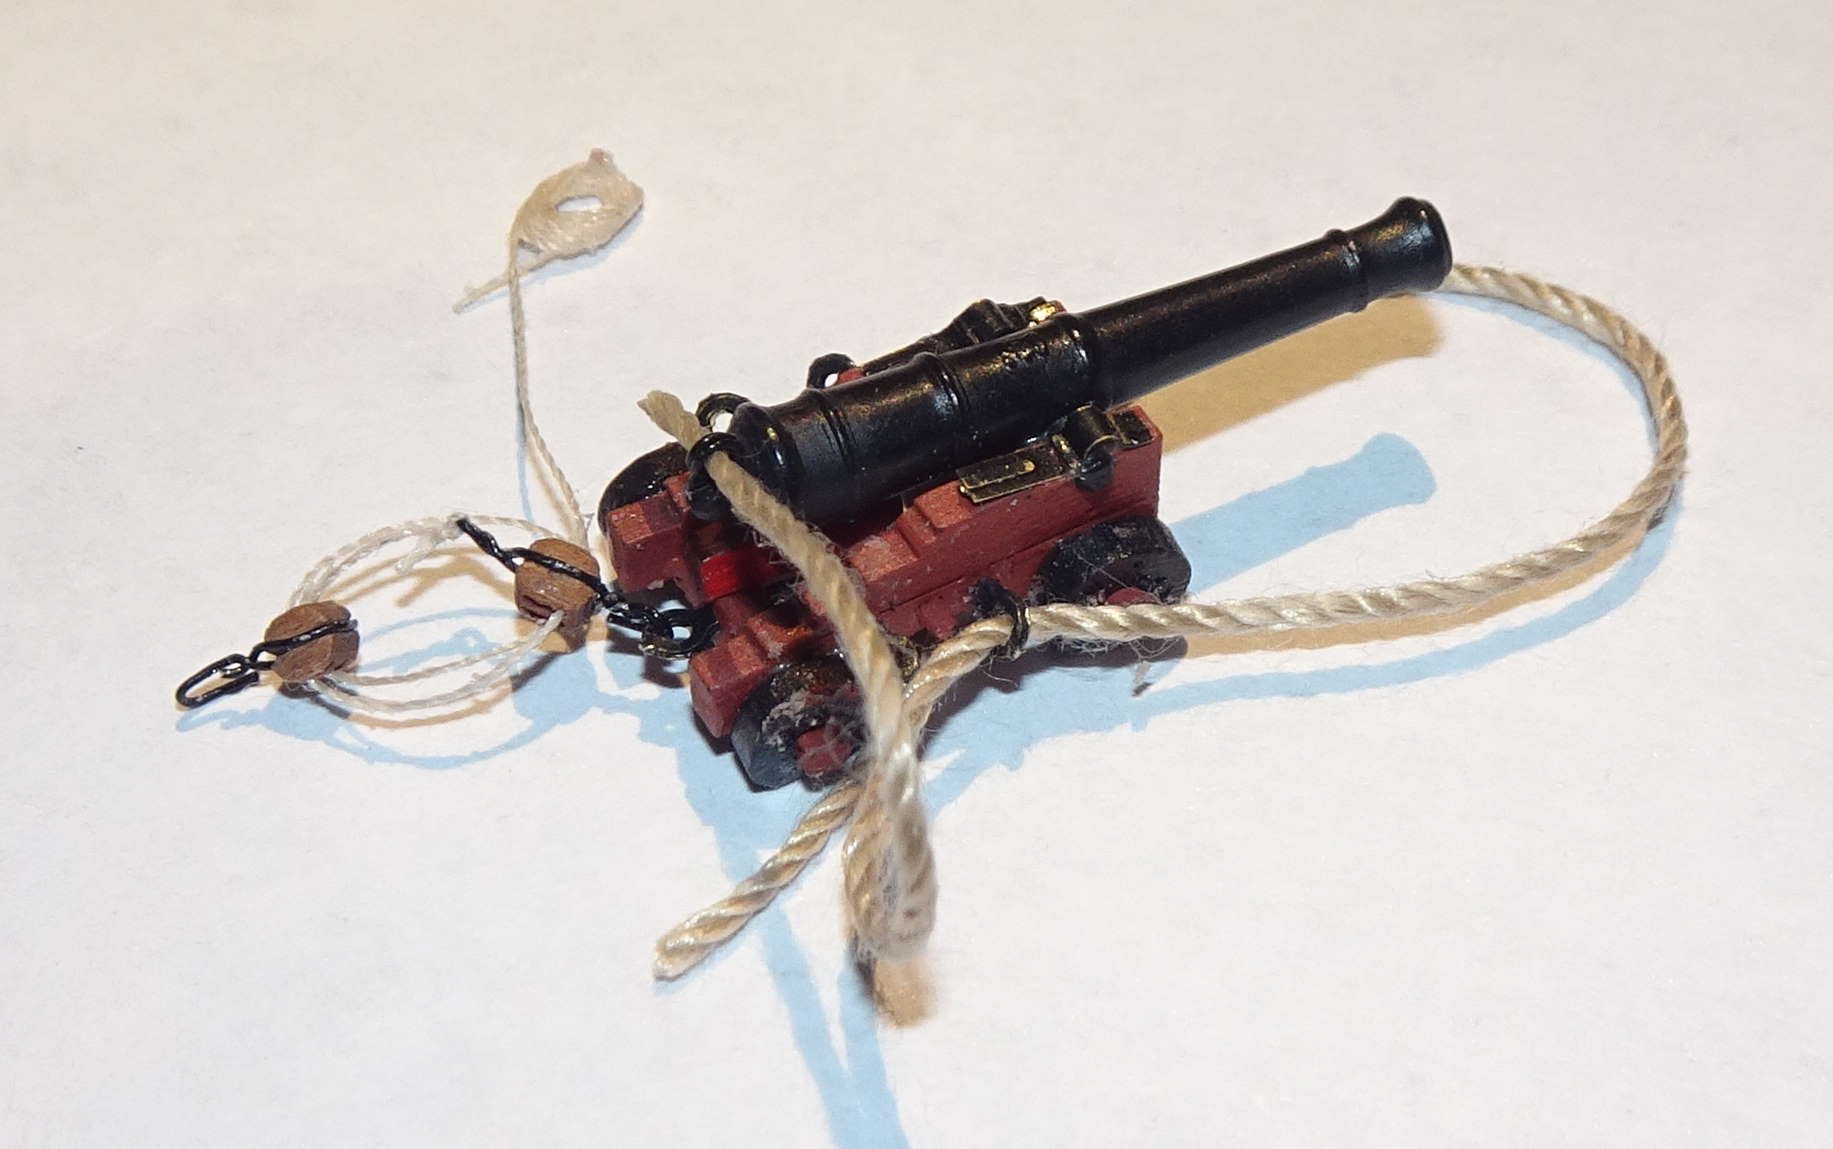
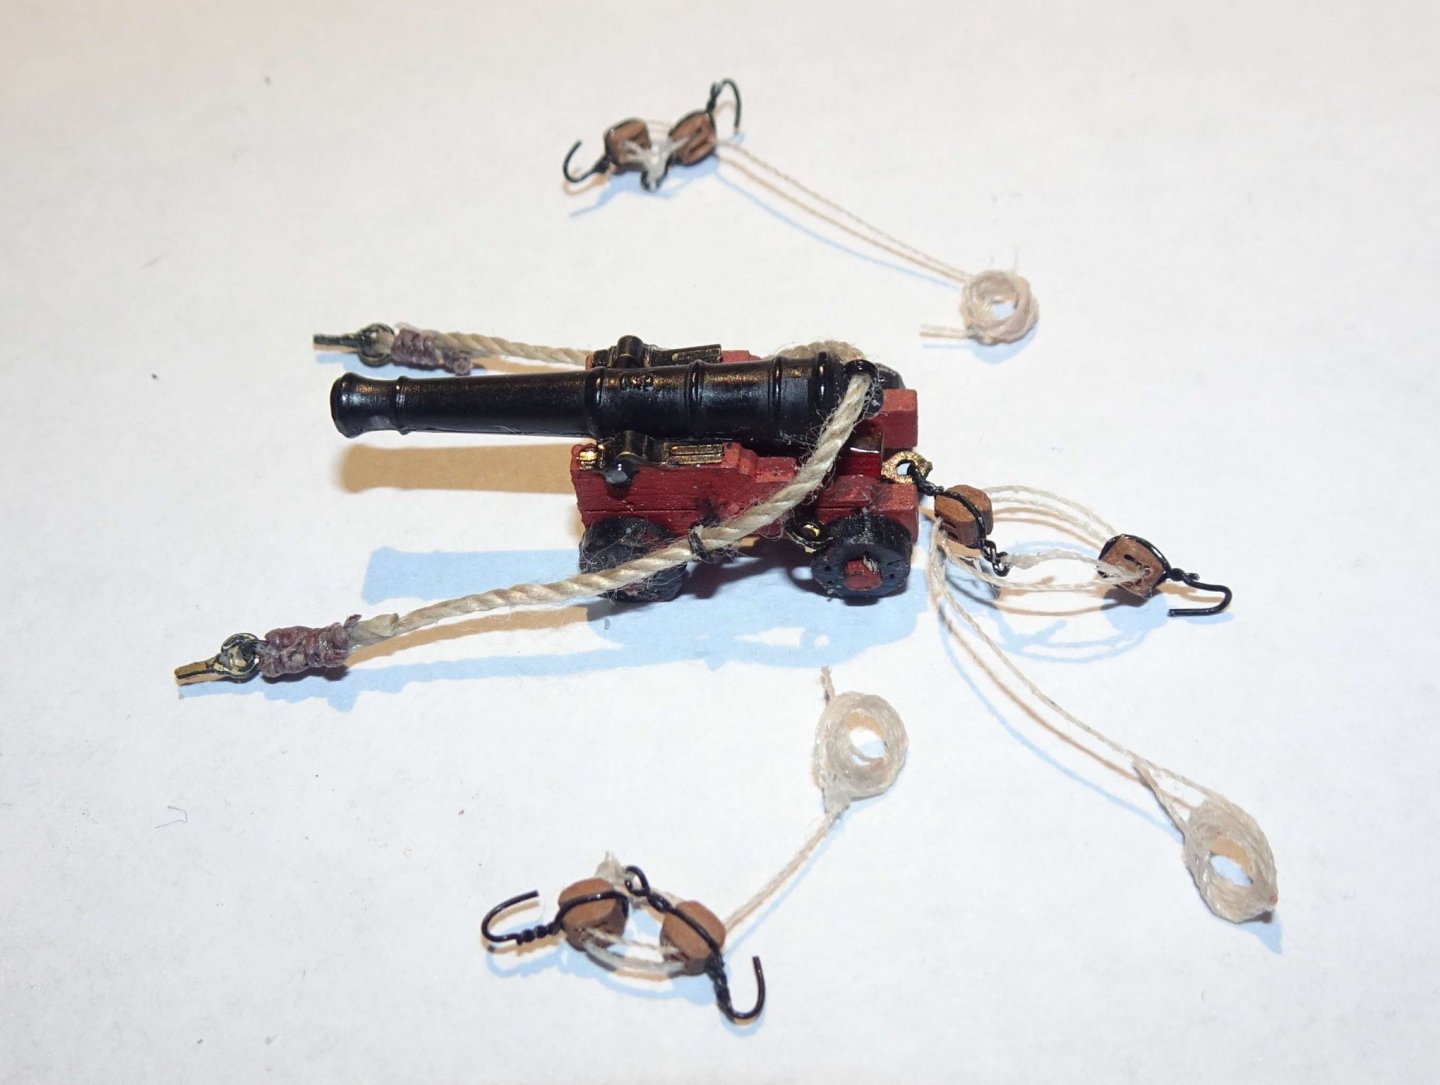
Hi all, I've decided to fully rig all the cannons. And have managed three so far....so general progress has really slowed down. The slowness is partly explained by me trying to figure out the optimum production method to complete the cannon rigging to a 'good enough' level but in a timely manner. I've also been doing other things, but have a bit more free time now to try to get the cannons finished. Here's what I've learned so far (and there's a lot more to learn) when rigging cannons... a) Don't glue the cannon onto the deck and then try to rig it. Way to difficult, as others had earlier hinted at. Rig the cannon first and then finally glue the cannon onto the deck. b) Don't glue the breech rope eyebolts into the bulwark first; rather attach the eyebolts to the ends of the breech rope and then glue those eyebolts in to the bulwark c) I used 0.3mm (black plastic coated) wire to form the hooks on the blocks. 4) The breech rope ends need a touch of PVA glue to made them stiff enough to feed through the cannon eyebolts. 5) I cleaned out/opened up the cannon eyebolts with a 1mm drill, otherwise it was very difficult to feed the breech rope through the eyebolts. 6) The thinner rope also had it's ends PVA'd to get it to poke through the blocks. Below, a breech rope being fed through the 1mm dia ring (that I added) at the end of the cannon). Below, all the rigging necessary for a Flirt cannon. (I wish I'd paid a bit more attention earlier on when assembling the cannons themselves...close-ups reveal some ugly mismatches.) Below, three fully rigged cannons...only eleven to go...sigh. Whilst trying to train myself to do cannon rigging I found this useful video talking about blocks and serving cables ...... Blocks Not From Scratch, Part 2 There's also a Part 1, which I'm currently watching 😉 Hope to post again within the next month, he says...when the cannons are all rigged. Richard


-
Theodosius, Remember that your bulwarks will be planked, twice. So any 'waves' will be long gone by the time you have sanded the thick 1st planking, and then added the 2nd planking. Get a plank out of the box and place it on the bulwark to get a feel for what I'm talking about. The 'waves' are perhaps caused by the bulkheads sitting slightly inwards of the deck. I guess you could flatten the waves out by adding thin wooden shims along the bulkhead edges...but to be honest it's probably not worth doing. Note - You are dealing with wooden parts that are laser cut to a tolerance (eg +/- 0.05mm?) and that these parts sometimes mate up with sanded parts. So you will never get joints etc that are within 0.025mm accuracy. Also, wood shrinks and expands during the day so, all in all, minor misalignments are not usually an issue, unless a later part needs to accurately slot in between two or thee parts that were glued together the previous week..... then some corrective action may be required, as when Spyglass recommended you may have an obstruction (excess glue?) sitting in a groove. I think you're doing fine and asking lots of good questions...pretty similar to ones I was thinking about when I started my ship building hobby last summer 😉 Regards, Richard
-
'The Terror' - BBC series Mar 2021
Rik Thistle replied to Rik Thistle's topic in Nautical/Naval History
Mr Pucko, The ships, the clothing etc etc. more here .... https://buildingterror.blogspot.com/2018/05/building-terror.html That link is a very interesting read, thanks (Note: it contains spoilers) .... ' Historical Reference: Erebus and Terror were among the first Royal Navy sailing vessels to be converted to screw propulsion. This was accomplished by installing railway locomotives in their holds. Peter Carney has conducted extensive research on this conversion and has determined that Archimedes and Croydon (shown here), identical locomotive engines, were likely candidates. This is the only known plan of the Croydon type engine.' And the series production team have got CGI and green screen work down to a fine art .... it really is now almost impossible to tell CGI from reality. I've just watched the 1st episode on the BBC iPlayer and it's a bit gloomy and foreboding but, as mentioned, the attention to detail is very realistic. So the scene is now set for whatever episode 2 brings 🙂 Richard- 8 replies
-
- 4
-
-
- John franklin
- 1845
- (and 2 more)
-
'The Terror' - BBC series Mar 2021
Rik Thistle replied to Rik Thistle's topic in Nautical/Naval History
It is very good, though, if a little strange... To fully understand the story of the monster, reading the book is necessary. But even without that part, scurvy, botulism, consumption, freezing and starving is terrifying enough.... I will get my popcorn ready for the weekend. Ok, I'm convinced...definitely watching it 😉 I've set my TiVo to record a Season Pass on it. Richard- 8 replies
-
- 4
-
-
- John franklin
- 1845
- (and 2 more)
-
There is a 'new', 10 part series on the BBC.... Inspired by a true story, The Terror centres on Captain Sir John Franklin, and his crew’s lost Royal Navy expedition to the Arctic in 1845 to discover the Northwest Passage. https://www.youtube.com/watch?v=dUZKjdewbZQ I haven't started watching it yet but it looks interesting. I'm not sure, but is this the first season of a 2018 American AMC production?.... https://en.wikipedia.org/wiki/The_Terror_(TV_series) Richard

- 8 replies
-
- 7
-
-

-
- John franklin
- 1845
- (and 2 more)