
Knocklouder
-
Posts
2,992 -
Joined
-
Last visited
Content Type
Profiles
Forums
Gallery
Events
Posts posted by Knocklouder
-
-
Yes I belive he talking bullseye, 2.88 a pack 30.oo to ship them.

Bob M.

-
Back on the list you go, both of you with a note do not remove from list. Thoughts and prayers my friend, you have made my journey easier and I hope HE makes your journey easier as well. All the best my friend.
Bob M.
- lraymo, Paul Le Wol, FriedClams and 2 others
-
 4
4
-
 1
1
-

I knew I had seen that bow before, sorry buddy but it is hockey season now lol. Great looking ship
.
Knocklouder
-
Translator seems to work now, all the way back to the first post, and here I that you were talking about me lol. Nice work my friend, good stand.
Bob M.
-
Progress is slow, but steady. Plumbing issues
 Nothing a new toilet and bathroom sink can't fix. I got them installed today, and just have minor adjustments to do tomorrow.
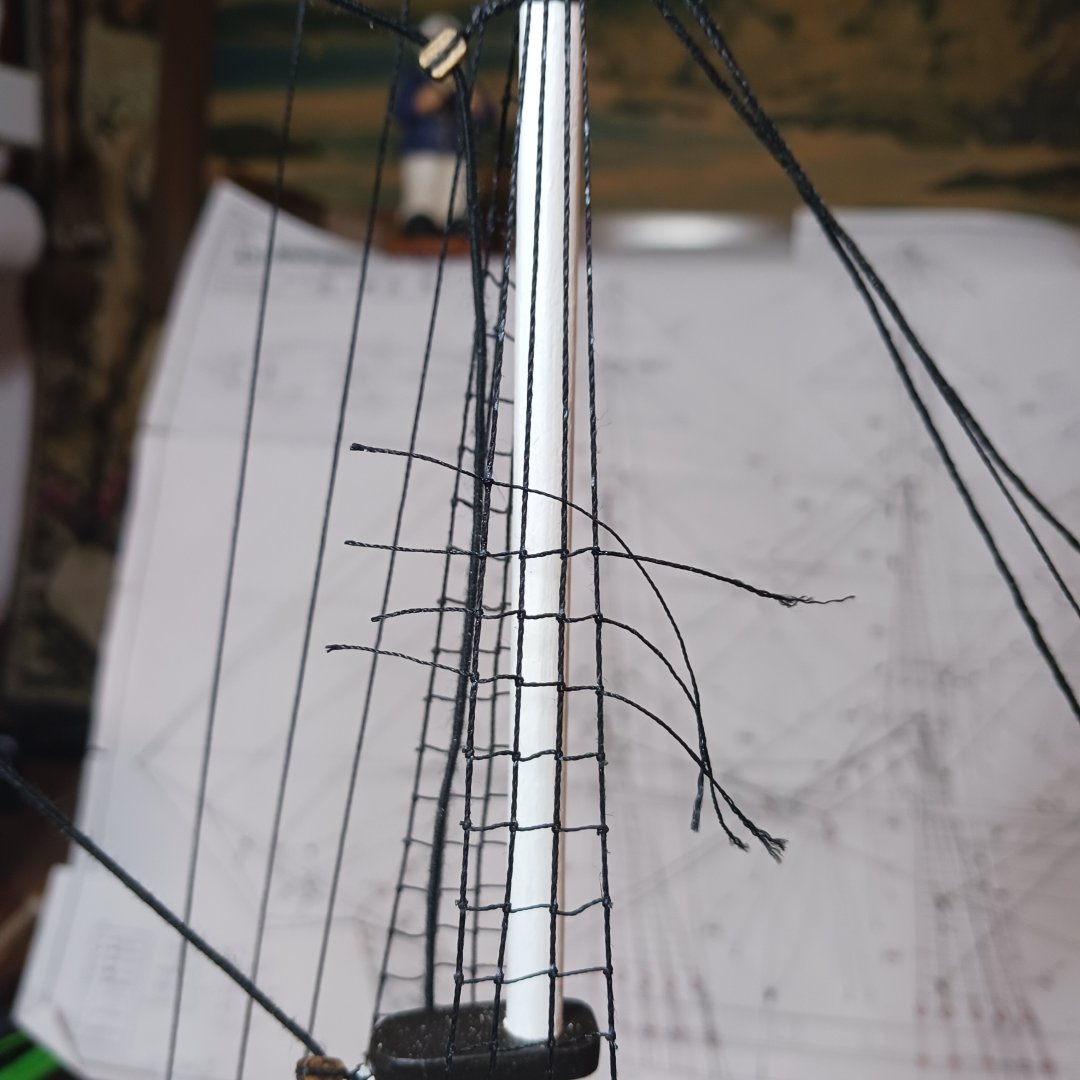
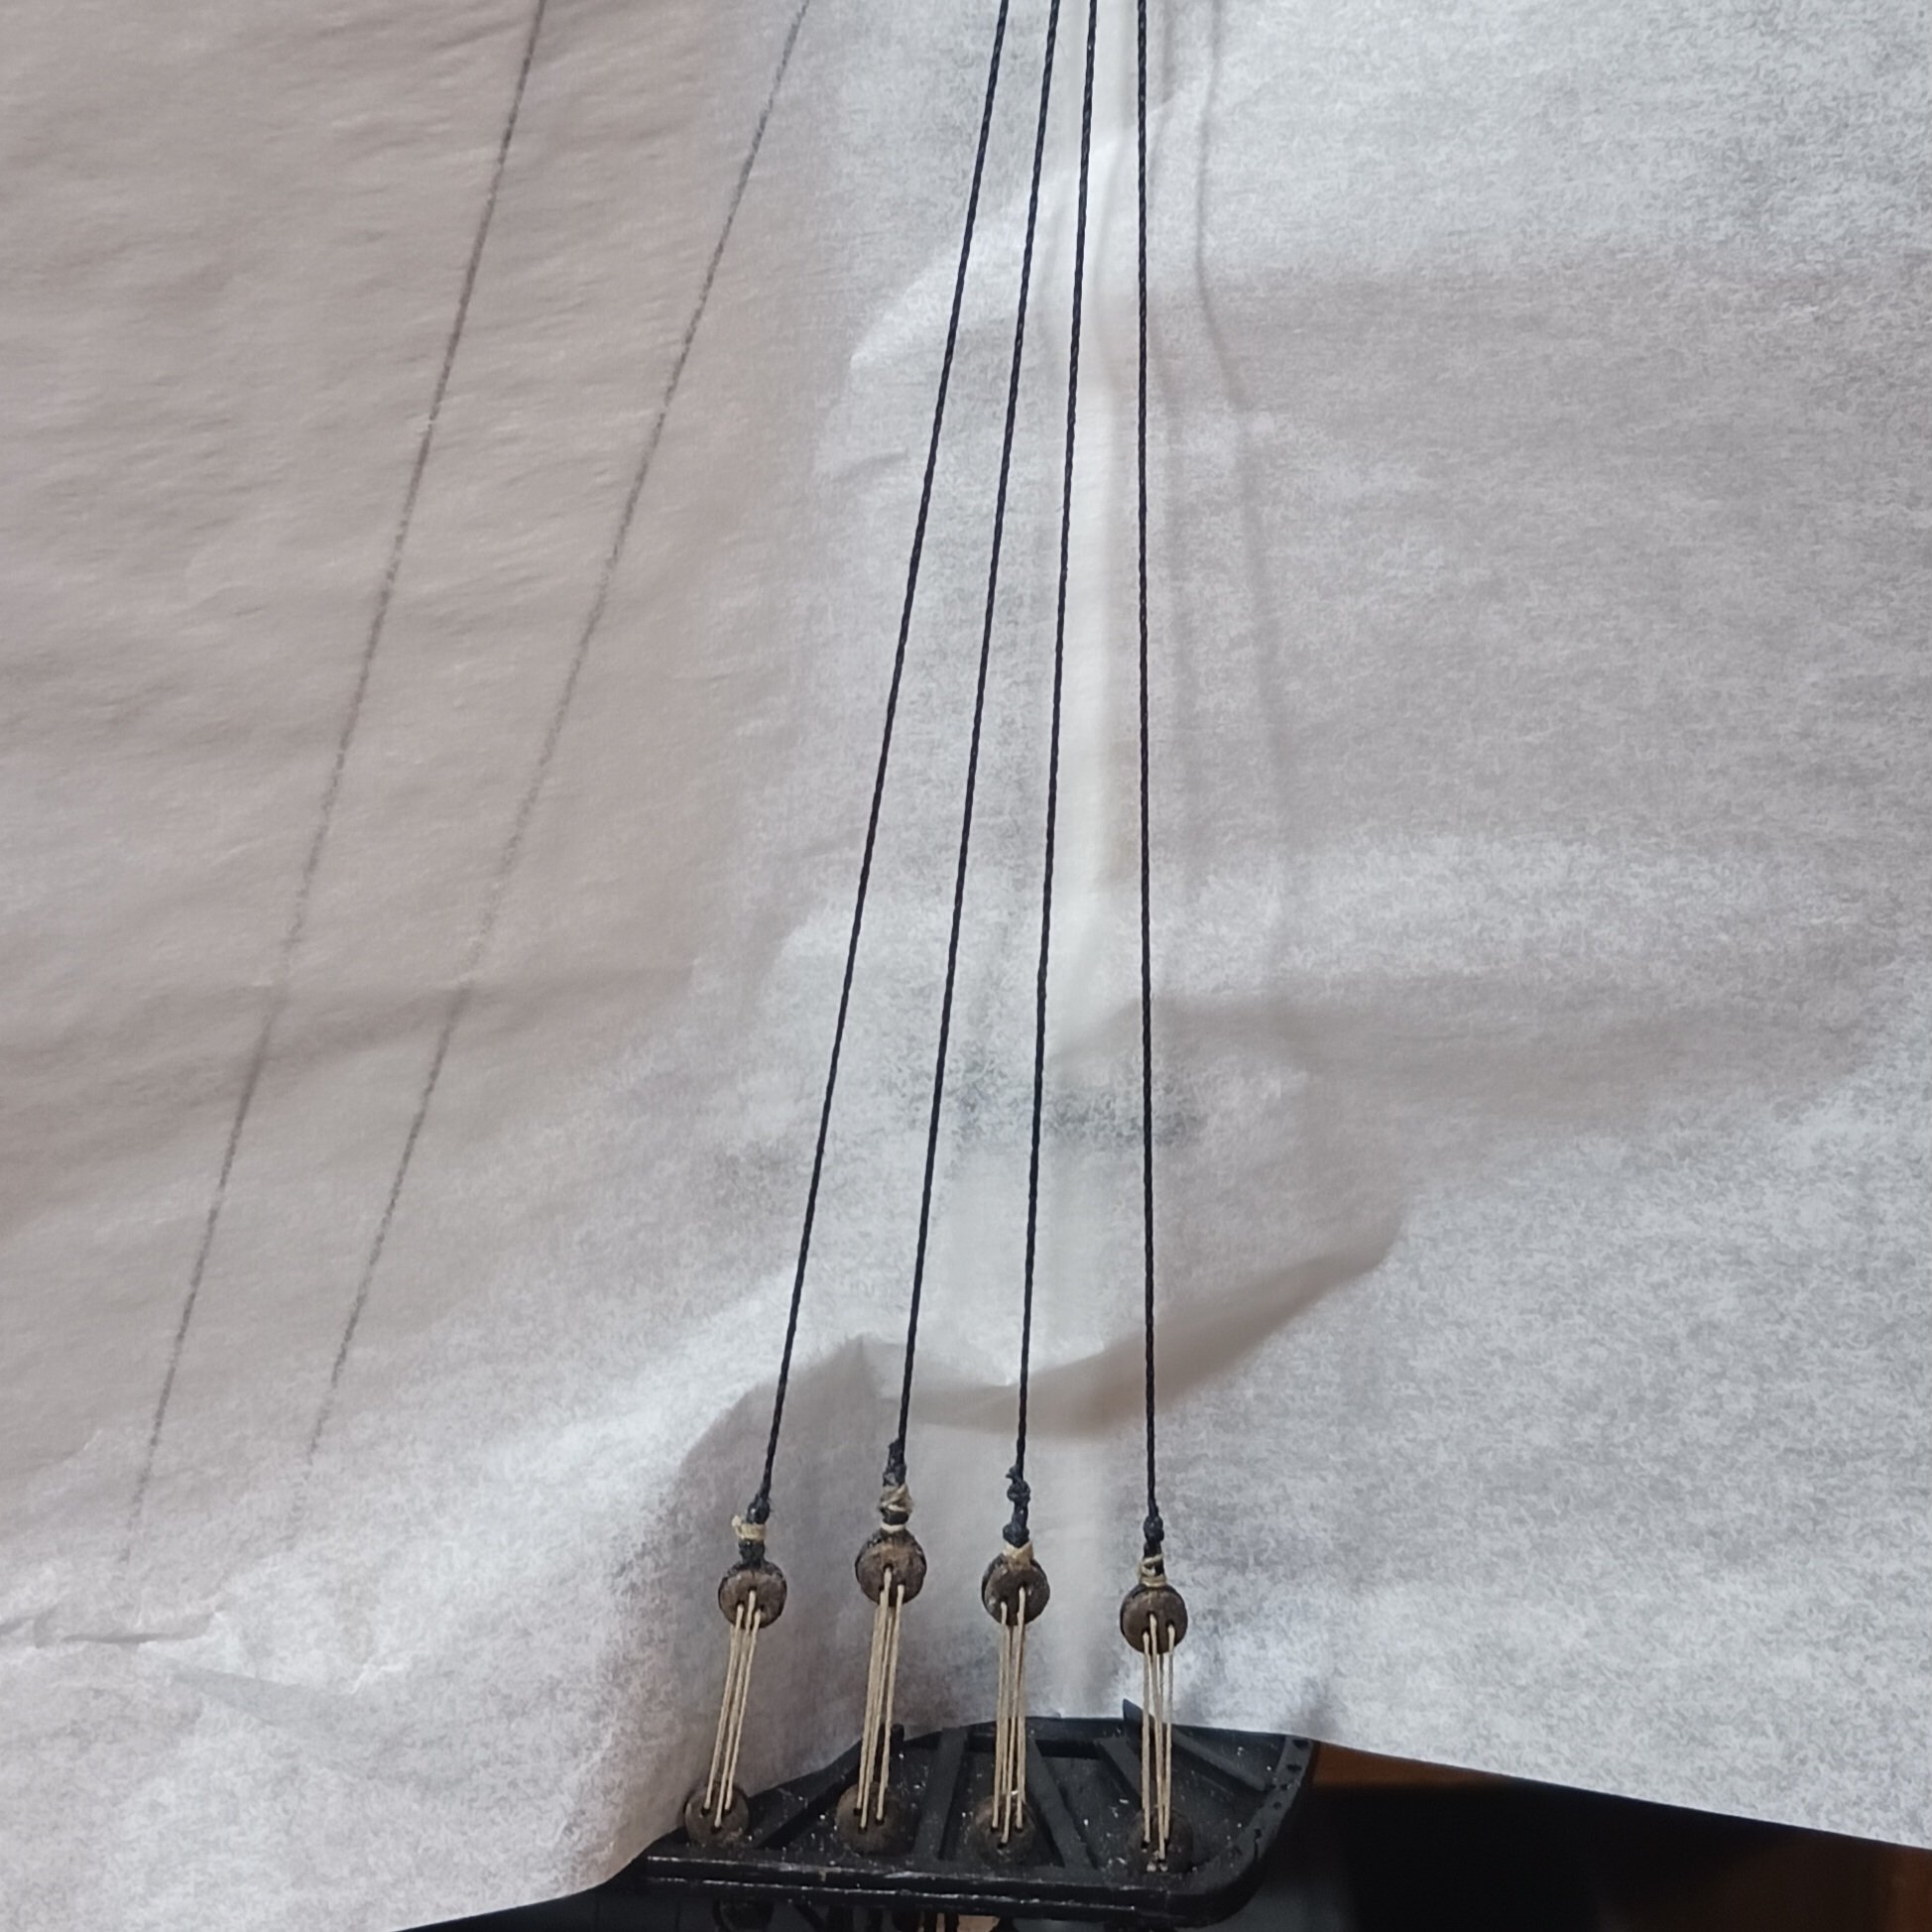
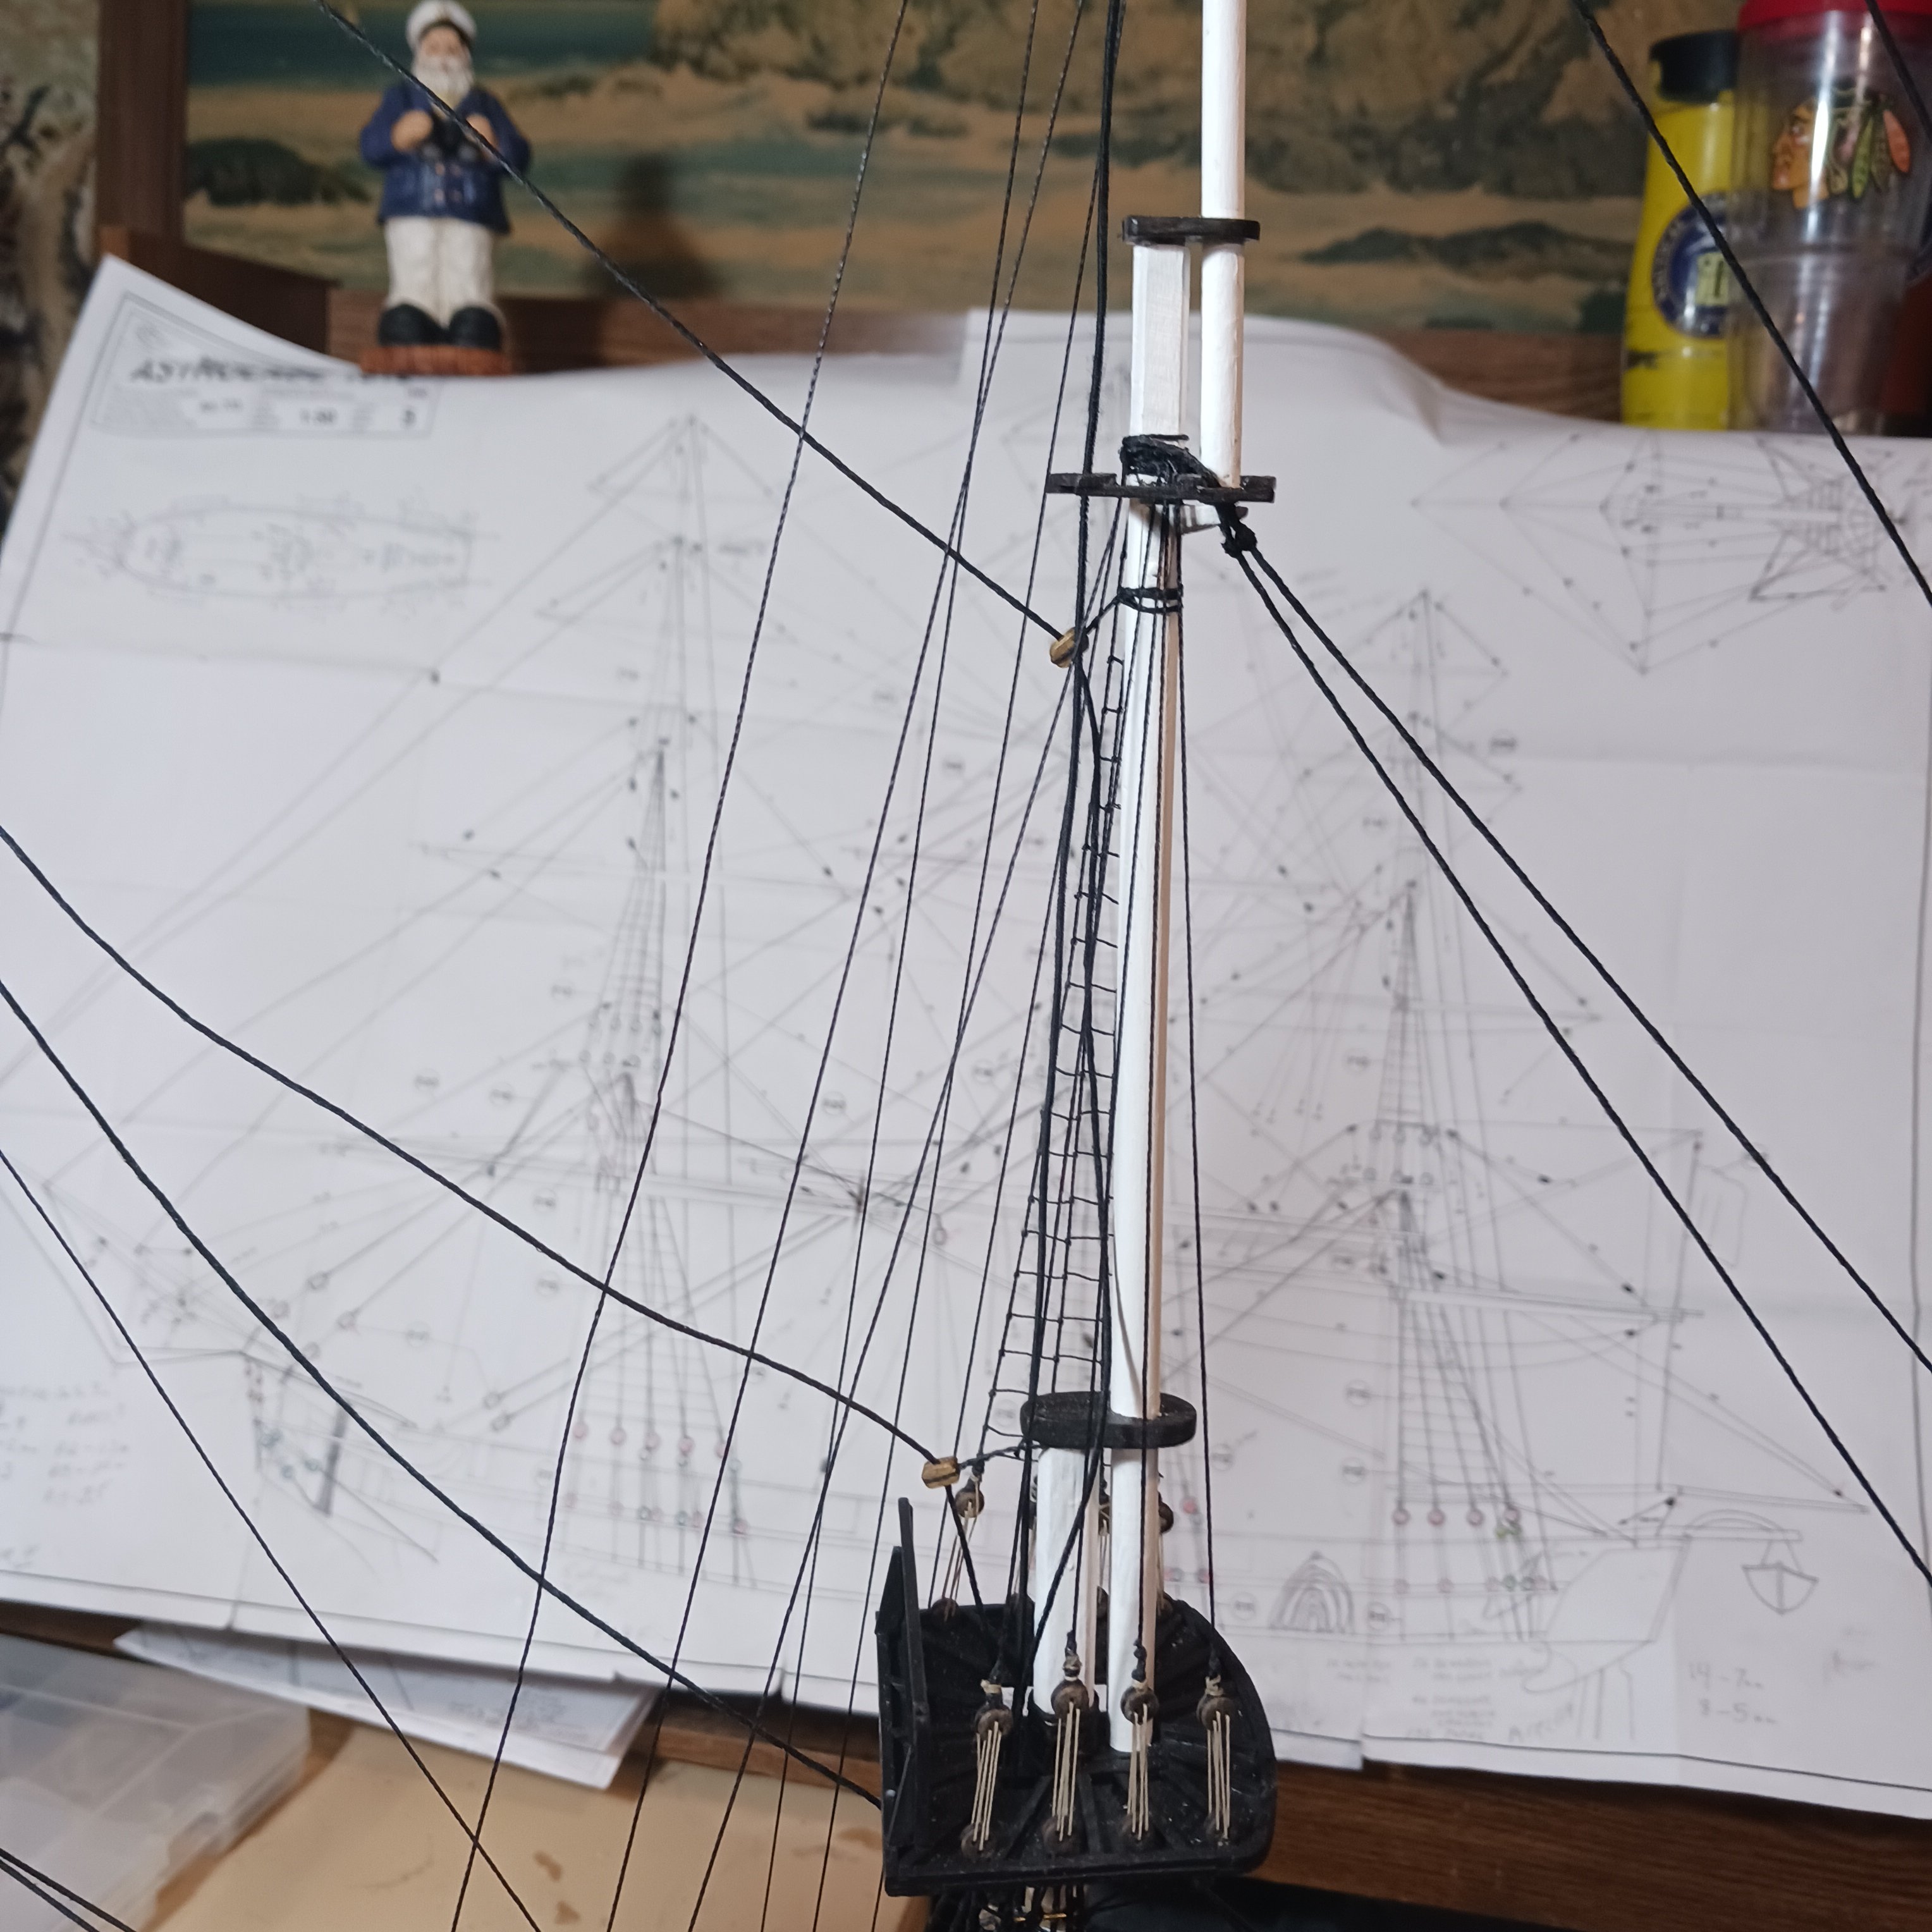
I did manage to get a few more ratlines done , I belive I have 28 left.

I had to put this paper behind so my eyes could focus on the shrouds.

And soon was down to 28 hitches left. Then more lovable interruptions , my Mississippi diorama partner showed up today , she always says BOO when she come in the shipyard, today she got me lol.
After the hug she said holy Uncle Bob that's a big ship, it's as big as me. So we checked it out.
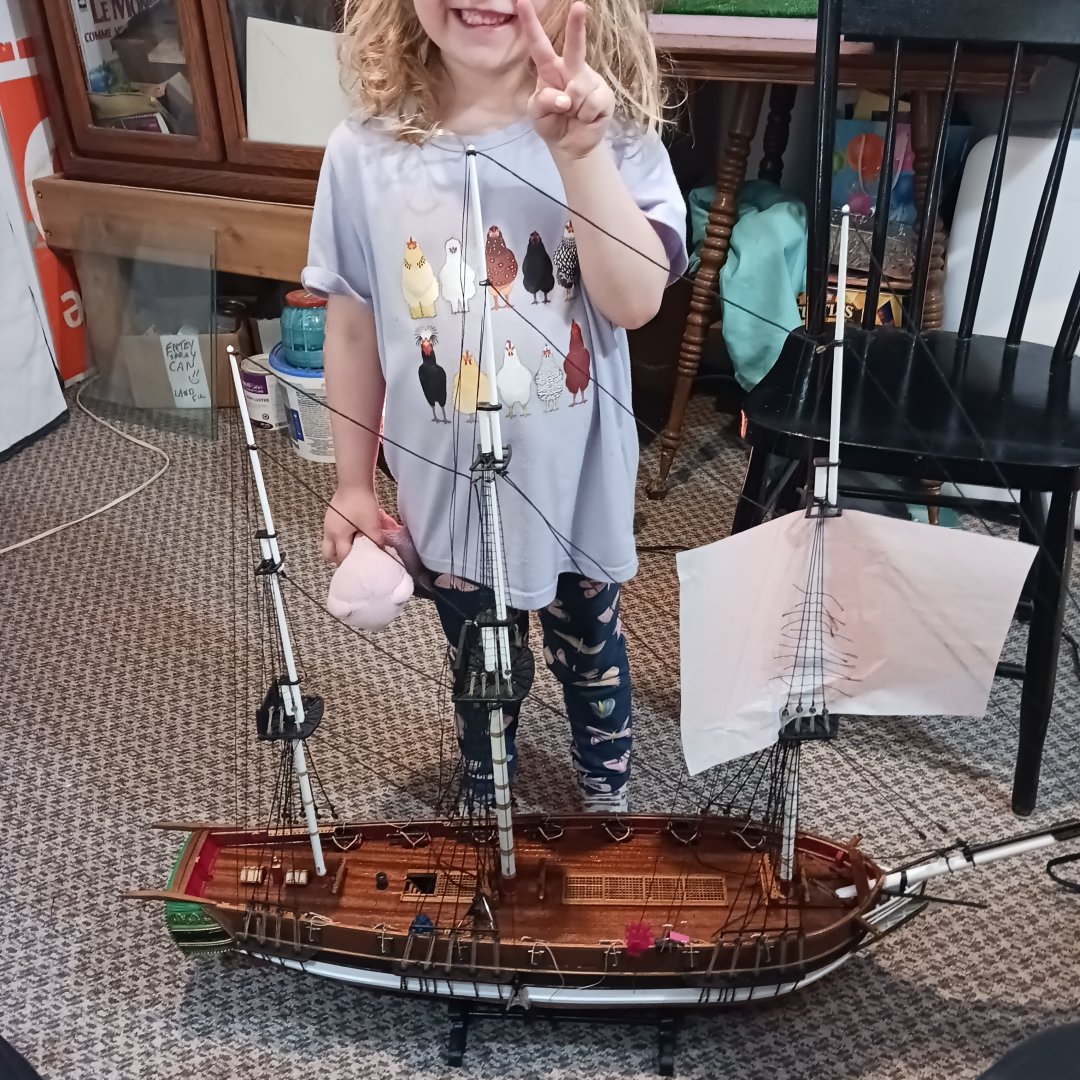
No she is 40 inchs, the ship is 34 inches, but we both agree that it is big.
Then we put it back in place moved on to the Mississippi diorama.
So I have six aft stays left to tie , then the forestays, there are eight to rig .
Finding lots of information about rigging of French ships , and trying to make them look like the pictures is all the fun one could have. That and playing MSW, lol I have gone from images of horses on deck to Captain Jim fighting off wicked Blue Fairy Penguins on his way passed New Zealand to the Artic, just north of Manitoba. Lol Research.
Thanks so much for looking in.
Knocklouder
- Ryland Craze, Jolly Jo, GrandpaPhil and 7 others
-
9
-
 1
1
-
You could bend one plank and see how it fits, that will give you an ideal of how much more you need to take off. Soak the plank in water 5 minutes or so, use your plank bender of choice,
This is the way I did my last few hulls., but there is always another way lol. Good luck.
It's looking good 👍🏾
Bob M.
- ibozev, JacquesCousteau and Meekes
-
3
-
-

Bob M.
Nice in deed.
- AJohnson, Keith Black and mtaylor
-
3
-
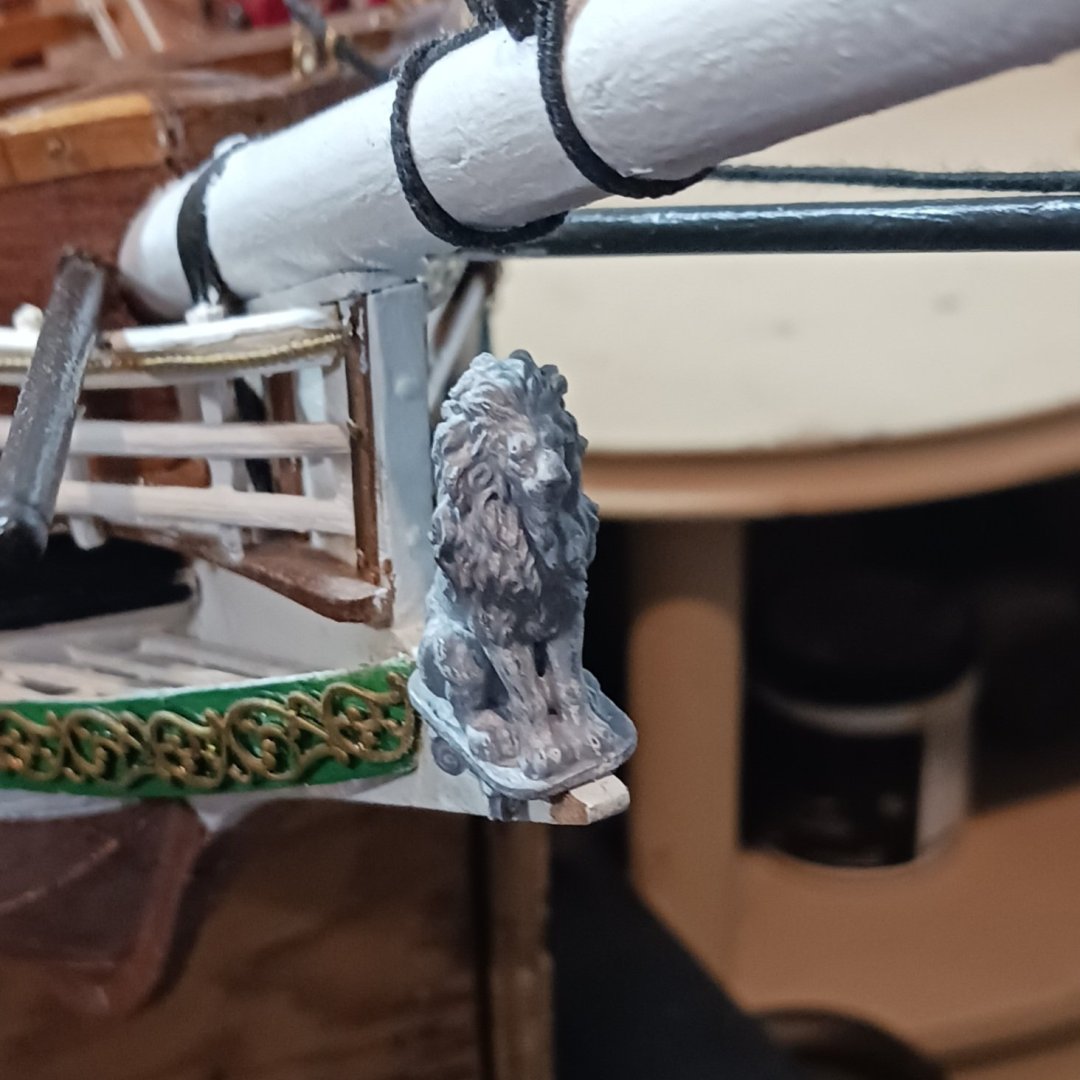
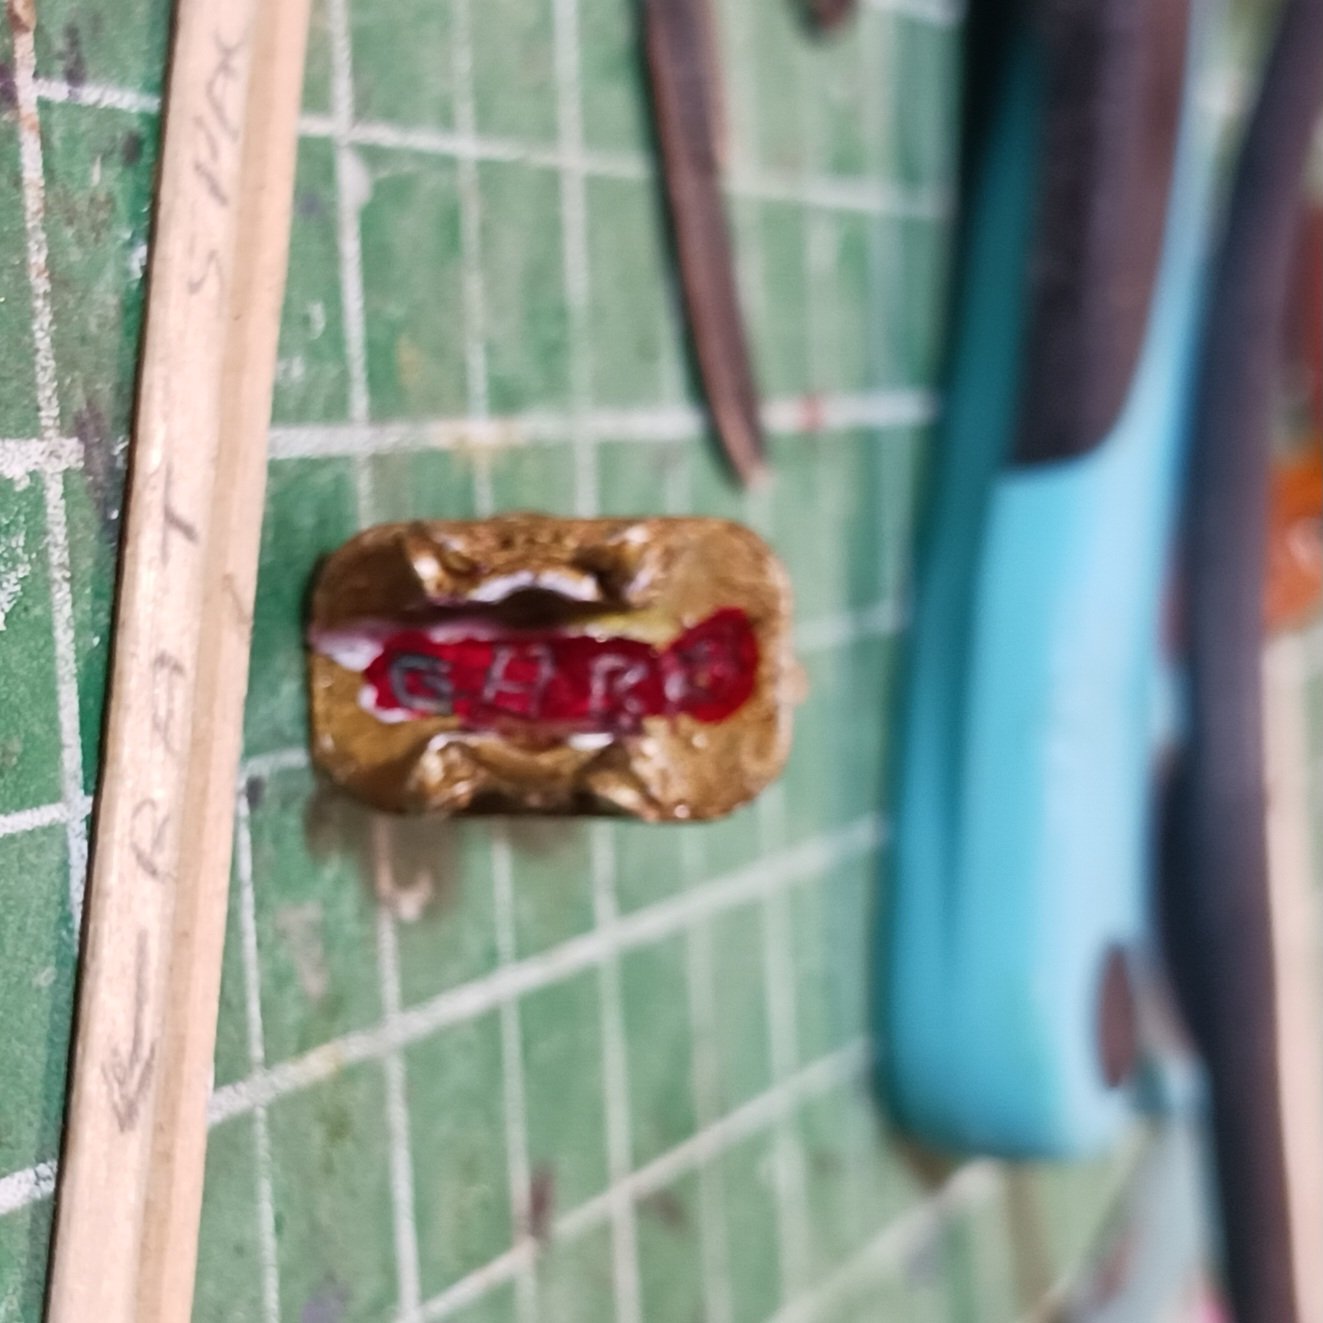
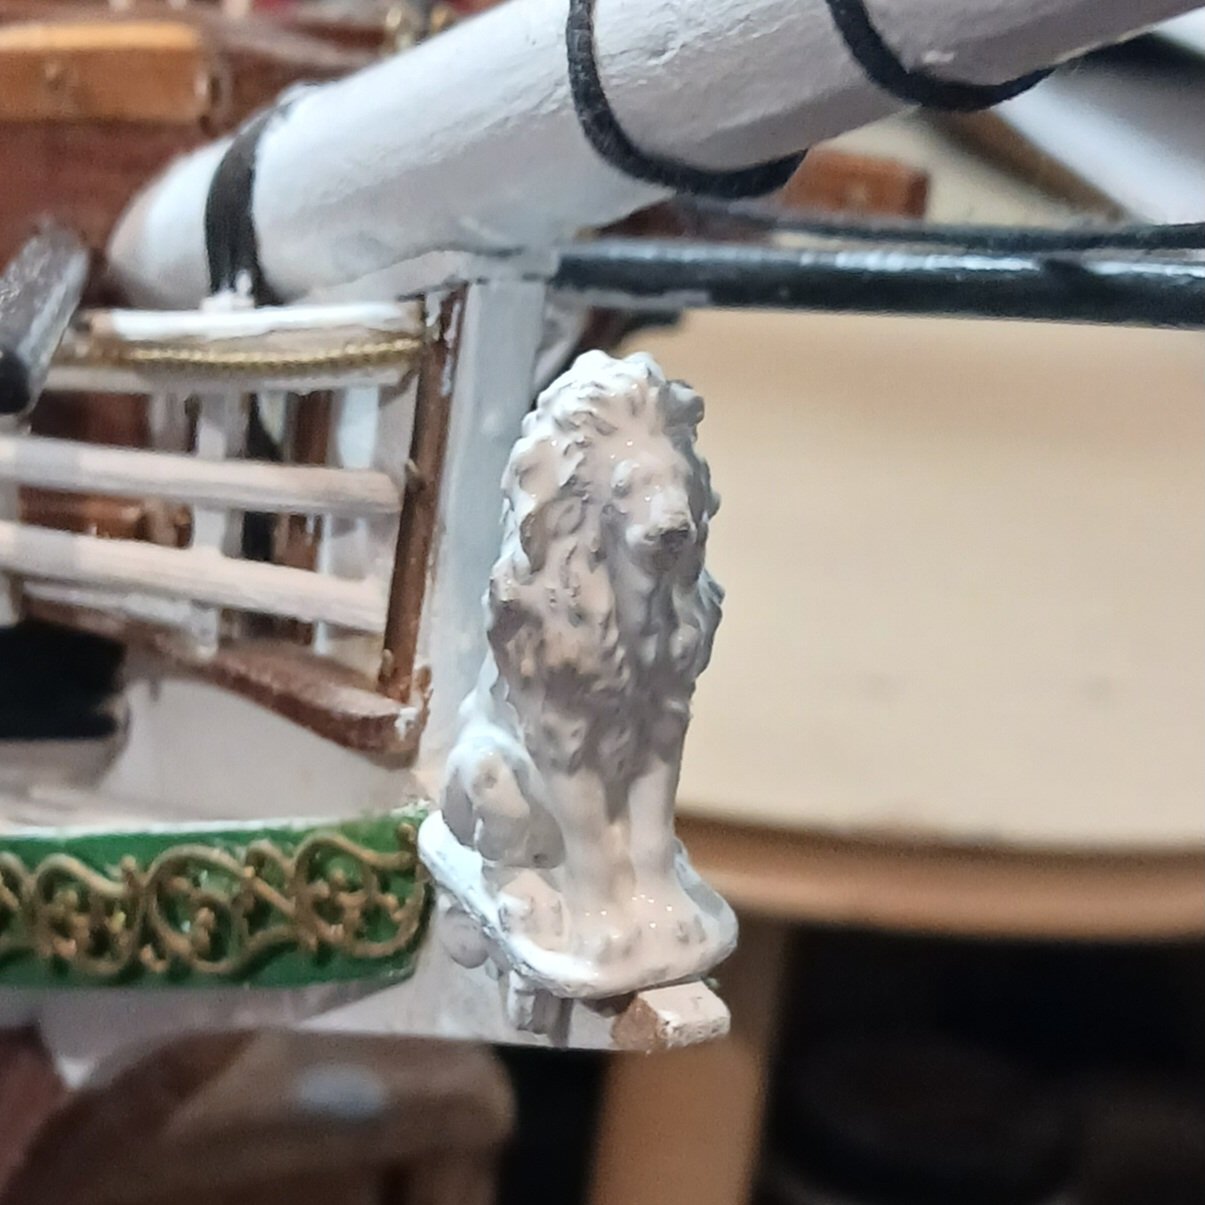
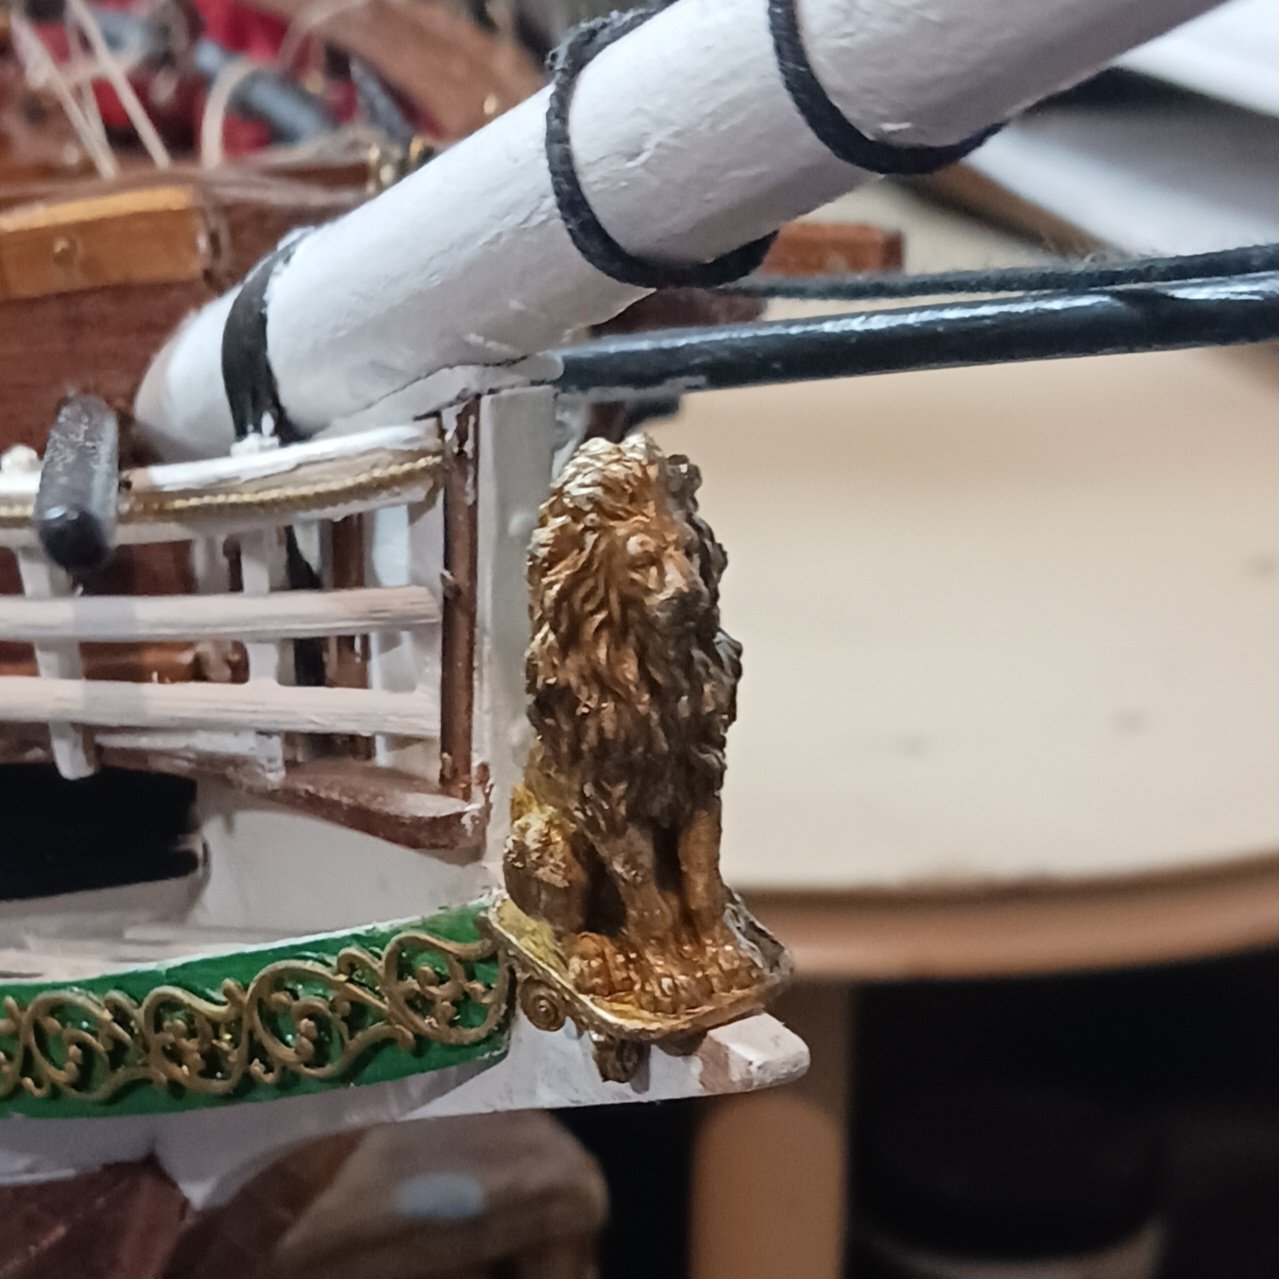
Well Tom , you didn't get picked. I am going with the Golden lion made by my buddy @Gabek I sealed it all with flat varnish ,wrote his name on the bottom.

And put it on the bow to dry.

I in my happy place, ratlines, I can't figure out why people don't like ratlines. Oh well some people don't like research either lol.
Here are a few time lap photos of today's ratlines. 😀.
A dab of CA to start , tie them on , finish with a dab of CA. Trim when finished 👌.

Moving on to the foremast upper ratlines, 80, then the Futtock ratlines. The aft stays on the main and formast will be tied on right after that.
Today special thanks go's to, @Gabek, @Keith Black, @archjofo, you have enrich my journey, thank you.
And thank you Rodney ,I hope you like it. I am having so much fun rigging this . Thanks
") .
.
Talk soon my freinds.
Knocklouder.
- Gabek, Keith Black, Bryan Woods and 6 others
-
9
-
I felt those winds, brings to mind an old sailing term about brass Monkeys.
And the reason they went exstinked in Manitoba , I think. He will be plenty warm enough, fire on, if no keg in the corner, maybe, a wee flask in his pocket to keep the chill off .
Lol.,great work Keith,
Knocklouder.
- Canute, Glen McGuire, clearway and 2 others
-
 5
5
-
-
-
Yes Please, find another app. I like following your work, and my translator doesn't work all the time , like your last post I can't translate .
Thank you
Bob M.
-
Very nice looking Fleet. Awesome work as well.
Bob M.
-
Thank you so much , ya'll . Yes the swear jar is filling up lol. The Frist Mate got me to change my words to "Surprise " it still cost the same but it sound better coming from the shipyard. Sailors lol.
@Gabek came over for coffee, yesterday. The wind was favorable and he never noticed the septic tank issues lol. The Frist Mate said it took about 3 and half minutes after he got here that we started talking ship. She said it was fun to listen to us ramble on and breakout into laughter for four hrs until Gabe had to go, but he did leave ,Dandy Lion 🦁 for the figurehead.
In fact he made two. A most heart felt thank you Gabe, even today , he sent me some pictures of a new captain for the Astrolabe holding a telescope, fresh out of the printer this morning, I had to tell him stop making things for me and get back to your build, he is on a time line to get his finished. I told him that I would make a list of what I need, and he can get to it after he is done his lol.
The lion in the middle is the kit supplied figurehead.
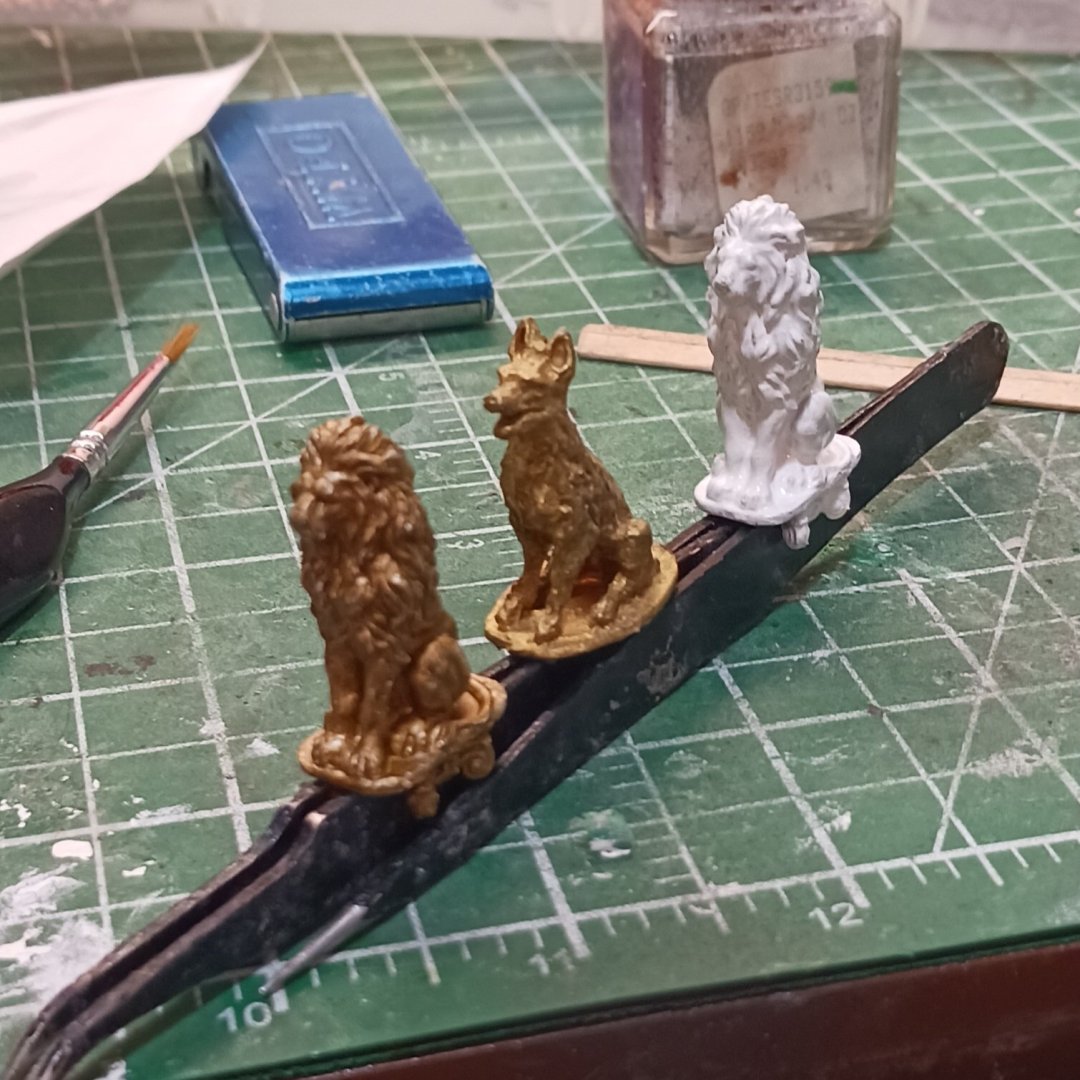
Above is Holy white speed paint, below lioark , lioark.


Contenters, white above gold below.
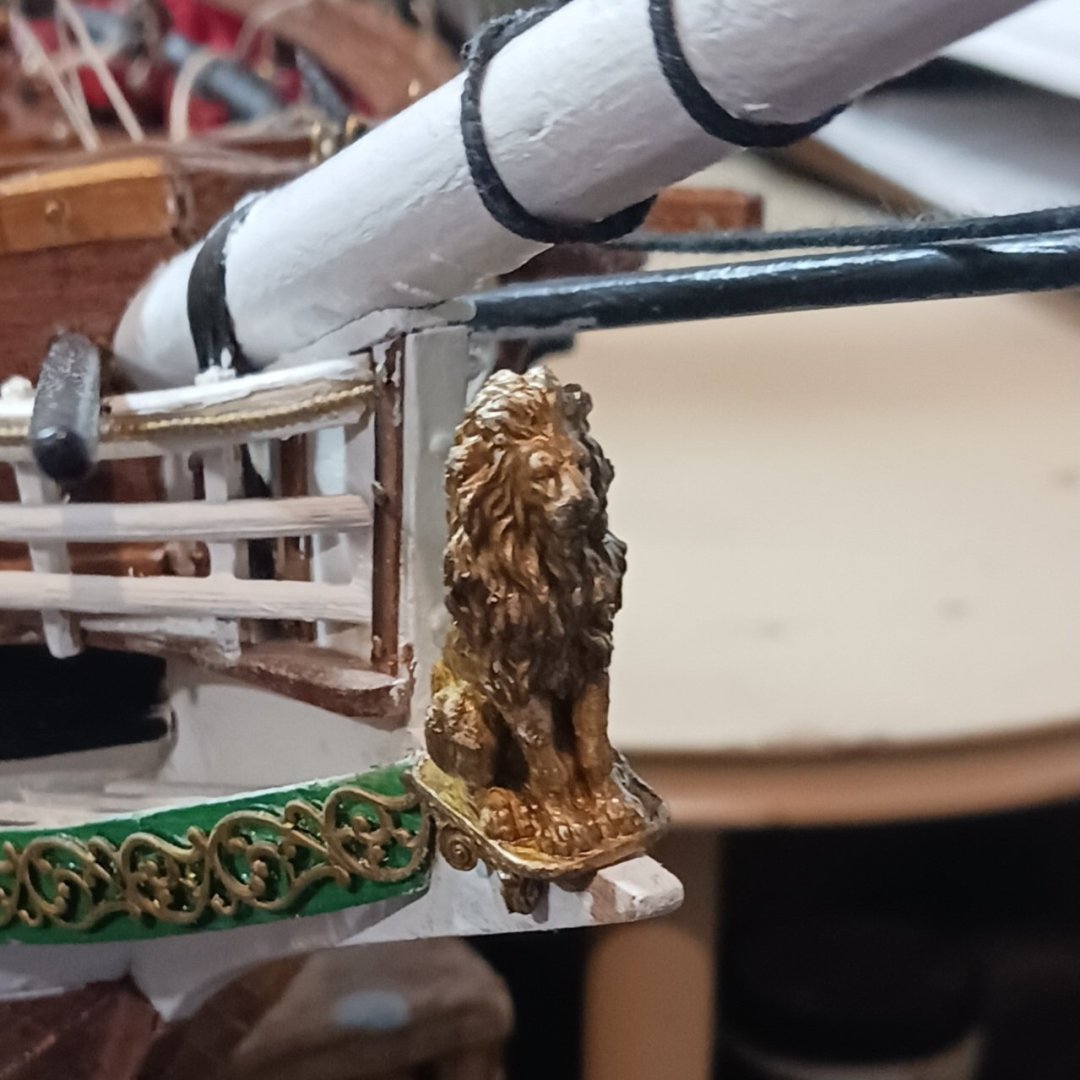
Everyone so far has picked the gold lion, it sets off the the bowsprit nicely, gold lion it is.
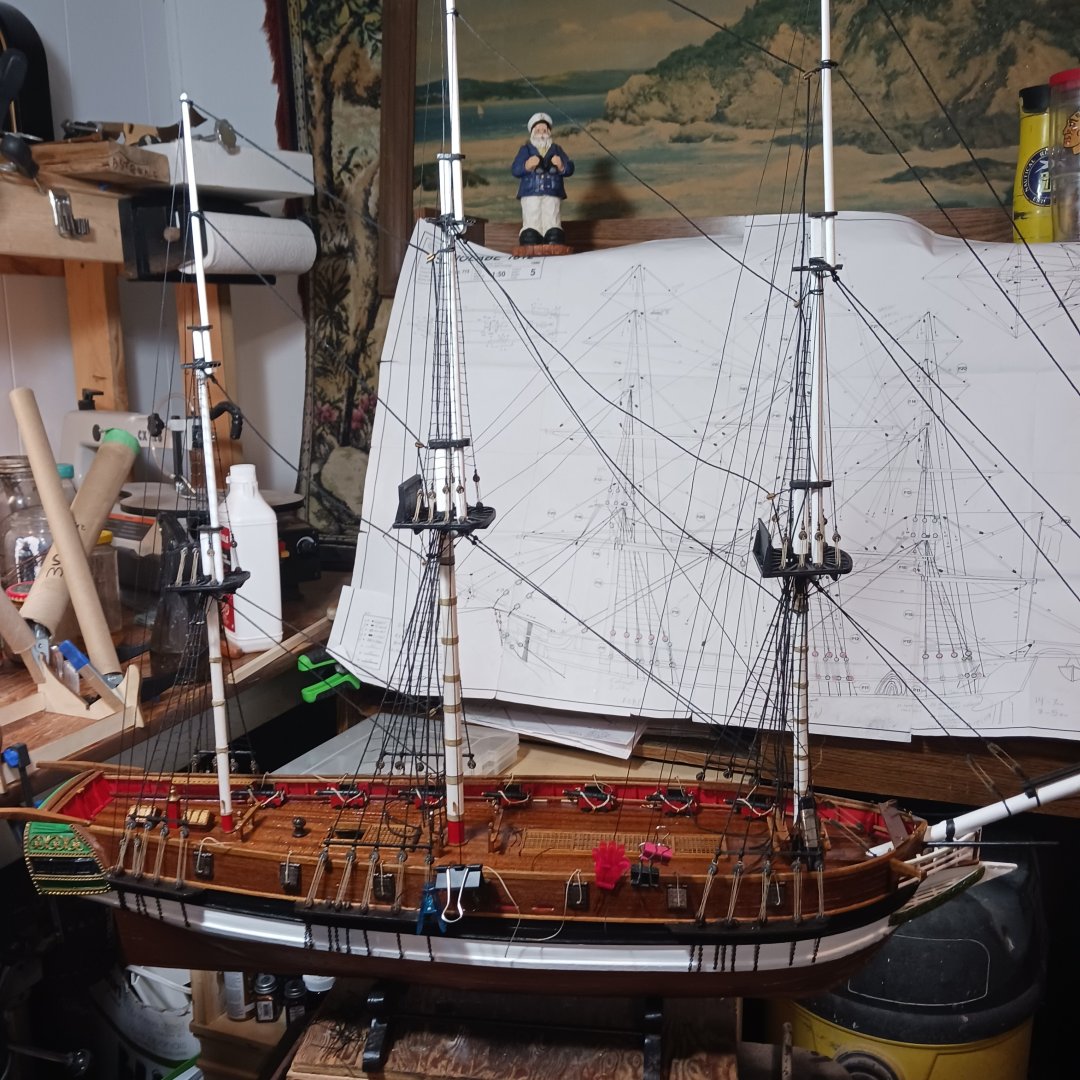
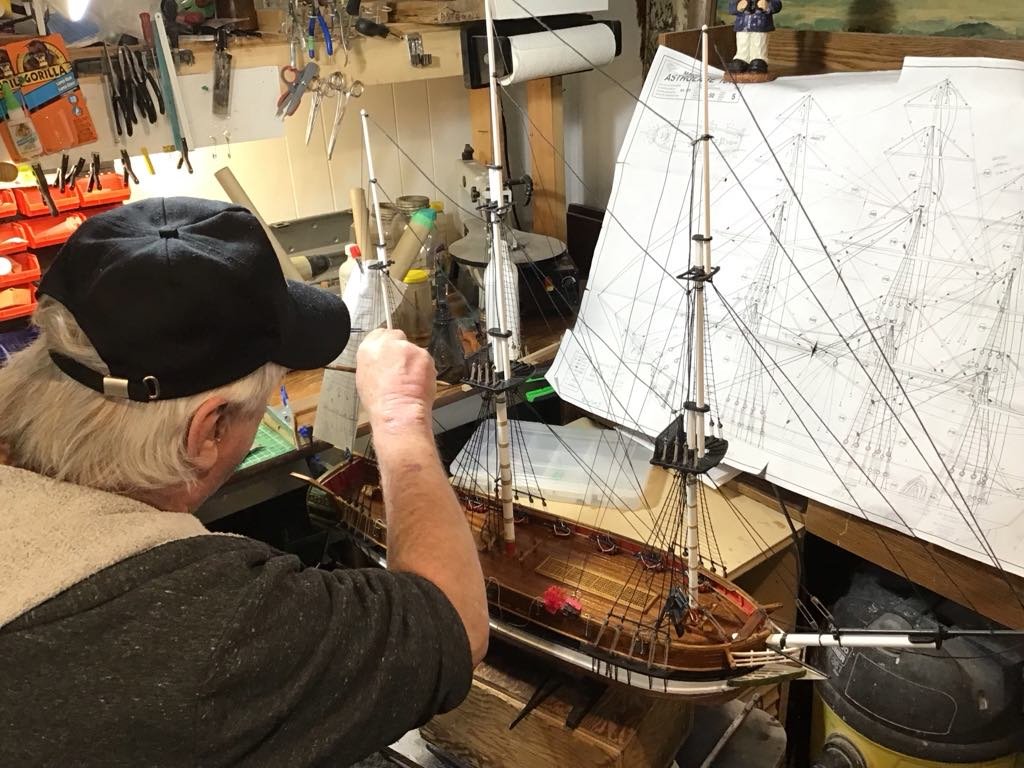
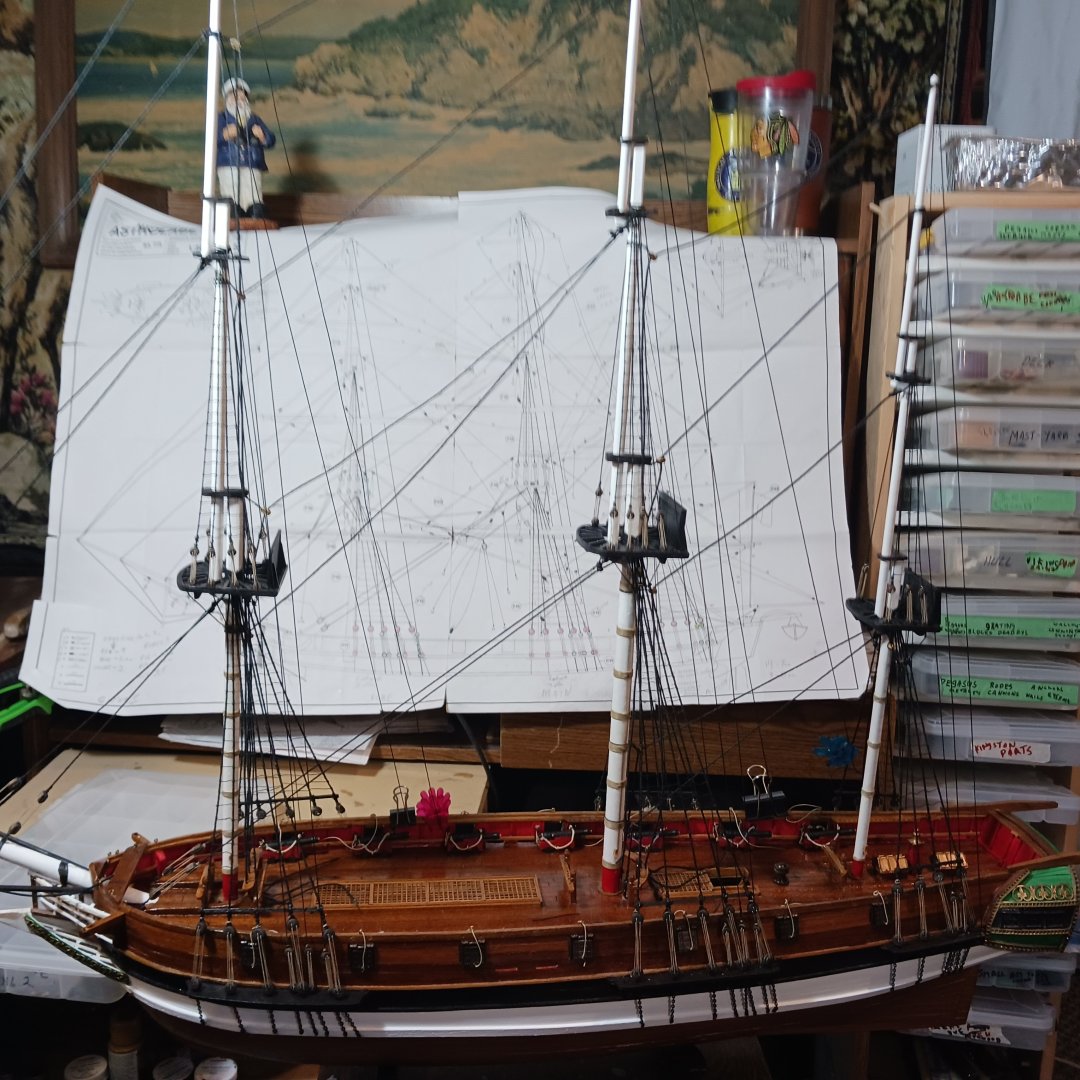
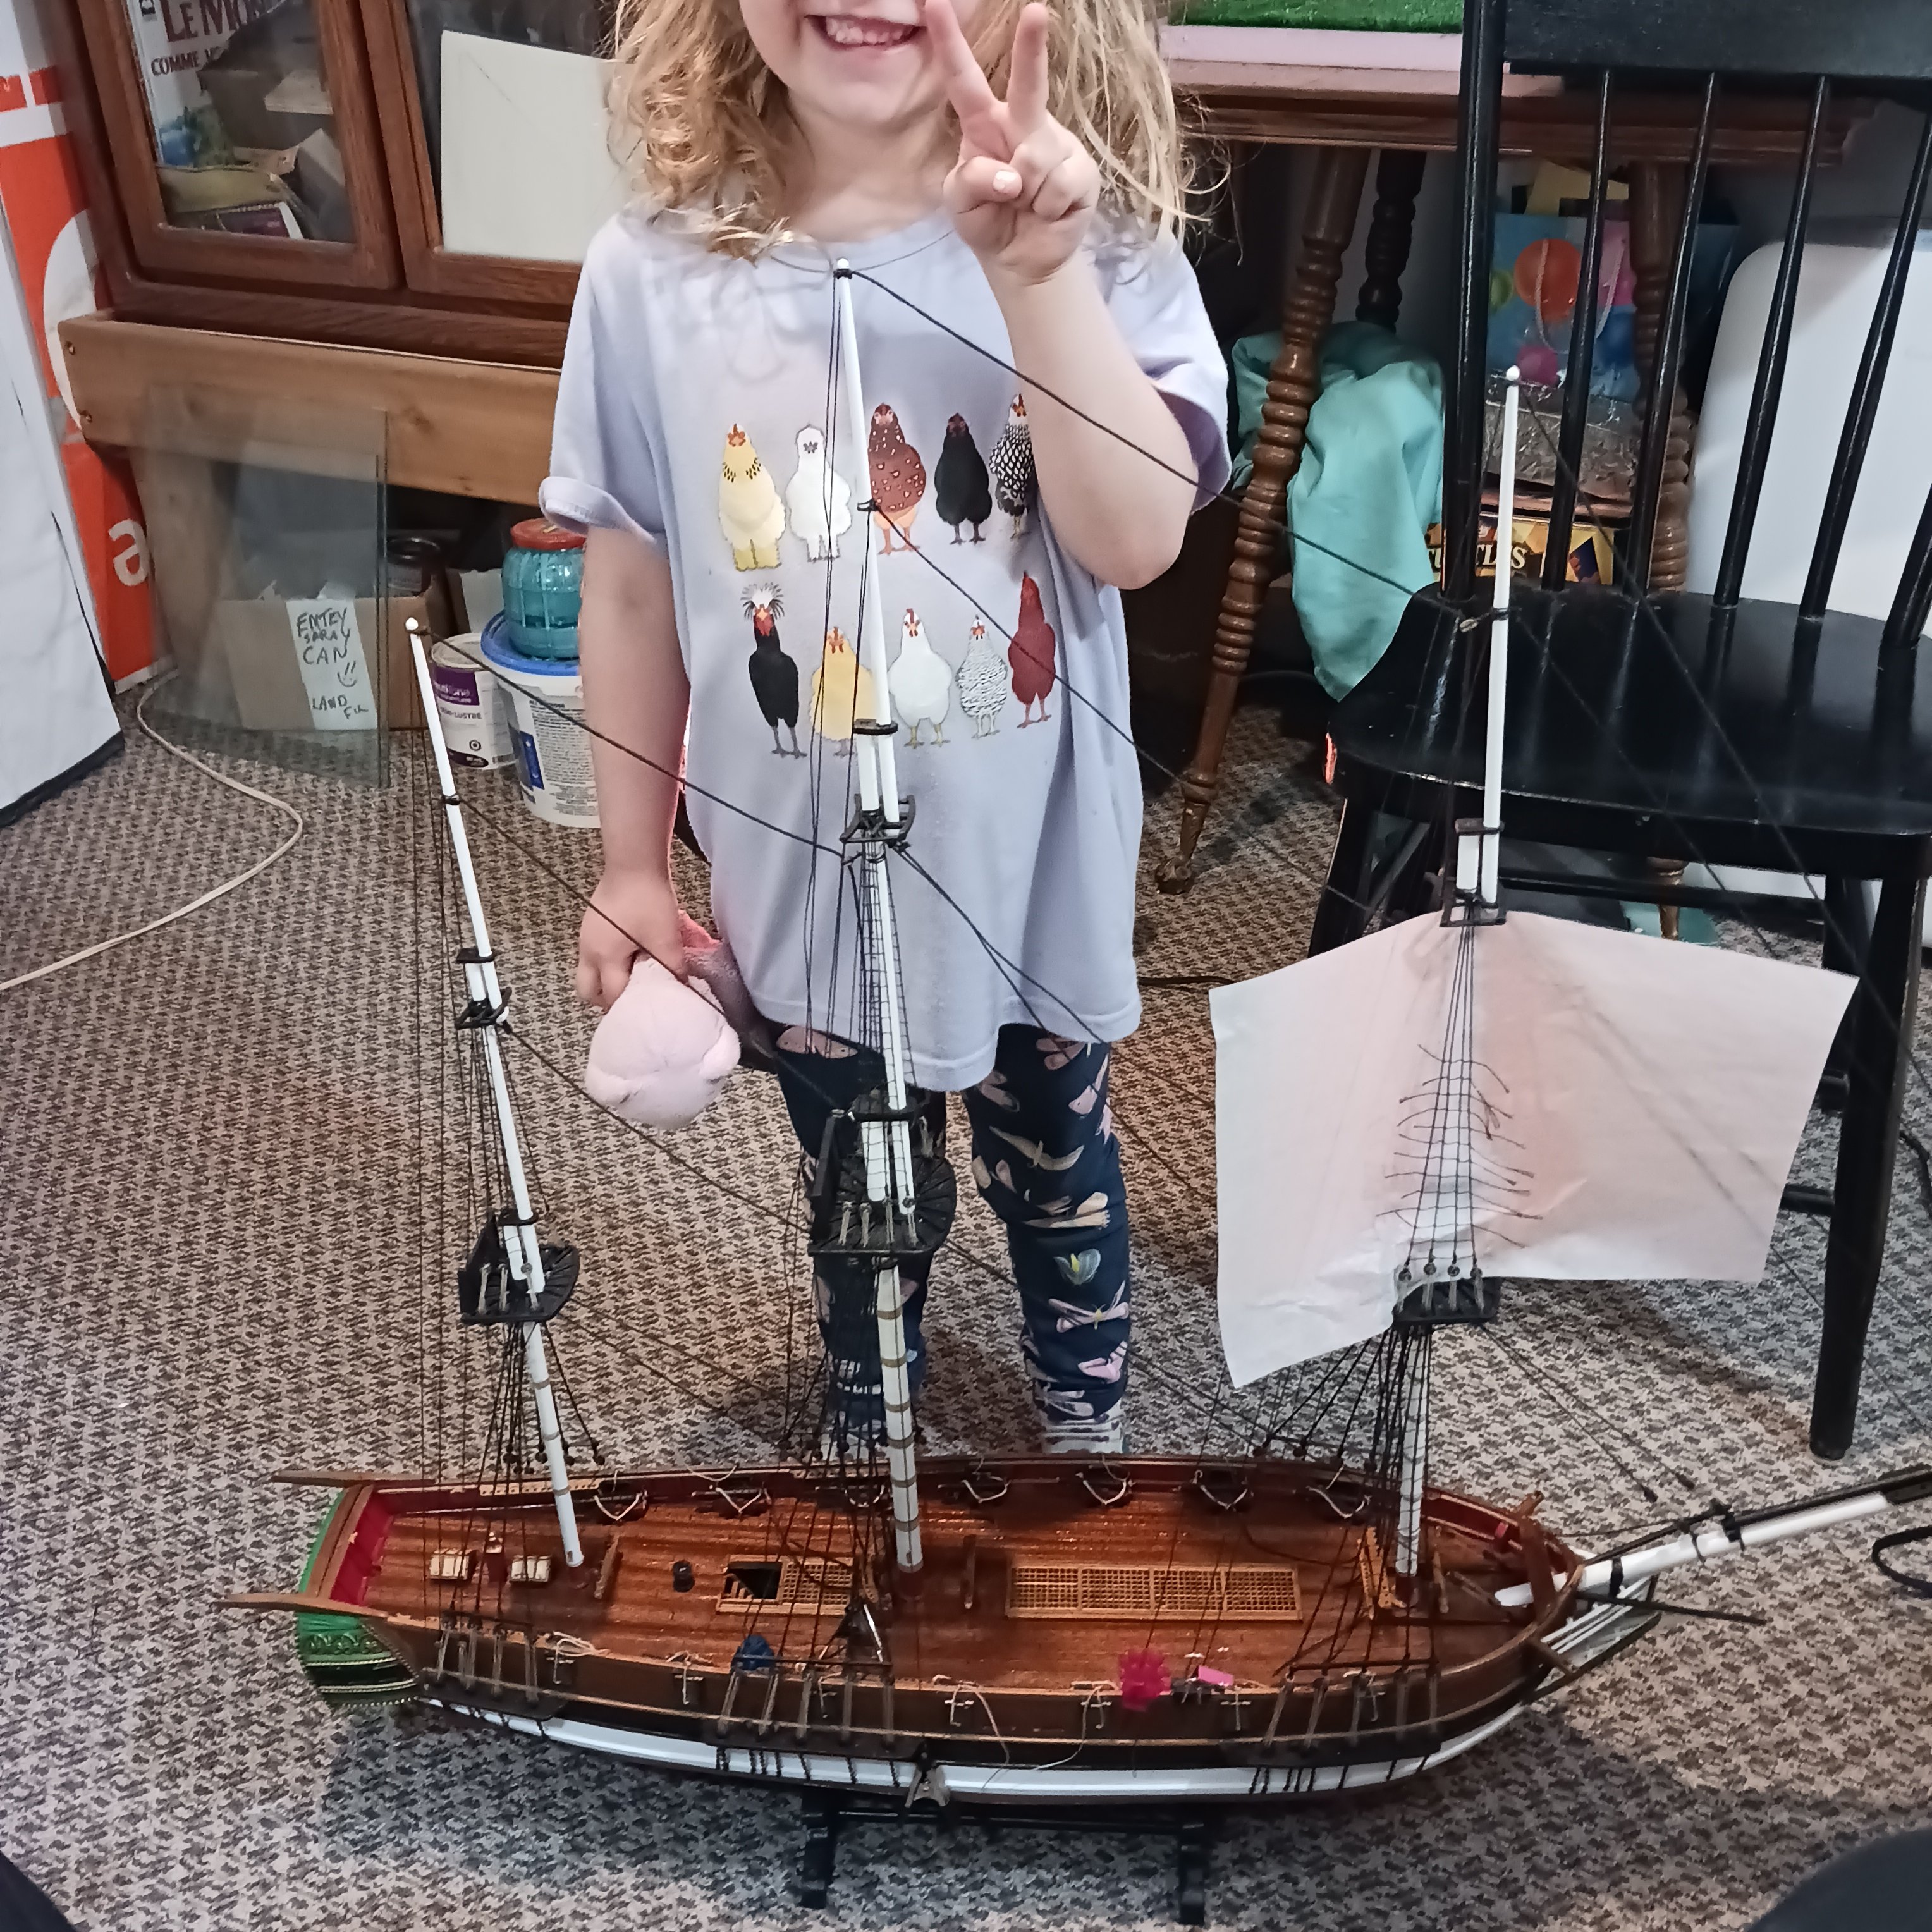
Gabe took this picture of me doing a clove hitche, it gives you a scene of how big this Astrolabe is.Four feet long and three feet high.
It looks like I am going to build a display case just for the Astrolabe, the case I have upstairs is full, five models in that one, four in the one in the shipyard, and two on the go, time to start moving thing around , trying to find room for the Surprise will be fun. Lol.
Now back to the starboard side of things, ratlines and stays, which Gabe and I came up with a plan for those, he brought a book on rigging to show me a few pictures of ways to hook them up. There are at least five different ways to tie them on. All will work, but which one is the easier lol..
Thanks for looking in and for all the help so far in my modeling journey 😊.
Bob M.
- GrandpaPhil, Gabek, JeffT and 9 others
-
12
-
-
Rigging continues, it never ends lol. Right after I rig Rodney's Astrolabe, I have my Pegasus to rig, then a Bluenose I to rig. Followed by a Scientific Bluenose to build and rig. And of course a Surprise 😮 🫢
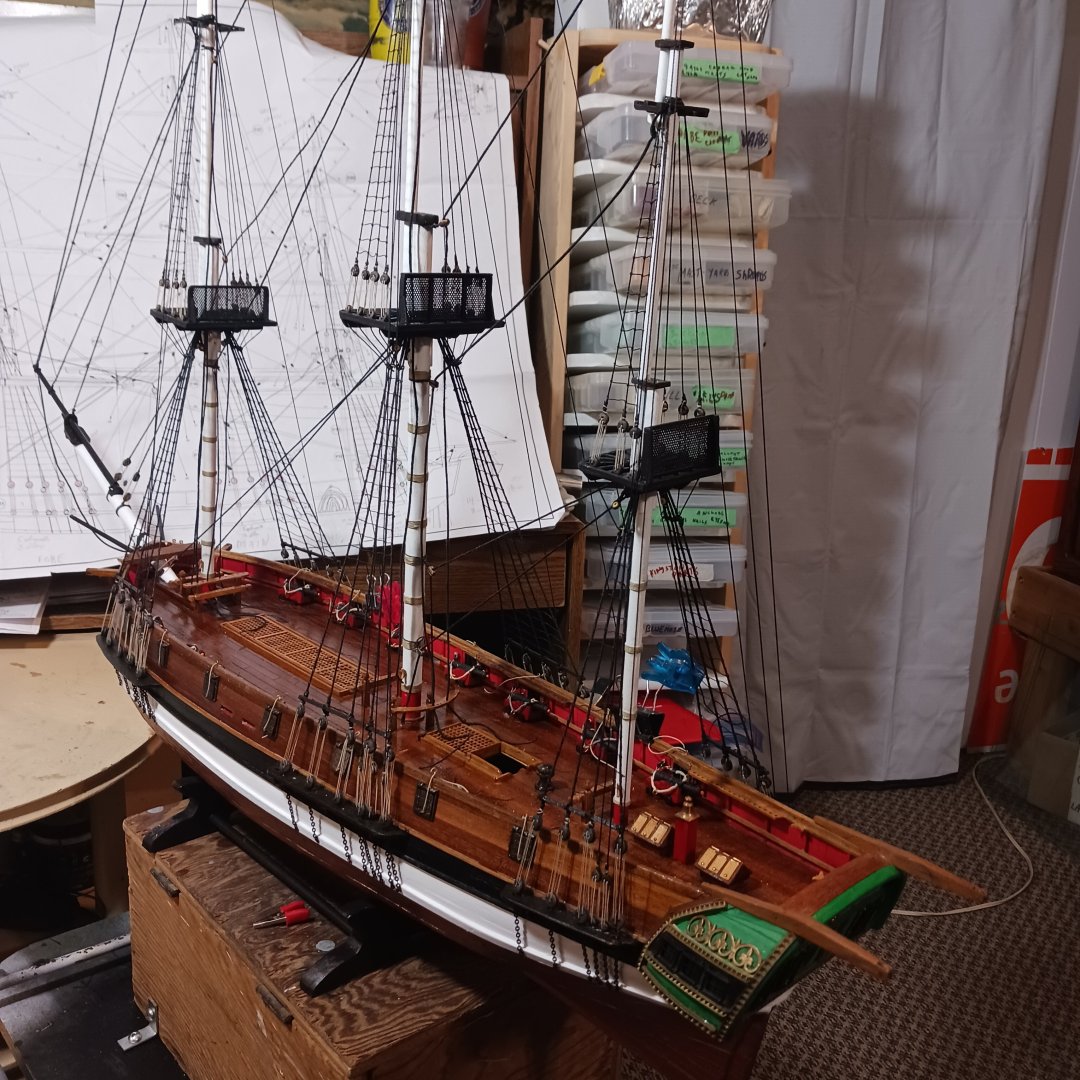
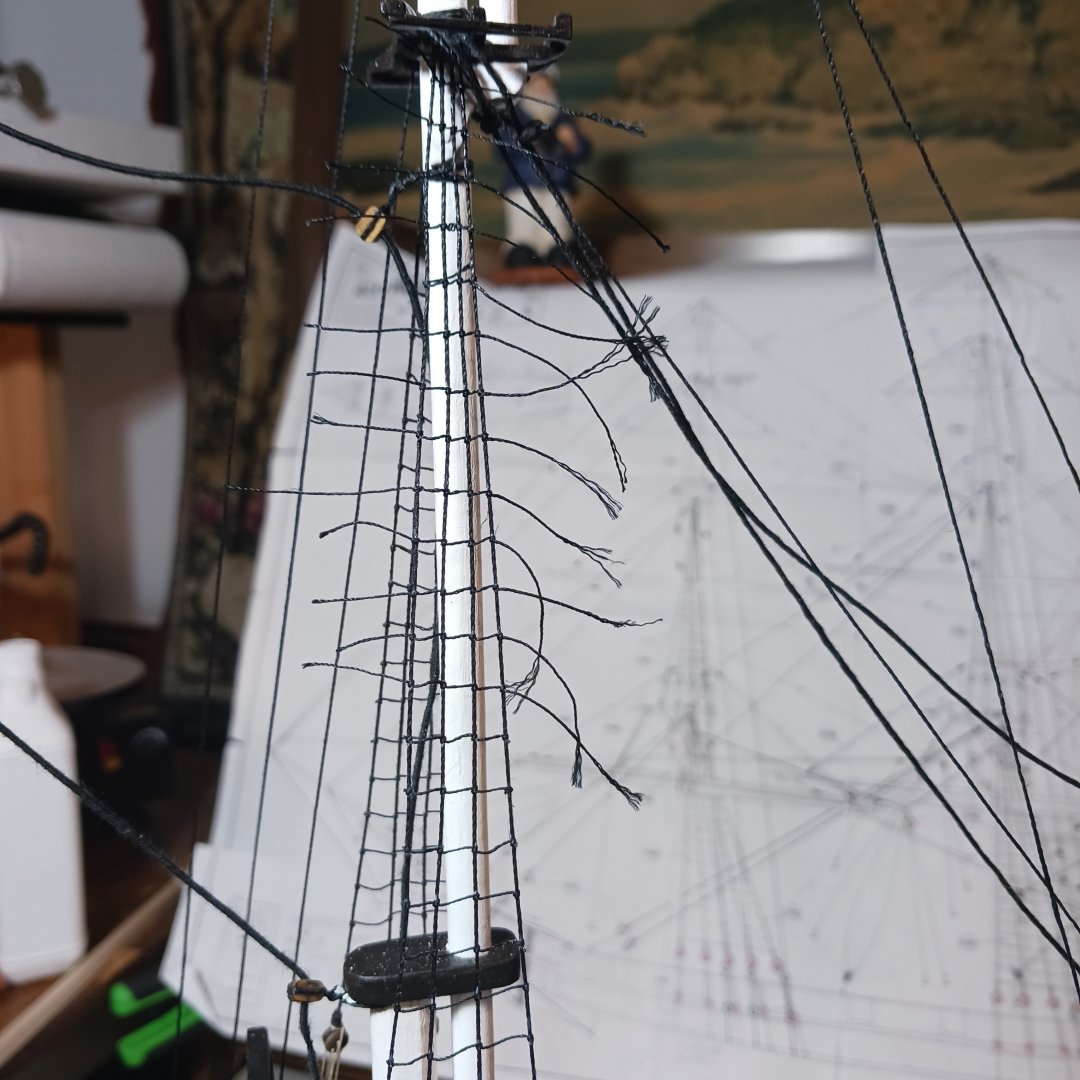
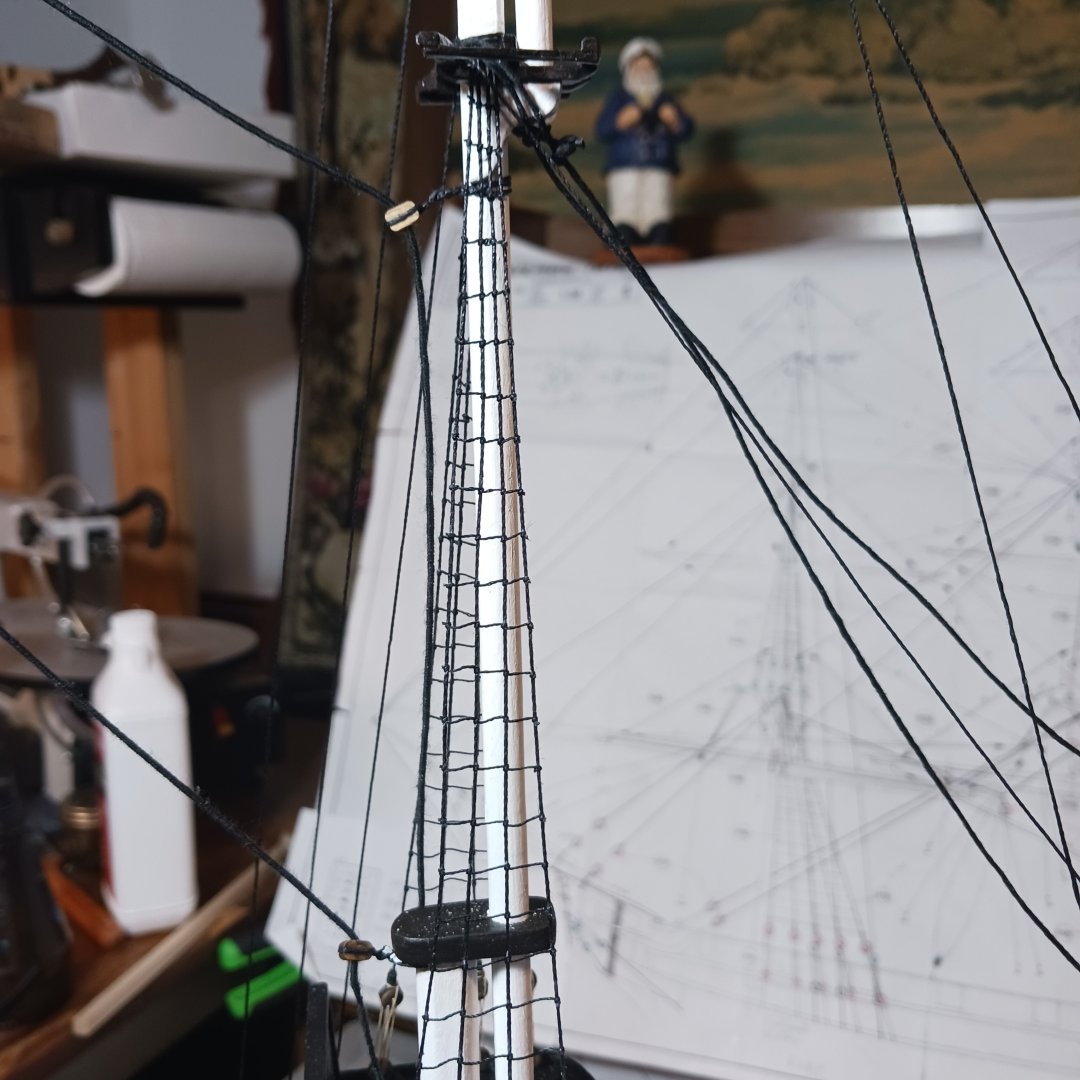
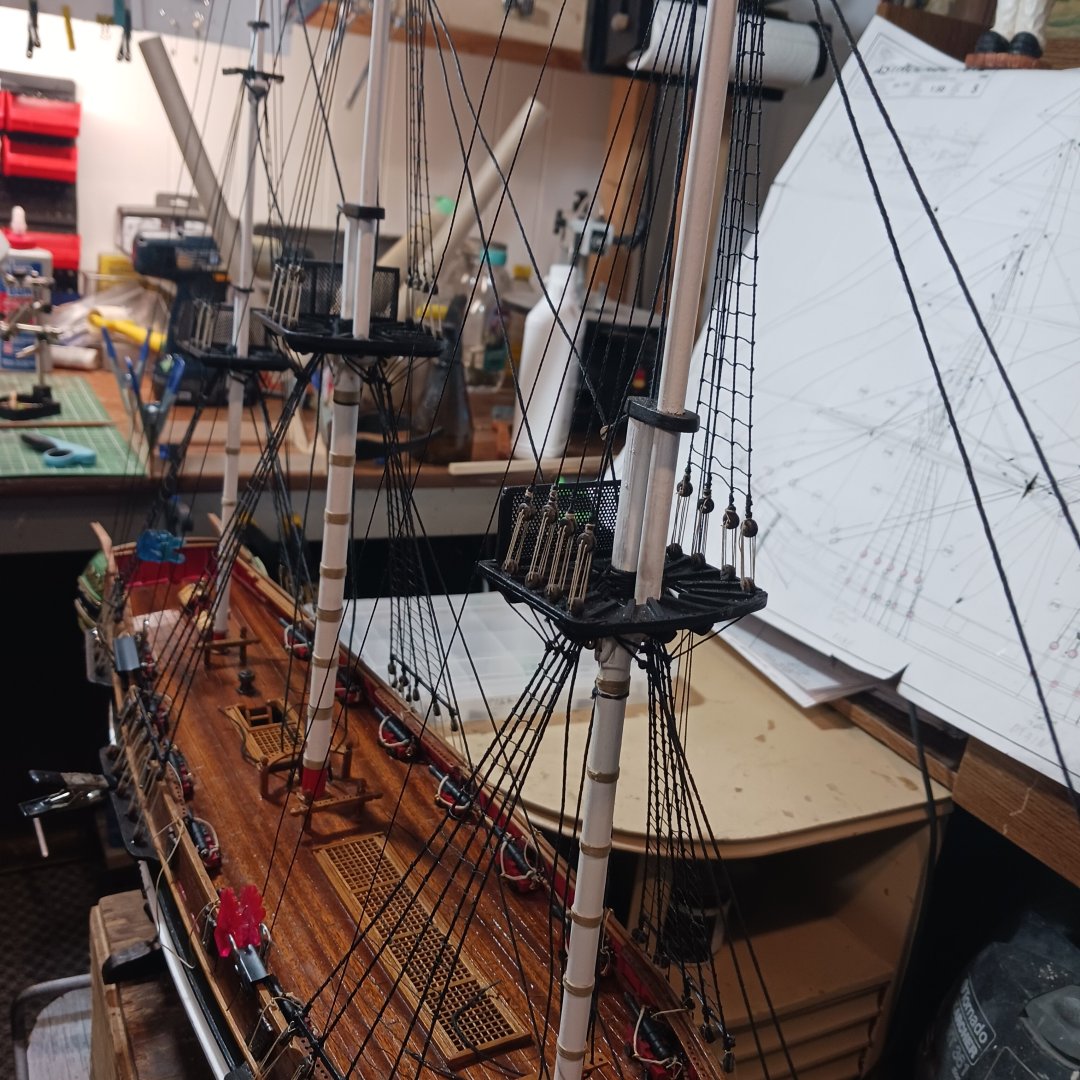
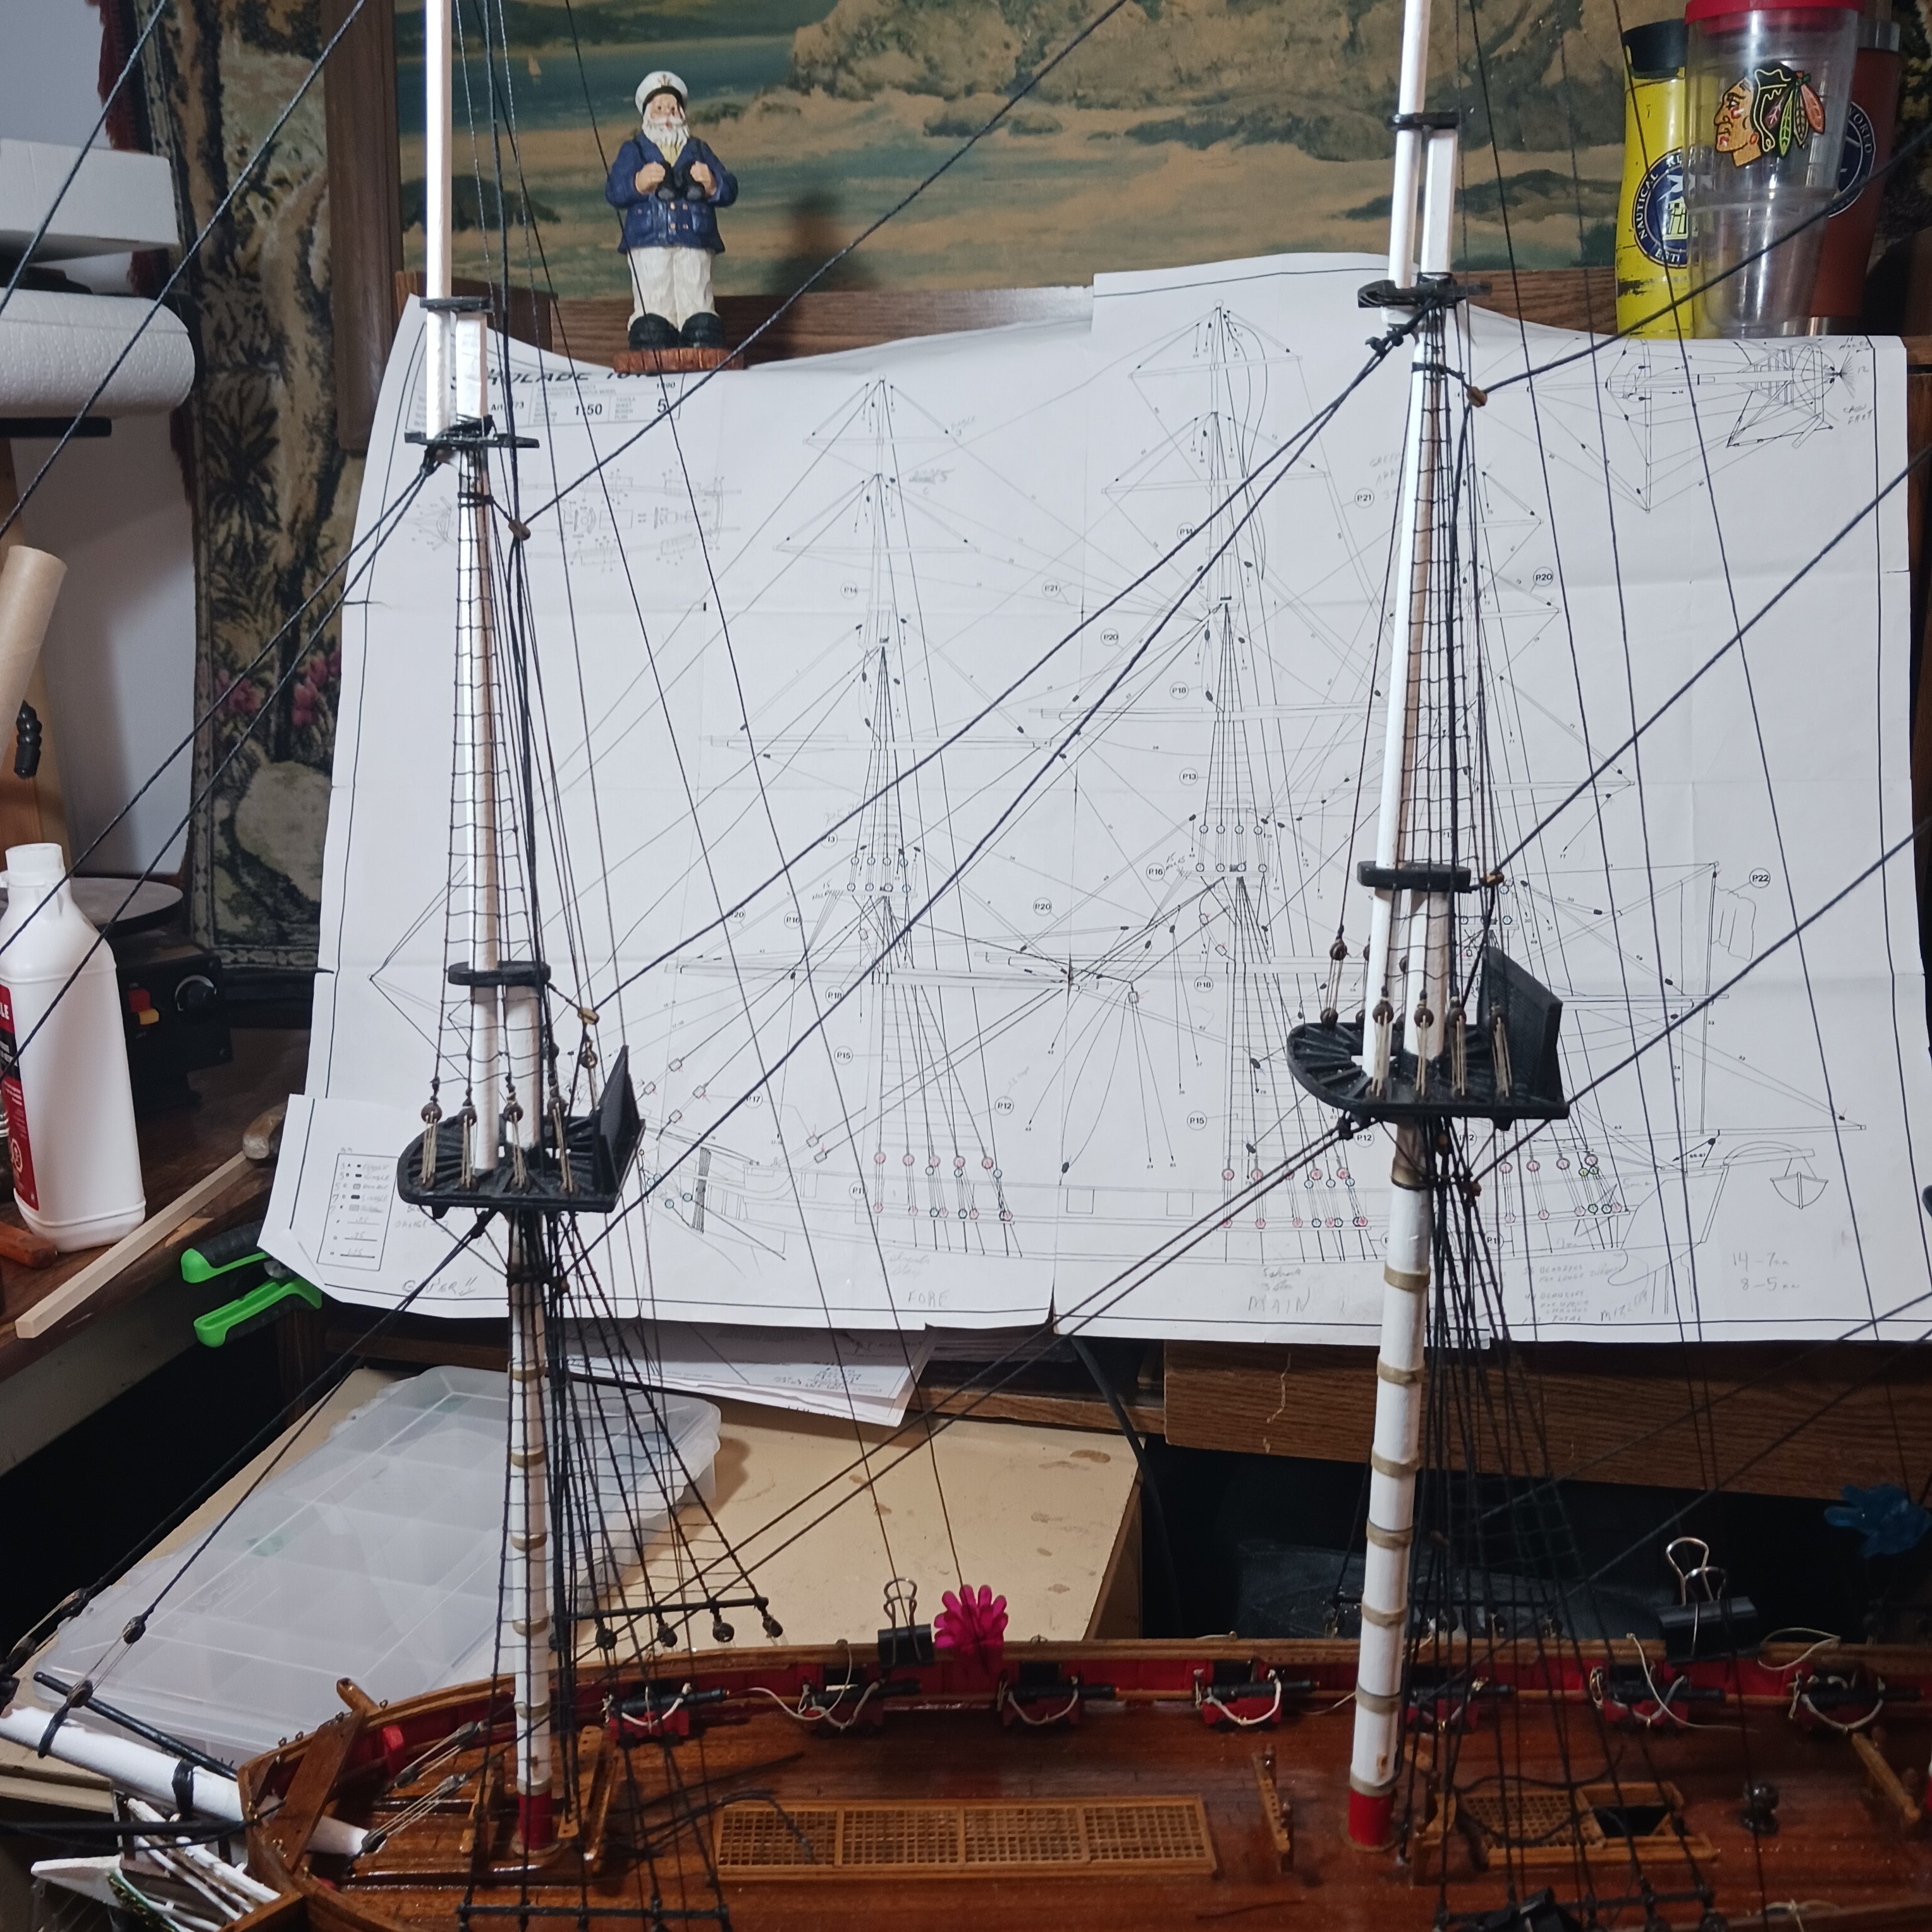
The upper shrouds ratlines on the portside as well as the stays are in place with deadeyes. I turn it around so I could do more ratlines 😃 I can't believe how much fun this is ,I missed it so much lol and was only out a week .
Buddy @Gabek is planning a trip out to my shipyard. He says it's for my coffee, but I think he is wanting to show me his handy work. I am so excited, I told him to hold his nose, I have been dealing with septic tank issues for three-day 3 now. It is fixed but could use some wind and rain lol.

I may tie the crowsfeet lines on, but the call of the clove hitches is to strong lol.
That and nervous about doing simple crowsfeet lines lol
This is the best place to be ,I am greatful for all the fun I have building, getting to know fellow modeler is priceless.
I know ,I know I have to much to learn but I am happy with my progress. I can still see all my mistakes but I know that they are there to correct on the next ship.
That's it for today the old arm is saying " let's quit for the night "but look at those ratlines empty waiting for clove hitches 😁
Thanks for looking in.
Knocklouder
-
-
Oh happy days, although I only got to tie 83 clove hitches before the arm started trembling a bit more than I like. Lol when you get to the point were you shake so much the knots start to unravel its time for a nap lol.
@Keith Black I like that idea, and had to move Rodney's binder to get at my drill press. As luck would have it I open it , ha ha. 😅

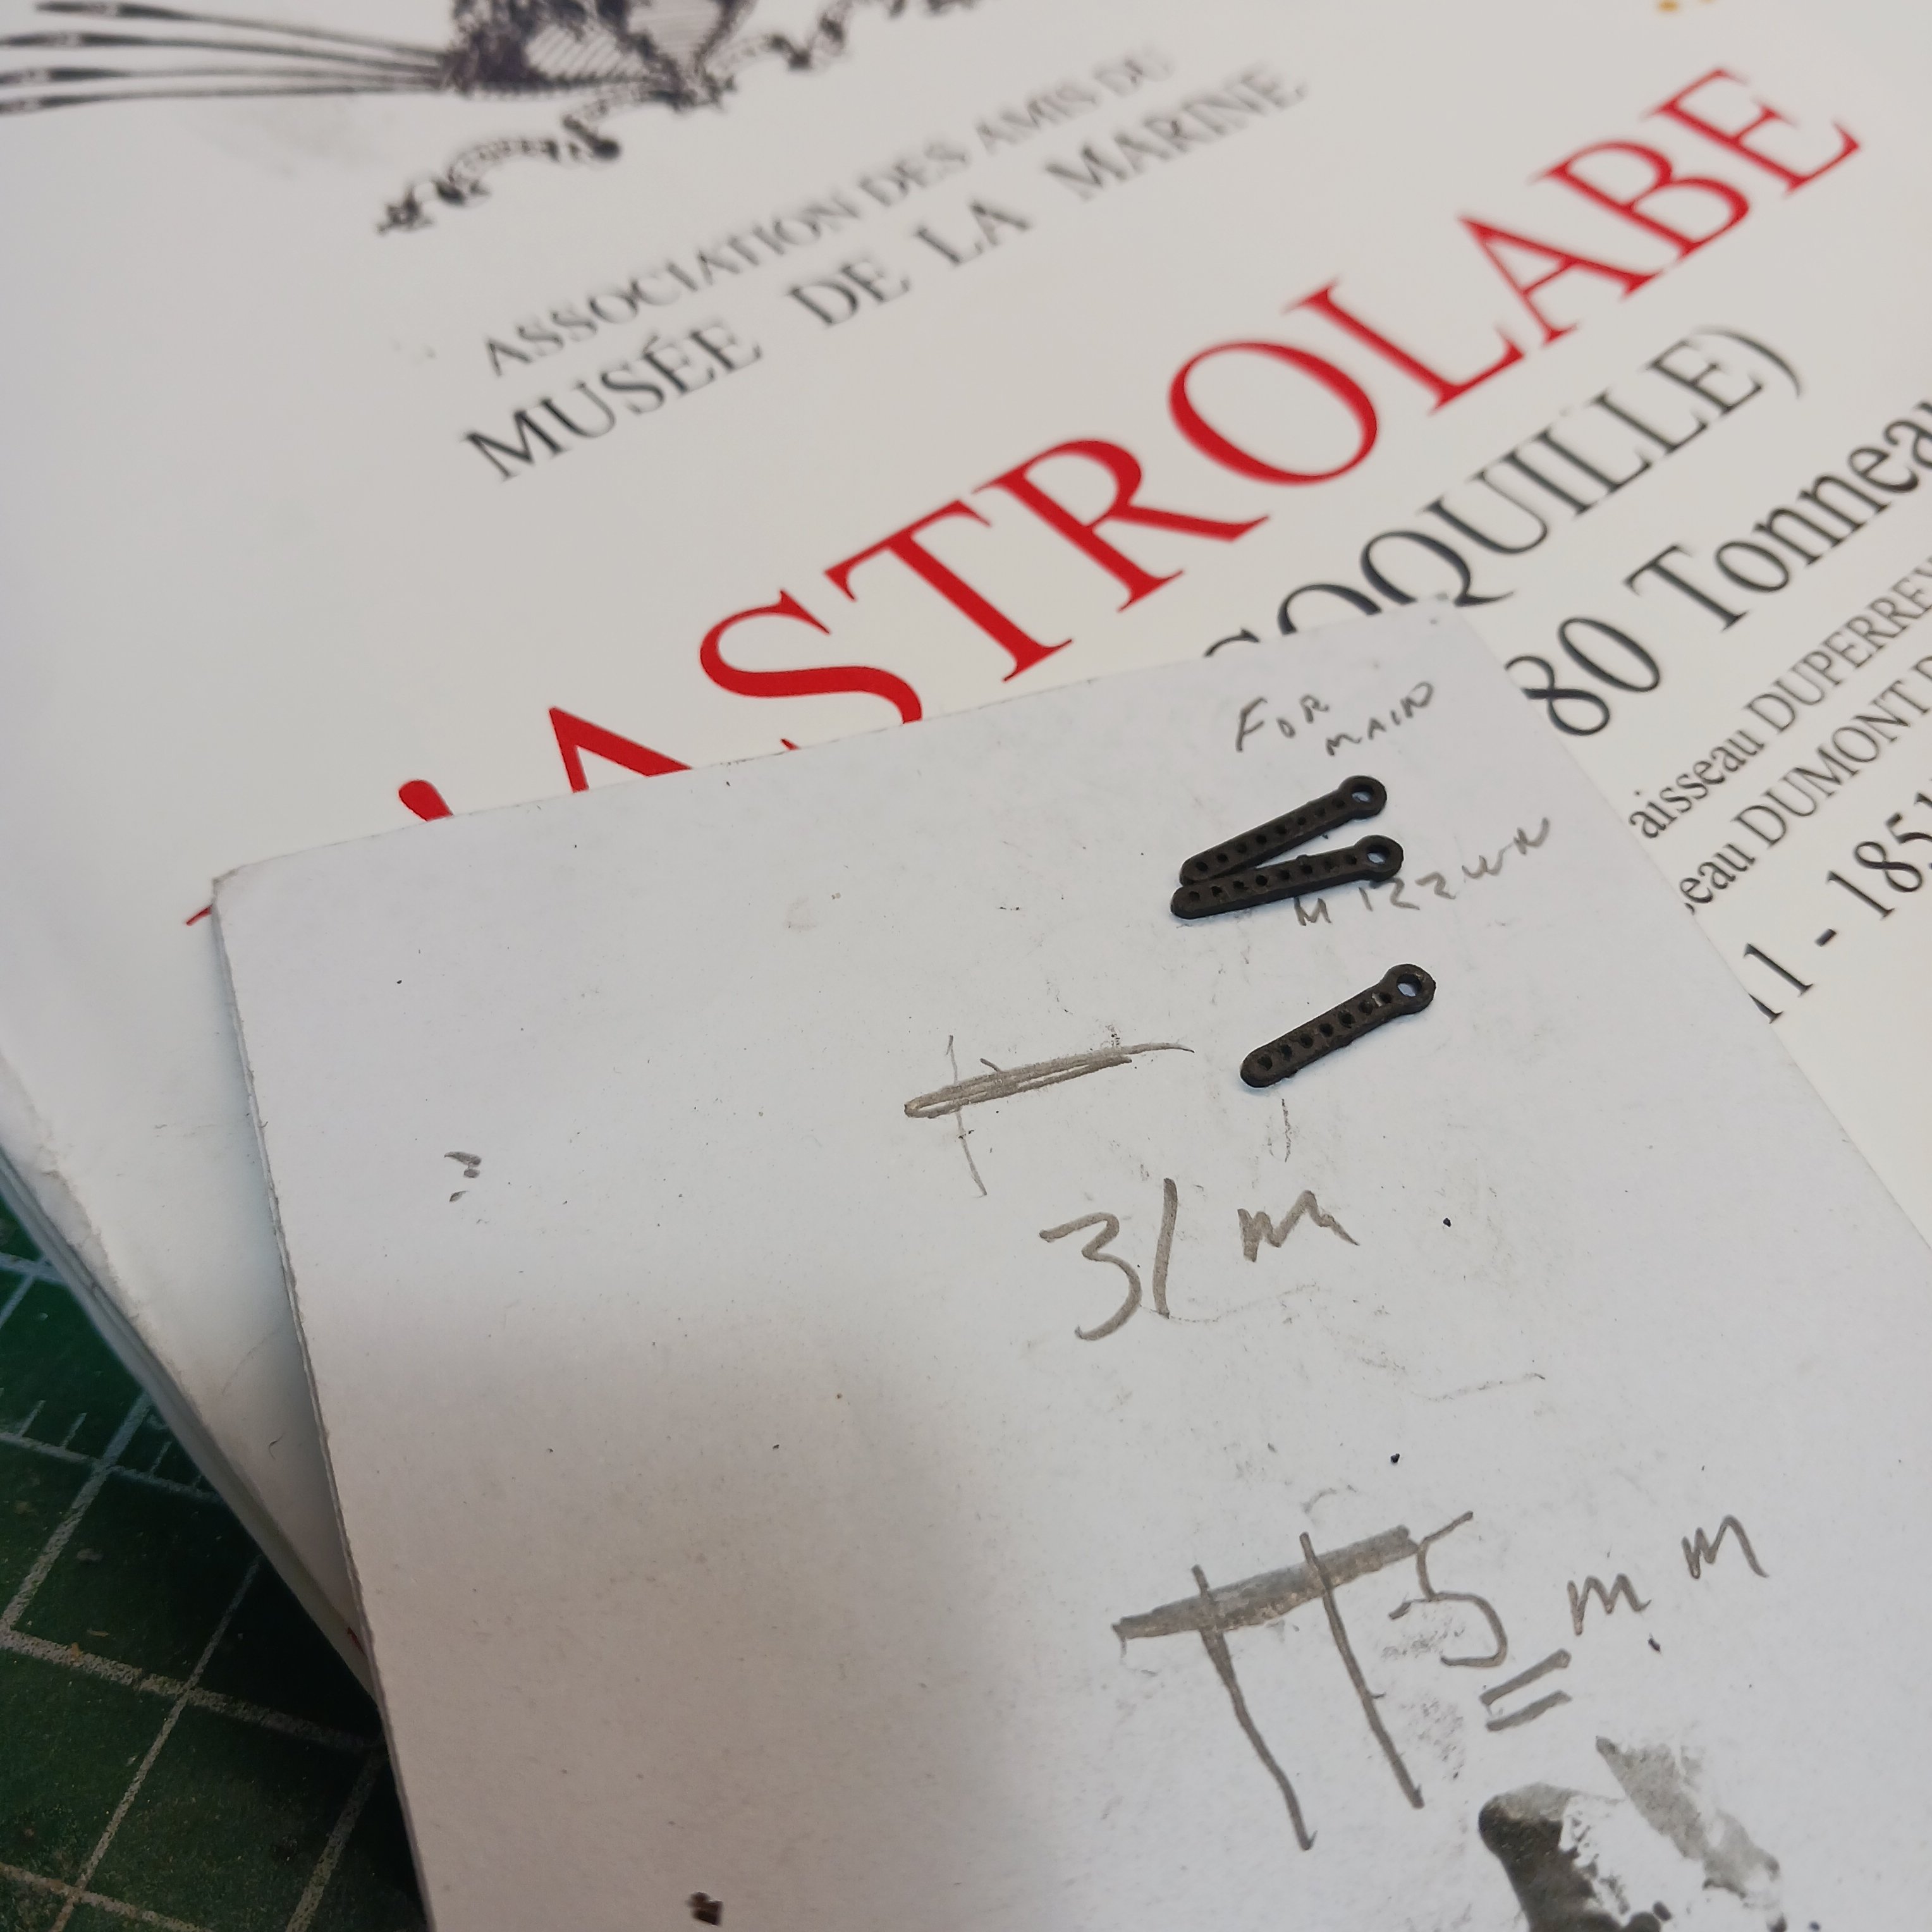
Single and double blocks tied to the rail. I was thinking of doing the same, but tieing them to the deck with hooks . The plan show eyebolts to the deck the instructions say nothing. Even the euphroes blocks are just tied to to the stays , no blocks either. I tryed to make some euphroes blocks, (extstream laughing) and the call to @Gabek figure and things, he whipped me up some the right size. ✅️

Thank you very much my friend. With the knowledge that I got from doing the Duchess of Kingstons crowsfeet lines and these euphroes blocks I hope to make a decent job of them. I also keep notes from @Vanguard Models that Chris made for his Duchess, that and help from all of you ,I don't fear them lol.

80 clove hitches on the upper main mast,

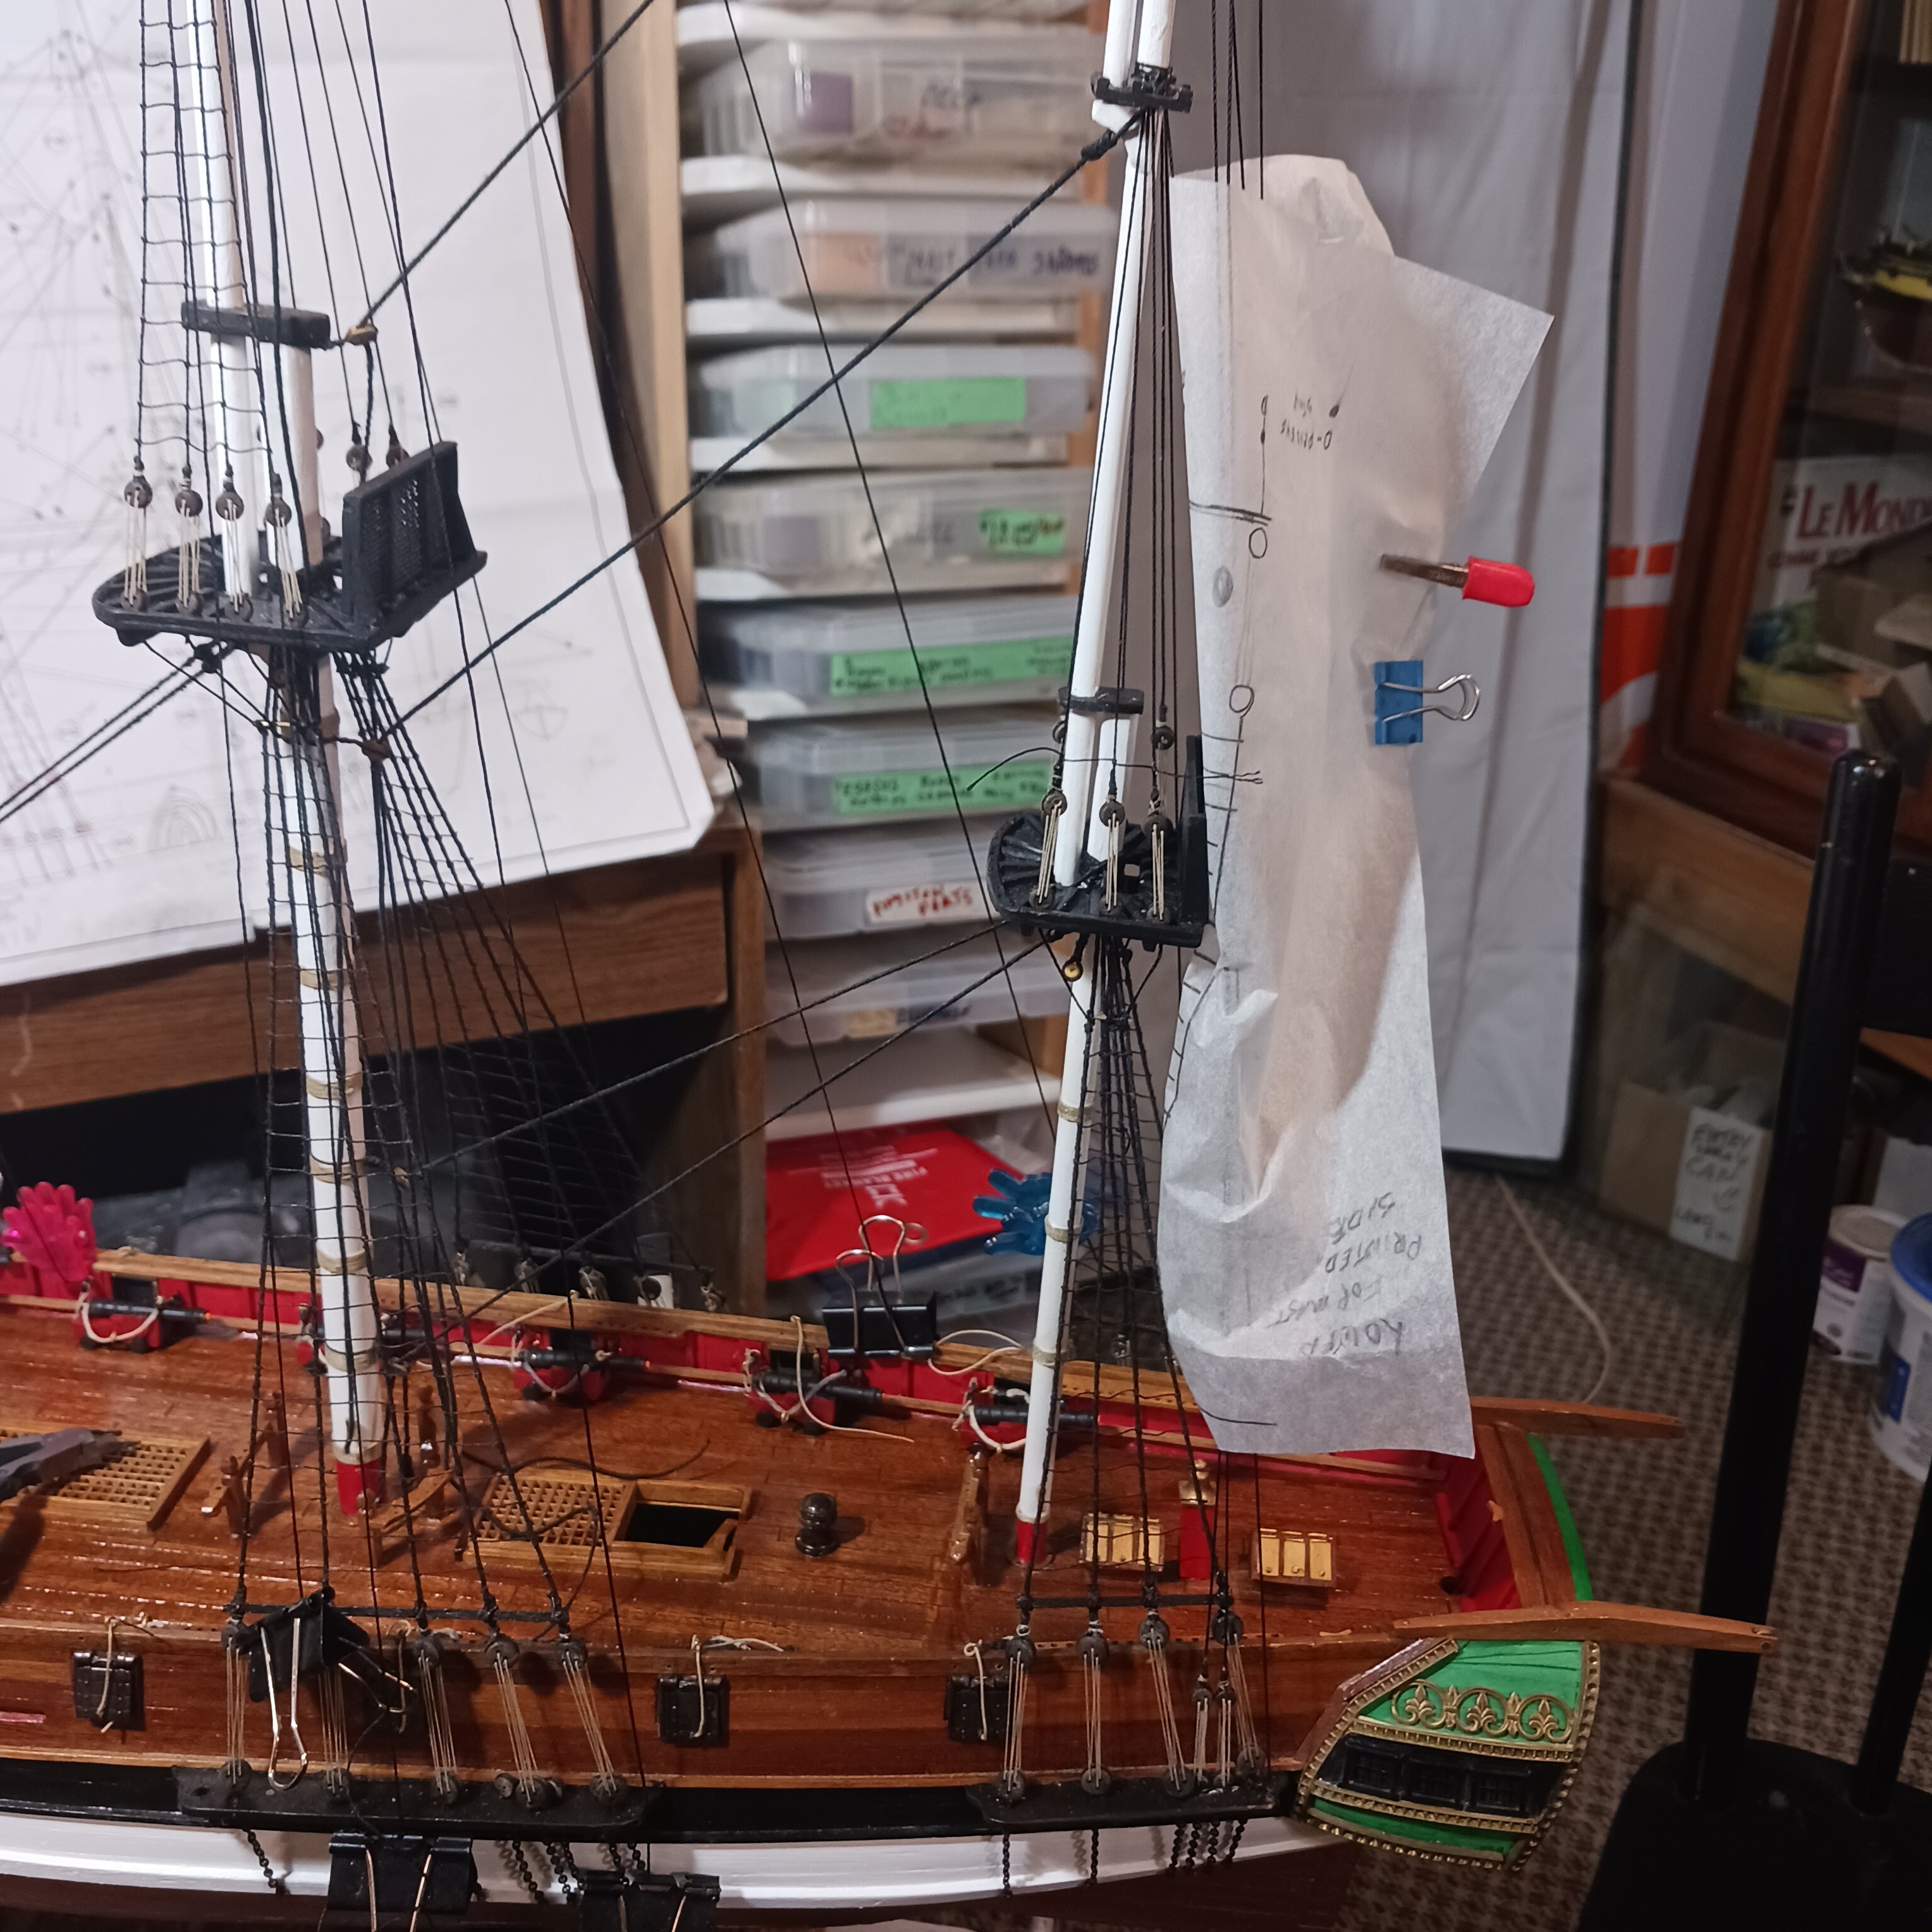
And 3 on the Mizzen mast 83 , I had to slip this paper between the shrouds and the stays. I was going cross eyed looking at all the lines. So later today, after more research I will tie up the Mizzen ratlines then turn her around and tie a few more lol 😆 270 more plus some for the Futtock shrouds but who keeps track of things like that
Good to be back in the shipyard even if it was just a few hours.
Very , very greatful for all the help I get here, and for all of you.
Knocklouder.
-
 Welcome to MSW, from one old beginner to another, this is the place to be.
There so many members who will help you , pick your model, start a build log and ask alot of questions and you will see. Most of all have fun and enjoy your journey!!!
Bob M.
- mtaylor and Keith Black
-
2
-
-
Research will continue for another week at least.
 Not that research is bad, but it is the one and only thing that I don't like about modeling.We went down to the shipyard, the First Mate and I, I tryed a clove hitche, and the look on my face said it all. Lol we looked at each other and said "Research time" it sucks getting old lol..
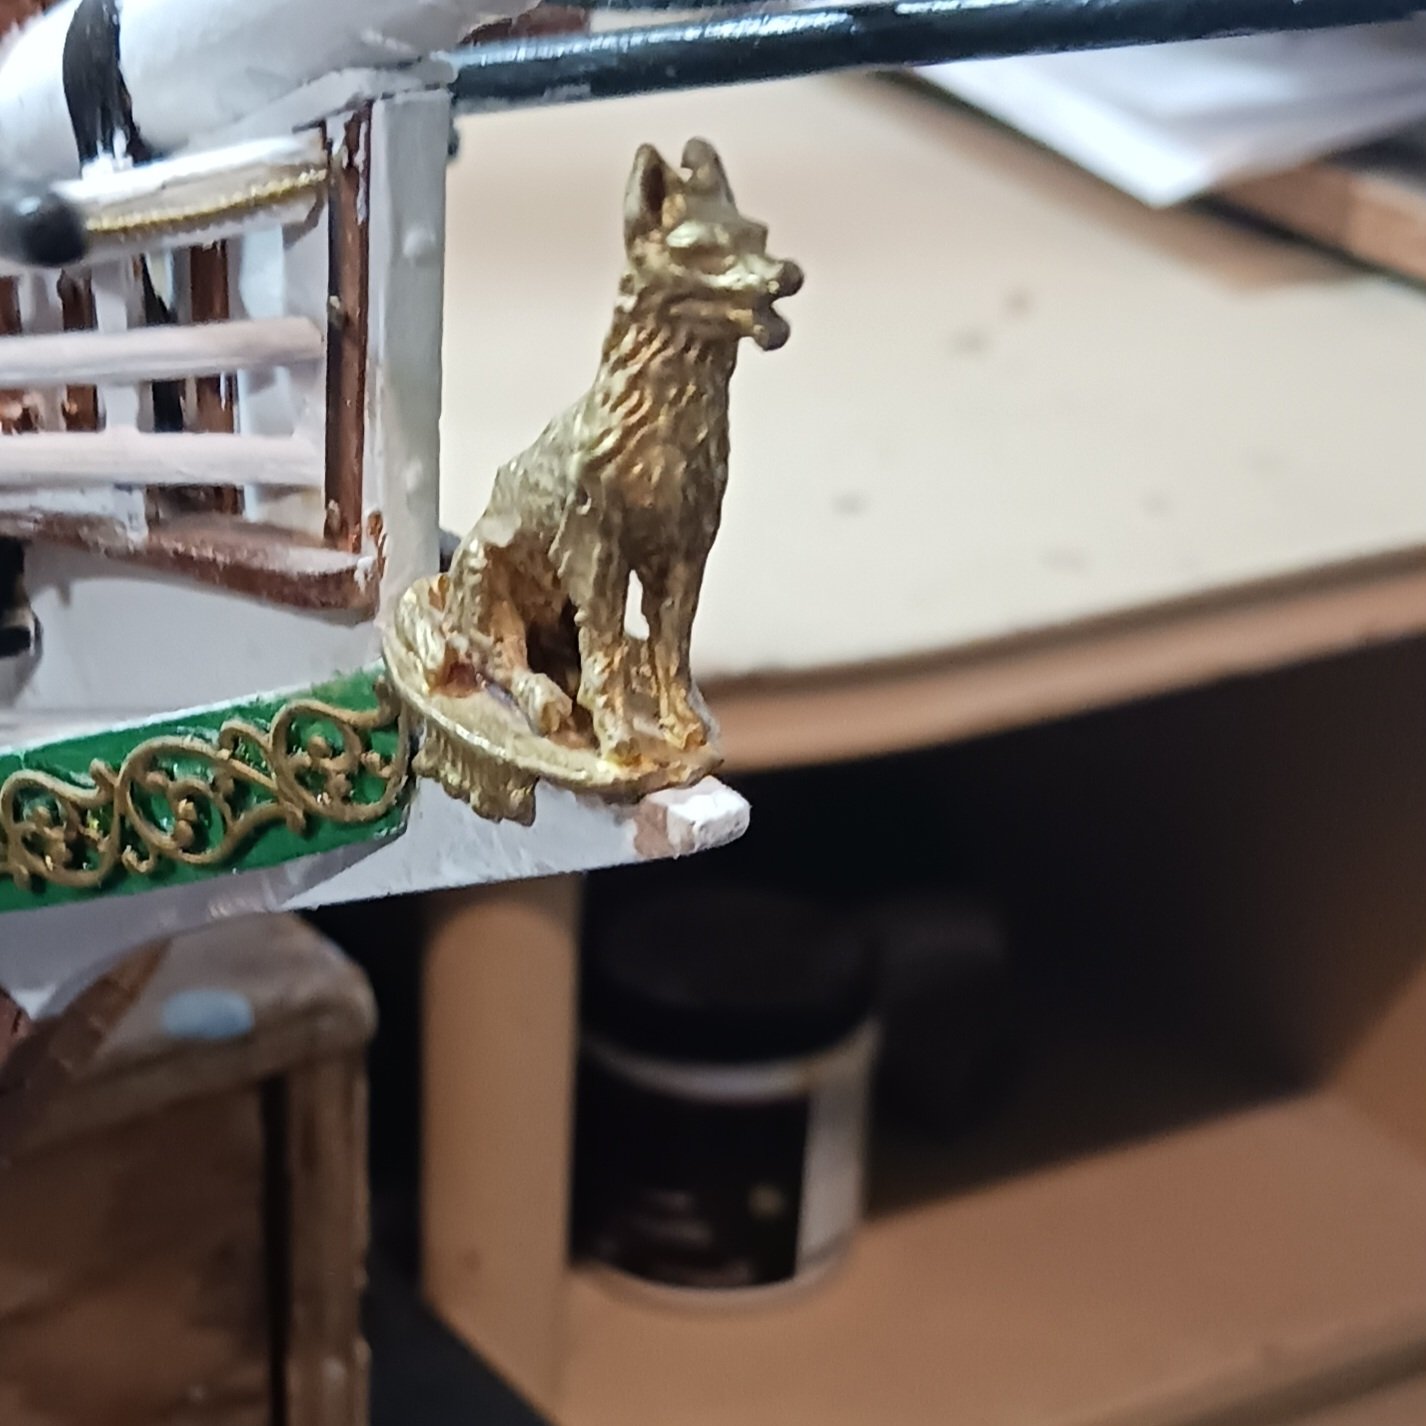
So research has led to figure out what kind of dog is used for the figurehead on the Astrolabe. I asked several questions about this to the manufacturer who makes these kits. They don't know either. My fellow ship mate @archjofo has sent me these pictures from the French museum in Paris.
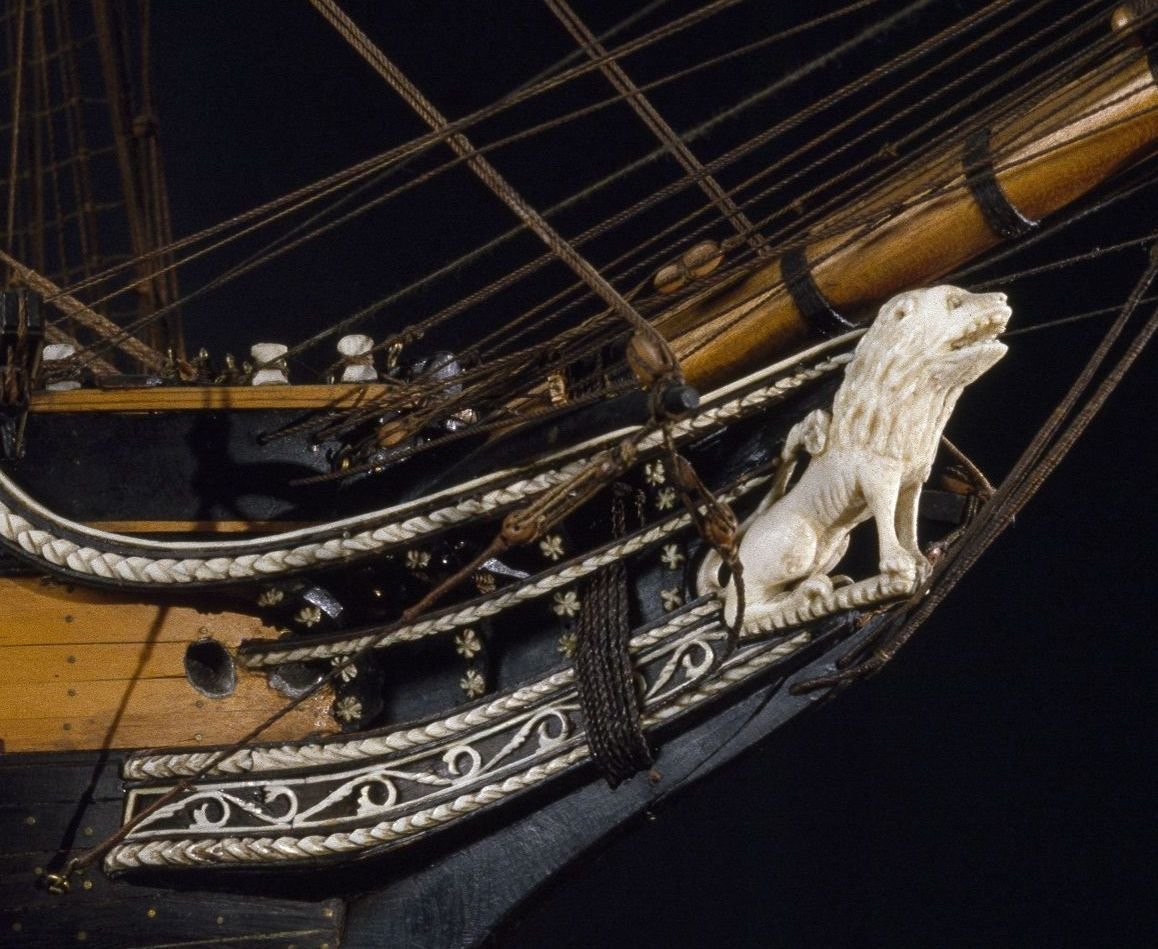 A far cry from what the kit lion looks like
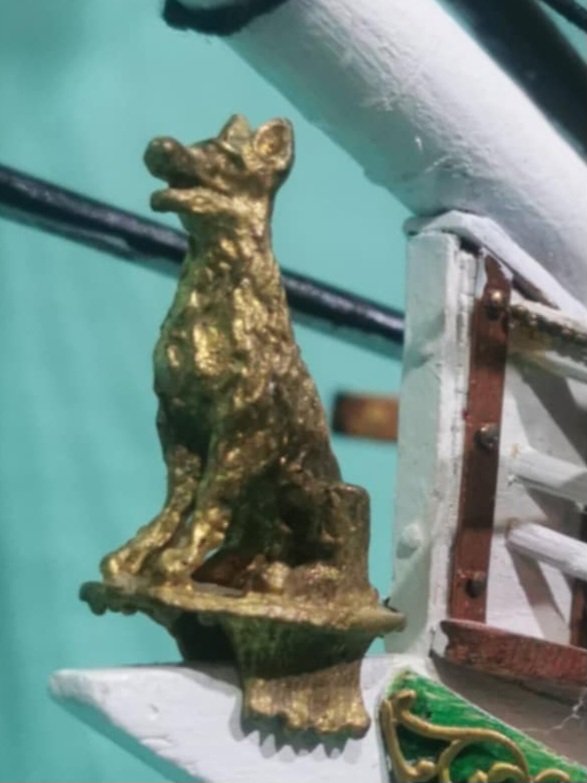 what was I going to do. My good freind @Gabek who follows along with my build knew I need help so he whipped me up a couple of lions to use. Thanks so much Gabe . He is a fantastic friend with many amazing talents
 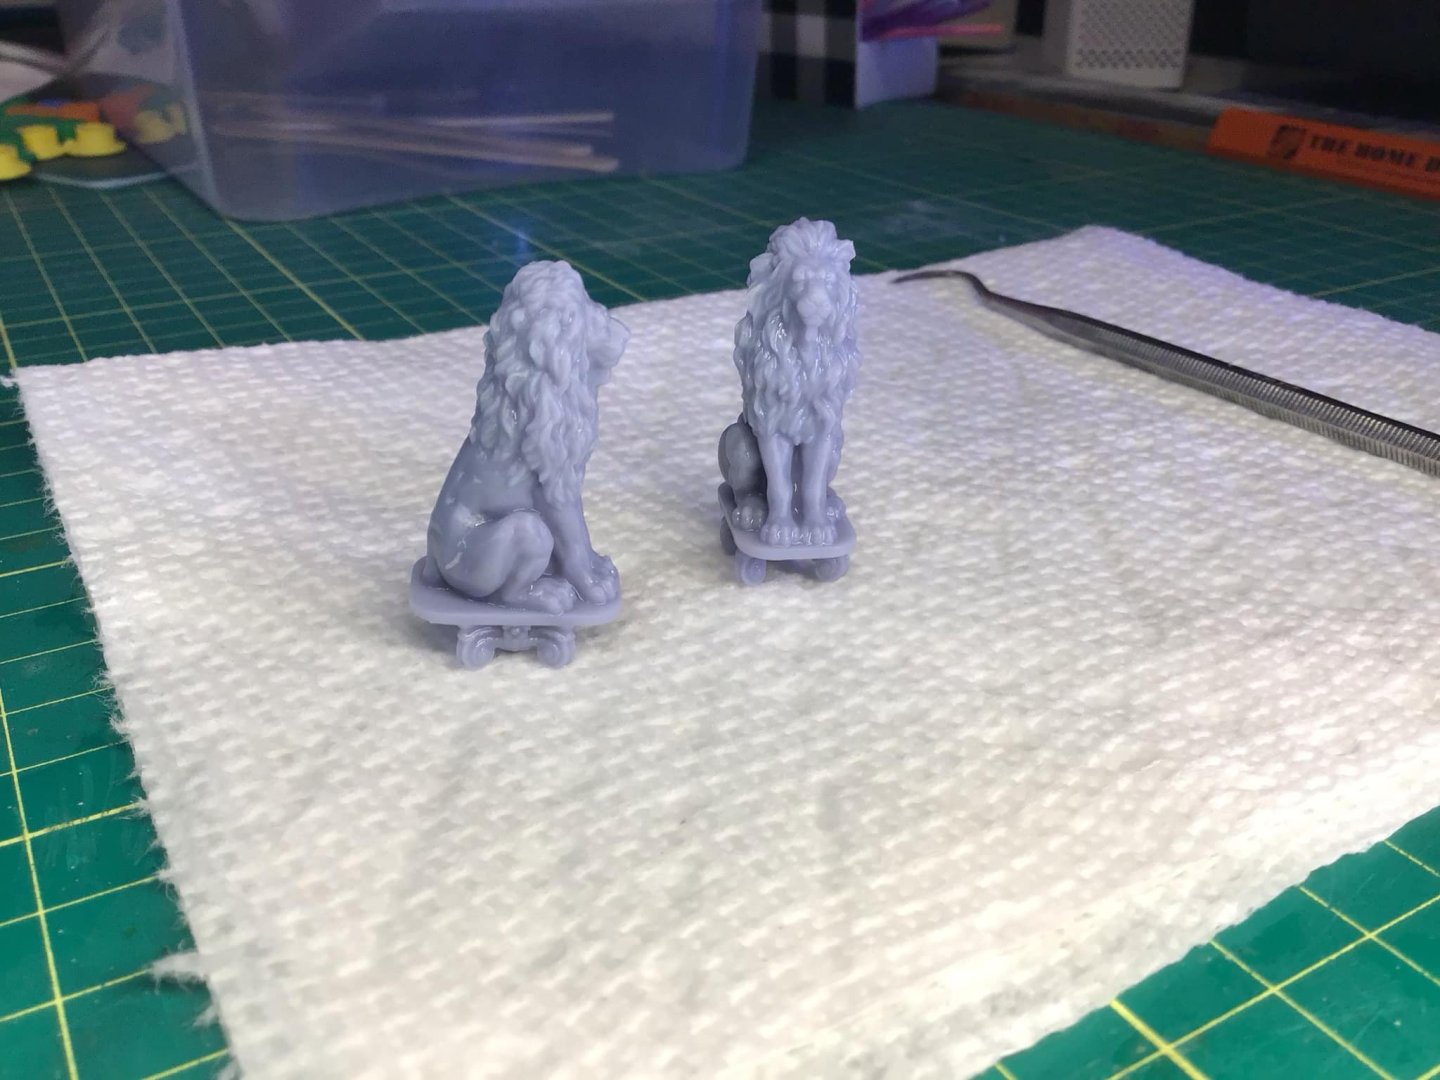 and just look at these dogs he made Roark Roark lol They are fantastic and he said they are only 89.95 plus shipping costs 😀.
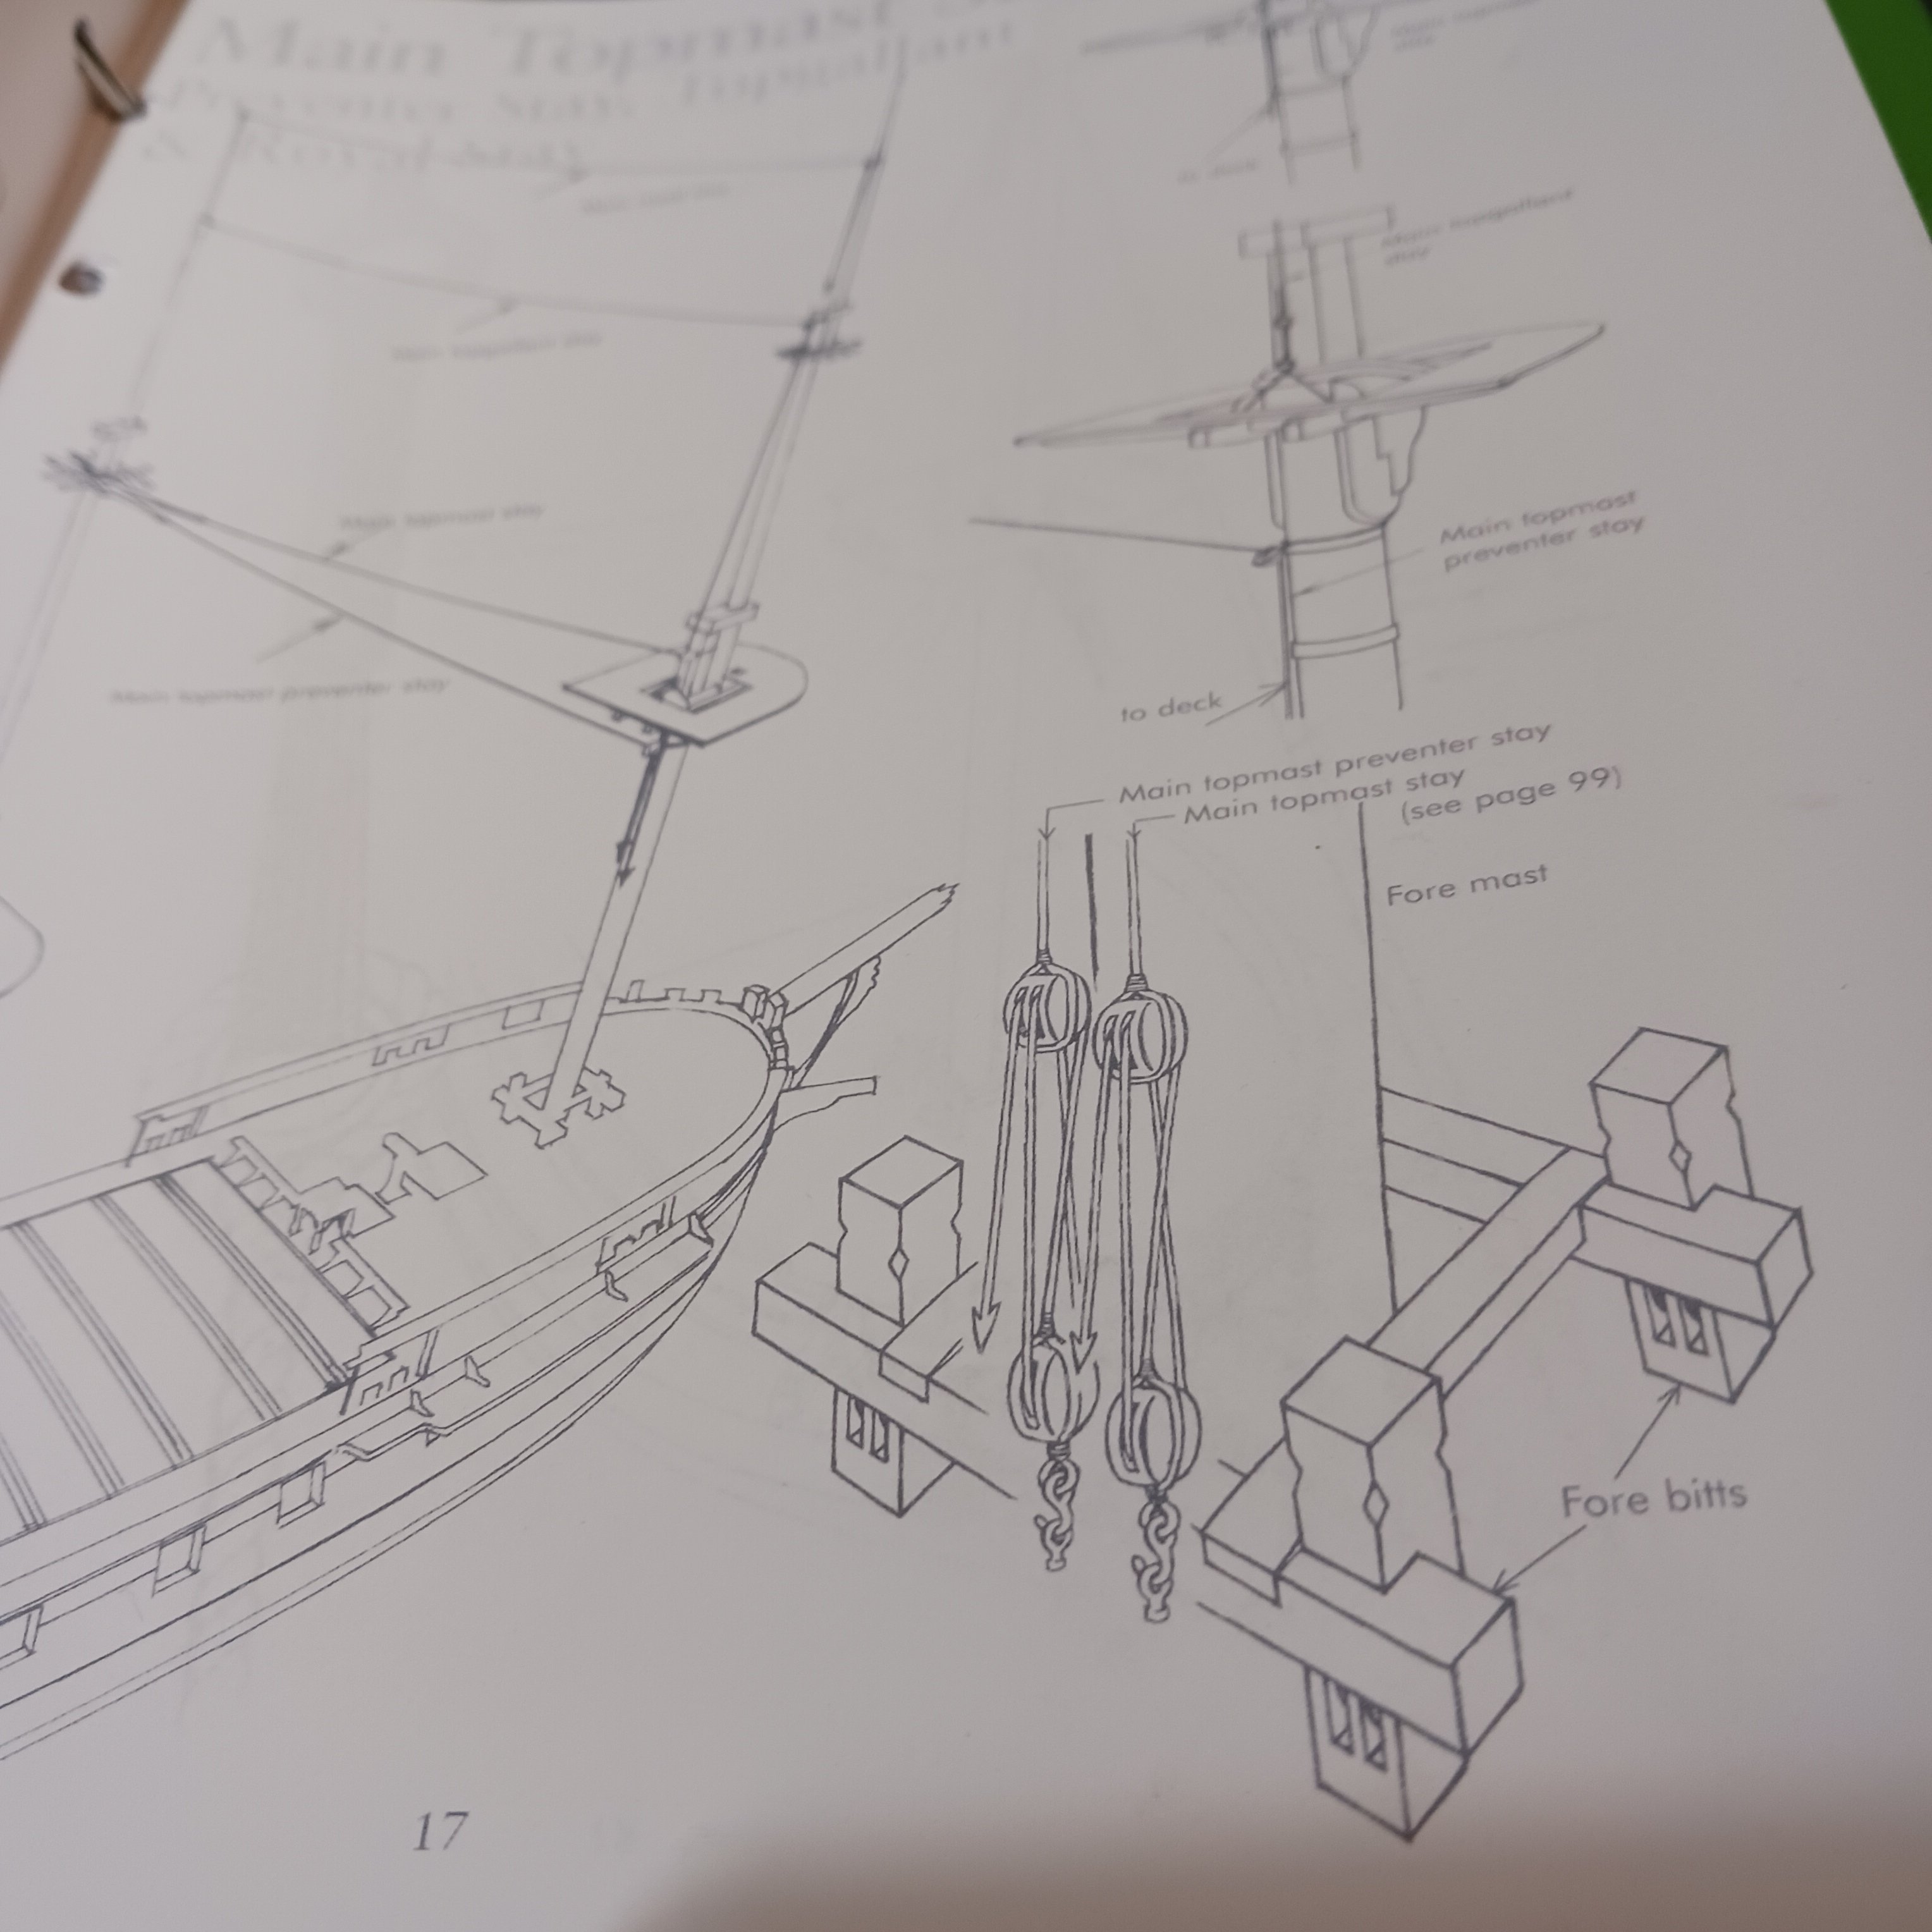
.with that it is time for more research, this time I am looking for how the aft stays are tied on. The plan shows eyehookd to the deck, but that doesn't look right to me, they need block and tackles to tighten them up I think.
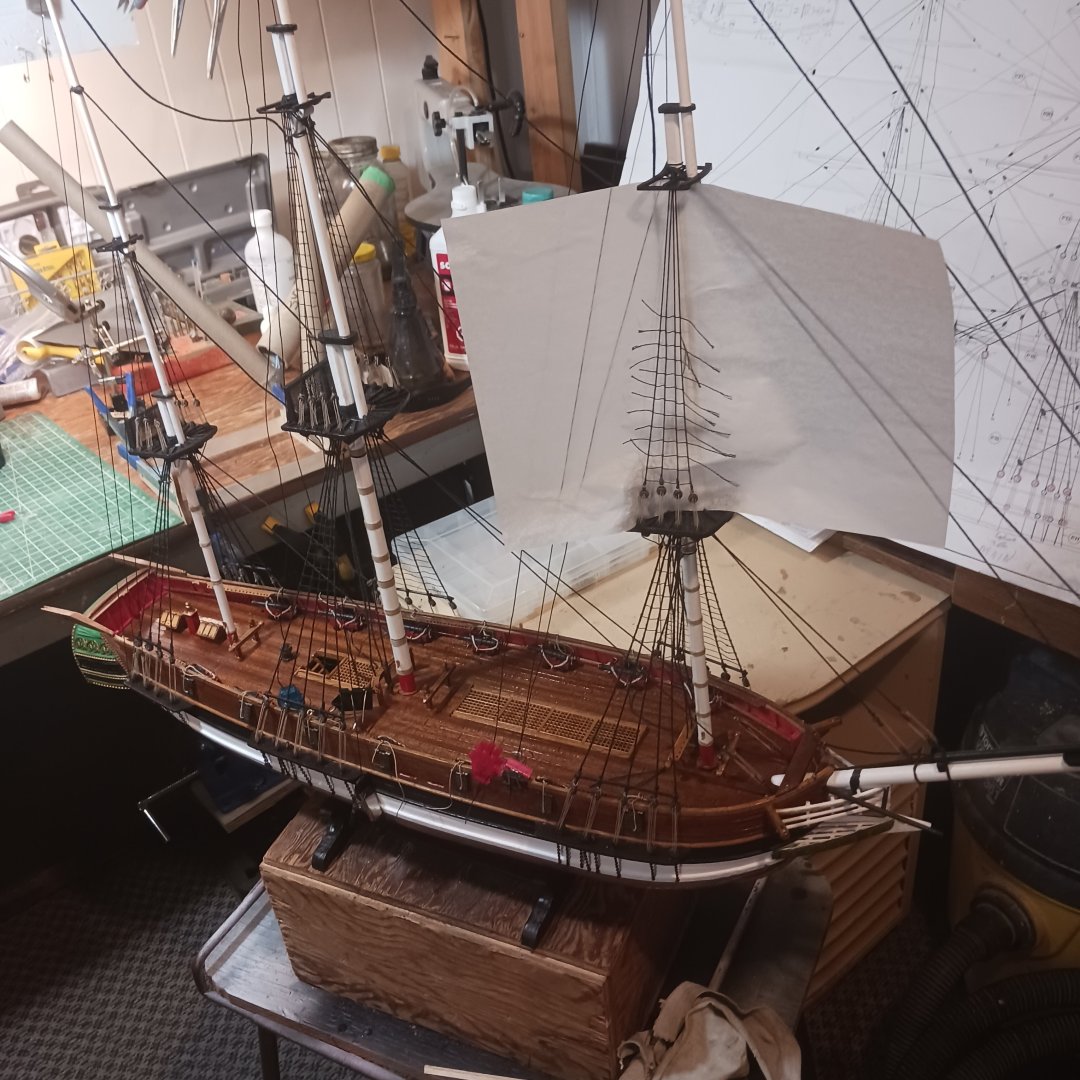
 I have the portside ratlines and stays finished on the foremast, and this is how it will sit for at least another week.
Take care my friends and step safer lol.
Knocklouder
- Paul Le Wol, chris watton, GrandpaPhil and 6 others
-
8
-
1
-
Good luck on your journey with this build Glen. Following along.

Knocklouder
- Keith Black, Canute and Glen McGuire
-
2
-
1
-


Astrolabe 1812 by Knocklouder - Mantua - 1:50
in - Kit build logs for subjects built from 1801 - 1850
Posted · Edited by Knocklouder
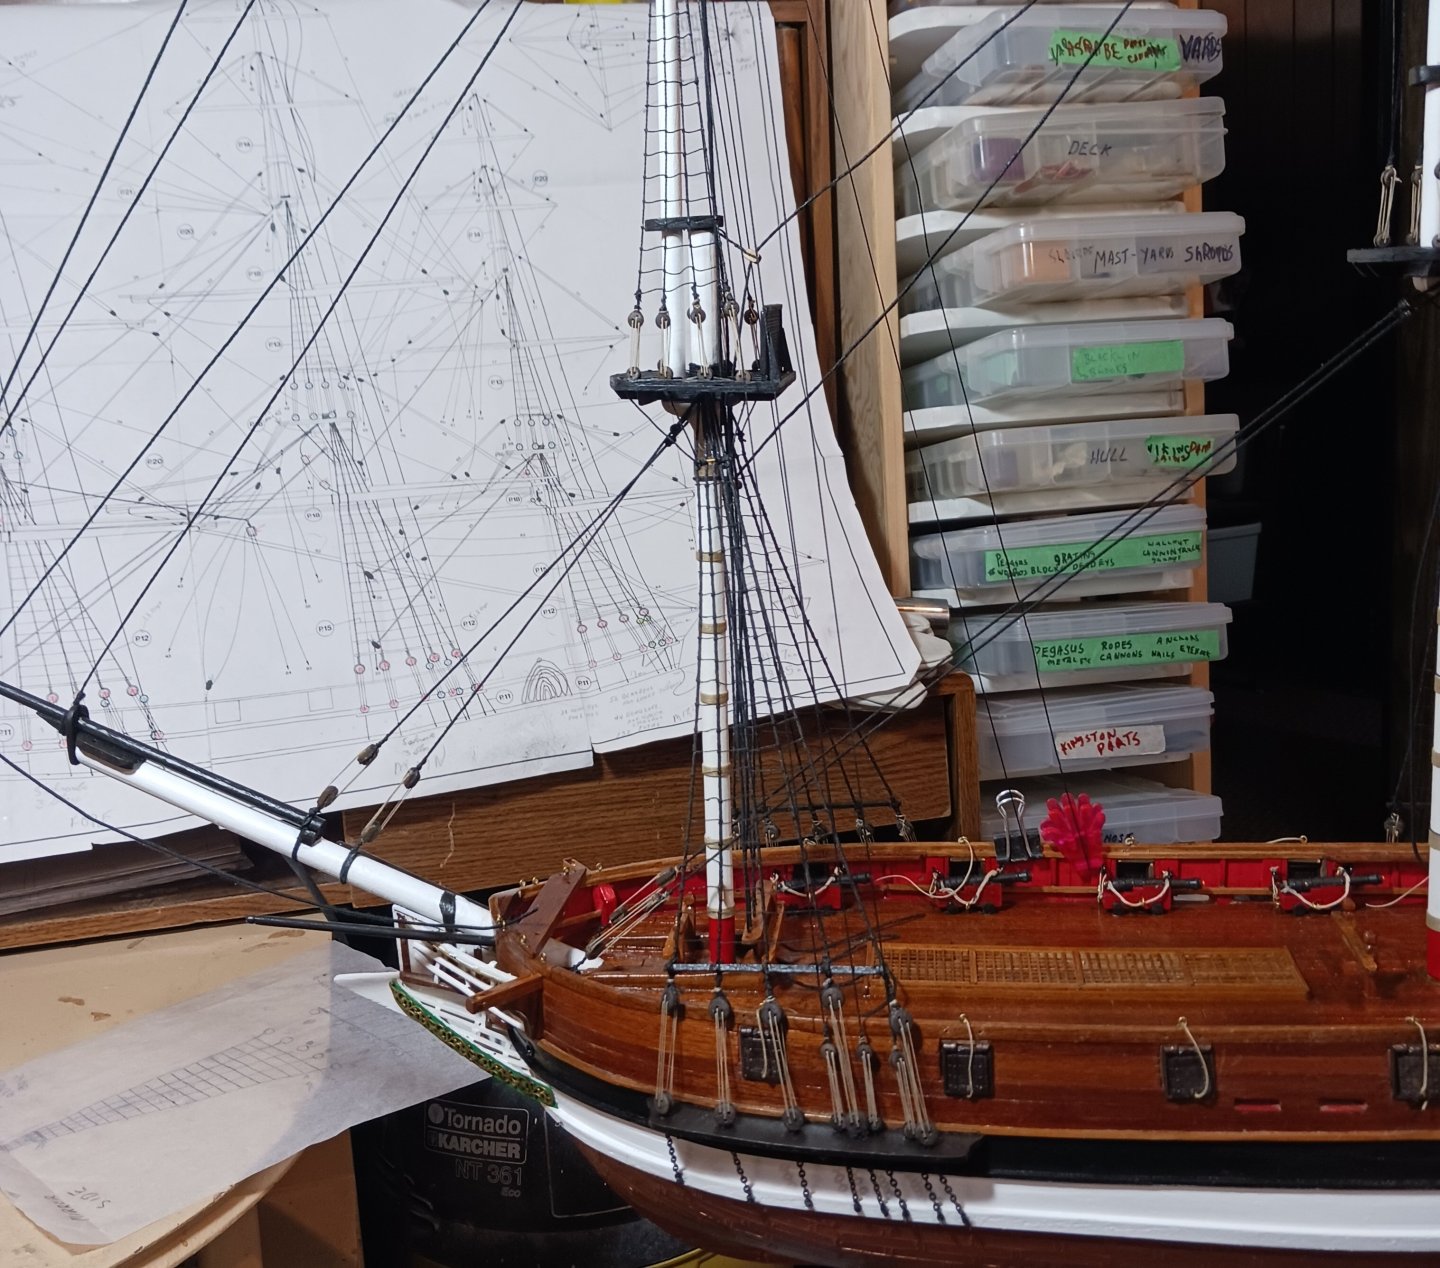
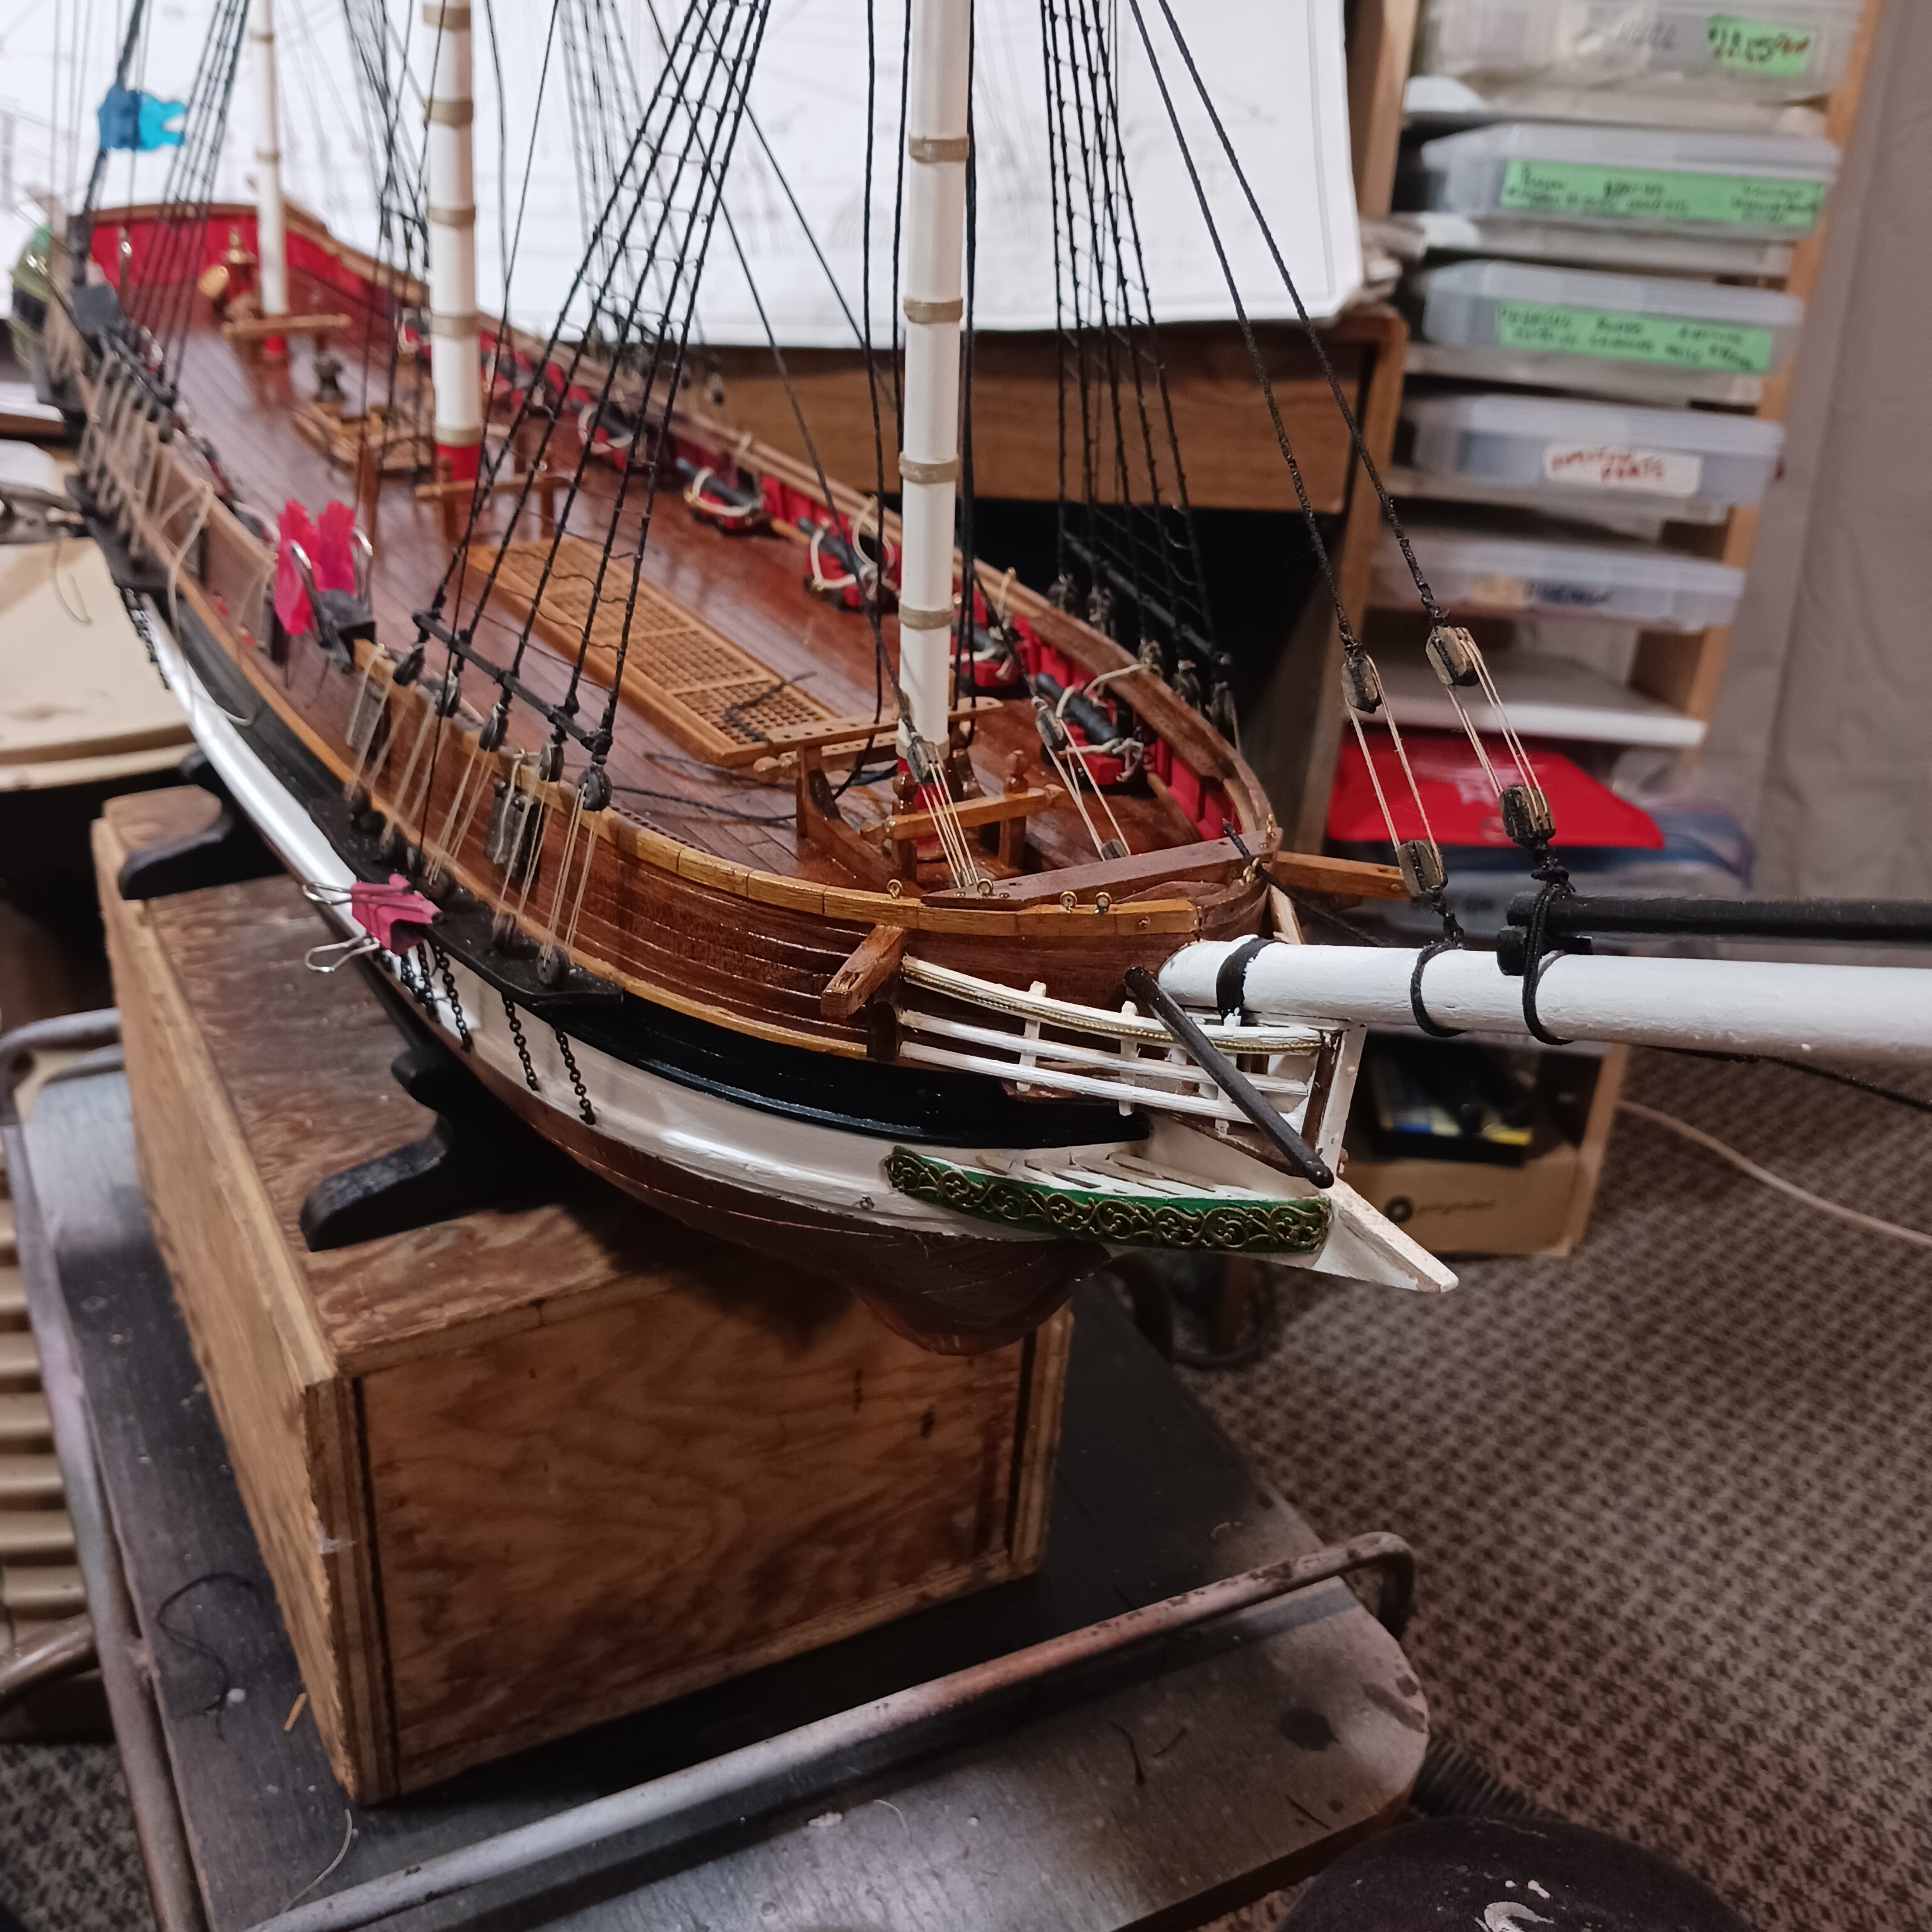
The upper shrouds ratlines are finished 🙌. And I have figured out how to tie the forestays to the deck.
Now its time for the Bowsprit mast , I am going with the golden lion for the figure head. The plans are useless for rigging the bow, I spent most of yesterday and part of today trying to figure it out. After a long chat with Rodney ,
we got i all sorted out and I knew what I was going to do,
I wrote it all down in my paper log and shelfed the Astrolabe. .
Some alteration was needed to the corner self, I need to cut one self off, it was easy to do.
So this is were she will sit for awhile, I still need to tie the forestays to the deck, the bow spirit mast , the ship's boat, then the yards 🤔 and I will be finished. BUT not for awhile, the Instructions are very hard to understand , in fact they are useless at this point. The ships boat needs to be rigged but they don't tell you how, 😤 and the bobstays again no decision on how to do these ,it's builder choice, so I got to do some more research, poop. So I am shelfing this for awhile.. many other enjoyable things to do in stead . After I got everything straighten out I spent an hour and a half looking at the Golden Hind, some glue may have been applied. Lol
But more about that later, I am not going anywhere just need time to set a new course. Tallk soon my friends.
Bob M.