HOLIDAY DONATION DRIVE - SUPPORT MSW - DO YOUR PART TO KEEP THIS GREAT FORUM GOING! (83 donations so far out of 49,000 members - C'mon guys!)
×


Spaceman Spiff
-
Posts
205 -
Joined
-
Last visited
Content Type
Profiles
Forums
Gallery
Events
Everything posted by Spaceman Spiff
-

Hello from Virginia Beach, VA
Spaceman Spiff replied to ftnemtst's topic in New member Introductions
Welcome! Did two tours at Norfolk. I need to get back to Jake's BBQ! A lot of great people on this board. Welcome, again! -
I have used a Crasftsman compressor for 10 years or so and use it with an Iwate HP airbrush. Never had any problems and does all I need it to. Heck, even used it air my vehicle tires, too!
-
Saw it over on hyperscale. Good stuff.
-
I mainly spray enamels with my Iwata but have used acrylics. I prefer to run 91% alcohol through my airbrush as this is great at getting acrylic out - especially the stubborn stuff. I have also heard that Windex works great, too. Now, enamels are a whole different beast. I run lacquer thinner through it when I am cleaning the airbrush. My Iwata only has a few parts so it takes like five minutes to disassemble, clean thoroughly, and reassemble. Pipe cleaners work great. It is also a good idea to use some oil made specifically for airbrushes on some of the parts. I know what some of you are thinking - won't that get into the paint the next time you use it? Maybe, but before I start painting I will always spray paint thinner through it just in case. Never had a problem. Never have sprayed oils, but I awlays use Humbrol's Satin Cote - which is a solvent-based varnish and thin it with lacquer thinner. Never a problem. It is my go-to for final coat on my models (never have built a wooden one). Now, for traditional varnishes - I have never tried it but know someone who sprays them using lacquer thinner and who says he never has a problem with it in his airbrush. I have never seen it used so I can't comment. Take it for what it's worth.
- 39 replies
-
- 1
-

-
- Airbrushing
- Tips
- (and 1 more)
-
I had forgotten about the water trap!
-
Be sure to post some pics! As far as airbrushes go, there is a wide-range of makes and models, from single action to double action. From what I have seen, Badger and Iwata are some of the best. But of course, you get what you pay for. My personal setup is an Iwata HP BCR dual-action airbrush (dual action airbrushes make it much easier to do fine painting and detail work) and a Craftsman compressor. If you go the compressor route, get one that has an adjustable regulator that allows you use different pressures (this is very important for detail work). Practice, practice, practice!
-
Minor update. With the new setup, I am unable to post pictures because I get the "upload failed" message. So, here is where things stand. I wasn't able to work on the hull and get that hump flattened out enough so the flight deck will lay down correctly, so I did some work on the island instead. No matter how I tried to sand the bottom of the island, it never would stand straight when positioned upright. I removed all of the PE doors from the sides and fitted sheet styrene around each side - I made one side a little longer than the other in order to get the island to stand upright. It had a slight lean which drove me crazy. Now, I just have to replace all of the doors and scratch some of the smaller stuff, and it will be ready. I then plan on adding all of the PE and painting it before attaching it to the flight deck. Sorry if the update wasn't exciting and pretty with pictures, but once I figure out how to add them I will go back and do so. Thanks for reading!
- 176 replies
-
- 5
-
-
- new orleans
- iron shipwrights
- (and 2 more)
-
You are welcome. I always use it straight from the can. Honestly, this stuff sprays and lays down so well I see no need to decant it for airbrush use. I am a bit leery of the decanting process - I am afraid I won't let the degassing process complete (an experience I don't want to relive), so I never do it anymore. This stuff is great - I use both the white and grey, depending on what color(s) I will be putting on top of it. And, it is so thin that even if you do decide to decant it, it won't need to be thinned at all. You won't be disappointed.
-
Hi, I have never used a water-based primer, so this may be of no help. I like to use Tamiya's Fine White primer - its only available in a spray can, but don't let that bother you. It lays down excellent and thin - sometimes when I am a little lazy, I will use this as my white. Their Fine Grey is also excellent. I also have an Iwata - the HP BCR. Great airbrush!
-
I would use a primer first. My personal favorite is Tamiya Fine White (or Grey) - available only in a spray can. It covers very well and gives the paint something to hold on to.
-
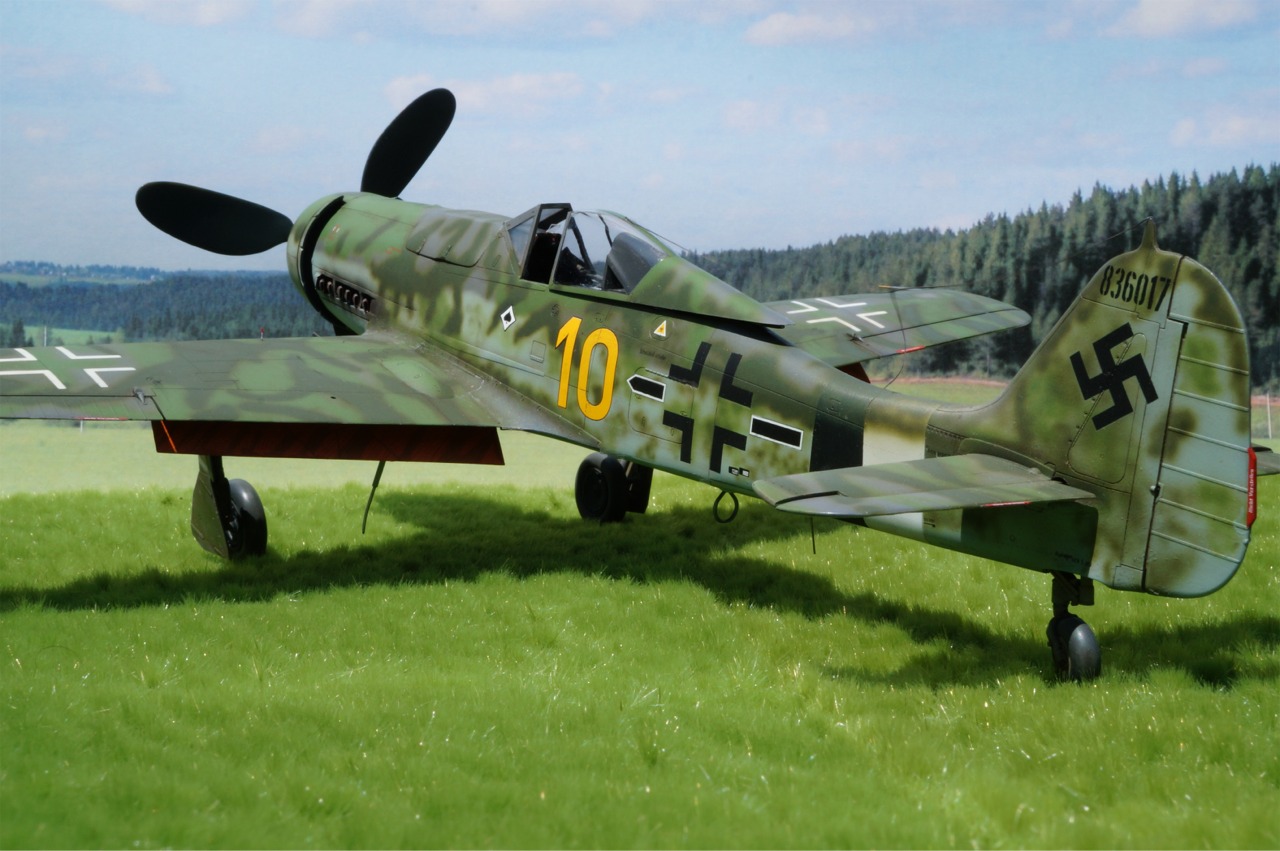
You are welcome. I really dial it down when doing fine work. Skim milk is almost water-like, just a touch thicker. Its been a while since I have used mine, but its like riding a bike. It will take some practice to get the right consistency (whatever brand/type you use) and once you have done it a while, you just mix it until it looks right. Honestly, I never have gone by a specific percentage ratio mix - I just eyeball it. A good thing to remember is to have a piece of card stock (box lid, whatever) or whatever to shoot that first bit - in other words, don't first open the nozzle when pointed at the model as it is likely to spit a little. Use the test target to get that first bit to avoid any splatters...ask me how I know. This is especially true when very fine work. You keep the paint/thinner mix in a jar? Interesting. Have always heard for the best finishes to not do that. I just mix enough to do the job and go from there. The mottled camo can be fun but also tough and about as fun as pulling teeth. Some people will go to the trouble of making a mask and holding it a bit above the surface of the model in order to give a soft edge (not masked), but I prefer to do mine freehand. As I said earlier, I thin the paint to almost water (maybe even a 50/50 or even higher thinner ratio) and use around 10 psi. This is where it helps to do the first shot on something else to avoid splatters. Check out this FW190D-13. I can't claim this model as it isn't mine (taken from the net), but you get the idea of what I am talking about. I did one similar but it unfortunately didn't survive one of the moves. I have another at home that only has a little bit of mottling, and will try to take pics of it and post. If you look along the sides and rudder/tailplane, then you will see this free-hand type of painting. This type of painting involves low pressure, low paint/high thinner ratios, and a very steady hand. I always like to first practice on a piece of card stock to get used to what I am doing and also to practice the design - because, as you can see, there isn't any really rhyme or reason to the pattern. I always try to replicate how the original was painted...

- 39 replies
-
- 4
-
-
- Airbrushing
- Tips
- (and 1 more)
-
Some great stuff in here. I have an Iwata and absolutely love it. A great, great airbrush that works very effectively at creating Luftwaffe mottled camo to large areas. I have only used it on plastics - planes, tanks, and a ship. I wouldn't trade it for anything (well...). I use Testor's Model Master paints and thin them to the consistency of skim milk - and I use the generic paint thinner found at walmart. Never any any paint problems whatsoever. As others have said, if I am doing fine detail work (the mottled camo, for example) I will dial down the pressure (will go as low as 10 psi or so) - but with that, you have to make the paint even thinner. Larger areas, I will go a higher psi and open the trigger (mine is a dual action airbrush) more. Practice, practice, practice. After each use I disassemble and thoroughly clean it. I have had that airbrush for six or so years for now and have never had any problems - just had to replace the needle due to my clumsiness... And I have never used one of those ultrasonic cleaners, although I have always wanted to try one and the admiral said that was a no-go. So, small brushes and pipe cleaners it is!
- 39 replies
-
- 2
-
-
- Airbrushing
- Tips
- (and 1 more)
-
Tamiya fine white or gray primer is one of the best primers there is. I use it quite a bit (white) - it has great coverage and works very well. Never any need to heat it or the like. When I am lazy on some models, I use that as white in some areas. Dries very smooth. Excellent stuff. Both the white and greay can't be beat - I have used them on a lot of models, and also have used them to great success on planes that require a NMF finish - if you have ever used Alclad products, you know that they demand a smooth surface... Mr. Surfacer (made by Gunze-Sangyo) is only available in spray in the 1200 form. I have heard good stuff about it, but have only used Mr. Surfacer 500 as of yet (and applied it with a brush).
-
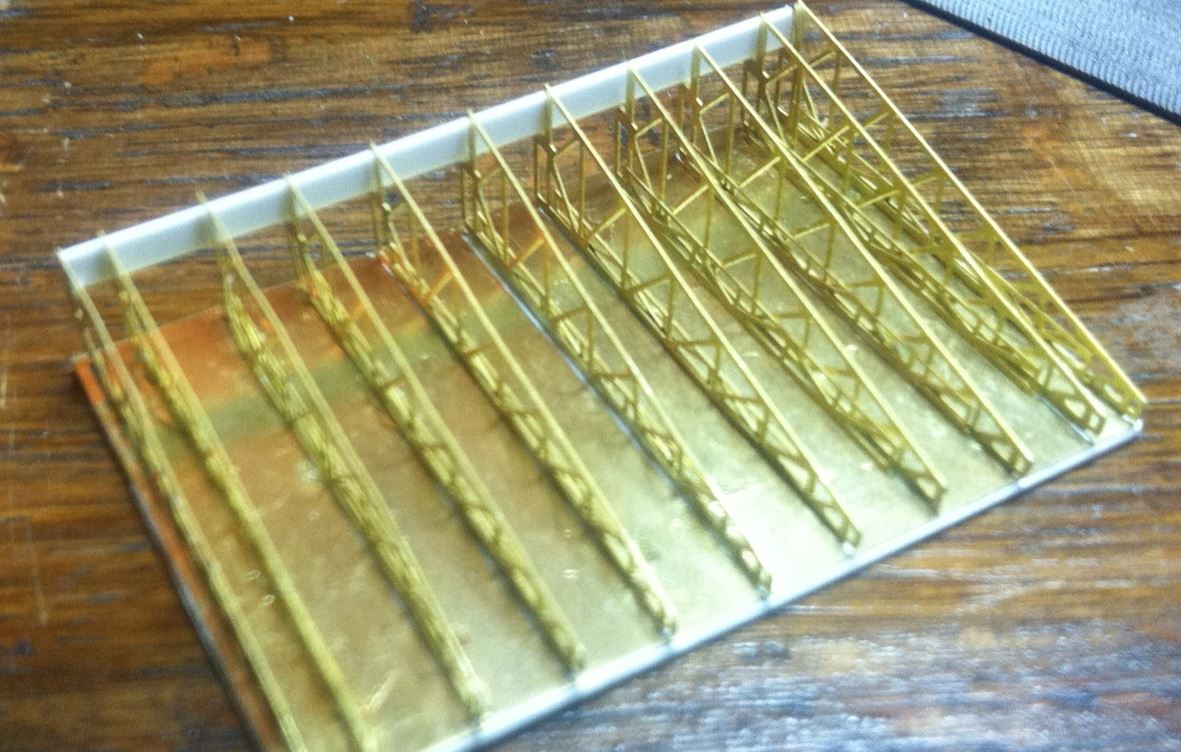
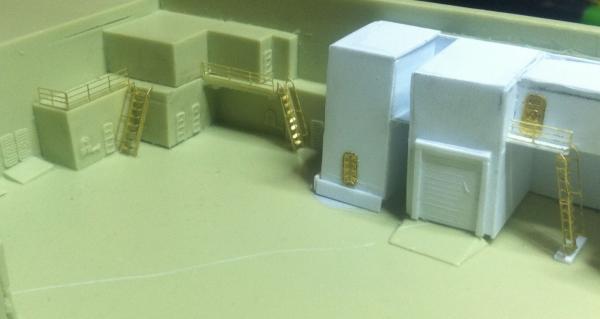
Thanks for the nice words, Tim. The company goes above and beyond in customer service. I just wish they would have put half the effort into the kit! So, here is the latest (albiet small) update from my restarted work. I apologize in advance for the quality of the pictures due to taking them with my phone. The admiral so kindly decided to lend our camera to the sister-in-law...ARGH is all I can say...(and will just leave it right there) First, the hangar bay. The kit supplied interior structures were in such poor shape that I decided to rebuild them using sheet styrene. I know my work isn't as good as I would like, however, I am at the point where I want to throw it out the window. But, the saving factor is that once the flight deck is on, only a small portion of the work will be visible from the open doors as I don't plan installing lights. I am aware of a few things that need to be fixed, especialy the gap at the bottom of the stucture with the ramp. And, some of those unsightly scratches. Once I have those tidbits fixed, I will first spray it with Tamiya Fine White Primer and then get to painting. Next up are the elevators. Once again the kit-supplied ones were junk - warped beyond usability. Fortunately the company made good and sent two types of replacements - resin and PE. Well, the resin ones were still not usable so I decided to use the PE ones. All in all, I have around 50 (give or take a couple) pieces in each of the elevators. The PE top and bottom were too thin when put together, and a little flimsy. I sandwiched a piece of sheet styrene in between the two to give it a little more scale thickness and stability. The styrene can be seen in the slots. I think it is adequate in all departments. Notice the empty slots in the PE? Well, the supports are supposed to fit exacly in each one... Guess what reality is? The PE supports are too long! So, I had to cut the back of each one to fit....more work that shouldn't have been necessary. This elevator is just about finished. I added a brace in the back made of styrene strip as the kit didn't supply one. I just have to add the front, put the netting on, and paint it (painting will come later). Not too bad - I can live with it. So, that's pretty much where I stand now. I have to do just a few more things to the hangar bay (rebuild the launch supports and paint the launches) and then I can get to the nasty business of fixing the "hump" in the top of the hull before painting and then attaching the flight deck. Once again, I apologize for the poor photos!


- 176 replies
-
- 7
-
-
- new orleans
- iron shipwrights
- (and 2 more)
-
Wow, I had realized it has almost been a year since I was last in this log. I have not had much time to work on it but just recently started back - a short TAD to Pensacola and a whole host of other things have sidetracked this kit. So here is where it stands as of now - I have no pics but will put some up soon. The hangar bay is nearly complete. I had to completely rebuild some of the structures, because, to put it mildly - they were very poorly done (profanity might be a better choice...). I rebuilt most of the structures out of sheet styrene using kit supplied ones as a guide for size and shape. I am not completely happy, but since it will have only a limited viewing area due to the flight deck and all, I am not going to spend a whole lot of time on it. Just a few more PE pieces, prime with with Tamiya fine white primer spray, paint, and close it up. But, before attaching the flight deck, I will have to level the top of the hull - it is poorly cast and has a "hump" on one side...*Sigh*... More work. With my luck, by the time I am finished, a plastic kit will come along. I am really starting to not like this kit - and am finding it increasingly more difficult to carry on, but I want to build it for Dad. Next up, I will be building the elevators (or rebuilding, as the case may be with one of them). Pics to come! I have decided to put it to sea and create a sea base due to the amount of sanding (resin is terrible to sand) and forming of parts that would have to be done if I were to put it on a stand. I get to work with good ol' Celluclay for the ocean - the only method I have used. Plenty of pics will be taken! Just thought I would give a little update as to where things stand. See ya'll soon...
- 176 replies
-
- 4
-
-
- new orleans
- iron shipwrights
- (and 2 more)
-
That bend is rather easily fixed with some hot (really hot) water and holding an opposite twist.
-
Sea Stand/Diorama
Spaceman Spiff replied to felelo's topic in Painting, finishing and weathering products and techniques
It does appear to be resin. I have had pretty good experience using celluclay. Form it around the ship (may have to add a little extra in case of shrinkage), coat it with thinned white glue, paint, and topped with Future. I like using celluclay and find it easier to make waves and less messy (for me, that is big) than working with resin. After the celluclay dries to the desired shape (remember that it will most likely shrink some), I coat it with white glue that has been thinned with water. This gives a good base for the paint. I pretty much use enamels and have never had a problem with coverage/reaction. For the initial water color, I use Testor's Model Master Dark Sea Blue (FS15042) and spray the entire water area (using airbrush). Then I lighten the blue and create various shades using white and yellow and dry brush them to highlight and create depth and color. Also, I use plain white drybrushed to similate foam, etc, typically found in wake, whitetops, etc. Once I am satisfied with how it looks, I will coat it all with two or three layers of Future (after the paint has dried for a couple of days, of course) which gives it a wet look. Works for me! -
Looking great so far! How are you going to weather it?
-
I though the Gunze Sangyo was discontinued, or unavailable in the US?
-
Thanks for all of the answers!
-
For example, the one by Model Expo - is it a good buy? Useful or not? Thanks for your time?
-
Impressive non-ship models (link)
Spaceman Spiff replied to Keith_W's topic in Completed non-ship models
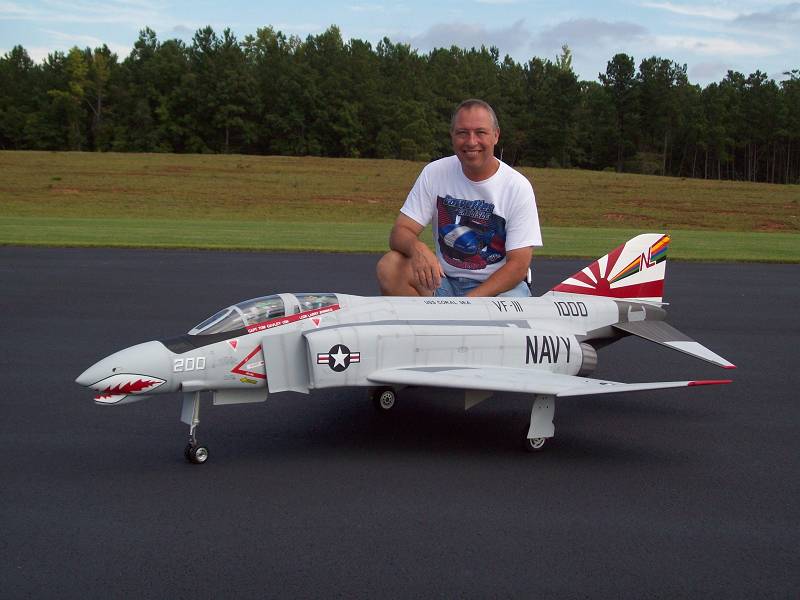
Although not as impressive as those, this one fits up there pretty nicely... a 1/6 scale turbine powered F-4 Phantom done up in VF-111 livery. By far my favorite jet! (not me in the pic...)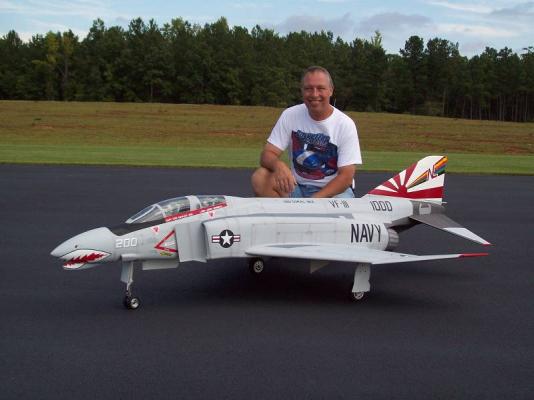
- 21 replies
-
- 10
-
-
A litte update, but no pics. At the point where I am going to set the island aside for now. I still have to put a primer on it to check for blemishes and do all the PE work, but that will be done at a later date. On to the hangar deck now. Hopefully, will have pictures soon!
-
Bend cast metal parts
Spaceman Spiff replied to bogeygolpher's topic in Metal Work, Soldering and Metal Fittings
I have thought about this, too. Would heating it work? I know that heating (annealing) PE parts makes them easier to bend, but I don't know if this would apply to white metal parts. -
Oh, ok. I think I will stick with that and the build logs. Would rather not pay those prices and deal with all that drama...