


allanyed
-
Posts
8,149 -
Joined
-
Last visited
Content Type
Profiles
Forums
Gallery
Events
Everything posted by allanyed
-
 Hi Halit I don't know how easy or difficult it is to get rope rather than thread in Türkiye but making proper rope is not a difficult task if you cannot buy it easily where you are located.. For the future, there are inexpensive ropewalks including the one from Syren, or you can get some gears and make your own ropewalk. If you look at the string you used and miniature rope in the photos below you can see there is quite a difference in appearance. Cheers Allan
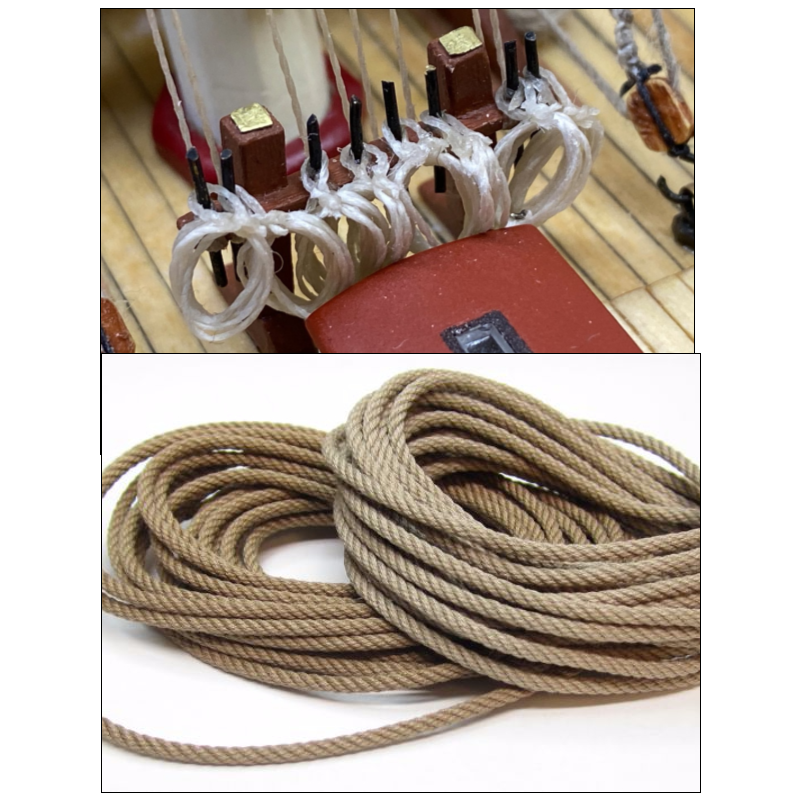
-
YES!!!! Not only needle work, using cloth can look pretty bad at times unless you get material with a TC at 1000 or more and the model scale is at 1:36 or larger. Allan

-
In the end it is up to the model builder as to what they like. I may be in the minority,, but I totally agree with your decision on NOT treenailing the deck planking. I may have missed some, but so far I have not seen one build here at MSW, at this scale, with realistic treenailing on the decks. Allan
-
Hi Halit! Your sails are fantastic!!! Easily some of the best on any build log here at MSW. Is the white thread used for the coils from the kit? Allan
-
Welcome aboard Mic! Where are you located in France? We are hoping to head over this year for a week in Paris and a few days in Normandy. We love both the cities and the countryside, and of course the food, and the people very much. Allan
-
John, This is the book referred to in post #2 and it really does have a WEALTH of information. But, unless something has changed, be aware there is no index for the details of construction for pages 313 to 683 (at least on my copy). These pages are what the book calls a Notebook of Details on Gloucester Fishing Schooners so it is a bit of a pain in the neck to find anything as each section is an accumulation of notes by Chapelle and others that he put together in somewhat alphabetical order. Still, it is a fantastic book to have for building the old schooners and I have worn pages in my copy from the many times I have used it over the past 45+ years. Allan
-
Bulwarks placement
allanyed replied to BMT's topic in Building, Framing, Planking and plating a ships hull and deck
Bee Try posting photos as jpgs or pngs. They will appear on the post rather than a box (at least on my computer) and more people may look at it. My first reaction was to ignore your post when I saw the box instead of a photo but I did get it open. Regarding your dilemma, sorry I have no answer, but it sounds like Dziadeczek has a good method for you to try. Allan -
HMS Euryalus 1803 by rlb - 1:48 scale
allanyed replied to rlb's topic in - Build logs for subjects built 1801 - 1850
Keep at it, you have a ton of support and supporters here at MSW. I find if I need a respite for any reason, it is good to maybe get into the deck furniture or boats or some such for a particular build. Keeps the project moving along nicely and eases the frustration at the same time. Allan- 122 replies
-
- 7
-

-
- Euryalus
- Plank-on-frame
- (and 4 more)
-
The coppering is one of the best if not THE best posted on any log here at MSW. Kudos! Allan
- 473 replies
-
- 8
-
-
- Indefatigable
- Vanguard Models
- (and 1 more)
-
Hi Herman, I think there MAY be some question regarding the description that BNII was a fishing vessel. Bluenose II is a replica of the fishing and racing schooner Bluenose, commissioned by Sidney Oland and built in 1963 as a promotional yacht. He donated the schooner to Nova Scotia in 1971 and it then operated as a sailing ambassador and promotional device. It was never used as a fishing schooner. The drawing brings up a question though. It states that the anchor cable was sometimes bent to the jumbo halyard. Is this true and if it is, why?? Hopefully one of sailing members can explain. Allan
-
Drifts
allanyed replied to tlevine's topic in Building, Framing, Planking and plating a ships hull and deck
Hi Toni, Have you contacted the Maine Maritime Museum? They have various plans that MAYBE will be of some help. This looks like a very interesting build and I for one look forward to seeing your progress!! Allan -
If you are happy that is all that matters. To each his own when it comes to whatever it is we want to do for any endeavor (except maybe for brain surgeons) Cheers Allan
-
Hope you will be responding to this inquiry in the near future. Many thanks for your help
-
Spell Check
allanyed replied to allanyed's topic in How to use the MSW forum - **NO MODELING CONTENT**
Thenk yu everryone I wonder why all three words are underlined in red on my screen😀 -
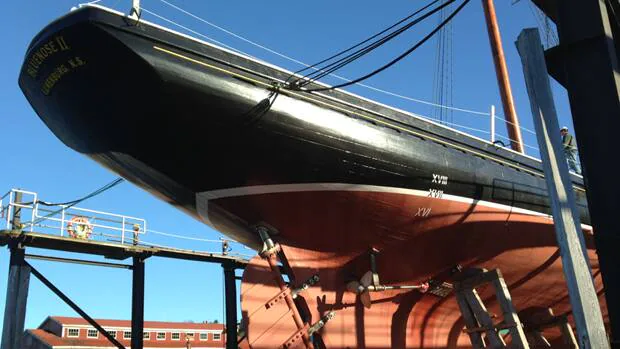
Hi John, Bluenose II carried two Caterpillar 250HP Diesels and props for propulsion. (See BNII photo below) Interestingly these gave her a top speed of 8 knots under this auxiliary power, half of what she could achieve in a strong wind with only sails. I am not sure what engines and prop sizes are on Bluenose IV. If your model has no props, it would make sense that she is the Bluenose I so the only chain would be the rode shackled to the hemp line. These would probably be no more than about 10 to 15 feet. As an aside, the following article on the transition from hemp to iron is very detailed and interesting. https://www.tandfonline.com/doi/full/10.1080/00253359.2013.767000 Allan
-
Arnold, Is your model the Bluenose 1921, Bluenose II 1963 or Bluenose IV 2007? There are many differences between them including twin 250 HP Diesel engines on the Bluenose 2 that were not found on the Bluenose. Other differences such as anchor lines, fittings, electrical apparatus and more might be considerations for your model depending on which version you are building. Allan
-
Hi Chapel, What size launch is this? I notice you have the tholes set up with two for each of three thwarts, but no tholes for two of the thwarts so no possibility of rowers to use these thwarts which would likely never be the case. Is this a kit instruction? If it is single banked they would be alternating and more likely having six thwarts, but if double banked every thwart would have a pair, not just some of them. Maybe consider scratch building a launch or other types of boats on your next adventure, it is not a difficult project. There are several current launch builds in the scratch build forum (1751-1800) as well as a dozens of contemporary drawings on the RMG Collections site and the Wiki Commons site that should help. There are scantlings available for everything from frames to risings as well, in a number of publications. I realize this is only your second build, so baby steps. 😀 It is never easy but should always be fun! Thank you for sharing your build with us! Allan
-
Spell Check
allanyed replied to allanyed's topic in How to use the MSW forum - **NO MODELING CONTENT**
Test - Yep it wrked Thanks Baker Allan -
Arnold Welcome to MSW!!!! According to Howard Chappelle, Banks Schooners used hemp cable, not chain. Chain cable was used for harbor service. When chain was carried for harbor service it was stud link chain with 5 inch X 3inch links on boats more than 75 feet long so would be appropriate for Bluenose. He does not mention how long the rode is nor if it was hemp or chain. If you need to make a rode of chain, at your scale, links would be 12 links per inch. Keep in mind the links are stud links, not open links but at your scale may not be noticeable to most folks. Allan
-
My spell check is no longer working on MSW and I cannot figure how to turn it back on. My spelling leaves something to be desired so I appreciate all the help I can get with Spell Check. If someone can tell me how to get it to work I would be grateful Allan
-
Making brass parts chrome
allanyed replied to John Ruy's topic in Painting, finishing and weathering products and techniques
If you want chrome rather than paint you can chrome plate parts yourself. Might not be worth the effort compared to painting but it is an alternative. https://caswellplating.com/electroplating-anodizing/chrome-plating-kits.html Allan -
2nd rate London 1656 – the art of the shipwright
allanyed replied to Waldemar's topic in Nautical/Naval History
https://www.rmg.co.uk/collections/objects/rmgc-object-136130 for a VDV portrait. Don't know that the following will help but if her keel length was 123' 6": For the R&S, one could use the information in Goodwin's The Construction and Fitting of the English Man of War for a second rate ship. Per Deane, the moulded beam is the length of keel X 3/10 123'6" X 0.3 = 37.05 feet Depth of keel = 1/2" for each foot of moulded beam X 37.05 = 18.5" Siding of frame = 5/7 X depth of keel = 12.86" Assumimg an average space between frames of about 2" the R&S is 12.86+2+12.86+2 = 29 3/4" Someone might want to check my math just in case🤔 Allan -
Yes, making the framing for the lights is a challenge at any scale from about 1:48 and smaller. I have even used wire for an experiment at 1:196. At 1:98 the frame parts would be something like 0.01X0.015 so can be done with a good hard wood like box or someother tight grained hard wood. For the future, maybe consider plastic frames. There are styrene strips available at 0.010" X 0.02" that might work for you. It can be mortised with out breaking for a good fit of the parts. I like to make a template for each light then make and assemble the muntons and stiles on the template. Once the framework is complete you can glue a clear plastic piece to the inboard side of the finished unit then glue the entire assembly in place. Just be sure to have a ledge of some sort in the light opening to support the assembly when it is placed and glued in place. It is a challenge to be sure, but they are a very visible and noticeable part of any model so worth the time and effort to make them as neatly as possible for many folks. Allan
-
Hi Kostas Thank you for sharing your build, it is a pleasure to follow your nice work. Are the stern and gallery lights (windows) from the kit? The reason I ask is that the stern lights have nine panes in each light rather than the six shown in post #17 and I believe the gallery lights have two rows with six panes and the lower row with nine panes. I realize this may be a kit design error. Allan
-
Hi Rob Just tuned in and congratulate you on your points in post #2. You have spotted a lot of things that could use some improvements. There are a couple build logs on building ships' boats in the scratch build forum that you may find helpful. These center around a 23 foot launch but the methods can be applied to any type and size boat and as you have a thicknesser set up you will have an easy time of it. Treenails at your scale may be a challenge for the deck planking. They would be about 0.015" or less in diameter. For the hull they would be closer to 0.03" so doable but as this is POF, you will need to account for the 70 or so missing frames. For trennals, when in doubt, leave them out. Looking forward to your progress!! Allan

