HOLIDAY DONATION DRIVE - SUPPORT MSW - DO YOUR PART TO KEEP THIS GREAT FORUM GOING! (Only 75 donations so far out of 49,000 members - C'mon guys!)
×


Rustyj
-
Posts
2,530 -
Joined
-
Last visited
Content Type
Profiles
Forums
Gallery
Events
Everything posted by Rustyj
-
 Thank you for such kind words. Nick. Practice, practice, practice. When I first started I rejected as many as I was accepting. I would think walnut would also be a bit harder to get a smooth run. Also I use a sanding block whenever possible. It helps me keep a clean edge.
 -
Thanks Chuck, If someone hasn’t tried it they can’t believe how much nicer it is to plank this way. This is my planking method now. Hi Sjors, Thanks but yes it can be done much better. Next time I’ll need to get the seams tighter and the width of the planks isn’t uniform enough yet.
-
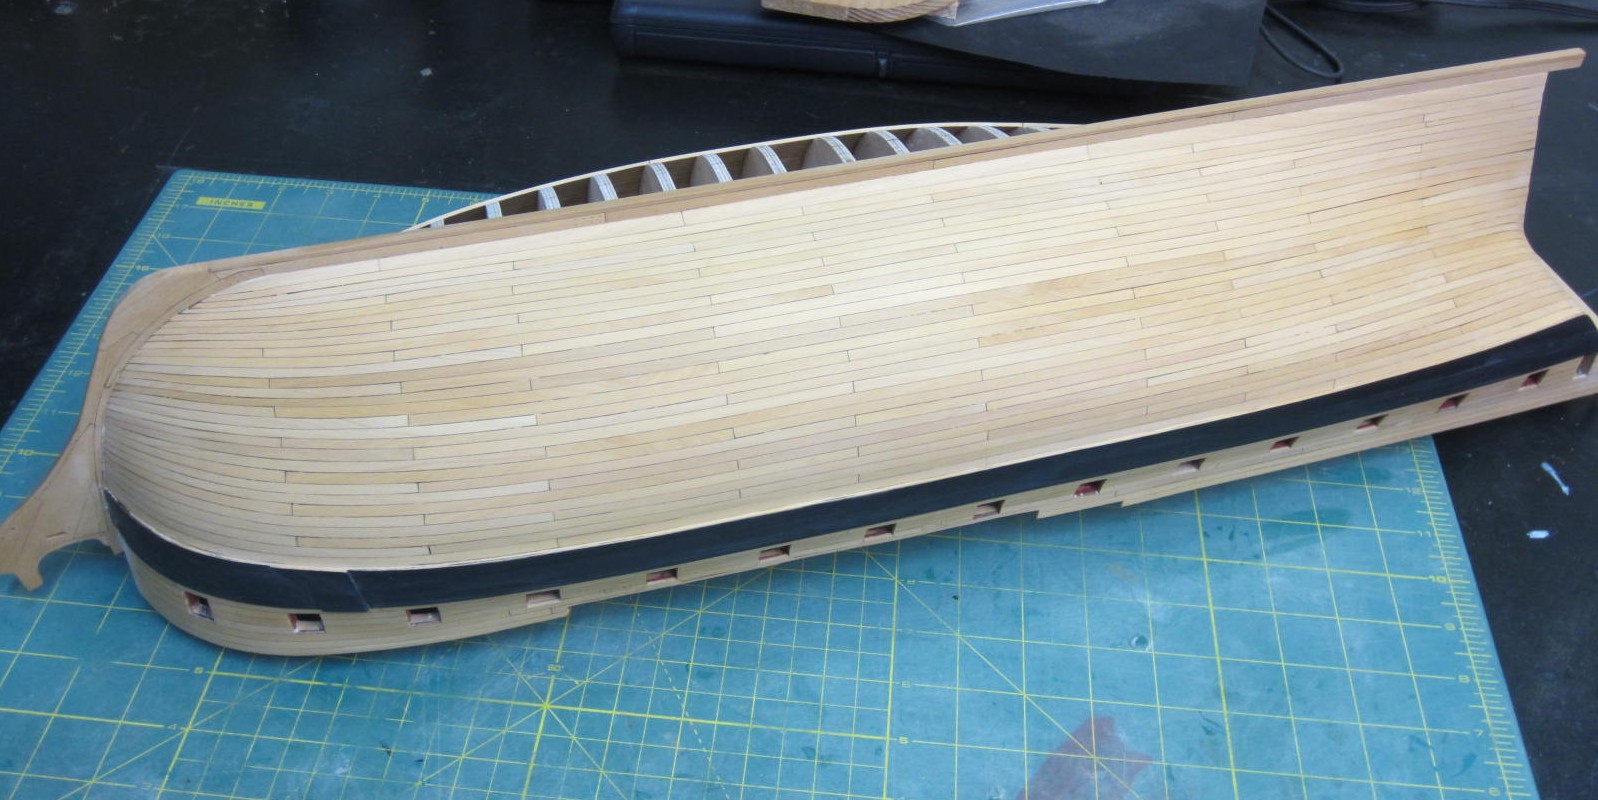
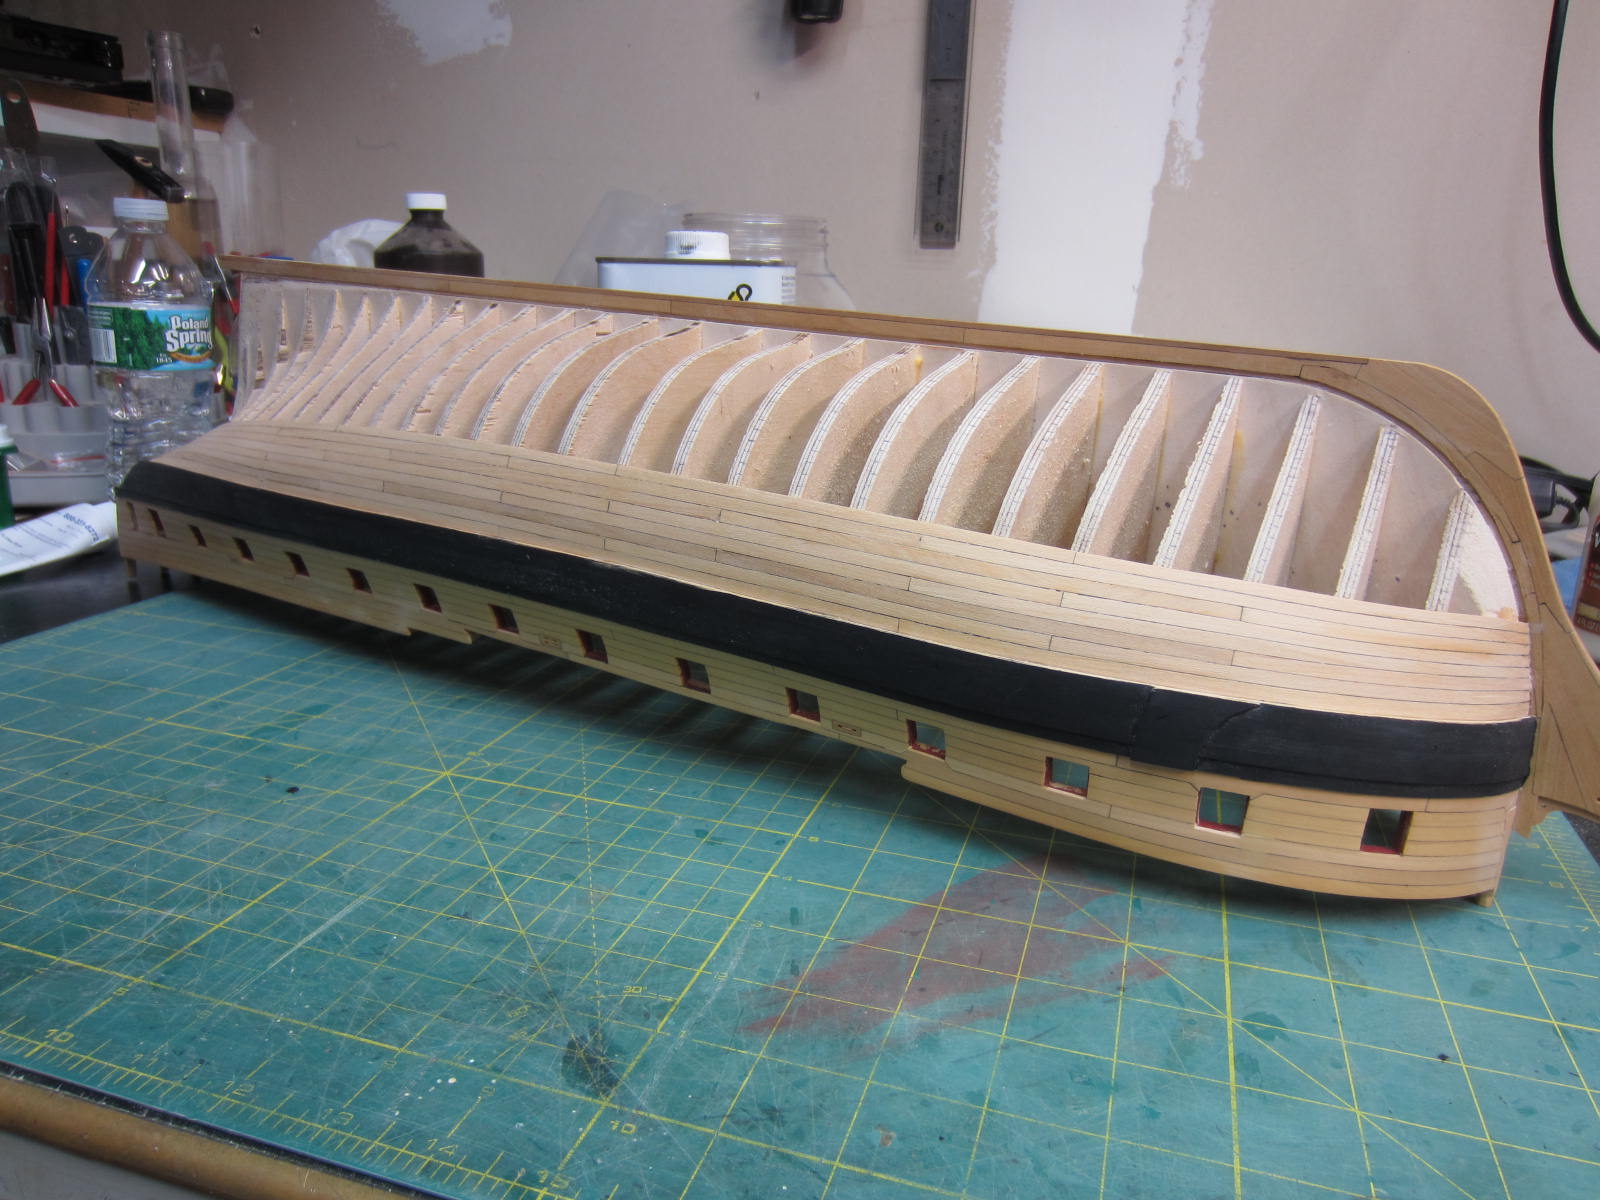
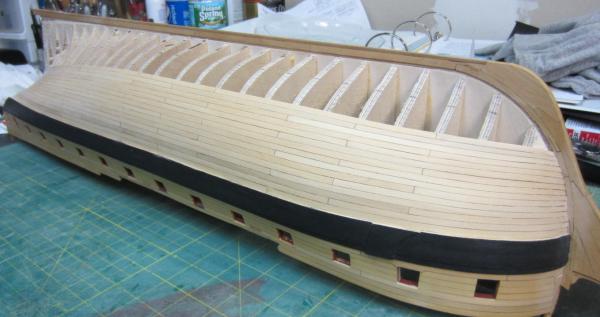
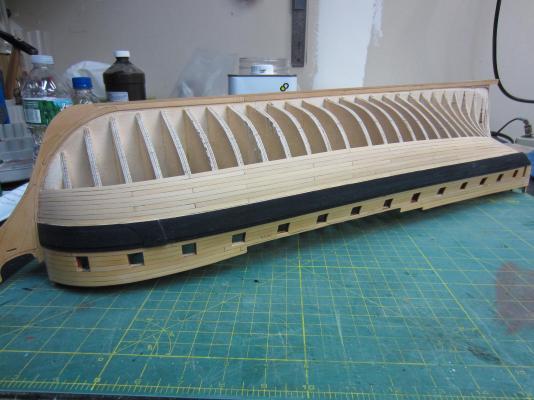
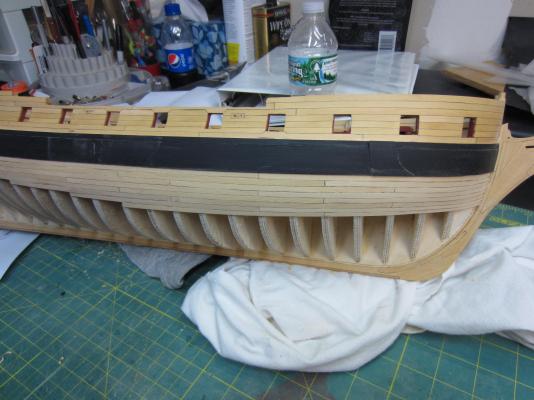
Hi Everyone. Thanks for the comments and likes. Sorry for the delay getting back to you all. My PC's hard drive started failing and had to take her to the doctor. During that time I was able to complete the startboard side planking, sanded it down and applied one coat of wipe on poly. The good news is that I was successful in doing it without any drop planks or steelers. The bad news is after sanding it a few joints aren't as tight as I would have liked. All in all I'm happy with my first attempt at this type of planking. Hopefully the next one will be better and the planks a little more uniform. Well I'm off to the port side to start the last two bands of planking.

-
Hi Chuck, I like your jdea to paint it. Then as we build our version we can fret about painting it or leaving it natural.
- 1,051 replies
-
- 2
-

-
- cheerful
- Syren Ship Model Company
- (and 1 more)
-
Hi Ben, You are really doing some great work and don't worry all Admiral's want the shop ship shape! Hopefully you don't have to holystone the deck too! As long as you have the storage unit in there it would always be Aye Aye Admiral!
-
Hi Chuck, you could take two months and I'd still not catch you. Thanks Mark. Thanks Augie I used to do more sanding but found that it was hard to match the new planks so I just hit it lightly until all the planking is done.
-
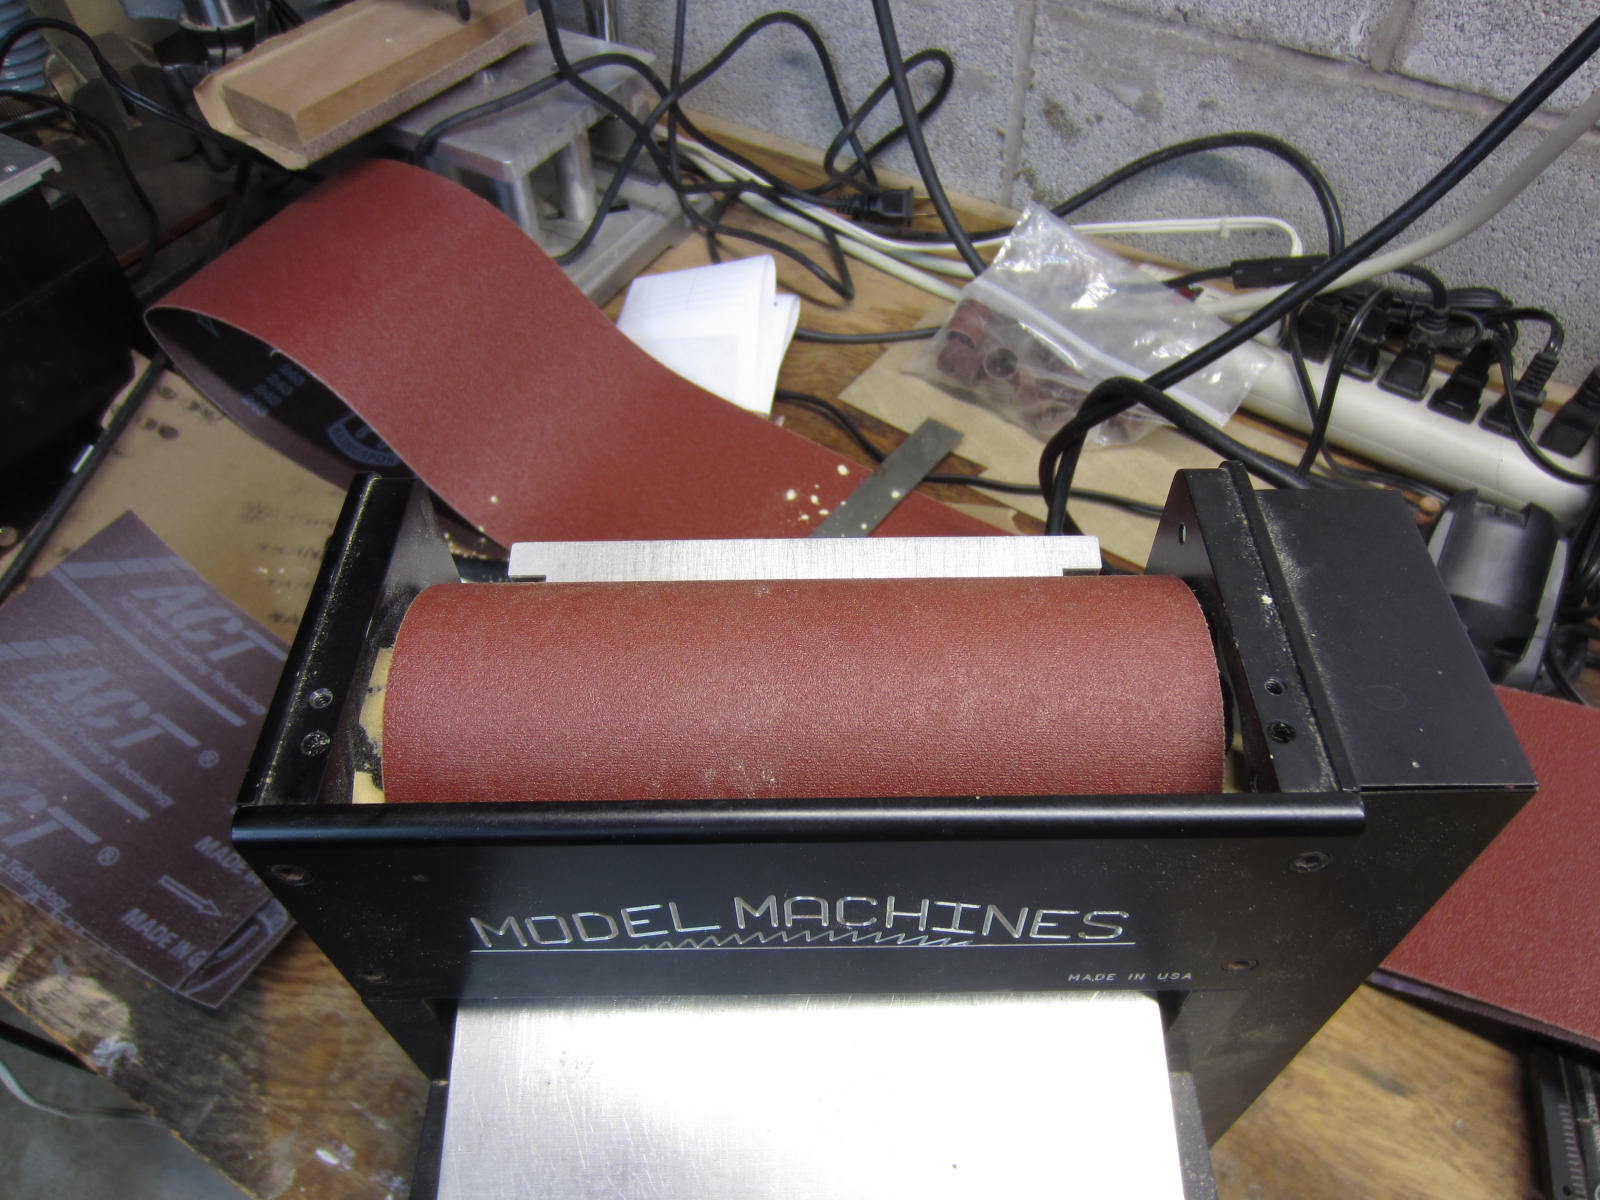
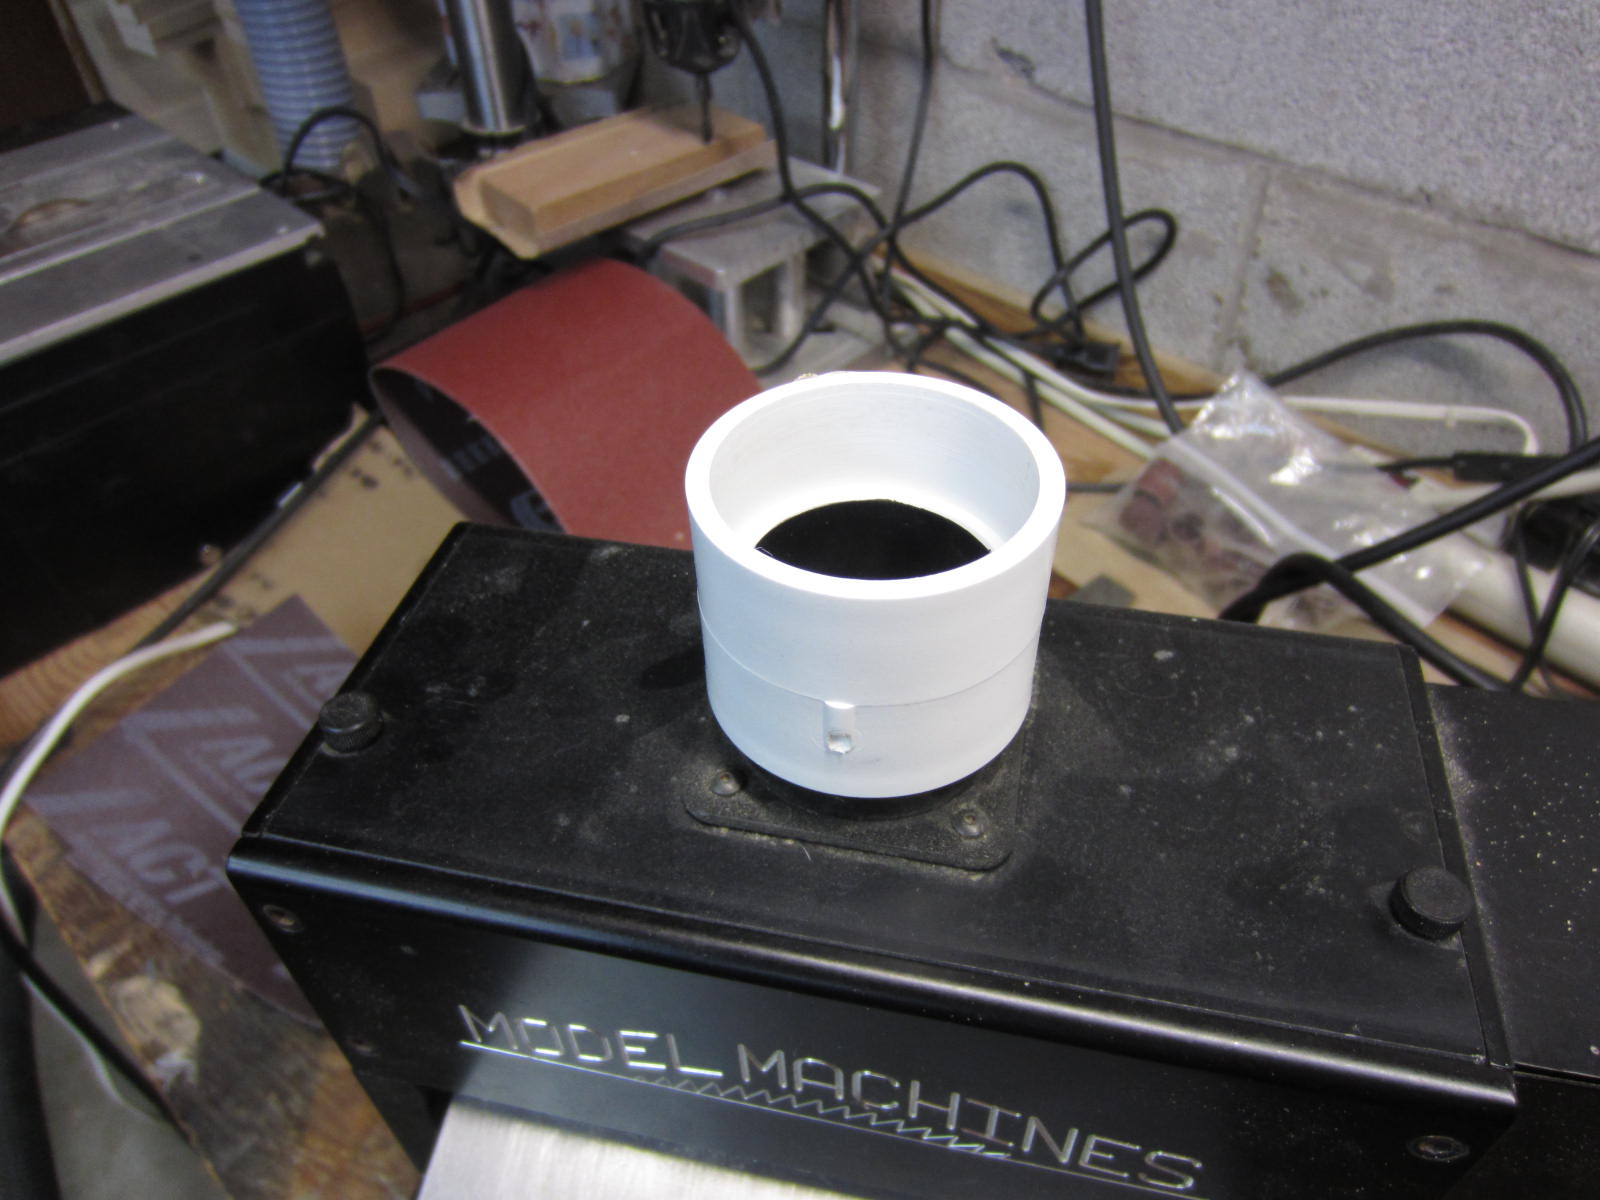
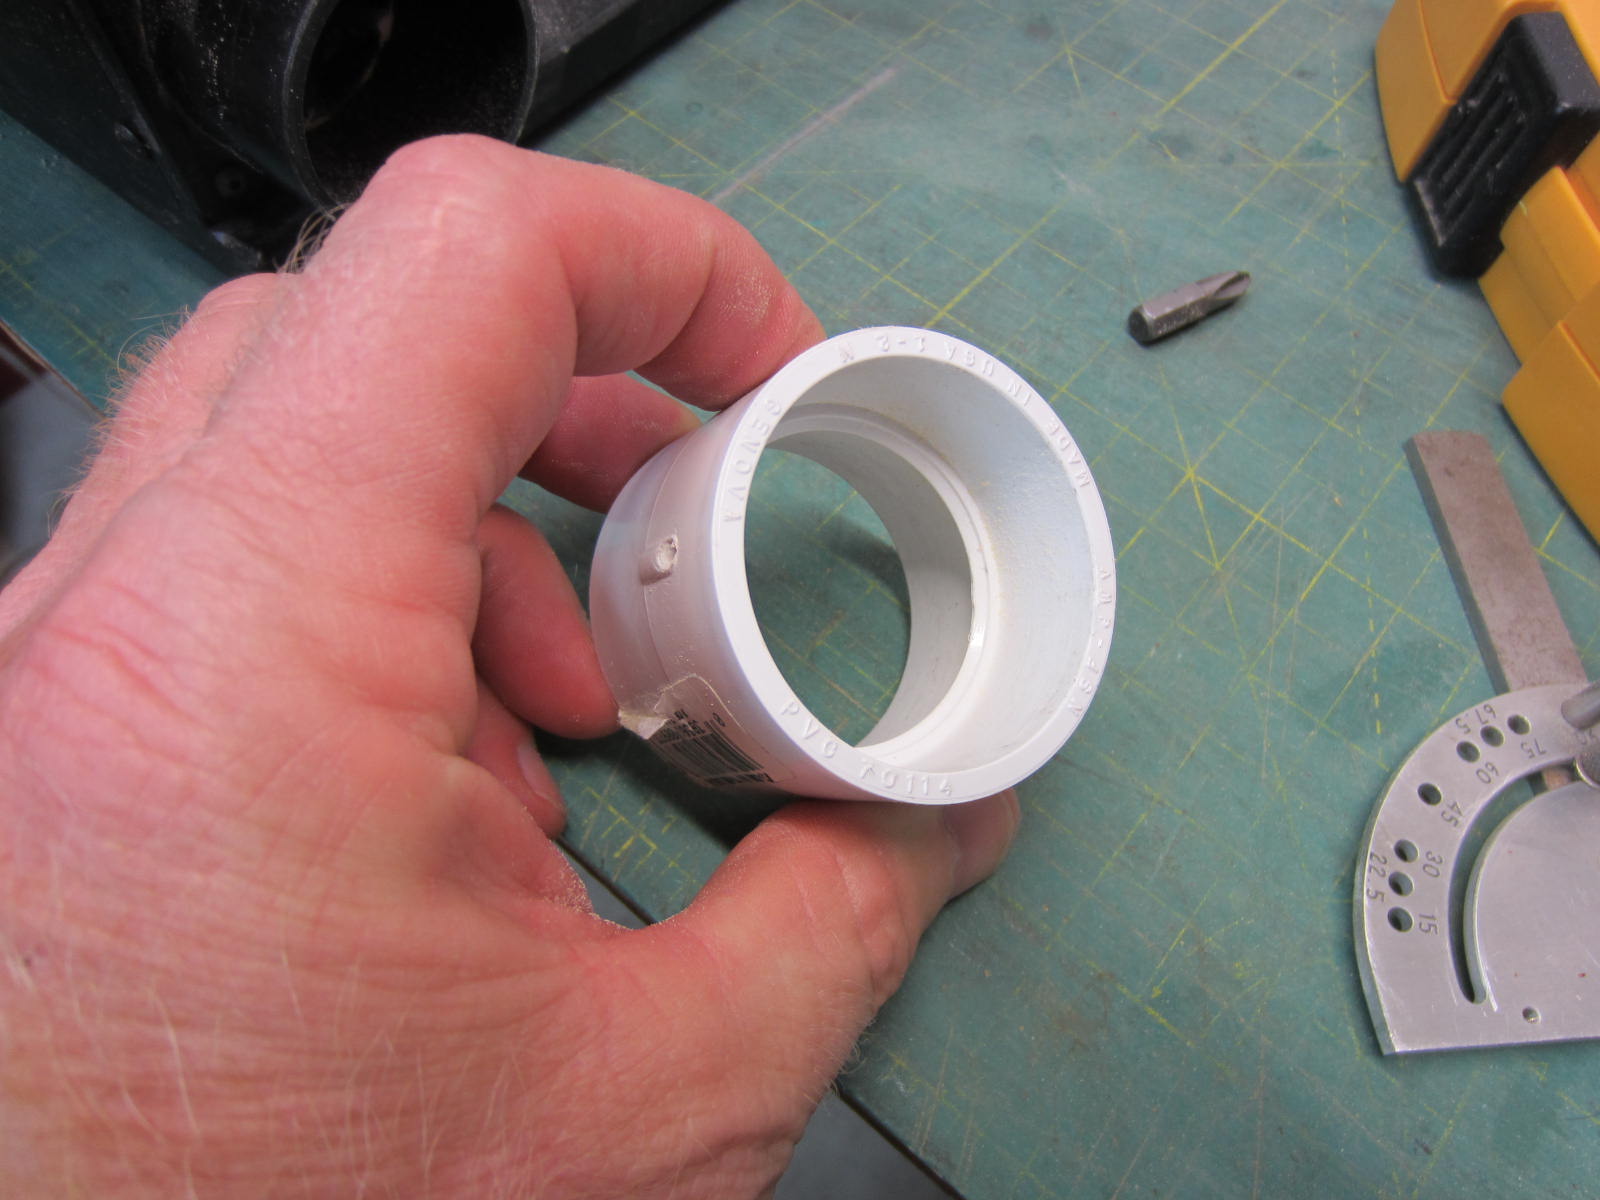
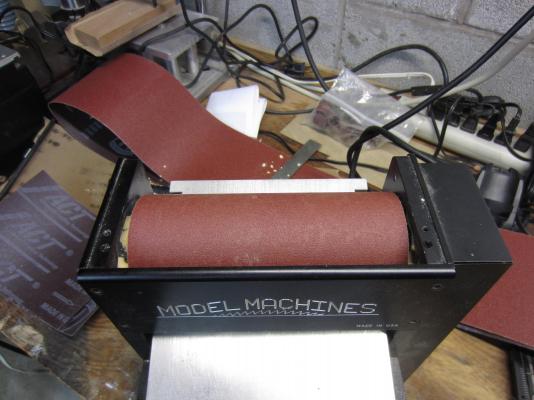
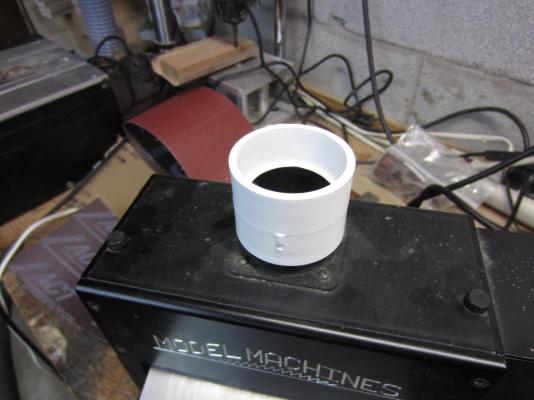
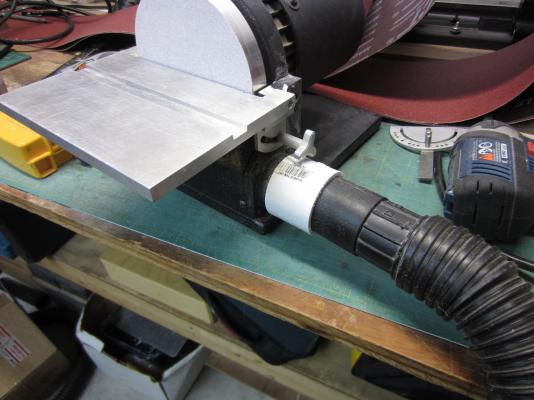
Hi all, Well I'm back and glad to be back in the shop and it feels sooooooo good. The first thing I did was to clean up a bit. Mind you it had nothing to do with running out of room to work. One of the things I did was solve the issue I had with my vacuum hose being the same diameter as the outlet for my Byrnes tools. I broke out my handy dandy lathe and took a 1 1/4" PVC coupling milled the inside diameter to match the outside diameter of the hose and bingo I had a quick coupling. The next thing I wanted to do was cut some sanding paper for my thickness sander. Normally there are two 3" strips of sand paper on the drum. Sometimes though I sand wood that is 3" or wider. Now you can put two strips of sandpaper side by side but that tends to leave a little grove in the wood from where they meet. So I got some 6" wide sanding belts and cut strips that cover the whole drum so now, if needed, I can sand wood up to 6" wide now in one pass. Ok back to actual modeling here. I have now completed planking the first two belts on both sides of the hull. So far so good. Not stealers or drop planks. And as I said before it is slower but the planking is much easier. Everything has been sanded with 120 grit paper. Once the whole side is planked I'll finish sanding it and apply a couple coats of wipe on poly. Now it's not a pristine as Chucks but I'm happy.


-
Hi Chuck, She's looking really nice. I like how the molding will define the run under the gun ports. That makes for a real nice flow. You will be planking below the wales the same way you did the Winnie won't you? I'm looking forward to taking a crack at her once you've finished!
- 1,051 replies
-
- 1
-
-
- cheerful
- Syren Ship Model Company
- (and 1 more)
-
Hi Mark, I've just had the pleasure of going over your build log and catching up from my busy season. Great work my friend! I loved watching your progression and how you worked through each portion of the framing. So very well done! An inspiration to us all. Also consider the like button pounded until it wore out. Best of luck on the stern, but then I don't think wishing you luck will be needed at all!
-
Hi Chuck, I found this log a couple of days ago and read through it and love what you are doing. But that's a given anyways. If you keep this up I'm gonna have to sell the couple of kits I still have on the shelf.
- 1,051 replies
-
- 3
-
-
- cheerful
- Syren Ship Model Company
- (and 1 more)
-
Hi Elia, It's was great to hear from you and thank you! No pictures to post but I wanted to let you know that I am working along. Slow but sure. I've almost completed the second belt of planking but work will halt for a couple of weeks as I have to take the Admiral on a vacation. It's one of those good/bad things. Vacations are great but I hate missing the shop time. See ya all in two weeks.
-
Hi Ben, Looking really good there and as you said careful on that sanding. Enjoy the conference. Wish I was going to be there!
-
She looks wonderful Chris. I like your thoughts and it would be a shame not to finish her. Go for it!
- 290 replies
-
- 1
-
-
- confederacy
- frigate
- (and 1 more)
-
Hi Jim, I do the bow and stern and then strip wood between. I do have to taper the strip wood though. Also I will be away and can't make it to St Louis. The Admiral issued travel orders that can't be ignored. Thanks Ben.
-
Thanks Druxey, I'm onto the second belt and with each plank cut out gets easier or I should say more comfortable. Thanks Bob, Fun but slow. Hi Alistair, Follow Chucks directions and you'll not have a problem. Thanks Sjors. Thanks everyone for all your likes too. I'm heading back to planking now!
-
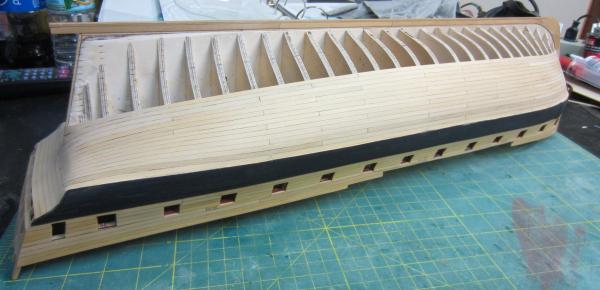
Hi All, When starting the planking I wondered about the waste, or maybe better put, the amount of wood needed to plank the hull in this manner. I started with a 2" x 18" piece of wood and I was able to cut all the spilied planks for both sides and still had wood left over. I was very pleased with this. Now onto my impression of this style of planking a hull. In the words of my sweet granddaughter .......OMG........ though time consuming it was soooooo much easier to lay the planks. No twisting and bending and forcing them into place. Here are pictures of both side rough sanded. Once the entire hull has been planked I will progressively sand it down to 400 grit and then seal with wipe on poly. On to the second belts!

-
Hi Bob, Great work on the bowsprit and all the pieces. Keep after sculpting the figurehead. I know you can do it!
- 1,477 replies
-
- 1
-
-
- essex
- model shipways
- (and 1 more)
-
Hi Bob, I just had a wonderful time reading the 8 pages of posts I'd missed and truely enjoyed every minute of it! As many have said your workmanship is outstanding and an inspiration to us all. Thanks for taking the time and sharing it with us.
- 1,477 replies
-
- 1
-
-
- essex
- model shipways
- (and 1 more)
-
Hi Ben, I just had an enjoyable read catching up on your build. Your workmanship and dedication to "getting it right" are outstanding! Great work my friend.
-
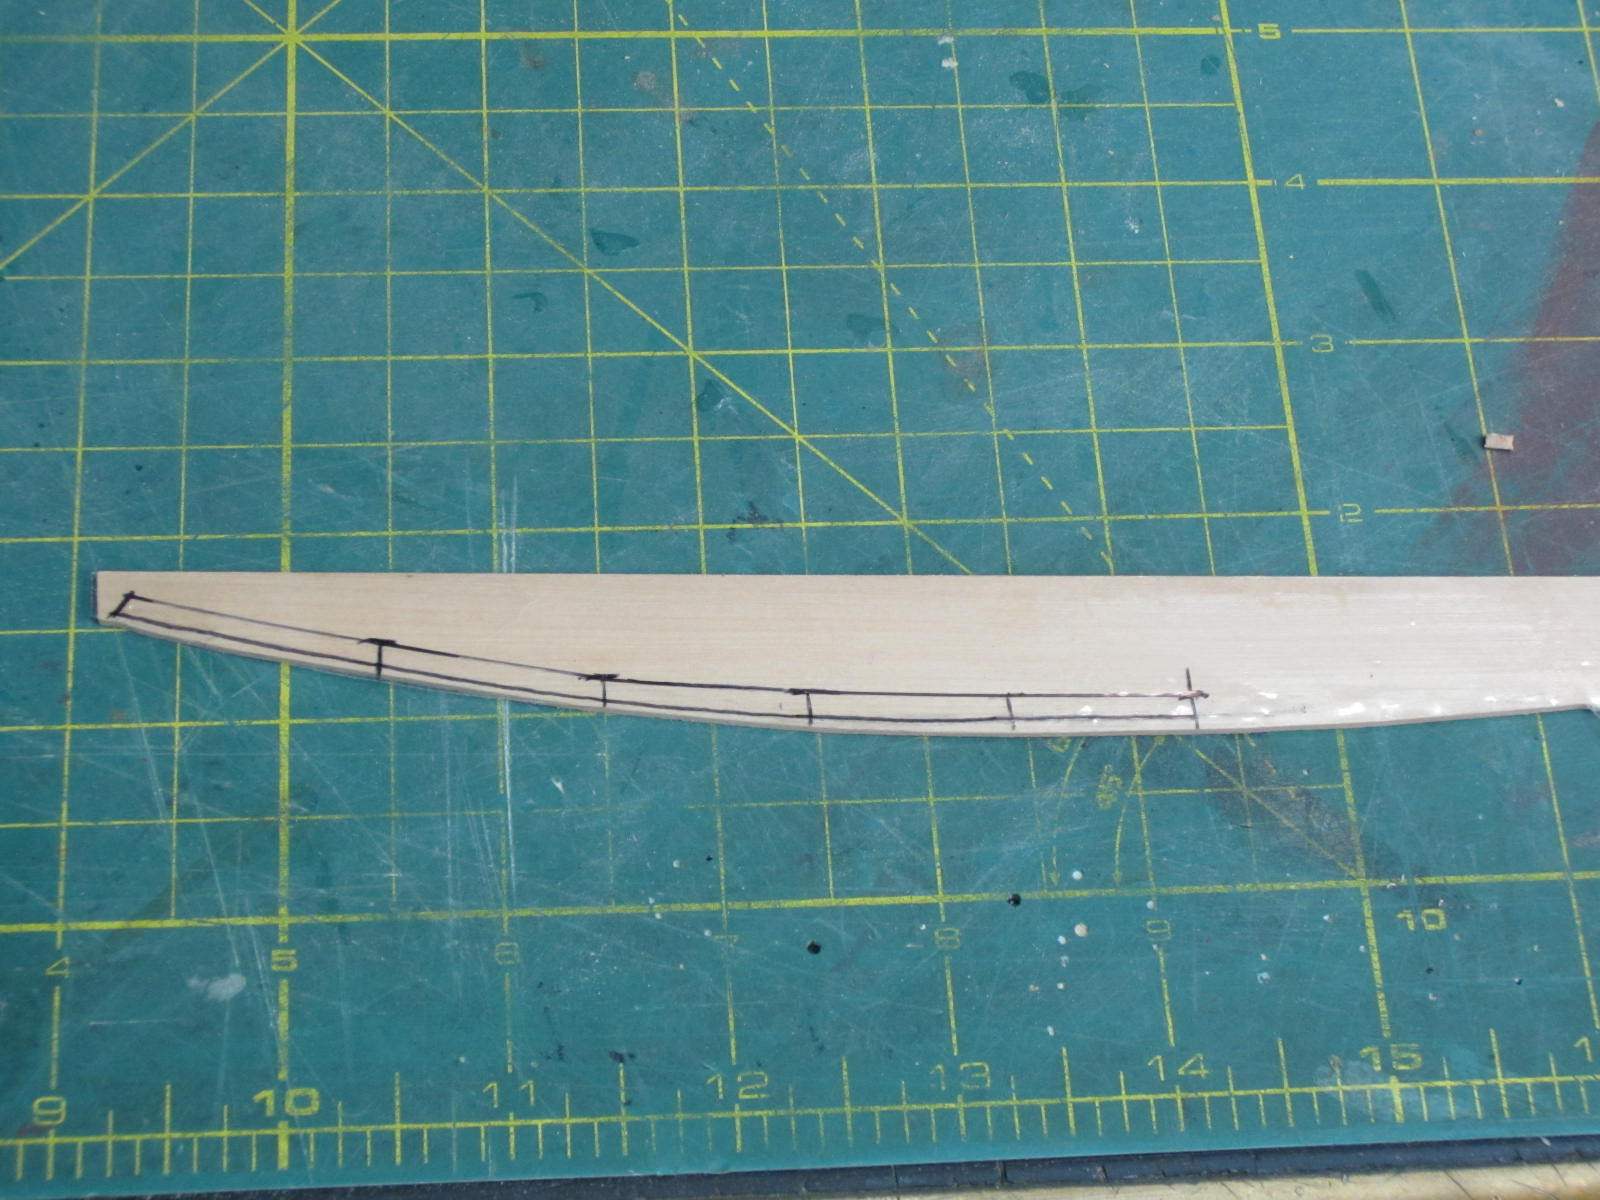
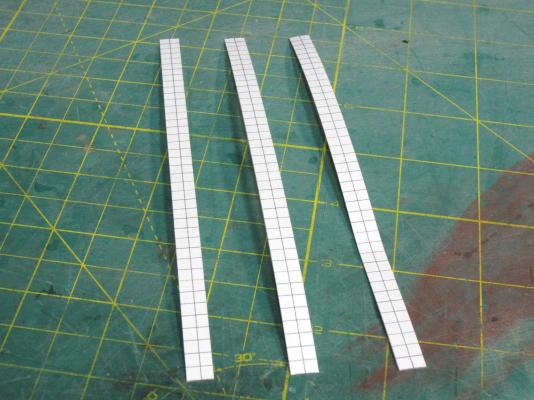
Hi Joe, Good to hear from you! Sjors, Look as close as you would like. Just watch out for splinters. Some planks had been placed, trashed and broken but progress has been made. At the bow I have fit and glued the first 7 rows which is the first belt. I am working my way to the stern and will finish up the entire belt before I move onward. Here is a demonstration picture of marking off the plank to be cut. The tape is placed on the hull and then using a pencil you mark the edge of the plank where it meets the existing plank. Then I marked the bulkheads. At each bulkhead I then mark the height that was already placed on the bulkhead. The tape is taken off and placed on the wood to be cut out and using a French curve the top marks are connected giving you the shape of the plank. Because the pencil lines are hard to see on the camera I traced over them with a sharpie so you can see them better. I won't use this piece as my tracing was a little to inaccurate. For a much better description follow check's link above!

-
Thanks to all for stopping by and all the likes, Hi Chuck, I am enjoying it. It's a little different to cut out but they lay down sooooo nice! Thanks Jason. Hi Ben, It' s good old boxwood. I've got to stop by and see how you are doing on the Pegasus. Hi Pat, Good to be back, We'll see what kinda groove I get into here! Hi Grant. Time will tell. Hi Bob, I hope so and I've got to catch up with you as well as everyone else too!
-
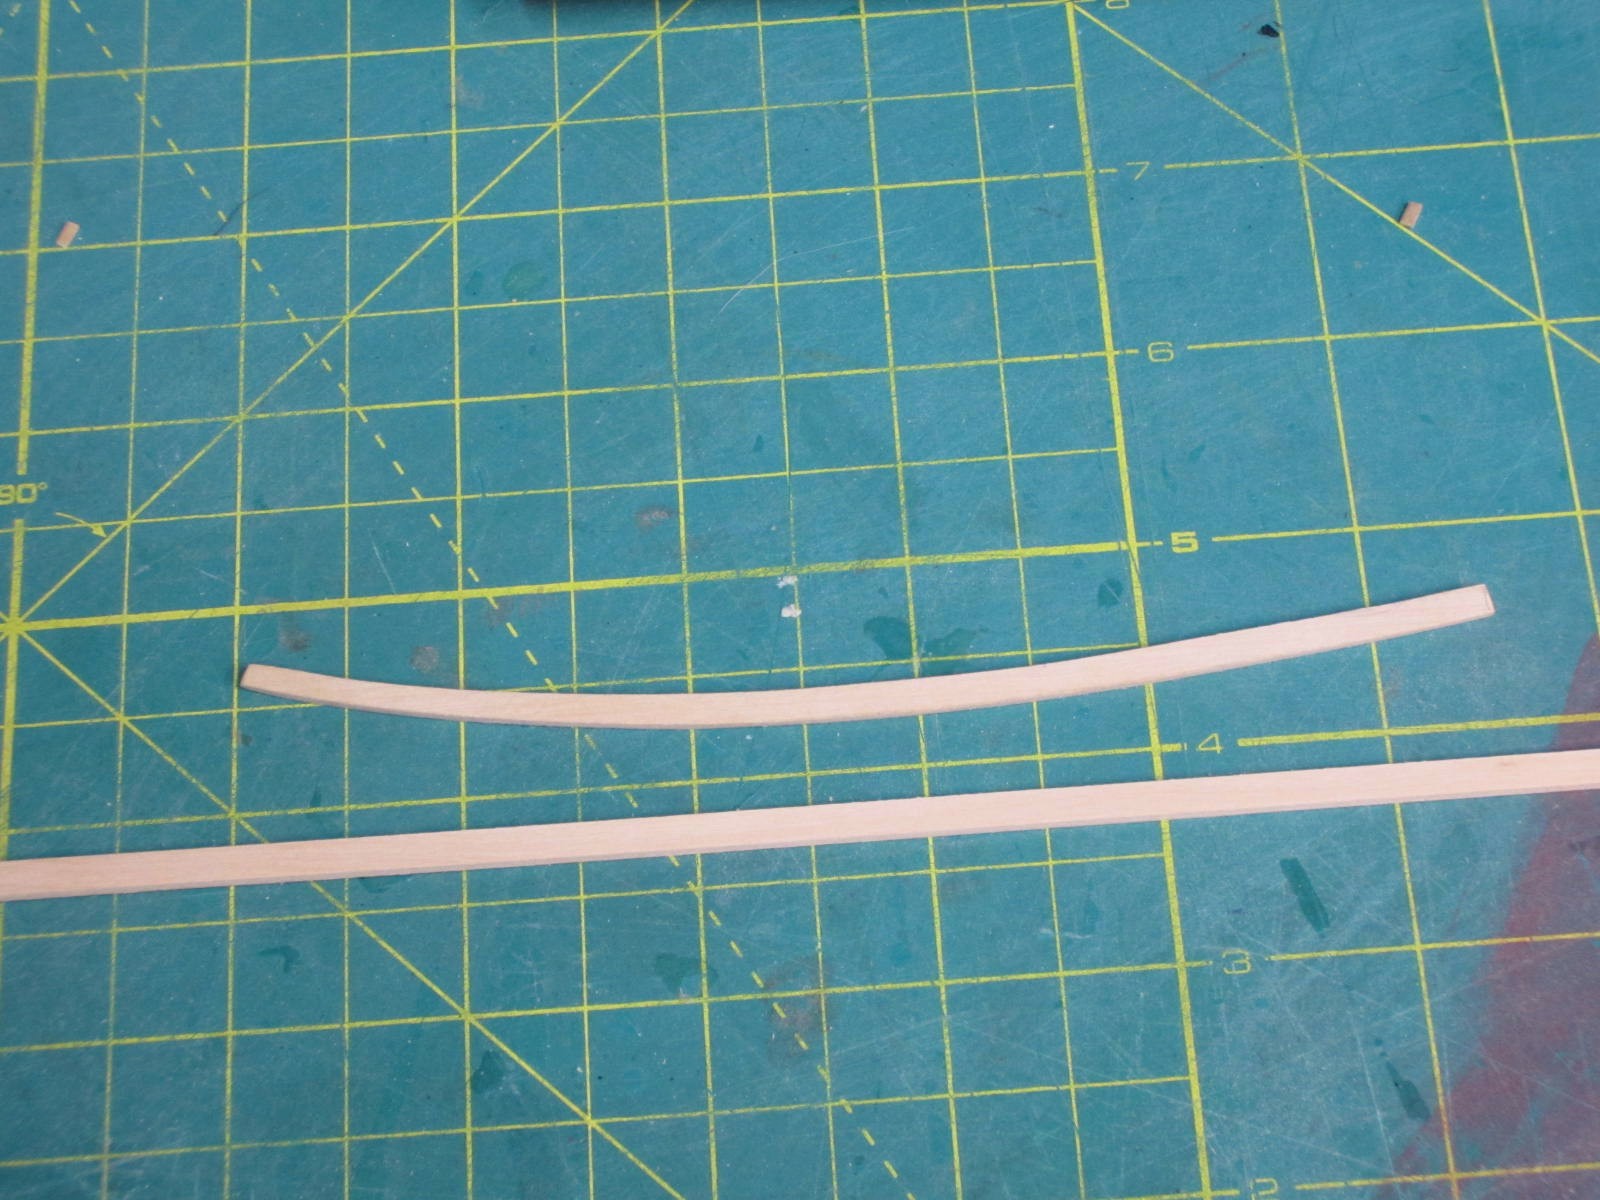
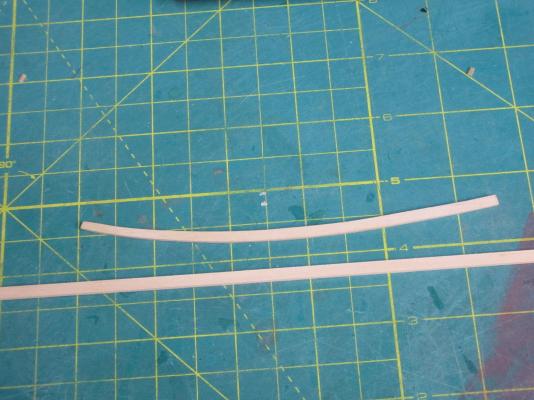
Hi All, Well in case you didn't notice I've been AWOL for a while now. August and the first week of September is really busy at work. 80 hours work weeks with no days off blah, blah blah. Boy that was no fun. I used to be able to do it no problem but now it kicks my butt. So it was work, sleep, dream of working on the Winnie and then back to work. Once that was over it was another week or so to catch up around the house with all the things that needed my attention. So I've now looked at MSW and found 11 unread pages in the Kit Build Logs and 4 pages in the Scratch Build Logs. Not to mention, oops I just did, all the other topics! So to all my friends out there I'm sorry I missed posting to your logs for the past 6 weeks and it may take another 6 weeks just to catch up. Now that I've got my whining out of the way here is where I'm at. I have not completed marking all of the bulkheads with the plank locations. That was over 1400 little pencil marks. I'm seeing little dashes in my sleep know. I've now started on the planking and here you see my first attempt at spiling a plank. You can see the curve compared to a piece of strip wood. Well I've now started the planking and will let you know how it goes.
-
Thanks all for stopping by. Yes Augie it's great to have access to Chuck and all his talents. Thanks Nils. Don't look too closely Sjors! Hey Ben good catch. Only thing worse then my math is my typing so I was in trouble no matter what!
-
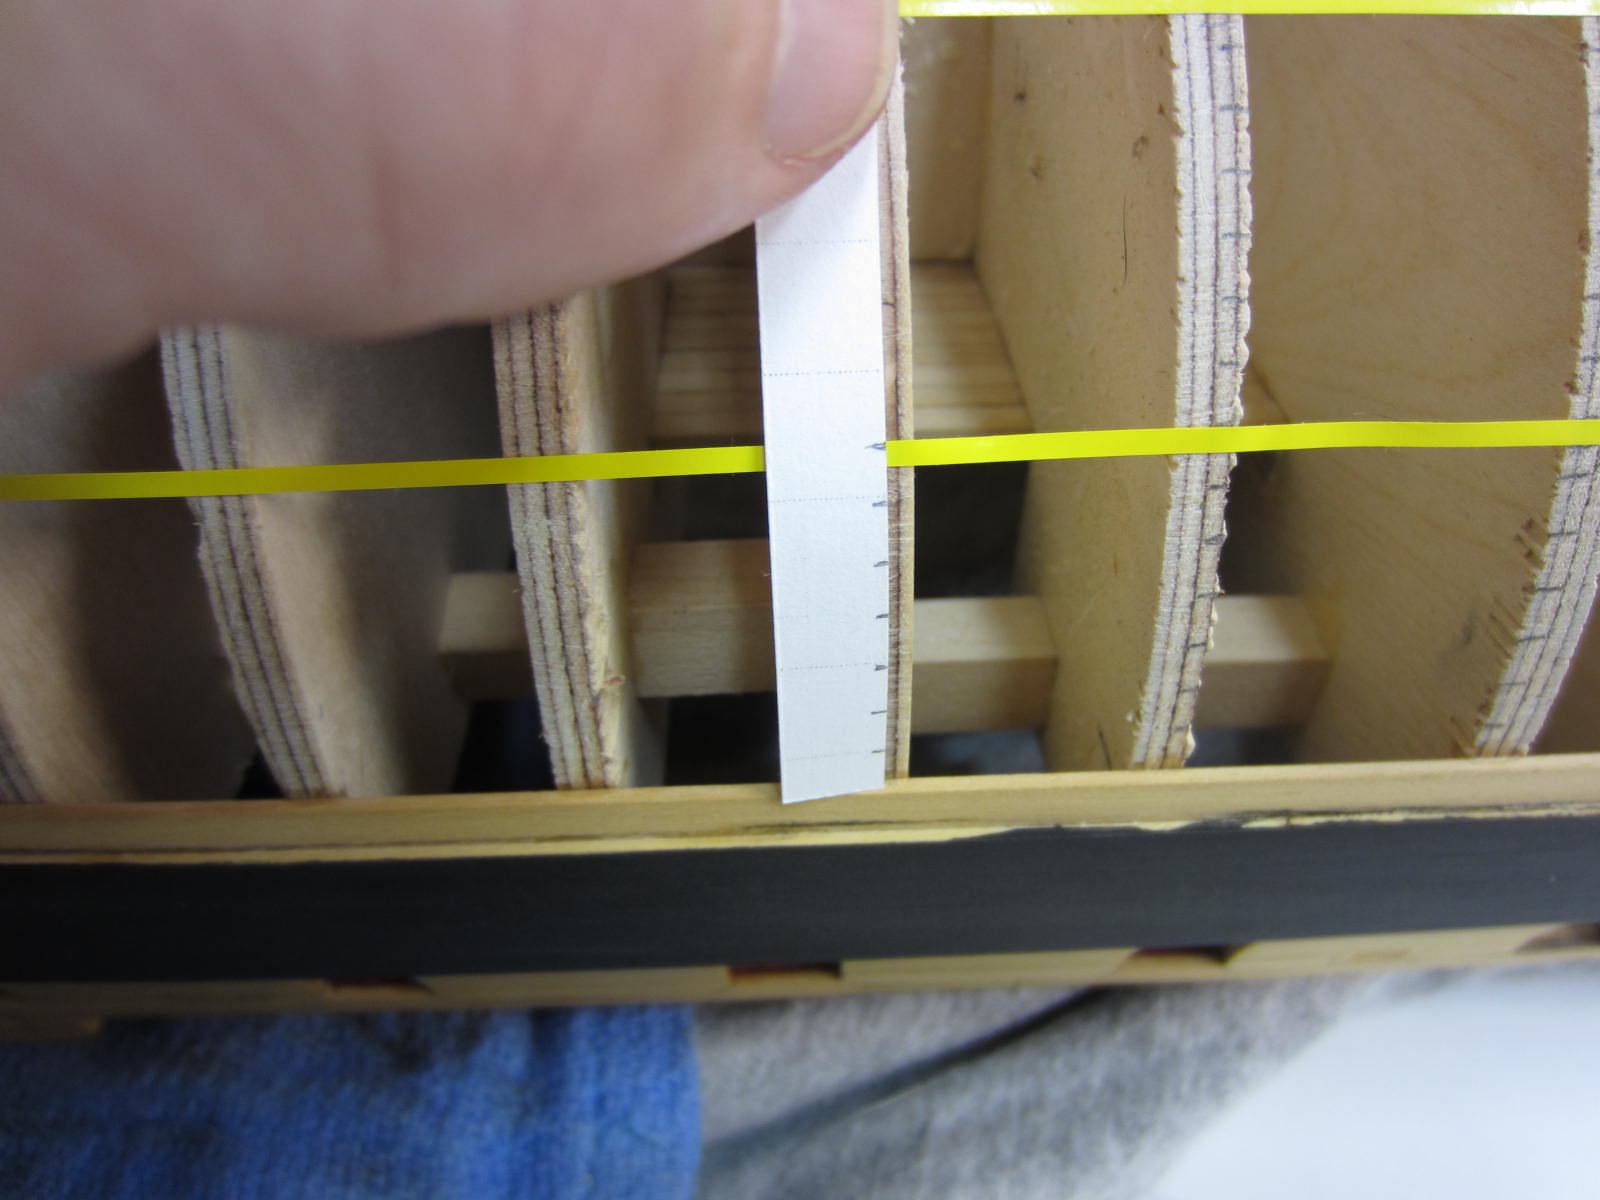
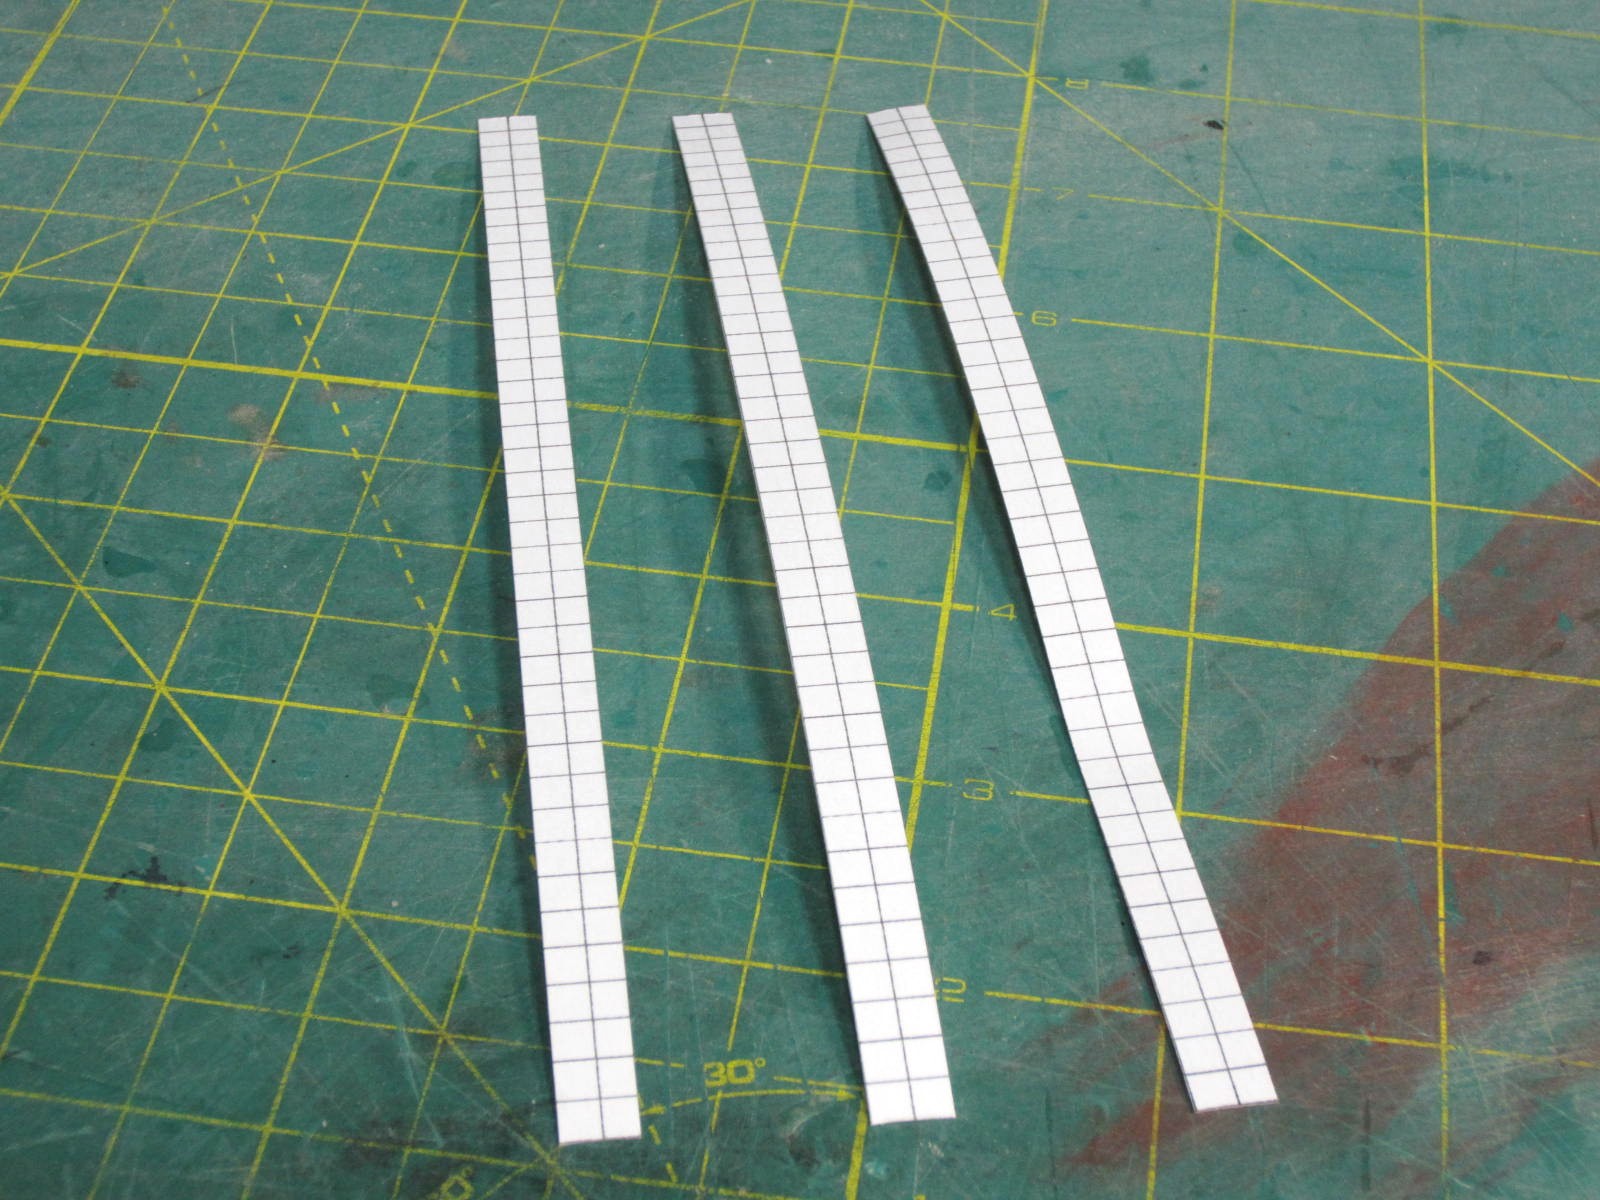
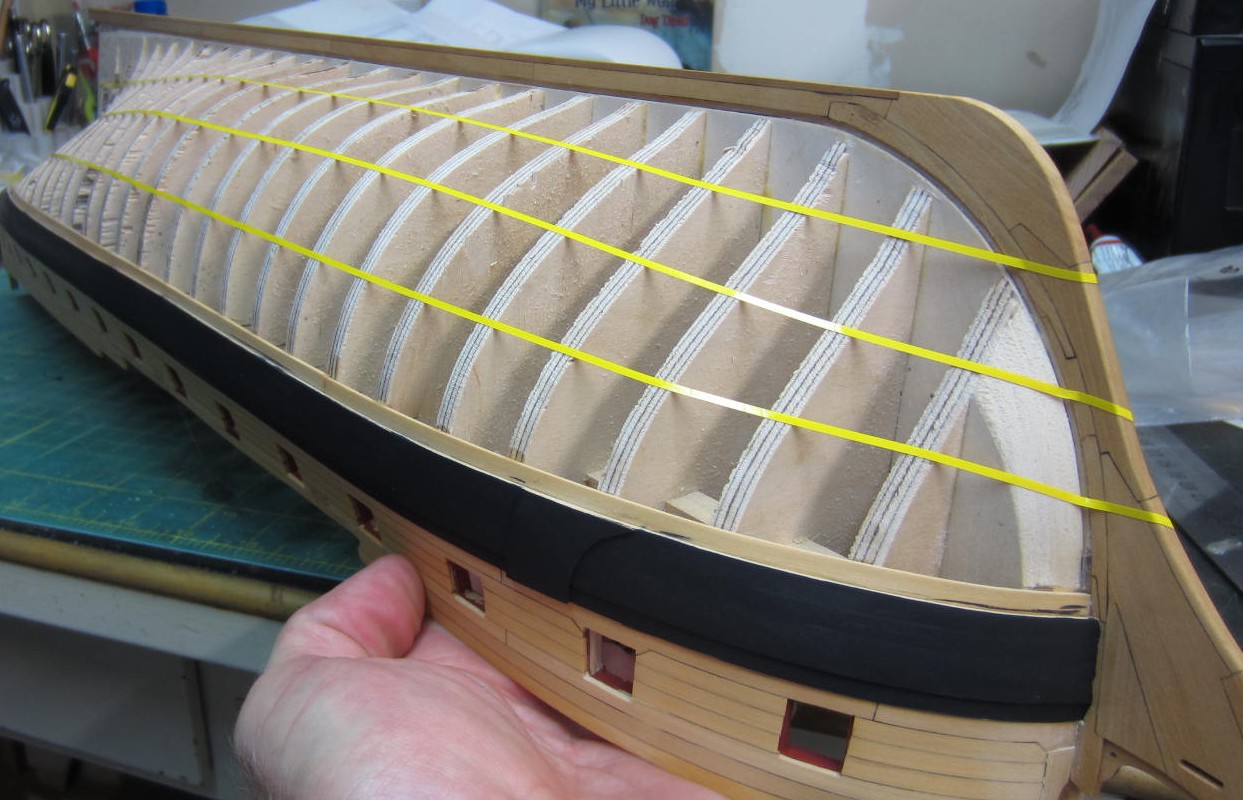
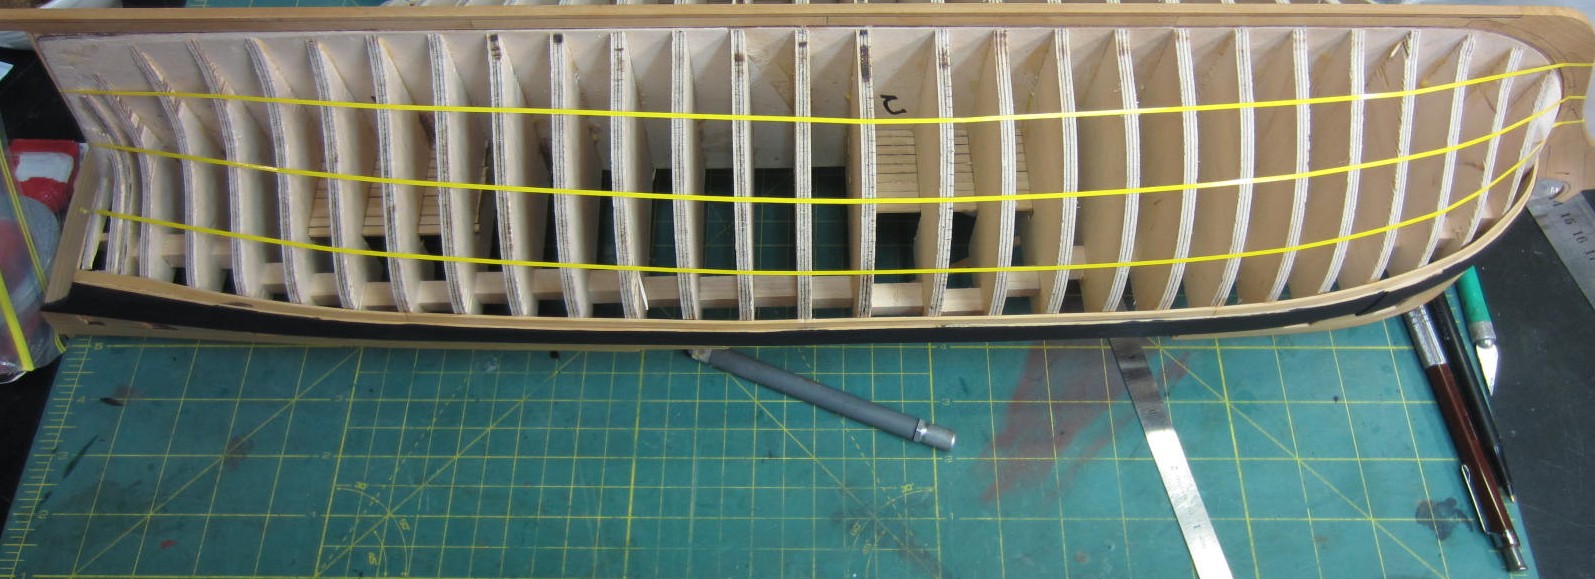
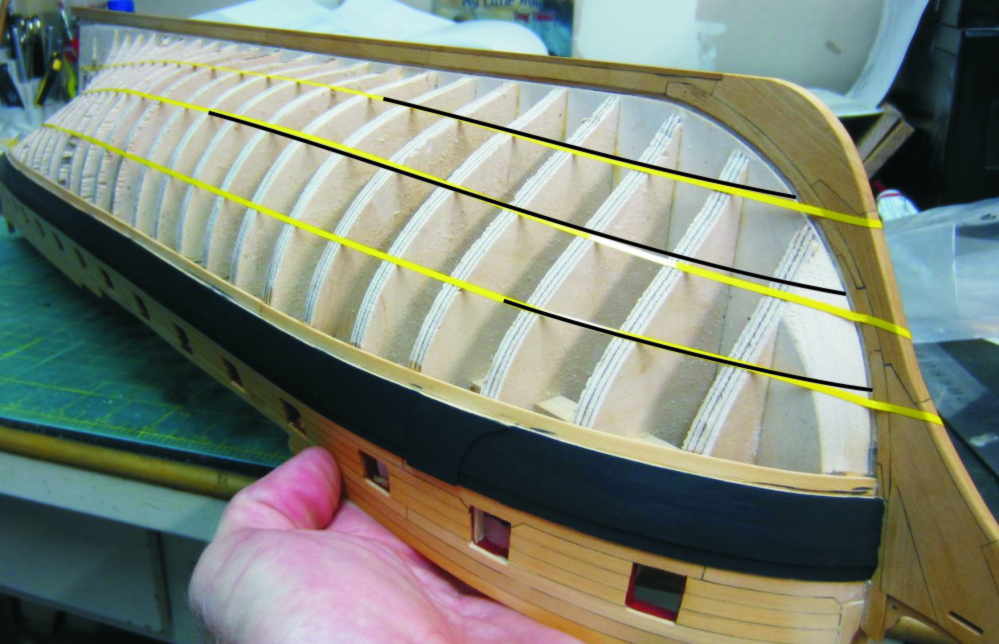
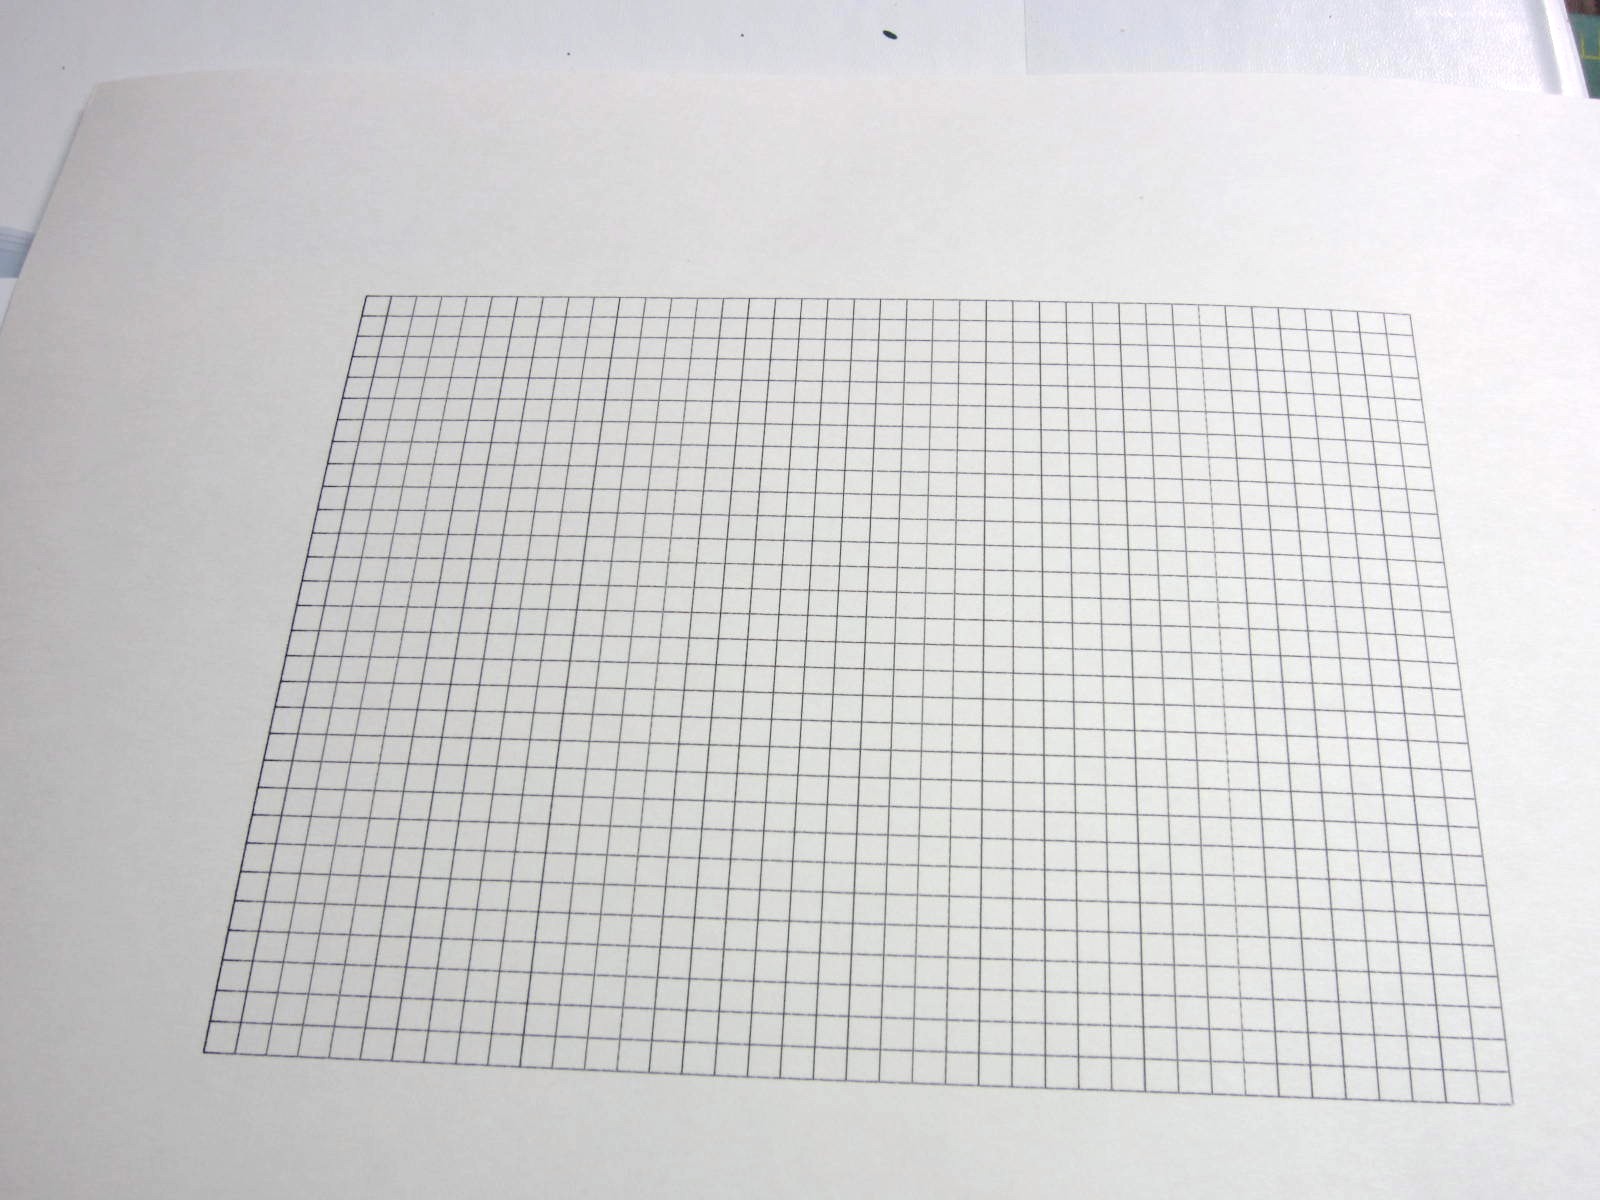
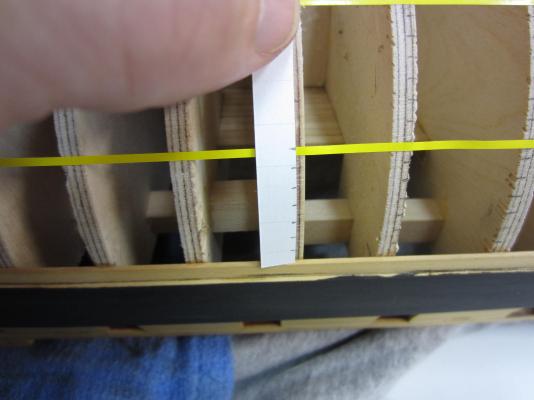
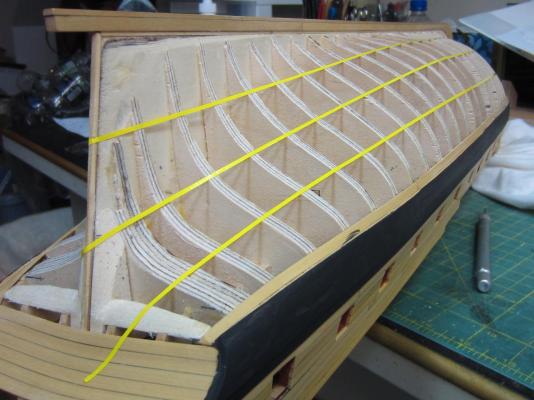
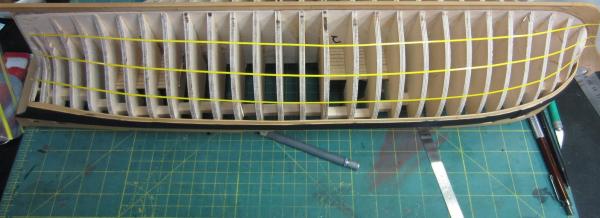
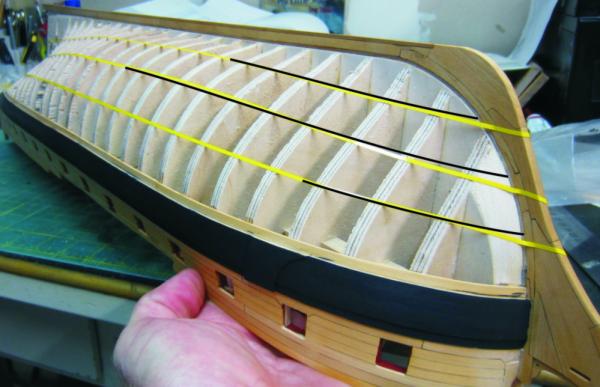
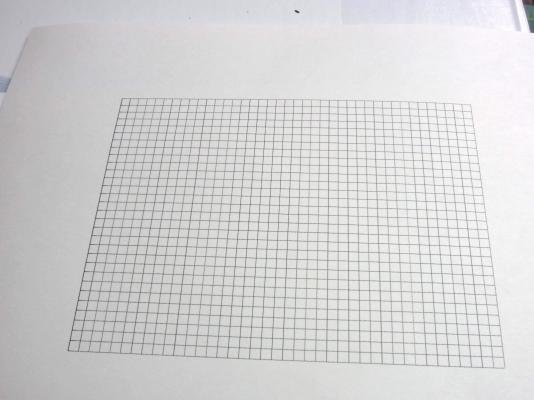
Thanks Ben and Sjors. Only two coats of paint and when viewed up close you can see the differences in the coverage. Several more will be needed. Well this is the start of Chapter 5, planking the hull below the wales. Chuck describes how to plank the hull with no drop planks at the bow and no stealers at the stern. This is something I have never been able to accomplish. The description is very detailed and I'm hoping to duplicate it. First a paper tick strip was to be made and divide it into 5/32” increments. To keep as many errors out of this process as possible I made my tick strip from 5/32" graph paper printed on card stock instead of using a ruler and pencil and transferring the marks to card stock. Next I positioned the strip along bulkheads “1” and “A” and marked the increments. There are a total of 24 planks so there will be 4 "belts" of 7 planks each. Chuck wrote; I had some yellow pinstripe tape so I used that to mark off the hull belts. After applying the tape and tweaking to get a smooth even run I sent these pictures to Chuck. His sharp eye caught some runs that weren't the best and sent this back which I used to adjust the belts run. Now I'm off to do the starboard side.

-
I'm also glad to see you're back at it. I see the time off hasn't hurt your work either. Very well done!