
Supplies of the Ship Modeler's Handbook are running out. Get your copy NOW before they are gone! Click on photo to order.
×


marktiedens
-
Posts
1,737 -
Joined
-
Last visited
Reputation Activity
-
 marktiedens reacted to ken3335 in Royal William by ken3335 - FINISHED - Euromodel - Scale 1:72
Hello Everyone,
Once again thanks for your likes and thanks to Mark and Zappto for putting in a reply. I think I'll start from the top, the yardarms are only 2mm diameter and I've already broken off one so the least time that they're on whilst working the better.
I've now completed the main and fore lower yards with all their associated blocks and footropes.
After some thought I came up with my own simple method of making the irons that support the yardarms. I bent a piece of brass wire for the arm and used heat shrink tube for the hoops. I cut a small piece of tubing and heat shrinked it into place on the arm, it was quite thin so I put another one over the first, this gave a good thickness. I drilled a hole through it and passed the wire through, I drilled a hole in the end of the yard then slid the wire into it, I could move the wire in or out to get the correct size rod and I could move the yardarm up or down and rotate it until It was in the right position, a drop of cyno then fixed it in place. Lastly I trimmed the protruding wire and put a drop of matt paint over the end. Unless you knew how it had been made you would even after close examination think that it was a neatly made metal piece.
For the foot rope supports I used pieces of brass wire, I flattened one end, drilled a hole through, filled it round then blackened them. They were easily made and fitted. I think that they look uniform and neat and you need to be fairly close to know that they aren't rope, that'll do for me.
Ken
-
 marktiedens got a reaction from NMBROOK in Royal William by marktiedens - FINISHED - Euromodel - scale 1:72
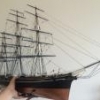
The rigging of the bowsprit is now pretty much complete - quite the mess of ropes! Most of the sail handling lines were installed with the lines running through the blocks with a toggle on the ends to keep them from pulling through the blocks
Mark
-
 marktiedens got a reaction from ken3335 in Royal William by ken3335 - FINISHED - Euromodel - Scale 1:72
Hi Ken - I usually work from the top down.Otherwise I keep knocking the longer,lower yards loose. Everyone seems to have their own order of doing things,though. There doesn`t seem to be a "best"way - whatever you are most comfortable with. Ask ten different people & you will get ten different answers.
Mark
-
marktiedens reacted to Old Collingwood in Ageing Decks
Thanks mark, the planks are already fitted on the deck so what ever I do will have to be in a controled manner and kept tidy, I had heard a bout a wire wool and vinegar trick, painting that onto the planks - and making sure they were sealed afterwards.
OC.
-
 marktiedens got a reaction from Canute in Ageing Decks
Hi O.C. - what I did on my current build was I soaked the planks in household bleach for about 40 minutes,then rinsed them,then laid them out to dry. They turned a light grey when dry. The planks I used were kit supplied 1mm thick walnut,so I don`t know how that would come out using other types of wood - haven`t tried it on anything other than walnut. It didn`t seem to hurt the wood,either.
Mark
-
marktiedens reacted to SawdustDave in USS Constitution by SawdustDave - FINISHED - 1:60th Scale
Fife Rails....
Just finishing up the main and mizzen fife rails....
Everything in maple....
Tomorrow, I hope to begin working on the ships steering wheel.
-
marktiedens reacted to md1400cs in Wasa by md1400cs - FINISHED - Corel - 1:75
Hi Mates,
Minor update. Started locating all of the bow area pin locations.
Now starting with securing most of the shrouds, a few will wait until I get to the foremast. These lines connect to the foresails as well as to the lower forestay rope.
Need to be sure that no tension bends occur later.
Also started doing rope wraps for the pins. One at a time will take way too long – need to get some kind of mass assembly of sorts. I’ll search out of logs for ideas in the rigging section.
Need to determine visual spool lengths as some shrouds connect to furled sails, others not. Also need to do some coiled wraps on the deck. For that purpose, I’ve ordered double sided clear tape as one of the members suggested in his log.
Rotating the boat back and forth on that small table of mine – the side of the gallery hit the recess of the inside the deep double-glazed window frame – Grrrr fix came out OK.
Moved the small table a bit away from the window ledge.
As always, thanks for your comments and likes.
Regards,
-
marktiedens reacted to Mirabell61 in Eagle of Algier 1753 by Mirabell61 - FINISHED - 1:48 - Chebec - Nils Langemann
Update :
yesterday had a little fright, when viewing from bow to stern over the length axis I recognized there was a little warp in the hull, due to the unsymmetrical planking arrangement and the tension of the planks on the framework. Was a bit upset, but that was to be expected.
Then, after seeking a solution to to compensate the warp, the model was clamped in a vice at the front keel portion, and a thicker plank tied to the upper stern deck, so giving a lever on port side where I could lay a lead weight on over night, in order to twist back the warp. This morning I was pleased to see that it worked fine (happy agin) , hoping it may stay this way
Nils
-
marktiedens reacted to Baker in Golden Hind (ex-Pelican) by Baker - FINISHED - scale 1/45 - Galleon late 16th century
Small update
The treenailing "adventure" continues.
I also discovered that the wales were not blackened in the time prtiod that this ship was sailing.
The whole idea of painting the wales black was partly based on a translation error from me ( my knowledge of the English language is apparently less than I thought).
I also found, somewhere on this forum, a topic that confirmed this.
On one side, most of the black is already removed. Treenails and bolts need to be added to the wales.
-
marktiedens reacted to md1400cs in Royal William by marktiedens - FINISHED - Euromodel - scale 1:72
Mark,
Yes indeed very impressive work! A pleasure to follow along.
-
marktiedens reacted to BLACK VIKING in Soleil Royal by BLACK VIKING - De Agostini - scale 1.70
Thanks to all who have looked in and the likes
A bit more work done on the stern
I have started painting and fitting the hundreds of carvings to the stern of this magnificent ship.
The kit gives you some 1mm brass wire to make the bands on the top and bottom of the galleries but I just couldn't get it straight enough to look good so had a think about it and came up a better idea. I have a moulding scraper and decided to use that with some 2x1mm strip pine that I had in my scrap box . The strip was passed through the scraper a few times, sanded and then painted gold. Once fitted and dry the carvings where placed in there positions and glued with two pack adhesive.
Lots more to do but here's a few shots of how it's going
Thanks for following
Martyn
-
marktiedens reacted to mtdoramike in Montanes by mtdoramike - FINISHED - OcCre - 1:70 scale - next donation project
I finally finished the Montanes.
-
marktiedens got a reaction from NMBROOK in Royal William by marktiedens - FINISHED - Euromodel - scale 1:72
Update - the footropes are finally done. I started by clamping a balsa board to my table & made two lines representing the length of the stirrups. The yard was then pinned down on the upper line. Then I bent a piece of 1mm brass wire into a u shape & pushed it into the board along the lower line. The stirrup ropes were tied around the yard & cut off long enough to wrap around the wire & with a small clamp holding a little tension on it,a seizing was made to make a small eye. Some diluted white glue was applied to stiffen the ropes so they would hang straight. Lastly,the footropes were then ran through the eyes & tied off on the ends.
Mark
-
 marktiedens got a reaction from baskerbosse in Royal William by marktiedens - FINISHED - Euromodel - scale 1:72
The rigging of the bowsprit is now pretty much complete - quite the mess of ropes! Most of the sail handling lines were installed with the lines running through the blocks with a toggle on the ends to keep them from pulling through the blocks
Mark
-
marktiedens reacted to MESSIS in Royal William by marktiedens - FINISHED - Euromodel - scale 1:72
Wuao.......thats the rigging I wish I could do!
-
marktiedens reacted to donrobinson in Royal William by marktiedens - FINISHED - Euromodel - scale 1:72
Very fine work Mark
-
marktiedens reacted to matiz in French 74-gun ship by matiz - scale 1:56 - Tiziano Mainardi
Hi, the work outside continues
-
marktiedens reacted to Beef Wellington in Royal William by marktiedens - FINISHED - Euromodel - scale 1:72
Really nice work on the rigging, the footropes came out great. Nice technique!
-
marktiedens reacted to piratepete007 in Royal William by marktiedens - FINISHED - Euromodel - scale 1:72
Mark, this work of yours is just soooo.... impressive. There are many 'twist and turns' around the bowsprit and you have risen to the challenge. Well done.
Pete
-
marktiedens reacted to ken3335 in Royal William by ken3335 - FINISHED - Euromodel - Scale 1:72
Hello Everyone,
Just a small update, a lot of hours spent shaping and making up the spars but I'm afraid not many photos or techniques to show for it. You'll just have to do with another picture from my home town. This is of the path around the marine lake, I used a wide angle lens and shot in black & white for a dramatic effect, this one won a photo comp that I entered.
Ken
-
 marktiedens got a reaction from pjofc4 in Royal William by marktiedens - FINISHED - Euromodel - scale 1:72
Update - the footropes are finally done. I started by clamping a balsa board to my table & made two lines representing the length of the stirrups. The yard was then pinned down on the upper line. Then I bent a piece of 1mm brass wire into a u shape & pushed it into the board along the lower line. The stirrup ropes were tied around the yard & cut off long enough to wrap around the wire & with a small clamp holding a little tension on it,a seizing was made to make a small eye. Some diluted white glue was applied to stiffen the ropes so they would hang straight. Lastly,the footropes were then ran through the eyes & tied off on the ends.
Mark
-
 marktiedens got a reaction from md1400cs in Royal William by marktiedens - FINISHED - Euromodel - scale 1:72
The rigging of the bowsprit is now pretty much complete - quite the mess of ropes! Most of the sail handling lines were installed with the lines running through the blocks with a toggle on the ends to keep them from pulling through the blocks
Mark
-
 marktiedens got a reaction from popeye the sailor in Royal William by marktiedens - FINISHED - Euromodel - scale 1:72
The rigging of the bowsprit is now pretty much complete - quite the mess of ropes! Most of the sail handling lines were installed with the lines running through the blocks with a toggle on the ends to keep them from pulling through the blocks
Mark
-
 marktiedens got a reaction from fmodajr in Royal William by marktiedens - FINISHED - Euromodel - scale 1:72
The rigging of the bowsprit is now pretty much complete - quite the mess of ropes! Most of the sail handling lines were installed with the lines running through the blocks with a toggle on the ends to keep them from pulling through the blocks
Mark
-
marktiedens reacted to donrobinson in Barque Stefano by donrobinson - MarisStella - 1:63
Good Morning All, A big Thanks for all the compliments, for stopping in and for all the likes much appreciated.
After 32 strakes and over 160 planks the starboard side is completed. I completed this with all strakes going from stem to stern with no drop planks or stealers . The use of short planks made the job much easier to complete. Other than the sheer size of this hull it has so far been the easiest one to plank for me to date. This could have been completed much faster by not tapering the planks and just slapping on planks. But then what would you learn from that. My process was to measure each bulkhead calculate how many strakes required and the widths of the planks at each bulkhead, After three or four strakes I would measure again then adjust as required then just repeated this until finished.
Enough of all this here are some pictures and a few explanations:
In this picture I'm showing the jig I used to keep the garboard strake straight
This picture is showing the taper required on the garboard strake as there is no rabbit line
Showing the last few planks, although it does not look like it in the picture the space left is quite even
The tools I use for sanding and scraping, nothing fancy but it works for me
And how she looks now before any filling
A little more fine tuning and it will be ready for some filler, but now it is on to the port side which has been already started
Have a good day, and Thanks for stopping in