


flyer
-
Posts
1,011 -
Joined
-
Last visited
Content Type
Profiles
Forums
Gallery
Events
Posts posted by flyer
-
-
Hi Frank
Thank you, but seen close they are as flat and even as the English Channel in november.
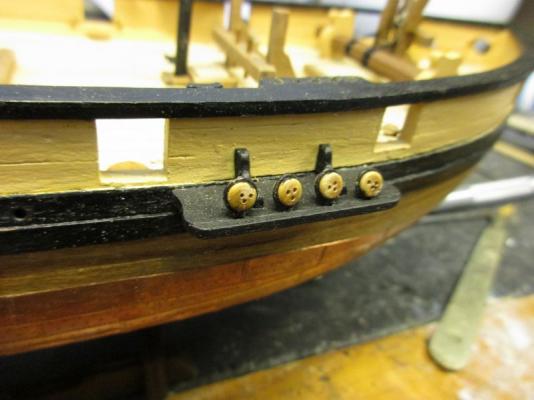
You find more about the hoops in B.E.'s Pickle log.
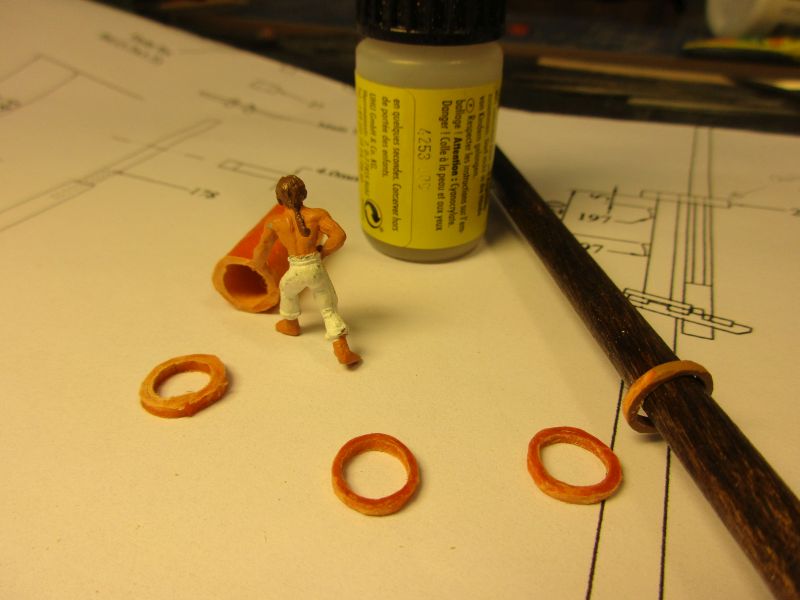
I just wound some insulation tape around a 6mm dowel until I had a 7mm diameter. Then I soaked a yellow paper strip, cut from one of those old fashioned envelopes, continuously with thin CA glue while winding it tight around (do NOT put glue onto the inside of the tube you are creating!) until I had a tube with a wall thickness of slightly over 1mm.
Fixed for drying. Pushed the tube off the tape and dowel. Soaked again inside and out. Cut rings with a thickness of about 1mm from the tube - I used a little circular saw blade in my Dremel.
The faces of each cut were soaked again with CA. and the hoops worked over with files and sanding paper until I had them almost round and flat enough. Finally I painted them a light brown as they were made originally from ash. Dirtying would be optional.

I'm not sure about the spacing of the hoops but 2 feet (which equals the width of a cloth or bolt of sail material seems adequate). This would mean the hoops would be about 1 cm apart on my Pickle.
Cheers
peter
-
Hi Martin
Thanks. Well, considering the fact that manning the ship with enough able seamen is difficult enough I shall keep an eye on him.
Hi Nils
Thank you. I'm now quite eager to start rigging but after a visit to bug's Santa Maria and Johns input I think I will have to go slow and work a bit on a more detailed belaying plan before I glue the masts in position. Also yards, boom and gaff are not yet fabricated.
Hi Bug
Thank you for the compliments. The paper-glue hoops are indeed a great idea - actually B.E.'s. Credits are due to him.
I like your Santa Maria. She has the same handcrafted yet realistic air about her I like so much in md1400cs' Wasa or Nils' artful work.
Thanks for all the likes
peter
- Moonbug, Mirabell61 and Martin W
-
 3
3
-
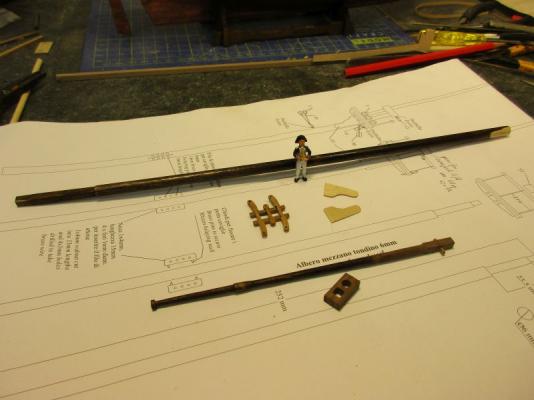
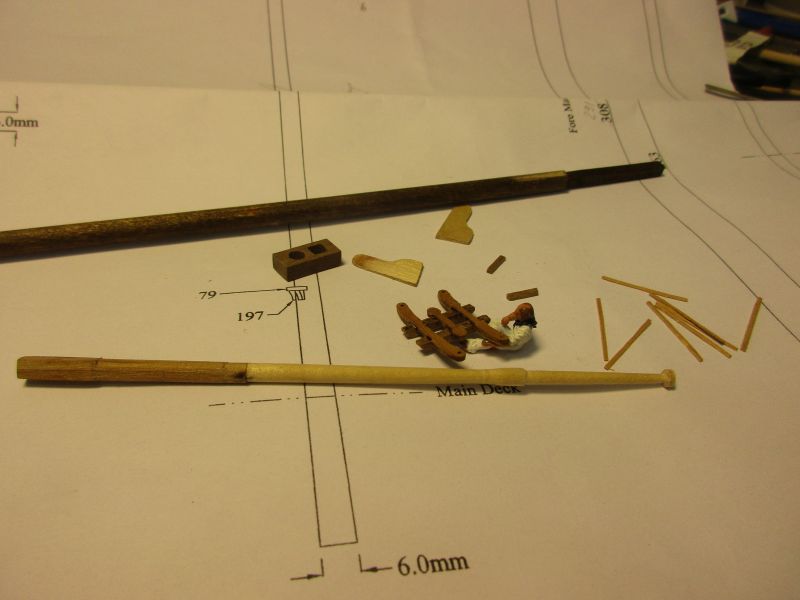
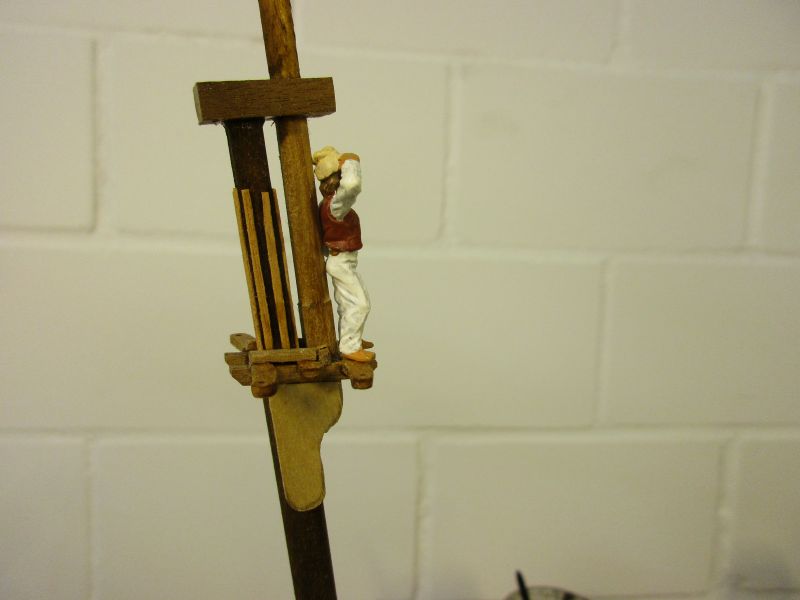
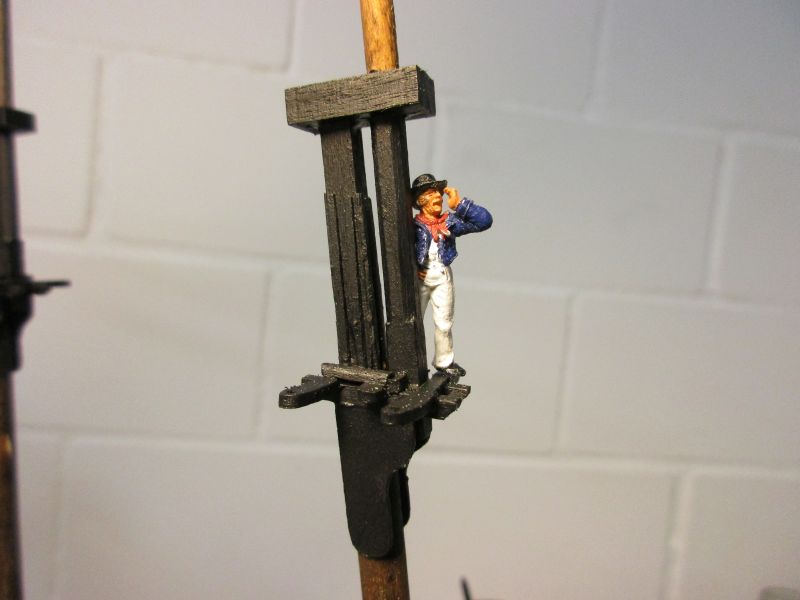
The foremast is quite similar to the main mast; only the length of the topmast differs. Both mast tops were completed with cheeks (size according Pegasus and Marquardt), battens and the bolsters.
Before I attach the saddle to the mainmast I will have to finish the hoops for the driver... the last part looks awfully like shop language - and that from a landlubber. I mean before I glue that table thing for the inner end of the boom onto the lower mast I will have to put on those rings which fix the sail to the mast.
Both mast had only two parts and were relatively simple. Therefore I became a bit high-spirited and tried a bowsprit closer to what my clever books say.
The bowsprit itself got a square end for a square hole in the cap and instead of those stop cleats I added bees. Marquardt doesn't mention them but Lees on the other hand doesn't make exceptions in the use of bees for smaller vessels. As they work quite well on Granado and Pegasus I fabricated them according to Lees and Pegasus.
I read about the problems others had with the splintering wood provided for the bowsprit cap. Therefore I coated it first with CA glue before drilling two 3mm holes in several steps. It's important to use sharp drills. The lower hole was then filed square. It worked fine.
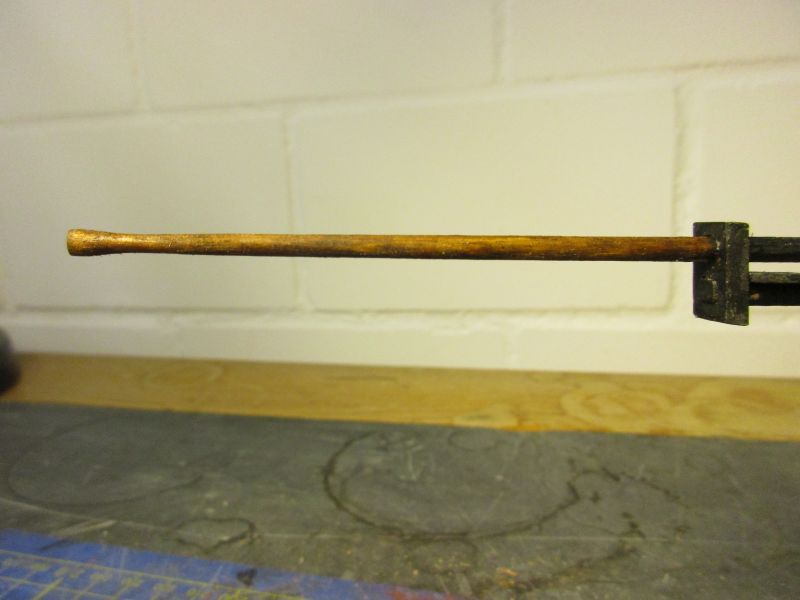
For the jib boom I turned again to Lees and made an octagonal inner end and a conical outer end. For stability reasons I didn't want to use the method from the topmasts but used 4mm dowel to make it in one piece. There is a 3mm octagonal section inboard of the bowsprit cap and the outer part is similar to the kits plans except the modified end.
A word about all the ringbolts for the rigging: Usually I attach them only reluctantly in this stage of the build. Fixing the required blocks, thimbles or ends of lines to them is much easier when you can do it on the table with lot of space to work. Drilling a hole and attaching then the ringbolt including what is fixed to it with a bit of CA glue works well during the rigging process. Only when I'm absolutely sure about the location or if it would be difficult later I drill the hole for the ringbolt in advance.
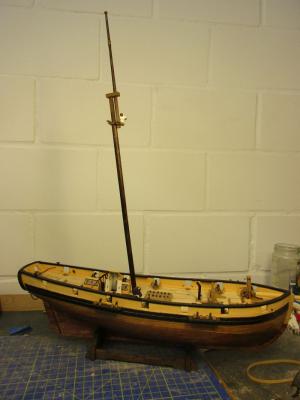
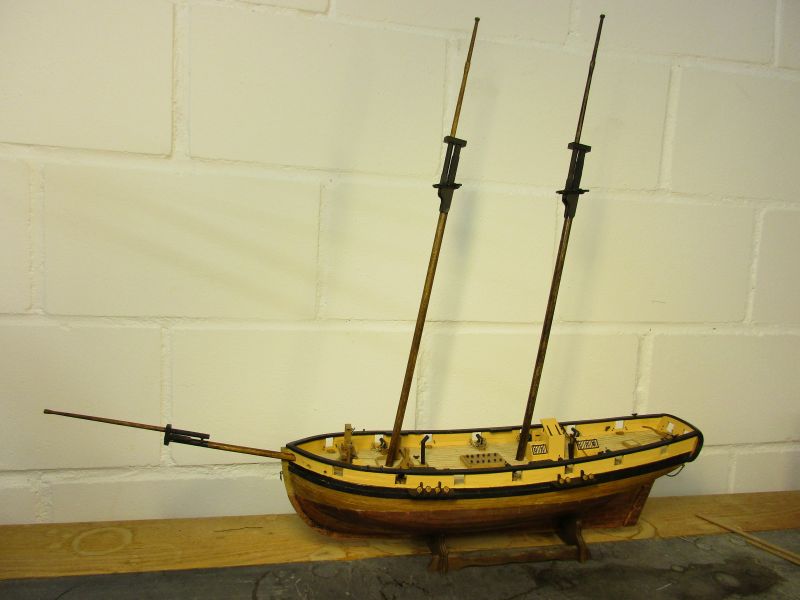
With the masts and bowsprit assembled I put them provisionally in place to check the new proportions. If I don't botch too much with the sails this should become an elegant little Pickle.
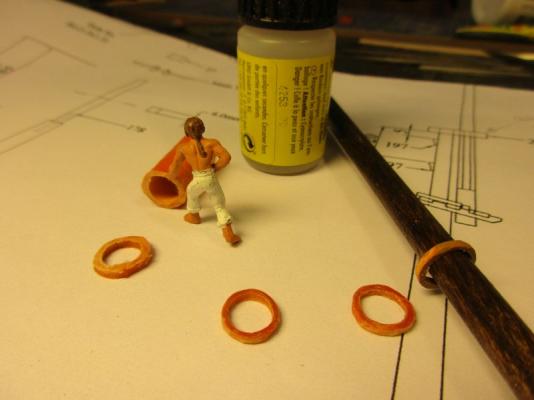
fabrication of hoops made of rolled paper soaked with glue

parts of the fore mast with crosstrees, cheeks, battens and bolsters
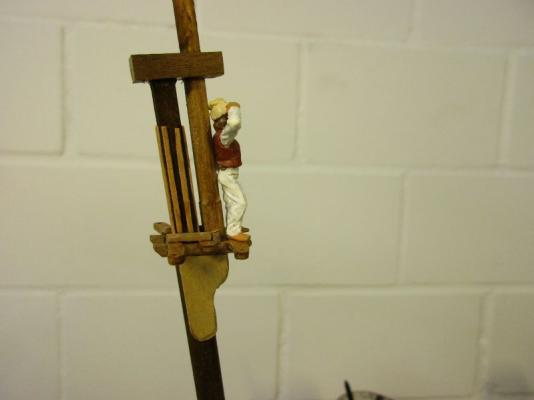
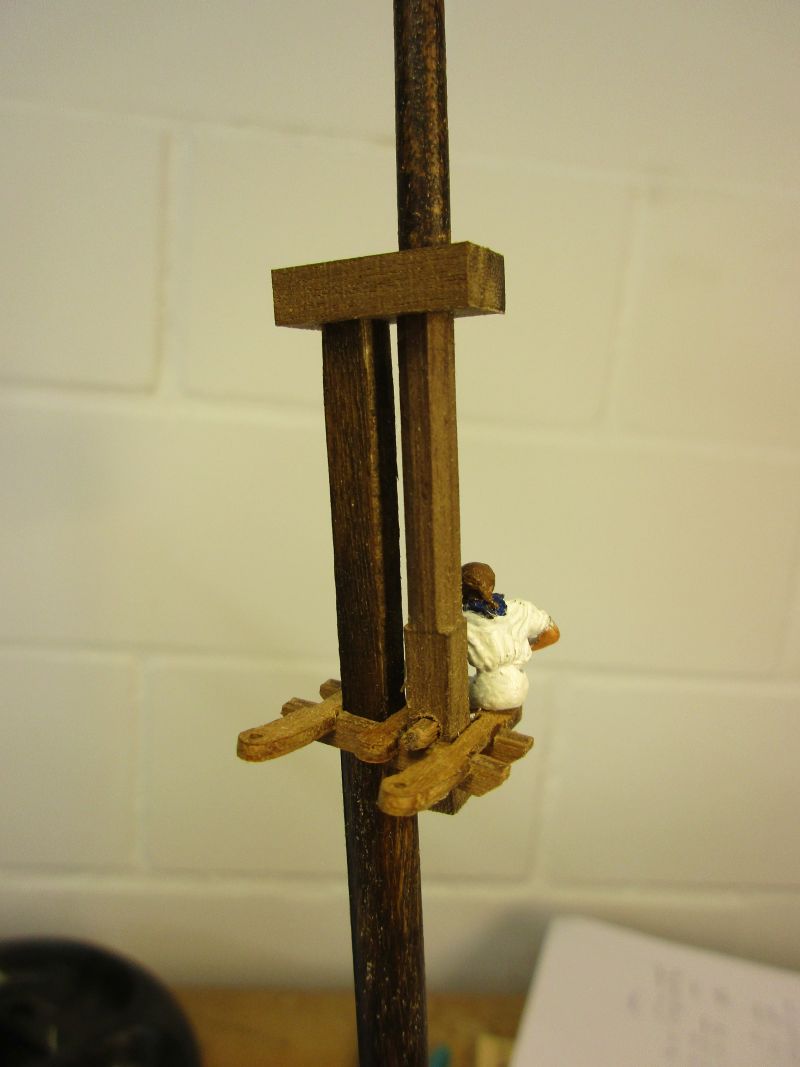
mast top before painting (yes I know about the missing safety harness but after a few tots of rum this seaman did that stunt by his own free will)
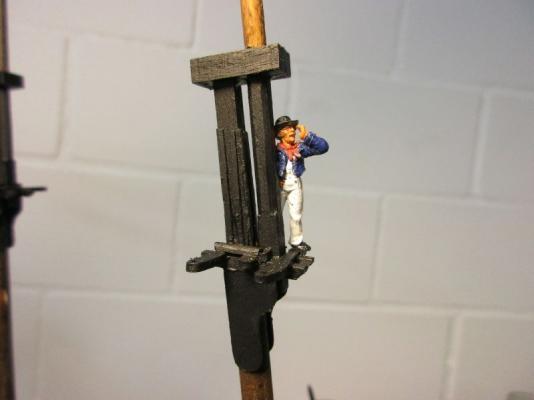
mast top finished and painted
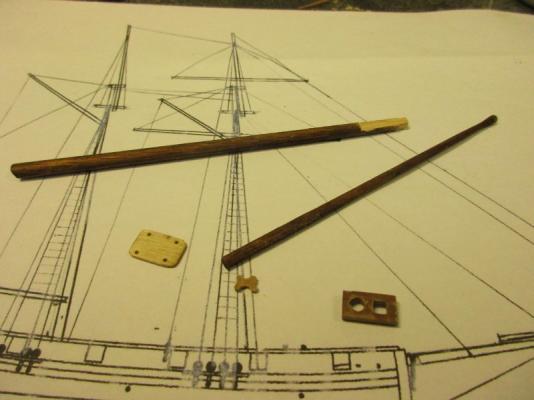
bowsprit, bees, jib boom, saddle and cap
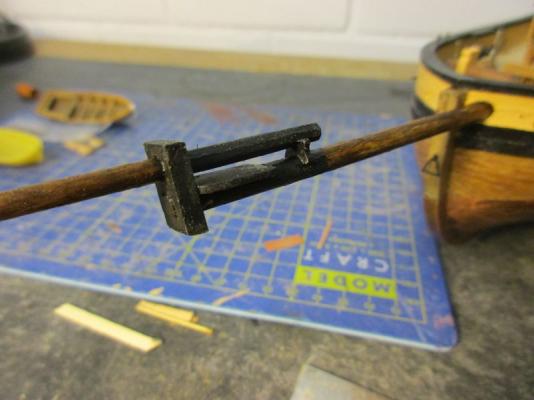
assembled bowsprit

jib boom
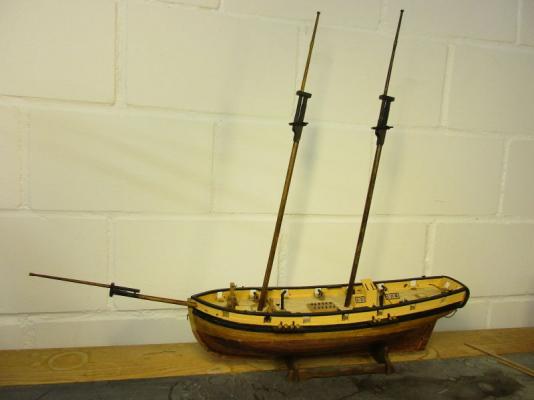
a pretty Pickle
-
Hi John
Just paid your Pickle a visit and think it's coming along nicely. I especially liked the part where you explained how you liked some tasks so much that you did them twice. I find that most modellers have such preferred tasks. (On my last built I broke the same topmast twice in various stages of the rigging process but must admit that I lost enthusiasm a bit the third time I did the same work.)
After following again your heroic fight with the deadeye strops I just hope mine really will be able to hold the pull of the shrouds.
About all the belaying points: I don't have drawings fit to put online, only a few drafts of sketches. But I hope to keep ahead of you with the work on Pickle and invite you just to follow. I will try to especially mark the changes I make. The first one was the altered bowsprit step with those pins.
So far I always completed the standing rigging before fixing sails to any stays. And the sails were attached to the stays by spiral lines or with individual slings. When furled you hardly notice the way of attachment anyhow. You could see an example in my Pegasus build log.
But your question was a good one. I have to think about rings for Pickle's fully set staysails. In any case I will open and close them around the finished stay - I see this as the easier way.
What you also have to think of early enough are:
Putting the equivalent of wooden hoops for the spanker onto the lower mainmast (I'm actually in the process of making them the same way B.E. did).
If you use a traveller for the staysail stay put it on the bowsprit before fixing the stays.
Cheers
peter
-
Hi Nils
I'm surprised myself that even putting up rigging can be fun. Thanks.
Hi Martin
Don't you think he had to hide because of all those violent non-smokers?
(I know smoking is dangerous and... blah, blah, blah. However - live itself is a deadly illness which, by the way, is sexually transmitted. It seems we have a limited warranty, whatever we do.)
Hi Dave
Thank you. Your blue nose looks fine.
Wouldn't you post a few photos of the finished build in a gallery?Hi Mobbsie
Sometimes they did a complete engine transplantation in these old cars (replacing Chevy by Mitsubishi) and looking closer at the undercarriage is not advised if you intend to travel happily in such a car. But it is ingenious.
My skipper is pure 19th century when it comes to safety rules: One hand for you and one for the ship and if you lose your hold you either learn to fly on the way down or hope for a soft landing. But I guess that was the usual attitude in those days.
Oh, and I always have use for some luck during the masting process. Accidentally braking off nearly completely rigged mast tops has happened and could happen again.
Thanks for all the likes
peter
-
-
Hi Frank
Indeed. And it's even warmer than California - being south of the tropic of cancer helps a bit, of course. But the people are open minded and friendly in both states and they speak the same language - spanish.
One can only hope that the island will survive the mass tourists and short-sighted investors that may follow the end of the embargo.
hasta luego

peter
-
Back to serious business: After preparing the stand I started working on the masts of Pickle. As always I begun aft with the main mast. Using the reduced heights the kit's dowel was sufficient to make the lower main mast in one piece by just filing a 4mm square with the length of my reduced mast head height on one end.
For the topmast I followed basically the kit's method and made it in two pieces. Contrary to the plans I however added hounds similar to those on the fore mast and left a small cap on top of the mast.
Following again B.E.'s lead 2 cheeks were fabricated by sanding some leftover ply into a shape roughly similar to the matching parts of Pegasus. The dowels were treated with walnut stain and are maybe a bit dark.
A provisional assembly showed a satisfying appearance.
the skipper inspects the finished mast parts
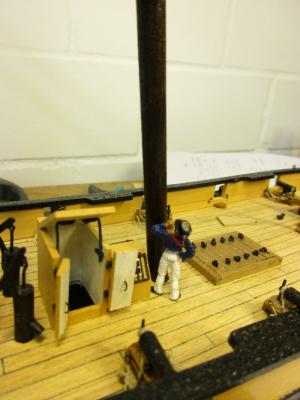
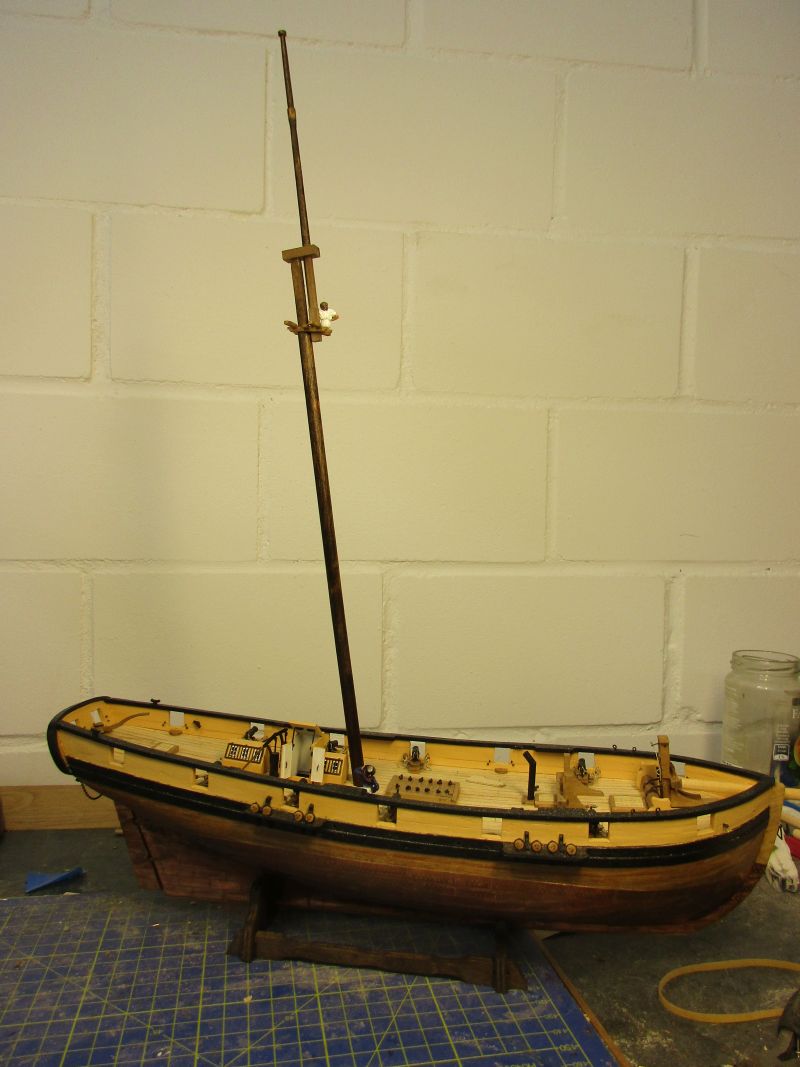
main mast provisional in place
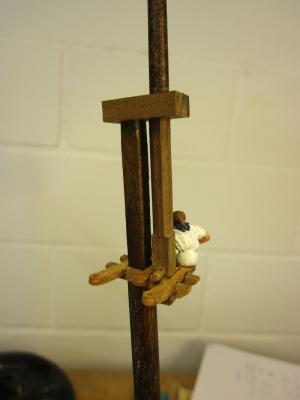
masthead
still quite a lofty seat for that seaman
- mobbsie, Cathead, Mirabell61 and 4 others
-
7
-
It was quiet in the wharf lately because the whole workforce was on a trip to the Caribbean. They spent two weeks on Cuba living (partly) a simple life but smoking rather sophisticated cigars (directly from the tobacco farmer for 2$ and excellent) and drinking a matching rum. Speaking of rum - if they had the same quality in Nelsons Navy it's no wonder they could fight like that or maybe it's a miracle they could fight at all. Lovely island, good music wonderful people!


no ship but nevertheless a very interesting vessel
-
Hi John
The chain was ordered from
http://www.cornwallmodelboats.co.uk/acatalog/amati_chain.html
It is the smallest I could find, with 1mm links (probably about 20 links per inch) and from Amati. This would correspond to about 2,5 inch links in reality which should be strong enough to hold the rudder. It seems that those chains only come in 1m length but after making about 5 more models you will have used it up.
Cheers
peter
-
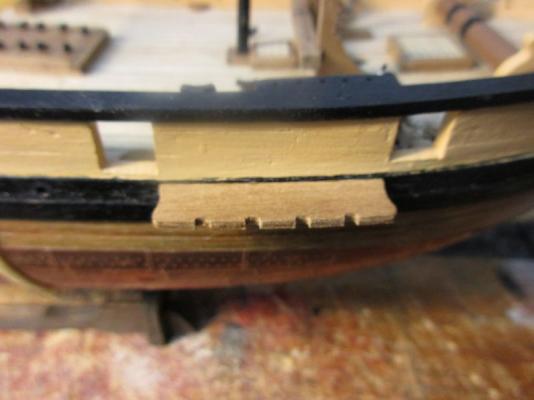
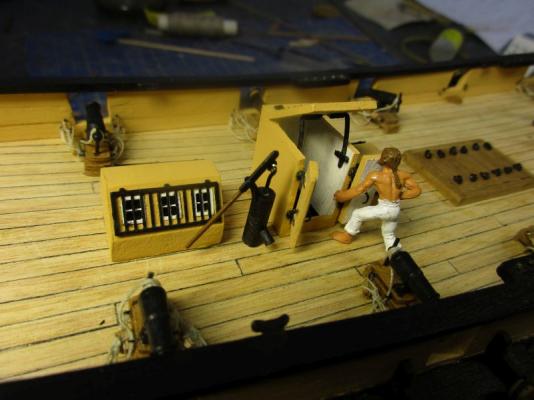
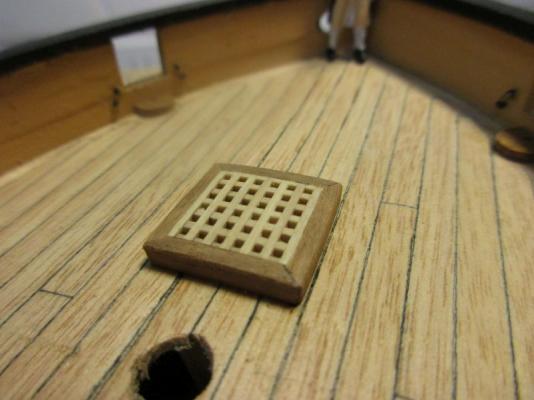
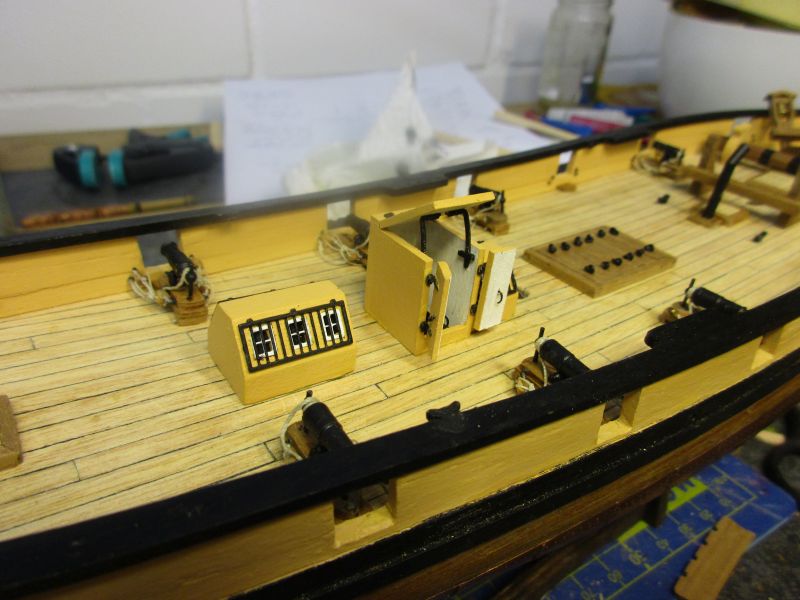
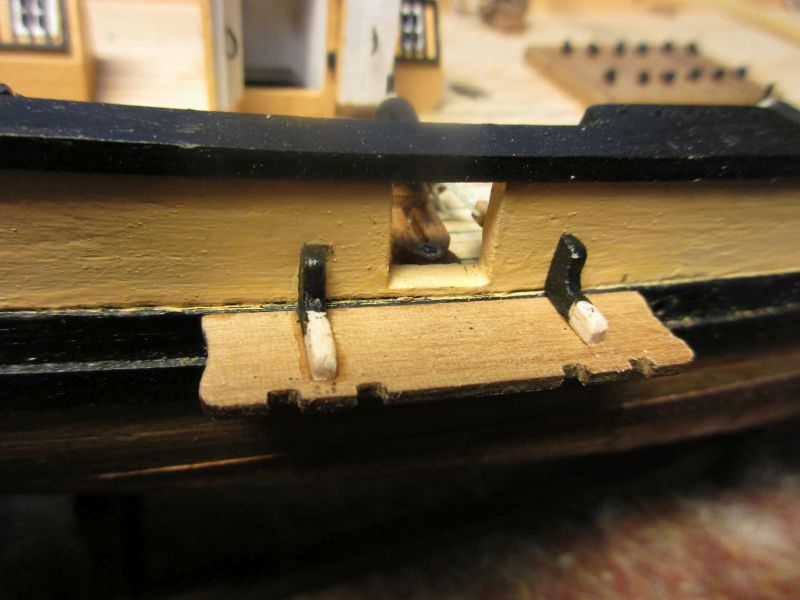
A few things remained to be done to finish the deck equipment. First were the navel pipes, a somehow strange set of holes to lead the anchor cables below. As B.E. mentions in his log it seems to be an unique feature of Pickle and is seldom heard of. I decided to use some holes in the foremost part of the main hatch cover instead, using a similar arrangement as on Granado. This solution is also that one, which is mainly used in Marquardts book.
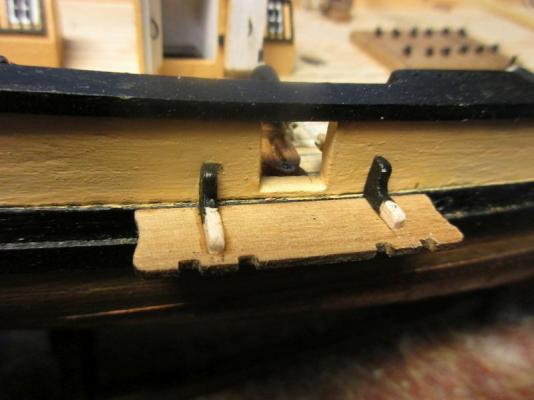
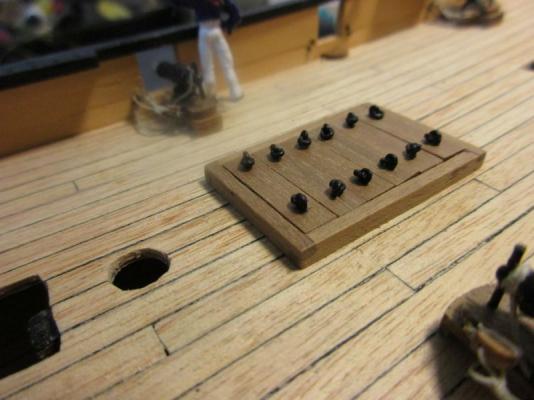
Also my skipper was unwilling to take the risk to drift rudderless over the sea. I contributed some rudder chains for his comfort.
And a first provisional boat stand was on trial on the foredeck. Phew, the boat just fits into the intended space. I hope it will still fit after the mast is definitely in place and rigged.
2 openings in the fore hatch cover replace the navel pipes

rudder chains
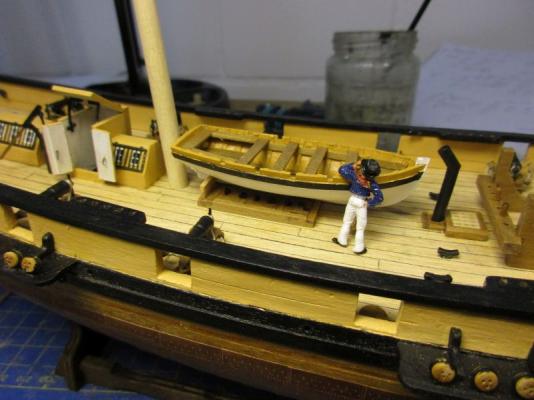
provisional placement of the launch
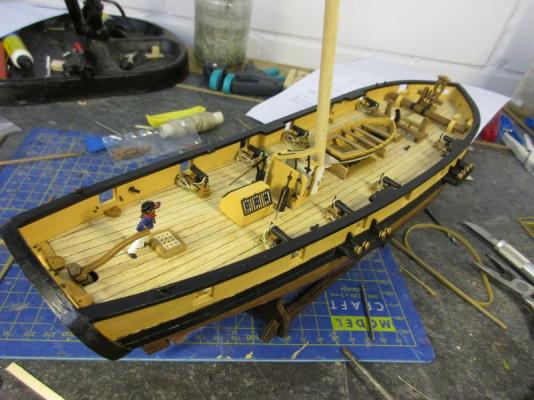
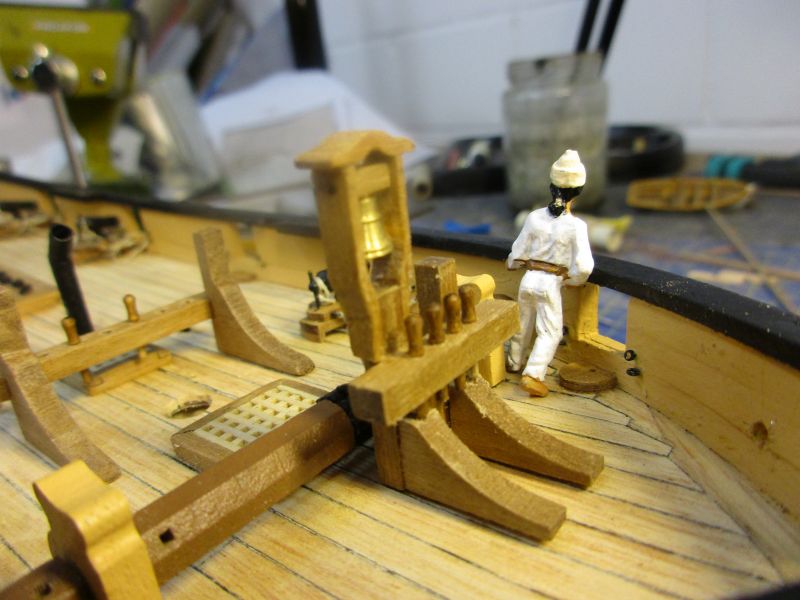
the deck looks already properly crowded with equipment
- dgbot, riksgewijs, Mirabell61 and 4 others
-
7
-
Hi John
Thank you very much for the admiration.

Those deadeye strops in the Pickle kit are indeed of a somehow unique construction. I just squeezed all the protruding stubs into the slits in the channels and sealed them with a healthy dose of CA while gluing on the 1,5 by 1,5 mm strip. In order to get the strength to withstand the pull of the shrouds its absolutely necessary that the upper stumps are fixed within the channels slits!
By the way I put furled sails on both my other models documented in those pages, Pegasus and Granado. Perhaps this could give you some additional ideas about furled sails. I'm quite happy with the way the sails are on Pegasus although I probably made a mistake there as the spanker, when set with a boom, shouldn't be furled to the mast but the gaff should be lowered to the boom and the sail furled between them. Frank(riverboat) shows some nice examples on his builds.
Cheers
peter
-
Hi Spy
Bad luck, especially if you are you planning to leave much of the wood unpainted. But if you use plywood you will have to paint the narrow side anyway in wood color. Perhaps you could even cover some repairs that way. But a big wooden piece is seldom of an entirely uniform color and I think the prototype also had repairs where only parts of a plank or a rail were replaced and small color changes therefore were common.
Hi David
Thanks. You better don't see my workbench. Apparently tidiness is rising out of chaos.
Cheers
peter
-
Hi Nils
Danke. The companionway is a unabashed copy of B:E.'s.
Hi Spy
Yes, those are the kits original railings. I just took them out of the sheet and cleaned them.
Hi B.E.
Yes, small is beautiful! In our country we deeply believe in this.
Cheers
peter
- Mirabell61, Martin W and Blue Ensign
-
3
-
Hi Frank
Great life like little boat!
From that last glances at your shipyard I conclude that you are allowed to work on the traditional kitchen table. Wow. But certainly for the dirty work (and there always seems to be a lot of it on your ships) you also have another place to go?
Serious question: How did you make the mast rings for the mizzen sail?
Cheers
peter
- mattsayers148, riverboat and mtaylor
-
3
-
Time for an update on Pickle.
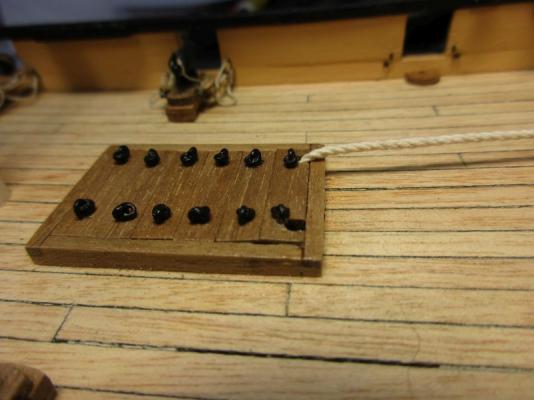
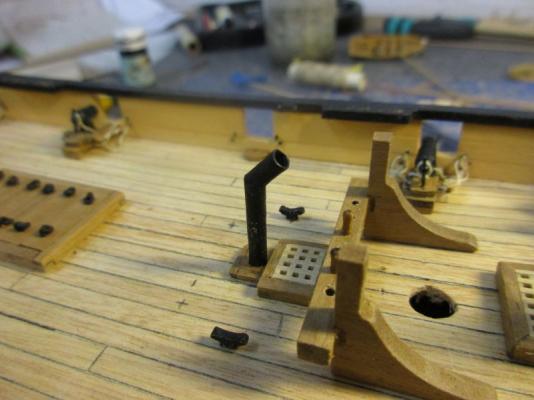
I checked the necessary belaying points for the additional lines needed with sails set. As usual the kit provides just enough for the minimal rigging which is foreseen. In all the pin racks the spacing of the pins is too big which accounts for the lack of belaying points. However there seem to be some easier solutions than changing all the racks by:
- putting some additional cleats on the foots of the mast and on the bowsprit.
- using shroud cleats where possible
- changing the bowsprit step to a mast bit with some additional pins. As I understand the kit treats this as anchor bits. However - according to Marquardt - on vessels with a windlass you used that instead of an anchor bit and no anchor bits were installed.
- double use some pins where unavoidable (as on all the kits so far).
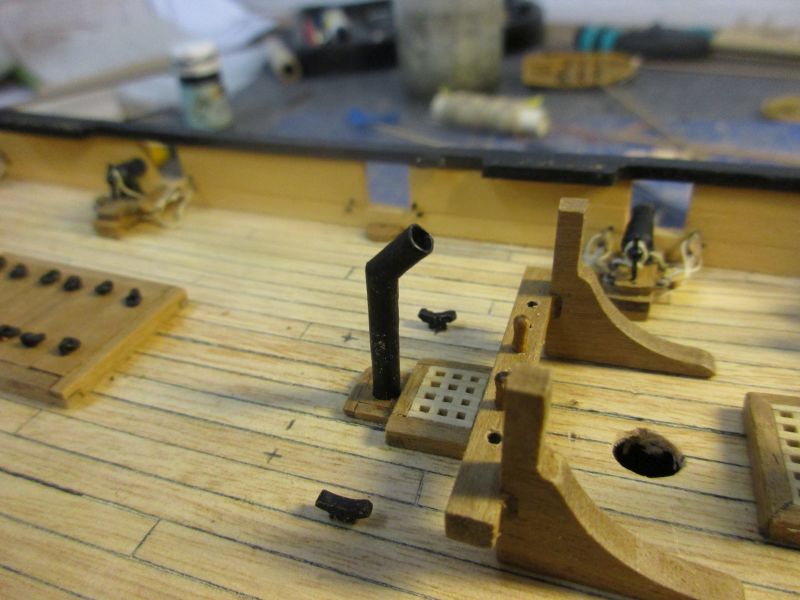
In the meantime the furnishing of the deck continued. Following B.E.'s example I whitewashed the inside of the companion way - wondering how fast it would change to grey washed through daily use.
To gain some additional inches for the stowing of the boats the wooden galley flue was replaced by a metal tube (ironically made of some leftover wooden dowels). I never did like the idea of a wooden galley flue on a wooden ship anyhow.
The channels were added. With the relatively short dead eye chains I expect some mighty tilting effect on the channels and added some knees (only standards above the channels).
Finally the first elm tree pump is ready to pump the bilge free of any rainwater going in there.

bowsprit step as mast bit with additional pins

companion way and deadlights
new iron galley flue made of wood
making of the channels
the first elm tree pump is ready
-
Hi Nils
Oh, I always follow your build closely but most of the time I'm just too dumbstruck with awe barely able to hit the 'like' button.

This time I wanted to write about something which could ruin almost any model: wrong colour. Of course not yours - this is a piece of art.
The second trial looks much better to me.
About repeated blending of the colours: this is difficult but easier if you use a simple proportion. On Pickle I take one part of white on tree parts of yellow. Of course there are slight variations in the colour but so were on the prototype. You couldn't paint such a behemoth as yours and expect the colour to be exactly the same over the entire space. At least not before RAL colour schemes came in use. And then the painting continued over the whole life of the ship. There was always something to mend or to beautify.
Cheers
Peter
- Omega1234, Piet, Mirabell61 and 3 others
-
6
-
Hi Nils
Amazing work on a beautiful ship!
If I may, I would like to add a little thought about colours on a model:
Quite often you see craftsmen using the same colours on the model as on the real thing, thinking this will give the most authenticity.
However looking at a model, even from close distance, equals looking at the prototype from a distance of dozens up to 100 meters (looking distance multiplied by scale). And looking at something from a certain distance you will see that the colours wash out or change a bit towards light grey or white (because of atmosphere and reflections of light). If you use the fresh original colour you risk to get a toy look - adding a little bit of white or grey often improves authenticity. This is not weathering - it's just using something like a 'scale colour'.
Those are not my original thoughts. I picked this up in publications of master model makers in the ship or train department and it works well. I'm writing this because I got the impression that you used rather bright colours on your trial.
Sincerely
peter
-
Thanks for the feedback, B.E. As you say, all sorts of rigs are possible. Upon my first look at the Pickles kit I had the impression that the masts were too close together, maybe the foremast positioned to much aft. Then I found that the masts positions coincide with those of other schooners. My reduced height now corrects that first impression.
You could call it only intuition, but I find, that the eye adapts to a suitable balance of sails or a successful hydrodynamic (or aerodynamic) form and finds it pleasing. And for me a ship model with hundreds of hours invested into the build should look fine (this also helps in possible discussions with the admiralty). That's why I will relinquish to build a model e.g. of the Endeavour. That ship is extremely interesting, well documented and there are excellent kits on the market but the prototype was a rather coarse workhorse built mainly to transport large volumes of coal at the lowest costs (not unlike the Short Skyvan - which is a flying oxymoron - an ugly aircraft).

Cheers to beauty and elegance (not in me - absolutely hopeless - but perhaps in some objects I tinker)
Peter
-
Well Spy, your aim is quite off the target - I'm so green, I'm almost black.


A lovely vessel matching her surroundings. Do you know when she was built? I would like to see her underwater hull. If she has a fin, she should be able to counterbalance higher masts than an older building type which would have to rely more on the ballast. Anyway if I take rough measurements out of your pictures and compare the height of the mainmast to the length of the deck I get something between the proportions of the kit and my interpretation. No clear argument there. I love the pictures and thanks for the information.
Cheers
Peter
-
Between working on the deck furniture I was trying to find a suitable rigging plan for my pickle. I did question the height of the masts as well as several other issues B.E. already researched in his Pickle log. He also described the rig as quite lofty and I had myself the impression that the masts were quite tall for a schooner with that draft. Another point was the position of the fore gaff - above or below the yard. In the online collection of the National Maritime Museum I found several plans of schooner rigs and most of them had the gaff below the yard. Following B.E.'s discussion of that point I still tend to the kits position but as I intend to hoist sails I will have a look at the situation when the masts and spars are ready to mount and will decide then.
For answers I mainly turned to four sources:
1) Sketches of the Adonis – class schooners in ‘The Global Schooner’ (TGS)
2) sail plan of an unnamed schooner from the collections of the Royal Museums Greenwich
3) the kits plans and manual
4) the excellent build log of B.E.'s Pickle
To find my mast sizes I compared the rigs of the first tree sources. The hull in all 3 is of approximately the same length but the year of origin of 2) is unclear.
Another source could have been Robert Dodds well known painting. But the rig there is even loftier than that of the kit and might have influenced the kit builders. I believe that generally contemporary artistic representations of sailing vessels - paintings or prisoner of war models - tended to exaggerate the already impressive height of the rig. This is understandable if you consider that a warships masts stood taller than most other manmade objects.
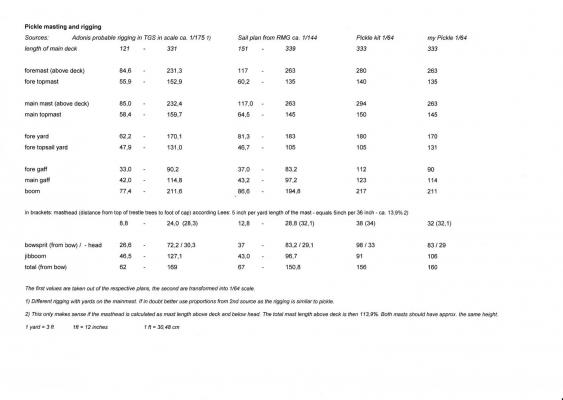
'My Pickle' shows the last of several tries. A rough sketch of the intended proportions was made in comparison to the kit for every try. Below is the final comparison with the kits proportions on top. As you can see in the table above the main changes were to reduce the heights of both masts and to decrease the length of the bowsprit while lengthening the (rather stumpy) jibboom.
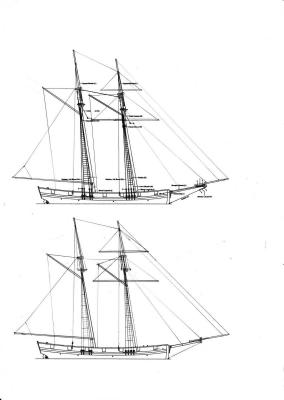
I find the new proportions look quite plausible but would very much appreciate any comments.
- Martin W, avsjerome2003 and Mirabell61
-
3
-
What an interesting and rewarding discussion! That picture alone of Victory's grating in Spyglass' link above is as good as a manual for the construction of hatches.
The way the timbers overlap at the (lap) joints coincides also with W. zu Mondfelds book which I used as reference.
Be aware Spy: Intuition is a tricky thing even for somebody who is a sailor salted to the bone. Take me for example - being married for umpteen years (always to the same wonderful woman) still leaves using intuition in homely matters a dicey business. Better use solid, verified facts. And remember that the sea as well as the ships are female...
Cheers
Peter
-
Hi Martin and Mobbsie
Didn't know that it is called mitre - joint. This is a rather agnostic ship but I will use those joints anyway in the future.
Making them is relative easily done:
- prepare a grating of the required size
- glue two pieces of the frame with enough over length onto the longer sides
- file the top halves of the projecting parts away - flush with the short sides
- prepare the short sides of the frame by filing the bottom halves of their ends back to the width between the existing parts
- glue in place
- sand all around flush (and the top convex as required)
It's really faster and easier than matching four 45° joints around the gratings.
My nimble fingers? I'm just tattering around until it fits - more or less.
And my family hardly ever accuses me of being over patient ...
Thank you all for the likes and positive feedback.
Cheers
Peter
-
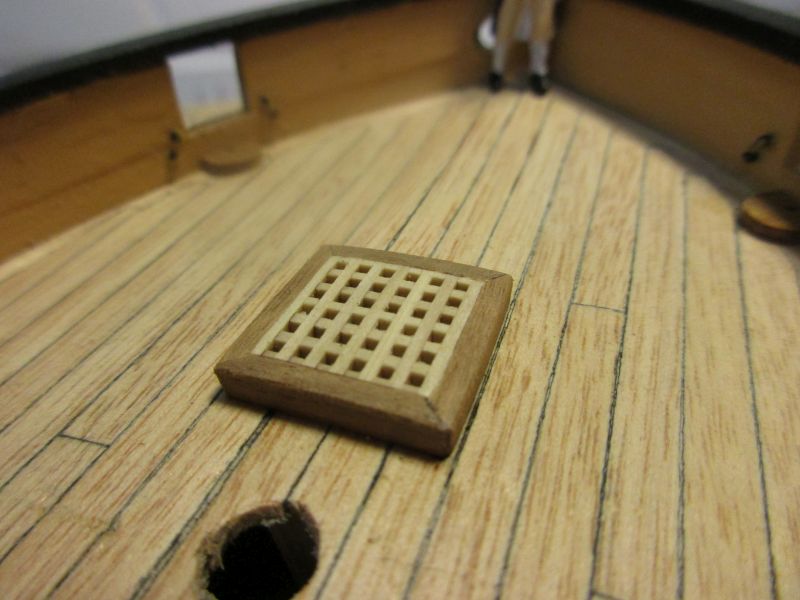
Initially I joined the hatch frame corners with 45° joints. I thought a decent carpenter would work like this. Then I found in the clever books that a completely and incidentally simpler solution was used which also took the strain on those corners better.
So much for avoiding the easy way.
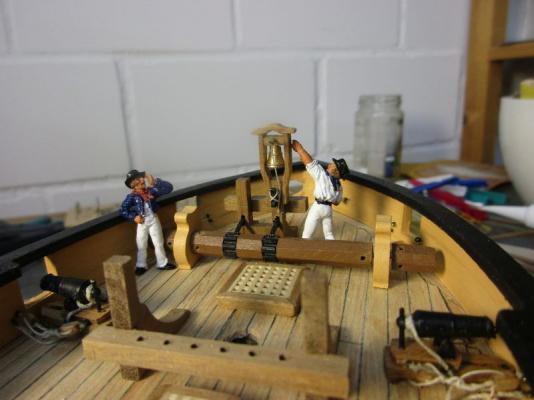
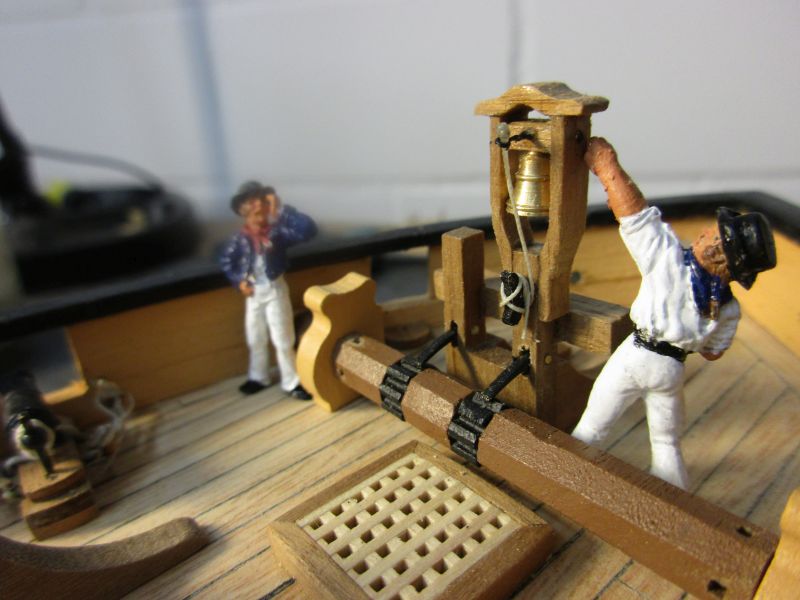
Whom the bell tolls...
As said before I constructed a belfry according to an illustration in 'The Global Schooner'. Sides and top were constructed with doubled and sanded 5x1mm walnut strips. The bell is from the shop and the small parts came from the kit.
Most of the furniture on the deck is only provisionally fixed. Before putting it permanently in place I will have to go over the rigging plans to find out which additional belaying points I will have to construct for the running rigging with sails set.
45° joint. Not so easy to make
joint according to several clever books
finishing work on the belfry

a simple but pleasing construction


HMS Pickle by flyer - FINISHED - Caldercraft - Scale 1:64 - my interpretation
in - Kit build logs for subjects built from 1751 - 1800
Posted
Hi Spy
Unfortunately that player doesn't work and I'm unable to watch the video. But then I visited the replica Pickles homepage and found a lot of information including a nice video there.
But I will treat this information with caution as I have my reservations about that replica:
First of all there are - as already discussed - no definite plans of the original.
The jib boom seems strange. In some pictures it looks like flying jib boom and is turned 45° to port - in others it looks like conventional one.
Obviously there were some alterations made for safety reasons and to fulfil regulations - e.g. a wheel instead of a tiller.
Some alterations may be there for commercial reasons (understandably - she must earn some money to keep her) as for example that cabin with the two stern windows.
Some Disneyland-ing is also visible. That figurehead - please!
But nevertheless there is a historical background with some research behind that vessel. It provides a lot of information which at least can be treated as a second opinion.
By the way I counted 12 hoops on the lower main mast and they are much more delicate than mine.
Cheers
peter