dvm27
-
Posts
2,467 -
Joined
-
Last visited
Content Type
Profiles
Forums
Gallery
Events
Everything posted by dvm27
-

Kit review 1:10 Military Turbofan engine - TECHING (build review)
dvm27 replied to James H's topic in Non ship-related reviews
That is one cool model. I'm thinking of building one for my Grandson. He has just started on a path for commercial aviation and he would go crazy for this. Unfortunately, it may have the opposite effect on his parents! -
I just discovered your log Ian. Congratulations on building such a beautiful hull. Your take on the style, fully planked on one side, makes it unique as well. I look forward to future updates!
-
I've spent a fair amount of time ripping out stuff and redoing problem area(s). I promise you that once she's in a case you will barely notice her. So what's another month or so in the construction time? The hardest decision is whether or not to redo something and once that decision is made progress is fast.
-
How will laser cutters compliment our hobby tomorrow?
dvm27 replied to EspenT's topic in 3D-Printing and Laser-Cutting.
Yes, I enjoy working with wood as well but when it comes to making hundreds of blocks, belaying pins, cleats, etc. I think 3D printing is the way to go. Chucks 3D fittings look exactly like box or pearwood so I'm happy to use them. The limiting factor is, of course, preparation of the stl or other cutting files required to 3D print them. I feel that's a level of computer expertise beyond my aging skillset. -
They sell mini crock pots on Walmart. Plug it in and wait until hot and do as Tony says. You can unplug the crock pot when finished and keep the solution covered. It lasts for months.
- 257 replies
-
- 2
-

-
- pegasus
- Swan-class
- (and 1 more)
-
I use a 1:5 dilution. None of my blackened fittings have faded over time and I don't get the flaking and uneven coatings I used to get when I used stronger solutions. I can't stress enough that the fitting needs to be spotlessly clean and free from oils so I wear disposable gloves. I do suspect that some of the results depend on the specific type of brass you are using. Being an alloy, perhaps the proportions of copper and zinc vary based on the type of brass. I do note that since I have been using Sparex before etching my results are much more consistent. I've never used Pewter black for brass Kenny. I've always used brass black. Not sure what the difference is though.
- 257 replies
-
- 4
-
-
- pegasus
- Swan-class
- (and 1 more)
-
Here is a video link to Kudin's method of turning in the deadeyes. It takes some practice but worked well for me on my last project. Try to master the seizings as you'll need them for many aspects of rigging. https://www.youtube.com/watch?v=NzVOOi3Eo5U
-
Swan class 3D model in progress
dvm27 replied to dvm27's topic in CAD and 3D Modelling/Drafting Plans with Software
perhaps you can post an actual rendering every once and awhile so that the technically challenged amongst us can fully appreciate the results of your work.- 141 replies
-
- 2
-
-
- pof swan series
- swan
- (and 1 more)
-
Swan class 3D model in progress
dvm27 replied to dvm27's topic in CAD and 3D Modelling/Drafting Plans with Software
Welcome back Denis! I doubt that most of our followers are aware that you have further developed the 3D model with sails and ropes to accommodate gamers (where the big bucks are). I'm sure that 99.9% of them will not notice that your rope is laid left-handed vs the traditional right-handed method so I won't point that out 😉. Still, if you are able to reverse the lay with the simple click of a button I know you will do it as you are OCD when it comes to details.- 141 replies
-
- 3
-

-
-
- pof swan series
- swan
- (and 1 more)
-
Try contacting Ben at the Midwest Modelers Shop. His e-mail address is TheMidwestModelShop@gmail.com. He has built a couple of Titanic models for clients and has many subscribers so he may be able to find you a model. You may also wish to check out Fine Art Models https://fineartmodels.com/titanic/. They have built the finest Titanic model at 1:48 but also sold 1:192 models.
-
You should put a small ruler in your photos for reference. It's hard to believe the complexity of your work at this scale. I wish your log had an index because it should become the new bible of ship model rigging. Your split thimbles look perfect. Can you point me to the section where you manufactured these?
-
Problems with blackening brass
dvm27 replied to Desertanimal's topic in Metal Work, Soldering and Metal Fittings
I've had better luck with Brass Black but this is unfortunately no longer available. If any of the part you need to be blackened is soldered then the Sparex works great as a cleaner/etching solution. -
Like everyone else here I miss Doris's work but you're doing an amazing job on this model. Count me in as a follower!
-
(inexpensive) Lathe recommendations
dvm27 replied to palmerit's topic in Modeling tools and Workshop Equipment
What scale will you be working at? What is the largest spar or mast you plan to turn? While turning spars and masts on a lathe are possible it is not quite as simple as you might think. You need to consider the maximum swing over bed. My Sherline has 16" so I can turn larger spars and masts. But, even with a hole in the headstock, the maximum diameter wood that can pass through is 0.040". If you are turning long spars or masts you will encounter deflection so a steady rest would be highly recommended. No matter which lathe you purchase there is a learning curve and it will take some time before you turn out (literally) passable spars. It is actually very easy (and satisfying) to make a mast with just a chisel or miniature plane (the Veritas mini-plane is fantastic). Depending on the period you are working in, masts and spars were not always round over their entire length. Many had octagonal centers and tapered ends. You may wish to look at Volume 4 of The Fully Framed Model, by David Antscherl, for a complete description of how to hand make masts and spars. It's actually easy and much less expensive than purchasing a lathe. -
Very nice Jason. Get a Bic lighter and experiment with flashing it over the splices and bindings. It neatly removes much of the loose fibers radiating from the rope. Practice on some non-essential rope first!
-
That's a shame because the Preac motor upgrade is fantastic. Quite honestly, I use my Preac table saw more than my Byrnes. It never binds or scorches the wood.
-
HMS RESOLUTION 1667 by KarenM - 1:48
dvm27 replied to KarenM's topic in - Build logs for subjects built 1501 - 1750
In the US and Canada we have the Veritas Mini plane. After honing on a diamond plate and leather stropping one can remove eyelash sized shavings from wood. It is now my goto tool for shaping. https://www.leevalley.com/en-us/shop/tools/hand-tools/miniature-tools/planes/70138-veritas-miniature-block-plane?utm_campaign=USA|DSA|PageFeed|Tools|LowPriceTier&gad_source=1&gclid=Cj0KCQjw9Km3BhDjARIsAGUb4nzO6oqLcoTrGhlXS0AtUbBIZp7pgIb9CxAkPUx80xbkGFnGMiAyBiQaAnEtEALw_wcB&item=05P8220 I am very much enjoying your build log -
I'd be happy with any of the above. The French vessels have a certain elegance that, in my opinion, is lacking in the British ships of the period. M. Delacroix is a member here. perhaps he has some insight into future Ancre publications.
-
Ken, that was us (Admiralty Models). We closed up this year. Those were CNC turned brass which we got from overseas. Nowadays, I'd probably use one of the new 3D printed cannons that Syren Models sells. I'm sure they'll be available in the size you need in the near future.
-
Byrnes Alternatives - Saw and Thickness Sander?
dvm27 replied to Jcredding's topic in Modeling tools and Workshop Equipment
I have the Proxxon thickness sander but needed a blade swap out. I tried but was unsuccessful to get the blades aligned. I sent it to Proxxon in the US and six weeks later they told me they couldn’t get the blades aligned. I was unable to purchase a new one in the US without a motor conversion. So I am using the old one which leaves a small score in the wood from an uneven blade. I finish up with the Byrnes sander. It’s really a fabulous tool and it’s a shame it can’t be purchased in the US anymore. -
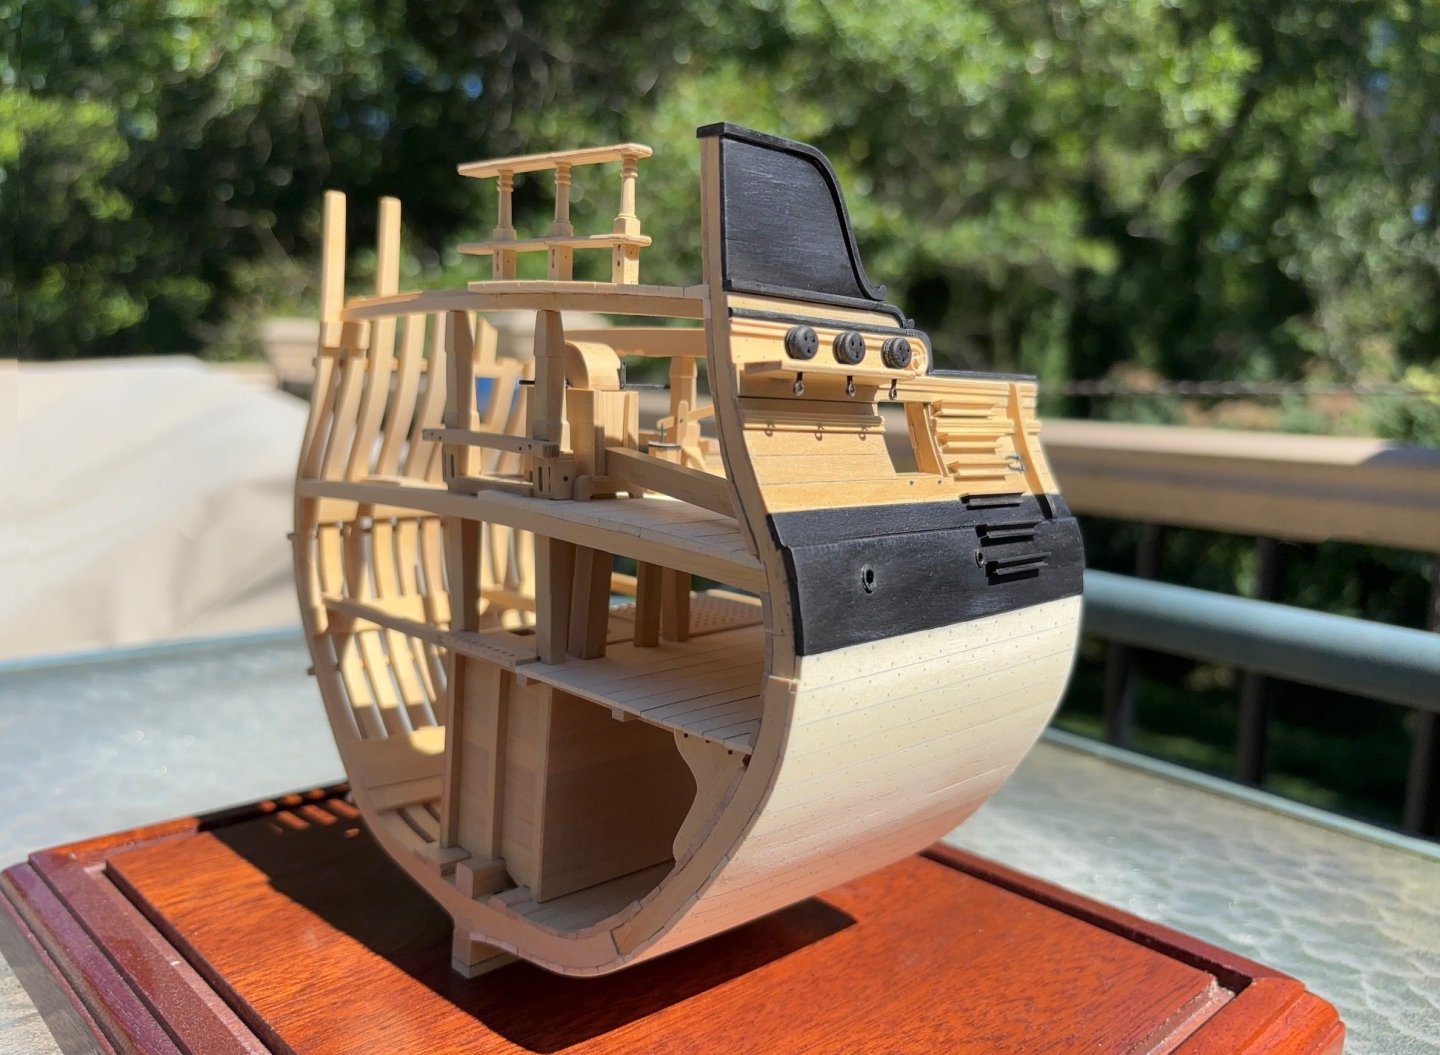
You might consider placing a garboard plank from the sternpost to the fore part of the stern deadwood. Then, add progressively shorter rows of planking above until the frame/deadwood joints are covered. Repeat in the bow section where, presumably, you have the same issue. I have seen some very lovely Navy Board models partially planked in this fashion. But before you do this please add some carpenters glue into the joints and run 120 or 150 grit sandpaper in the direction of the grain and see if some of those irregularities disappear.
-
We had lofted a sheer plan and frames years ago. We sold a few of them but no one ever built a model of her to my knowledge. It’s a shame because she would be a beautiful model!
-
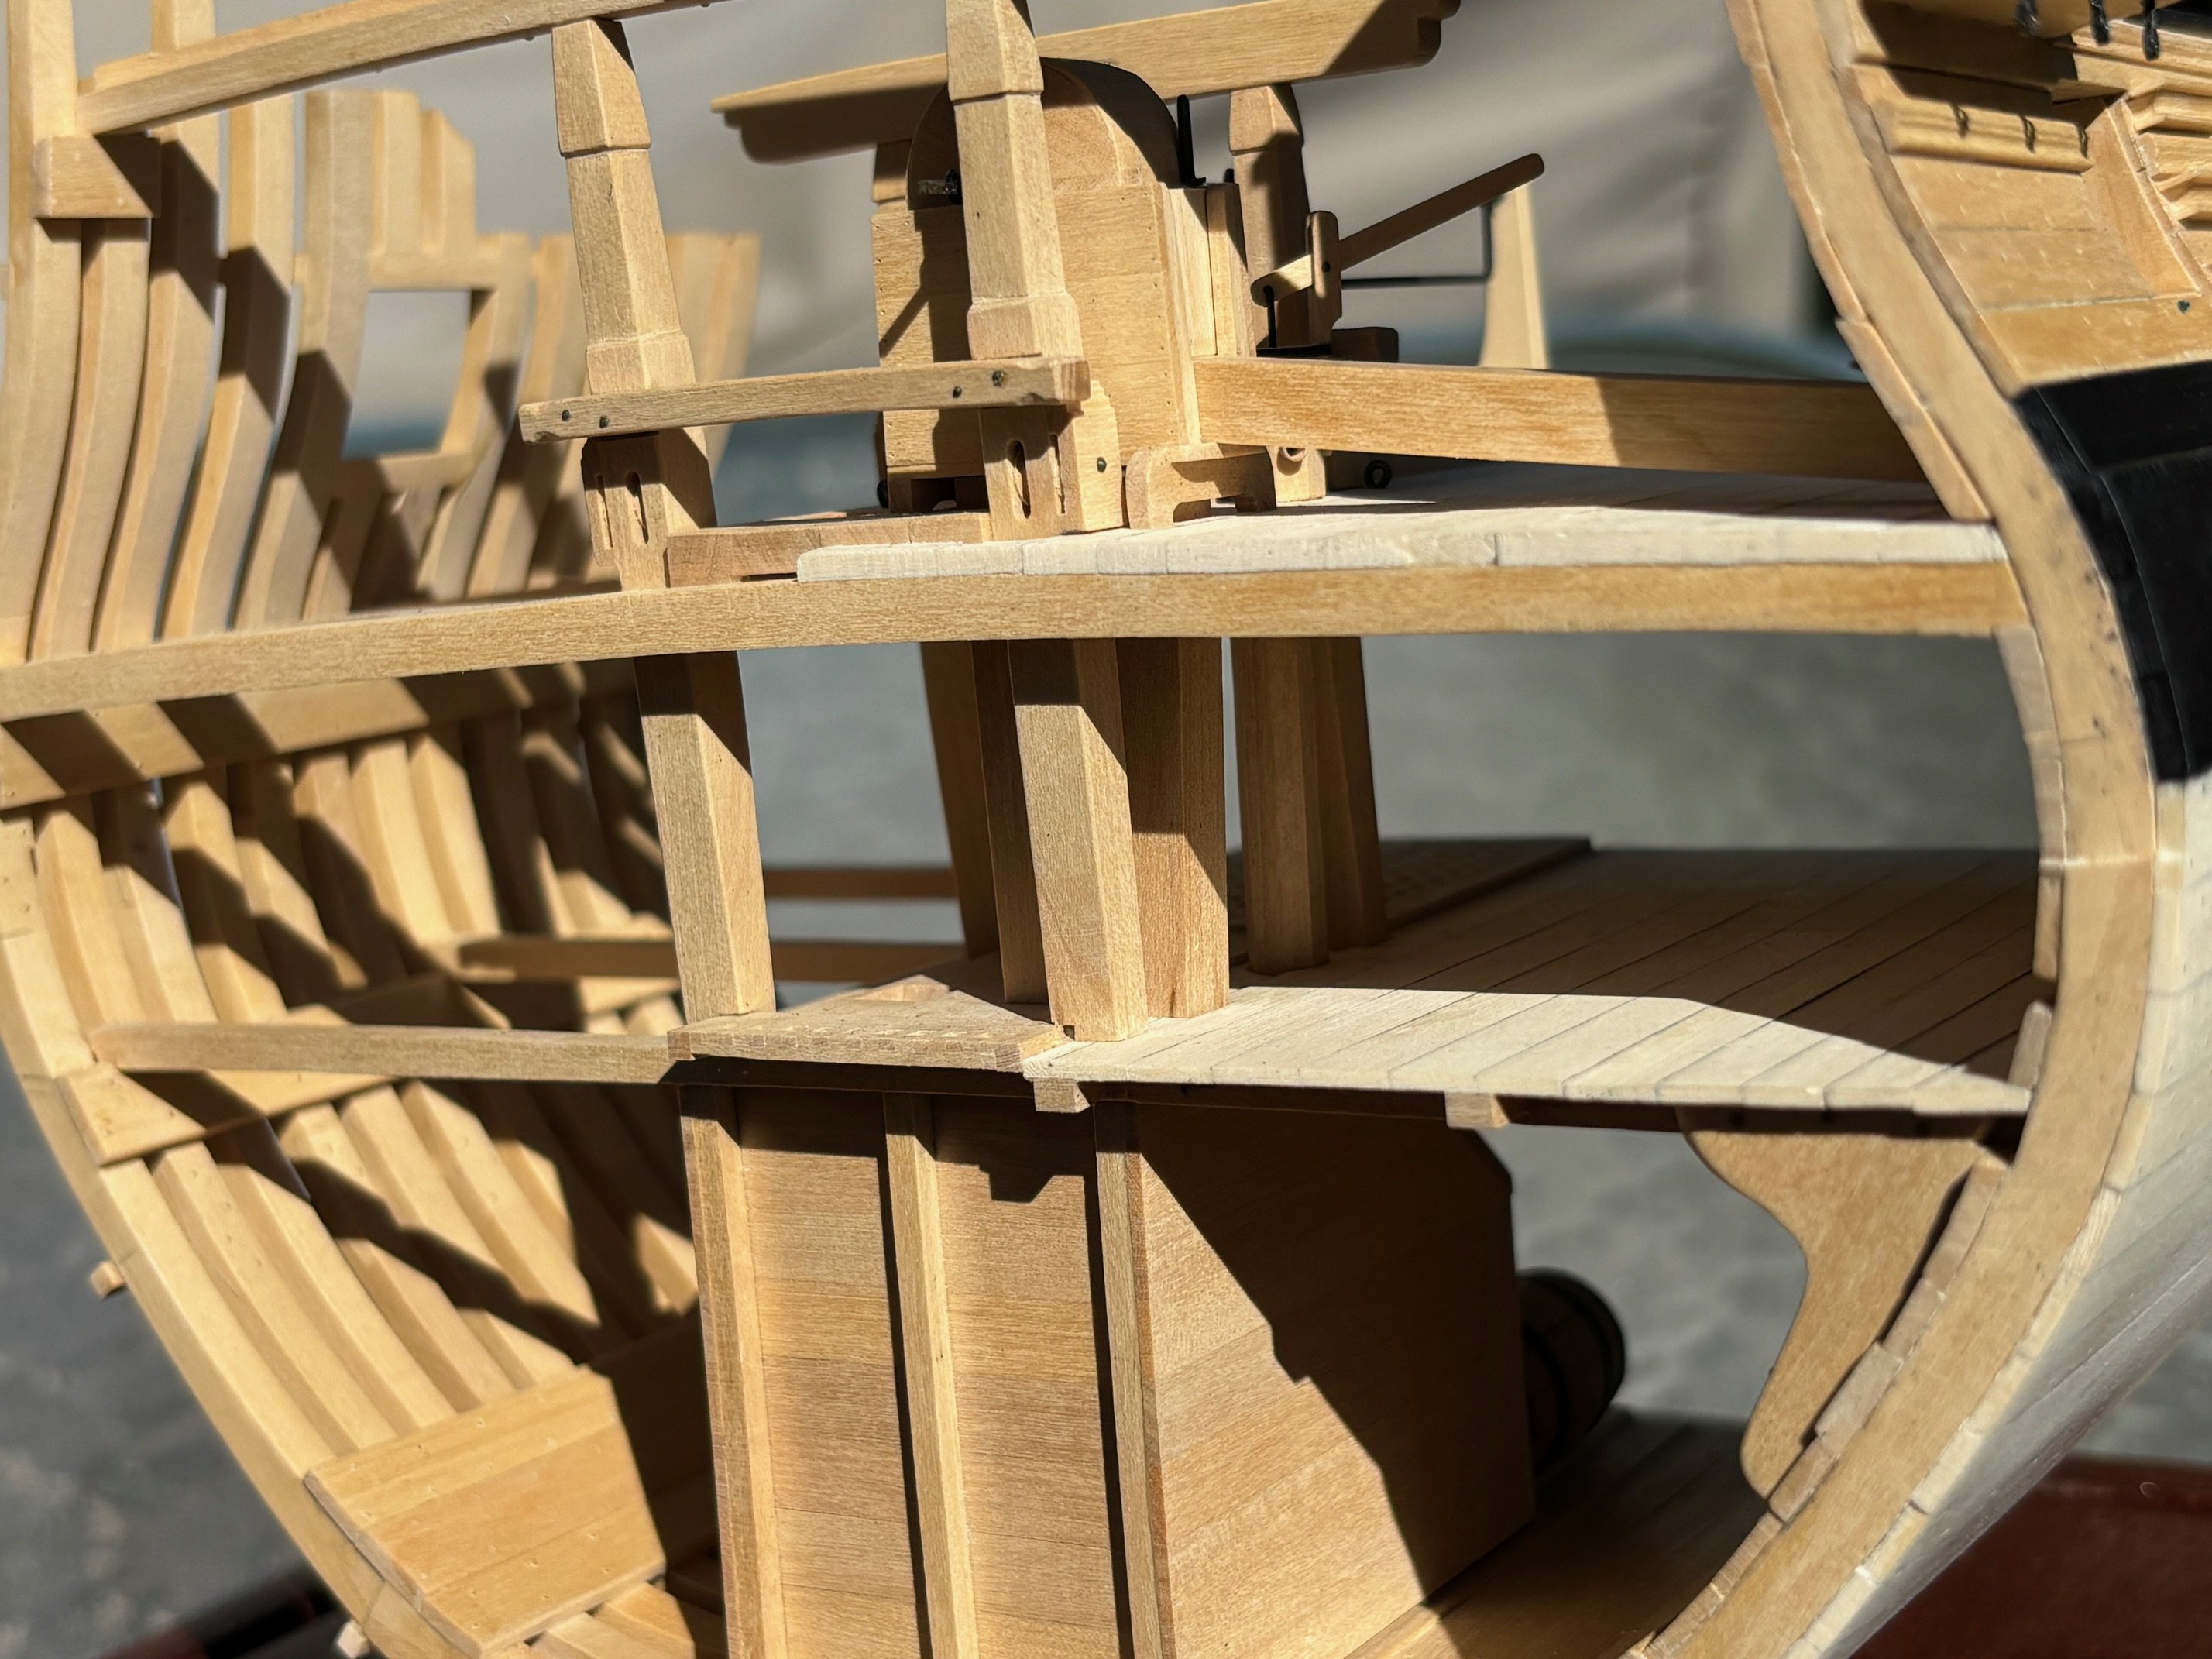
The simplest solution, if you don't mind a bit of a compromise, is to end the brake pumps at the main deck. The bottom segment which protrudes into the well is invisible (hidden by planking and the mast partner).
-
I looked into my cross section to see if I had the same problem but my pumps appear to have the proper clearance. If not, I would adjust the carlings by moving them a bit and or mortising to accommodate the pumps.

-
I looked into my cross section to see if I had the same problem but my pumps appear to have the proper clearance. If not, I would adjust the carlings by moving them a bit and or mortising to accommodate the pumps.