


wefalck
-
Posts
6,641 -
Joined
-
Last visited
Content Type
Profiles
Forums
Gallery
Events
Everything posted by wefalck
-
 By 'securing' you probably mean 'holding in place until the glue has set' ? That may be only one issue. Or rather, if this is a serious issue then you may be missing the rabbet in the stem post ? Once there is a proper rabbet against which the planks can land, they may be already more or less locked into place, making clamping simpler. An additional strategy will be to water and heat the planks and then to clamp them until dry into a jig that has a similar curvature as the place where they are supposed to go. Such pre-bend planks will be easier to fit and require less force, when fitted finally.
 -
I may be wrong, but I think Citroen used this kin of system for the rear suspension of the half-tracks that were used for the Sahara expeditions and the on-land trip from Paris to Pékin (Beijing) in late 1920s/early 1930s.
-
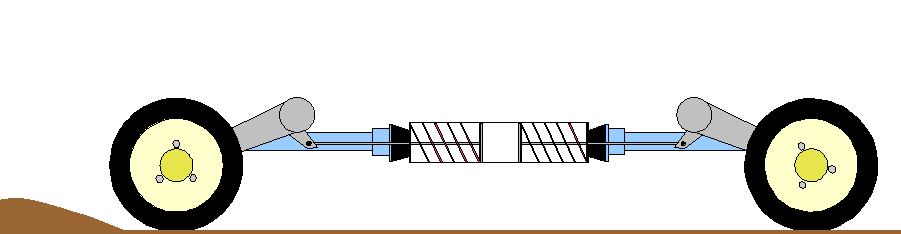
Well, the car was conceived in the late 1930s, when there were not too many other cars on the road and mainly for use in rural areas. That it became so popular in the 1960s to 1980s particularly with non-conventional urban young could not be anticipated. The lack of passenger protection was one reason, why it was discontinued. I have a late 1970s repair manual, which shows a lot of cross-sections of the parts of the suspension, but no GA drawing unfortunately, but I found this site with a lot of useful photographs (albeit in German): http://www.entmontage.de/fahrwerk.htm. And the animated graphic from that site:
-
Actually, the fabric looks very much the one on mine, but the stitching was different.
-
At least on the later models the grills were stamped and pressed sheet-metal in a light grey plastic frame, independent of the colour of the car. Before the frame was also stamped and pressed from sheet-metal - remember very well, because at some stage I repainted mine. The very first models did not have a separate grille, but just slots in an inverted chevron-pattern stamped into the pressed bonnet. The Citroen inverted chevrons were chromed, if I remember correctly. Will you be adding still the connecting rods to the suspensions ? The 2CV had a rather unique suspension cum shock-absorber arrangement. The longitudinal pipes under the chassis are the spring cum shockabsorber elements. The arms on which the wheels sit are connected to these by long rods. In this way the suspension for wheels on one side is not completely independent. The suspension overall was very soft, but safe, even when taking bends at high speed (relatively to the 2CV that is) - one just had to get used to the swaying of the body of the car. One of the design criteria was that a farmer should be able to safely take a basket of eggs from his farm, across unmade roads, to the market town The first models were sort of painted in sort of satin oil-paint, I think. But since the mid-1950s or so normal painting procedures of the day were followed, resulting in a gloss finish. The quilted leather upholstery is rather posh for a 2CV. Usually they had a sort of velvety fabric, the same as used on the larger Citroens. The seats were rather soft by modern standards, but very comfortable - I could sit in it the whole day without circulation problems.
-
Down-sizing rope ratio compared to the proper scale
wefalck replied to Sandor Laza's topic in Masting, rigging and sails
Colour can also matter. Lighter coloured ropes may appear thicker than dark coloured ones of the same diameter. We also tend to have modern ships in front of our mental eyes. There, even natural fibre ropes tend to be thinner than they would have been say 150 or 200 years ago. Since the 1880s or so techniques to quantitatively testing the breaking strenghts of rope have been developed and also quality control measures on the raw materials that go into them. In this way ropes can be made thinner than in previous centuries, where they had to err on the safe side. -
Keith, that's a good question. I don't really know. As the muzzle is several metres beyond the rim of the barbette, I assume they could shelter behind that. There are contemporary pictures of deck-guns of this type (albeit only half the calibre) being fired, where the crew is lying on the deck, while the gun-layer is standing behind it, holding the firing lanyard. There was a gun-drill manual for this type of gun as official publication, but so far my searches through all of the German archives, museums, and libraries has been unsuccessful.
-
We are kind of crazy, arent't we ? Making things that no one ever (except perhaps a restorer in a 100 years time) will see. But it gives you a good feeling that it is there and the satisfaction that you could do it ...
-
iron-oxide red and green are perhaps the most popular colours for anti-fouling paints because they resemble the colour of coppering under different circumstances. But this is only an assumption. A captain from Bremerhaven (Germany) invented in about 1862 an anti-fouling paint, that used shellac and lineseed oil as a binder, iron-oxide (red ochre) as pigmentmt, and arsenic and/or mercury as active ingredients. He received patents all over the world and the paint became very popular due its efficacy. It was manufactured in many countries under license and many other manufacturers tried to copy it. Its trivial name was 'patent paint' and also 'red-hand paint', as obviously you ended up with red hands when applying it. Shellac is expensive and was later replaced with other fast drying binders. The fast drying property was one of the selling points, as it could be applied onto a careened vessel between tides and it reduced docking times. The textboock of 1870 on iron shipbuilding by Steinhaus list various other colour options for this paint. In the 20th century mercury and arsenic were replaced by tributyltin (TBT) compounds. These are banned now also, as they are endocrine disrupting substances - leading e.g. to reproductive disorders and birth defects in snails and other sea animals.
-
Thanks, gentlemen ! I am only partially happy, as not everything turned out quite as crsip, clean and straight as I had wished. Macro-photography is unforgiving. The real moment of truth will come, when everything is painted, because of the clear lacquer used, imperfections are difficult to see. The painting will be done after the summer break. I have in principle the right colour, but it is a Tamiya paint that still needs to be thinned for the airbrush. I will have to get some Vallejo pre-thinned paint, but with the virus still lurking around the corner, we restrict ourselves to the only really necessary outings. I realise now that many of the little details will not, or barely, be seen once the gun is installed on the boat. I probably could have safely let them off. But then I wanted to prove (to myself) that it is possible to create them and also it is quite difficult to predict what will be visible from what viewing angle. Makes you feel good that the details are there
-
Thanks for your kind words ! ****************************** Attaching the gratings The lower carriage was now ready for installing the gratings. For this purpose some flaps had been foreseen on the supporting brackets. They were cemented to the carriage using the zapon-lacquer which resulted in a surprisingly strong bond. The stand for the gun-layer was put into place only temporarily for the photograph. The final fixation will be done, when the gun is being installed. It is rather exposed element that would make painting the gun rather difficult. The lower carriage with gratings in place from various angles The lower carriage put temporarily into the barbette To be continued ...
- 935 replies
-
- 16
-

-
Not so bad, we have two balconies, where can have the meals - weather permitting. In fact, I had not been physically out of the apartment for two months, but it didn't really bother me too much.
-
I think anti-fouling paints in the modern sense began to be developed from the 1820s on. By the early 1860s such paints have been available in many different colours, although the most common one seems to have been iron-oxide red. Before the 1820s and well thereafter ships bottoms where either covered in concoctions of lineseed oil and lime with all sorts of additives, such as ground glass, or in pitch or tar. The former would appear in a sort of off-white, while the latter would be a brownish black. The latter was only used in areas outside the risk zone for a terredo navalis attack. What you seem to describe is the boot-topping stripe, which is an altogether different story. It doesn't seem to have come into general use before the second half of the 19th century. it is a kind of fashion element and its use varied greatly across the different regions of the world. It seems also to be associated with the used of 'proper' paints, meaning that it not normally seems to have been used together the white concoction or tarred bottoms.
-
Build the masts and rigging on a dummy deck first?
wefalck replied to Rik Thistle's topic in Masting, rigging and sails
I would do (most of) the standing rigging in situ unless you are 100% sure that you can make a mock-up that has exactly the correct dimensions. This doesn't mean that certain operations could not be done on a jig after you marked off the precise lengths in situ. I am thinking of bindings or servings and operations such as that. However, it could be of advantage to prepare yards with their various fittings on a separate jig because it is easier to do this in a comfortable position on the worktable. Some people also prepare whole masts on the worktable and then transfer them to the model. This implies that the turning in of the deadeyes has to be done at that stage and also the ratlines can only be put in after the mast complete with the other rigging has been installed. On the bottom line the decision on which strategy of mixture of strategies to use will depend on the complexity of the rig. -
Oops, I honestly believed that this is the camber of the beams, analogous to the camber of a road profile with actually a similar purpose, namely shedding water more easily. Druxey is right, just checked in Paasch's 'From Keel to Truck', and there the transversal curve of the deck beams indeed it the rounding, while the curve in longitudinal profile of a keel is the camber, and that of the deck is the sheer ... good by to what I thought was a good piece of nautical knowledge.
-
Proxxon DB250 mini wood lathe
wefalck replied to Jorge Hedges's topic in Modeling tools and Workshop Equipment
Druxey, I think it depends also on the diameter you have to work with. If your spars are only two or three mm in diameter at the end, it may be rather difficult to employ the classical method. For this you would need to make yourself jigs to hold the material while applying the plane or offering it up to the circular saw.- 11 replies
-
- 2
-
-
- db250
- mini lathe
- (and 1 more)
-
Proxxon DB250 mini wood lathe
wefalck replied to Jorge Hedges's topic in Modeling tools and Workshop Equipment
As for all lathes, collets are basically a must (also from a safety perspective), when you are working with smaller diameter pieces. However, I think the lathe normally comes with collets, doesn't it ? @obsidean12: why do you have a a three-jaw chuck in the tailstock ? I hope it is a free-spinning one ...- 11 replies
-
- 2
-
-
- db250
- mini lathe
- (and 1 more)
-
"I had a bit of a slow time last week, distracted by the lawn tractor passing away at the age of 22 ..." - as my father said, when his cousin told him that he had 90.000 DM tax debts to pay: "I would be glad to have such a problem ..." - lawn tractor problems mean that you have a lawn big enough to need a tractor The pedestals under the gratings look rather masssive. Is that also on the prototype ?
-
Used to buy a lot of tools, new and antique, in the USA, but since the US Postal Service has discontinued 'surface mail' it often costs more to ship than the price of the goods. So this is only a proposition, if you are desparate for something antique. The Chinese send most of their new stuff for free .. probably subsidized, but it is my money. As for medical treatment, it really depends on in which country you are and what kind of insurance scheme you have. For consumer goods and food there are big price differences between the different European countries. It also depends on, whether you buy brands or not. We buy a lot of stuff during our frequent trips to Spain, as most things there are a lot cheaper than in Paris ... In spite of all that, I think many people live a rather comfortable life in Europe. Of course, there are also poor people, but the poor are still better off than many other people around the world. The socio-economic differences are much less pronounced than in the USA or let alone in the emerging economies or developing countries.
-
Two steps forward and one step backwards ... 😡 ... as I said somewhere above – on Friday the plastic globe on my 12W LED globe-bulb in my architect’s lamp fell out and dropped right onto the lower carriage on the workdesk. One of the caster-roller snapped off and two others were loosened – then I spent an hour turning everything on the table upside-down and didn’t find the roller – then I sifted through the waste-bin nearby for another hour and still couldn’t find it – eventually I gave up, cut a new bracket on the laser-cutter, fitted it and then turned up a new roller. Perhaps should have done it like this in the first place, as one always spends more time in search of a part than it takes to make a new one, but I just could not believe that a part like that could have been ejected so far ... Still work on the lower carriage ... OK, the gun is the key feature of a gun-boat and its very raison d’être, but this gun and its carriage seem to develop into a model of its own right. Perhaps one day I should build a larger scale fully working (the mechanics, not the ballistics, which would be probably illegal over here in Europe) model, now that I have a pretty good understanding of its functioning. While I was drawing some additional parts to be cut with the laser, I realised, that I had completely forgotten the stiffening brackets for caster wheels. They are essential elements in the construction, as the wheels each have to carry around 15 tons of the total weight of the gun. The brackets were fabricated from steel plates and forged(?) angles, fabricated on the model from tiny pieces of Canson-paper cut with the laser. Stiffening brackets added over the caster-rollers There were also two brackets needed for the operating lever including connecting rod of the gun training mechanism and for the clutch that connects the cranks below the barbette with the gun. The latter allows to connect gears for two different speed ratios, a high ratio for fine weather and a low ratio through as self-locking worm-gear for foul weather. A quite sophisticated arrangement actually, but as nothing of it will be visible on the model, it was ignored. Supporting brackets and connecting rods for working the training gears Connected to the gun training mechanisms is also a kind of capstan to help run-in the gun. A tackle is hooked into each side of the upper carriage and the runner lead by two guiding wheels into the lower carriage and onto the capstan. The wheels were turned from steel rod and their supporting brackets cut from Canson-paper. I meant to closely reproduce the original design, but in the end had to simplify it, because the parts were simply too small to laser-cut and handle. Because they are so flimsy that had to be put into place now and will have to painted over. Rollers in brackets to lead the running-in tackle The next challenge will be the fitting of the eleven gratings distributed around the lower carriage. To be continued ...
- 935 replies
-
- 13
-
-
If you have the patience, make a break between sessions. Acrylics need time to fully cure, even so they are ‚touch-dry‘ very quickly. The curing is a combination of cross-linking the acrylics molrcules and an outdiffusion of the water molecules. Its is difficult to judge the coverage at the beginning and you don‘t want to flood surface details with paint.