augie
-
Posts
4,669 -
Joined
-
Last visited
Content Type
Profiles
Forums
Gallery
Events
Everything posted by augie
-
 Um......thanks Popeye. But I'll defer to Mobbsie on the ship's boats
- 1,279 replies
-
- 3
-

-
- agamemnon
- caldercraft
- (and 1 more)
-
Very well done. Like I always say....... the smaller it is, the longer it takes.
- 1,279 replies
-
- 1
-
-
- agamemnon
- caldercraft
- (and 1 more)
-
Oh, that's right! They are sitting on top of the piano. You're good Andy
-
Thanks again! Seems like everyone is looking forward, with great enthusiasm, to planking. Everyone but ME! The task ahead will rival that of planking the basketball court at Madison Square Garden. Besides, I LOVE plans, blueprints and line drawings. So much so that I have a fully built Piper J-3 Cub hanging in my office 'in the bones' ....... uncovered so the entire structure is visible. So perhaps I'll just leave her as is :D . A new concept ---- the PRE admiralty model ! But no, we'll forge ahead. Mobbsie- haven't completely decided yet on the finish. A lot will depend on how the planking shapes up. She won't be coppered as that wouldn't be accurate. I've always been partial to a natural finish. But the fine examples I see here on MSW are changing my preferences. That's astounding since I'm known to be as stubborn as a stump.
- 2,191 replies
-
- 6
-
-
- confederacy
- Model Shipways
- (and 1 more)
-
OK, we have length and height. Now when do we start adding the width????? There must be about 15 yards and spars sitting about somehere
- 1,873 replies
-
- 1
-
-
- occre
- san ildefonso
- (and 1 more)
-
Yes Sherry. They were very long and thin. I think they were actually mostly used to maneuver in close quarters.
-
I'm with the others on this. I use pva diluted a bit with water and generally go with 2 coats.
-
SJORS - No, we don't cut anything out from the beams. These are the small sweep ports which will be created as we plank. Each will have a closed door and a metal hinge holding it closed. So we'll never see the beam. The actual gunports are framed above on the gun and quarter decks. I'll be painting the insides of those soon so you'll have a better perception of it.
- 2,191 replies
-
- 1
-
-
- confederacy
- Model Shipways
- (and 1 more)
-
ANDY --- Thanks for the reminder. It's been fun so far......but 99.75% of what's been built will never be seen again!!!!! And thanks to everyone for the kind thoughts.
- 2,191 replies
-
- 1
-
-
- confederacy
- Model Shipways
- (and 1 more)
-
Be interested to see which 'part' of you wins out. You can't beat natural wood........but then 'white stuff' has a charm of it's own.
-
Is that ANOTHER new avatar I spy???? Between all the ships and buses, it's hard to keep up!
-
That's an interesting approach !
-
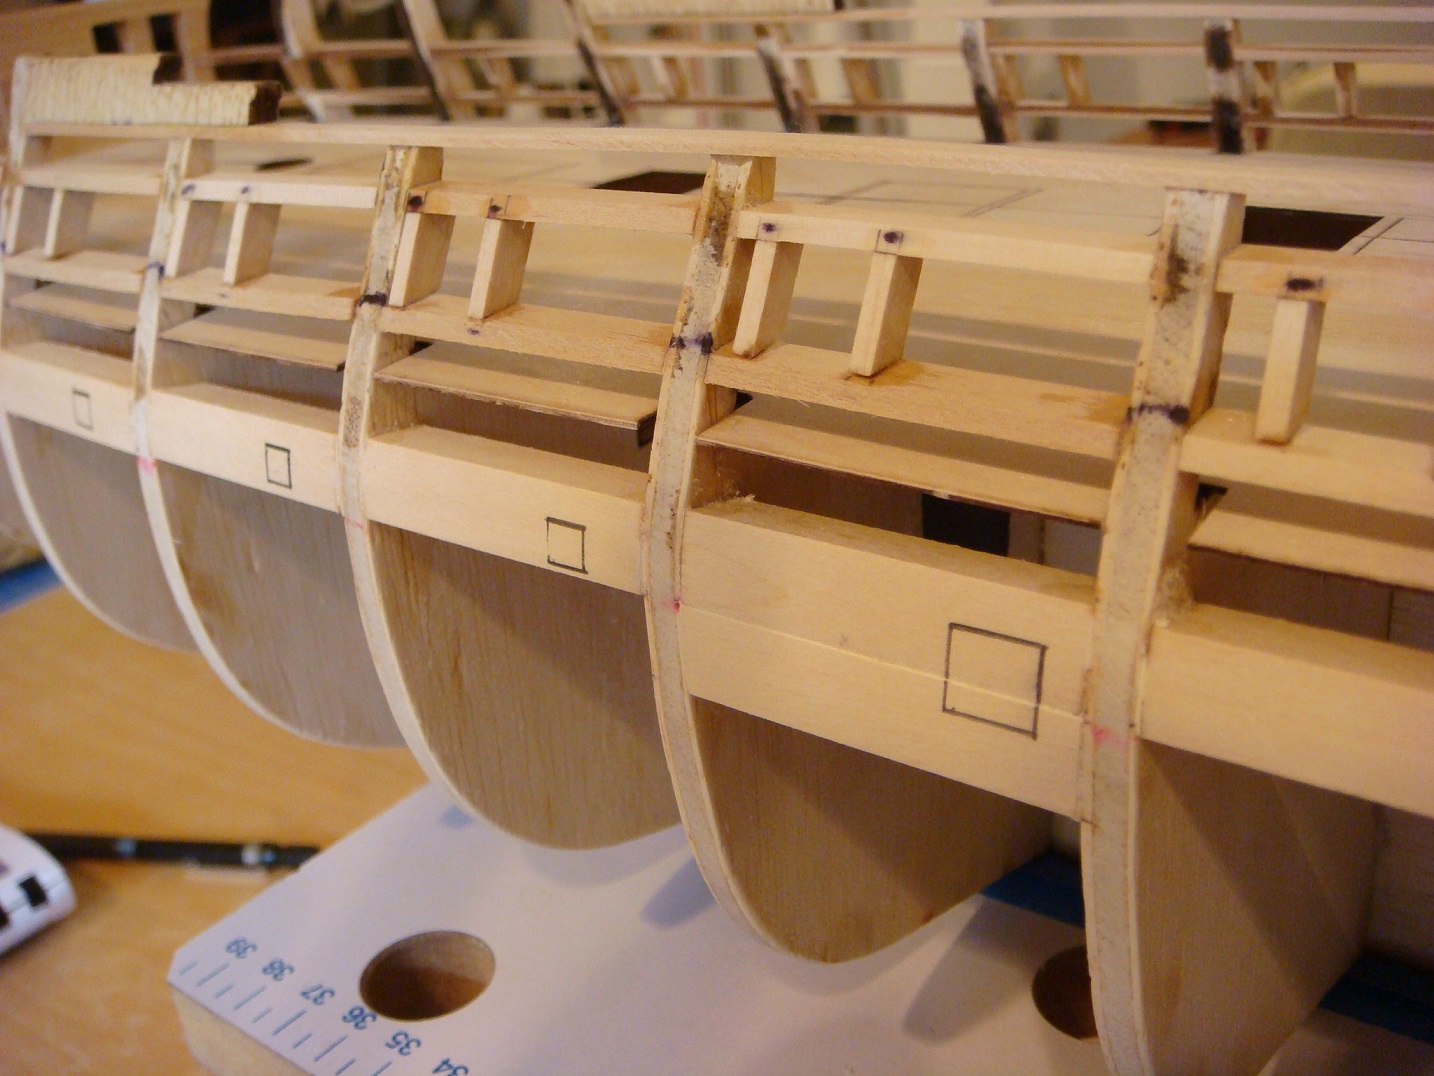
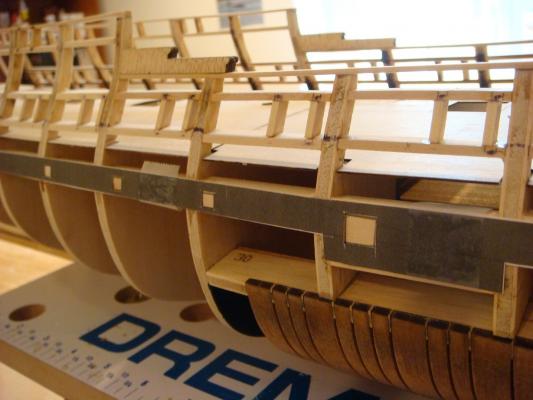
OK, the dust has settled A line of sweep port 'frames' has been installed the entire length of the hull. These frames are 3/8 x 3/8" square stock aligned with laser etched lines on the bulkheads. The alignment of those lines was checked with a plank prior to setting in the blocks. Note the double block amidships which accommodates the larger ballast port: Once the frames were in place the entire hull was faired for the last time. Chuck provides a template to align the sweep ports. Here it is attached to the hull: The template allows the ports to be marked with a pencil. It is the planking which will actually define the ports later on: Two items remain before planking above the wales begins. Firstly, I need to construct and install 6 simulated sheaves to pass through the hull. Then, some fun is at hand establishing the color for the ports and bulwarks...but first things first.

- 2,191 replies
-
- 18
-
-
- confederacy
- Model Shipways
- (and 1 more)
-
Either that or go old school. Level the model itself. Then hang a line from the ceiling on a plumb bob. Move the model to the appropriate position and install your stanchions in line with the vertical line.
- 188 replies
-
- 1
-
-
- constitution
- mamoli
- (and 2 more)
-
Great tongue-in-cheek characterization of OSHA regulations. Would probably also include the use of supplemental oxygen for high altitude work
- 1,873 replies
-
- 3
-
-
- occre
- san ildefonso
- (and 1 more)
-
Makes being speechless all the more impressive
-
Incredible...... and innovative. I'm speechless.
-
Great to have you and the Admiral back home safe and sound. Now, I believe there are 7 whaleboats waiting in the wings
- 2,250 replies
-
- 1
-
-
- model shipways
- Charles W Morgan
- (and 1 more)
-
Good idea on the windows.
-
Are you getting the 6 or 12 pounders? Either way, they're great.
-
Well done Jax!
-
Nice.....and very dramatic. Have fun on the flip side.
-
Again with the 'mill'. It's a Zona saw and a sanding block :D (lubricated with elbow grease).
- 2,191 replies
-
- 3
-
-
- confederacy
- Model Shipways
- (and 1 more)
-
Now Anja is in the bathroom ????? I understand how it goes. I moved the bedroom set into the garage so we can have more room for crafts. Tell Mobbsie to bring his Aggy along so we can see some side-by-side photos
- 1,873 replies
-
- 2
-
-
- occre
- san ildefonso
- (and 1 more)