HOLIDAY DONATION DRIVE - SUPPORT MSW - DO YOUR PART TO KEEP THIS GREAT FORUM GOING! (Only 13 donations so far - C'mon guys!)
×


augie
-
Posts
4,669 -
Joined
-
Last visited
Content Type
Profiles
Forums
Gallery
Events
Everything posted by augie
-
 Really sorry about the shipping mishap, Bob. In spite of the best precautions, you never know. A long distance repair will be challenging. On the other hand, she's a beauty!!!!
- 1,477 replies
-
- 1
-

-
- essex
- model shipways
- (and 1 more)
-
The kit box doesn't look much the worse for wear. Take a careful inventory and notify ME if any pieces are missing or damaged so they can get them out to you. I've found they are very good in that regard. BON VOYAGE !!!!
-
I'm glad things are returning to normal for you Randy. Life has it's many distractions, some annoying and some downright scary. Some folks take solace in their projects. Others, like me, can't focus during those periods and need to resolve what's going on first. In any case, welcome home. Looking forward to your progress.
- 384 replies
-
- 3
-
-
- san francisco ii
- artesania latina
- (and 1 more)
-
Really first rate on the railing, mate.
-
Household Ammonia
augie replied to Q A's Revenge's topic in Building, Framing, Planking and plating a ships hull and deck
As a rough estimate, maybe 5% of the water volume. Usually it's just a last resort for a particularly tenacious or thick piece of wood. -
CONGRATULATIONS, INDEED! Popeye and I have been waiting, seemingly forever, for someone to replace Sjors at the Commodore's table. Really happy it's you, Andy. Waiter --- see if there's place over at the Rear Admiral's table :D
-
Thanks everyone. I also need to credit Mobbsie who actually came up with his own version of the (almost) functional sheave on his Aggy. JOHN- I'm sorry but I can't resist. I'm up to page 33 in Chuck's practicum at this point. But if you flip to about page 94, you'll find a handwritten notation: 'Inner sheaves are in magnetic ashtray ---- put them in NOW!
- 2,191 replies
-
- 3
-
-
- confederacy
- Model Shipways
- (and 1 more)
-
OK, since Wes gave out his 'secret weapon' , here's mine: http://www.micromark.com/the-dobson-miter-rite,6453.html It's not the strongest or most accurate thing in the world but it gets you in the ballpark. I've cut up to 1/2" square stock on this and the cut is pretty accurate. Finish up with Wes' tool and you're there!
- 188 replies
-
- 2
-
-
- constitution
- mamoli
- (and 2 more)
-
Matt Spray / dull coat
augie replied to demonborger's topic in Painting, finishing and weathering products and techniques
I've used 'dullcoat' (acrylic flat lacquer) over WOP as well as acrylic paint to bring down the shine. I use Model Master from Testors and brush it on. I understand it's also available in an aerosol but I haven't tried that. -
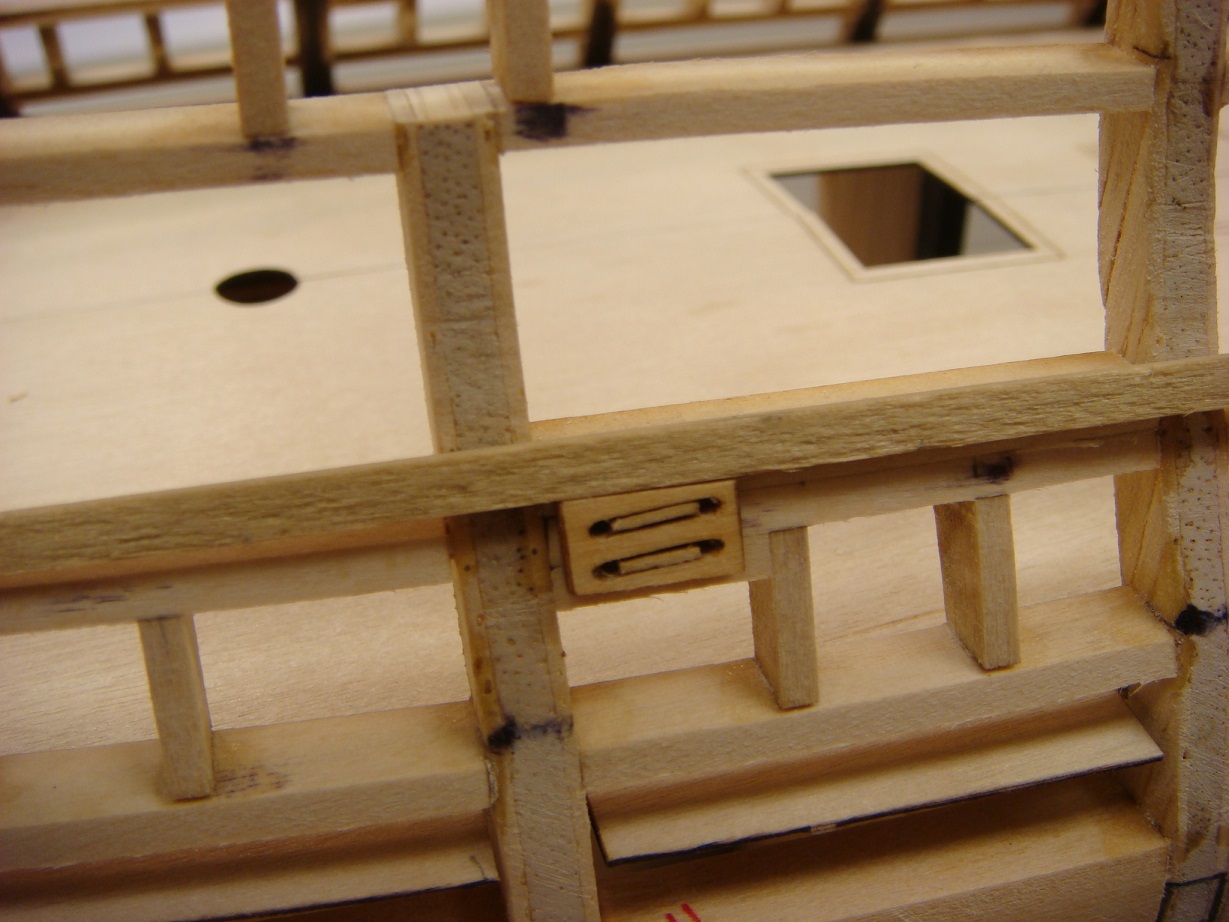
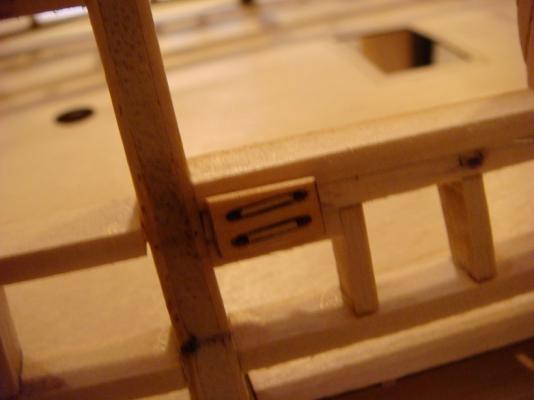
Not exactly record breaking progress this weekend. But Chapter 4 has been completed. There are a series of sheaves, 3 per side, that pass through the hull. Confed has simulated sheaves that add some nice detail. Additional framing was installed to serve as a backing for the sheaves both inside and outside the hull. Then the laser cut 'shells' were fitted with small slivers of wood to simulate the sheave itself. These assemblies were glued on to the framing and #68 holes drilled through the hull. The inner sheave assemblies will not be placed until later after the inside bulwarks are faired. The sheave shells or housings are 1/16" thick and will match the eventual hull planking. The first photo shows the assembled sheave glued to the new framing.... the through hull holes are drilled: In the next photo, I've laid a plank on top so you can see the effect we'll achieve once the planking is in place: As I've often said, the smaller things get, the longer they take . Overall, I'm pleased with this detail. The next task will be to plank above the wales. But, in order to delay that as long as possible, I plan to play with some paint first to see where I'm going on the bulwarks colorwise. Plus, since it's been almost 2 years since I've planked a hull, I need to psyche up and try to recall how I did it the last time (haven't a clue). In the meanwhile, I wish my English and European friends all the best of luck in weathering the current storm. Batten the hatches and stay dry!

- 2,191 replies
-
- 15
-
-
- confederacy
- Model Shipways
- (and 1 more)
-
Hey Sjors------ Mobbsie tells me that big blow that hit England is on the way to you !!!!! You and Anja stay safe ----- and DRY!
-
I don't do social media at all Richard but have found the 'like' button useful. As Dirk says, it gives you an opportunity to let the author know you're looking and that you 'like' what you see ....... without sending the old 'great job' comment.
-
I think you should be VERY proud of those guns. Now as far as ratlines are concerned ...................
-
Those stanchions look great. On the length of the planks, normally I cut the planks so that the butt joint is real. If the joints are square the planks should line up. There is always the possibility of varying plank width in a batch. Also, your technique can effect the width of a series of laid planks. Even the moisture content can have impact on the final dimension. What I'm saying is, there are lots of small variables that will multiply the more planks are laid. And in your specific case the hatch may be off center. You really can't do anything with the keel..... but check the hatch and the two sets of coamings behind it to try and get everything centered. As a general rule, I lay the planks from the center out to the hull. Any variation will then pop up near the hull and yes, sometimes it's necessary to lay an odd size plank out there. I suppose that's 'cheating' but it's easier to handle. If you ever get a really small gap, you can try the old sawdust/glue trick. Make some sawdust, mix with a little glue and fill the gap. Sanding and finishing will generally make a presentable appearance. Hope this gives you some ideas.
-
My condolences on your loss Buck. Sometimes, life comes at you in a hurry. Keep centered and you'll pull it together. Our thoughts are with you.
-
Nice work John. That deck is going to fill up in a hurry.
-
Looks about right from here. But the best judge of it is your eye.
-
I bought Anja once flowers a year of 8 ago and the whole day she looks suspicious at me why I give her flowers........ That was the last time. Hey, that's my line! You are now in permanent trouble :D
- 1,873 replies
-
- 2
-
-
- occre
- san ildefonso
- (and 1 more)
-
Well, this is certainly a pleasant surprise. Big schooners have always been one of my favorites. And an R/C project brings added challenges. If there's still room, I'll pull up a chair.
-
She certainly is a 'busy' ship with those boats in position. But then, men of war were not meant to be luxury yachts. I can't even imagine what she'll look like when she's fully rigged. Beautiful work, my friend.
- 1,279 replies
-
- 1
-
-
- agamemnon
- caldercraft
- (and 1 more)
-
I'm with Patrick on the gun ports and sheave.
-
He gets us mixed up Andy. All North Americans sound the same to Sjors.
-
Both Mobbsie and yourself will have another 2 ships built by the time I get to my ship's boats!!!!
- 1,279 replies
-
- 1
-
-
- agamemnon
- caldercraft
- (and 1 more)