ASAT
-
Posts
619 -
Joined
-
Last visited
Content Type
Profiles
Forums
Gallery
Events
Everything posted by ASAT
-
kit review Kit Review - HMS ENTERPRIZE (1774) by CAF MODELS
ASAT replied to kljang's topic in REVIEWS: Model kits
Did I miss it or is there any info on shipping this large multi box kit? Can I get a ballpark shipping estimate for the entire kit? -
No Bristol in sight? Scrubbed or moved further to the right?
-
Revenge 1577 by Asat - Amati - 1/64
ASAT replied to ASAT's topic in - Kit build logs for subjects built from 1501 - 1750
Just checked in myself after seeing it agin with this new methodology of grouping build logs, thanks for the encouragement Richard. I kind of got sidetracked by some plastic builds and haven’t done anything on this for a while. Need to work out a way to rotate everything into my build time.... Lou -
MRAP ATV by CDW - FINISHED - Rye Field - 1:35 Scale
ASAT replied to CDW's topic in Non-ship/categorised builds
Looking great! I love that panel line stuff, easy to use and really looks realistic the way it seeks out detail and collection areas -
MRAP ATV by CDW - FINISHED - Rye Field - 1:35 Scale
ASAT replied to CDW's topic in Non-ship/categorised builds
Wow, that looks like a ton of fun! That paint set is killer! The instructions look like chicken scratch but I think I could figure it out... looks like a great effect. -
MRAP ATV by CDW - FINISHED - Rye Field - 1:35 Scale
ASAT replied to CDW's topic in Non-ship/categorised builds
Yeah well, you gotta figure anybody with an old Duo Glide panhead in his avatar for an old rodder....😀👍 -
MRAP ATV by CDW - FINISHED - Rye Field - 1:35 Scale
ASAT replied to CDW's topic in Non-ship/categorised builds
Yeah I did that before I posted, saw that it was pretty much all the same color, I think with your ability’s with an airbrush shading and weathering, it will look very realistic and bring out the details as well as can be done, I guess I am thinking more along the lines of an old hot rodder...😎 -
MRAP ATV by CDW - FINISHED - Rye Field - 1:35 Scale
ASAT replied to CDW's topic in Non-ship/categorised builds
Craig, I guess all that gets painted the same color? I would be tempted to highlight the frame suspension/running gear with different colors.... but that’s probably not how they are...? -
MRAP ATV by CDW - FINISHED - Rye Field - 1:35 Scale
ASAT replied to CDW's topic in Non-ship/categorised builds
-
MRAP ATV by CDW - FINISHED - Rye Field - 1:35 Scale
ASAT replied to CDW's topic in Non-ship/categorised builds
My thoughts exactly! Other than ooooh... gotta get one...... -
Very nice Richard, I built this model except I went the other way and didn’t use any paint. I had to re-make a lot of the kit parts in various colored woods but that’s how I build anyway.... I really like your approach to the shutters, very clean work.. Lou
-
Newbie Keel Problem
ASAT replied to Jim in KC's topic in Building, Framing, Planking and plating a ships hull and deck
Soaking it will soften it for sure but it may warp as it drys and create a larger issue, have you tried flexing it to see if it is pliable enough? I would think you only need about an 1/8” or so flex across the beam . -
Newbie Keel Problem
ASAT replied to Jim in KC's topic in Building, Framing, Planking and plating a ships hull and deck
How thick is the false deck? I would think if it’s 1/16” or less it will conform to the bulkhead tops just by pinning or weighting and glue.... -
Do you happen to know the timeframe of when Sergal switched from bronze to white metal ? What vintage of the kit has the more desirable fittings?
-
Yeah OC, it’s nice out there in the winter the direct gain from the sun comes in the windows and I have my morning coffee there, in the summer it stays cool cause there’s a 20” overhang on the eve so it’s shaded... plus the ac keeps it cool. My admiral is O K with the idea, as long as my saws and sanders,etc stay down in the basement.... 😎
-
Military Wrecker - Revell - 1:32 Scale - PLASTIC
ASAT replied to CDW's topic in Non-ship/categorised builds
Awesome! I thought the Scammell looked bad but this one is just MEAN!! I love the look of these big old trucks, they are just BadAzz!! -
'Yep - gonna build a big display shelf out in our sunroom, doesn’t get as much use as it used to, so I’m pretty sure I can move in and re-decorate without too much resistance.... maybe....😇
-
M-50 Israeli Sherman - FINISHED - MP Models - 1:35 Scale
ASAT replied to CDW's topic in Non-ship/categorised builds
Wow CDW, that is awesome! Lots of skill all rolled up on one model. Really like the shading effects and your tracks/suspension - subtlety and intensity mixes well together. -
Tiger 1 by marktiedens - FINISHED - Dragon - 1/35 scale
ASAT replied to marktiedens's topic in Non-ship/categorised builds
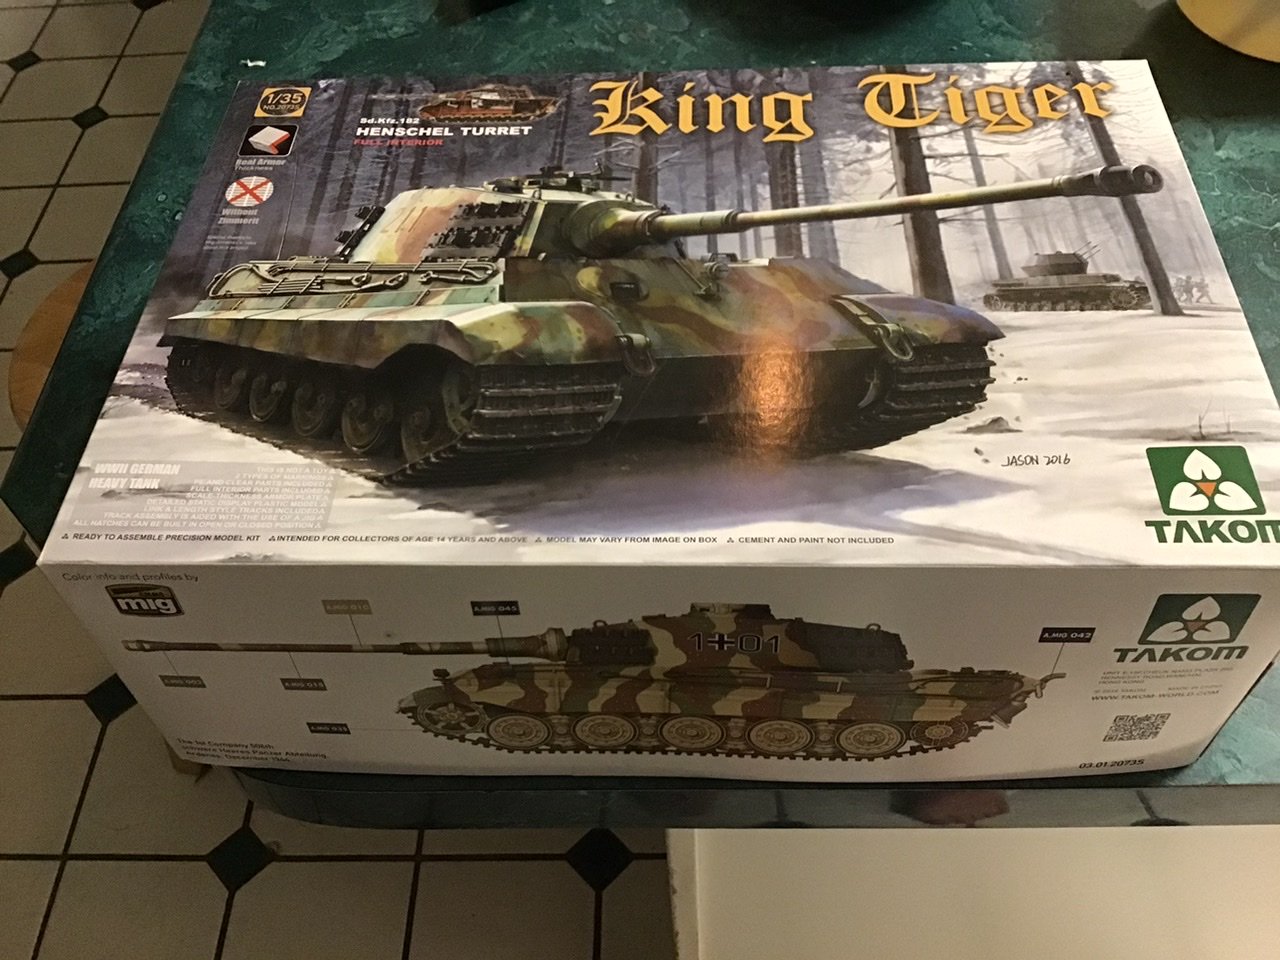
Mark, I really like the Vallejo paints - seem to shoot well and level nice with the Tamiya XF-20 thinner, wow I just looked at your initial pics of your kit, metal barrel, brass rounds lots of PE.... very nice kit! I have the Takom King Tiger and it’s molded nice and seems like a great kit but I’m not a fan of the way they did the rounds - molded in the stowage racks.... gonna be hard to paint.... still trying to decide how to depict the full interior... I’m getting excited, let’s see some more pics!! 😃 -
Hi Jason, just saw this post again.... they give you several options to show detail - the one that shows the most has the whole nose de- paneled but I plan on depicting it like JamesH (James Hatch) did for his magazine builds with the port side engine exposed and a couple on the port side off around the intake/radiator.... I know it won’t look as good as his but at least I can impose on him as a resource!😀 EDITIO EDITIO
-
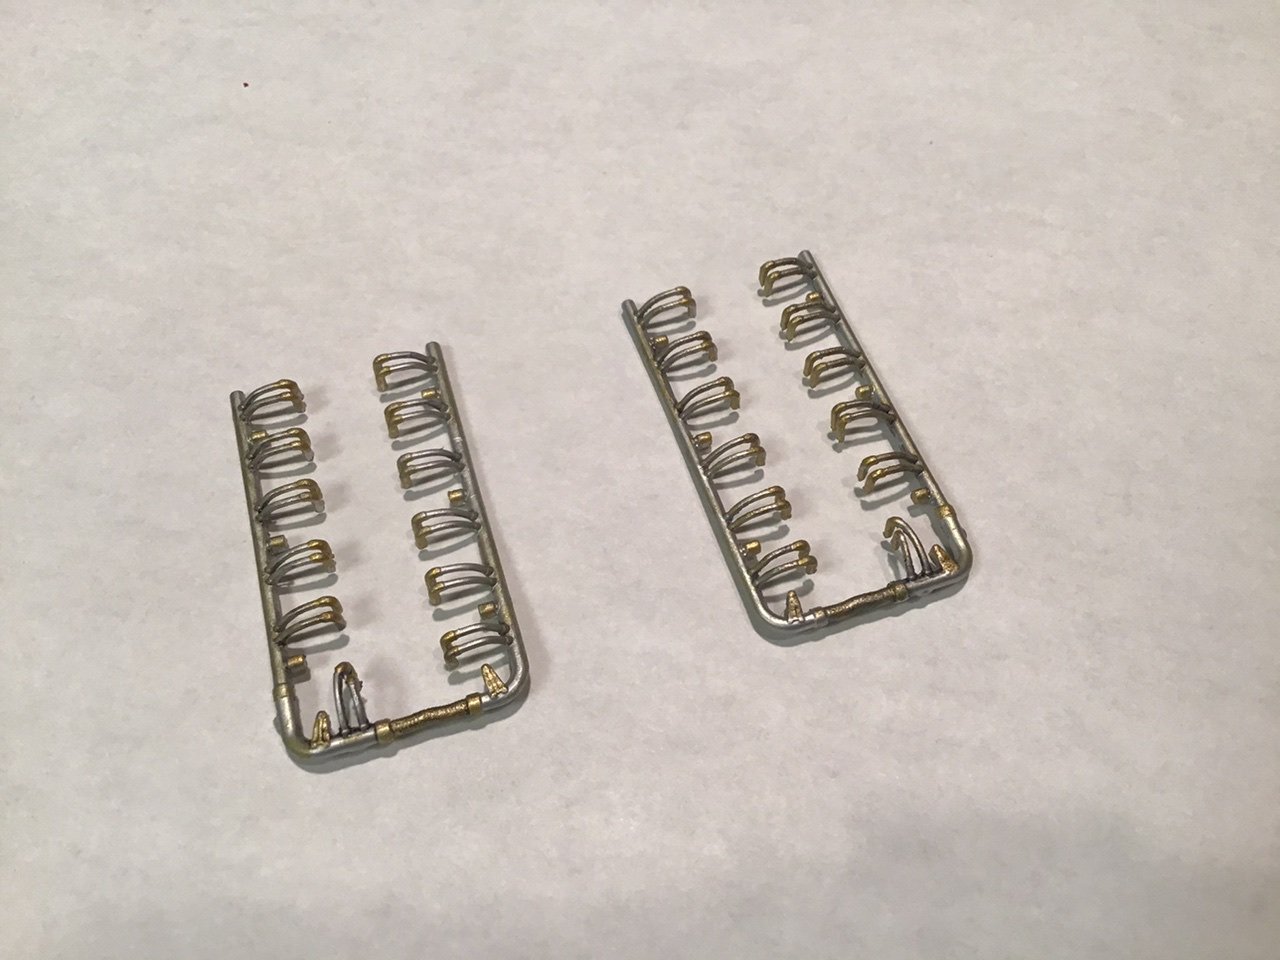
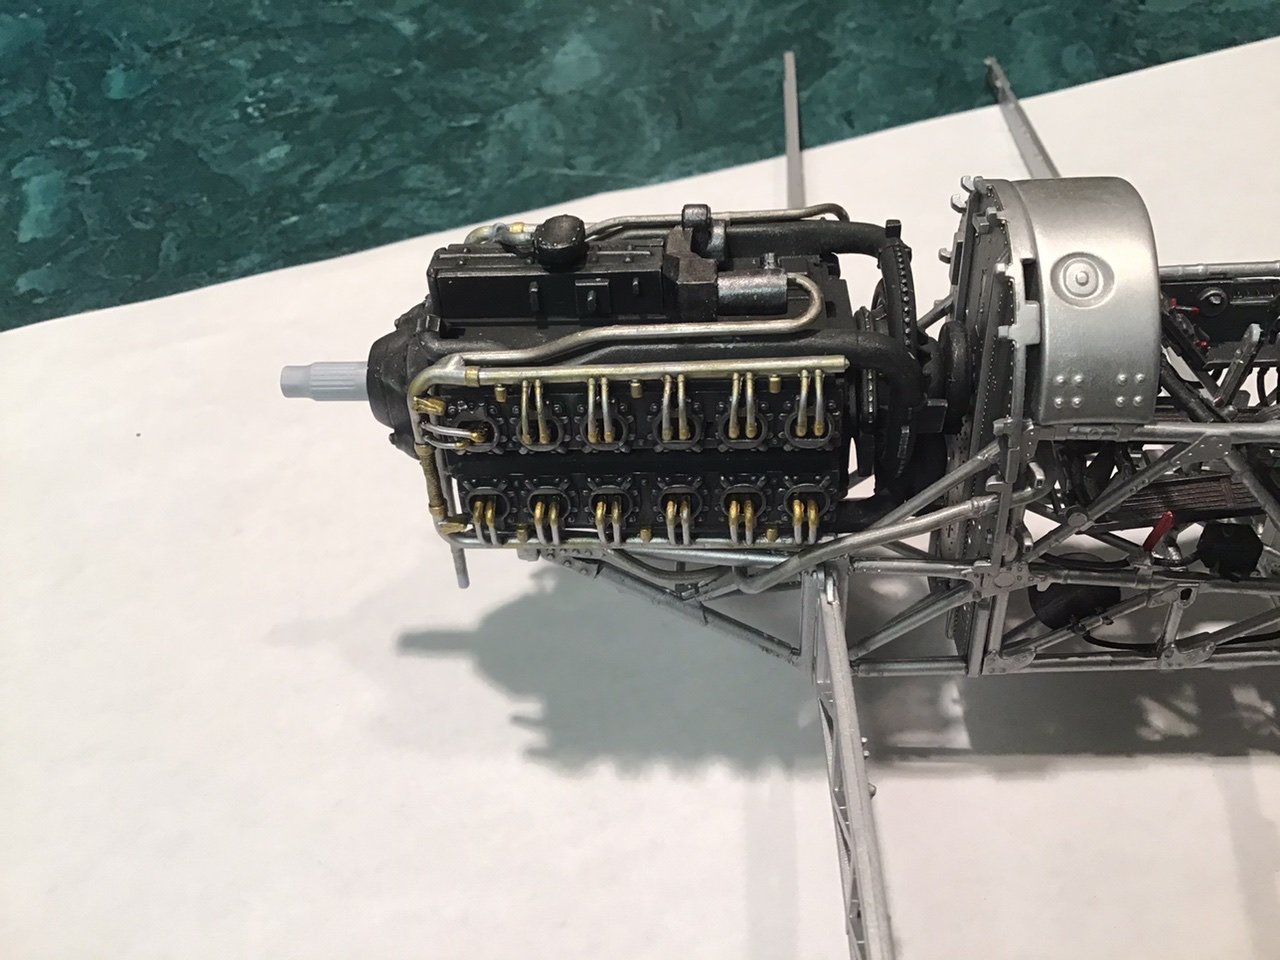
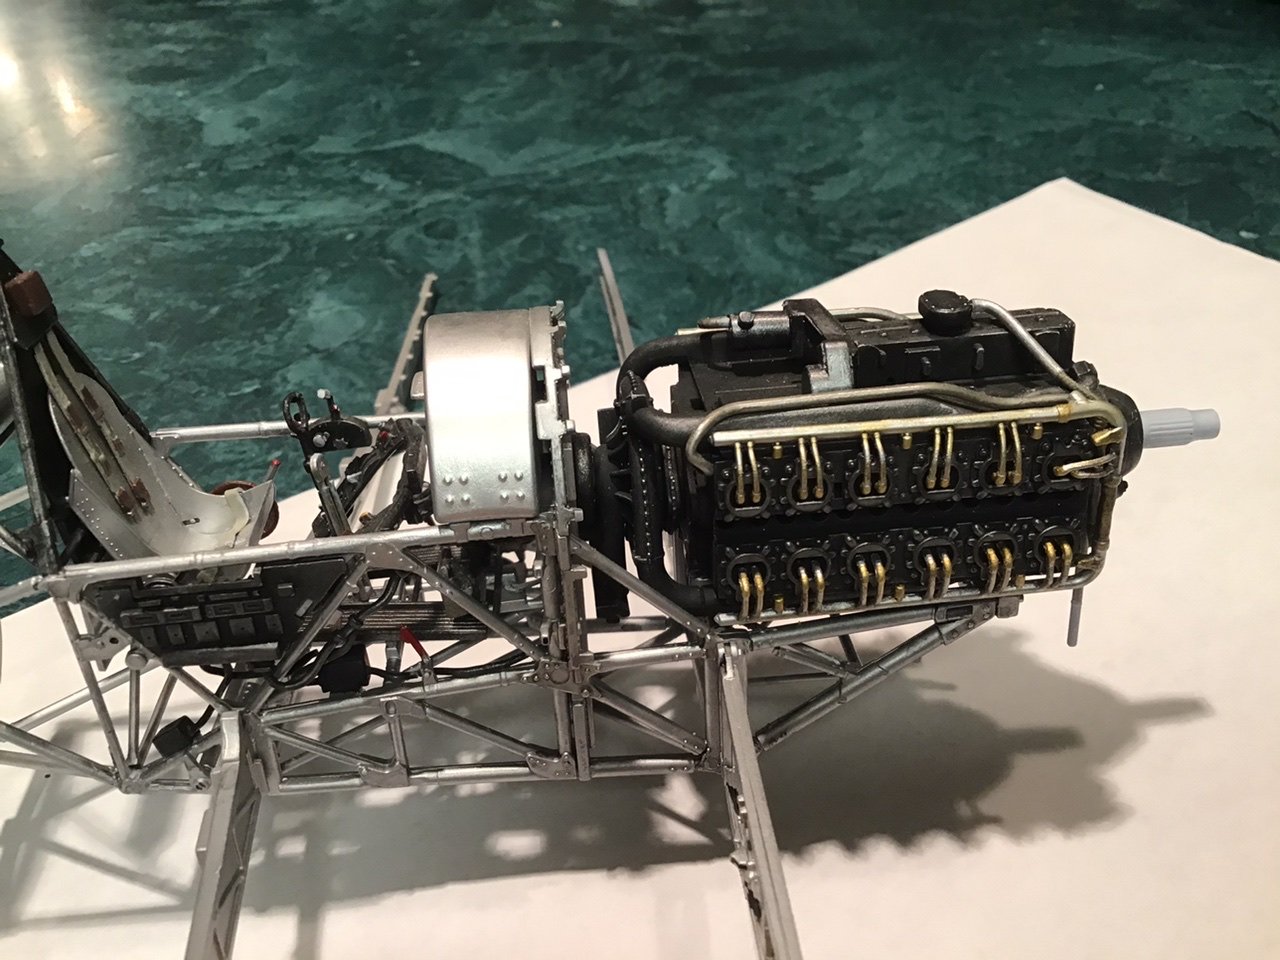
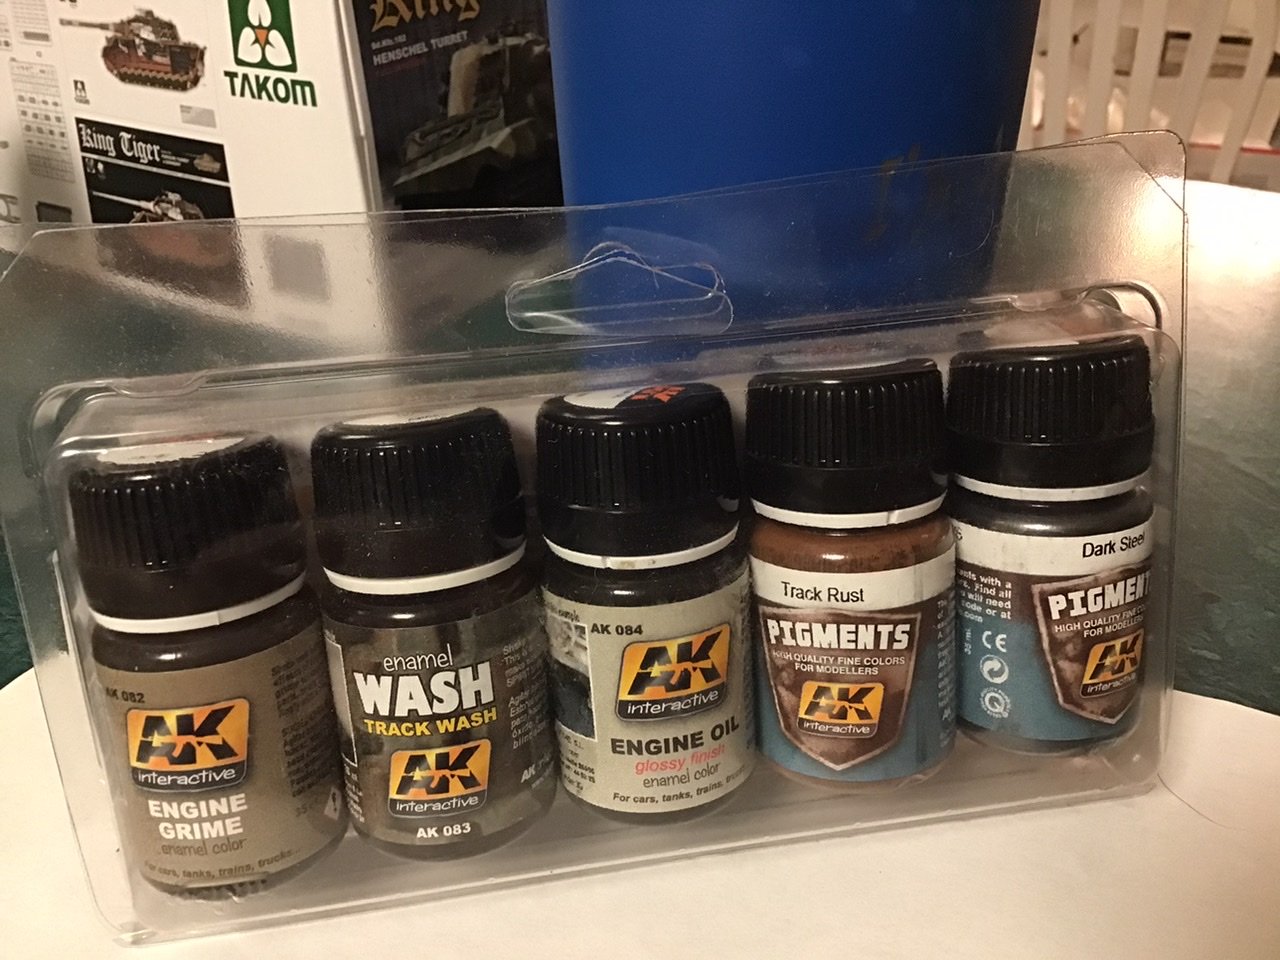
Did some more engine work, the ignition harness to be exact, there was a plethora of flash/mold lines - itty bitty little tiny lines that stuck out like a sore thumbnail? 😁Took quite a few hours to get them ready for paint, lots of fine work mostly with a #11 blade. Tried to emulate some of the Napier Sabre engine harness on google, seems like the main tubes are aluminum but have been heat soaked and discolored yellowish, the leads are kinda magnesium looking and the spark plug boots are brass. Washed it down with some engine weathering paints from AK interactive.... came out pretty good!
-
Tiger 1 by marktiedens - FINISHED - Dragon - 1/35 scale
ASAT replied to marktiedens's topic in Non-ship/categorised builds
I’m in! I’ve got a King Tiger waiting in the wings, or after the wings, so to speak.... -
North American P-51D Mustang by Asat - Airfix - 1/48
ASAT replied to ASAT's topic in Non-ship/categorised builds
I agree! The plastic is a bit soft but I like it, not a lot of work to smooth stuff out - but I have learned to let the glue dry completely before working on the panel lines involved... -
North American P-51D Mustang by Asat - Airfix - 1/48
ASAT replied to ASAT's topic in Non-ship/categorised builds
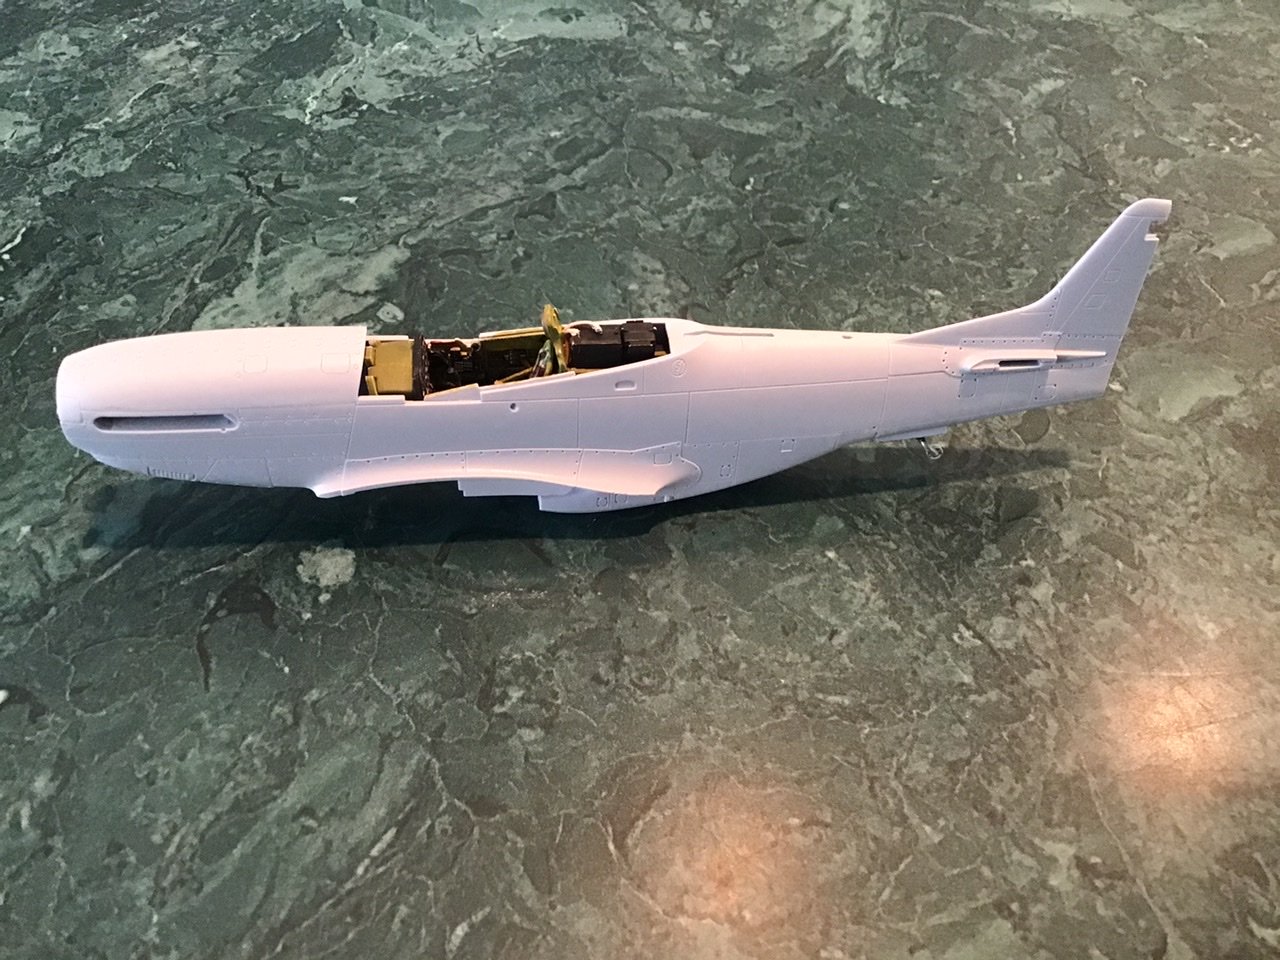
Ooops- forgot the bottom shot - maybe a touch of filler but pretty darn nice!.... the kit gets all the credit!!!
-
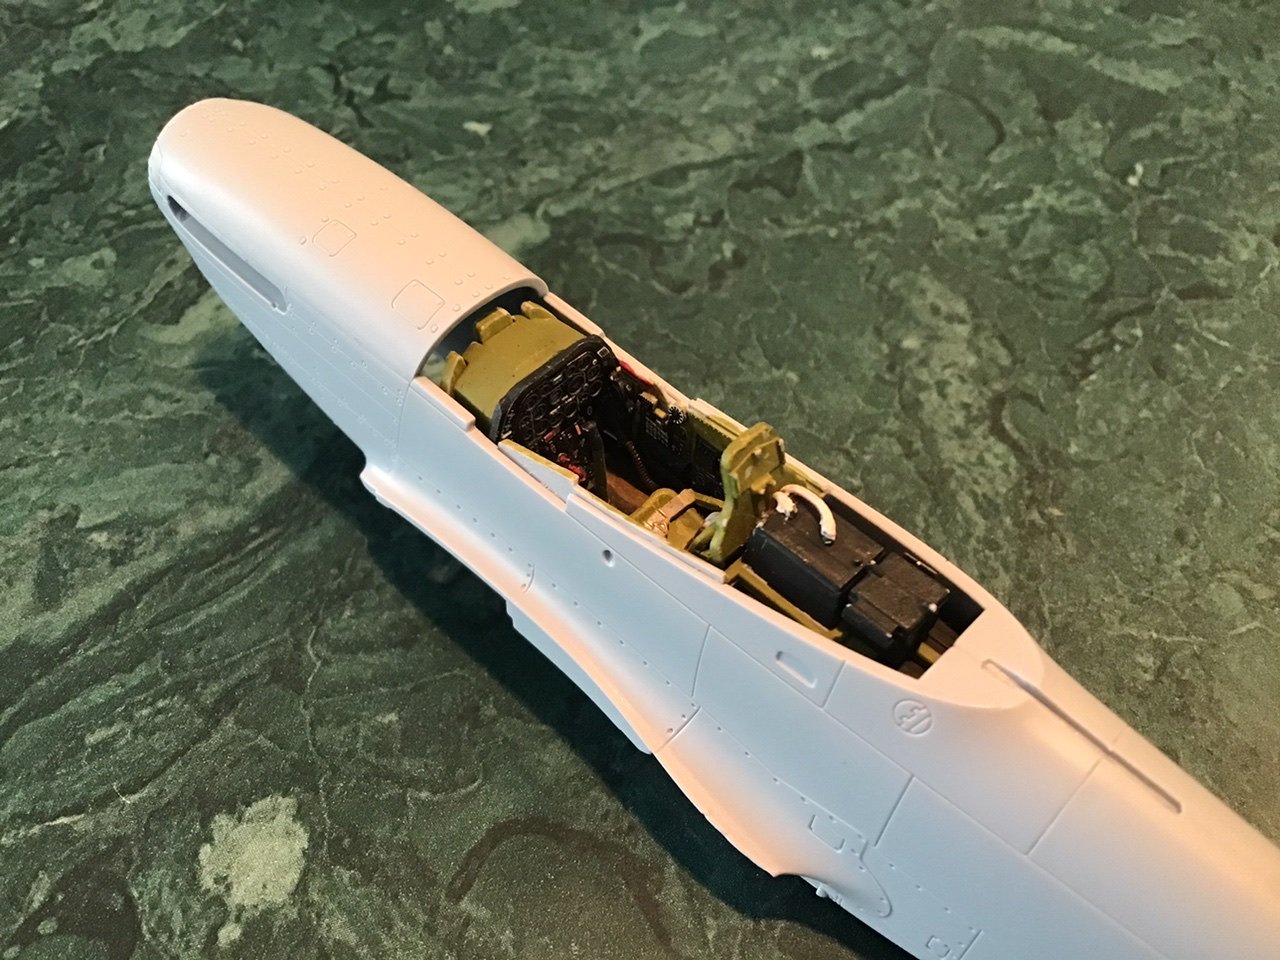
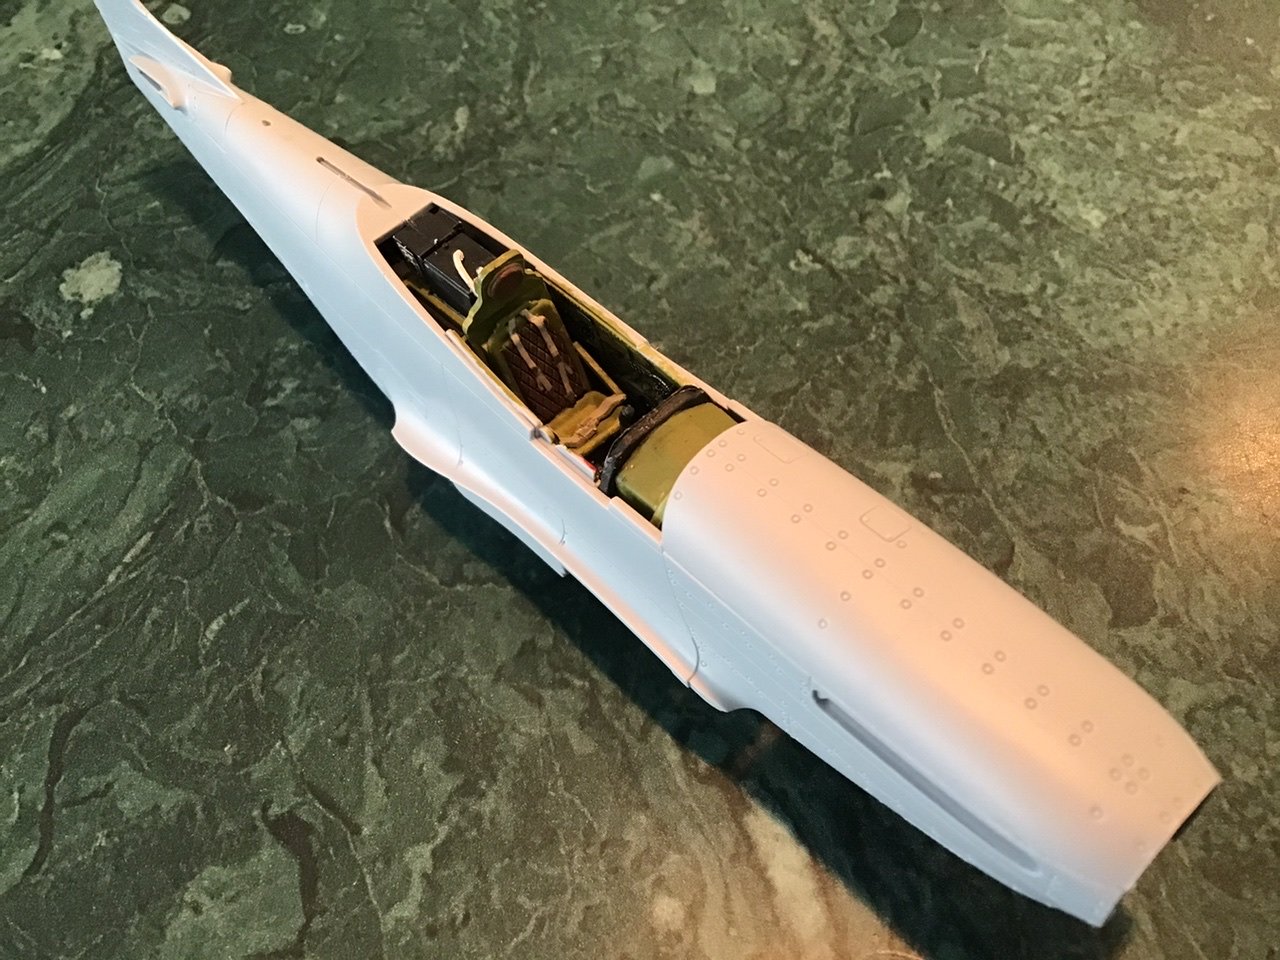
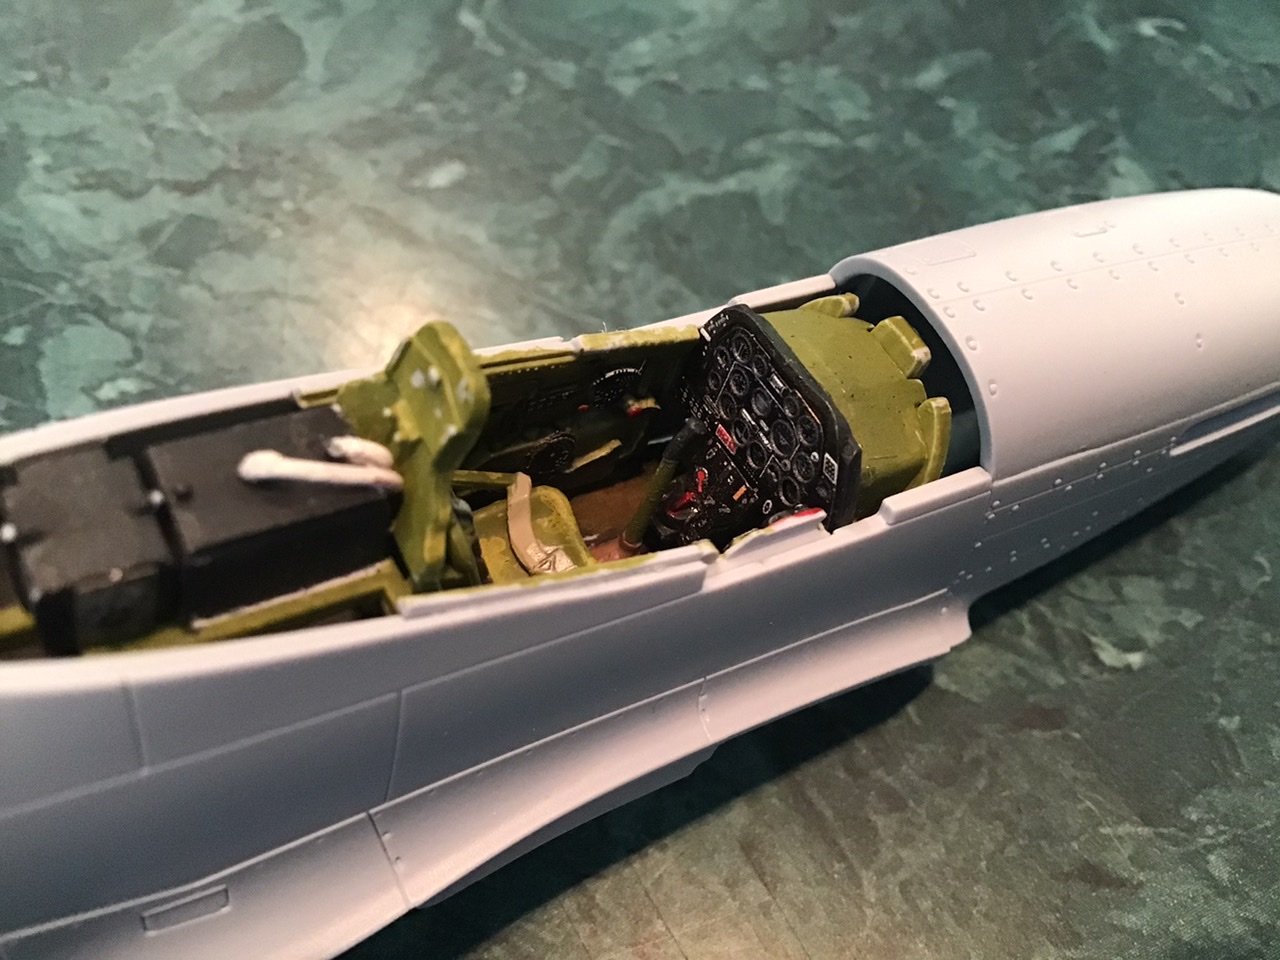
North American P-51D Mustang by Asat - Airfix - 1/48
ASAT replied to ASAT's topic in Non-ship/categorised builds
Thanks guys for all the tips, and the discussion... I think I’ll get the Tamiya pliers, and go from there, found a couple Tigers online too, haven’t pulled the trigger yet..... Worked on the Mustang though, got the cockpit installed and joined the fuse..... Man! A lot like the P-40 - this kit goes together nice, gotta primer it but I’m thinking it may not need any filler....!!