HOLIDAY DONATION DRIVE - SUPPORT MSW - DO YOUR PART TO KEEP THIS GREAT FORUM GOING! (Only 13 donations so far - C'mon guys!)
×


keelhauled
-
Posts
788 -
Joined
-
Last visited
Content Type
Profiles
Forums
Gallery
Events
Everything posted by keelhauled
-
 I LOVE Those lights!!!!!!! very nice work. I'm so happy that you fixed the issue. The lights really push the effect over the top! Best marc
 -
Cutty Sark by NenadM
keelhauled replied to NenadM's topic in - Build logs for subjects built 1851 - 1900
Congratulations!!! The joys of life!!! Always cherish your time together. The cutty will always wait!😊 Best Marc- 4,152 replies
-
- 5
-

-
- cutty sark
- tehnodidakta
- (and 1 more)
-
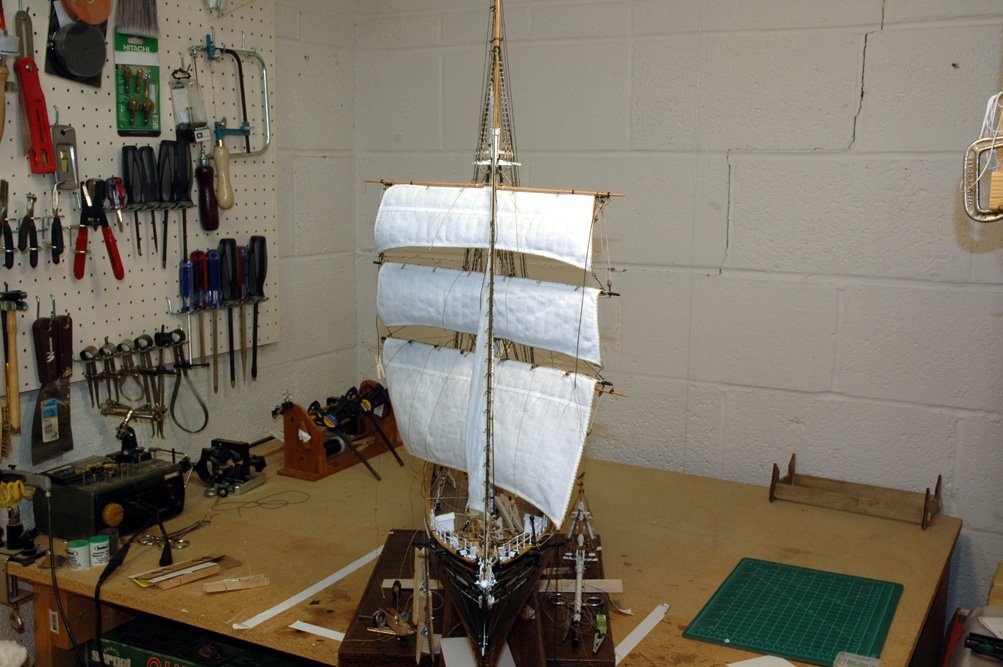
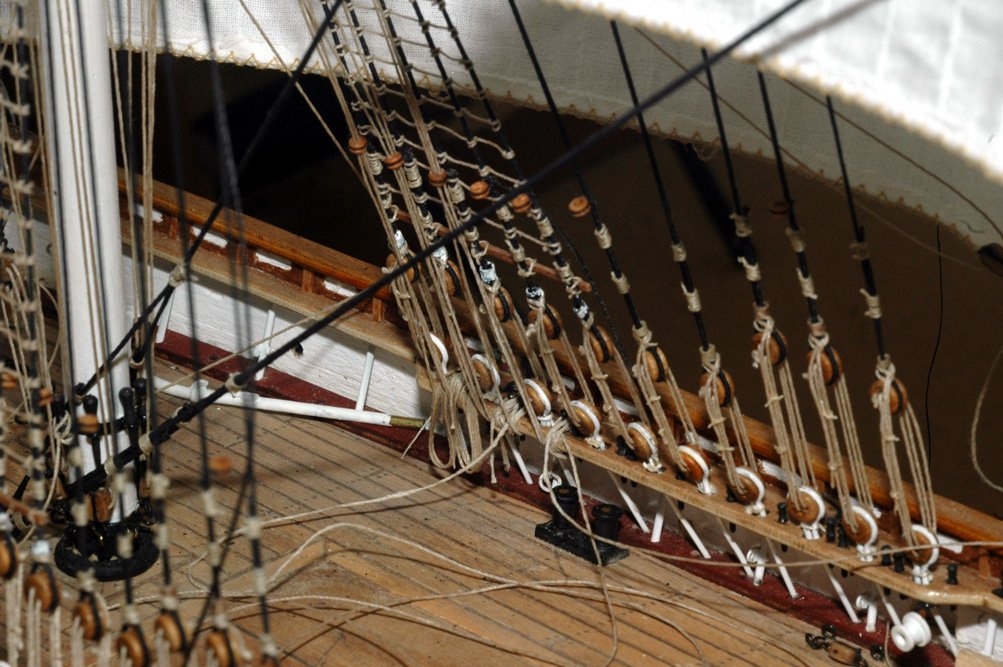
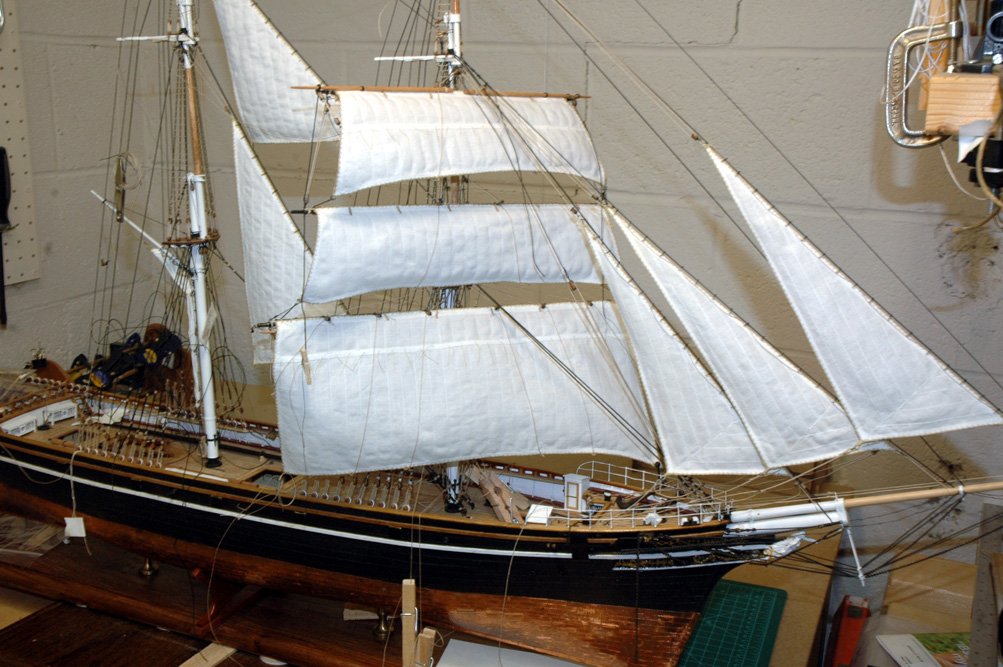
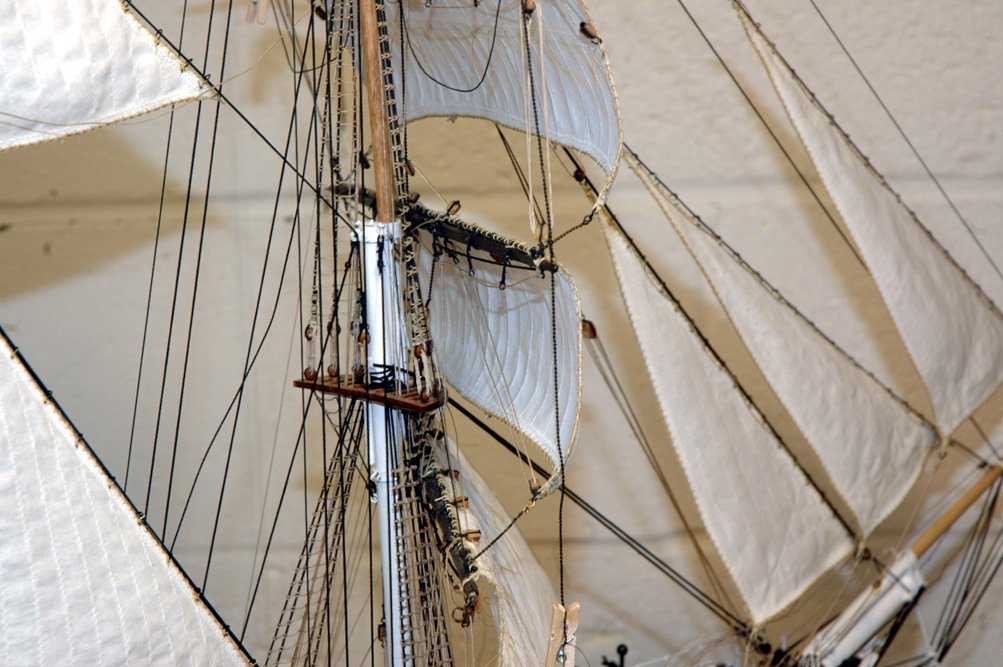
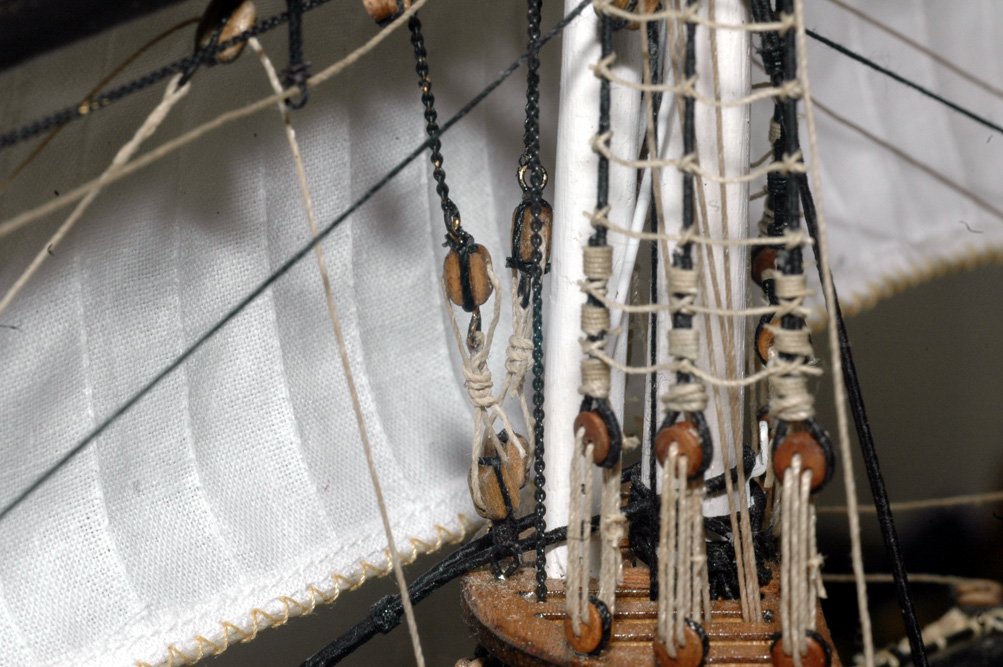
Hi everyone, I've been working on attaching the upper and lower topsails/yards to the mast and rigging their running lines. For each sail, It took me about 20 hours to attach the lines lift the yard and rig the lines. (combination of slowness and rerunning lines to ensure free running). After rigging the upper topsail it occurred to me that the sheets need to be shortened. Stupid oversight that the sheets are fixed and thus the tightness/looseness of the sheets is a result of the height of the yard. I fixed the issue but don't have photos yet. Here is a view from the front. Also you can see that the masts are perfectly aligned vertically. upper topsail sheets. These are fixed at the top. they don't look as good as this magnification, but it was the best I could do especially with the sails rigged as they are. A shot of the saddle truss and iron saddle strap. Of course my version of the iron saddle strap is made from copper, but once it is painted it will look fine. The truss isn't perfect, but considering they will be hard to view with all of the lines running along and behind the mast. I made the saddle strap so that the yard can be placed into position on the mast and the saddle strap will "lock" into the saddle truss and then can be glued to permanently secure the two parts together. Fairleads are starting to fill up. Rigging the lines to the pins is a real pain with the course set and braced over as far as it it. Close hauled is a pain. thanks for looking ! Marc
strap.jpg.cc0ac5ac52633b4da6357af55b71ac42.jpg)
- 525 replies
-
- 9
-
-
- cutty sark
- mantua
- (and 2 more)
-
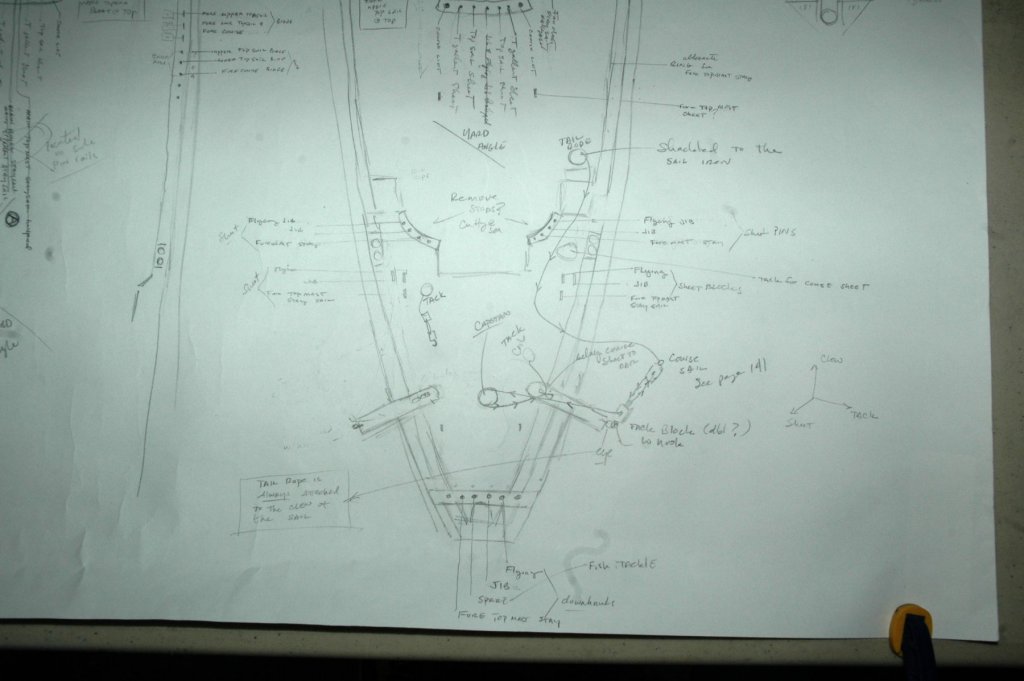
Hi, I just came back across this topic. I know my post isn't timely for this discussion, but maybe it can help someone with the same questions. In the past year I've come across the subject of tacks, sheets, tail ropes as they are used on courses in reading the fictional Aubrey novels, Longridge's Cutty Sark book (page 141) as well as others. I would just point out that I've come across references where the tacks, and sheets were detached and reattached to the courses during tacking. They run the tack line and sheet as required for that ships tack and wind to stay out of the way of the sailors going up the rigging and interfering with other lines. Also Longridge states that the sheets and tacks would usually not be attached to that same (port, starboard)clew iron at the same time with the course set. Might not apply to the Victory, but if so, maybe it throws more insight into the inconsistencies as to how they are being run through the rigging. just a thought. Marc
-
Hi Lou, thank you for helping us to understand Campbell's plans and the background. Much appreciated! Best Marc
- 525 replies
-
- 2
-
-
- cutty sark
- mantua
- (and 2 more)
-
Hi Mojofilter, If I can help fill in info on the Campbell plans that are broken, missing on your set, let me know. If had a couple of folks ask me "what does it say here" or "what size blocks are identified there", etc. Happy to help. Best Marc
- 525 replies
-
- 1
-
-
- cutty sark
- mantua
- (and 2 more)
-
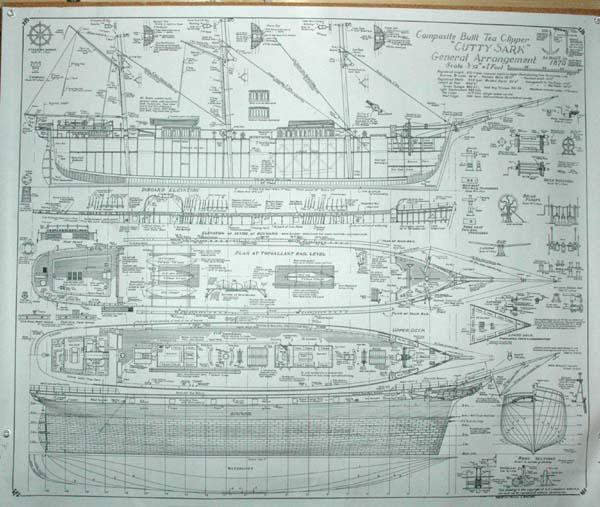
Hi Harry, G.F Campbell created a set of three plans which have been available through the Cutty Sark's gift shop for at least the past 28 years. When I bought mine, they offered to stamp the plans with the ships original seal. Campbell was a navel architect that as I understand it was commissioned to draw plans during the 1st half of the 20th century. Campbell also wrote a couple books on clippers. Lou, if you are following, perhaps you can give us some info. as this is a shot from my set of plans. The plans are available from the website below. The sail and rigging images are from the Cutty's shop website (link below) I've purchased two sets of plans over the years, one set in 1990 another in 2003. The quality of the 2003 set was much lower than the 1990 set, which was very crisp and clear. The 2003 set looked like copies of copies. I recently was at the Cutty back in June and looked at the set for sale (which at that time only 2 out of the 3 plans were available). The quality of the 2017 set was significantly better than the 2003 set. They can be purchased in person at the ship's shop or online at https://shop.rmg.co.uk/collections/prints The sail and rigging plans are 5 pounds and the general plan is 8 pounds I don't know if these plans are the same as the Cutty Sark preservation Society plans. From best I can find the Cutty Sark Presevation Society became the Cutty Sark Trust both under Prince Phillip. I have a couple of reports that the Trust put out concerning the plans for restoration. Sometime between the restoration work starting on the Cutty and now, the Trust website redirected to the Royal Museums Greenwich site. I'm sure someone can tell us what happened. Maybe the Trust became a part of the RMG? Any way, I've tried to search for plans from the Cutty Sark preservation society using google, without success. So I can't answer your question about whether they are the same plans. Longridge's plans are as they were when he visited the ship as she was being used as a cadet training ship. She still retained major changes to the ship including a different fore castle and monkey poop/liverpool house with an aft entry and a completely different forward entry (both are retained to this day). Campbell's plans are supposed to be "as built" but we know that isn't true, because it includes the crew deckhouse. However, they are the best plans I've seen. Don't know if this helps, but at least you can see the thumbnail images of the plans of Campbell's plans for comparision. thanks Marc
- 525 replies
-
- 3
-
-
- cutty sark
- mantua
- (and 2 more)
-
Hi Harry, I'm excited to see some night shots of the LEDs Also looking forward to watch the woodworking! best Marc
-
Cutty Sark by NenadM
keelhauled replied to NenadM's topic in - Build logs for subjects built 1851 - 1900
very cool Nenad ! What was your inspiration? To me, it looks like something Duke Leto II should be using on Arrakis to get around the planet ☺️- 4,152 replies
-
- 4
-
-
- cutty sark
- tehnodidakta
- (and 1 more)
-
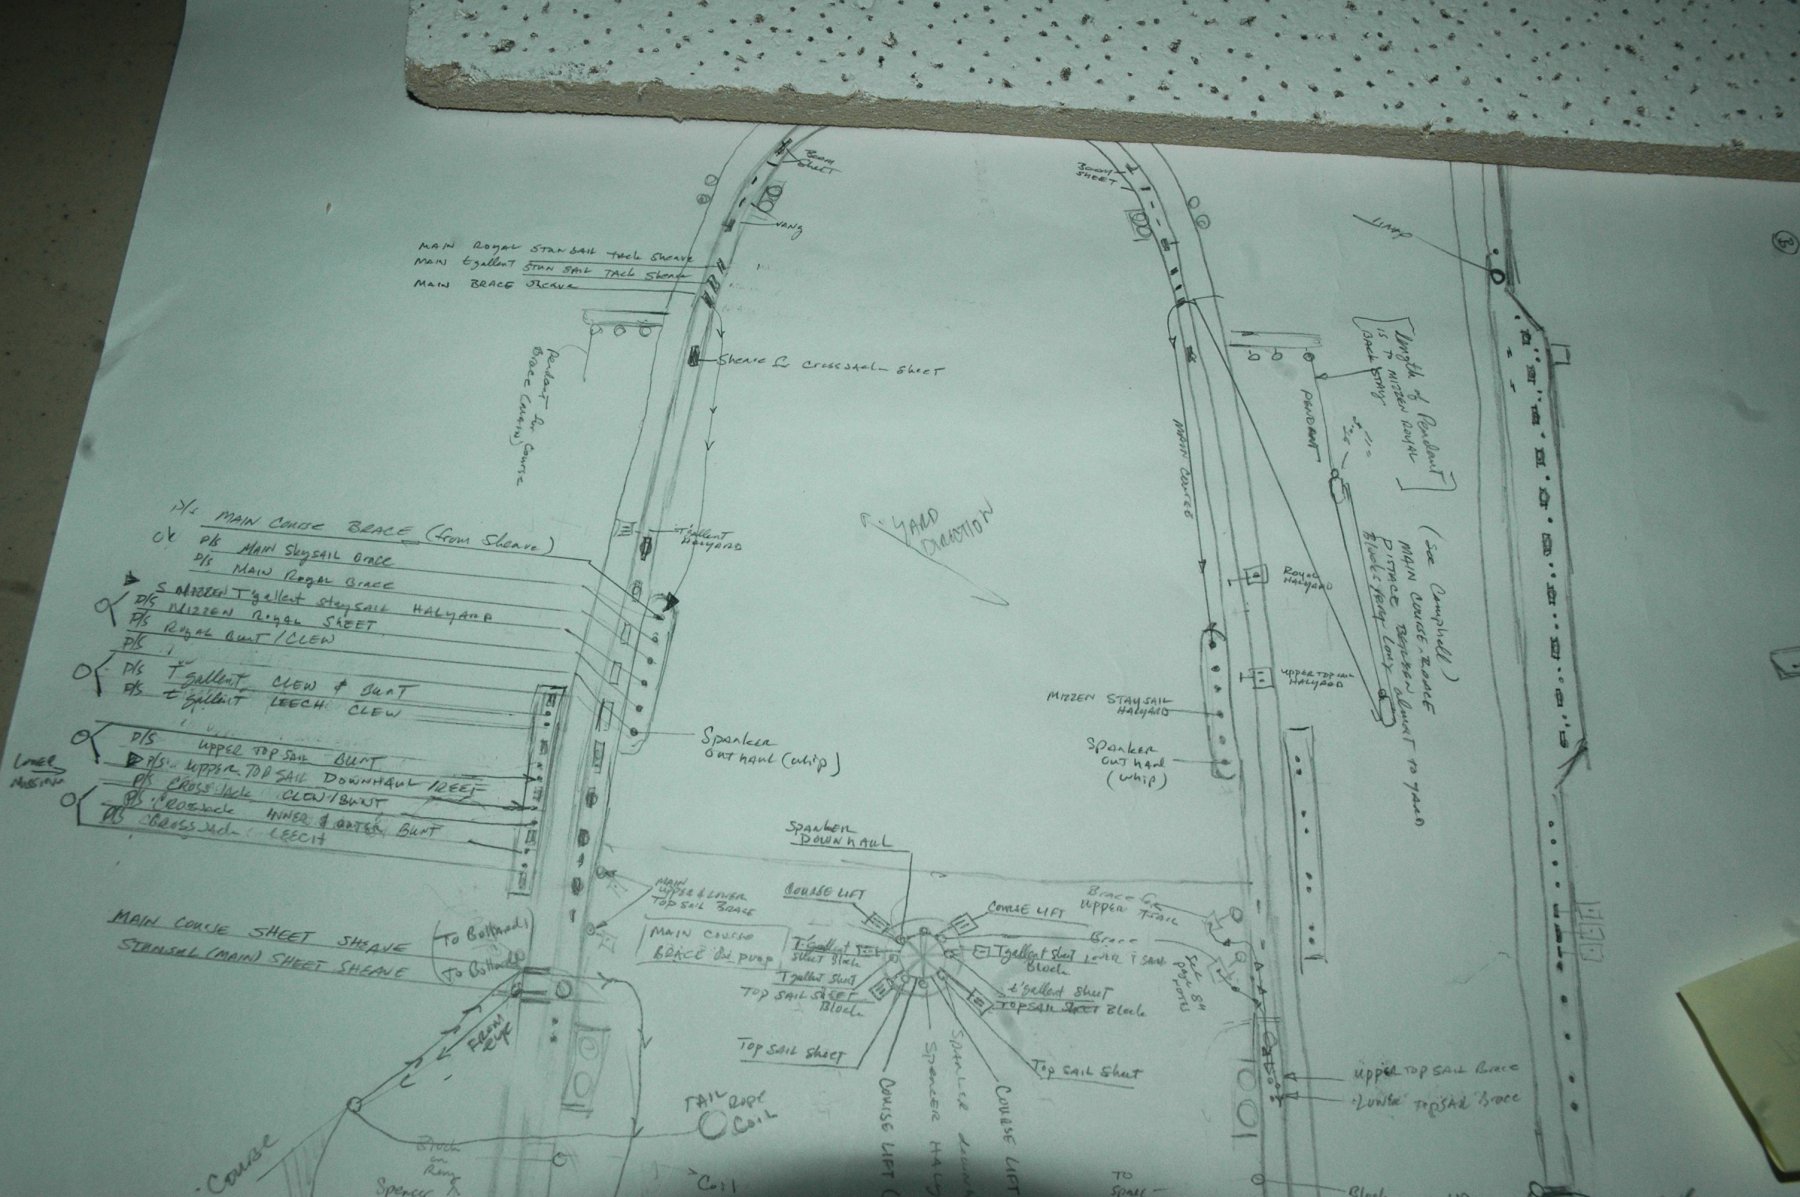
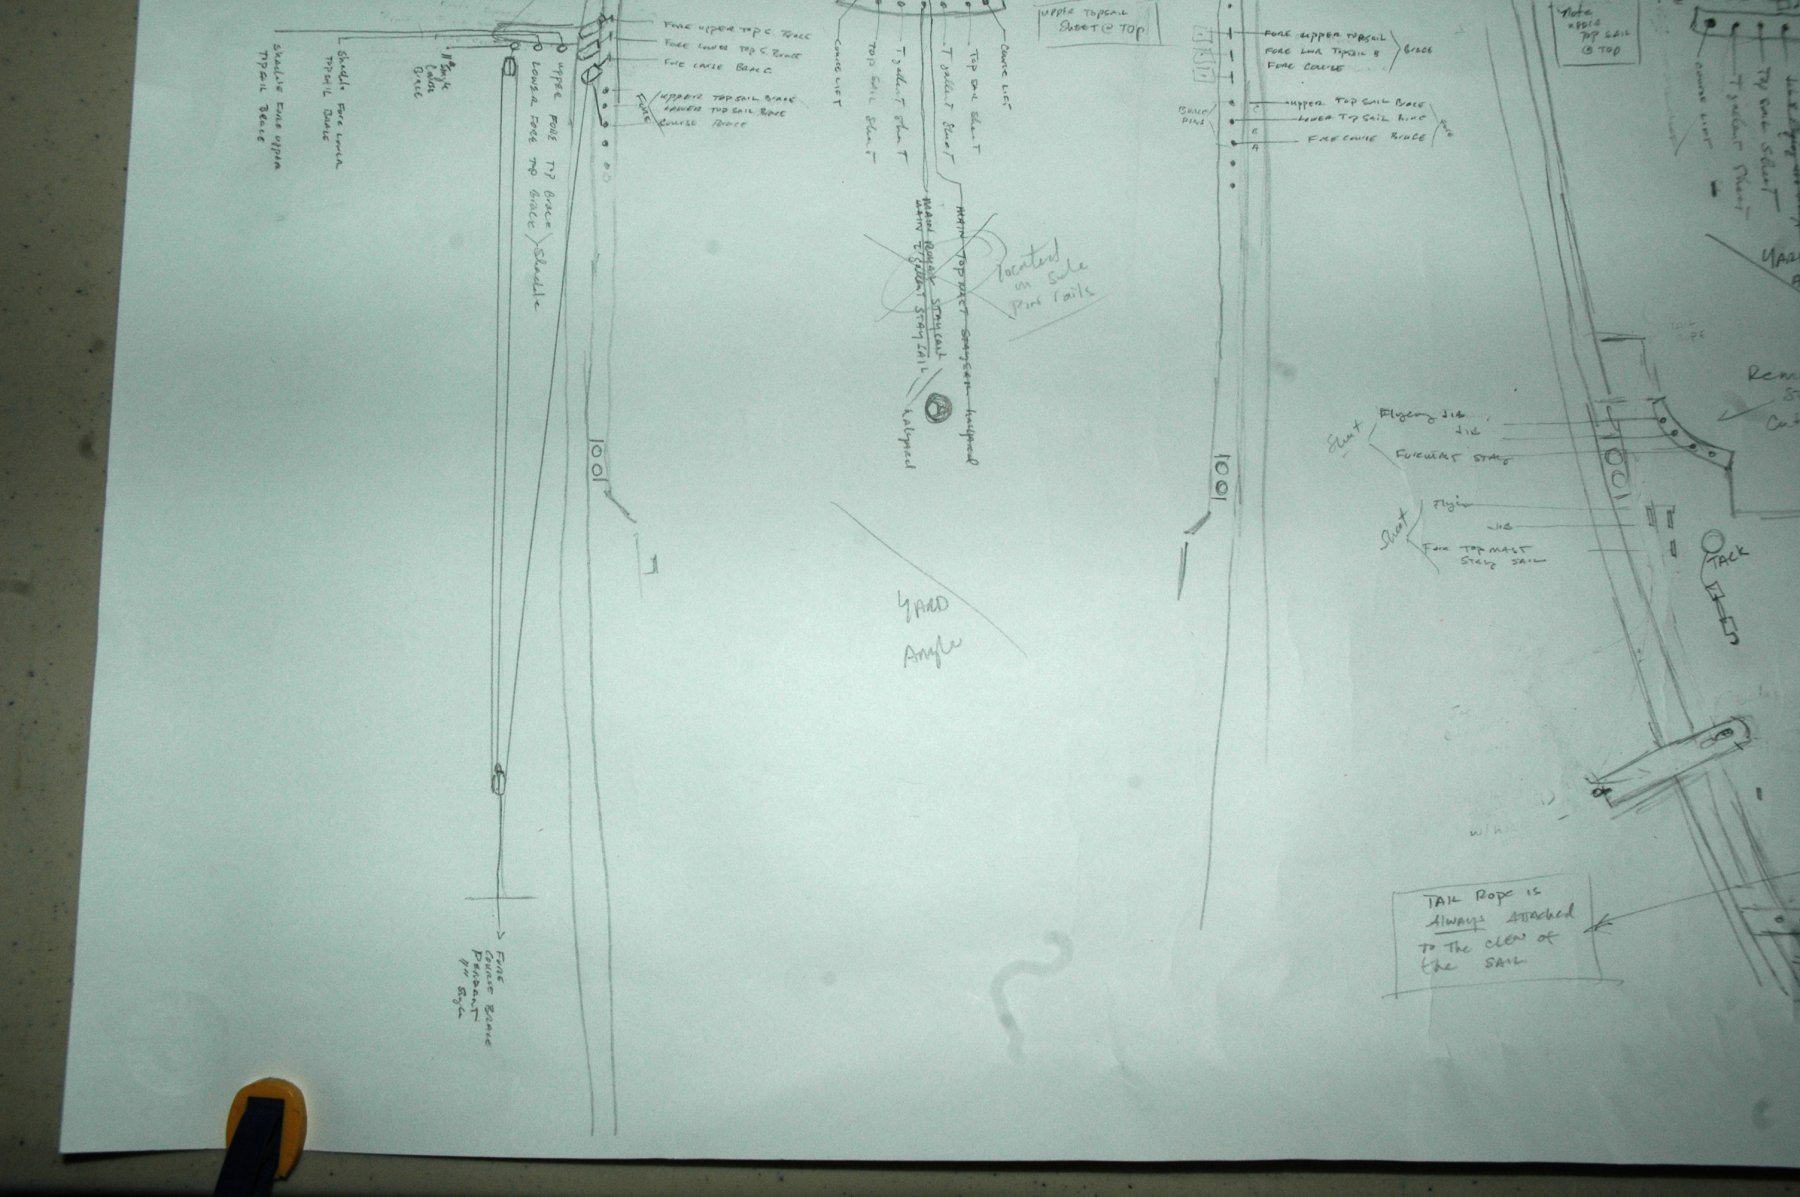
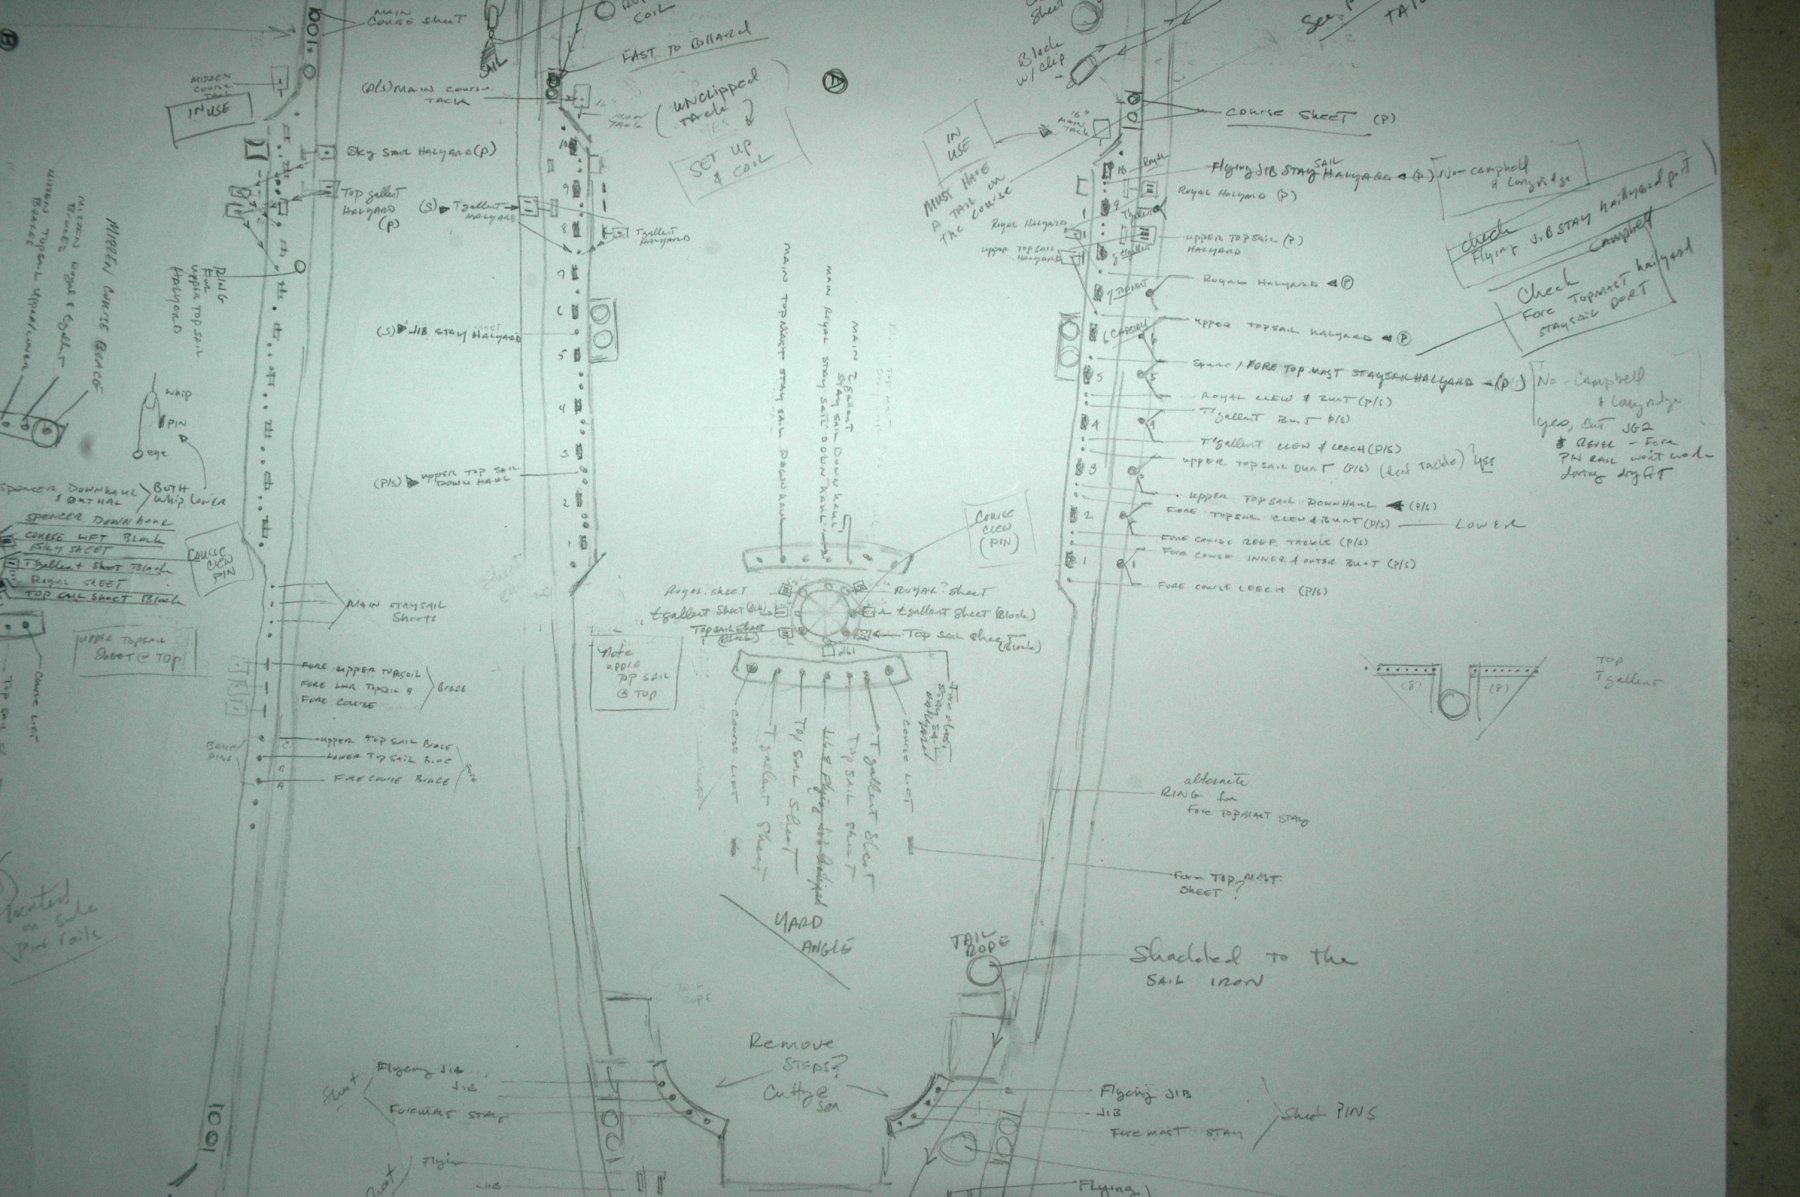
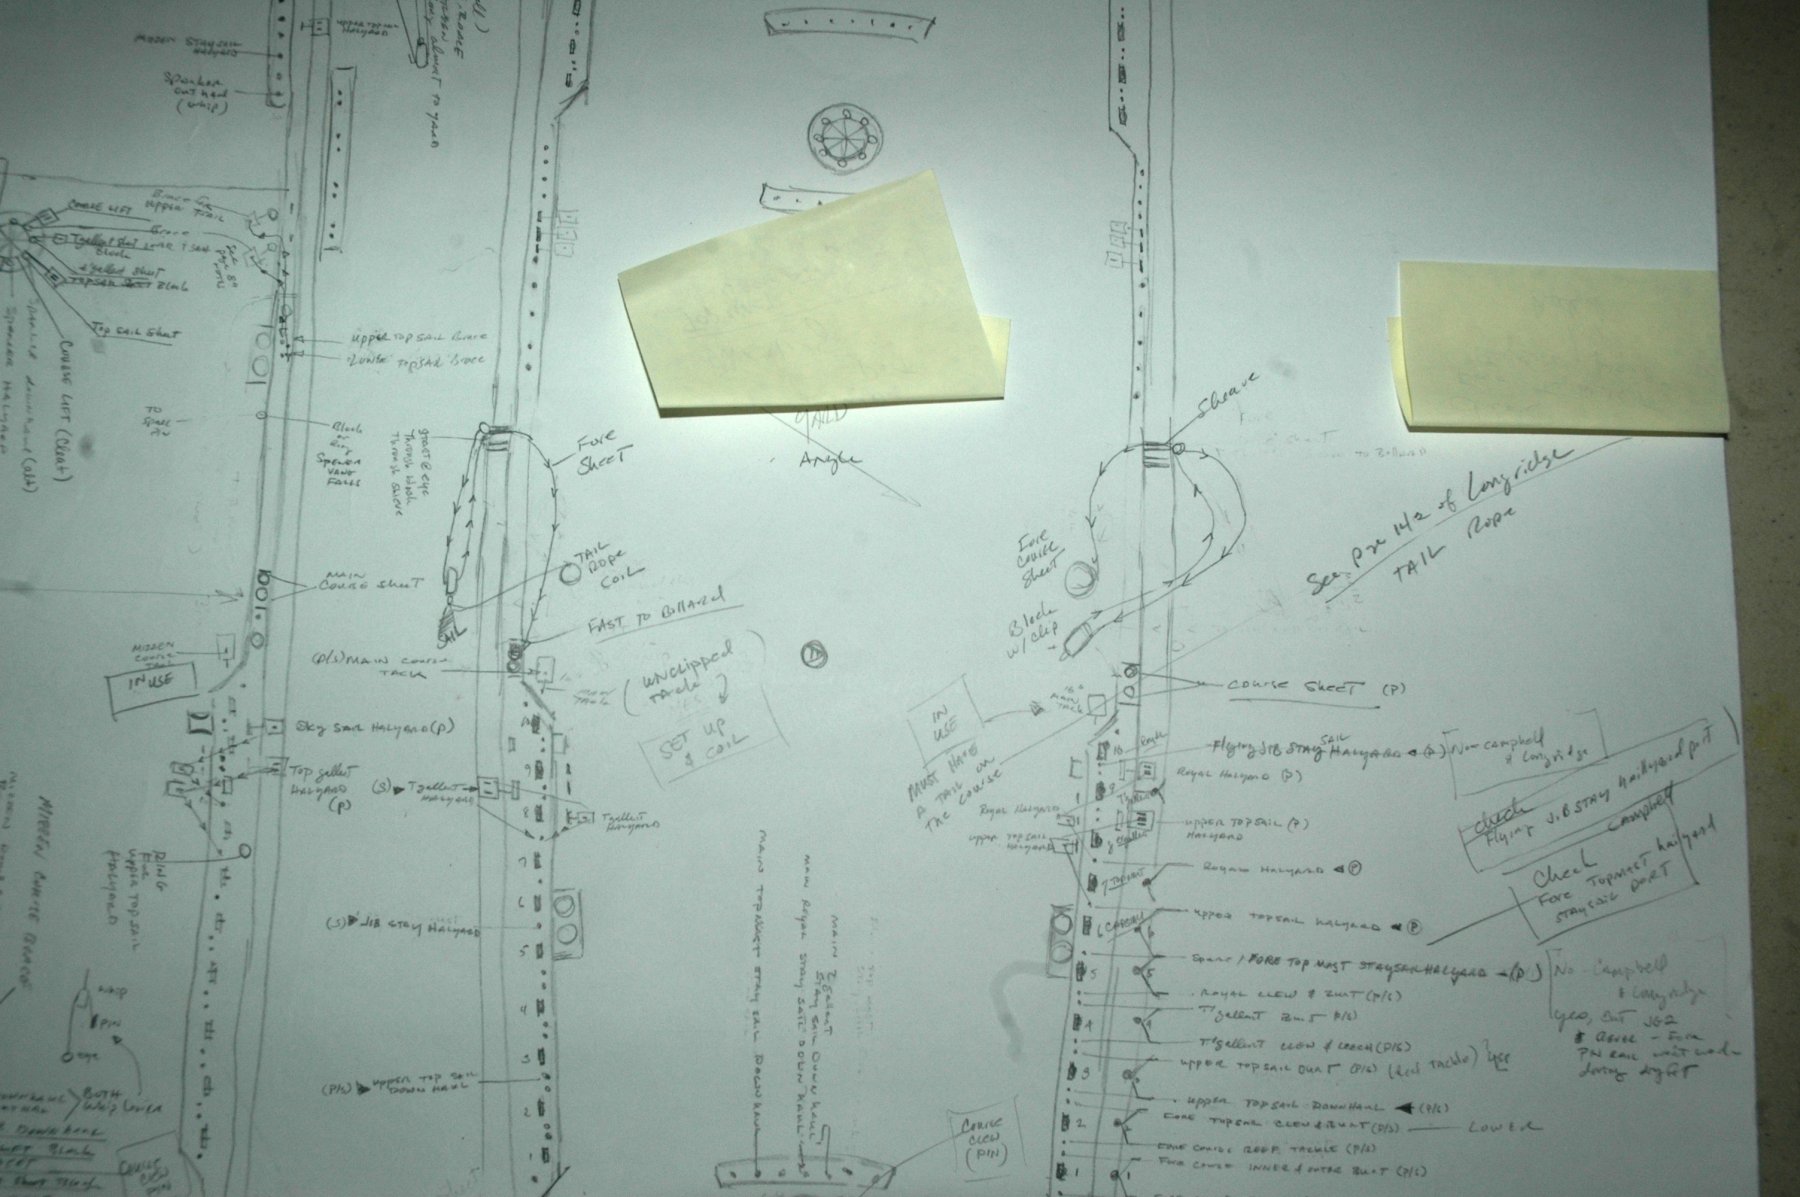
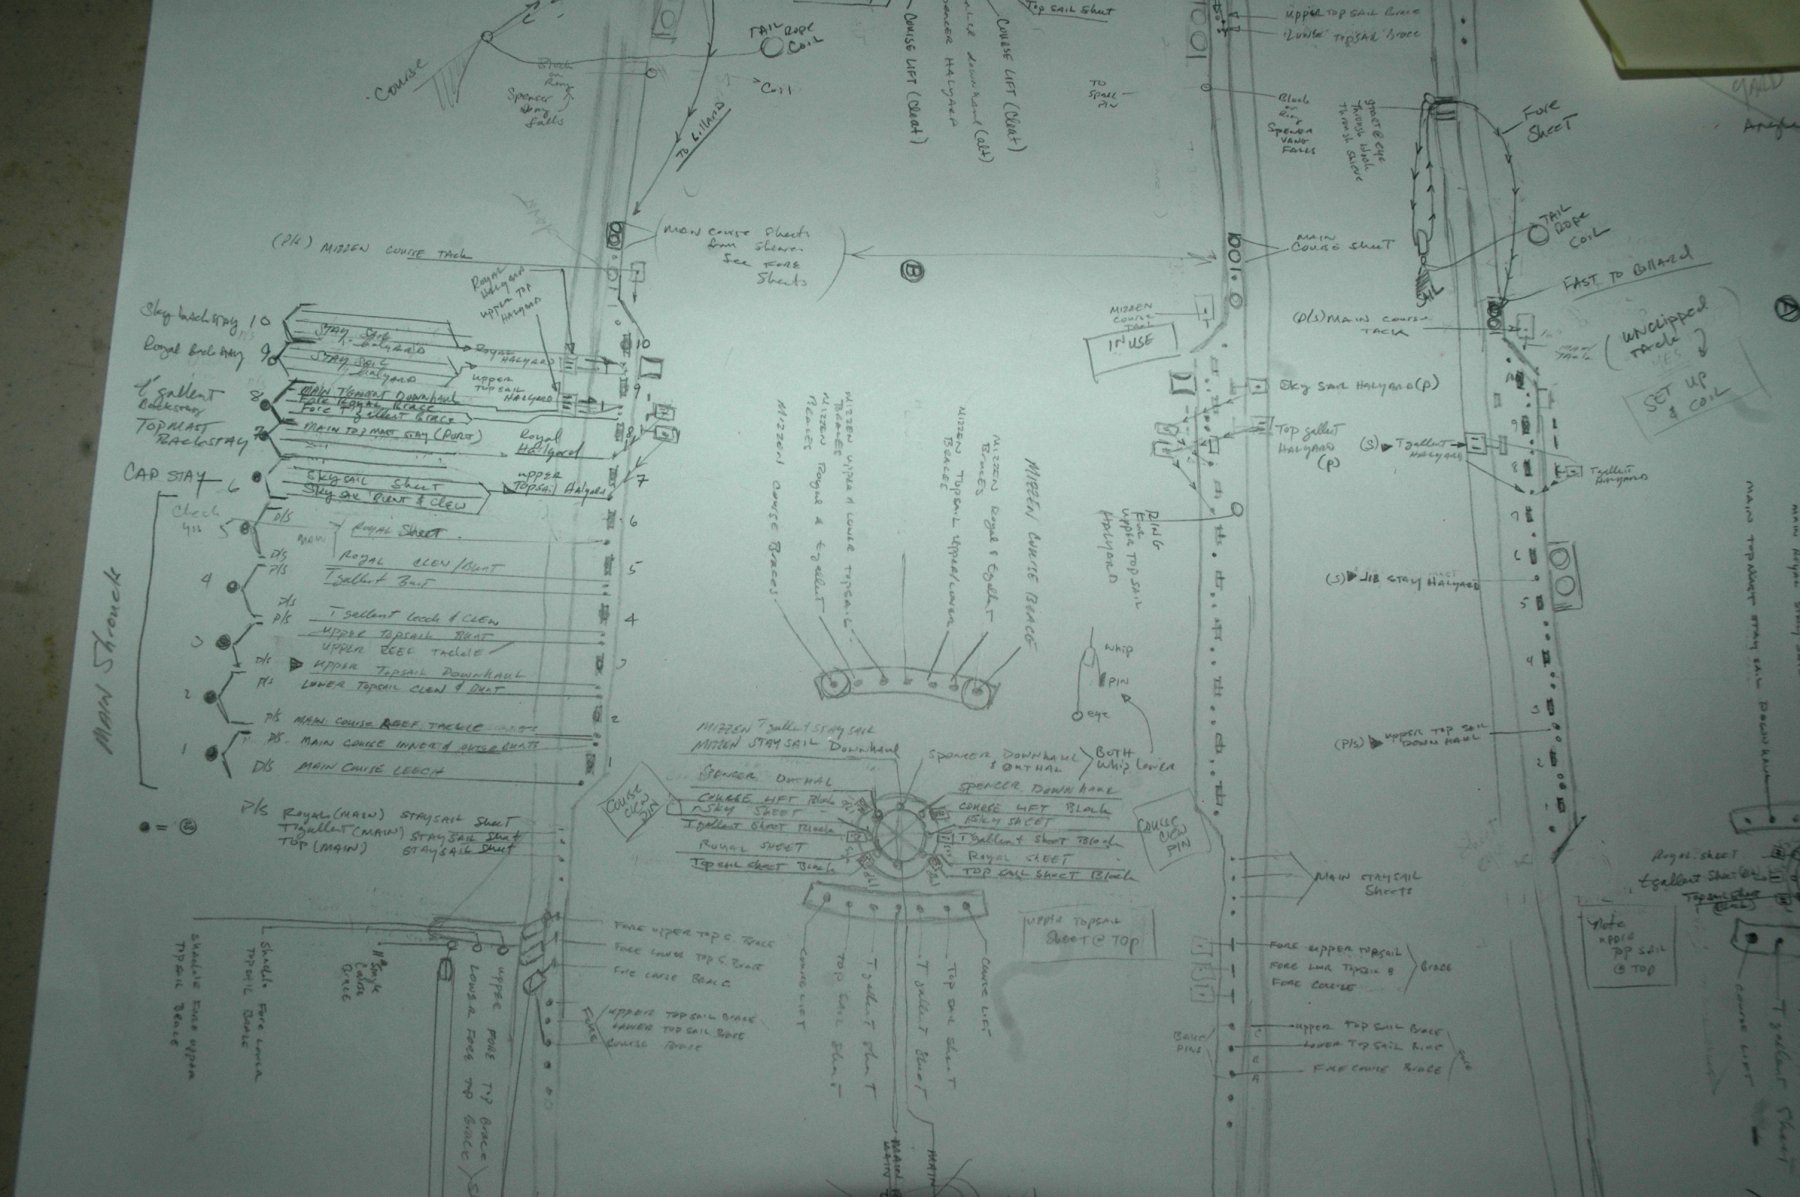
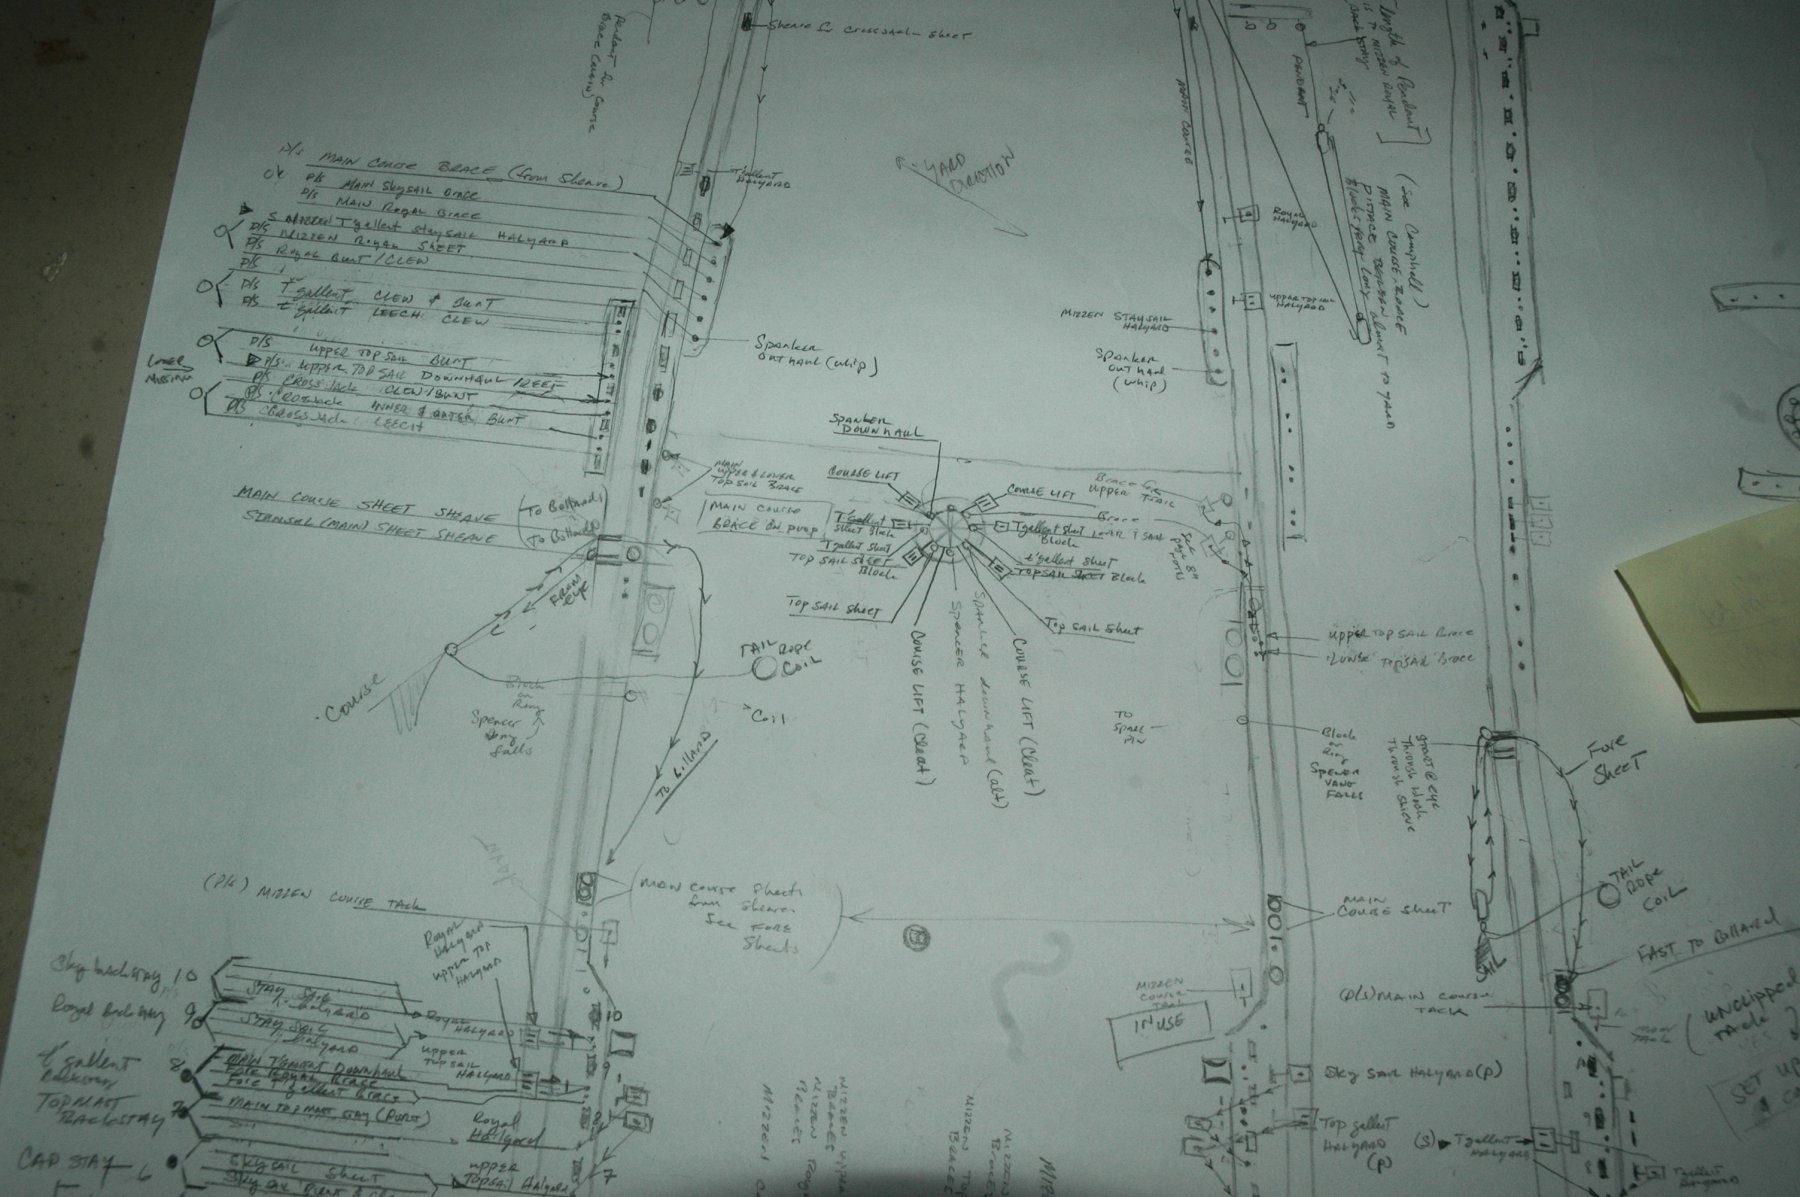
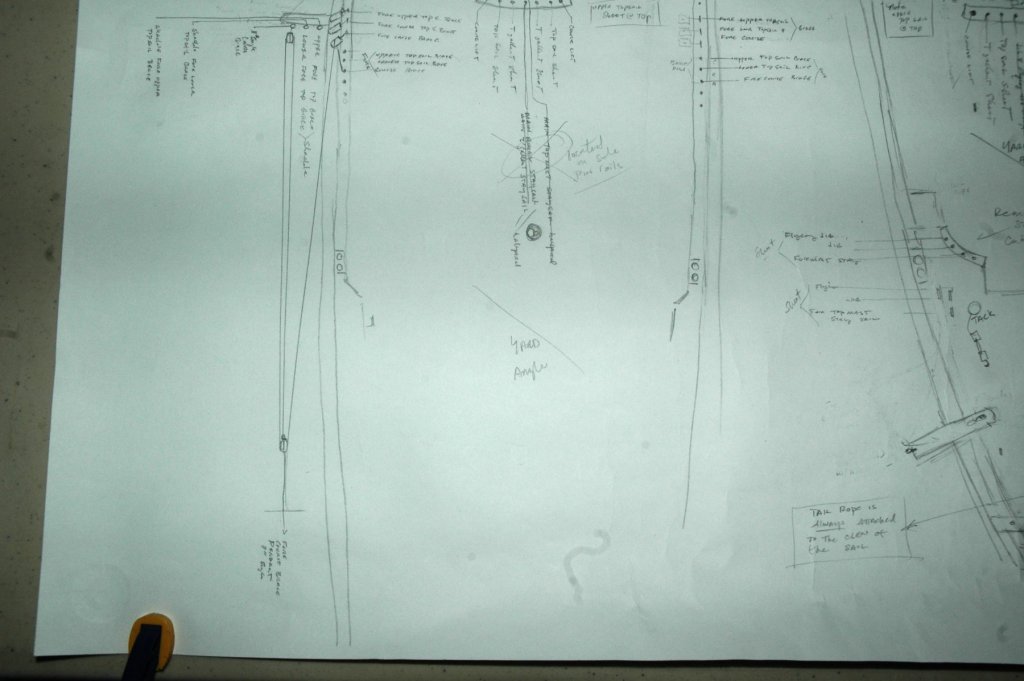
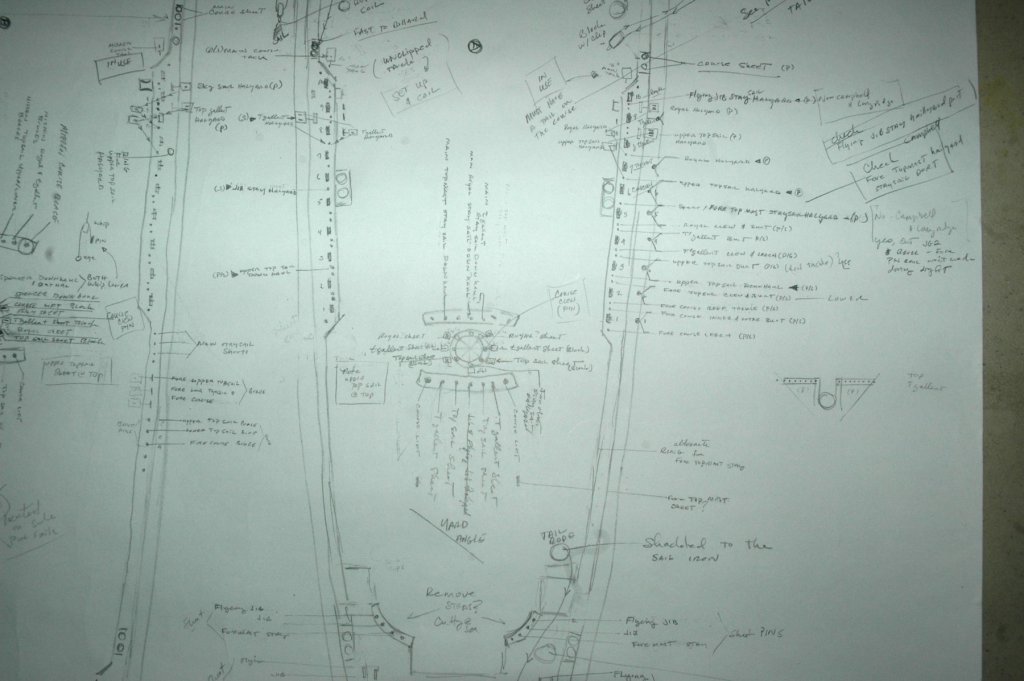
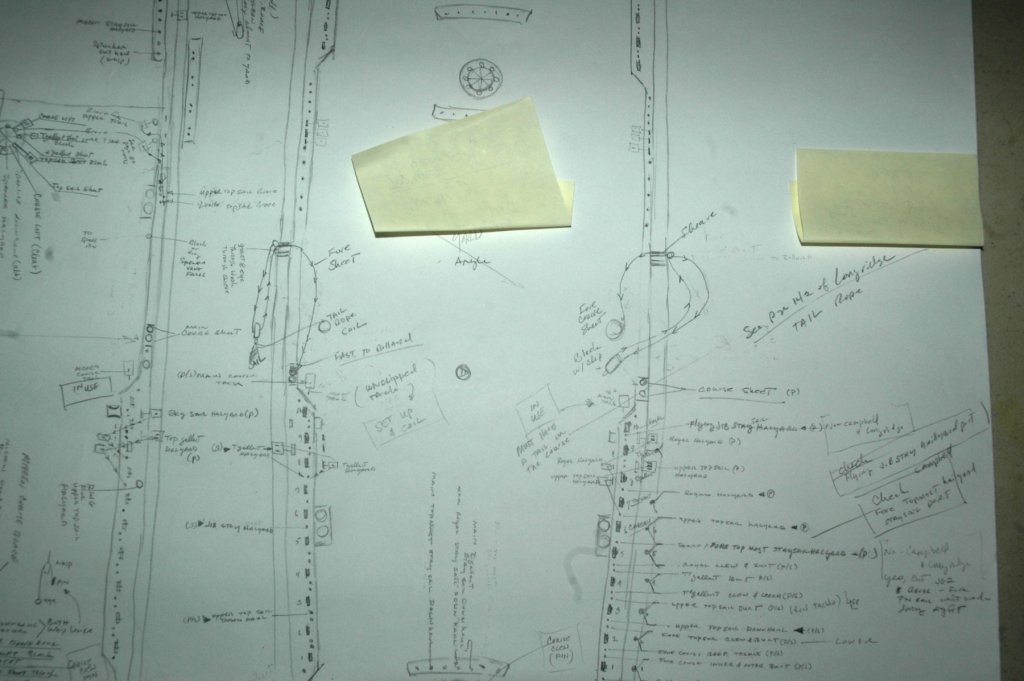
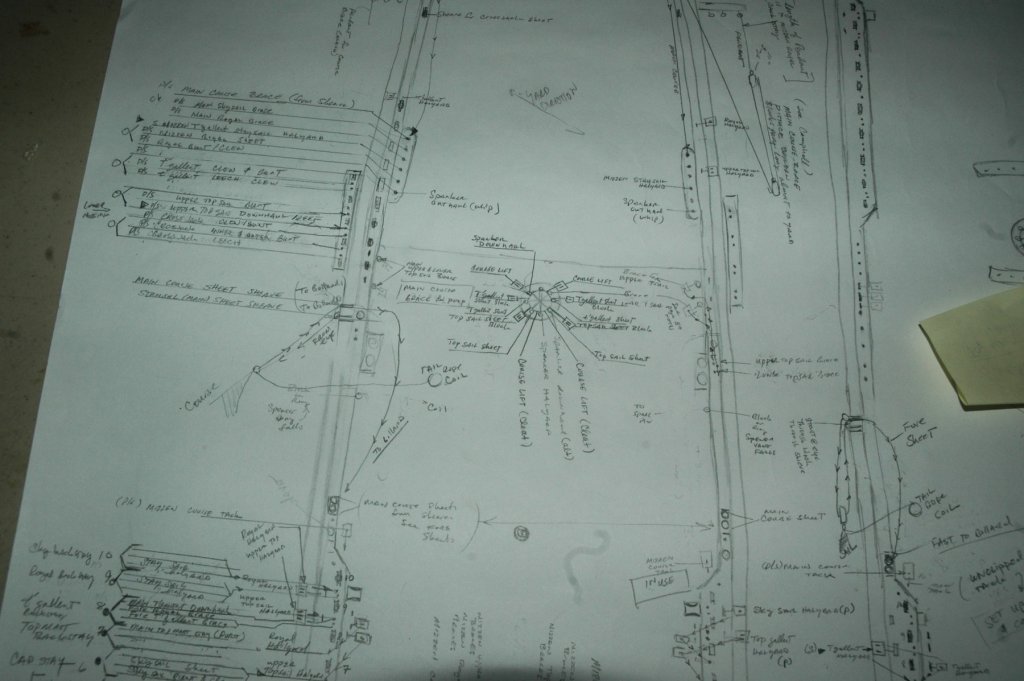
Hi everyone, I had issues with my scanner, so I had to take photos of my belaying plan. The ship is split between the fore mast and main mast to fit the ship onto the paper that I had. I made a reference point indicated by the letter "A" with a circle around it on both sections of the deck plan so that you can easily see where the two plans come together. I don't claim that this plan is correct, but it's the best I could come up with using Campbell, Longridge, underhill and cutty photos. I also went back and compared it against Jan's and may have made adjustments. You can see that I've made some adjustments along the way when I found better info or found that some points would never work if the stunsuls were set or some other conflict with Campbell's rigging plans. Also you will see that I'm using tails lines as indicated by Longridge page 141 when the ship is sailing close to the wind (wind from forward of the beam) with the course yards braced hard. Also, you'll notice that I only wrote out the lines on either port (P) or starboard (S) and usually indicated that the line was either for port (P) or starboard (S) as well as the side indicated. You'll also see a symbol of a circle with a "V" on its side connected to the circle and often connecting lines together. This symbol indicates that fairleads on the shrouds are used for these lines as indicated on Campbell's plans. Edit - I was checking the location of the royal sheets for the fore sail and comparing where I had it located vs newer photos and Jan Gilbrich's pin layout and noticed an error on my plans. For some reason, I erroneously switched the Course clew and Course lift belaying positions on my plans as they appear below. You should switch the Course Clew and Course Lift for the fore and main pins. -sorry Marc Sorry this isn't neater. I never thought I'd be sharing it with anyone. I'll post some photos of the ship this weekend. Last weekend just got too busy (sorry) best Marc


- 525 replies
-
- 2
-
-
- cutty sark
- mantua
- (and 2 more)
-
HI everyone, It occurred to me that since I'm in the sail rigging phase of the ship that you might be interested in the rigging plan. I made the plan by using Campbell's rigging plans. He details which lines go through the fairleads on the shrouds, which essentially tells you which belaying pins are used for those lines. Between that info and the info he provides in the sail plan, probably 70% of the lines are taken care of. I used Longridg, photos of the cutty, and the Underhill's book on rigging to fill in any missing info. While searching the web, I came across a site that has belaying plans for the Cutty created by Jan Gilbrich http://www.jans-sajt.se/contents/Navigation/Modelling/Belayings_Collection.htm. I checked the plans that I created independently using Campbell, Longridge, underhill and cutty photos against Jan's site and the plans are almost identical. I'd highly recommend the site. http://www.jans-sajt.se/ I'll try to scan my hand drawn plans into the computer and post my version this weekend. Also photos of the work on the foremast upper and lower top sails. Best Marc
- 525 replies
-
- 2
-
-
- cutty sark
- mantua
- (and 2 more)
-
Hi Vossy, you can actually get primaries and secondaries as single pigments as well. black (black often has blue toner added to keep the carbon black from being a little on the red (brown) side. For example, you can get several single pigment brown pigments made from different oxidation states of Iron as a single pigment. These range from almost red through a deep brown (Can you tell I love pigments and dyes?)😊 Antonio, I'm sure that the wax and plastic versions will help. best!! Marc
-
I'm not really familiar with Vallejo, but I've worked professionally on ink and paint formulations as a chemist. Vossiewulf's correct, although it isn't actually mass spectroscopy the thought is correct. It's actually chromatography - a chemist technique for separating out chemicals and was used early in the 20th century by forensic chemists to separate out inks into their individual dye components using essentially a solvent wicking up a sheet of paper. Then using the results to identify the ink/pen. It sounds like the paper towel and solvent is actually acting to separate the paint into its components. There is numerous ways to make a brown hue. One is by mixing red and green (or blue and yellow to make the green or adjust the color brown) pigments or dyes. I agree with Mark about the wax paper, it should help. There are drying retarders that can be used to slow acrylic paints. However, acrylic is just fast drying, especially if it is being diluted by water. I don't know what you are painting, but if you need a slow drying paint, oils are an excellent option. Just never use turps to dilute the oil, use one of the oils. Diluting with terps will actually separate out the pigments from the oil and can cause chalking and other issues. Best, marc
-
Sounds exciting!!! 😉 I can't wait to see how it goes!
-
Dave, Now that you have the course yards rigged with the stunsul booms, how wide is the model? Thanks marc
- 742 replies
-
- 4
-
-
- constitution
- frigate
- (and 1 more)
-
Hi Mike, I don't know for your particular ship, but typically the if one gun deck is red, the bulwarks on all gun decks are red. Of course there are always exceptions. The orlop is sometimes red or white, depending upon the ship (I think that I've seen more with white than red). I guess it is because there is less blood being splashed on the bulwarks on the orlop deck? good luck Marc
-
Hi Denis, I'm late to the game, but have spent last night and this evening reading through the build so far. Great way to spend a Friday night!! She's really taking shape and looking good. Great work!!! I wish I was as fast at building. cheers Marc
-
Thanks Dennis. I really appreciate the feedback and support!! Marc
- 525 replies
-
- 2
-
-
- cutty sark
- mantua
- (and 2 more)
-
Hi etubino, thanks for the complement and taking a look at my build! best Marc Hi everyone, I'd like to point out that black and white photos of the Cutty's boats/skids in etubino's post above quoting my post, above belong to and are copyrighted by Lou van Wijhelong. I had downloaded them from google where someone had striped his watermark. My apologies Lou. Best Marc
- 525 replies
-
- 2
-
-
- cutty sark
- mantua
- (and 2 more)
-
Harry, very nice work on the ships! you have a lot going on. Thanks for sharing! Enjoy your summer - try to stay cool and watch that sun exposure! cheers Marc
- 525 replies
-
- 1
-
-
- cutty sark
- mantua
- (and 2 more)
-
Cutty Sark by NenadM
keelhauled replied to NenadM's topic in - Build logs for subjects built 1851 - 1900
Happy New Year! Nice work. Looks great! much to be happy about😊 best marc- 4,152 replies
-
- 2
-
-
- cutty sark
- tehnodidakta
- (and 1 more)
-
Hi Harry, nice build. Love the lights. I'm glad that you revived the build. Can't wait to see the next steps!! best Marc
- 118 replies
-
- 1
-
-
- sanson
- artesania latina
- (and 1 more)
-
Cutty Sark by NenadM
keelhauled replied to NenadM's topic in - Build logs for subjects built 1851 - 1900
Nead, looking good! very detailed work on a small scale. I look forward to the next steps!!- 4,152 replies
-
- 5
-
-
- cutty sark
- tehnodidakta
- (and 1 more)