HOLIDAY DONATION DRIVE - SUPPORT MSW - DO YOUR PART TO KEEP THIS GREAT FORUM GOING! (Only 13 donations so far - C'mon guys!)
×


keelhauled
-
Posts
788 -
Joined
-
Last visited
Content Type
Profiles
Forums
Gallery
Events
Everything posted by keelhauled
-
 Thanks Nenad! I hope you are doing well! Harry, Thanks for the warning!!! I'm looking at the plans. I believe I see what you are alerting to. If you are looking at the plans, It appears to me that on the main mast, just below the band that supports the crane for the Main course , that there is a block attached to the aft most shroud, which says " 9" single seized to shroud." To me it looks like BOTH the mizzen lower topsail brace and the mizzen course brace run to THAT same block (although the plans say that it is a "single" block. In reality it should be a 9 inch Double block. Is that correct? Sorry I don't have an ability to insert a photo of the plan. If needed I can go back and do so. This also reminds me that I need to make sure that I rig all blocks attached to the shrouds right after finishing the ratlines. As you said it will be almost impossible one the sails go into position! I also need to check all of the blocks attached to the masts for what seems like the millionth time. I checked over and over on the fore and still found about 4 single blocks that should have been doubles after the rigging was underway. Each block took a couple of hours of tedious work to remove the incorrect block and replace with the correct one. It was almost impossible to fix (at least it seemed that way). Thanks!!!!!!!! Marc
- 525 replies
-
- 1
-

-
- cutty sark
- mantua
- (and 2 more)
-
Cutty Sark by Cuda1949
keelhauled replied to Cuda1949's topic in - Build logs for subjects built 1851 - 1900
Great work!! -
Thanks Dennis! I need a little sailor to take care of those rope coils and the rigging!
- 525 replies
-
- 1
-
-
- cutty sark
- mantua
- (and 2 more)
-
Thanks Harry! I appreciate the complement! I seem to be rigging every line at least 3 times. Seems each time I run a line, I don't like the run and think that it can be done better. I'm also finding the close-hauled sails are a real pain to rig around. They almost completely block access to the starboard side of the masts. Makes rigging that side of the ship a very slow, delicate process 😳😖
- 525 replies
-
- 2
-
-
- cutty sark
- mantua
- (and 2 more)
-
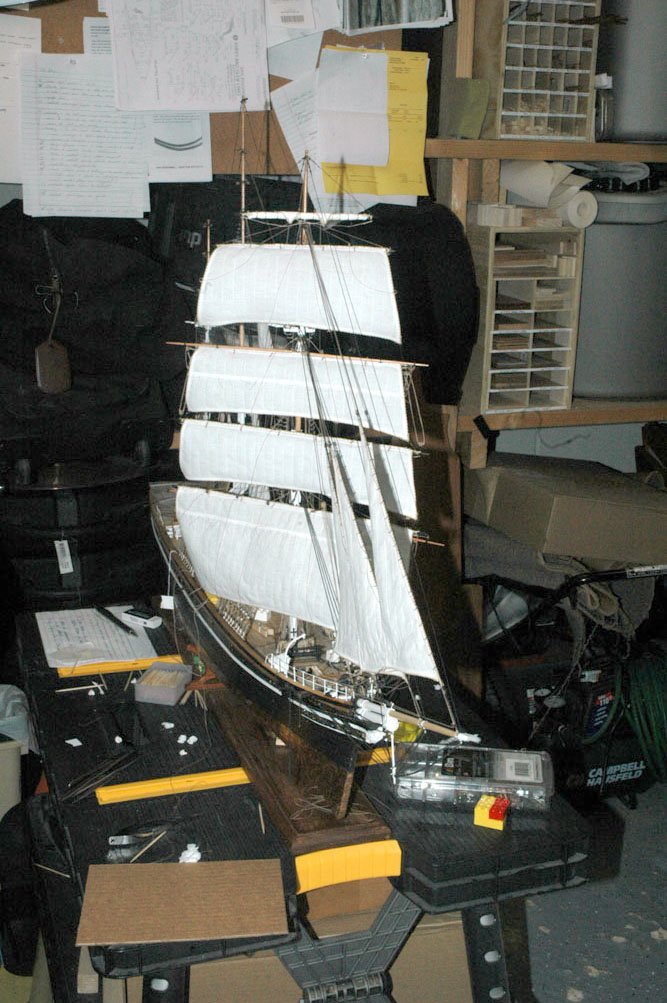
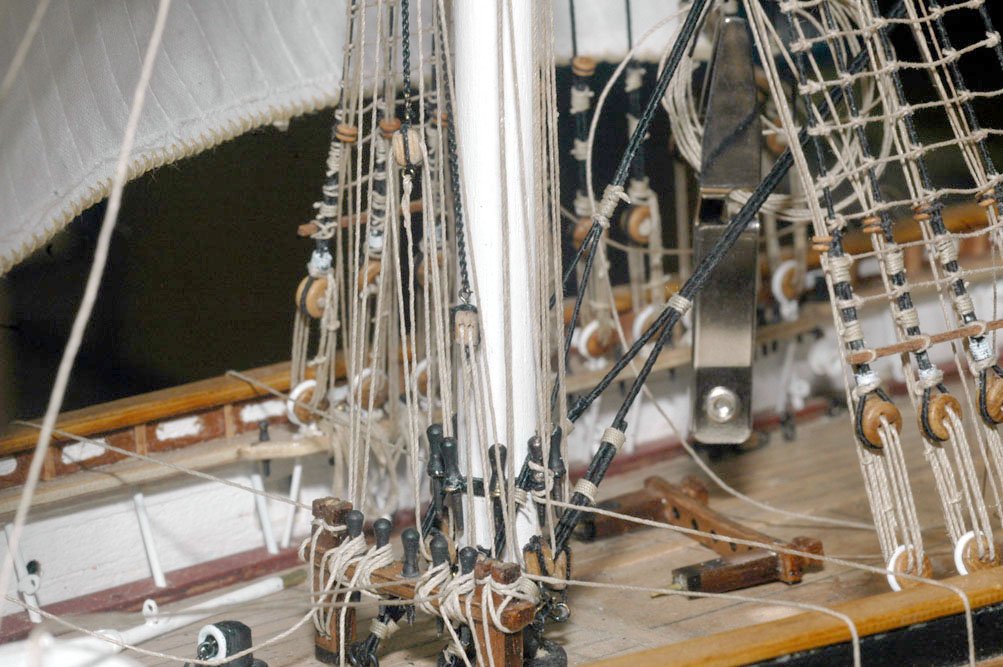
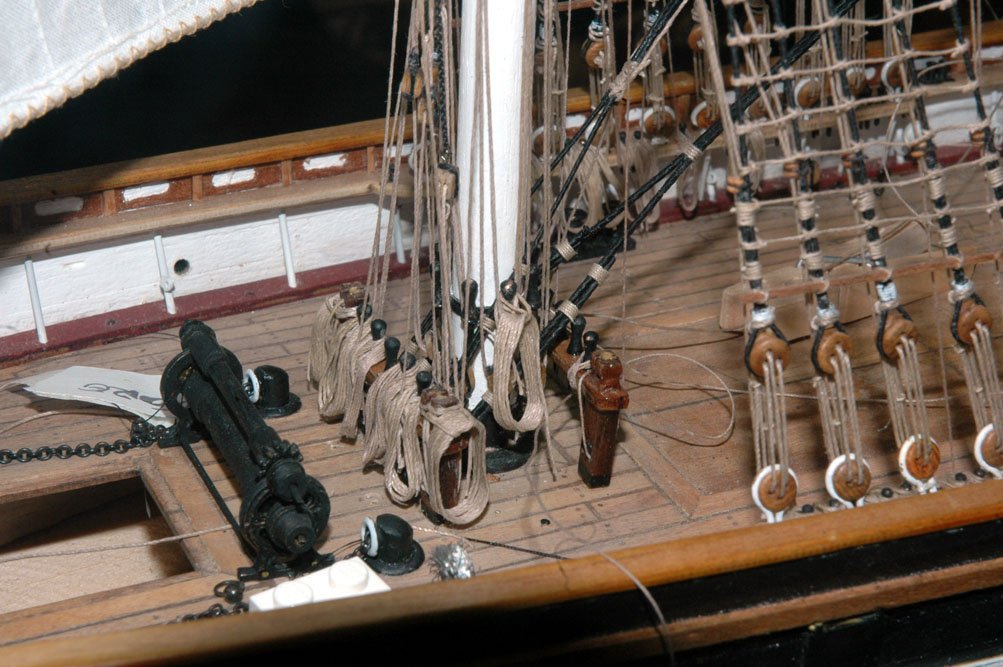
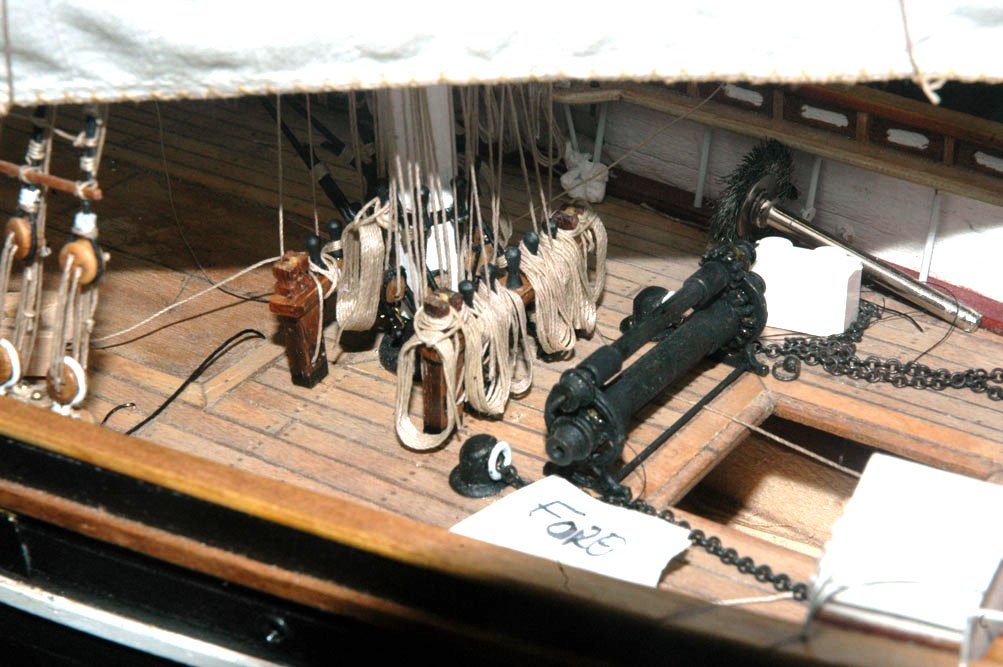
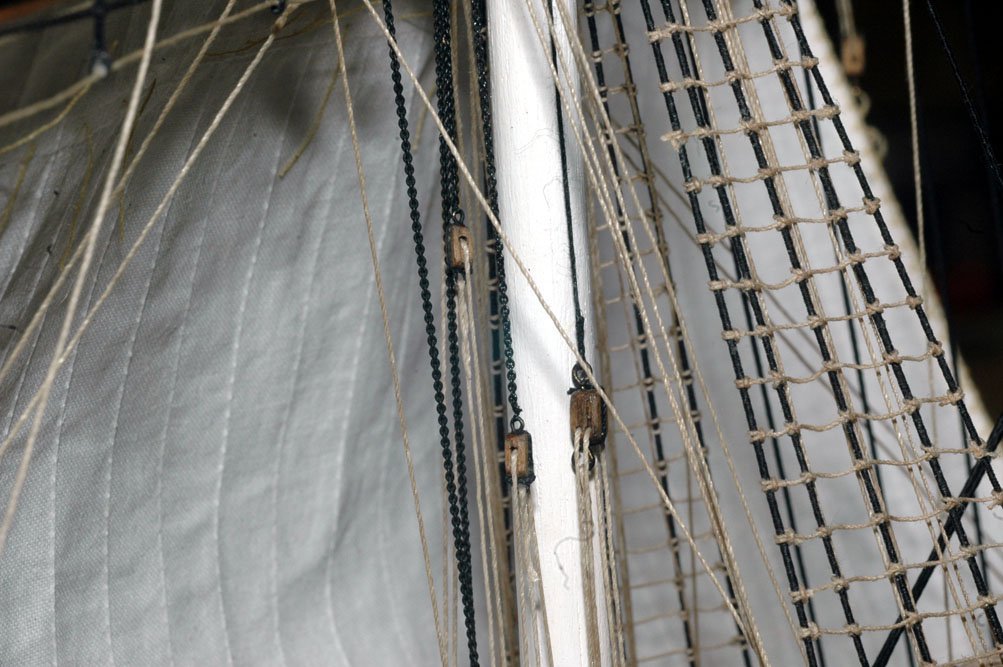
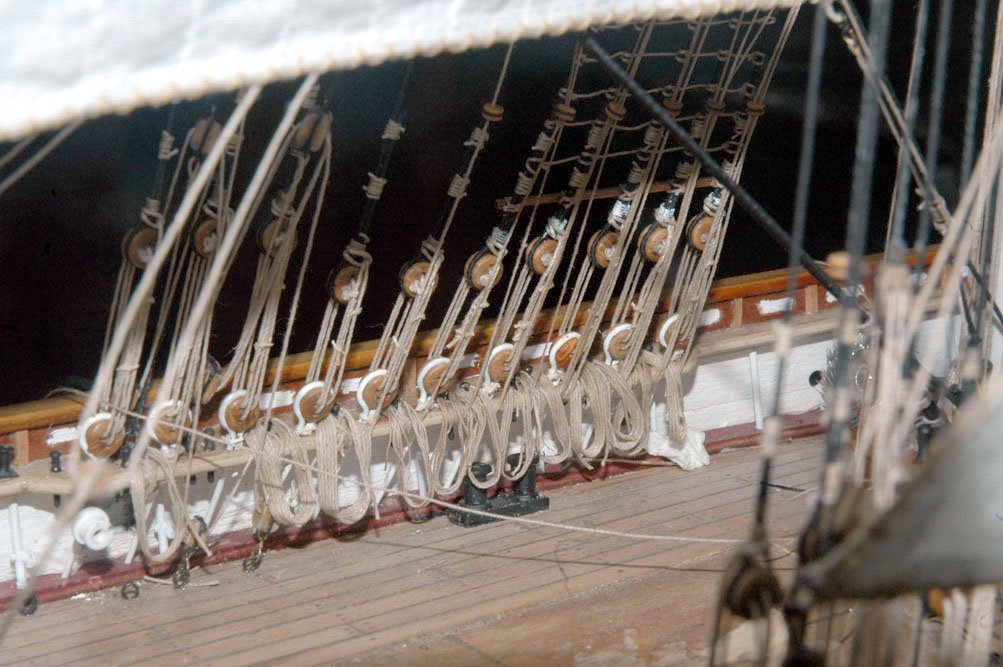
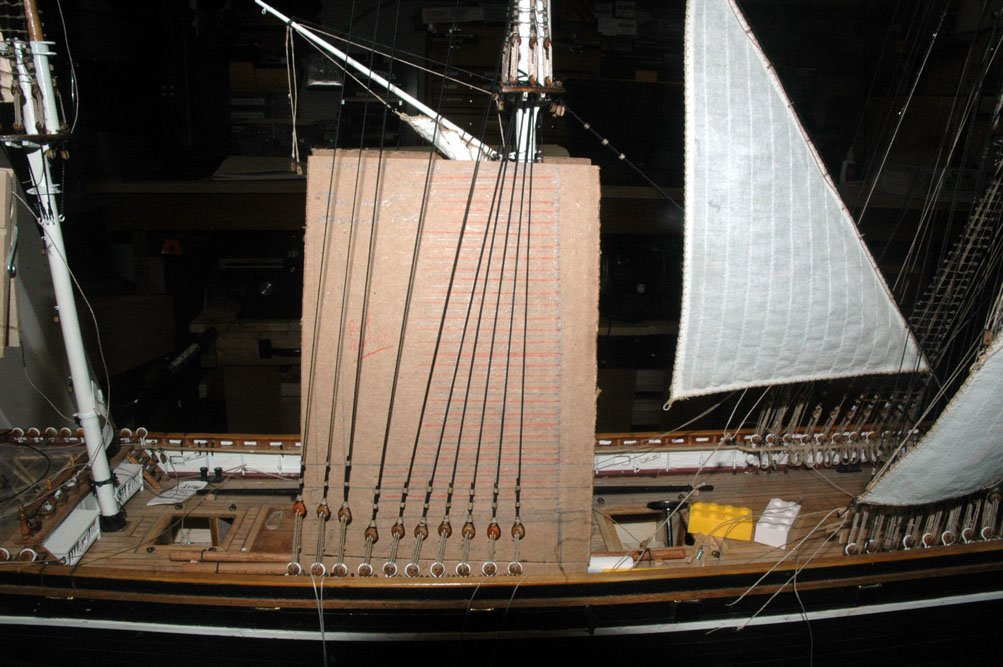
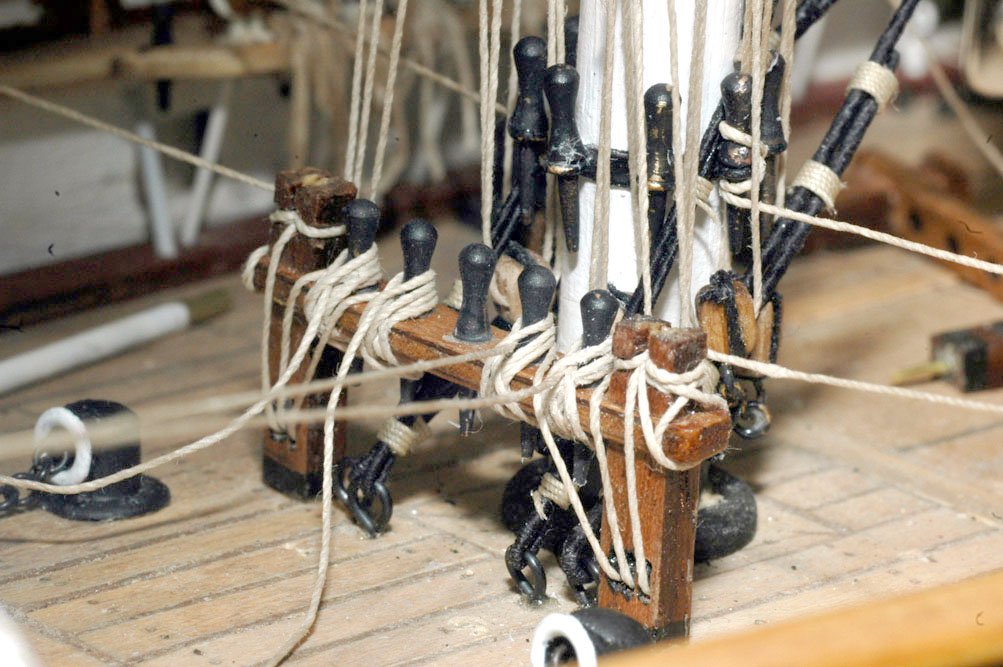
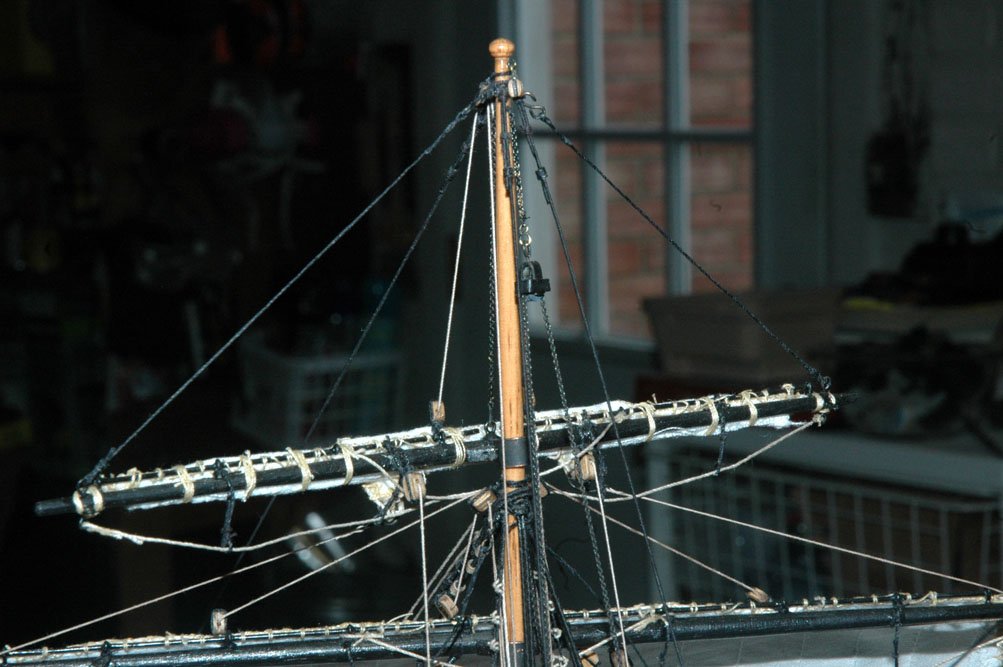
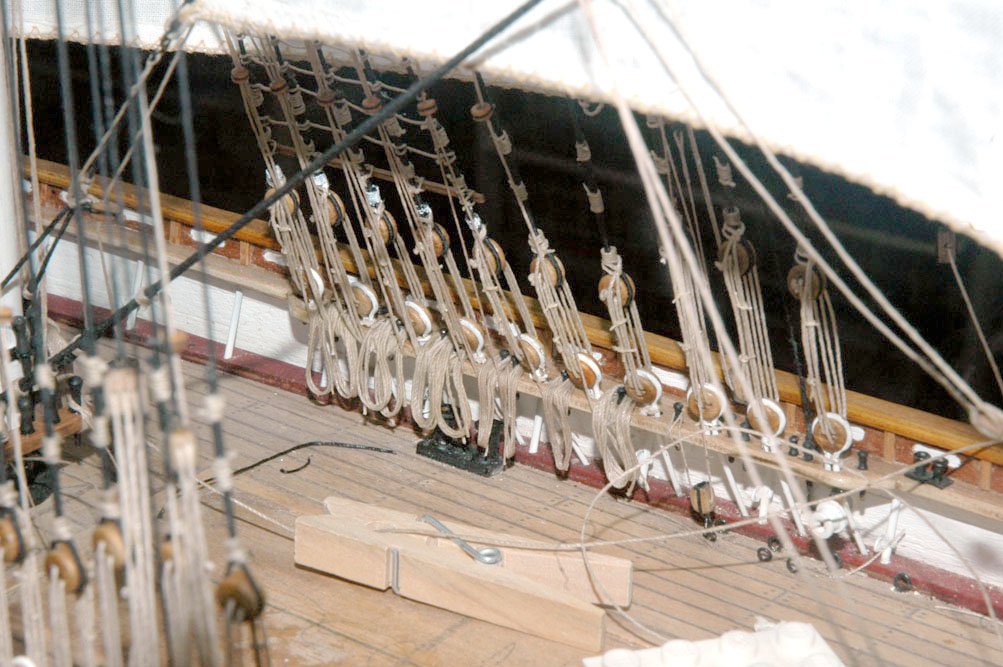
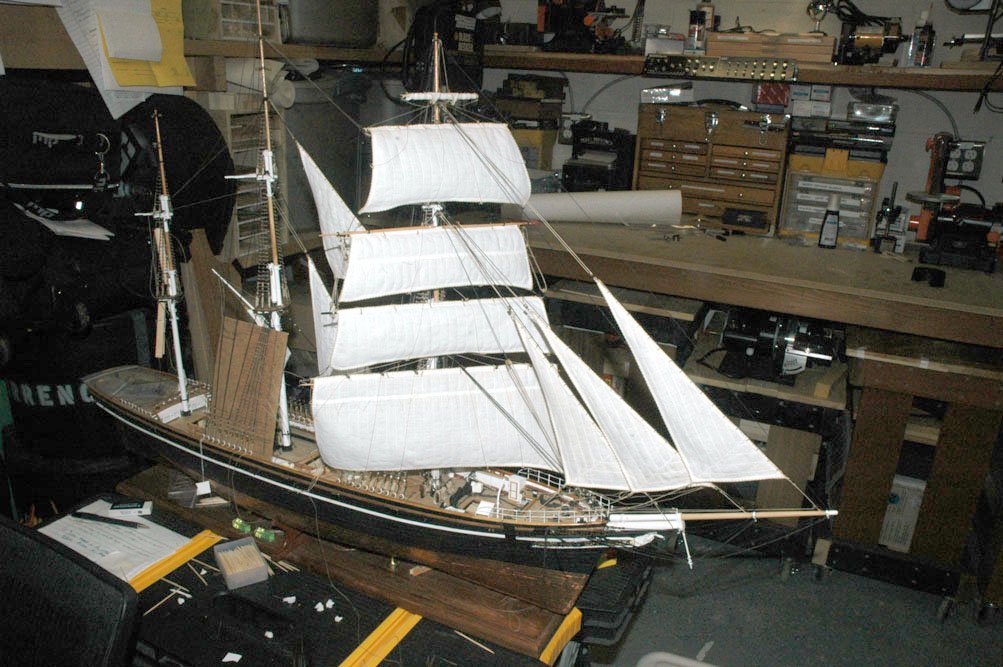
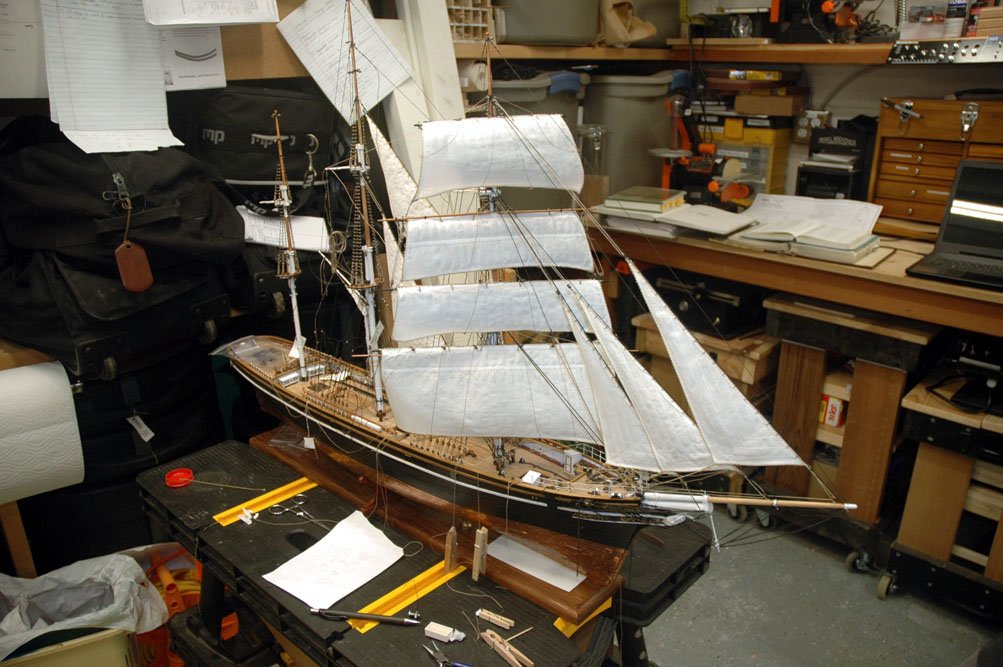
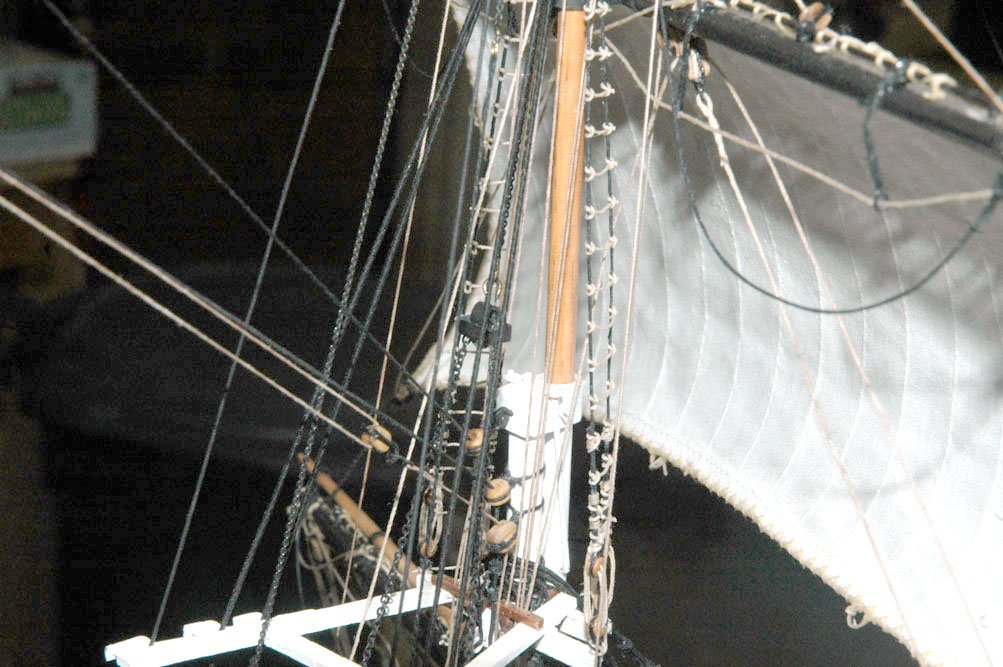
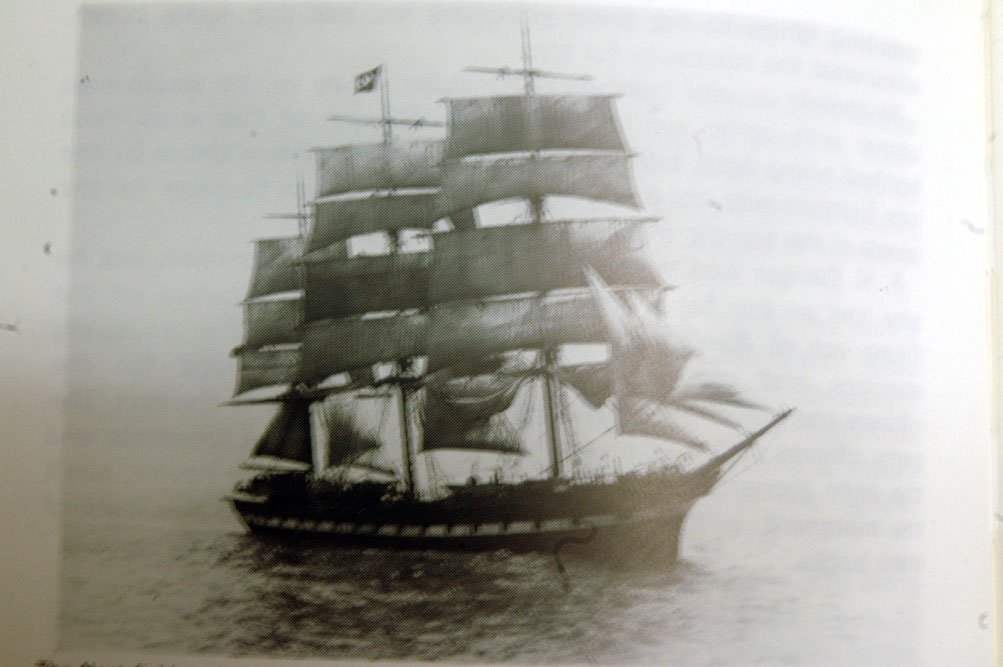
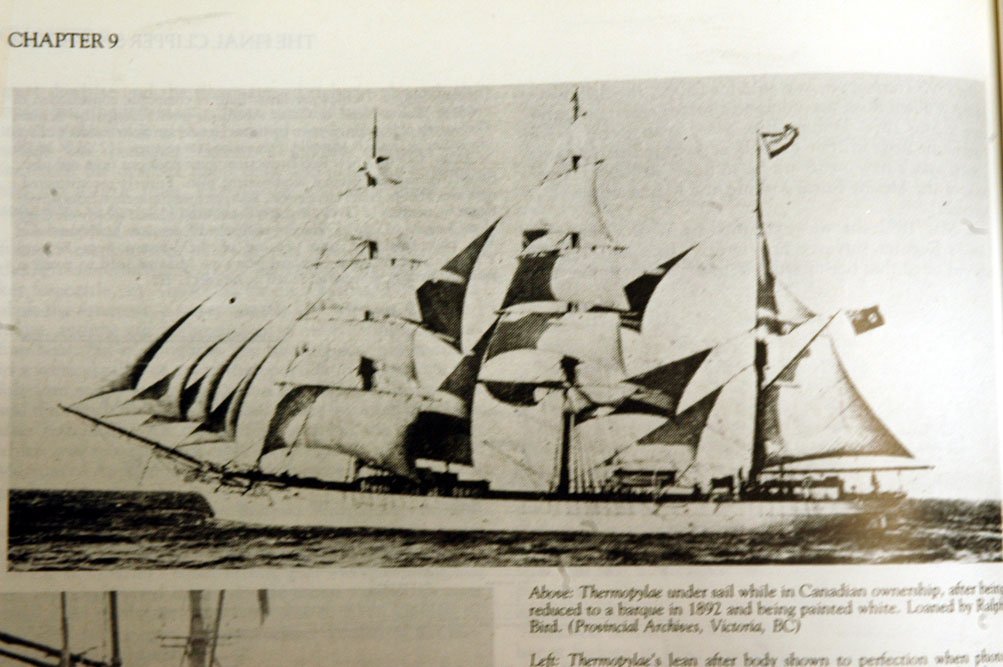
Sorry for the delay in posting. I have been working on the ship. Not as much as I'd like! Life gets in the way. I've been traveling for work then I was traveling weekends to visit my wife and a sick family member she was taking care of for a month. Everything is quit for a month! Time to get back to working in the shop. I finished rigging the fore mast and rigged the main stay sails. Problem there was I didn't think far enough ahead and the sheets actually prevented me from working on the lower main mast and would have prevented me from rigging the yards and sails on the main. Lesson learned - don't get carried away. Her is a couple of photos to give you an idea of where I'm heading as far as the sails. I wanted to reduce the sails blocking the deck and reduce some of the bulk aloft. Essentially my model is close-hauled with the fore sail set, the main sail and mizzen will be hauled up in their gear, and the royals and sky sail will be furled. The photos are from the Cutty Sark and Other Famous Clippers. My sails are cork-screwed according to diagrams and actual photos of clippers. The Thermopylae photo above shows this effect. Here is some of my progress The ship without the royal and then with the royal rigged. I ran the lines through the sheaves A couple of photos of the pin rails. By the way, the lines coming down would be a mess without the fairleads. I don't have a current photo, but will go back and take some to show how effective they were. The other challenge was with the pins that have two lines belayed. Once the lines are belayed with three figure 8 wraps on on those little pins there isn't much room for the line coiled lines (especially if they are the correct length). Most only have one coil of lines on the pin. although if one of the lines were short and the coil not that thick, I belayed both coils (mainly on the for mast pin rail and the spiders of the main and fore mast). the aft view of the fore royal and top Now on to the rigging the ralines on the Main Mast! thanks for looking! marc


- 525 replies
-
- 7
-
-
- cutty sark
- mantua
- (and 2 more)
-
Can i live without a BYRNES TABLE SAW
keelhauled replied to shihawk's topic in Modeling tools and Workshop Equipment
I will say that after several years of owning a Byrnes saw, I have never regretted the purchase. It also makes me smile every time I pull it out to use it! I've ended up buying every accessory for the saw except the tilting table. I've never regretted any of those purchases. The attention to detail and quality is outstanding. Compared to most high quality tools it was a bargain expense. best marc- 367 replies
-
- 10
-
-
Glad to hear that you found a solution. Varnish and linseed oil will do the same. They may turn yellow with age, but can be sun bleached. The down side is that the UV from the sun which is bleaching these solutions can also destroy many dyes. best Marc
-
I couldn't imagine rigging the yard and then bending the sail. Might just be me, but I'd never be able to successfully accomplish this maneuver. Not unless it was a VERY big model or I had a very very small helper!
-
Cutty Sark by NenadM
keelhauled replied to NenadM's topic in - Build logs for subjects built 1851 - 1900
Hi Nenad, Happy Birthday! I'm so sorry about Adrian. My thoughts and prayers are with you and your family. My best wishes for you Marc- 4,152 replies
-
- 4
-
-
- cutty sark
- tehnodidakta
- (and 1 more)
-
Harry, thank you for adding valuable insight and advice! You are always welcome to join in the conversation!!!! much appreciated. I also have many days when I walk into the shop, look at the ship and walk back out. Charlie, I have several rules, which include never work when your tired. I've worked a few minutes too long and in an instant caused damage that required hours to fix. No long sleeves. I always have some object (chair, table, whatever) preventing me from clipping the bowsprit when I move around the ship. I use a lazy during parts of the build and have the table marked and other markers to ensure that the ship can rotate without the bowsprit striking an object (i have a block wall that always seems to be reaching out to the bowsprit). Always wear safety glasses whenever you use power saws, dremels, etc. I also have a rule for my wife: not to disturb me if a power tool is on or If my hands are near the ship. A startle is dangerous for either the ship or my hands. I don't want to damage either! Best, Marc
- 525 replies
-
- 2
-
-
- cutty sark
- mantua
- (and 2 more)
-
Cutty Sark by NenadM
keelhauled replied to NenadM's topic in - Build logs for subjects built 1851 - 1900
Hi Nenad, I'm all caught up! life got in the way for a couple of months😡 Very nice work on the pumps and rails! always such attention to detail. I tried looking into the rails a couple of years ago without success. Some drawings have two rails at both the mainmast and foremast. I've also seen photos with a rail matching the aft main rail behind the foremast (fore all I know it could be the rail relocated from the main to the fore mast). I will say now that I've rigged the foremast, I don't know how you could attach all of the lines running aft of the fore mast to just the spider band pins if you have it fully rigged. In fact I found that I was missing 6 lines when I was planning the rigging -I came across some references to trip lines for the staysails Along with the downhauls you would be looking at 9 lines sitting on two to three pins. My thought is that the 2nd foremast pin rail was removed when the masts were cut down and the sky sail and all studding sails were removed. It would also explain why there seems to be differences in rigging plans where many of the lines are routed to the bulwark pin rails. As to the single sheave in the round aft pin rail - I agree with Wood Hacker.😄 I was asking the same question. However, unlike the foremast, when I rigged the foremast aft pin rail I only had one large line that would benefit from the sheave. Maybe that is the answer? I could also be full of crap.🙄 best, marc- 4,152 replies
-
- 2
-
-
- cutty sark
- tehnodidakta
- (and 1 more)
-
Nenad, You keep me inspired, both in modeling and in life!!! thank you my friend! Marc
- 525 replies
-
- 1
-
-
- cutty sark
- mantua
- (and 2 more)
-
Hi Charlie, sorry for the late reply... check out these books. They were helpful to me. Historic Ship Models by Wolfram Zu Mondfeld ship Modeling from Stem to Stern by Roth Ship Modeling simplified by Mastini Ship Models from Kits by Colin Riches Nenad has a terrific build log for the Cutty. His ship is for all purposes is scratch built. Harry (hoff00) has an awesome version of the kit build
- 525 replies
-
- 1
-
-
- cutty sark
- mantua
- (and 2 more)
-
Hi Charlie Thanks for the kind comments. First, i would suggest getting the books i mention in previous posts as well as cambell's plans. For planking, i would follow Chucks tutorial on the subject. There are also several good books on the subject that I'll try to post later today. Also search this site for the topics you need info on. The book of directions that came with the book were terrible and would actually paint you into a corner. The plans were better, but not great. In fact, early on stopped using them and only worked off of campbells plans. This model and rigging is pretty ambitious for a first model. You will have thousands of hours in building and research. If that still sounds exciting i would recommend buying and building a beginner or entry level plank on frame model from model shipways or Artesanía Latina. They have good directions. I'd stay away from Mamoli, mantua, or most other european companies for a first build, the directions are sometimes in broken english or so packed together on the plans that it is difficult to follow. Building an entry level plank on frame (bulkhead) model with good plans will help understand what has to be done on any plank on frame model and will develop your skills. Message me for help when you need it and start a build log and ask for help when you need it. Best Marc
- 525 replies
-
- 2
-
-
- cutty sark
- mantua
- (and 2 more)
-
Hi, Wasn't aware of the difference in crane heights on the Victory, but I haven't started the build yet. Not sure why the difference. I have seen the hammocks folded in the shape of a "U" in the cranes, but I'm not sure of the accuracy; however, that would address how the hammocks were stored in the shorter cranes. I can't imagine that they would allow the hammocks to protrude much on an actual ship, since they would need to be covered to protect the hammocks from spray and rain (no one likes a wet bed 😊) best, Marc
-
Hi Denis, Lou, and Harry! thanks for the complements and feedback. Much appreciated!! I'm working on the t'gallent sail now. Will post the progress next weekend. Best Marc
- 525 replies
-
- 1
-
-
- cutty sark
- mantua
- (and 2 more)
-
Hi Tasmanian, For rigging plans, I'd use Campbell's plans. They can be purchased in person at the Cutty Sark's shop or online at https://shop.rmg.co.uk/collections/prints The sail and rigging plans are 5 pounds and the general plan is 8 pounds. For info on how to post go here: https://modelshipworld.com/index.php?/forum/47-questionsinstructions-on-how-to-use-and-post-to-this-forumsite-problems-or-suggestions/ Best Marc
- 525 replies
-
- 2
-
-
- cutty sark
- mantua
- (and 2 more)
-
You're a very fast builder! Very nice work!!! Looking forward to following your progress! Regarding Drilling holes on the spars; if you create an indentation where you want to drill, It will make it a great deal easier. The drill will slide into the indentation instead of wandering across the round surface. If you don't use a punch or awl or some tool to make the indentation, your drill bit may still wander (if it is a small bit) even using a drill press. Also another tip is to drill from one side but stop about half way, turn the dowel to the opposite side where you want the hole to exit and start drilling from this side. The bit will shift in the shaft such that it comes out the first hole. If you only drill from one side (not using a drill press) you most likely will not come through the other side exactly centered. best marc
- 14 replies
-
- 2
-
-
- cutty sark
- mantua
- (and 3 more)
-
Cutty Sark by Cuda1949
keelhauled replied to Cuda1949's topic in - Build logs for subjects built 1851 - 1900
Looking good. Nice scratch building. You are making fast work of the build ☺️ -
Great start! I look forward to following the build best marc
-
Cutty Sark by NenadM
keelhauled replied to NenadM's topic in - Build logs for subjects built 1851 - 1900
Much wisdom expressed here by you two. Life is rich if we allow it to be so.- 4,152 replies
-
- 3
-
-
- cutty sark
- tehnodidakta
- (and 1 more)