


popeye the sailor
-
Posts
16,007 -
Joined
-
Last visited
Content Type
Profiles
Forums
Gallery
Events
Everything posted by popeye the sailor
-
 thanks Ken........I agree.......weathered wood is not glossy. in fact, to stay with a sense of realism with ships, there is a very small window where gloss is actually OK to use. if I wasn't treating this one as a showpiece model. I'd have anti-foiled the bottom. I have a nice bundle of this wood, very pleasing to see it shine like this thanks for the good word. the deck is cemented on the bottom at the moment. both main deck structures are indeed off. after I found which holes I needed to use, I marked the deficit of the other tabs, and cut the holes to fit them. it was equally troubling to see that the second level doesn't fit quite right either. I got the planking to do now, so that will keep me busy for a little while. I do have some pictures to show.......I post 'em tomorrow thanks for look'in in and the likes
 -
thanks Kees and John...appreciate the very kind word thanks Patrick......it's hard to glam up one of these boats, while keeping with the work boat feel. I get a lot of ideas looking at pictures of actual boats....or the one in question {if I can find it}. pick the little things you can do and go for it......and you certainly know how to do that you folks have been telling me how fast I seem to be going with this build.......you folks are right! I'm amazed.......I started this model in mid December. I'll likely be finished with her by mid March....with what I still need to do. this very well could be my quickest project yet no real progress today though, although I have been working on the stand {an effort to get that face cloth from under her}. well.......thanks for the kind words and to those who hit the like button. it's not finished yet......so more playtime is in store for her
- 378 replies
-
- 9
-

-
- t78 norden
- billing boats
- (and 1 more)
-
thanks Lou.......if I had gone to Hobby Lobby, I'm sure I would have found something in the Jewelry dept, that I could have used. this worked out just as well.
- 378 replies
-
- 5
-
-
- t78 norden
- billing boats
- (and 1 more)
-
hi Kevin........of course she is......but she made the hand gestures I.C.U. what's that other stones song........"under my thumb"...... she sees where I'm going with it though. after seeing how the bottom looks, she's on board with it. of course, the revelation I discovered with the mahogany planking was a good thing....to think that if I didn't actually measure the width of the planking, I might have ordered the wrong replacement size. she isn't mad at me. when I can get around to it, I'll order the replacement wood......and slip in a few items I need to finish the trawler {I wasn't going to place an order for a couple of items} it's the main reason why I stopped working on that project......but I need to get that one back on the table too. thanks for the good word........the bottom looks so much better with the second coat
-
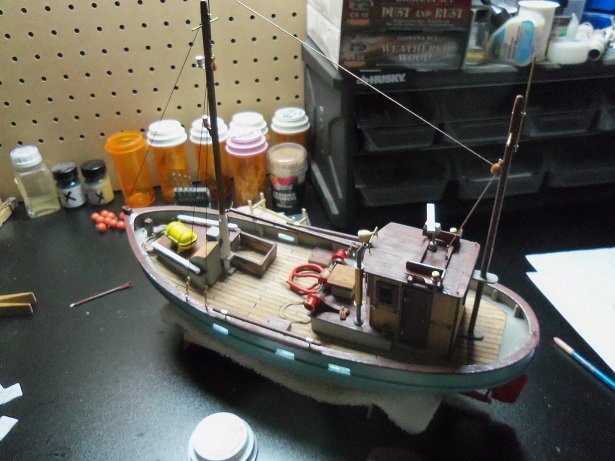
thanks John.......no....that's being resourceful you'll need that skill for the project your doing now. try taking the decals off anywhere else?!?! I couldn't believe it, when I got up the next morning and saw the flags like that! if you do anything to them.....use a spray, not a brush. I noticed that CA takes the color off them too { I gotta touch them up}. I noticed the pho-par with the winch as soon as I saw the videos........the weights and the catch would jam the winch up, if it had fill bars over the rollers. it's almost finished now, and soon, I can add it to the boat. I was hoping I could still slide the net under the upper rollers, but with the way I had to assemble it, I don't think I can do that. I may try to adjust it. thanks for look'in in and the kind comment John.........I don't regard you as a novice. you lost that the day you finished the model
- 378 replies
-
- 7
-
-
- t78 norden
- billing boats
- (and 1 more)
-
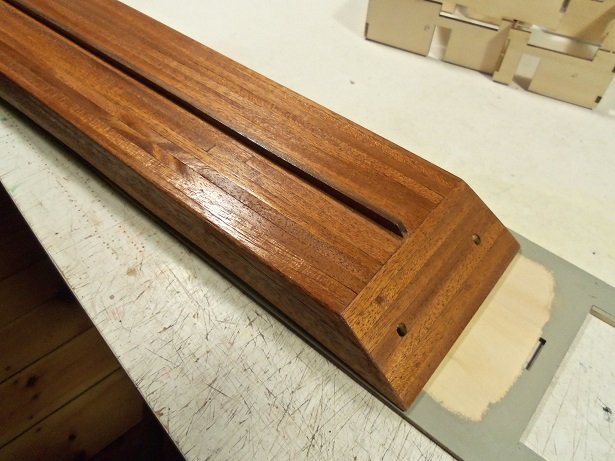
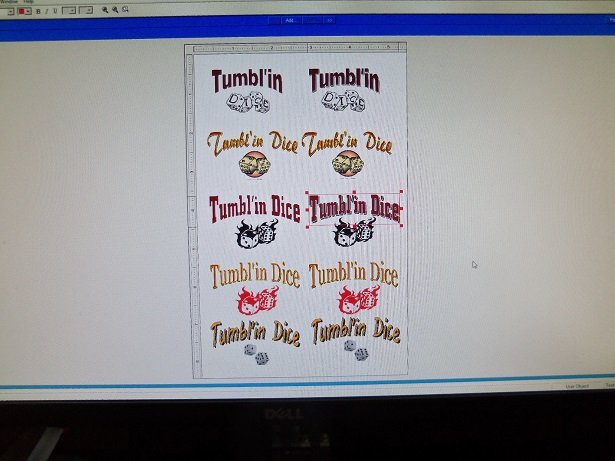
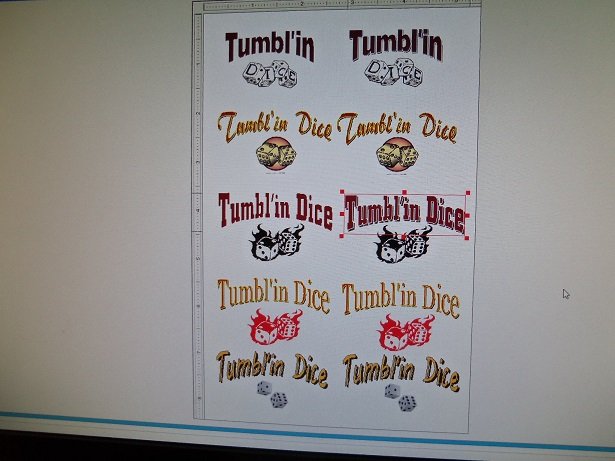
thanks Chris......actually, I'm still on the fence. I like the white walls...most of the ones I've seen have been painted. when I saw the mahogany planking in the Nordkap, I decided then that I would save that wood.....too decorative to paint over. I would wait and use it on a hull that would look better as natural wood, but I wasn't holding my breath. in this kit, they supply .5 x 5 mm dark walnut planking, which I thought was too dark, so I decided to use the mahogany planking.. ..which is actually 1.5 x 7 mm {not what I stated earlier}. the other mahogany planks I found mixed in are actually 1.5 x 10 mm. I have an abundance of the .5 x 5 mm blonde thin strip. I may use a walnut stain {which I have on hand}......or I'll go and get some mahogany stain, and do all the structures in stained wood. my inventory of wood is fairly large.....I could go a few different ways. decking is the same story......again, I haven't really decided yet {the reason I haven't planked anything else}....it won't be a blonde color, the river and age would have discolored it.......I'm thinking oak with a grayish quality. the decals are just a preliminary thing......showing what I'm looking at. I like the bottom one too, but looking at the dice...they look like a picture of actual dice, and not drawn or painted in appearance. the admiral had fun juggling around my combinations. the flaming dice are out...would have been nice to have multi layered flames. I do like the ones that spell out the word 'dice'...I can arch the word 'Tumbl'in' more. I'm also going to look into past builds.....one fellow had a nice bit of detail for the pilot house. it's going to more of a show piece than an actual boat. thanks for the good word Chris.......all the cards are still on the table
-
I'd say this is a milestone Piet........no doubt about it truly awesome! I see some dark haze on the hull......did you camo it already, or is it a lighting thing?
- 378 replies
-
- 5
-
-
- java
- pacific crossroads
- (and 2 more)
-
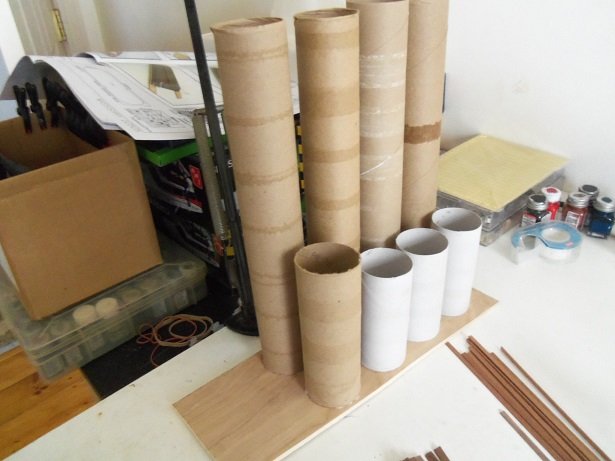
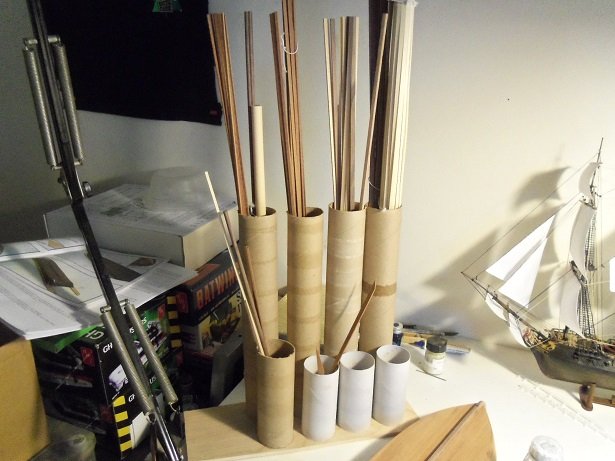
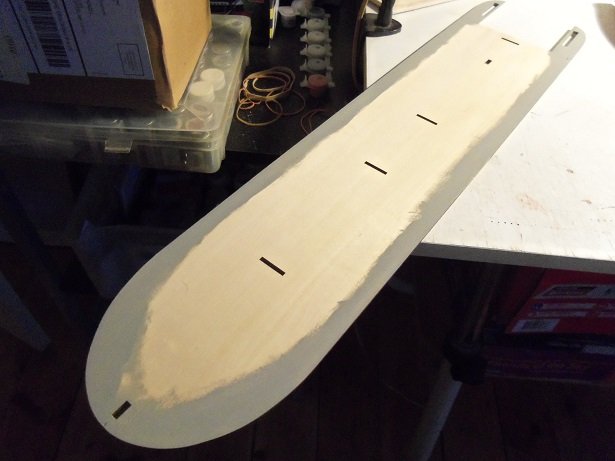
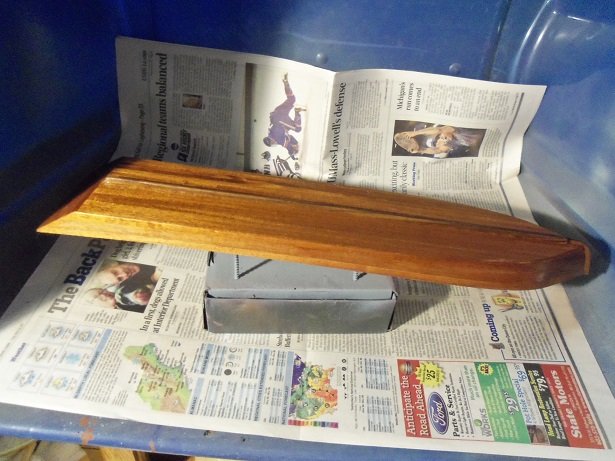
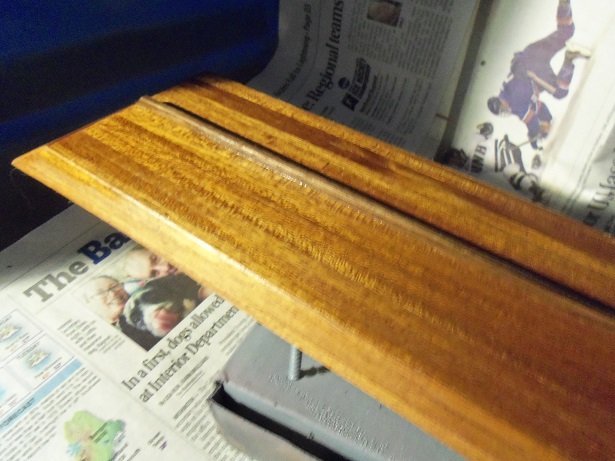
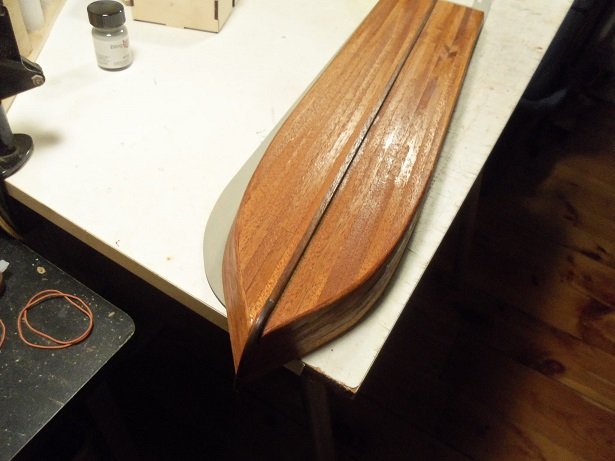
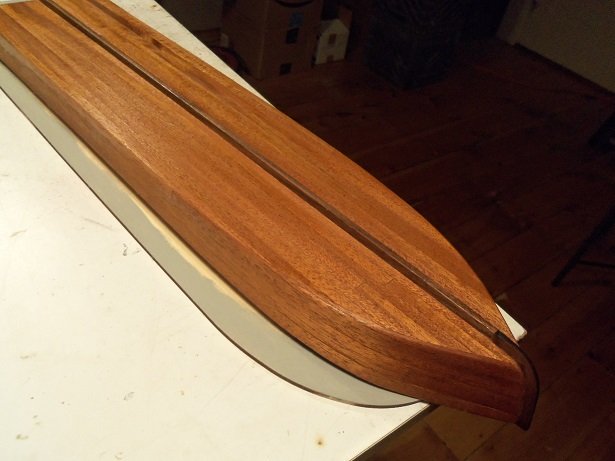
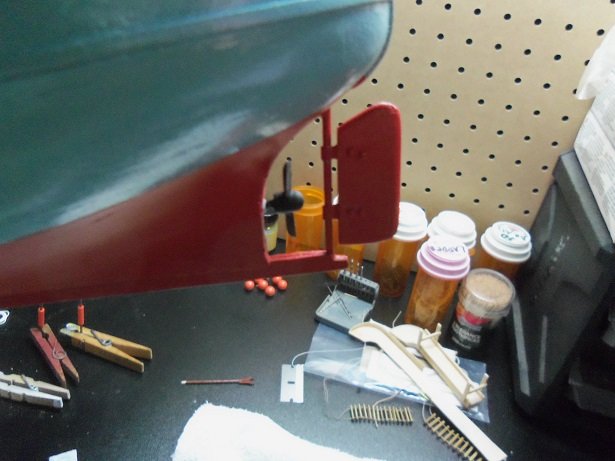
I spent the afternoon on her today..........I'm so glad to see my vision paid off as I mentioned earlier, I made up another wood organizer.....not as elaborate as the one by the main table, but it will serve the purpose. all household stuff......except the 1/4 plywood. all the wood strips are separated.......as soon as I clear a space, I can move it out of the way the underside of the main deck has been painted with Billing's flat pale gray. I noticed that I forgot to paint across the paddle opening......I'll do that later. the counter was marked out and the holes were drilled for the rudders. I'm gonna hold off on installing them, until I get the main deck and the bottom assembled, so I can better assess the depth of the shafts. I also did some more sanding.....it is ready into the paint booth it went.......and got the first coat of gloss lacquer. it was like 'pop city'! it was still wet at this point.......needs to dry now. I went to work on the Norden and browse MSW..... a while later, I took it out of the booth.....I was amazed with how it came out. the grain came out nicely.........and then I heard the admiral. she was asking me about the mahogany for the Nordkap........I haven't even told her that I'm using it on this project and that I want to order blonde planking {basswood or obechi} for 'ole Nordie. well boys......I think I been found out.....time to fess up. it must have sounded like jargon, that is......until she saw the bottom. I flat refuse to paint over wood like this.....this is what it's meant for. the bottom is a little rough, and there are some shadows, from where the lacquer literally sucked into the wood. but, the shine is there......and I am so pleased. I gave it more time to dry. usually I will wipe my hulls down with a clean soft cloth...this is more than enough to knock down the roughness and raised wood fibers. if I wanted to wait a day, then I would have used either steel wool, or some fine sandpaper and do a light sanding. I actually rubbed it down with my bare hands......trust me, my hands were never intended to give back rubs. it's in there now........it got a second coat......it won't need another. the shadows are gone.......and there are no runs, considering I used a rattle can. I am thoroughly impressed with how it came out. I have a picture of it tomorrow.....I want to see what happens to the sheen when it's fully cured. the rudders will match the keel, which sets off the mahogany nicely. see you folks tomorrow
-
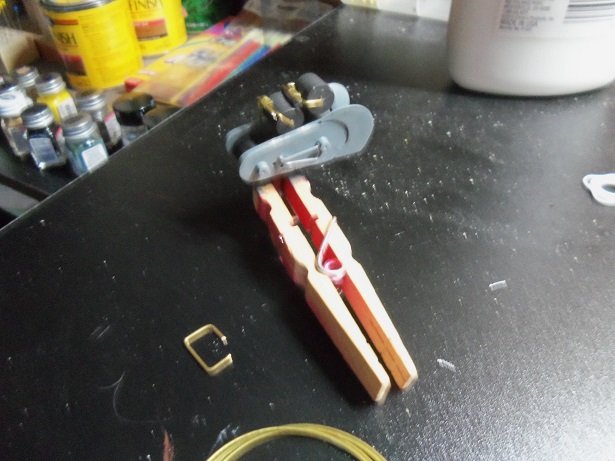
thanks for the good word folks..........and of course, thank you all for hitting the like button more time was spent on her today, bringing her even closer towards being finished thanks Sam...never be sorry about a good one liner {Rodney D. taught me that } never mind that......today, I couldn't get'em to settle down at all, until I went down and got'em the latest copy of Buoy's life.....bata boom...bata bing! a job's a job.......you got one......I got the whole lot of'em! thanks Pat...appreciate the good word thanks Piet......glad you enjoyed the last update......I was chuckling just writing the darn thing it was intended that way....no matter what you do....you gotta have fun doing it. 'cuz if you aren't, then why do it. thanks for the good word my friend man! I can't believe the weather........the last couple of day, it was beautiful! we almost hit 70 degrees.....we lost about 90 % of our snow and ice! today.......30 degrees and an inch of snow! the morning was spent putting together the rollers and cementing them in place on both sides. I even did some of the rigging. I still need to make the trays for the fish and the two small sails. I won't disappoint you on the life preservers John......I still remember I also assembled the upper rollers for the net winch. I had goofed......I had the main part of the bracket attached to both sides of the winch...no.....only one side. so I made the adjustments for that. you can see the two white spots where I patched over the holes. I'll get a better picture when I assemble the other two lines...the ones that go down to the base. I also put the prop on. I don't know why, but the flags on the other buoys came apart. they are sticky.......they wrap around the pole and the two sides fold together. CA fixed that though......they just need a little touching up now. tomorrow's Friday already.....then back to my private purgatory. but there is redemption......I took Sunday and Monday off! I only have to put up with 'em for one day. hope to have an update for you fine folks tomorrow
- 378 replies
-
- 13
-
-
- t78 norden
- billing boats
- (and 1 more)
-
never thought of that.......thanks for the explanation Russ
- 420 replies
-
- 3
-
-
- captain roy
- lugger
- (and 2 more)
-
sorry to hear you can't do what you intended to do. a different design........are you ordering more cannons? good to hear your making progress...again, I'll look forward to seeing what you've decided to do.
-
if you look into it, make sure that you purchase the standard edition, and not the basic. the basic decal it kit will not let you import images into the program. I've scanned lots of stuff, like stencils to print out scroll work...perfect for friezes. I have both programs....visit the Testor's site
-
yea...I'm not real familiar with the vessel. I was referring to along the sides and the fact that you haven't planked to the top of the transom. now I can see why
-
they are water slide, printed on Testor's decal paper. they are made using the decal maker program, and printed off on an ink jet printer. after waiting a short time, to let the ink dry, they are sprayed with a product called decal bonder, which seals and locks the image on the paper. the program give you a field to work in, which the equivalent to the 1/2 sheet of decal paper. the only drawback to this program, is in how they are printed......ink jet printers cannot print white. the only alternative is to use white decal paper....you can get it clear or white.
-
there has to be a build up to the top of the transom, unless that segment of the transom is mostly windows along the sides. are there windows between the ornamentation?
-
that's a good point.......thanks for the suggestion the picture is awesome.........now, if only the manufacturers made a replica model for this vessel. they'd be taking a huge step in the right direction
-
in most cases the way the hull is shaped, will determine the width of the planking used. the turn of the bilge {chines} is quite drastic on this ship, so a narrow plank would be better suited. you wouldn't be able to use a wider plank....it would look terrible. you have double bulkheads......that will strengthen the joints. perhaps you could purchase planking to continue....seems a pity that you can only go so far and stop. will they supply plating to lay over the planking?
-
the square grated structures along the middle of the gun deck. you can also run a pair along the mast collars too if you wish...I think it would be correct.
- 89 replies
-
- 1
-
-
- constitution
- revell
- (and 1 more)
-
I spent a little time play'in with the decal maker this morning. gonna be tough folks........the admiral is over my shoulder. of course, I had to keep reminding her of the time period that this vessel was dominant in. this is what I came up with so far. I had done some searching for images of dice, staying with the confines that the dice should equal either 7 or 11 {can't have them showing 'snake eyes', now can I?} the text can be changed over to any font I want. I may need to size them down a bit more. right away though.......I kinda give a thumbs down to the dice at the bottom, simply because they look too real. the cool thing about this decal maker, is that you can import any image. from there, the size can be adjusted, but color can be a problem, if it's a multi layered image.
-
I like how you planned the rope connection. I don't bother......just lay the rope coil over the ending to hide it. with the size of the rope and how much of it, I can see why. of course, you've put in all this time and thought into her........why stop now?!?!?! nicely done!
-
looks like smooth sailing from here! you did a wonderful job on the hull {and you thought you couldn't do right by her} the deck area looks very clean and neatly done I'm still very curious about the stern area........I figured that the port and starboard should have run up the bulkheads, to form the transom. I'm sure you'll show me in good time
-
what n encrusted beauty! must have been trying to get all the decorations on there! very very nice
- 192 replies
-
- 3
-
-
- sovereign of the seas
- sergal
- (and 1 more)
-
...or he'll find it when doing something else. most of the time, parts are found when your not thinking of them. when I was working on the Jeanne D'Arc, I lost a part...obsessed like crazy to find it. we ended up running out for an errand..........when I came home, I went to the table and found it at a glance.
- 378 replies
-
- 4
-
-
- java
- pacific crossroads
- (and 2 more)
-
thanks Ken and welcome. it very early, so you haven't missed much. this will be the first project that involves P.E.