popeye the sailor
-
Posts
16,007 -
Joined
-
Last visited
Content Type
Profiles
Forums
Gallery
Events
Everything posted by popeye the sailor
-
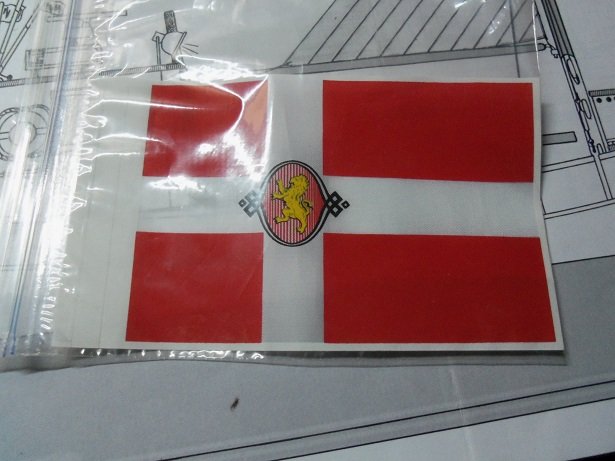
 flags look good Michael........I realized that what I showed was likely a dutch flag I looked in the box I have allotted for the Gothenborg parts, and the flags in there are the same as yours...smaller scale of course. your almost at the finish line of your wonderful ship.
 -
very nice progress Piet......the PE additions really add to the model. the cranes are cool
- 378 replies
-
- 5
-

-
- java
- pacific crossroads
- (and 2 more)
-
the more you add, the better she looks.........nice work on the winch I recall one time, during a visit at Hobby Lobby, I happened to look at a bag assortment of odds and ends brass part and pieces. I put it back down because it cost $17.........I should have bought it {not one of my brightest decisions}. your scratch building skills are coming in handy with this project looks very nice!
-
on plastic models, wood filler is not always best. it will tend to crack over time. it doesn't stick to plastic very well either. Testor's and Tamiya have a plastic putty......there are other brands out there as well. the transom / counter part has always been a problem with these models..very hard to fit correctly.
-
superbly done Danny.........well done on fitting her out! hard to believe this is a paper model!
-
great progress so far........hull looks really good.
- 90 replies
-
- 2
-
-
- fairmount alpine
- billing boats
- (and 1 more)
-
yea Mark.....too bad I can't combine them together
- 378 replies
-
- 4
-
-
- t78 norden
- billing boats
- (and 1 more)
-
you'll have more control than with a spray can. what brand is it? I have a Spraycraft gravity feed that I haven't used yet. practice with it.......you'l get comfortable using it nice bit of painting there
-
yepper! you've made some great progress and it looks super hunker down and stay warm .......we've been seeing crazy weather here in the states as well.
-
thanks OC........I don't have the Cux anymore.......it's out in Wisconsin somewhere
- 378 replies
-
- 5
-
-
- t78 norden
- billing boats
- (and 1 more)
-
sweet little fella Danny! yours too.....you've shown pictures. Gibbs isn't little anymore........about 22 - 25 LBS our other Esky was around 39 LBS and every bit as loyal {we miss him}. I do apologize for foddering your log......you mentioned carpet monsters, and that's mine, aside from a pair of tweezers. one thing that binds us together is man's best friend...it's an awesome thing
-
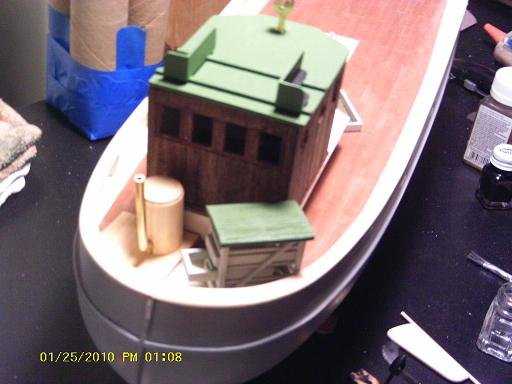
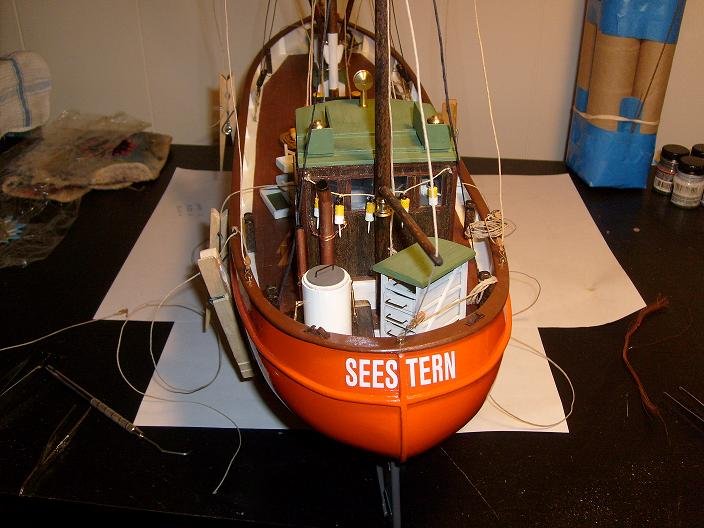
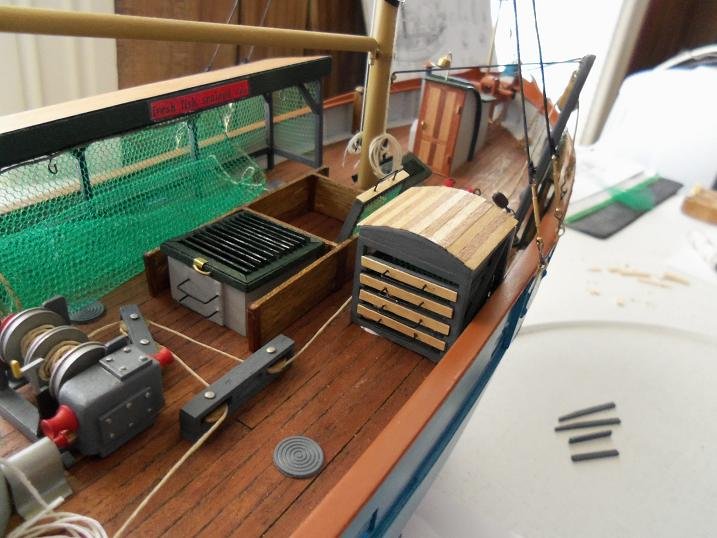
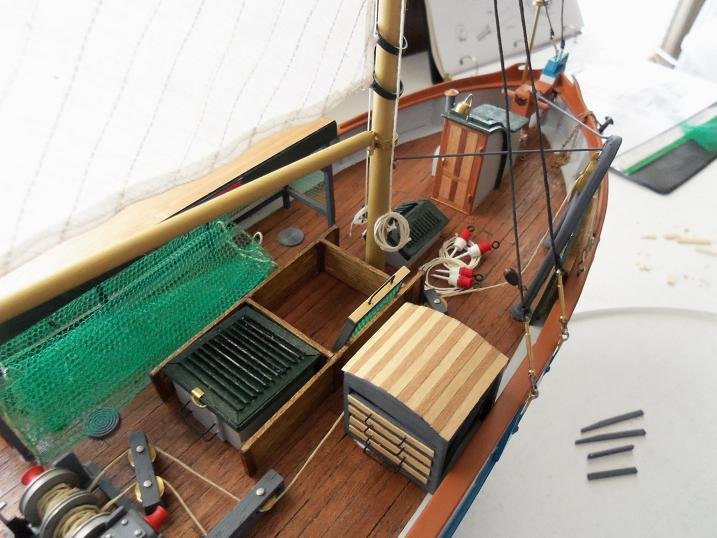
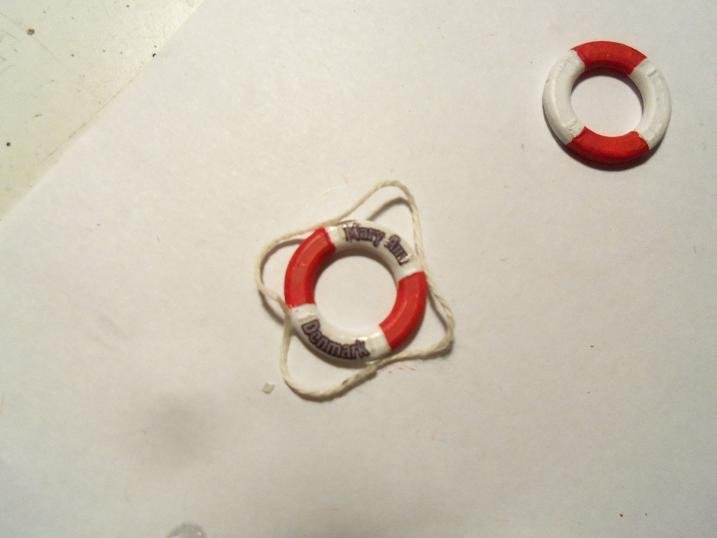
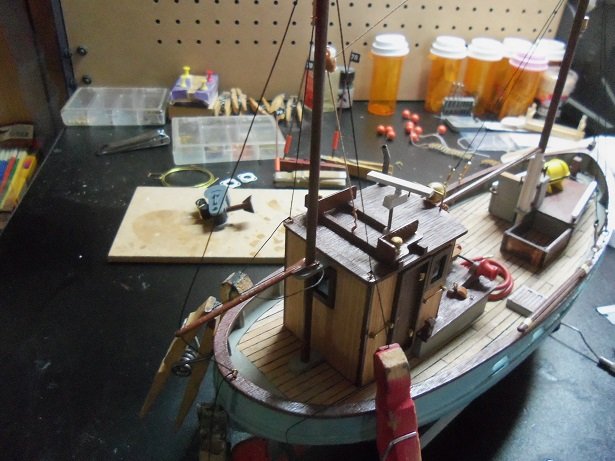
thanks John.......there's really a few more things to do on her. if I applied myself, the Norden could likely be done by the end of next week. Thermopylae will be back on the table after that.......hope'in I don't botch it thanks John {#2}........still have some more rigging to do.........I did a bit more and finally added the break waters to the bow. I'm ready to make up the sails, which I'm surprised that there aren't at least a few hoops, but I'm past that step now, so that won't happen. yea, I'm not crazy about the plastic fish either. I had some for another build.......never used them. I'm not much into that kind of detail....but I do have an idea that I might try {we'll see}. I was going to do a rack for the trays. in the Cux 87 build, the rack is one of the deck fittings I had to make, along with a sluice for the catch. it's a shrimper. I started populating the model, when this one was taken. my Sony camera had died too....RIP on the Mary Ann build, I copied the idea and added one to this build, along with a net repair rack. I added a lot of stuff to this build....too much....I thought at times. but ti was fun to do. detail was added to the winch, the hold and cover, and the pullys that rig the gallows. the buoys you see on both boats are decorative jewelry beads, altered with 7 mm brads, eye bolts {although I think the eye bolts were already part of the bead}, and paint. another thing I like to do, that John {#1} suggested to me, pertained to the life preservers. the plastic rope was cut off, and actual rope {thread} was cemented in it's place. the decals was my added touch.......having this decal program was money well spent. you can do about the same thing with photo shop, but I think it's harder to scale down the size. these two boats have the same general hull shape and contour, as the Norden. fitting one of these boat like the Norden would be very easy to do. I'm going to do these preservers the same way so......I have a few more things to think about.....perhaps even add something else here and there. OH.....and I still want to do something about a net
- 378 replies
-
- 10
-
-
- t78 norden
- billing boats
- (and 1 more)
-
jeeze, with all the sub assemblies you've made, the progress is going to burst at the seams! definitely would be cool to snap a picture before you added all the parts, and then one after the Hood is going to be an awesome model....can I select a seat now ? the color on the paravanes.......I hardly noticed it. it will disappear in all the detail and reduce it'self to mere weathering!
-
the part I find most worrisome.......attaching the yards with all the lines going everywhere. she's look'in very good we're only seeing wind and rain in my neck 'o the woods.......wondering if we'll see a little snow by morning. I'm sure the seacoast is seeing worse with the high tides and all.
-
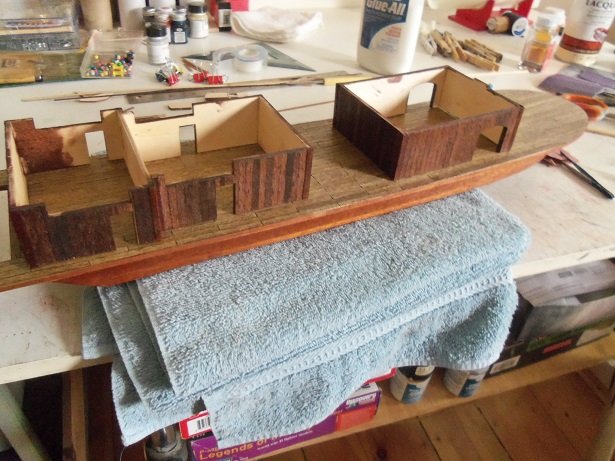
after not making much headway with the T.D. I though I'd go to the other table, to see what mayhem I could cause there. the boat was sitting on a towel all this time....guess I'll start with the stand first. I had cut some thin felt strips......the best parts were cut into short lengths, and then glued to the stand. I used Ca, even though there is an adhesive backing to the strips....I found they have a tendency to fall off after a period of time. there is a sort of name plate on the decal sheet.....figured I'd use it. not that I would forget the name, but for others when I'm not around {who knows}. now that the model is a bit more stable, I was able to finish the main mast shroud lines. taking out the measly small piece of sail cloth, I noticed that one end had some really bad fraying going on. So I cut a fresh piece of cloth to make the sails from. these sails don't do anything in the way of propelling the boat.......they are used primarily to keep the boat from rolling and pitching, as the work is being preformed. they are also simply tied in place too.......I would think there is some sort of rigging involved........I don't think someone shimmied up the masts to tie them. I'll do something the short boom for the aft mast was put in place as well.......two shroud line were added, as well as the stay rigging associated with the boom {no blocks involved}. I'll try and get a bit more done today......thanks for look'in in

- 378 replies
-
- 9
-
-
- t78 norden
- billing boats
- (and 1 more)
-
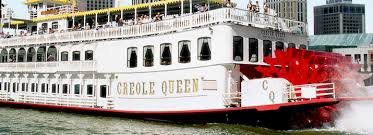
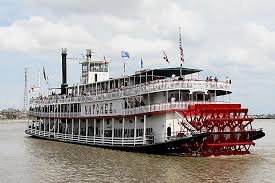
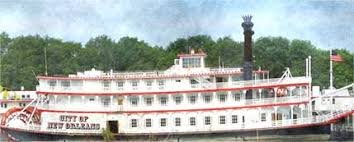
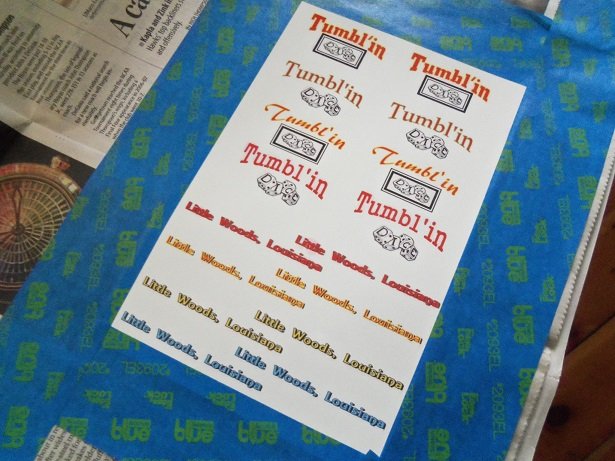
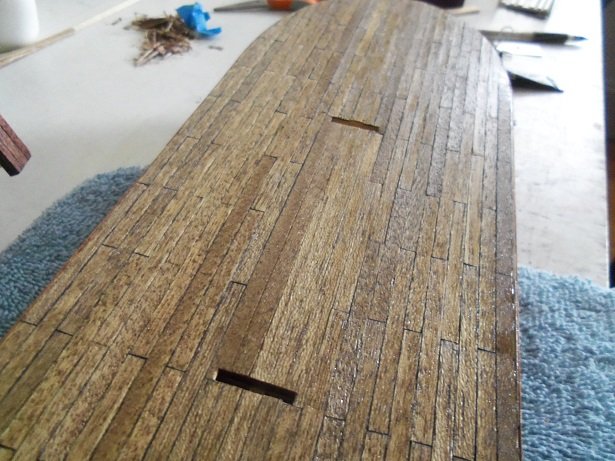
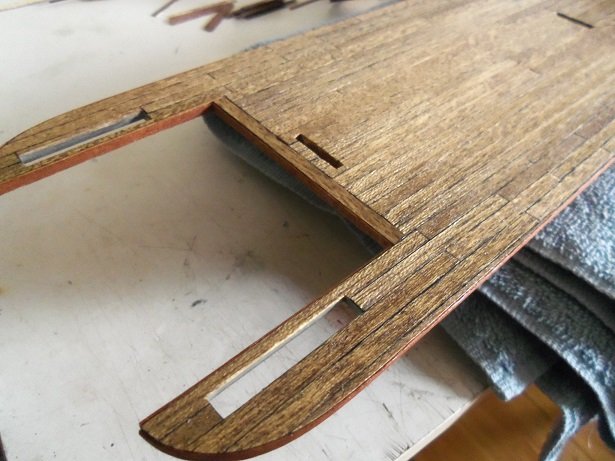
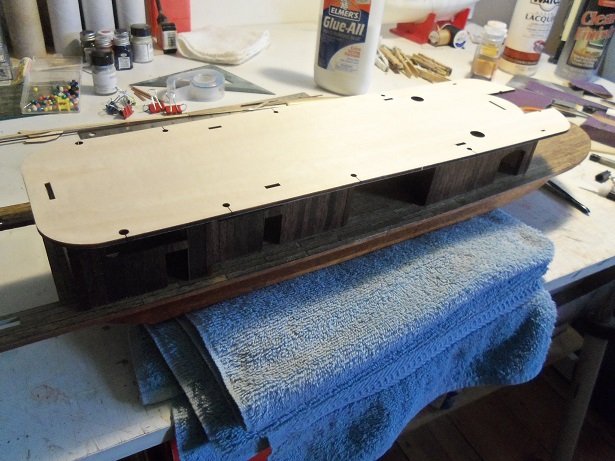
good morning gents......on a chilly, wet, and potentially snow/slushy day {no snow yet......could very well come later}. fairly big storm coming our way......so far just the rain and wind has moved in. as mentioned, I took a look at some images of river boats. I found more modern vessels though, and not older ones. I must be real fussy.....I've found very few figures that reflect the period that I'm going for. I may have to 'modern up' a bit, so I can decide on what to get. ...and yes, white is the dominant color. I even saw the American Queen, which has four levels.......five counting the helm room. these vessels very well could have been the early concept for the cruise ships we know of today. bringing up a map of the Mississippi river and Louisiana, I just scrolled around and picked a place at random........Little Woods seemed like a good place. adjacent to the Bayou Sauvage, and the New Orleans French quarters. the name Eleanor 'Tipsy' La rue sticks in my mind, an ex-New Orleans madam, tired of the Madi Gras scene, gathered up a few friends and backers, and bought an old boat........fixed it up and struck out on her own. I played around with the decals a bit more, and with the aide of the admiral, we decided on what will go to print. once printed, I though I'd line the edges with tape to keep the bonder from seeping into the paper. some past decals were useless due to this, but I think it might have been that the bonder caused the paper to curl. it kept the paper flat, lessening the chance of color runs {this can happen too}. it was a good thing I printed two copies of the decals.........while removing the tape, it latched onto the decal surface and tore the film, ruining the third and fourth set of decals. the bonder is shiny as well........to obtain a flat finish, I'm trying a flat lacquer......I do have my doubts with it's survival rate using it. we'll see what happens when I go to use them. the deck and structures are dry now....each have gotten two coats......the deck with a semi gloss, and the structures with a gloss. I'm sure that when fully cured, the sheen will die down to some degree. the strip around the deck, turned pretty much the same hue as the bottom.......glad about that the deck sheen isn't too evident......a lot of it sucks into the deck. in talking to Hugh about his kit, his kit is older than mine......mine has a date on the box, in the lower right hand corner....2015. I'm not sure if others have experienced these problems with the ill fitting decks......mine seems to include the second level deck as well. dry fitting the deck over the structures, I'm beginning to wonder if I went the right direction with the adjustments on the main deck. the front slot is on the tab of the forward structure......the slot at the rear is 1/16 aft of the slot. if I were to have moved the front structure forward, then the rear corners of the aft structure, would have protruded past the rear second deck edge....not good. using the front tab as the guide, the deck sits over the rear structure correctly, but leaves the slot and tab off. I will need to trim the rear slot to fit. I also wondered if this accounted for the alignment issues with the support poles, when it comes time for the third deck level. strange.........you bet it is there are some steps that need to be done before the deck can be installed. I'll have time to ponder this new issue.
-
they are real.....I've seem 'em. some look like a wookie ..one of his baby pictures....look at the eyes....and the claws digging into the admiral's leg. he was a terror as a pup! he's mellowed out now, but the first thing that hits the floor, usually ends up in his lair under our bed. sticks to me like glue though.....my 'lil buddy

-
I think he's in it for the long haul.........but I think some "wood envy" is starting to creep in
-
Cutty Sark by NenadM
popeye the sailor replied to NenadM's topic in - Build logs for subjects built 1851 - 1900
good to hear Nenad! rest up and a speedy recovery to you!- 4,152 replies
-
- 5
-
-
- cutty sark
- tehnodidakta
- (and 1 more)
-
..had to take a peek.......amazing what I see! very well done model.......like the way you made the turnbuckles...those are neat! it requires a left and right hand tap to make them? is you halyard rigging just temporary? it probably should be rigged on a couple more places to better support the gaff. darn nice looking model though...kudos!
-
thanks for the kind comments gents. and again, thanks to those who hit the like button. I spent some time at both tables....I cut my losses with the T.D. I hit onto another problem, and I caused another, so better left alone. thanks Grayhawk.......if they don't upgrade it, they should at least look at it and cure some of these problems. I'll explain when I post my update. thanks John........I've warmed up to them. especially since I looked at images of these vessels, and found that they are indeed......mostly white. I keep repeating the 'non conformist's oath'
-
I spelt sail wrong......I'm los'in it