
HOLIDAY DONATION DRIVE - SUPPORT MSW - DO YOUR PART TO KEEP THIS GREAT FORUM GOING! (Only 20 donations so far - C'mon guys!)
×


popeye the sailor
-
Posts
16,007 -
Joined
-
Last visited
Content Type
Profiles
Forums
Gallery
Events
Everything posted by popeye the sailor
-
 hope your feeling better........don't know any of those foods you folks were talking about a keg 'o beer and some fried chicken....and I'm a happy camper
 -
to you and yours as well Ed!
-
that would be a Chromate green...........Zinc Chromate? look'in good so far
-
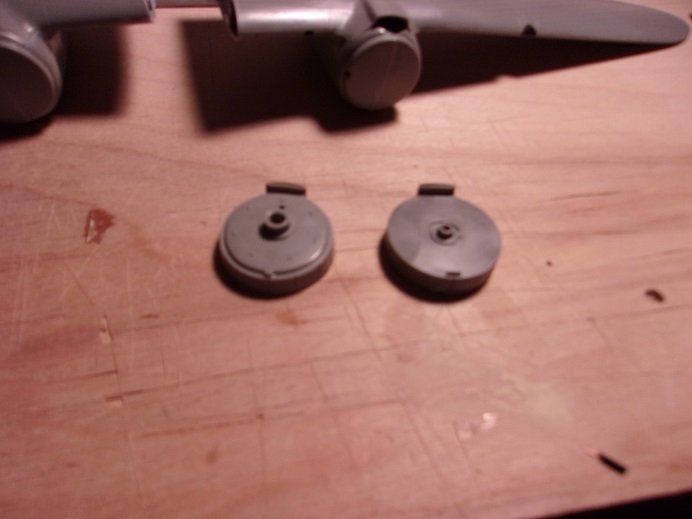
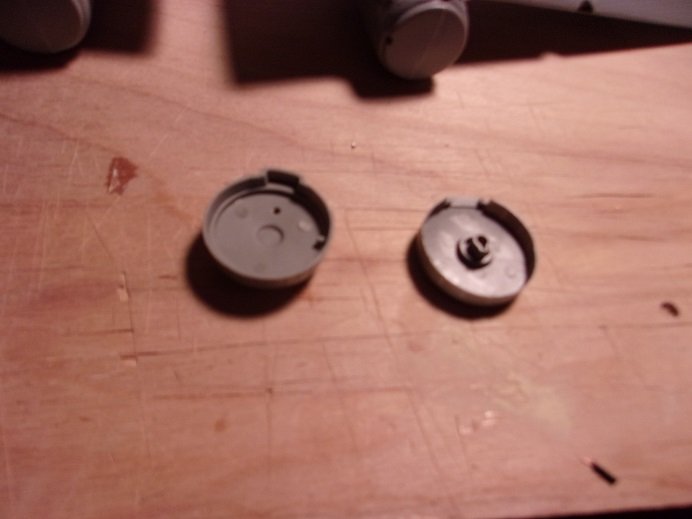
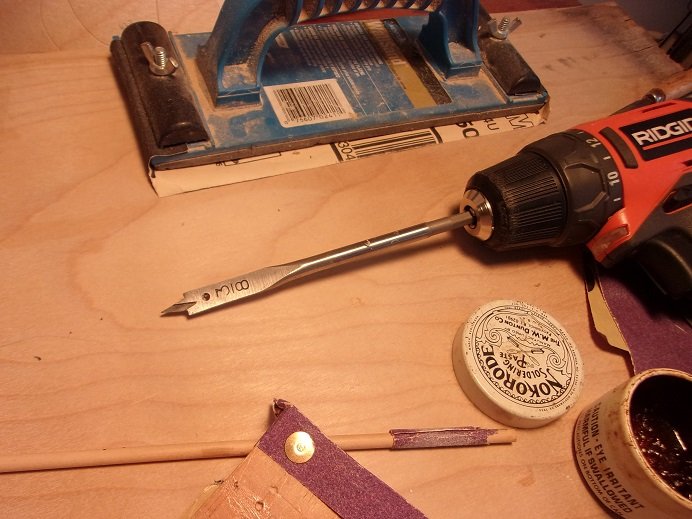
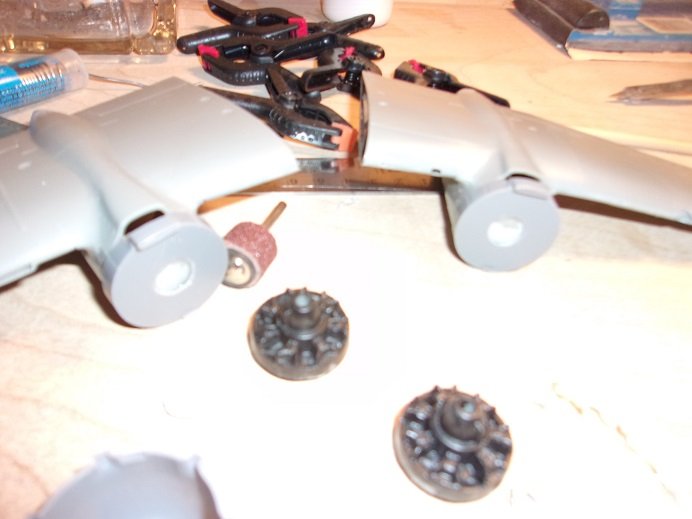
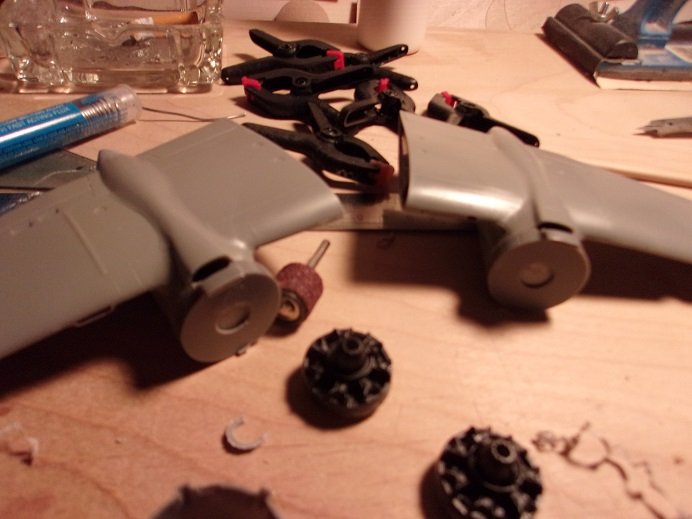
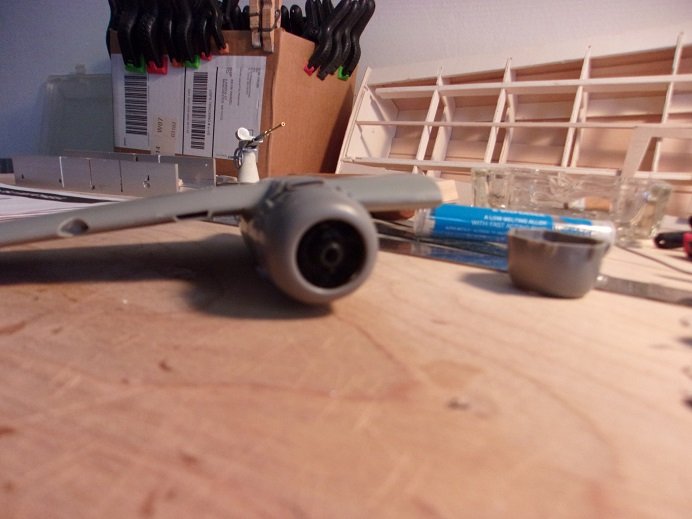
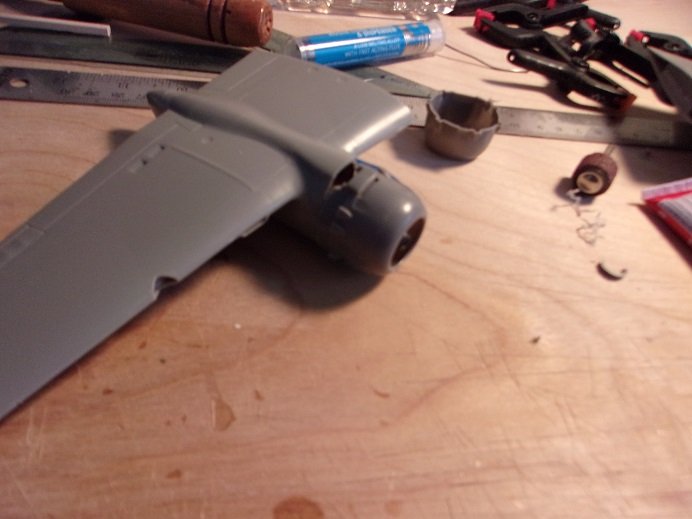
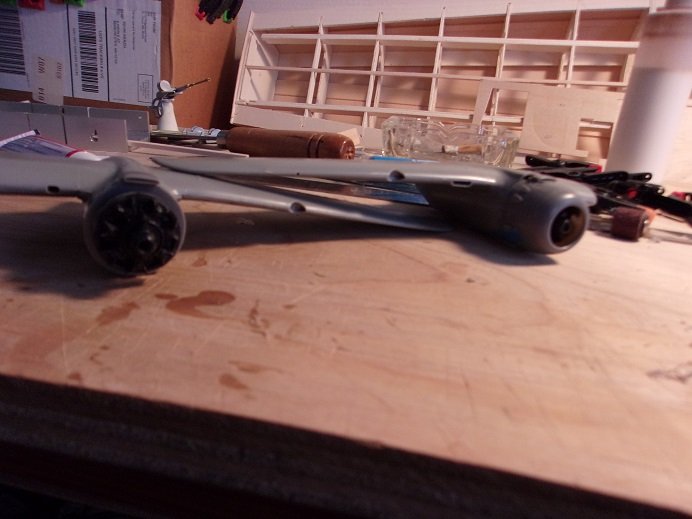
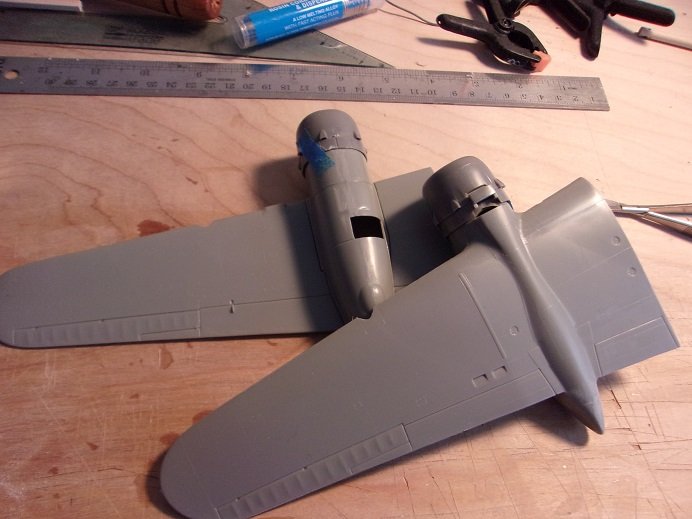
here is some progress on the Devil Dog. the first observation was that there are differences between the two manufacturers.......... ...not as thick.......the plastic is not as thick either. no guide hole for the engine part......I can orient the engine using the original part. the big difference is the back of the part......it or the narcelle will need to be modified. that's OK though.........we have ways to make things fit.......... the face of the narcelles needed to be sanded to flatten them out....they are a bit on the concave side. drilled out, they fit on there alright.......the circumference is around 1/32 of an inch larger, but centering them was not too hard. I will use the Accurate Miniatures cowls.......if I had the engines, I'd have used them too. the gap on top looked like an issue early on, but there is a part on the sprue that will take care of it. I will need to cut the part{s} to fill the gaps. the engine was centered with the cowl in place. the tabs were cut off and the mating surface was sanded flat. both engines have been fitted now........ I'm thinking I should have cut out the gear doors.........
- 103 replies
-
- 10
-

-
thanks Mike !
-
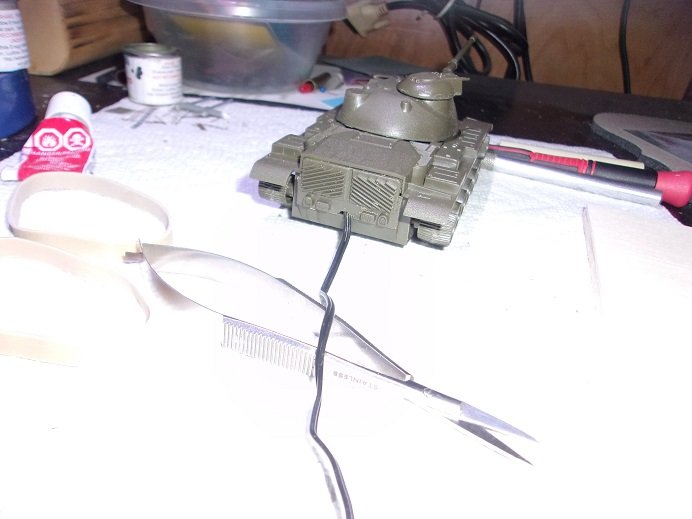
thanks for the concerns and well wishes gents.......so far I feel fine. Saturday's morning meeting I asked questions about it.......believe me! I have been very diligent about wearing a mask and keeping my distance.......we also get temp checked at the gate. the fellow in question is someone who is not a usual contact of mine...concerning though that he told them that he talked to me. I haven't heard of anyone else that got the phone call. I'll keep you all in the loop as to how things go I have other motors, but they may not fit........I've tried other size batteries, but the only combination that works is the two AA batteries. the gear set up is very much like your Ian, but the chassis is plastic.....I suspect that the gear shaft holes {journals} may be a tiny bit oversize, since the stress from the tracks cause they to buckle to the point of binding. the power of the motor isn't a factor either, since with the rubber bands, it moves along like it should. I really don't feel like altering the drivetrain on the tank..........and finding track to replace them would be hard to do. I've been looking for wider rubber bands.....seems to be the best way to go about correcting this problem. one thing I did do in the meantime, was change the way the wire was routed. the turret is glued in place.......to remove the body with the access for the pin blocked because of this, the head of the pin, which is on the underside of the chassis, was slotted so a screw driver can be used. once apart, I cut a deviation in the body's back plate, and ran the wires out through it when I reassembled it. if it's possible, I can stain the bands black....then I can get some paint on her. I'll have to look in my decal stash for usable decals. more on this project soon
-
you do have quite an array of military armored vehicles Patrick......an award winning collection! I've done armor, but ships and planes have always been my favorites. the motorized feature is what caught my eye.....something I thought would be fun to do. I really don't feel like altering the drivetrain on the tank..........and finding track to replace them would be hard to do. I've been looking for wider rubber bands.....seems to be the best way to go about correcting this problem. one thing I did do in the meantime, was change the way the wire was routed. the turret is glued in place.......to remove the body with the access for the pin blocked because of this, the head of the pin, which is on the underside of the chassis, was slotted so a screw driver can be used. a deviation was carved along the bottom of the back plate of the body, and the wire was re-routed to exit from the deviation. I'll do some painting and look in my decals to see what I can use...... more soon


-
yea........the holidays put a crimp on more research, but I think I have that site bookmarked too. the Higgins / Nasty Class is particularly interesting. I've been wanting to get back to her.........adding the gun wales and {chine} spray rails. I never did tell you how I got glue in along the chine / bow panels..... what made me remove it from the plywood board, was I was sanding.....pressing down along the seam, I heard the bond break....that's when I stopped. what I did was cut a diamond shaped hole in a drinking straw. bending it there, it was sealed with clear scotch tape. it was then pressed onto the nozzle of the glue bottle........I was able to squirt some glue along the chine stringer and spread it too when I run the spray rails, as I get to the bow, they will run over the seam, covering it. it will not be seen unrelated..........the admiral has been looking for one of my Christmas gifts. it was in limbo in post..........well.......it came it today! you'd have thought it was for her, with the squeals going on......riled up Gibbs even! in it was the IJN Shokaku.....but something else that the admiral forgot.......a smaller scale of the Billing Boats Coast Guard Waverly life boat! she looked through her order invoices....it was there......she must have been confused. I'll post pictures in the 'what have you received today' thread......crazy!
-
I dunno gents.....I thought it looked ok...... the water dio is good, but in the initial pictures I liked how the model was shown, and not shrouded in the water. the bow does ride a bit too high, but I liked the balance. really nice effects
-
very nice progress Mike! the deck looks great with the fittings on, but I'm curious about the flag. is that supplied in the kit, or something you made?
-
back when I was a kid, I had a tank.......comparable to 1/8 scale, that moved and shot plastic shells out of the cannon. as for this small model, all it can do is move around....can't turn or anything, but a savvy person could alter the remote in some way. to create a dead track might be the biggest hurdle. I just got a call from the Walmart DC that someone I work with in the truck shop tested positive and that I may have been exposed to the person. she didn't tell me that I had to stay home......I can go to work, since I am tested for temperature at the gate. I don't have any symptoms...I feel fine. I'll find out more when I go in tomorrow. I think I'll take Tuesday off
-
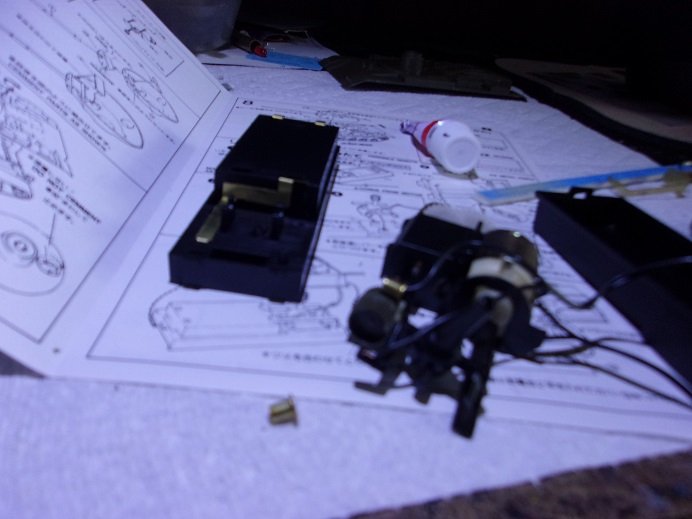
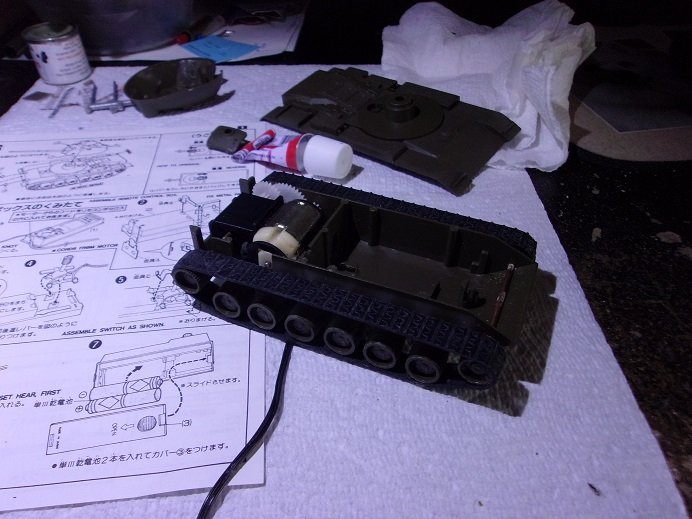
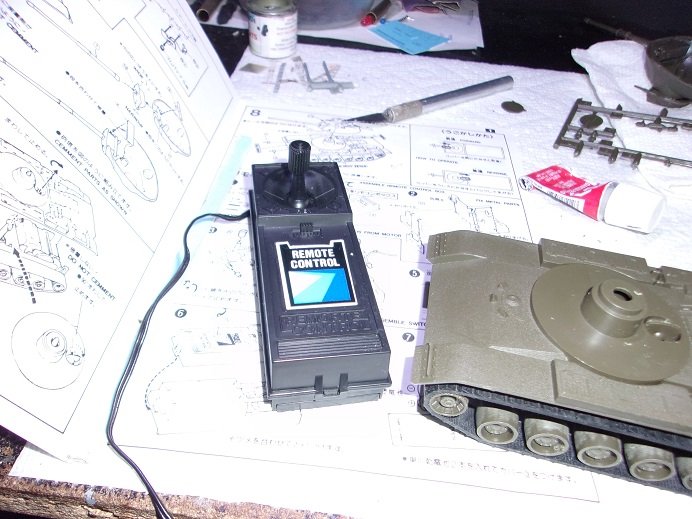
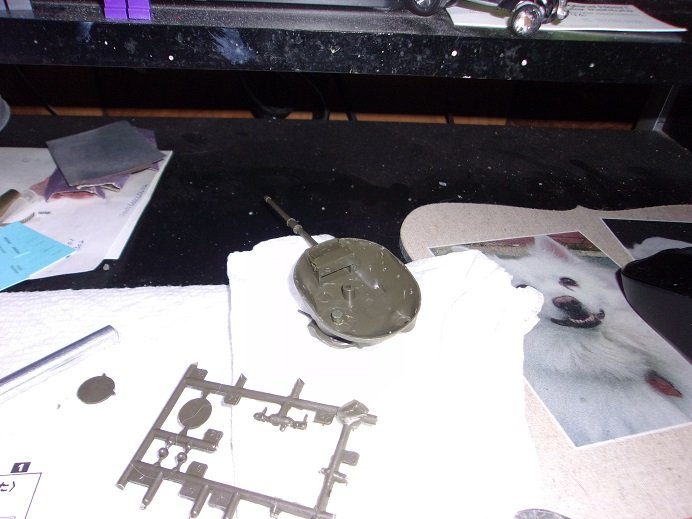
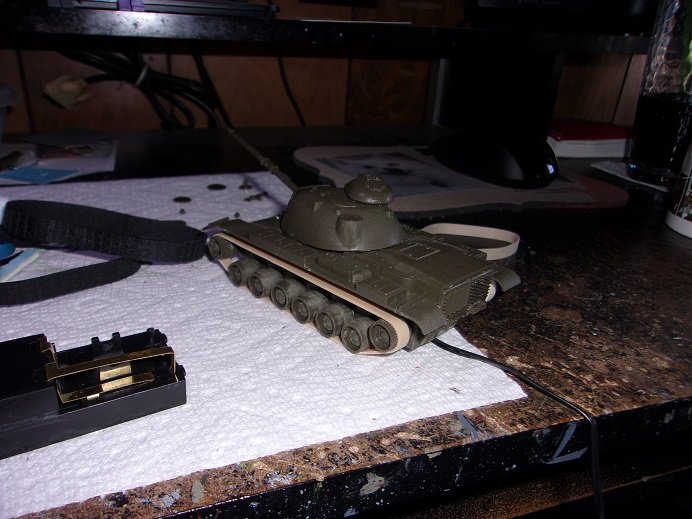
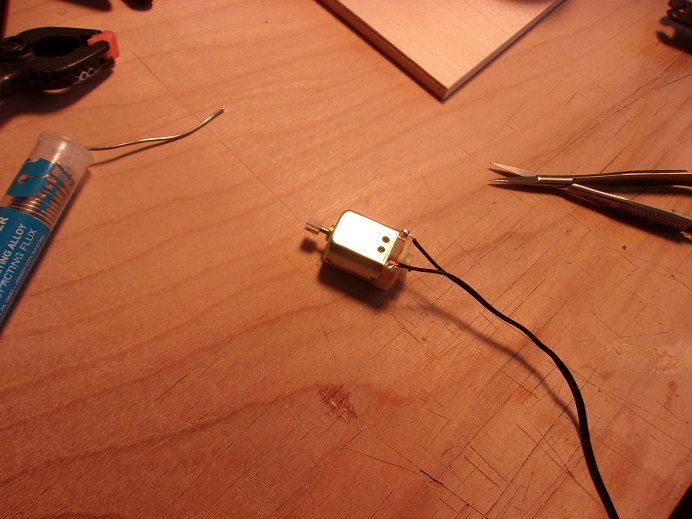
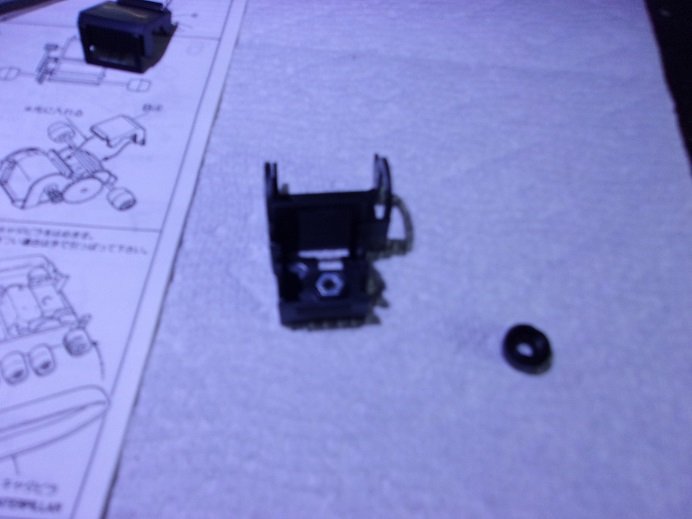
I've seen some kits with pliable plastic tracks Ken.......these are real McCoy rubber.......kinda stiff though. welcome! the boggies turn good.........there's more to the story any oil applied to rubber will also make the rubber expand....might also impede them from moving. it will also cause the rubber to break down...in my dealing with automotive, this is one thing that one shouldn't do. OC.........well aren't you the little devil 😈 the boggies are in place..........the remote is assembled as well. sad that I didn't get too many pictures of it, but you'll see more as I go along....grrrrrrr! I was assembling the remote at the time here........they were not too clear as to where the wire was to come out of the tank body, so I ran in from under it. there are a couple parts that I did not add.......it seems that the interior of the chassis will also hold a battery pack.....makes me thing that another variant of this model was more of an R/C type {with an antenna}. this likely made the model heavy and hard to run on just a pair of AA batteries...four would have probably made a difference. I did run the motor to insure that it worked OK..........thing were looking up! hard to see in this picture......but this is the knob that runs the remote. the wires fit through hole in the pegs to the left in the picture and are capped off with metal eyelets. in the body of the remote, you see that the battery compartment is almost complete......one of the contacts is in position where the knob will be located. this would have been flawless.....but I broke off one of the pins on the knob I cemented it back together and plated the breat with a thin piece of plastic. I waited for this to dry........with this plastic, it took much longer for it to set. there is a pin that enters from the underside of the chassis, and exits in the well in back of the turret pylon. a little twist will lock the body to the chassis, enabling it to be disassembled in the event that a problem arises. when I figured that the repair was dry enough, the remote was assembled. the turret was assembled at this time.......... cute.........upside down........it's so shy in front of strangers ....just some odds and ends left to add. driving the tank though was a big let down......it would only roll 1/4 inch forward and backwards. removing the tracks, I ran the motor for a few moments in an effort to break it in.......so to speak. the tracks were put back on, but I got the same results......saddening to say the least. removing the top of the body and watching the gears reveled plenty.......to much tolerance for the gear axle holes causing the axles and gears to shift.....causing binding of said gears. this wasn't the main culprit though........it's the tracks. it takes a bit to stretch them in place on the boggies. there is too much stress and torque here, which causes the gear assembly to move out of alignment, binding the assembly. to test the theory, I got a pair of rubber bands......I wish I had wider ones, but these will do for now. by this time, my repair of the knob assembly had failed.........I will have to think of a suitable replacement of the assembly or configure the remote differently. the remote works on a power reversal design.......forward is + and - , and for reverse is - and +. with the rubber bands, the tank runs fine, driving over everything that was in it's way. the tracks can't be adjusted, being a one piece deal.........however, there is a solution. I can make new holes for the leading boggie axle and reposition them, decreasing the amount of stress applied by the tracks. it is kinda cool though........with no lubricant on the boggies, it does give it the sound of a tank rolling along. so.........in conclusion to this little project, they are fun to play with......but not something I would get into on a collective basis. I didn't paint the model......something I might do once I get the track issue solved. I wasted the decals, since they wouldn't stick to the bare plastic. I will change where the wire comes out......I should have known that under wasn't a good place........I'll drill a hole somewhere in the back. when I get the model truly finished......hopefully with a short video.....I'll post the final pictures Happy New Years to all......2020 was a trying year and I'm glad it's over! happy modeling in the year to come !


- 25 replies
-
- 10
-
-
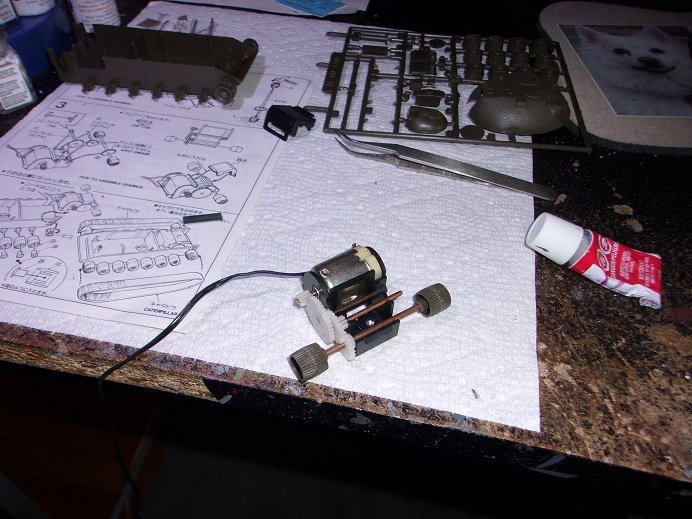
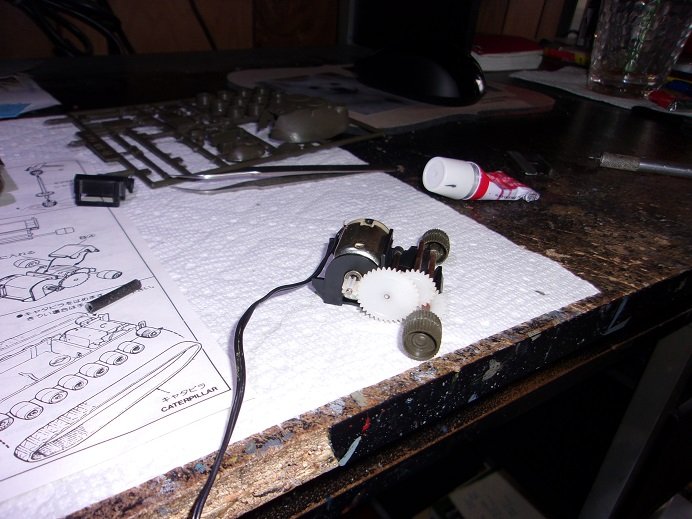
hello Egilman.........why of course I plan to mobilize it! I wouldn't dream of denying everyone the opportunity of watching me fall on my own sword! it's like telling a Samurai to 'spill his guts' on the old model kits site, there is a surge of these kits showing up by different manufacturers. the big push was today..........the wires was connected to the motor to fasten the drive carriage to the chassis is with a screw..........a nut was pushed into the hole provided for it. it was later capped by a round cover and glued into place. the drive boggies were pushed onto the drive axle, which has a gear on it already. it is preset into place. the rest of the gears were set in place, in connection to one another. to keep one of the gear axles from shifting, a small piece of rubber was pushed on the other end.......later though, I saw that it had split, telling me that the life expectancy of the material was probably past its end. I'll have to leave it in the lap of the gods, that the shifting doesn't impede the action of the gears. assembled, the drive assembly looks like this.. the axle arrangement was arrested in place by the black part you see in the upper left hand of the picture.........the round tube you see in the picture is what I cut the gear axle stop from. I won't be using it since seeing that the stuff is useless.
- 25 replies
-
- 11
-
-
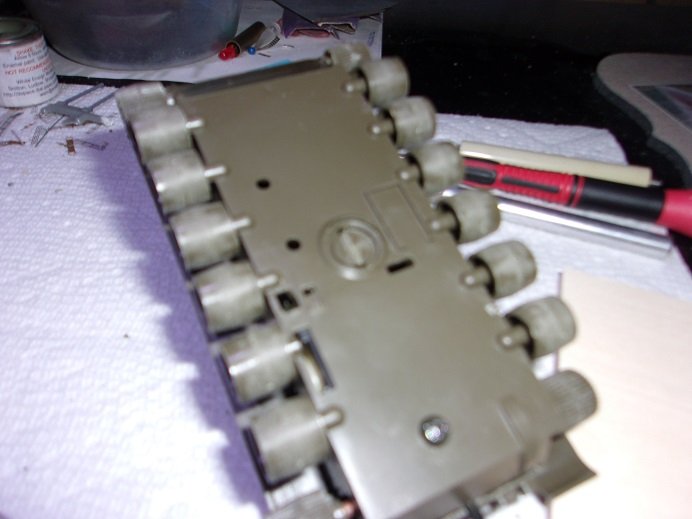
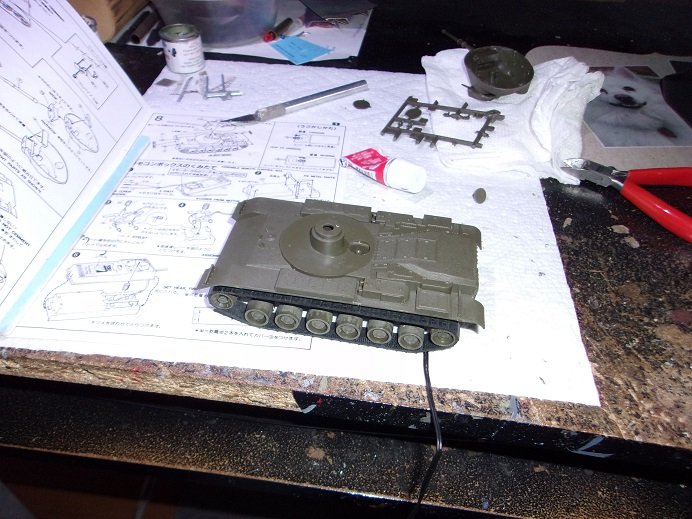
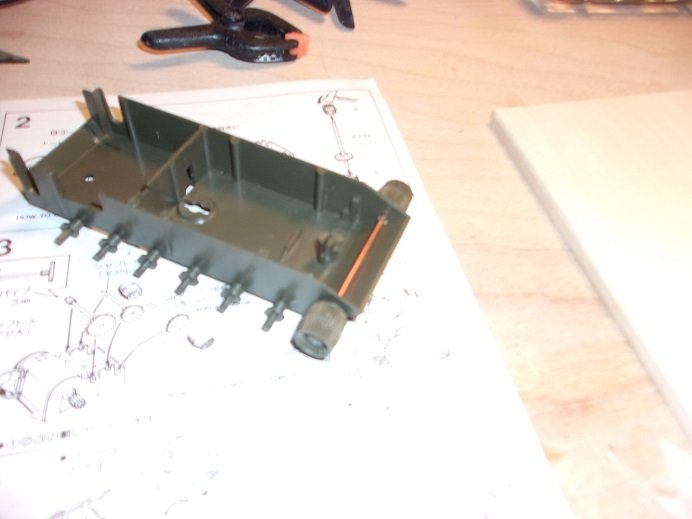
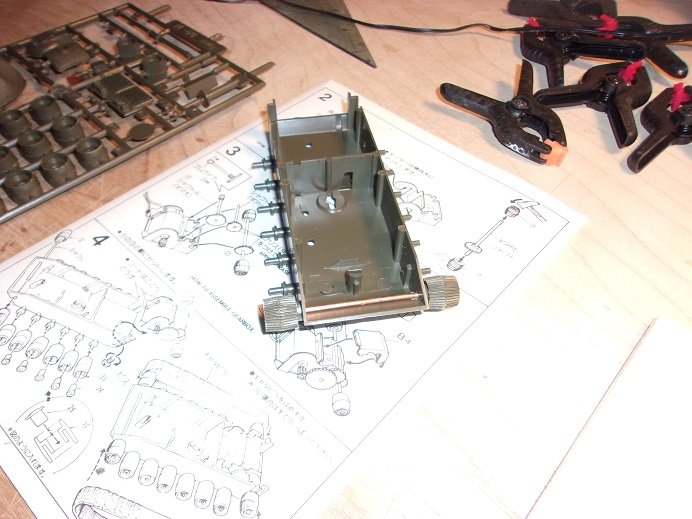
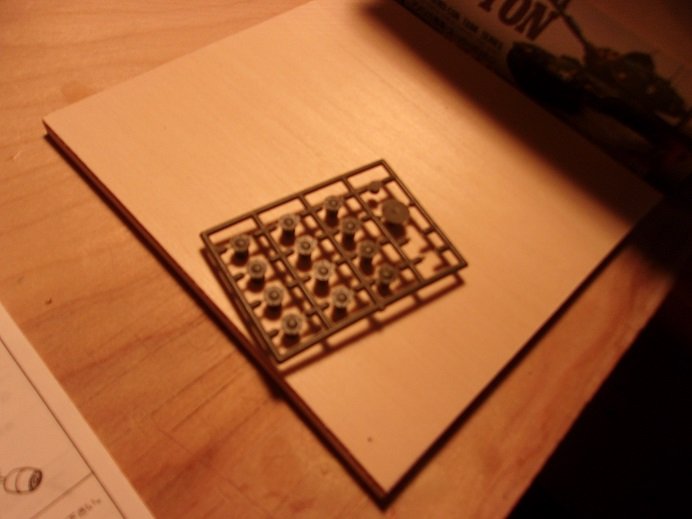
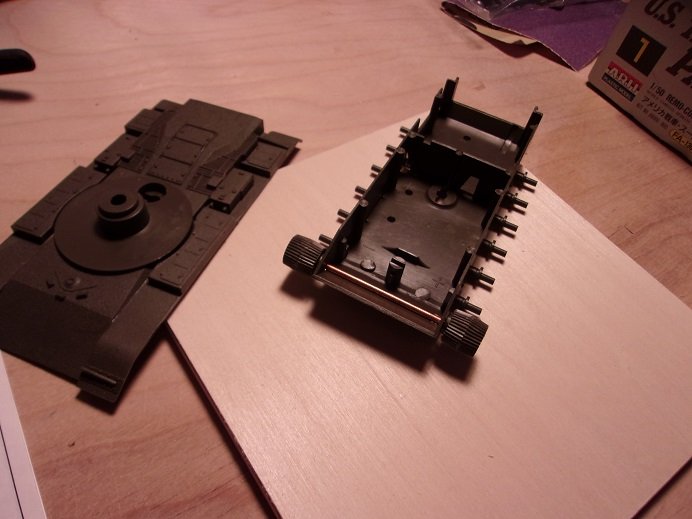
it starts with the tank and assembling the leading wheel assembly. they press on the axle with a little effort......certain that they will not to come off any time soon for the boggie rollers, there are these rubberized caps that hold them in place. they go through the holes of the rollers and fit onto the pins along the bottom of the tank chassis. the top surface of the tank body has some really good detail. for the kit being molded so well, there is quite a bit of flash. I'm doing quite a bit of trimming. the plastic cuts like barbed wire and sanding produces some really grainy dust. the perfect plastic to make putty from......but I'm not going there all of the boggies need to be sanded around the circumferences to lose the molded tool lines. I didn't do that to the leading and drive boggies though.......as you can see from the picture above, they possess some sort of tread design. one wonders if this will deter track wandering........I guess it would depend on how exact the model really is.


- 25 replies
-
- 11
-
-
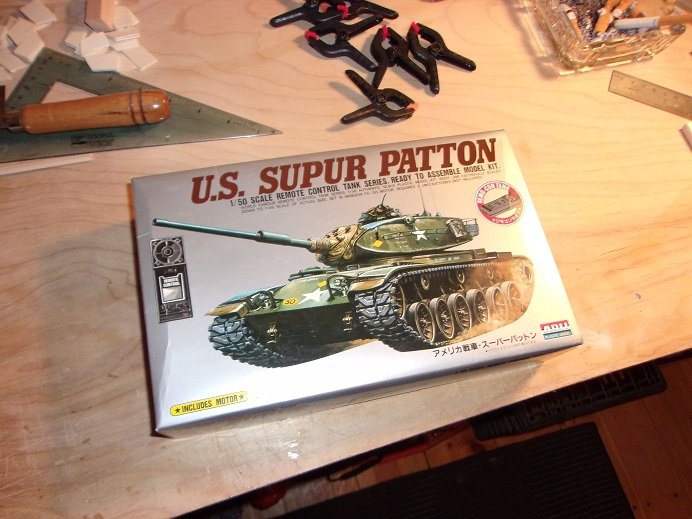
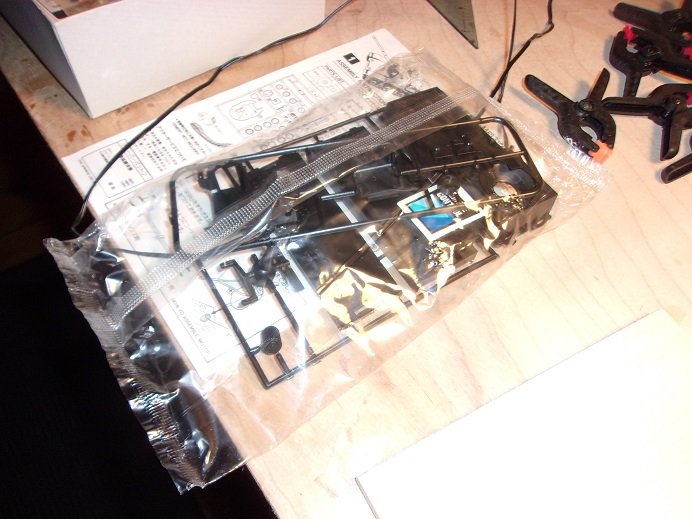
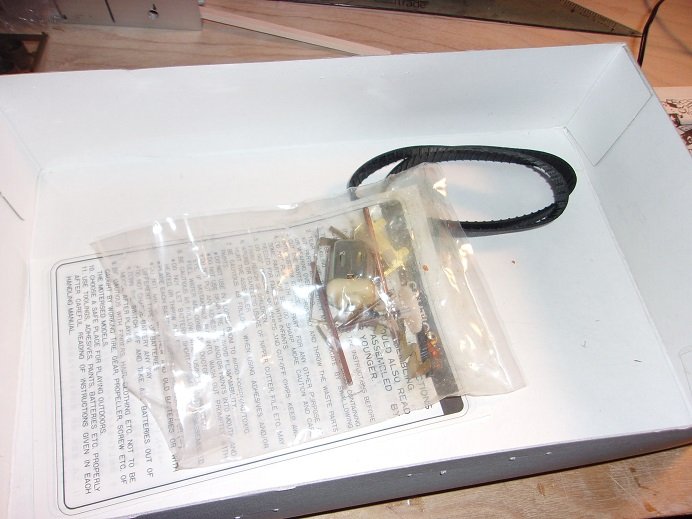
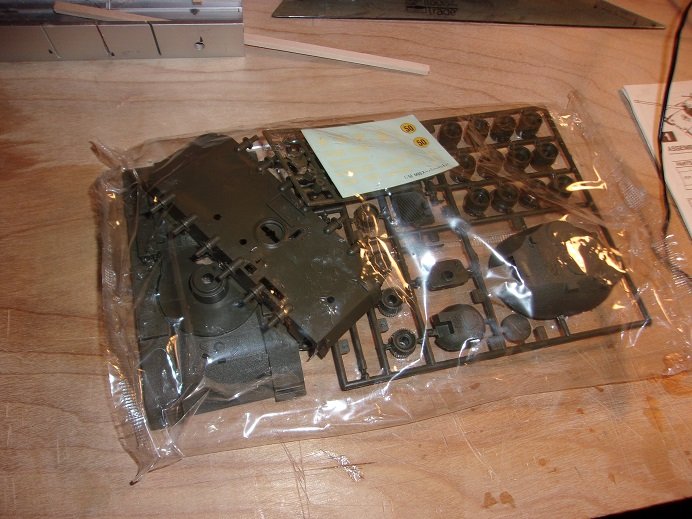
hello all.......a very happy New Years to you! we had a quiet one here.......had the young one and his girlfriend over, but shuffled them out early and finished the evening with just the three of us. I watched the first two ' Die Hards' with Gibbs, and the admiral read her books. the after Christmas fun began with this model kit, which is the smallest tank I've ever built. this is the model that I asked for after submitting my wish list.........the admiral told me sure.........but I'll need to put it under the tree. I can't have it until Christmas. so I did....... the big draw to this model was the fact that it is motorized, which I thought would be something different here on the site I did do a contents overview........but not much. the remote control need to be assembled........ it had all the hardware.......even the motor. I have a couple of other models that don't supply the motor.......just the hardware. I have these motors in my inventory.......taken from one of those animated Christmas stuffed figures. of course, it has pre-connected rubber track, and all that........and of course, the tank needs to be assembled as well. it made from a really strange plastic.......something I've not felt before. should be a relatively quick model to build
-
Centurion.............is that British?
-
can't do that Patrick......... we're on the same side now if'n you were do'in British armor..........that would be a hoss of a diffr'nt color thanks for look'in in and the likes
-
look'in even better with the added accessories
-
on some, when the bumpers and such are added, they have tabs that the chassis will sit on. you haven't added the windshields either, and that will set up the interior to sit in its proper place.
-
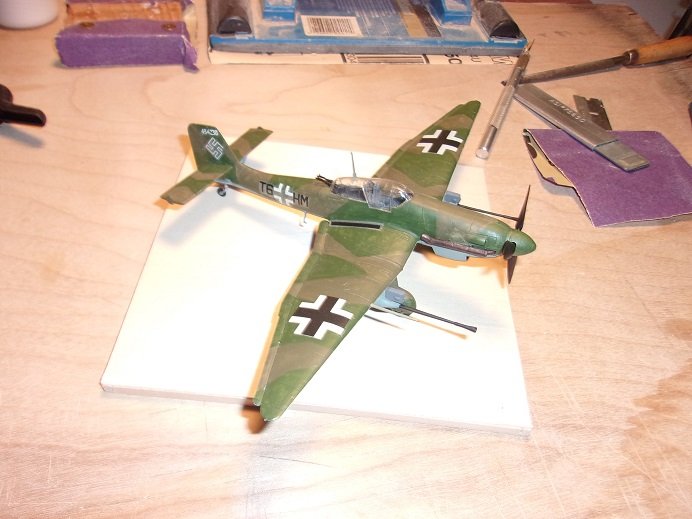
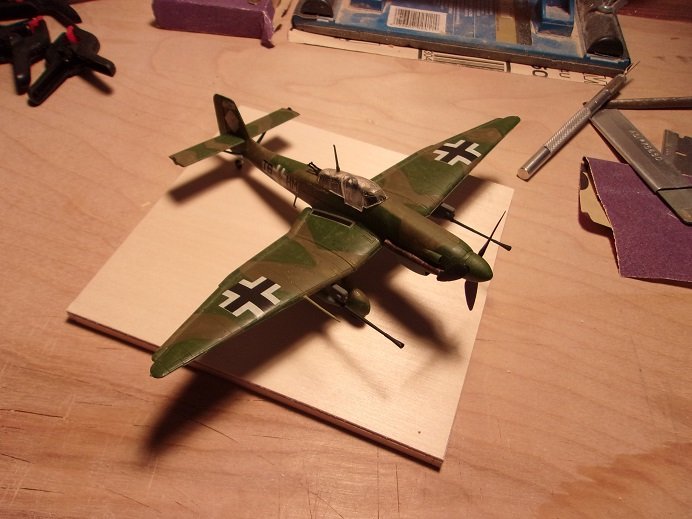
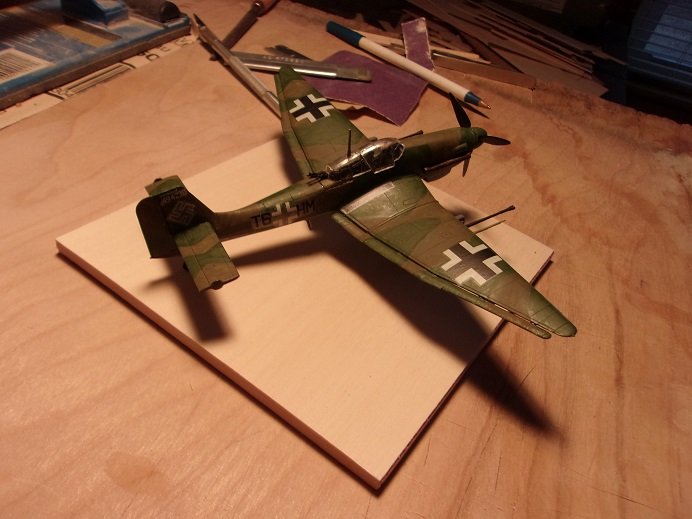
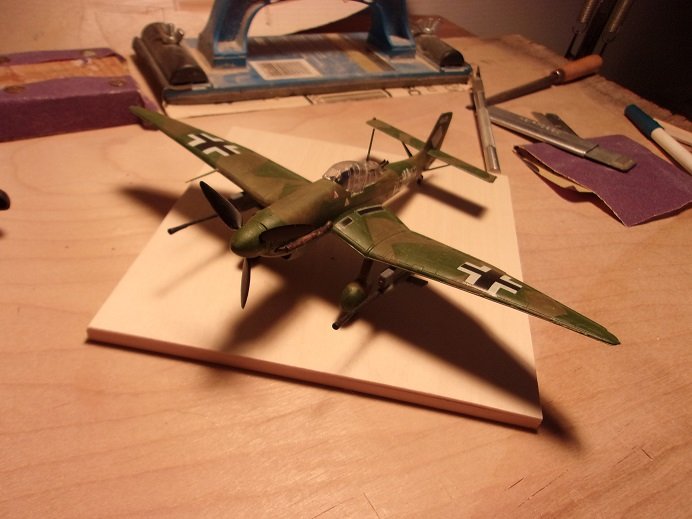
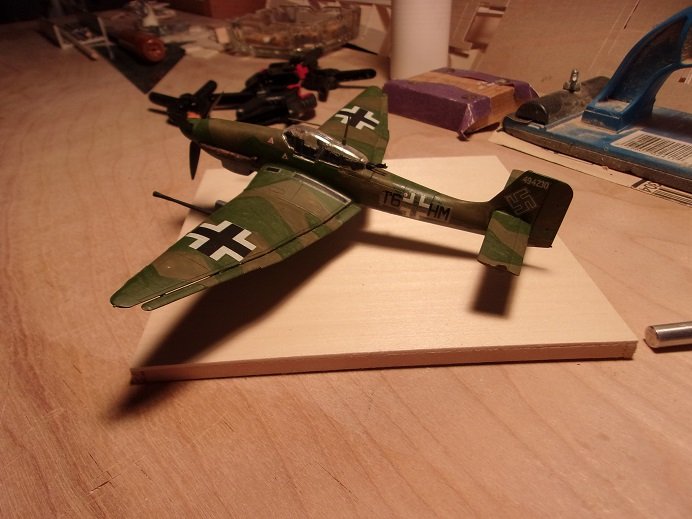
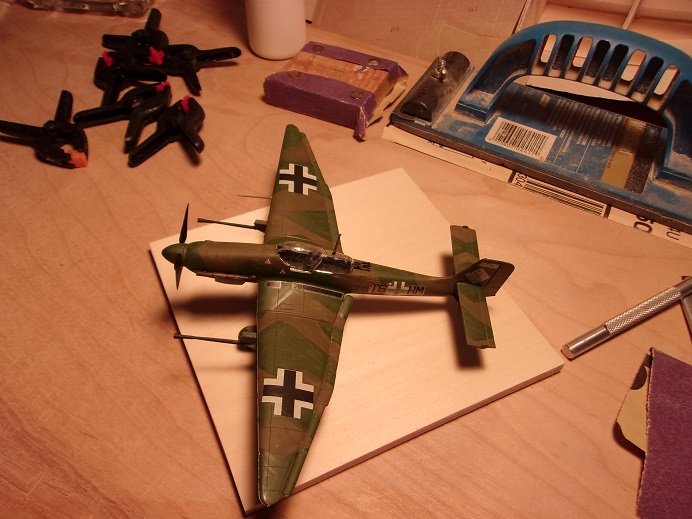
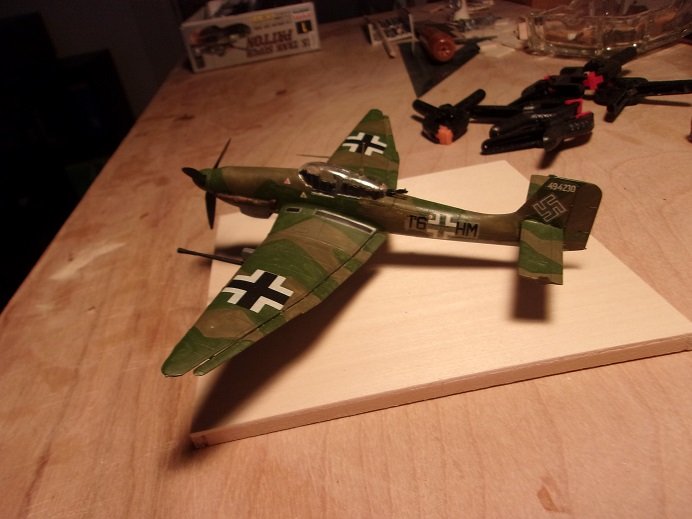
this one has hung around long enough.........I put the finishes to it before Christmas......then thing got too busy 🎅 I dunno........I like it, but I don't think its my best work. I was hoping to put the closure on a few other projects as well. as mentioned, there was a fit problem with the canopy......comes in two parts. hope you enjoy.......definitely one subject that I want to revisit in a larger scale these two were with flash........the rest are without flash. thanks for look'in in.........I really appreciate yas follow'in along

- 89 replies
-
- 13
-
-
great looking cockpit.....the detail set does wonders for it hope to see more soon!
-
nice model Jack........your becoming a rotor head.......could be contagious! now you need to do an assault chopper.......plenty of fire power!
-
I saw those 3D items....and in my mind, I started clapping! ....they are just SO cool! the carts.....the boats....awwww hell....the whole ensemble are gonna look nice! buy your friend a brew for me will ya!?!?!
-
read my mind Mark............can you say 'bird strike'....holy cow! yea.....nasty glad your gonna try to save it......next time, white glue


