


Tigerdvr
-
Posts
389 -
Joined
-
Last visited
Content Type
Profiles
Forums
Gallery
Events
Posts posted by Tigerdvr
-
-
Holy crap, how good will you be when you can see what you are doing? You are already pushing us mere mortals over the edge🙃
Seriously, I use the Optimizer with the swing away single lens. I think you can do better than the Optimizer lighting setup. One of our members here suggested
a small rechargeable light that can be velcrowed (?) onto the frame. It has a chrome body and roHs stamped on the body. Sorry, the full name is covered
with my Velcro strip. I've had this light for at least 3-4 years now and is the best I have found. I can't remember the members name that suggested it.
Harley
- thibaultron, Canute, RGL and 1 other
-
 4
4
-
I just don't have the time or space to do give this ship the attention it deserves so- - -
1/200 Trumpeter USS Yorktown, #03711, new, all pieces still in unopened plastic bags.
Box opened only to check contents.
Will be shipped in original heavy duty container at the buyers choice of shipper.
$250.00 plus actual shipping costs. The box is 51"x18"x6" and 16/7 pounds so shipping from south Florida should be considered.
Have a Safe & Happy New Year
Regards, Harley
- Landlubber Mike, Canute, Dubz and 1 other
-
4
-
-
A mighty steady hand there, very impressive work. Thanks for sharing your log.
Harley
- mtaylor, popeye the sailor, lmagna and 1 other
-
4
-
As part of my USS Kidd project I looked into a number of commercial items available to load the floater net baskets. The commercial items were all PE thusly very thin and required some creativity to make the basket look loaded. None of them worked for me even though I only had seven baskets to fill. Pictures of the real baskets show the gear was usually a lot of different stuff without much uniform distribution. I just cut up some plastic rod of what appeared to visually simulate the basket's contents, painted some items slightly different colors, and loaded the baskets. I don't know if that would satisfy your well known desire for accuracy, but from a normal viewing distance, I'm happy with the overall impression.
Your idea of crimping wire is certainly worth a try IMHO.
Great work on the Essex.
Harley
-
Thanks for the kind remarks gentlemen. I'll post a pic or two when she goes to sea.
Cheers, Harley
- popeye the sailor, mtaylor and Canute
-
3
-
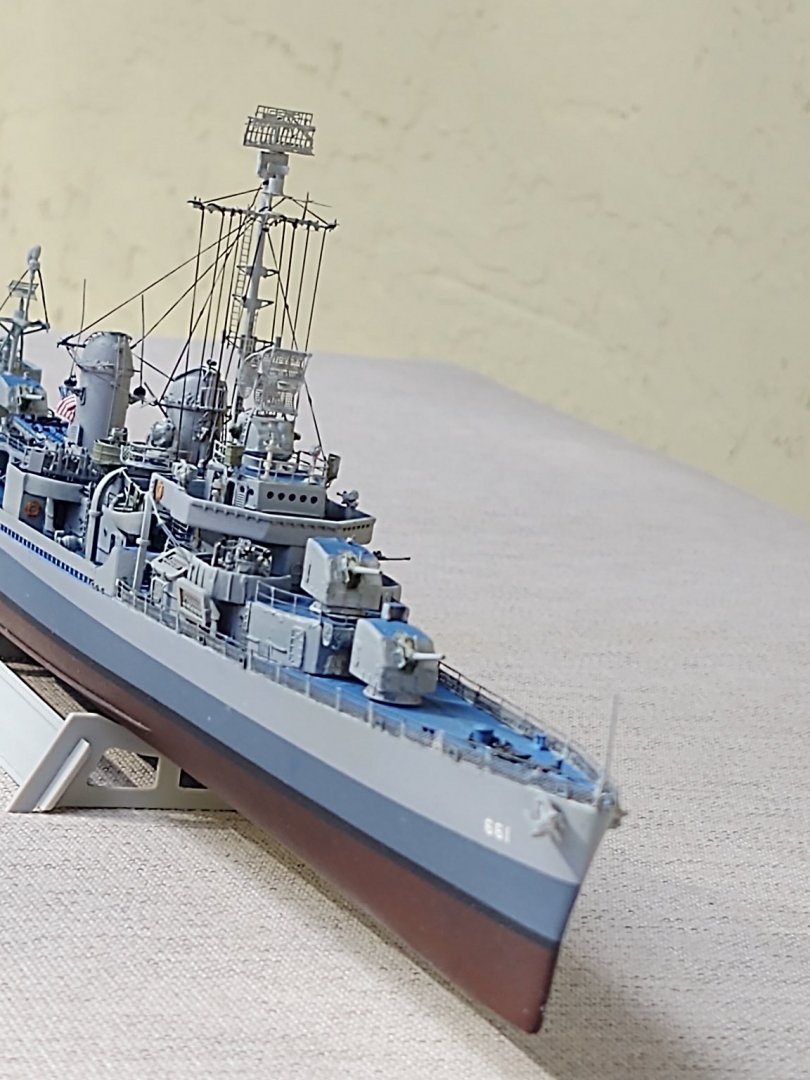
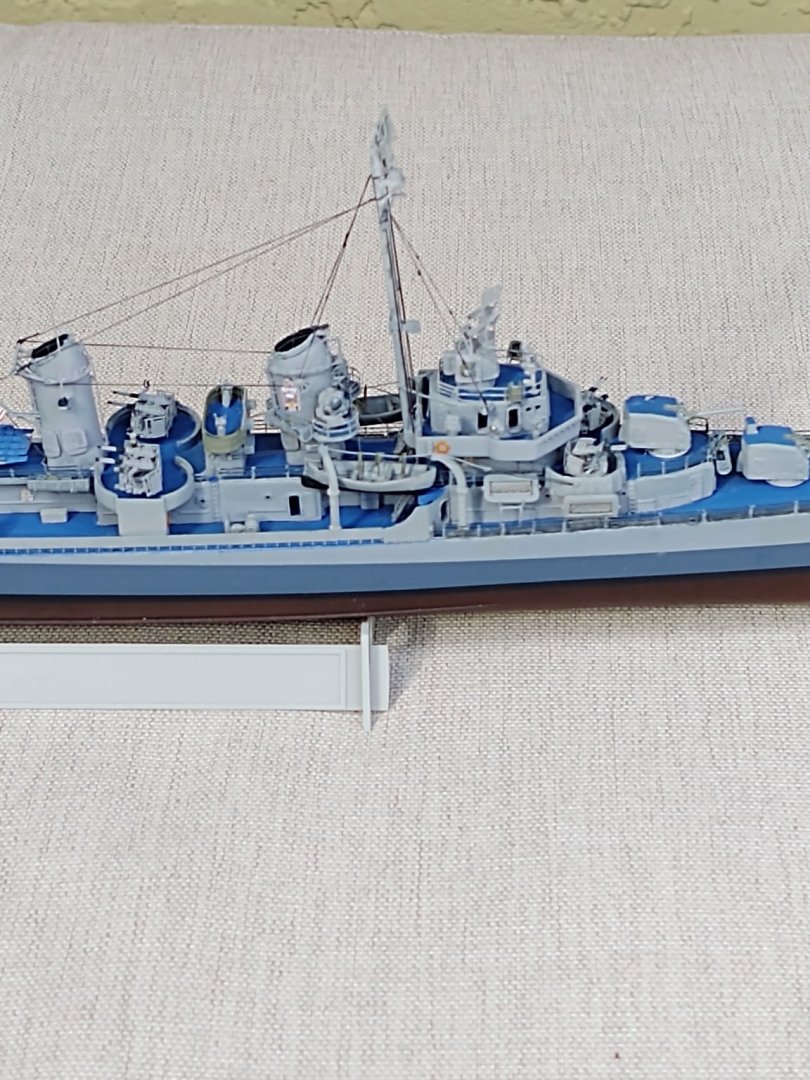
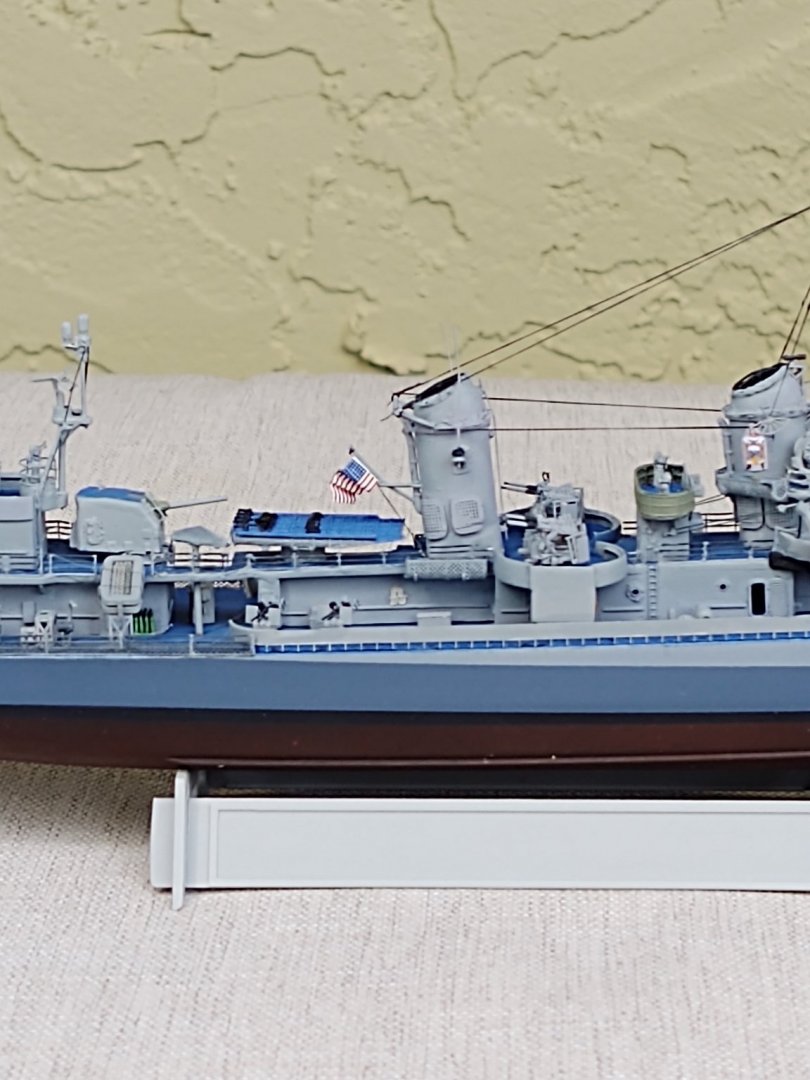
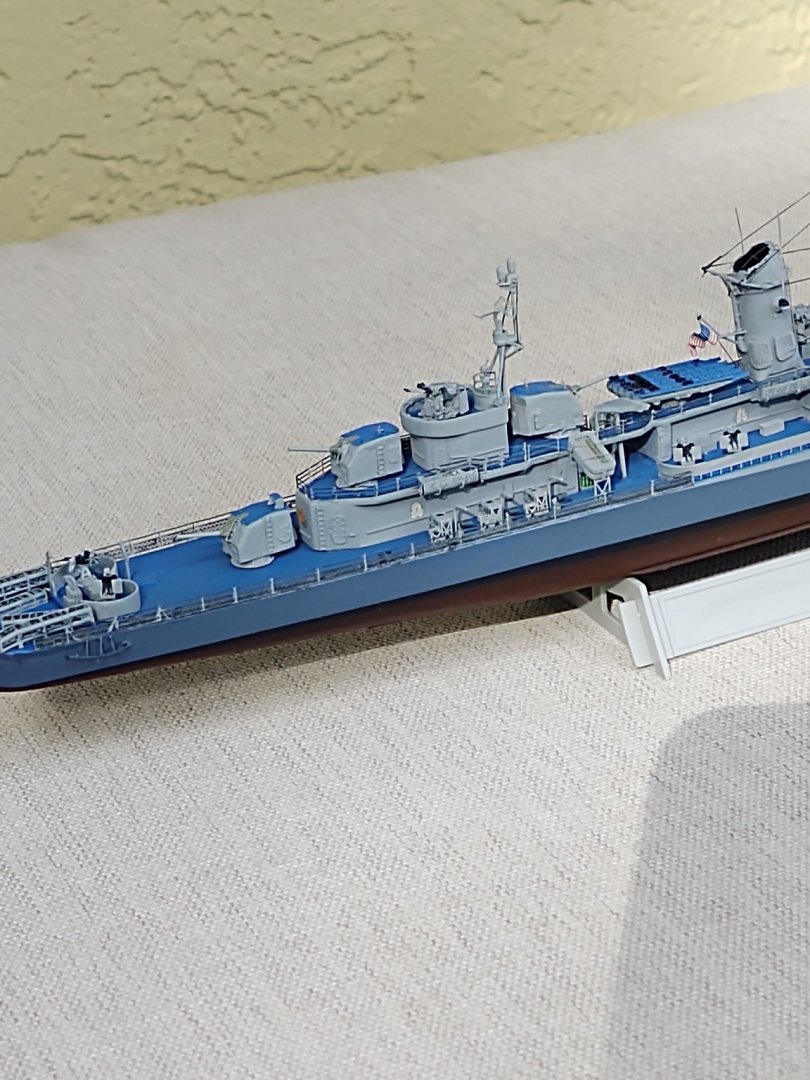
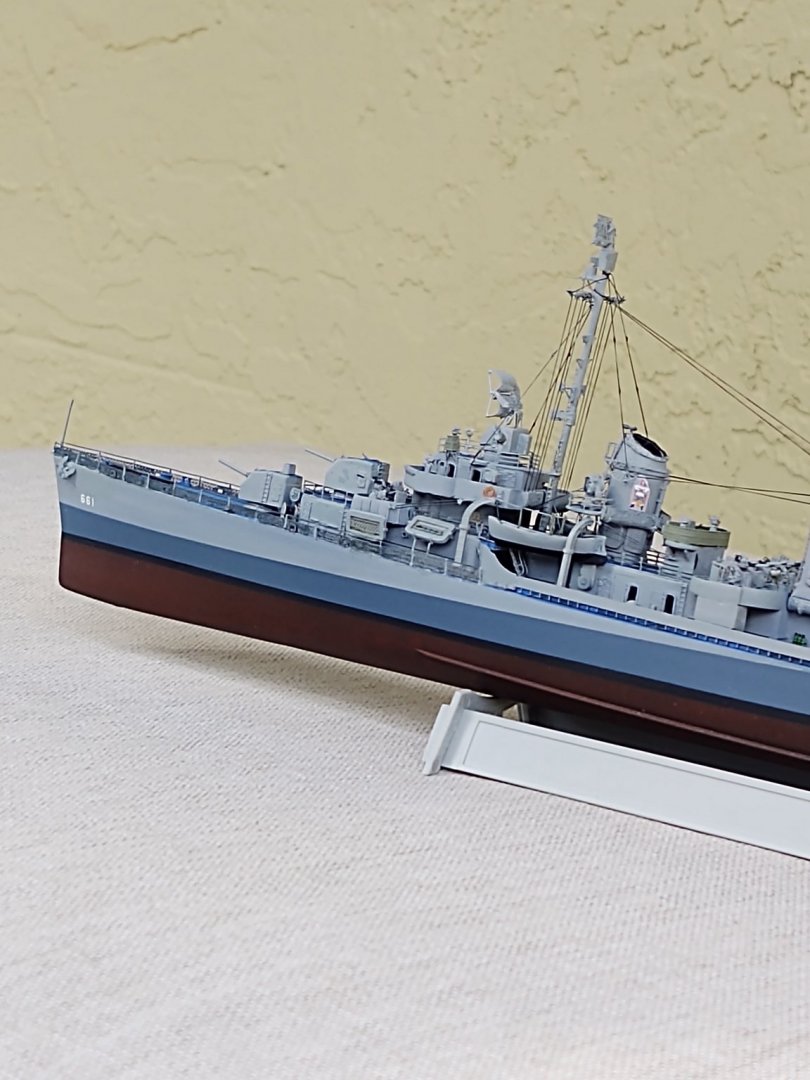
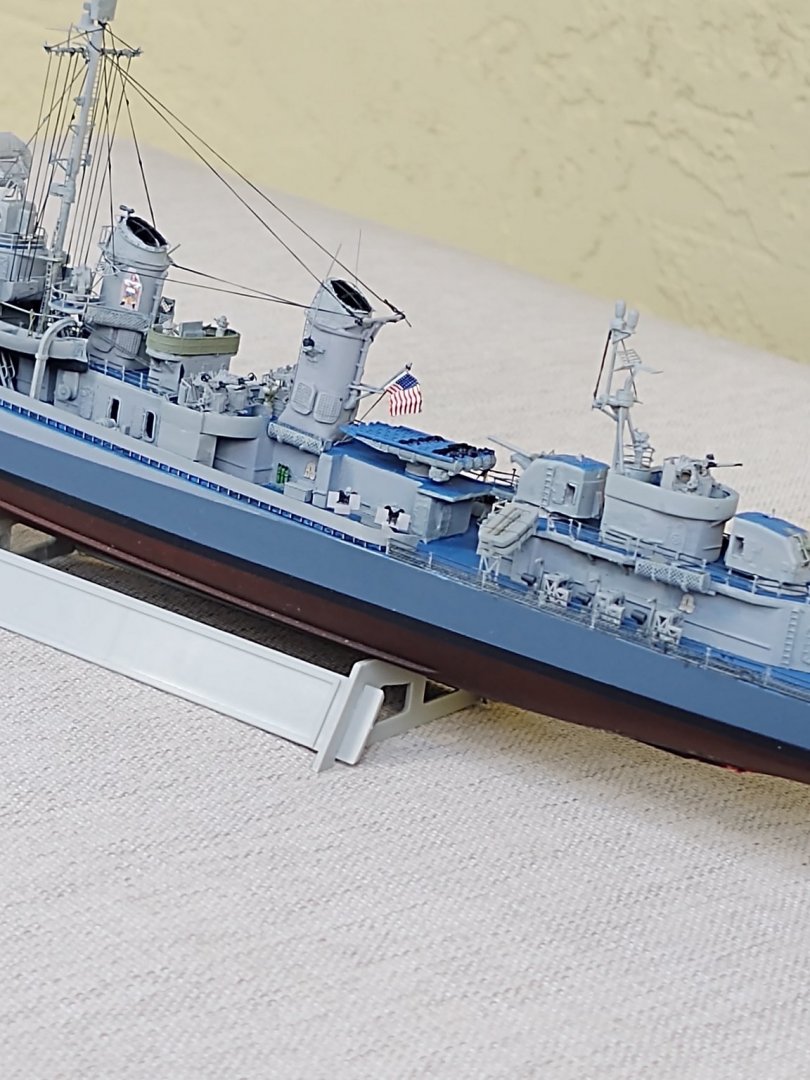
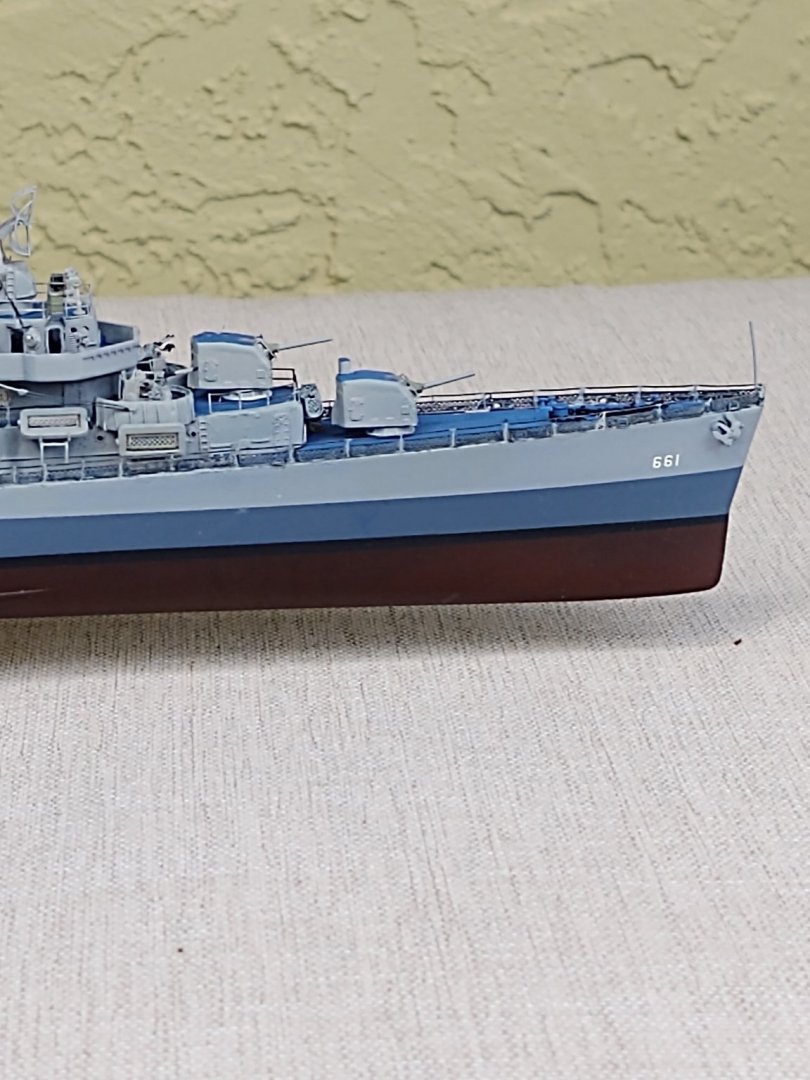
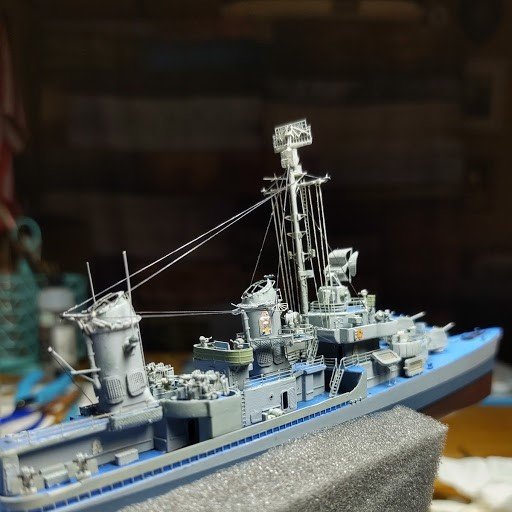
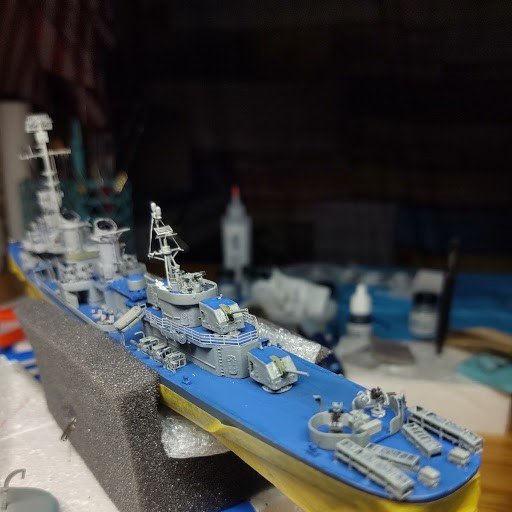
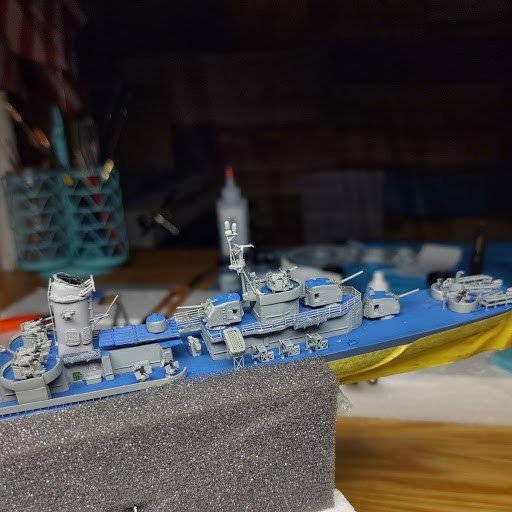
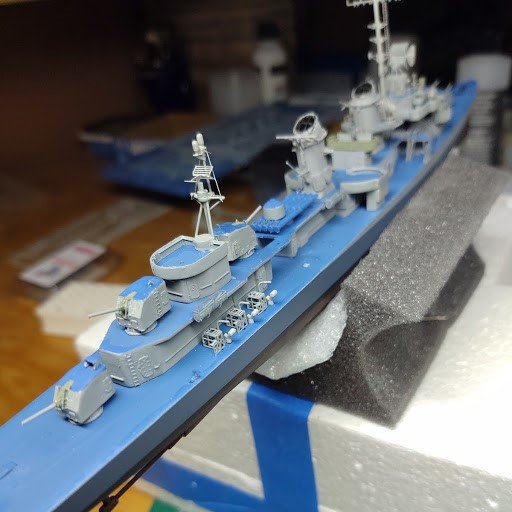
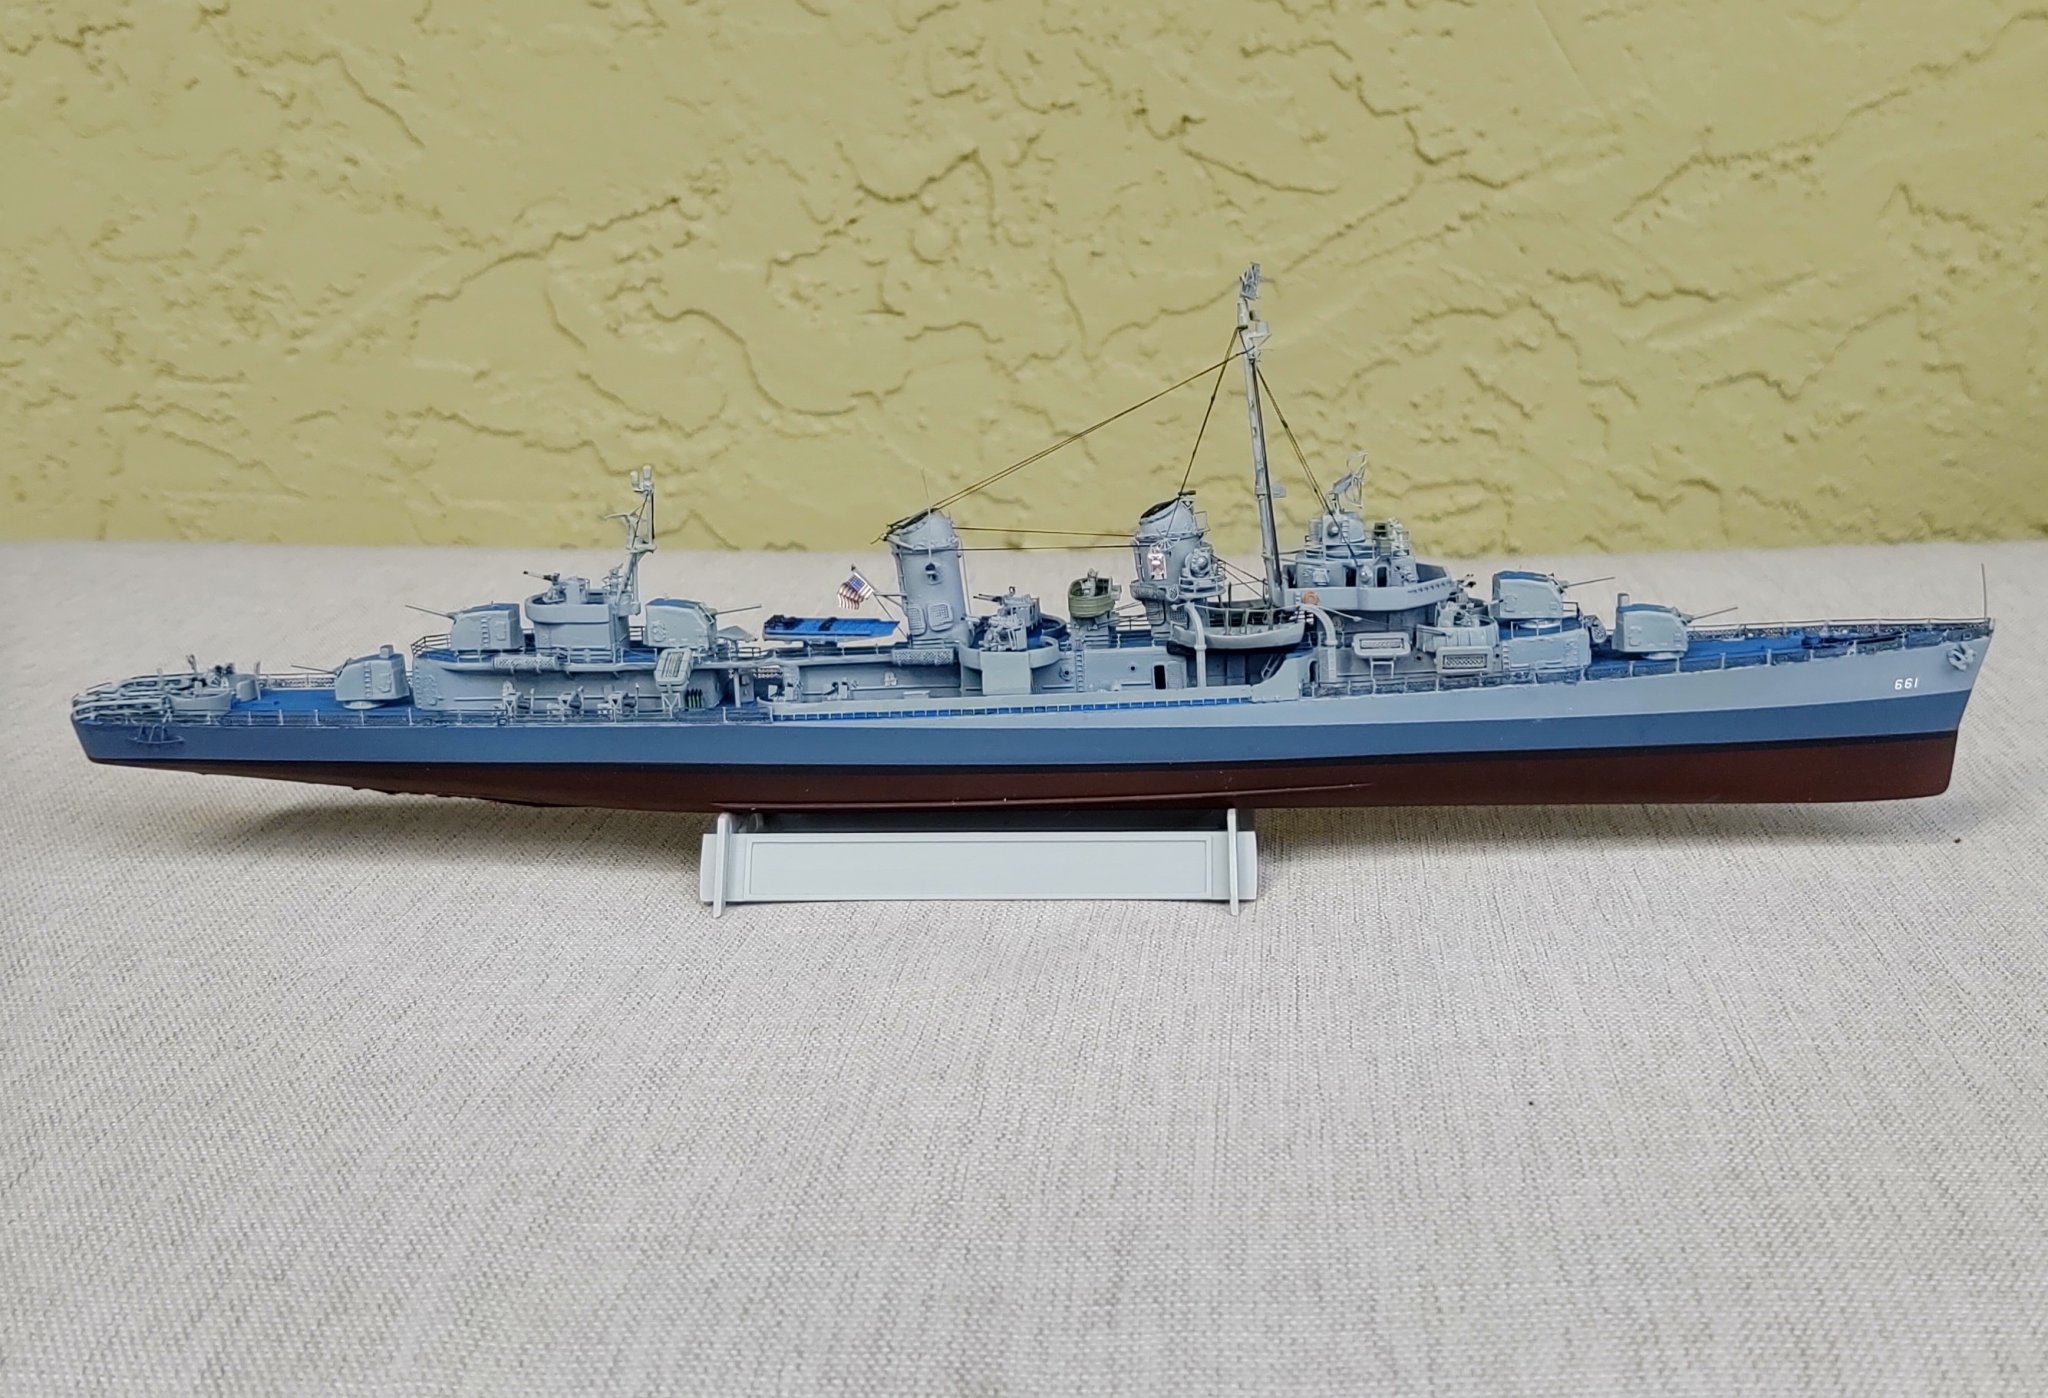
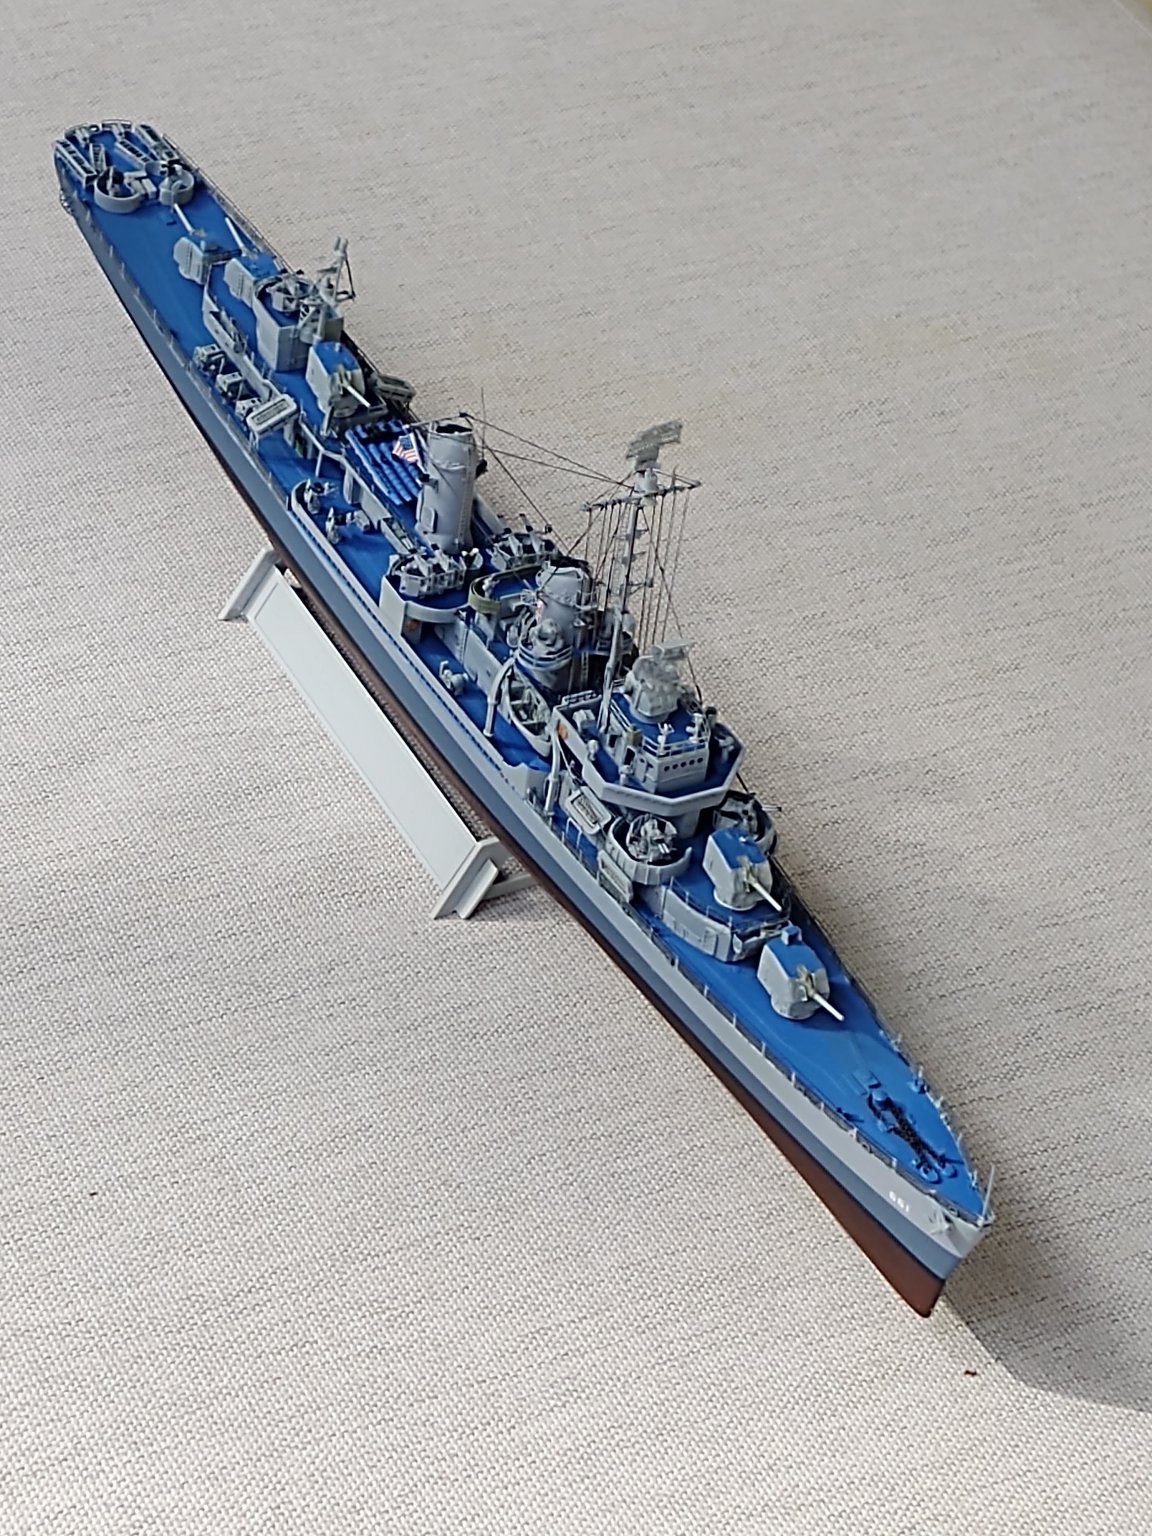
USS Kidd-FINISHED Named in honor of Isaac C Kidd, Rear Admiral, USN, who died aboard his flagship, USS Arizona, December 7, 1941.
Started in June, 2019. The hull, deck, and main superstructures are from the Trumpeter kit. The rest is a combination of kit, aftermarket, photoetch, and scratch built details. Main reference is USS Kidd On Deck by
David Doyle. Paint is acrylic. The screws and rudder are removed as the model will be mounted on a seascape which is under construction and encased.


-
If you use real used oil you will have a new height in realism--smell, odor like only an engine room can have.🛠️
Then the bolt counters will be able to discuss weather it smells correct⚔️
A really marvelously detailed engine.
Cheers, Harley
-
Thanks Popeye, I'm taking your advise regarding space left on the deck and desired results.
Working on a seascape for her then she will get the "Finish" tag.
- mtaylor, popeye the sailor and Canute
-
3
-
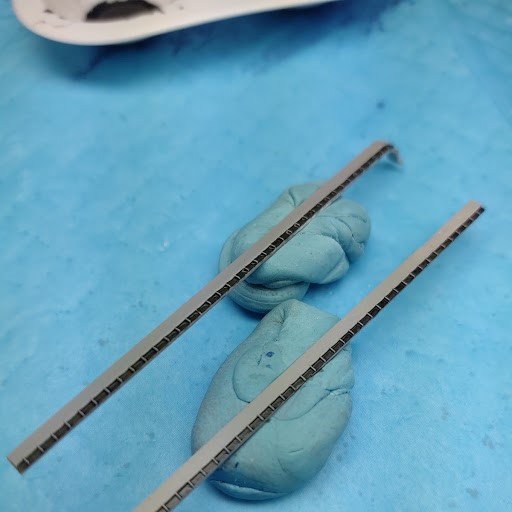
After the rails were installed in a conventional manner I wanted to make the rails look more like cable/destroyer like. Masked the hull for protection.
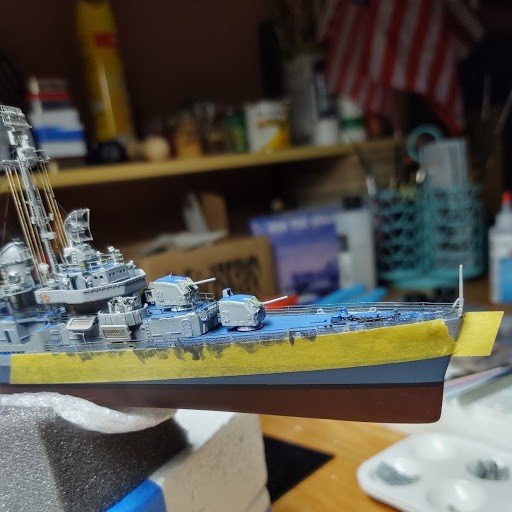
The hawse pipe was configured to accept the anchors from Blackcat
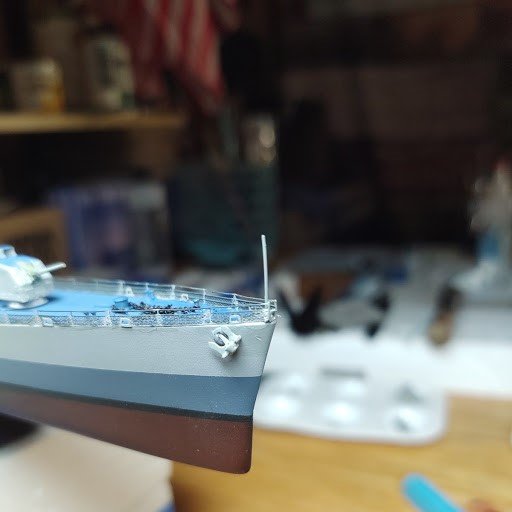
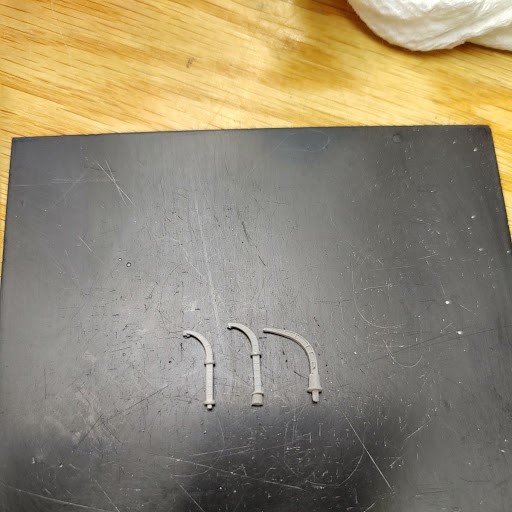
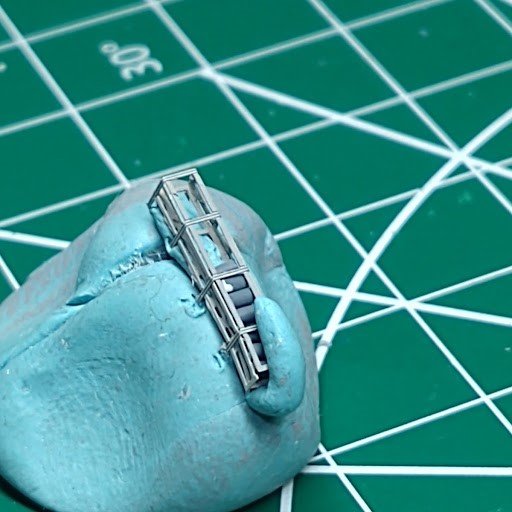
Replacement torpedo crane was fashioned from brass, PE, & plastic

New torpedo tubes from Shapeways painted and installed
Capt. Kidd's caricature, authorized by the Navy, was actually painted on a metal plate which was attached to the forward stack. I reduced a photo of the Captain to less then a quarter of an inch.

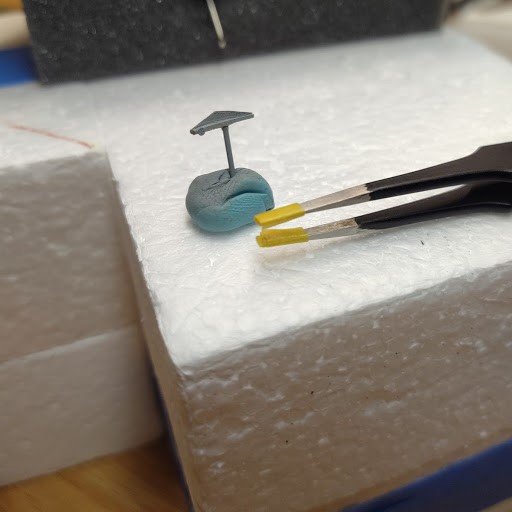
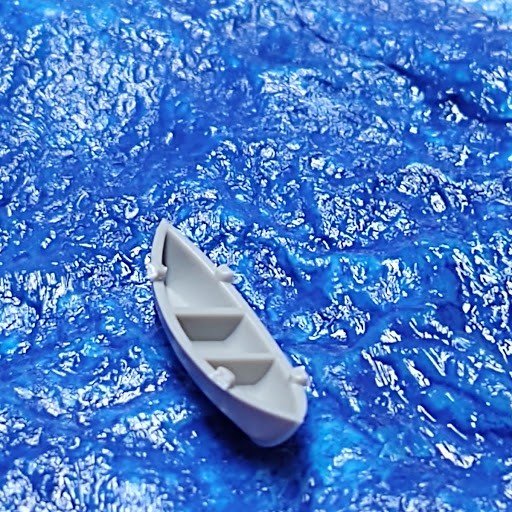
The ship's boats and davits became a real challenge. The boats were OK but I needed to combine the kit and Shapeway davits to make it work.
Left is kit, right is Shapeways, middle is combination used Clay was used to position the boat while fitting the davits
PE, different size wire, and plastic completed the boat installation
Water practice, more touch up, and final details and she should be ready to ship out
Standby to cast off!
- GrandpaPhil, Dubz, Canute and 4 others
-
7
-
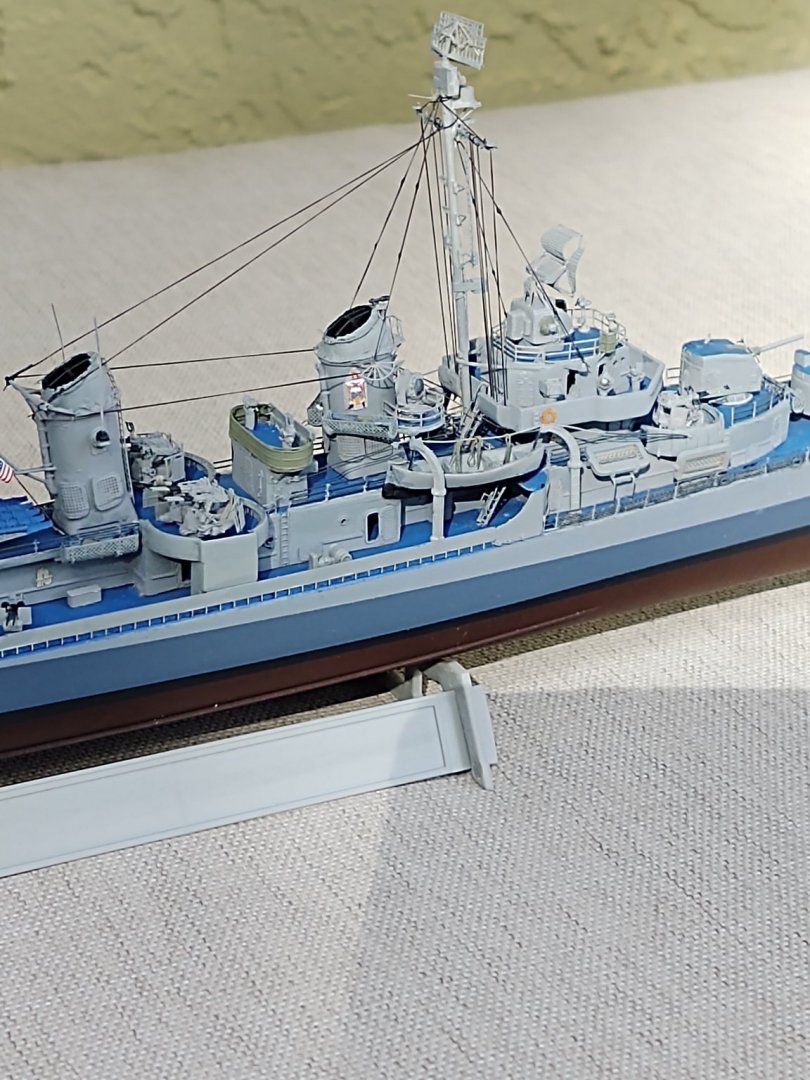
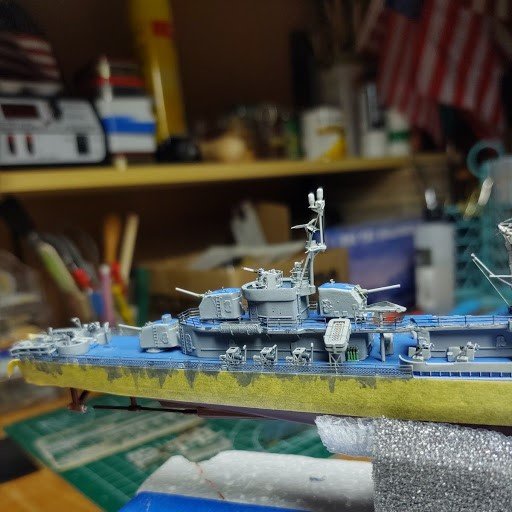
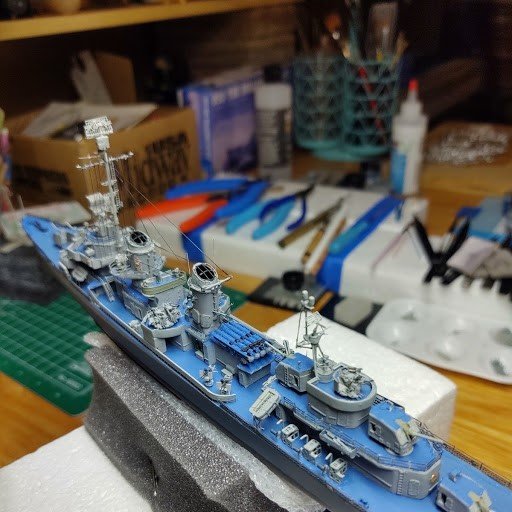
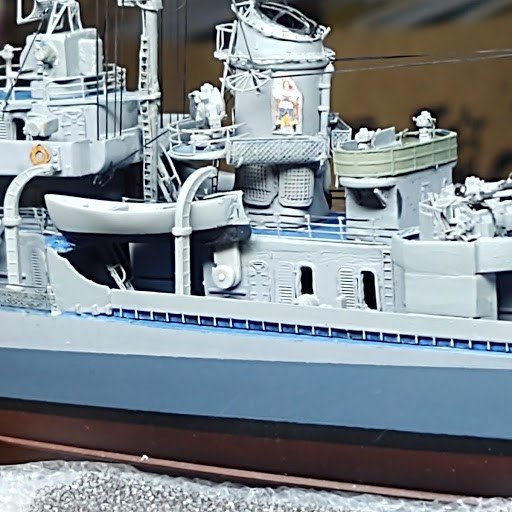
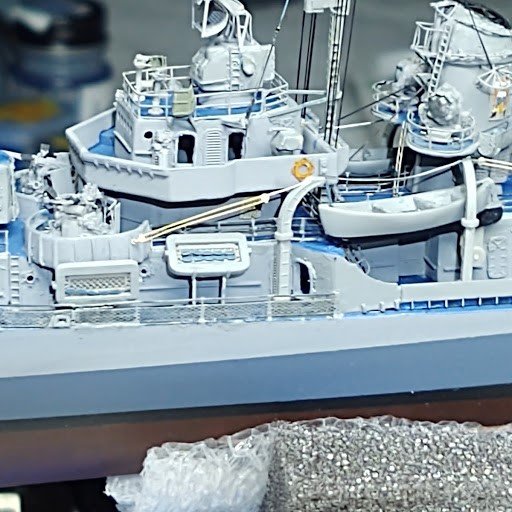
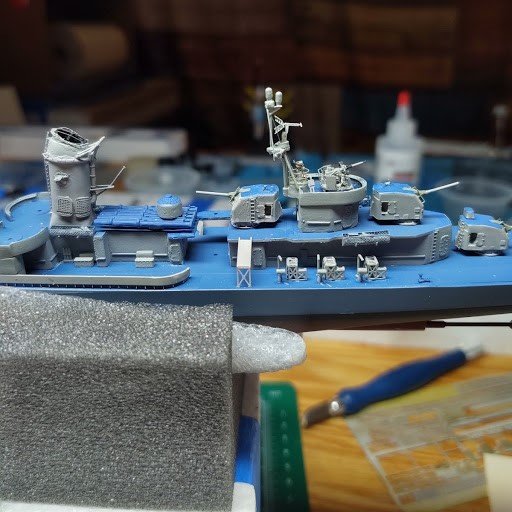
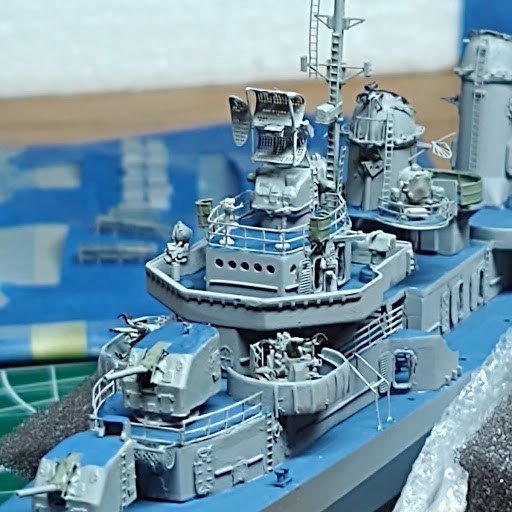
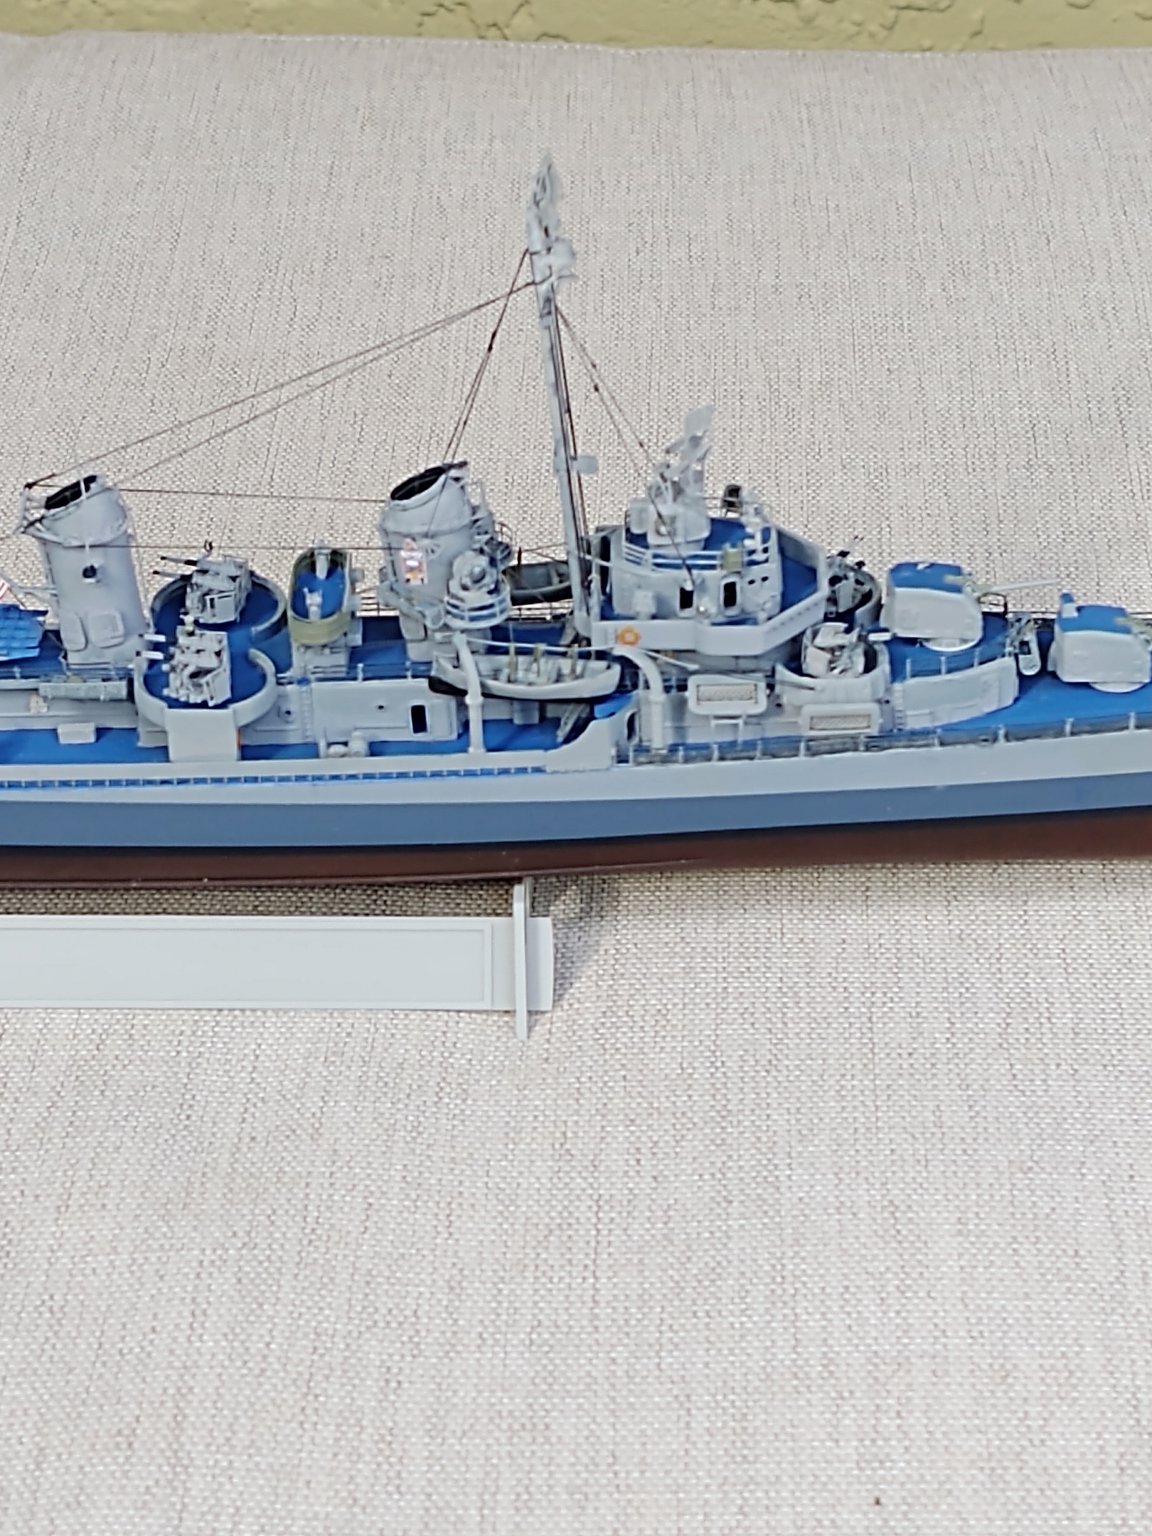
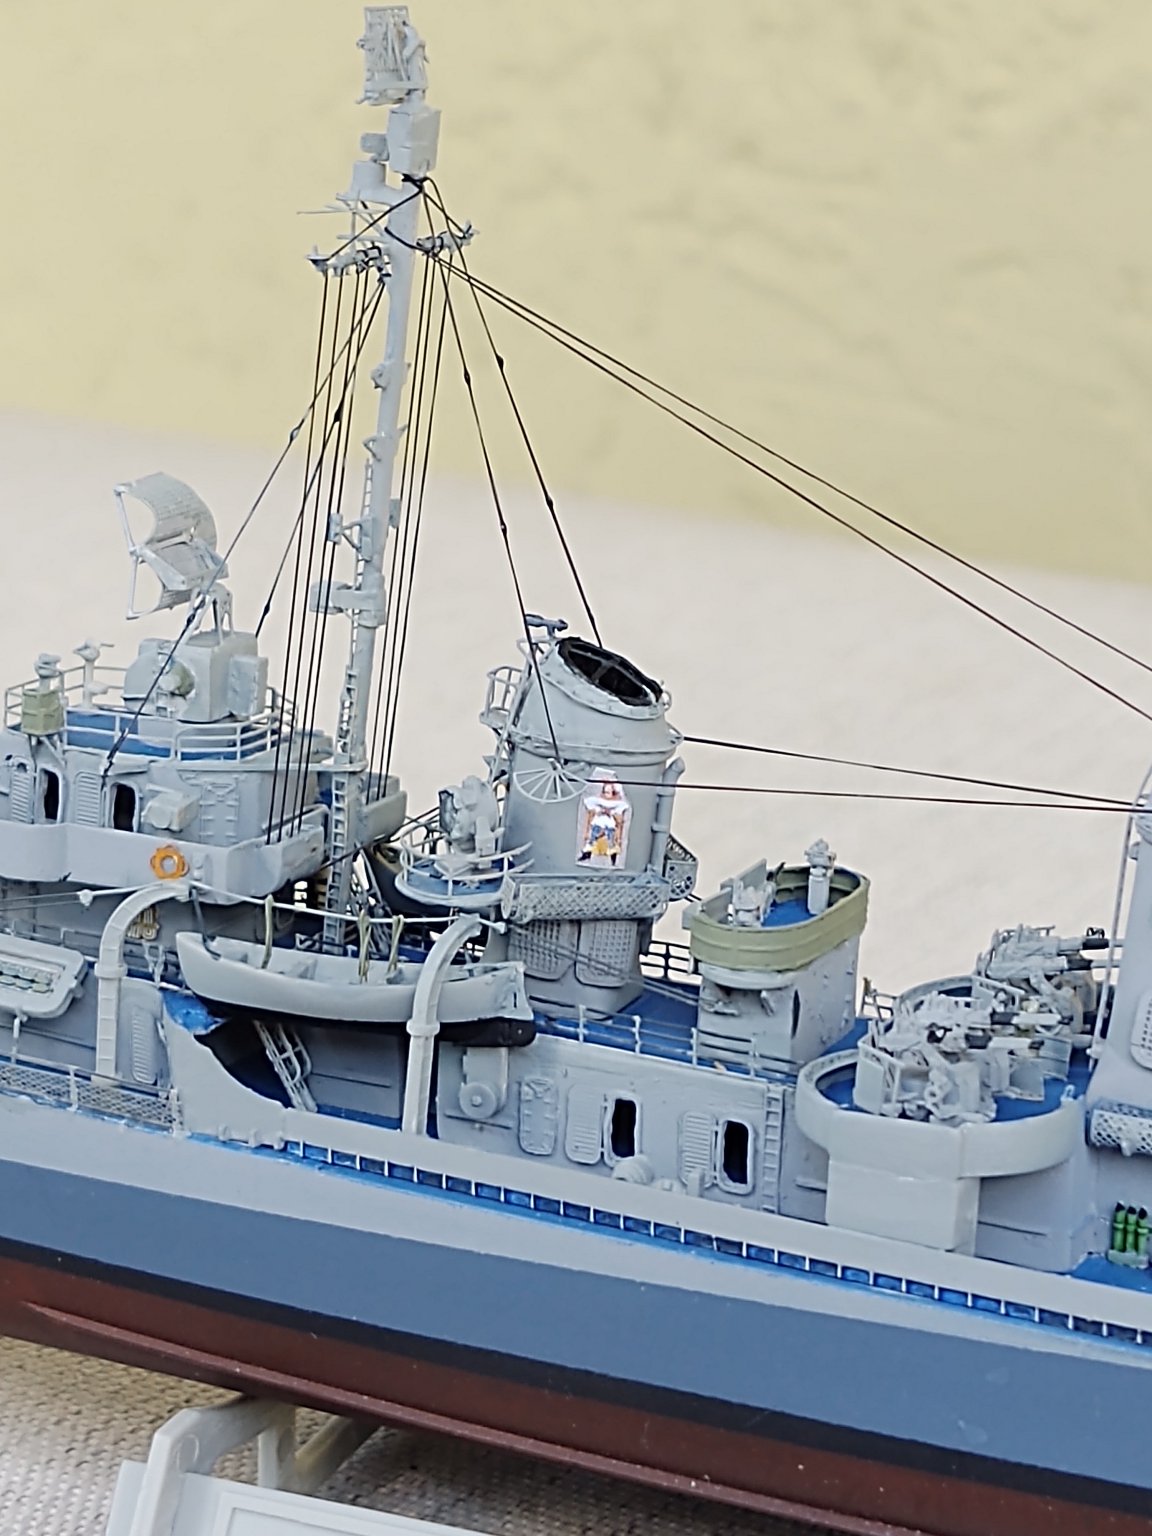
Work on small details continues. The Anti Kamikaze update replaces the seven single 20mm Orlikons with six twins. My twin mounts are from Black Cat Models and are quite good. They come in one piece so you can't realistically change the elevation. The muzzles were pointing at the gun tub walls. I glued the mounts to a strip of .27mm plastic and then trimmed the new base.


The railing installations on the deck house seem to vary a lot. I wasn't happy with the way the railings looked at first so I cut the top rail off some areas and painted the top rail black in other areas to simulate a line in place of a rail. This simulates a line instead of a metal rail. References show that the rail systems appear to be removable to clear the torpedo tubes and main battery mounts.


Next I'm working on the rigging, paint touch up (endless), and boat davits.
Cheers---


- Canute, lmagna, GrandpaPhil and 6 others
-
9
-
Thanks Popeye, I'm getting another chapter ready for the log. I keep on finding little details to try and add to the Kidd.
How do you learn or know when enough is enough?
Regards, Harley
- Canute, popeye the sailor and mtaylor
-
3
-
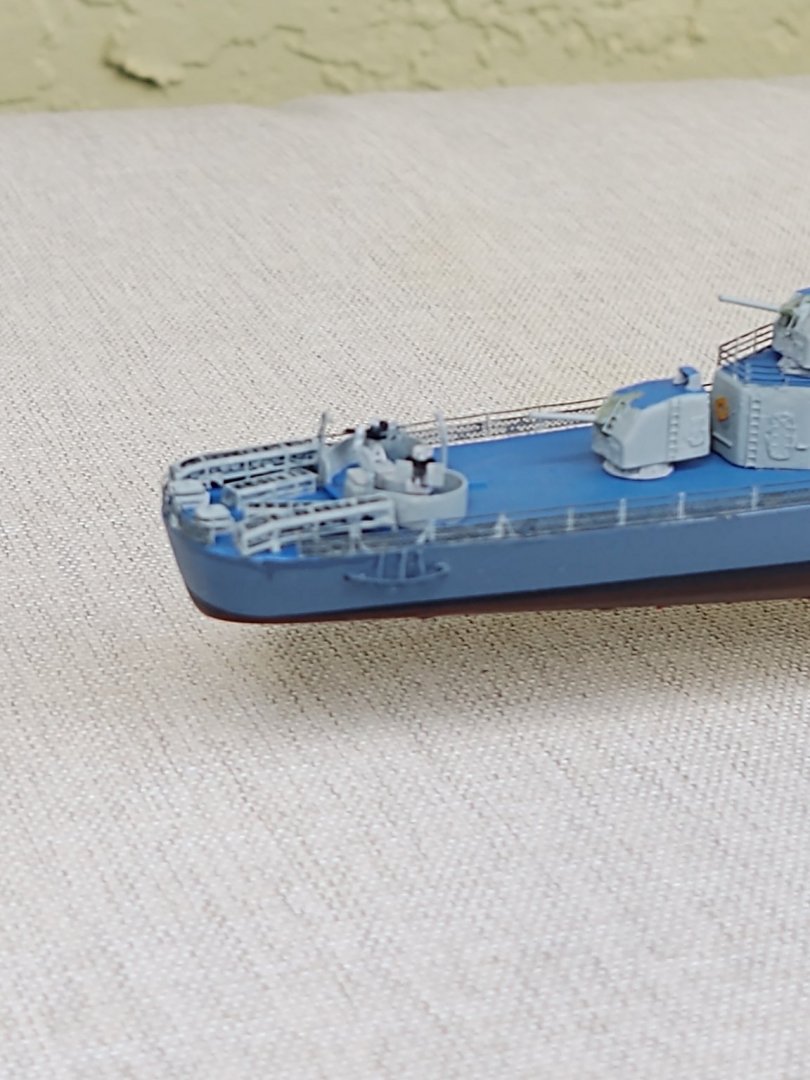
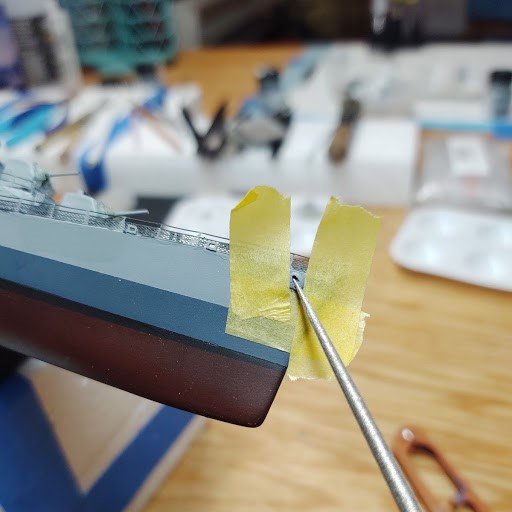
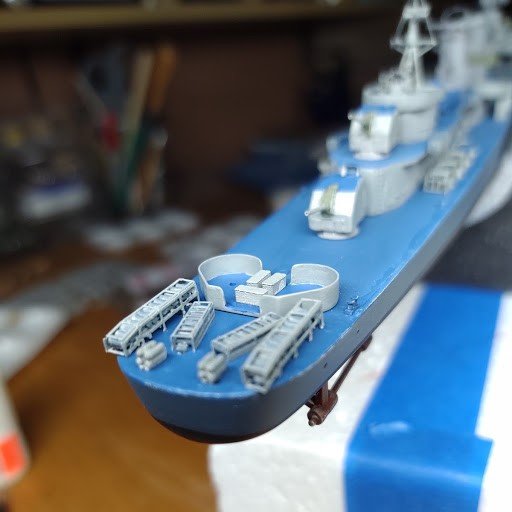
Progress-- I don't know what the pieces that run along the deck edge midships are called. Part of the rail system I guess. If anyone can identify them I would appreciate it. Anyway the bottom of these are off the deck so water could run overboard under them.
I mixed a color to paint the spaces between the uprights so it would appear that they were, in fact, off the deck.
 The actual color has more blue in it
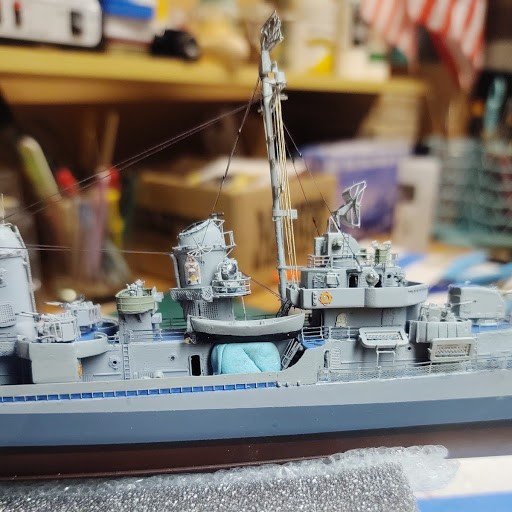
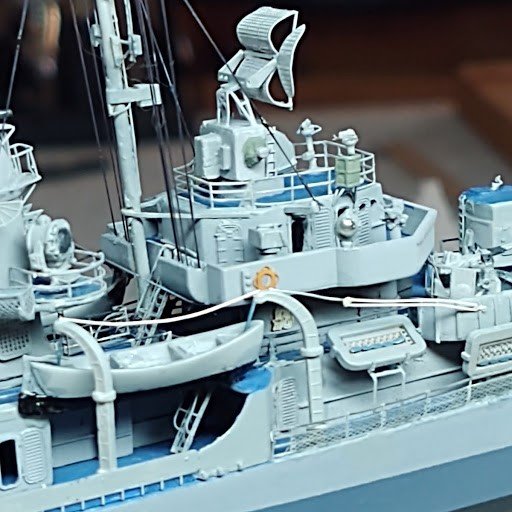
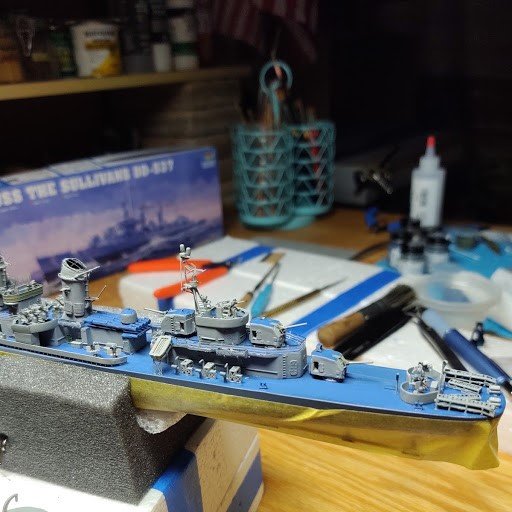
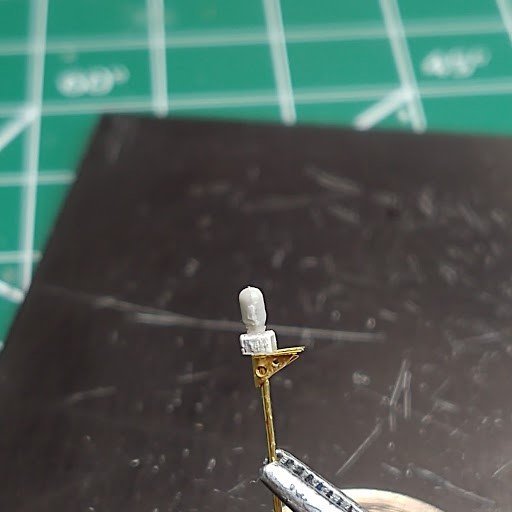
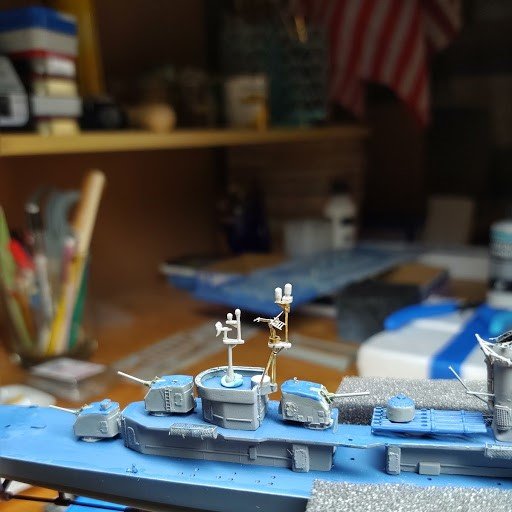
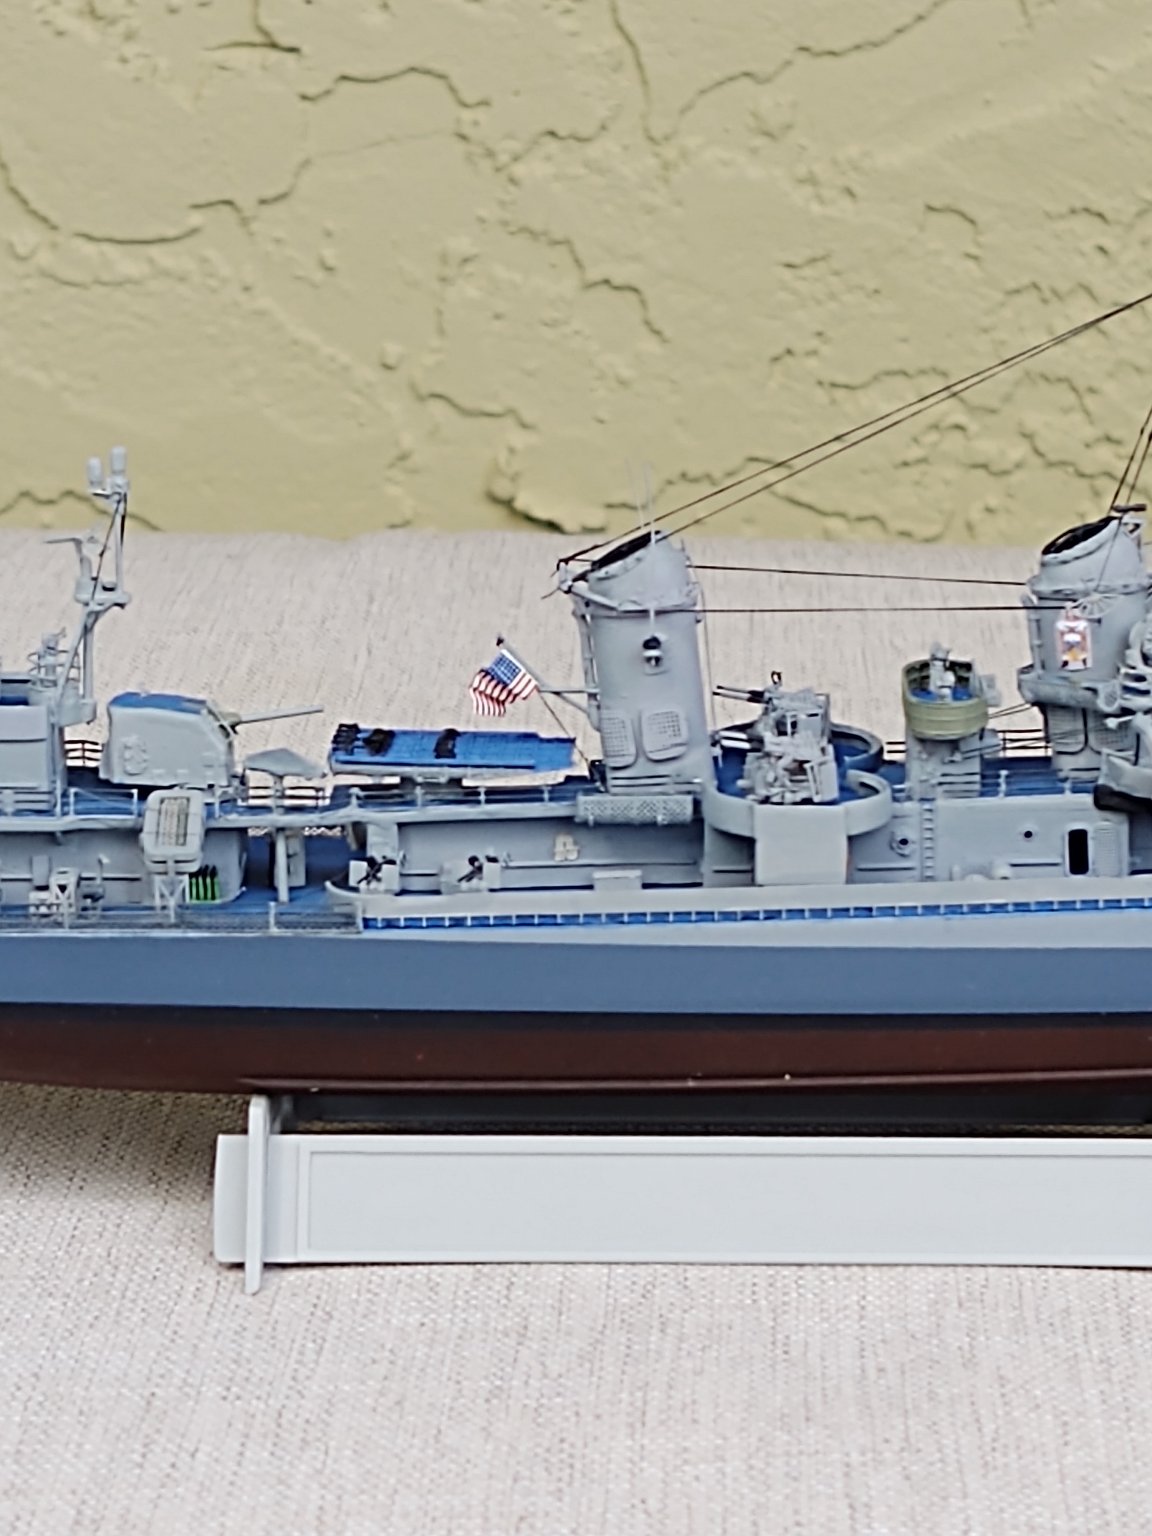
The secondary conning station, 40mm quads, and life rafts are on board. The signal halyards are made of EZ Line.
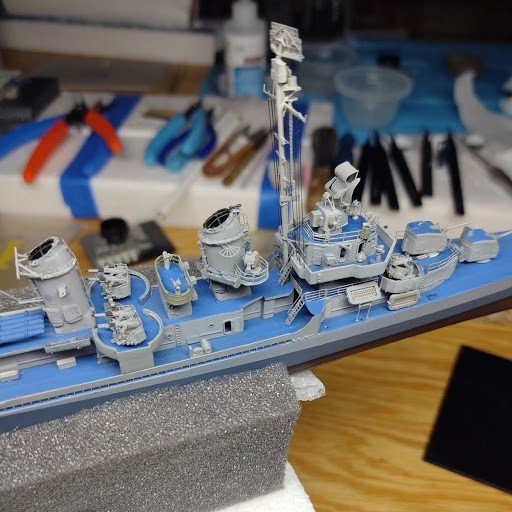
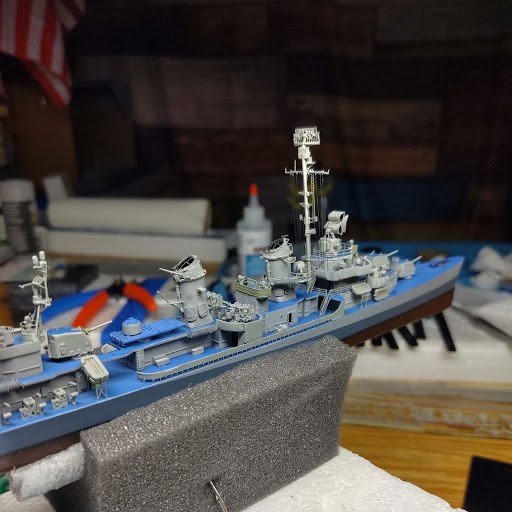
More details and the rigging still to come. The mast uses nothing from the kit. Brass rod, PE, and misc shapes from the parts box. USS Alaska
contributed a lot of items.
-
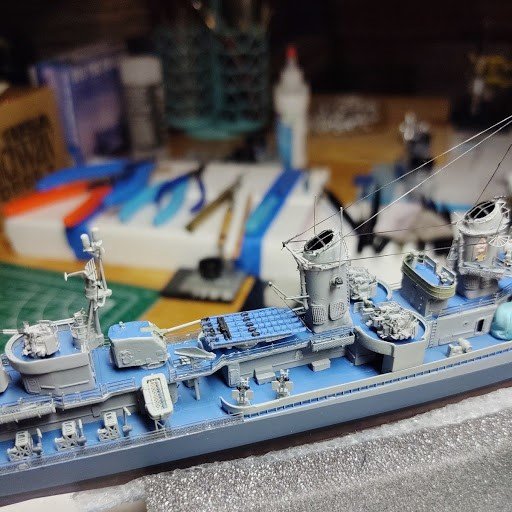
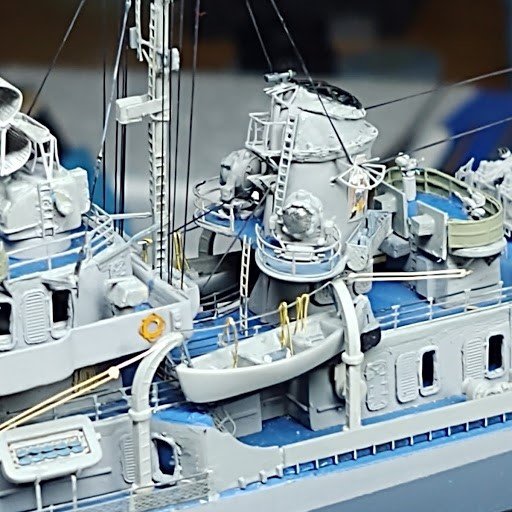
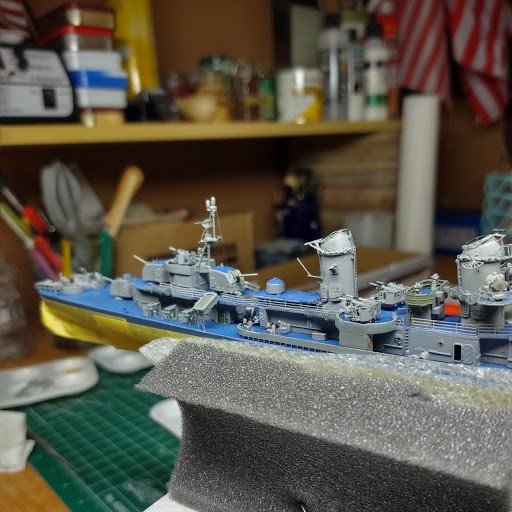
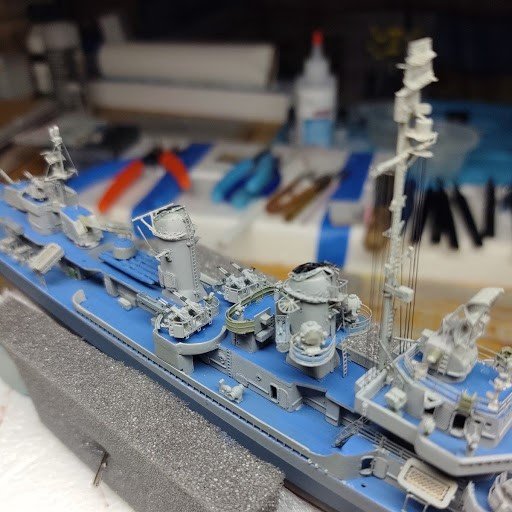
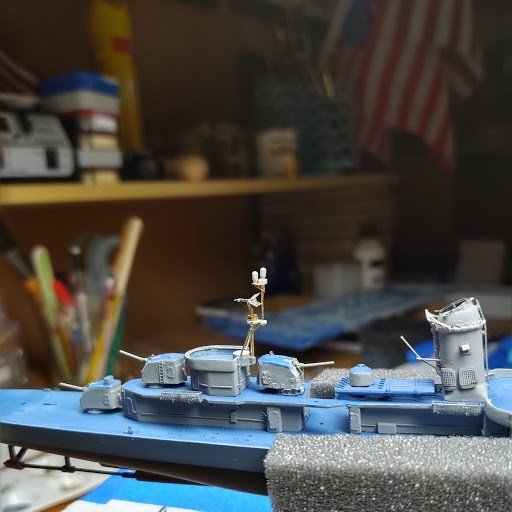
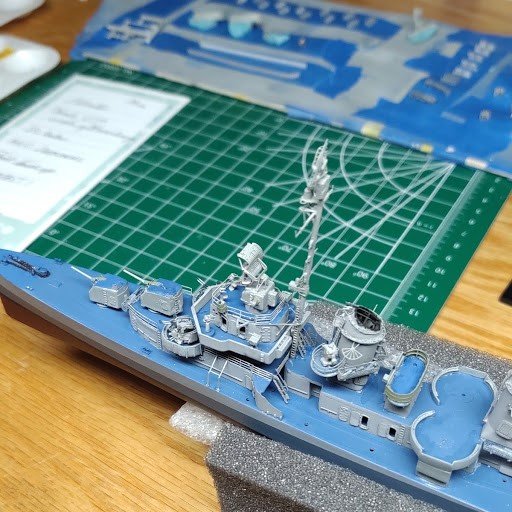
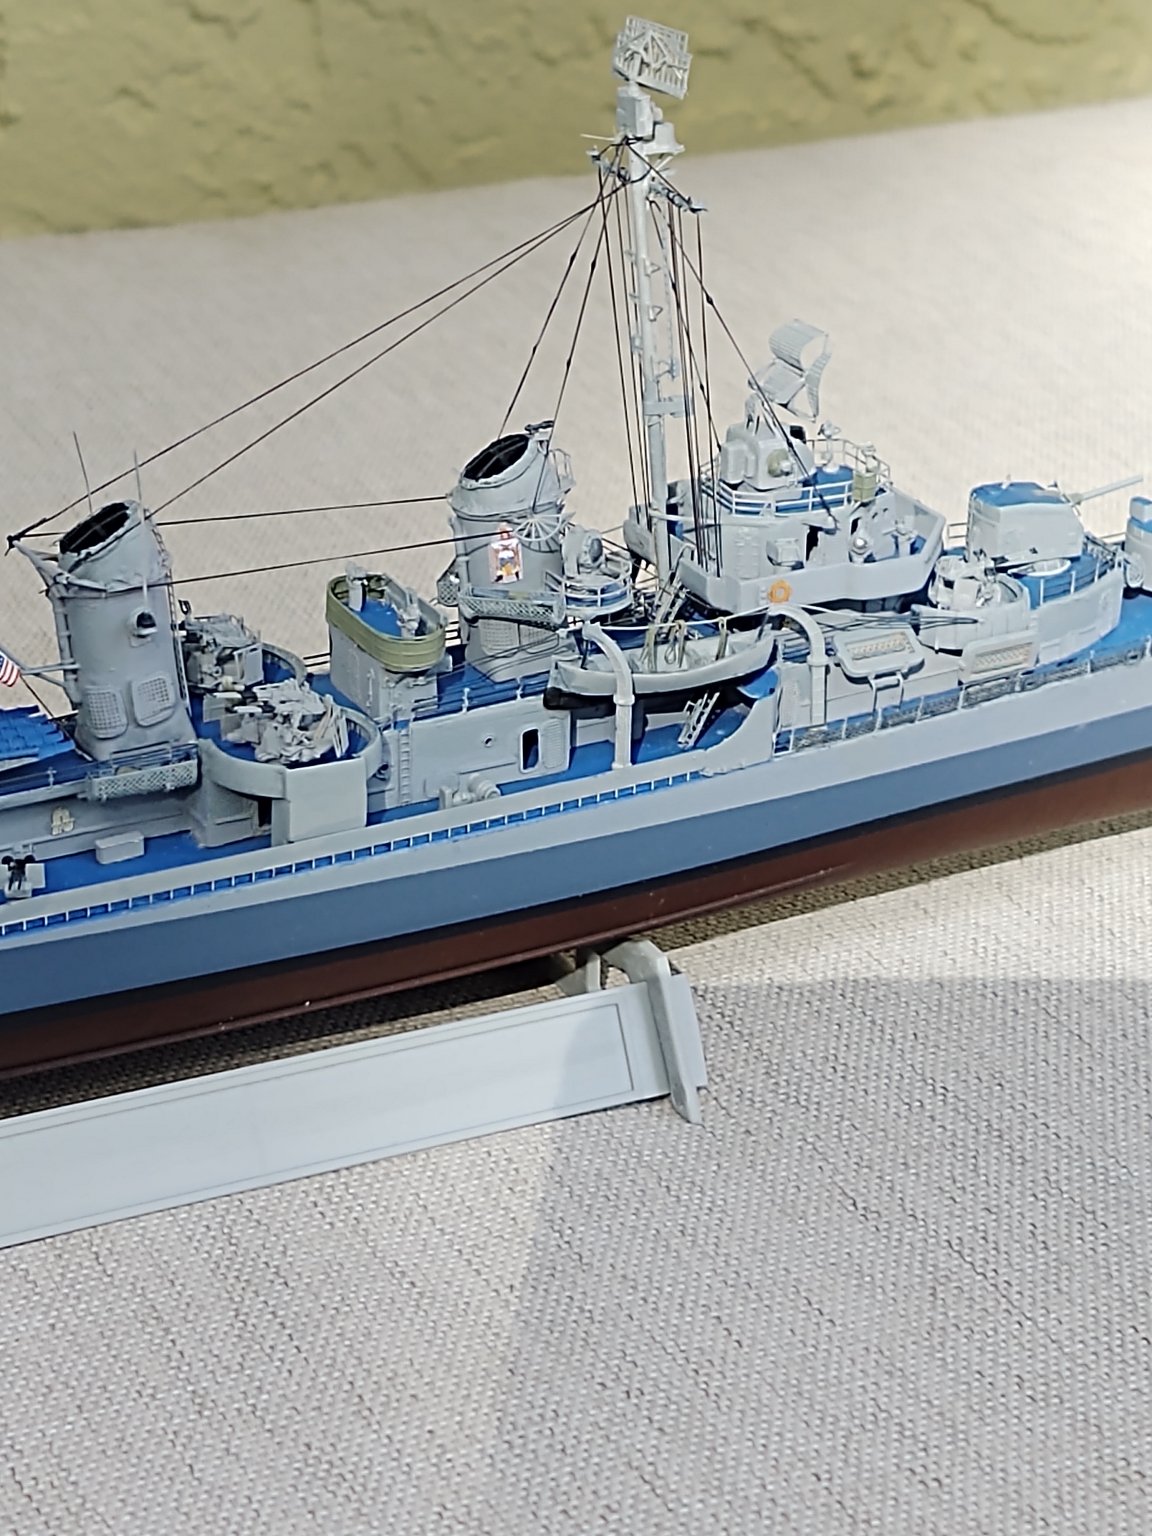
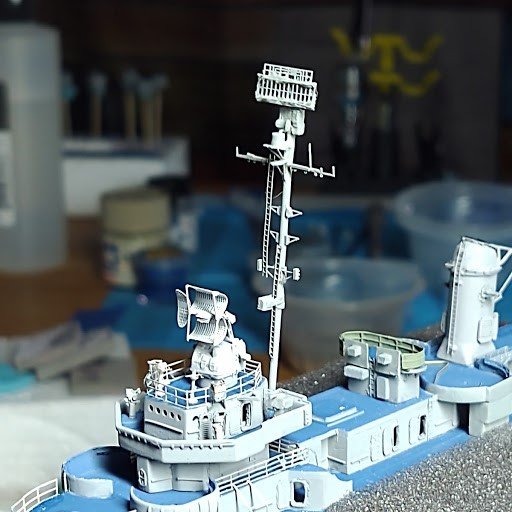
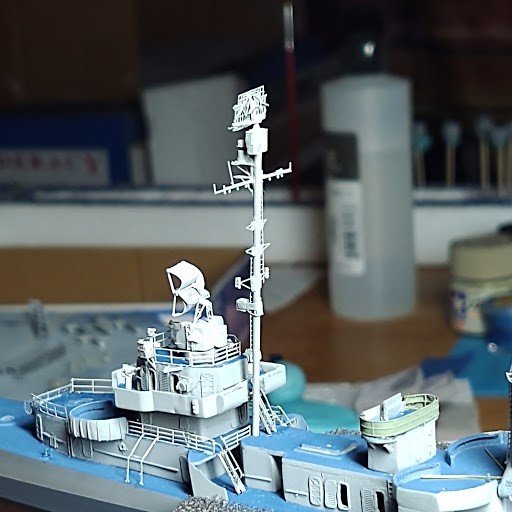
A lot of subassemblies have come together so I will attempt to bring the log up to date with some kind of order. Hopefully the photos will help.
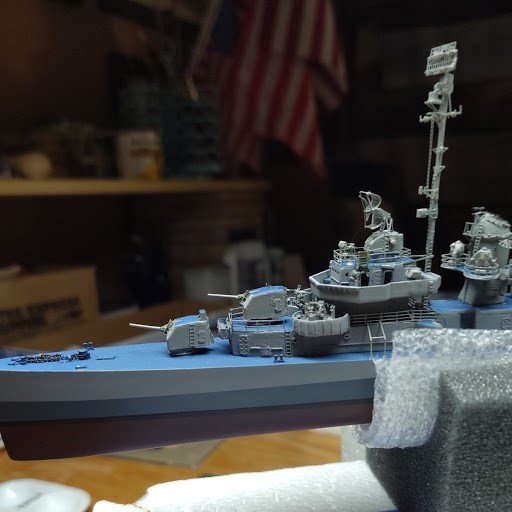
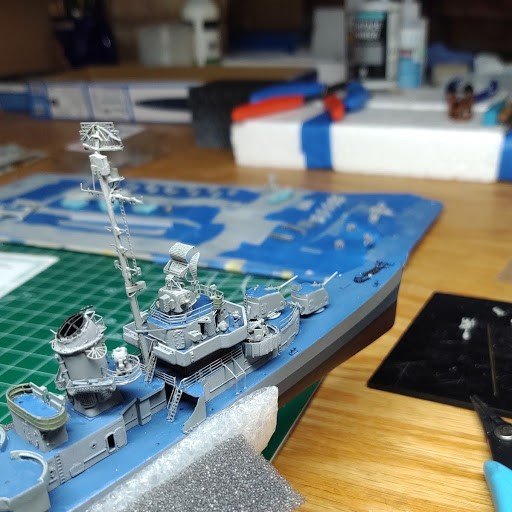
The mast aft of the torpedo tubes became an interesting little project. I don't know what the proper nomenclature would be for that mast. I replaced the kit mast
with a combination of brass rod and other spare parts. Triangular gussets from Alliance Models have come in handy in various applications on this project.
The deck on the aft Mk51 director position was raised by filling the tube with Perfect Plastic Putty. All the Mk51 directors are aftermarket.
The right picture below shows the kit mast and the replacement.
The depth charge racks are Gold Metal which most of the PE is. The depth charges are cut from 1mm plastic rod. The K-guns are kit. Kit cranes(?) were replaced with brass rod. It's easier to load the depth charges in the rack if you glue them to a thin strip of plastic. Then you load the rack like a stripper clip into a rifle.
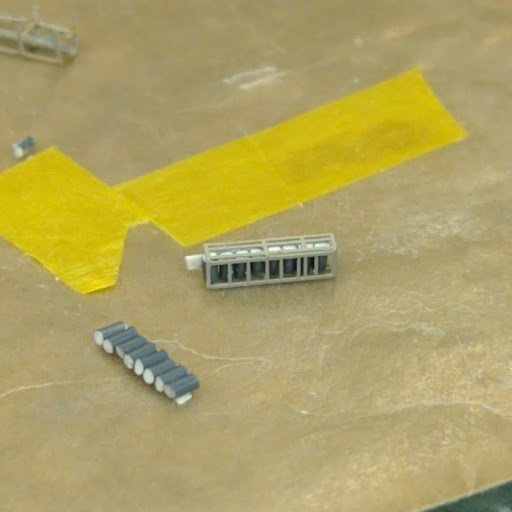
The stern racks and smoke projectors are installed. The aft 20mm gun tube was modified to follow the configuration per references.
Closing with some shots of other additions. The midship 40mm director platform was constructed like the aft mast by adding items to make it look like the reference photos. I'm making the backup
conning station which is not part of the kit.
-
Nice project choice. I've been contemplating a carrier build next. Now I can sit back and enjoy watching
your worthy efforts.
If I may, what is your impression of the Trumpeter kit?
Thanks, Harley
-
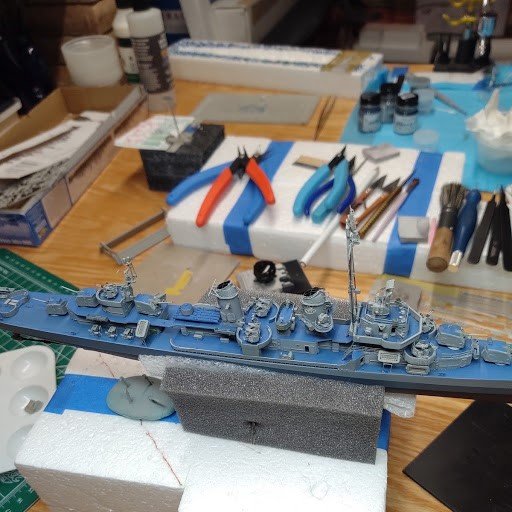
I've tried all the systems for finding wayward pieces but to no avail. It was probably the authenticity saint that saw I was using double racks instead of singles which would be correct for the Kidd at this time period. I'll probably just make up a set of singles.
My admiral suggests tying a piece of line to the part to make it easier to find when it flies 😜, a good laugh was had by all.
- mtaylor, popeye the sailor, Canute and 1 other
-
4
-
Greetings Steph, I don't wish to add to your dilemma but studying your pictures is stirring my little brain up. If I recall correctly, another member building the same model described how he had to make the middle piece fit. I would try to find that log before spending so much on a second set. Is there not a good chance that the second kit would suffer from the same misalignment? If, as you said, the bow and stern sections line up OK, why not adjust the midship piece?
Hope you have clear sailing once you get this big challenge out of the way.
Cheers, Harley
- SigEp Ziggy, mtaylor and Canute
-
3
-
Hi Zippy, I am using the Black Cat 20mm Orlikon twin mounts on the Kidd. Right now
I'm hunting for a depth charge rack that got flipped off the bench. How can you lose a gray
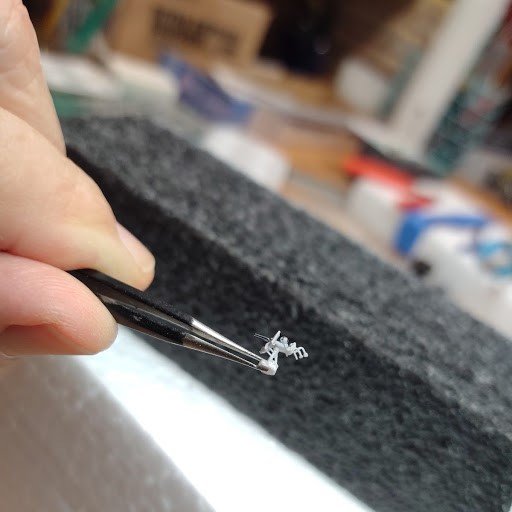
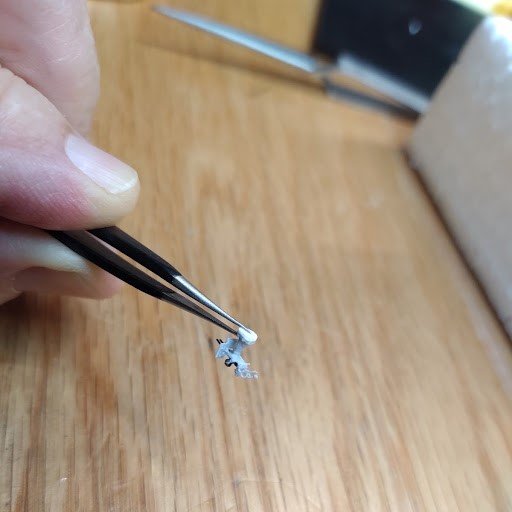
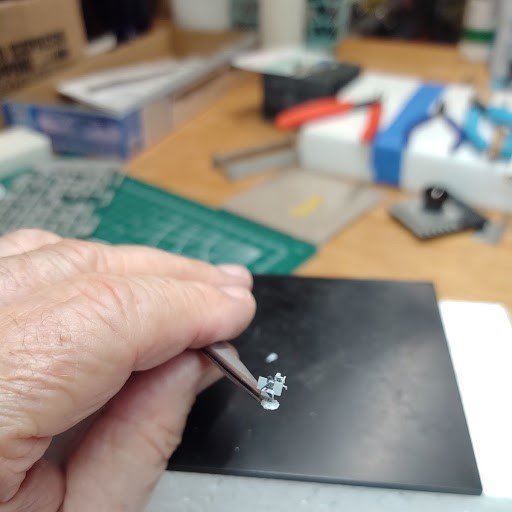
piece on a light wood floor? Does build time include "search" time? I hate these part eating magic floors.
There, I feel better now, thanks for letting me vent a bit.
Cheers, Harley
- SigEp Ziggy, mtaylor, Canute and 2 others
-
5
-
Thanks popeye, working on loading the depth charge racks now🤪, a bit tough one on the old eyeballs.
- mtaylor, Javlin, popeye the sailor and 2 others
-
5
-
-
A person can go nuts trying to get the correct combinations of grays and blues. And to add to the equation
it depends what time period you are choosing to portray, exposure to weather, what was the ship's operating area etc.
www.shipcamouflage.com/measures.htm is a very good source as has already been mentioned.
Johnathan11's picture is of the USS Kidd DD-661 in Baton Rogue, LA. I think you will find the Missouri would have
had about the same scheme in early 1945.
That nice wood deck you have that looks so good will end up BLUE.
Enjoy, Harley
-
She has a look of quality already, very nicely done.
-
-
Full speed ahead! Congrats on jumping in with both feet. You have selected a great rendition of a great ship.
I think your selection of Blackcat's 20 mm batteries is a good compromise between the kit and all PE options.
I'm using their AA guns on my current build of USS Kidd.
Will be watching with interest, keep your patience cup full & most of all, enjoy.
Cheers, Harley


Rafale by CDW - FINISHED - Hobby Boss - 1:48 Scale
in Non-ship/categorised builds
Posted
It's going to be a knockout. Is the stand a commercial product?
Thanks, Harley