


Tigerdvr
-
Posts
386 -
Joined
-
Last visited
Content Type
Profiles
Forums
Gallery
Events
Posts posted by Tigerdvr
-
-
-
Tks popeye, the model is better than the photography/log
Cheers, Harley
- mtaylor, Canute and popeye the sailor
-
 3
3
-
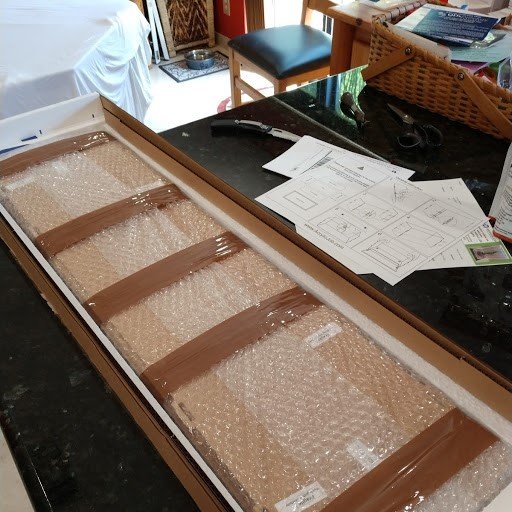
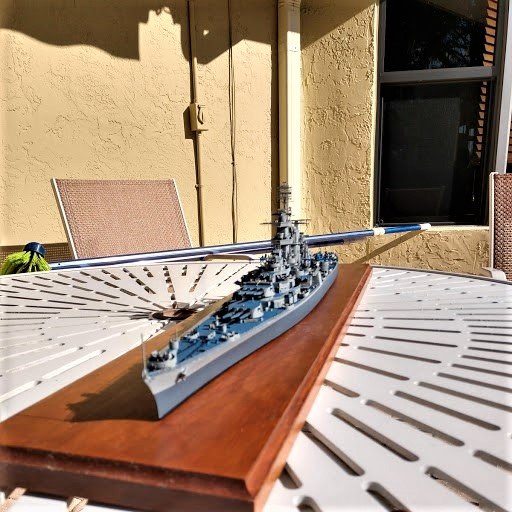
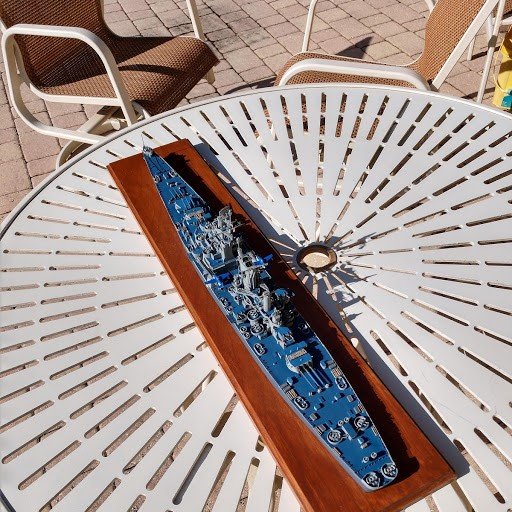
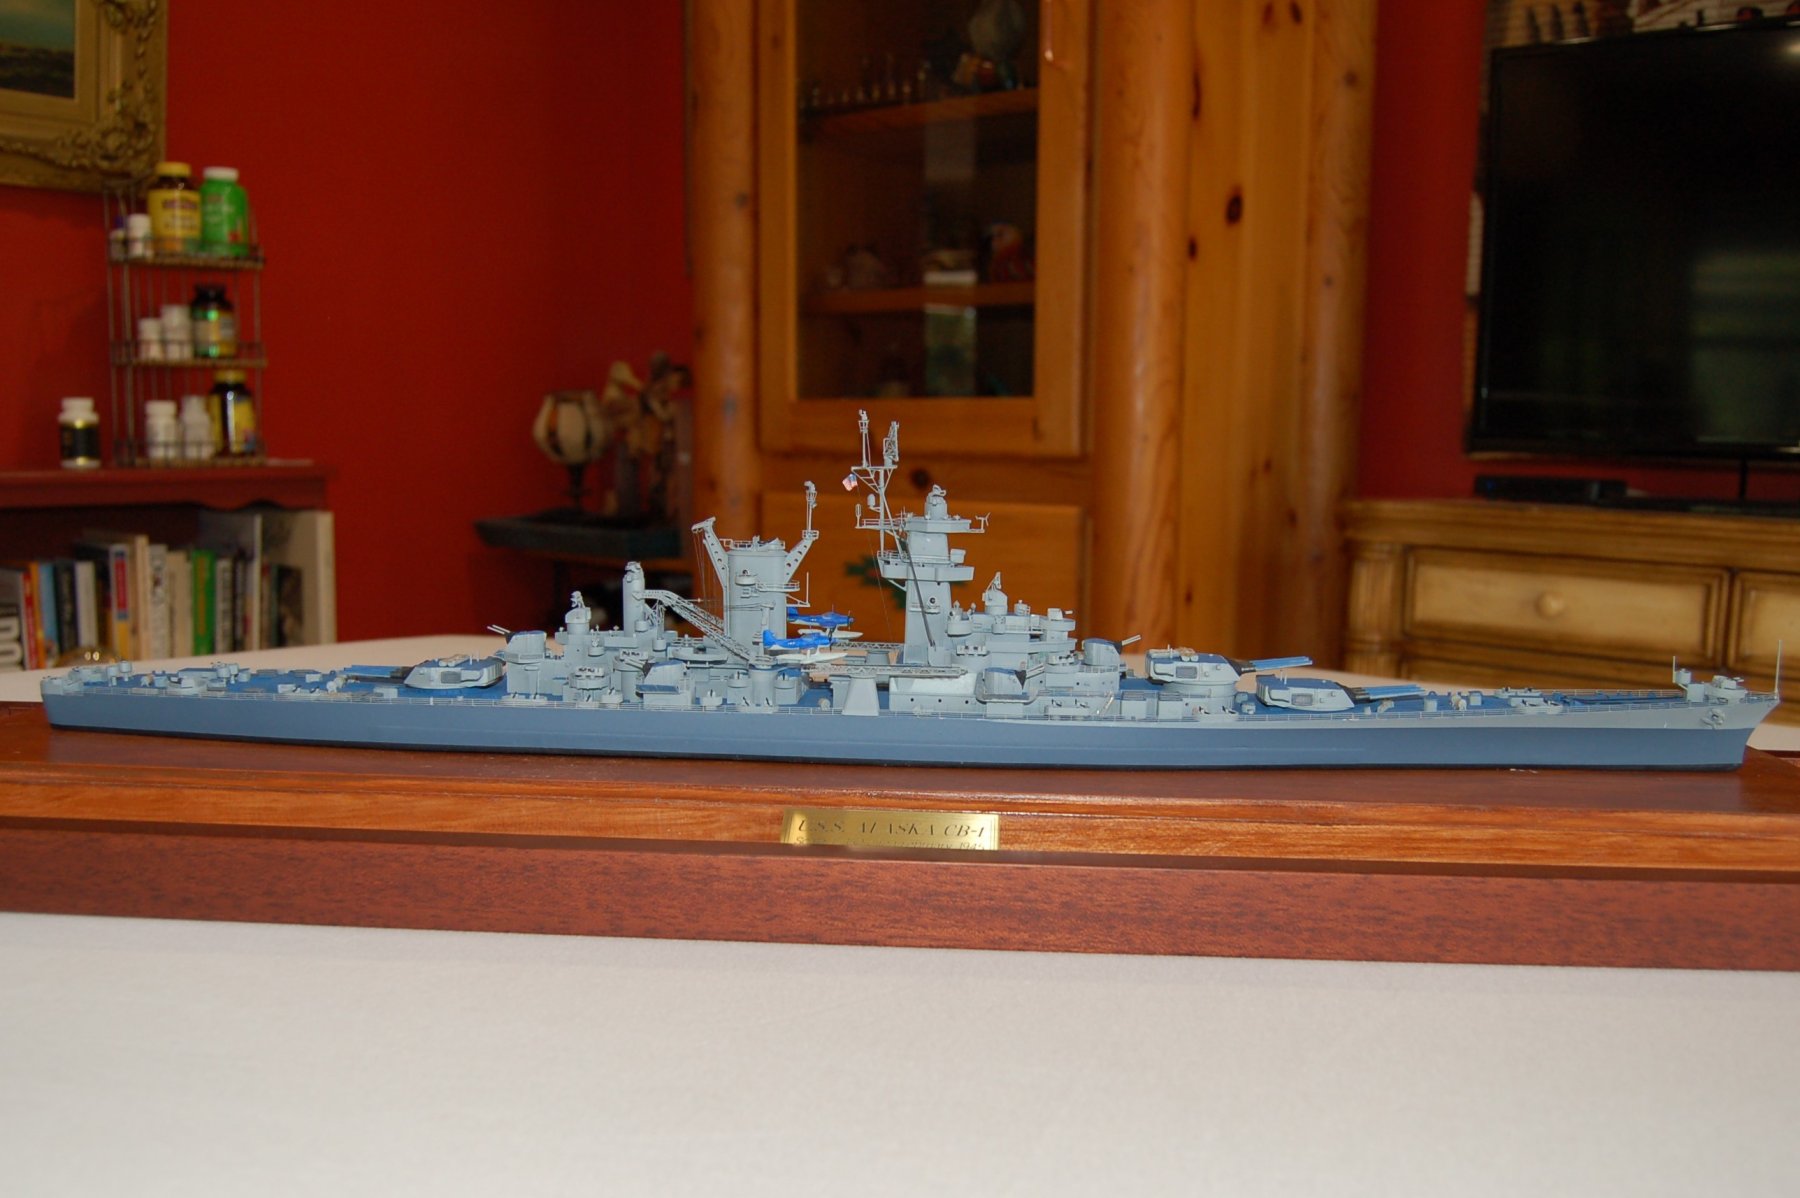
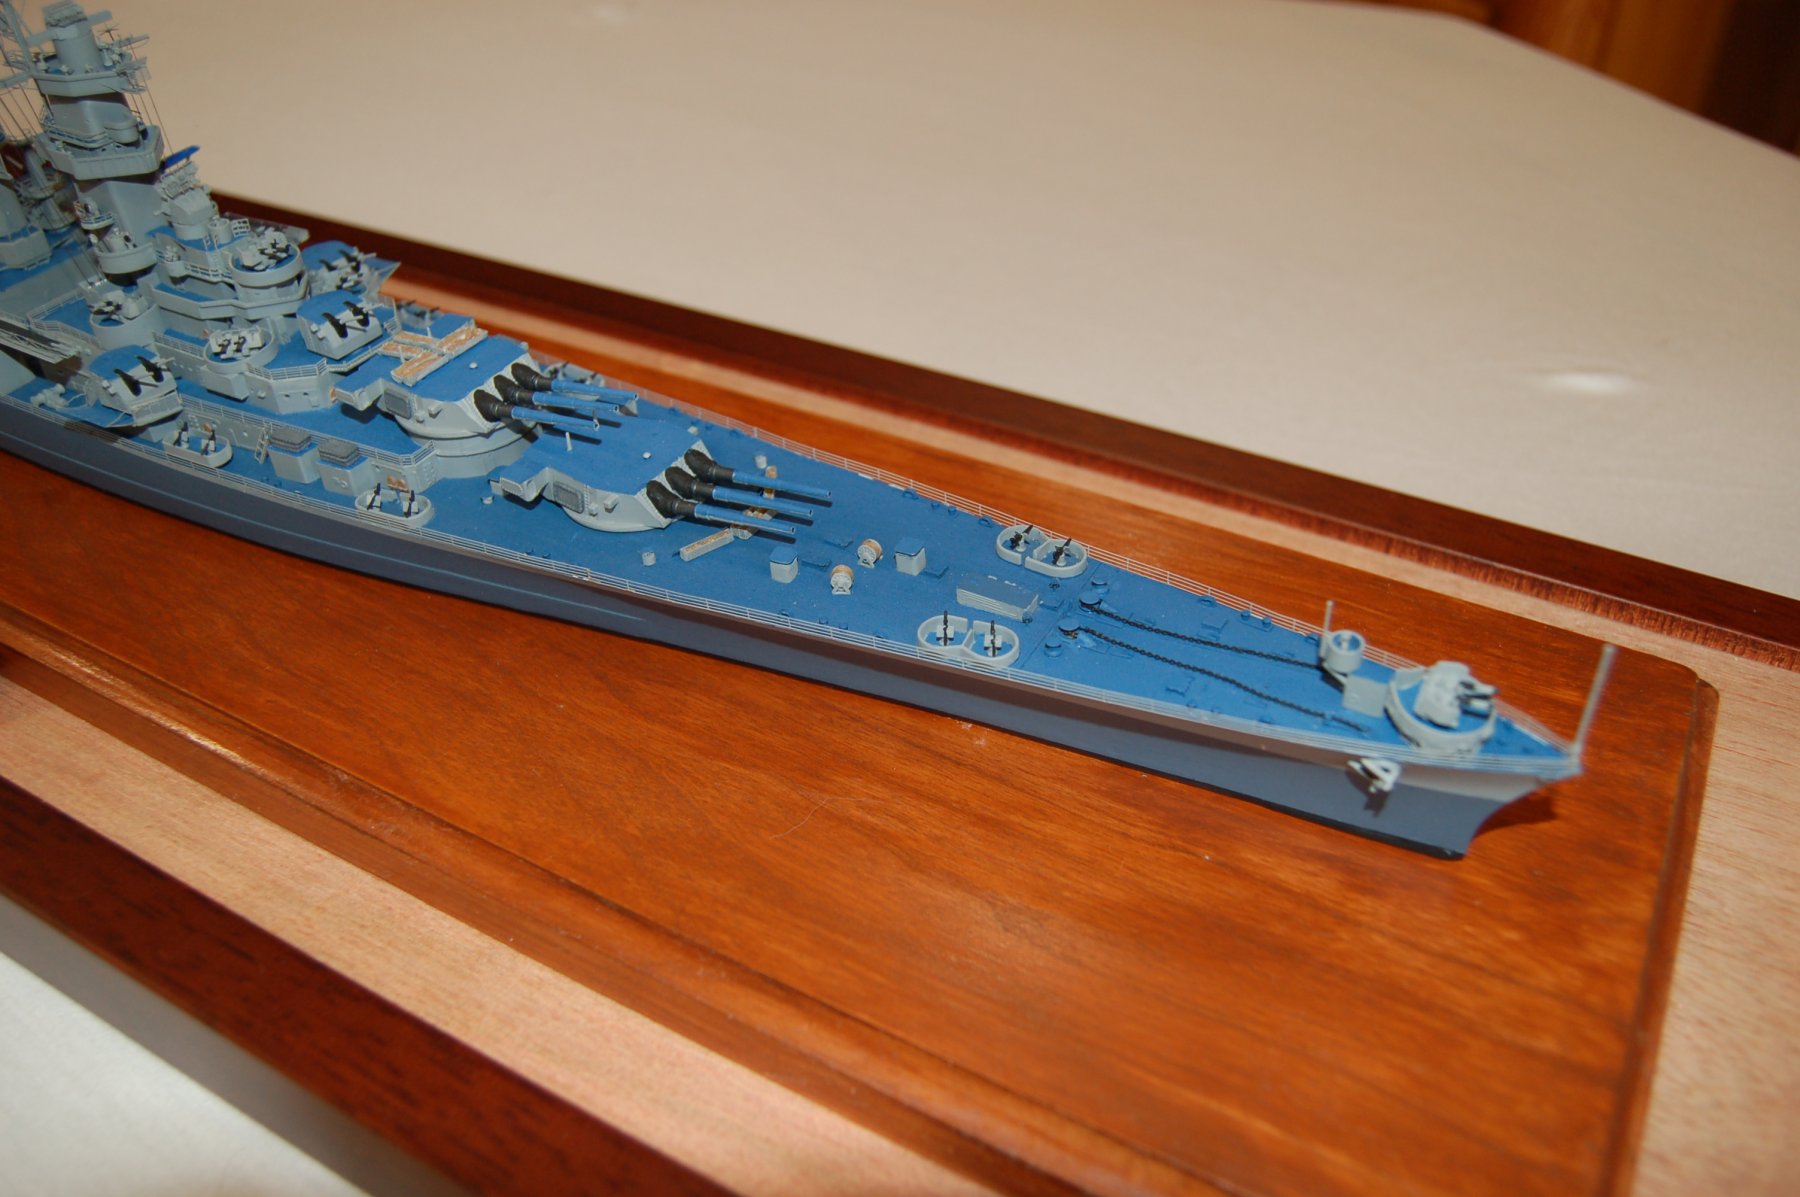
Case has arrived, been assembled and will provide a home FINISHED U.S.S. Alaska CB-1The case is by Acrylicjob. Well packaged, easy assembly, reasonable price, looks good.
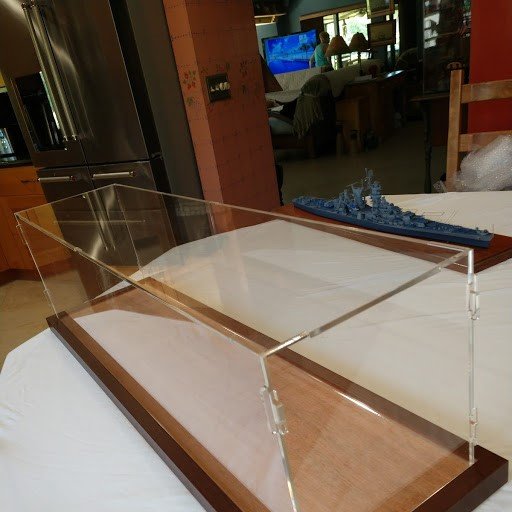
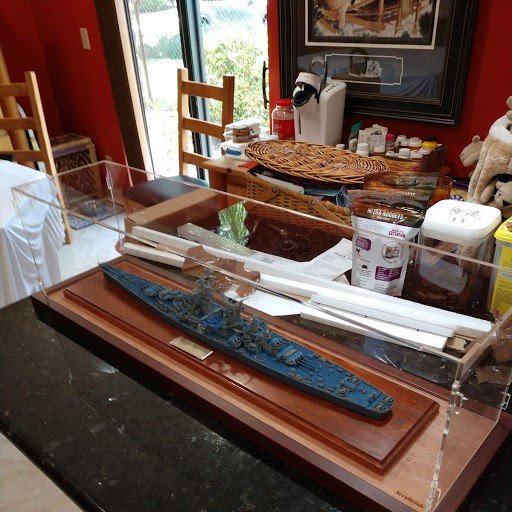
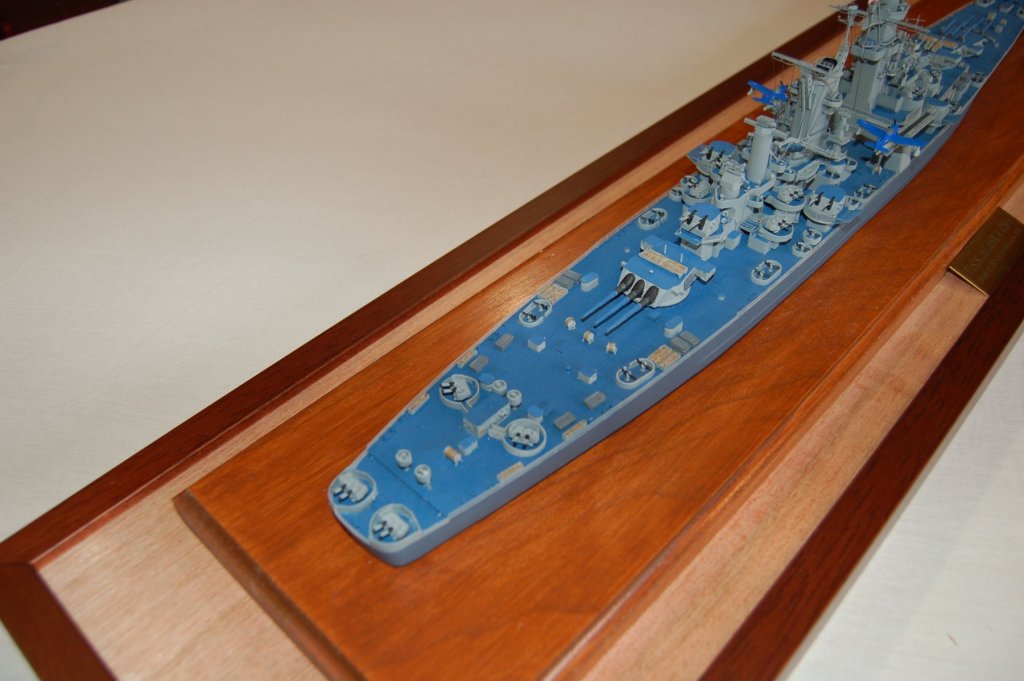
The finished Alaska


Sunlight causes color change-
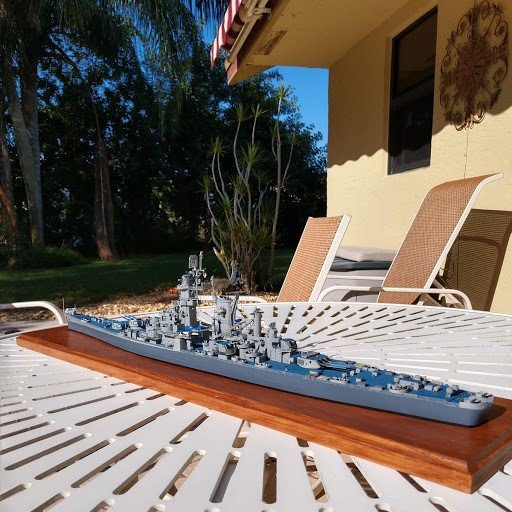
Cased in the living room, will find some LEDs to get more light on her.
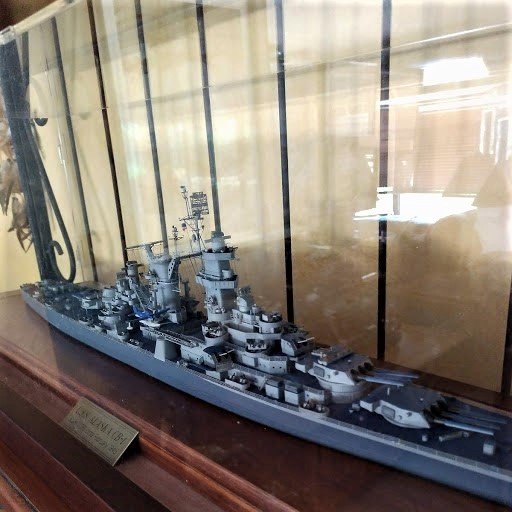

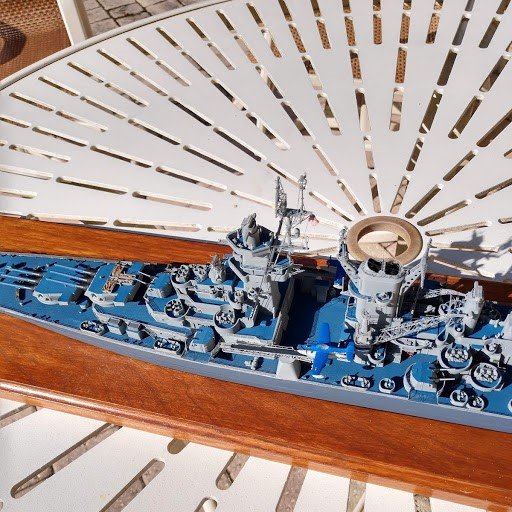
U.S.S. Alaska start date: 10/20/18, completed 6/15/19 A great kit by Hobby Boss

- Haliburton, popeye the sailor, CDW and 9 others
-
12
-
Very nice collection. I sympathize with your obsession. I accumulated a healthy group of troops before I came back to ship building. They are carefully stored away for now. Some get to come out and visit on special days like 6 June.
Enjoy your brigade.
Harley
-
This is synopsis of steps bringing the Alaska project to a finish.
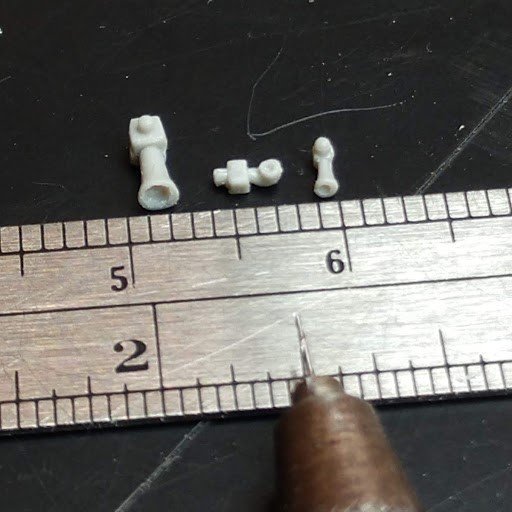
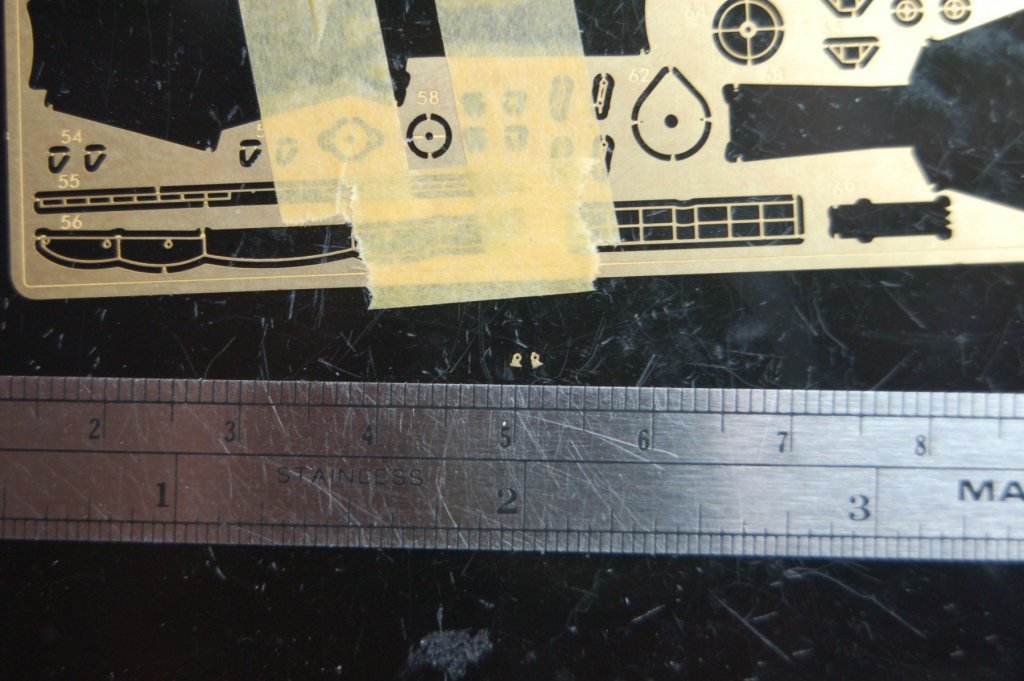
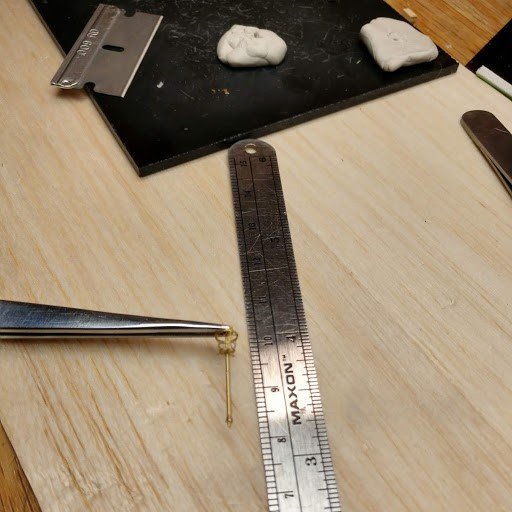
Small parts, both plastic and PE abound
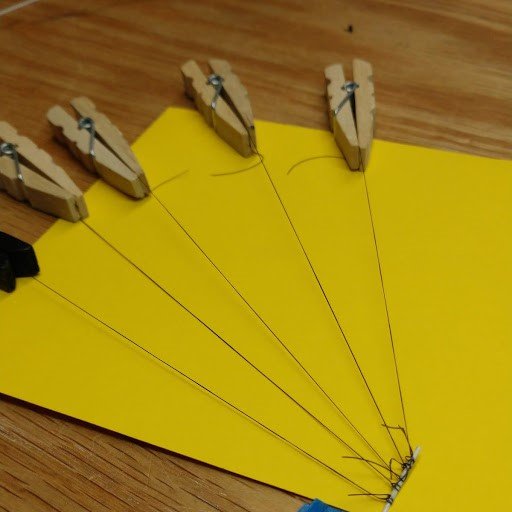
Black fine E Z Line was attached to a small plastic rod and inserted into the flag bags then run to the
yardarms to simulate the halyards
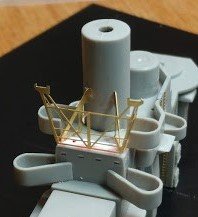
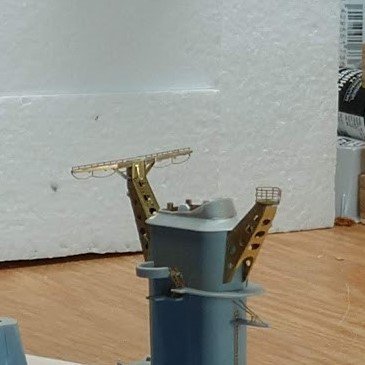
PE work from the kit, Infini, & White Ensign was time consuming but worth the effort.

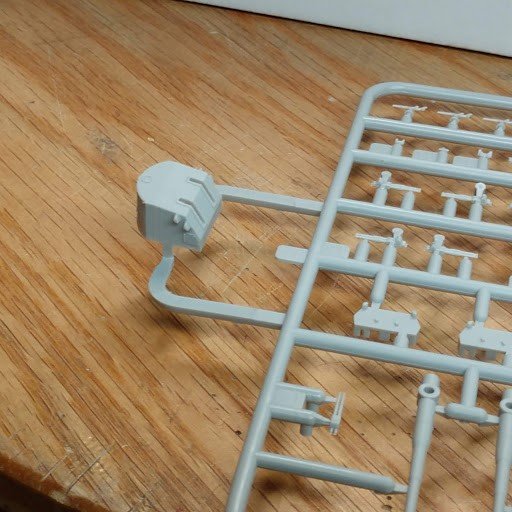
 Storage rack for the cranes
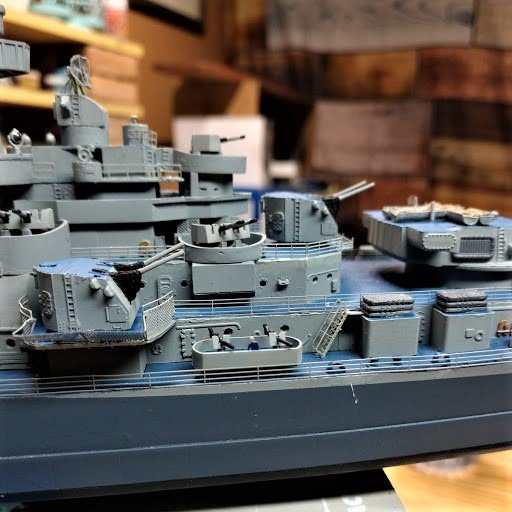
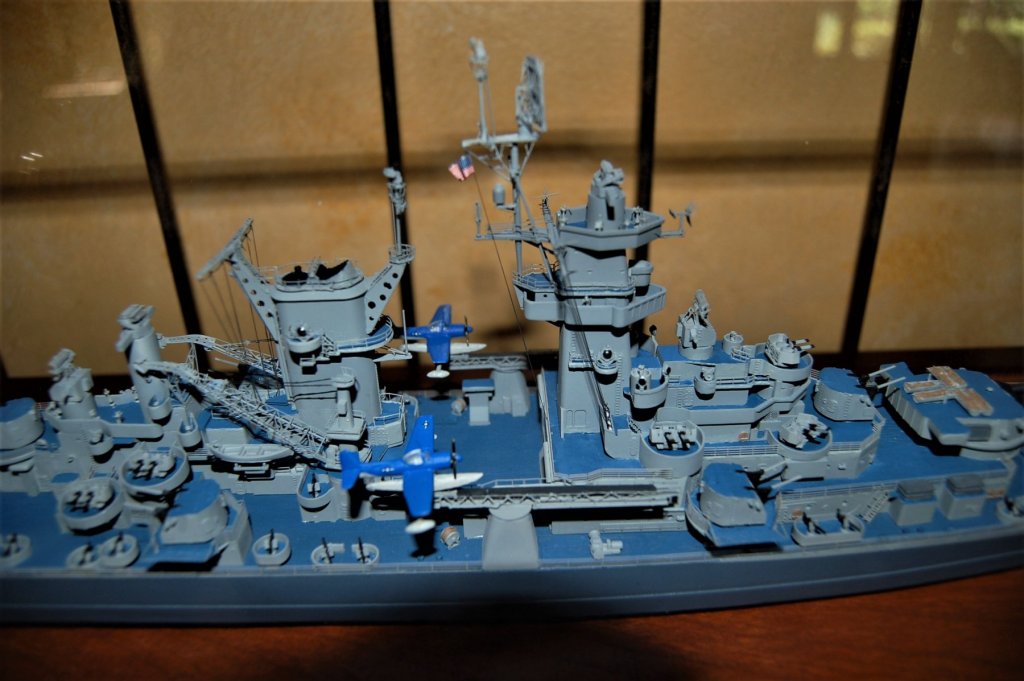
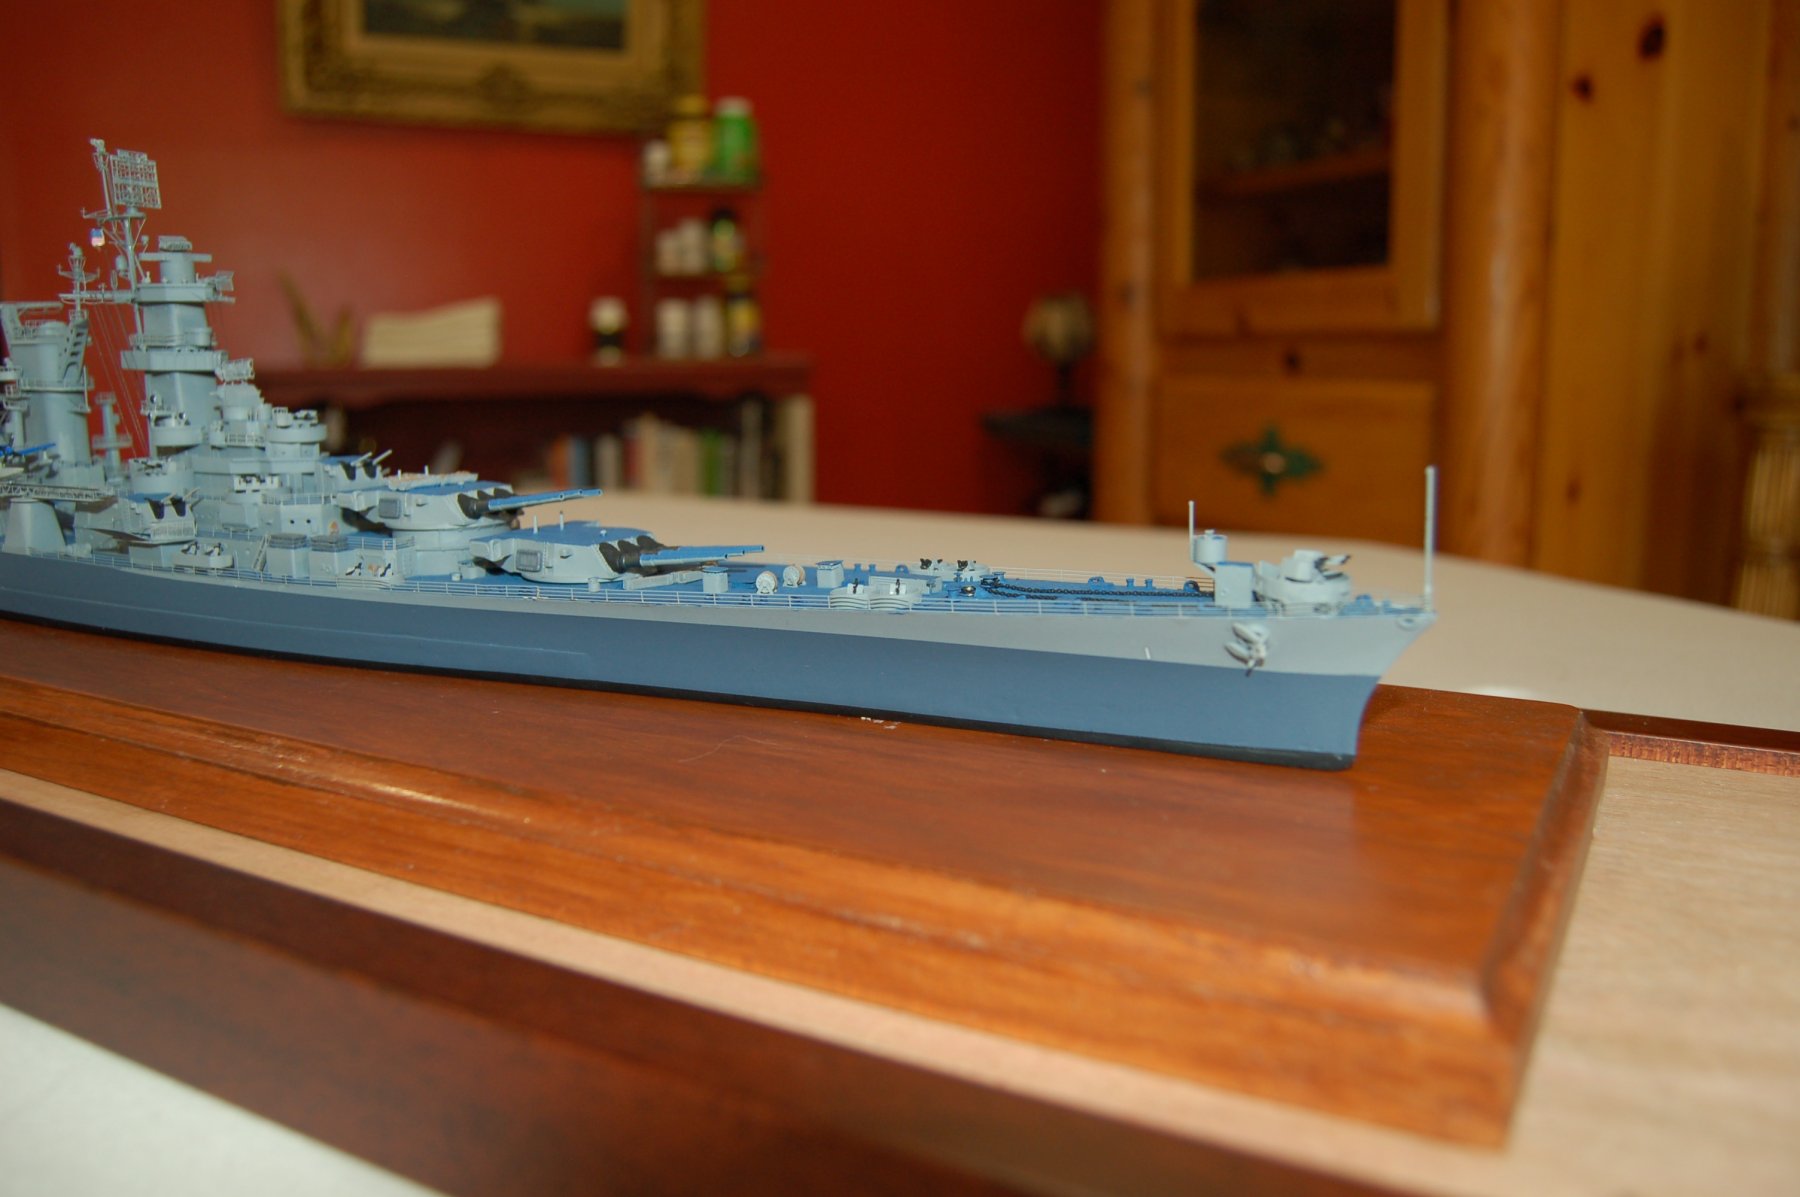
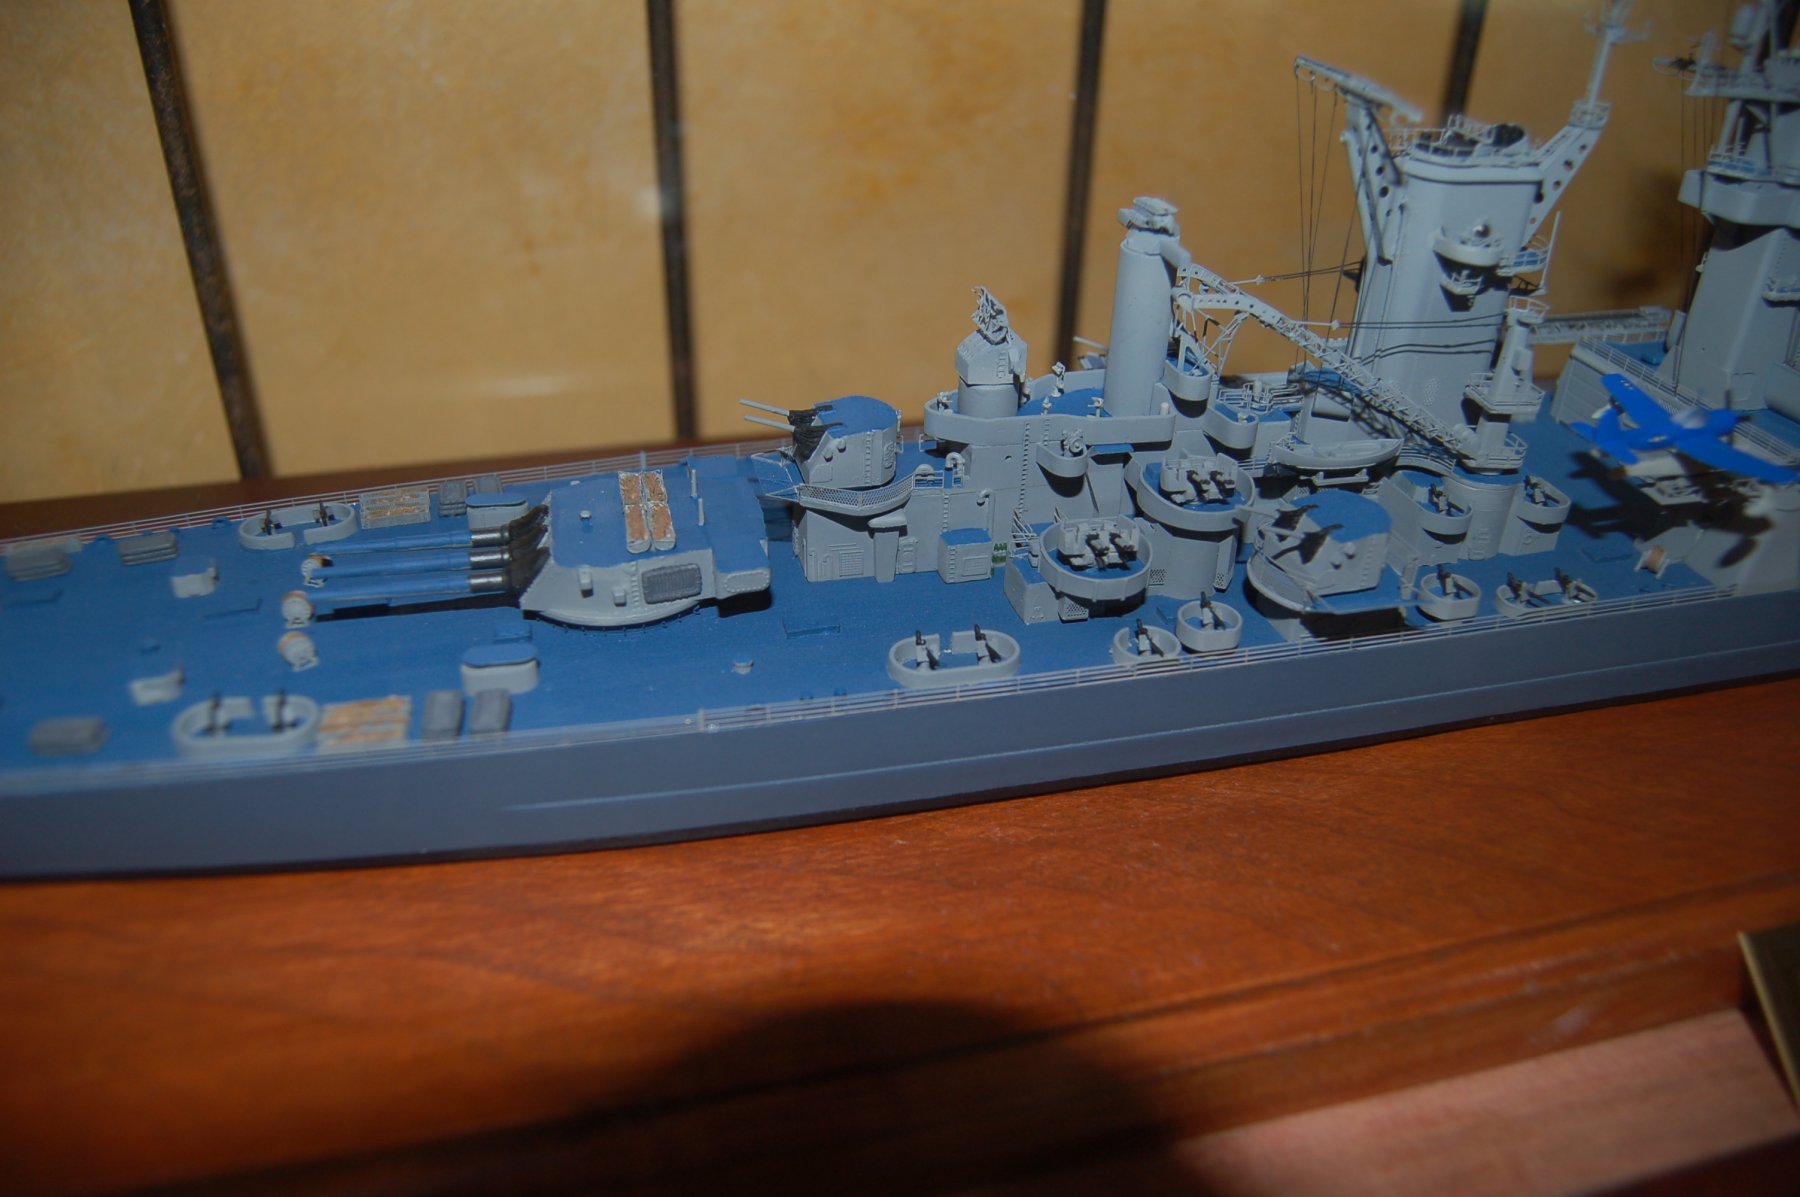
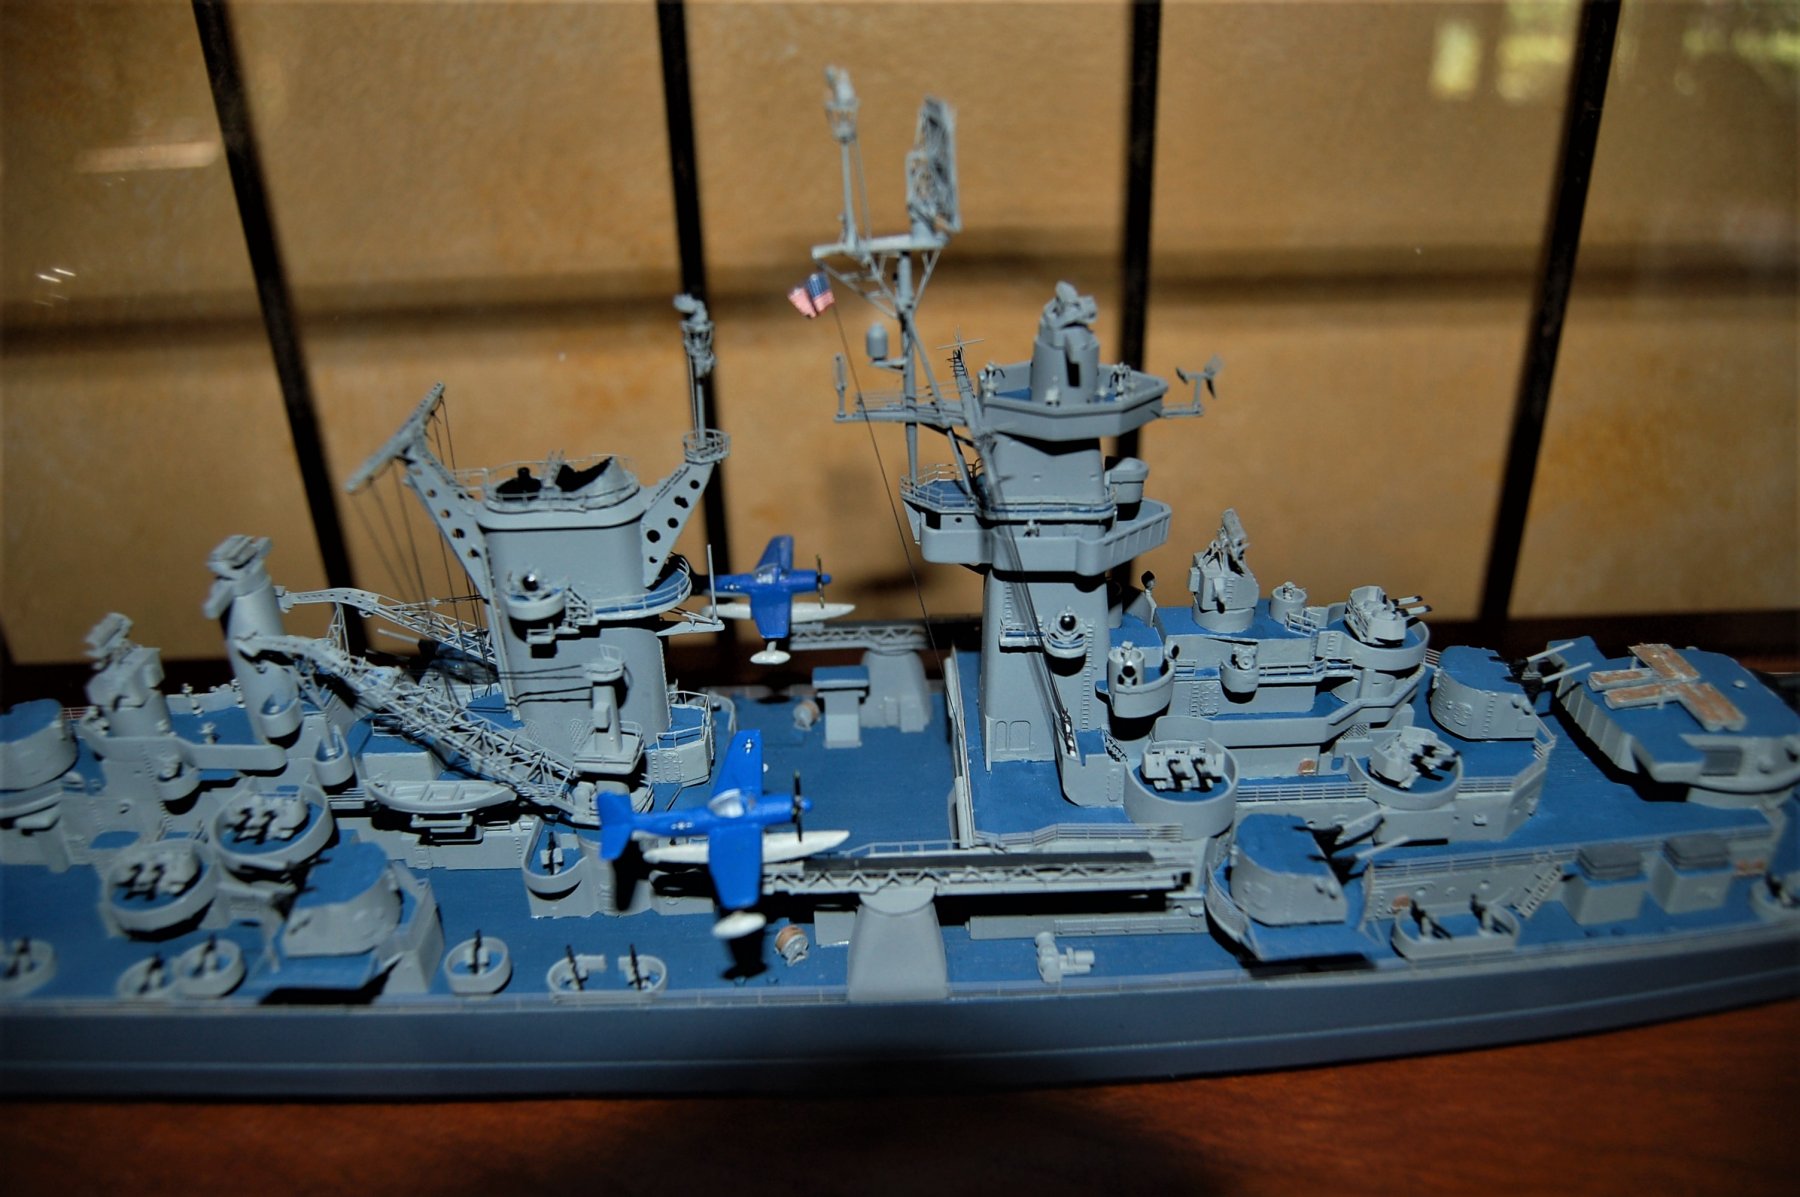
Alaska was heavily armed with a main battery of nine 12" guns, secondary battery of 12 5" DP guns and an extensive array
of 20mm Orlikon single mounts and 40mm Bofors quads. Her main mission was AA cover for the carrier groups. The main
and secondary batteries have brass barrels by B&D. The blast bags were formed with Tamiya putty. The 5" mounts did not have
blast shields as shown in the instructions. The sliding hatches on the main battery turrets were relieved as shown closed.

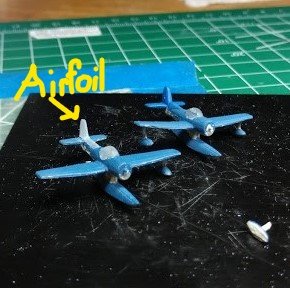
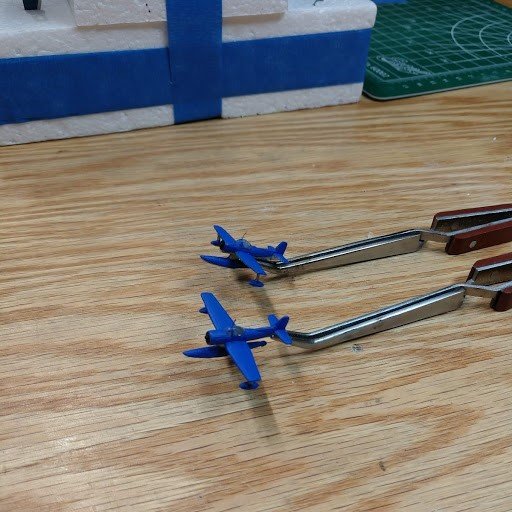
My aviation background wouldn't let me finish the Curtiss Seahawks with such gross shaped wings & tail
surfaces so they were reshaped and various colors tried to get an acceptable shade of blue.
 Radio masts are tiny
More test fitting, priming, and painting to get ready for final assembly
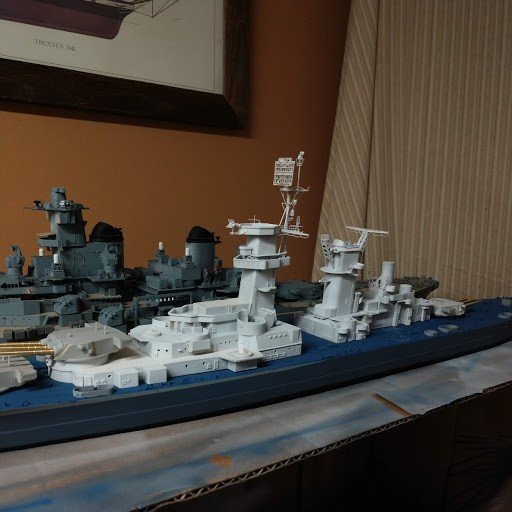
Assembly, main deck rails, and touch up for the completion of USS Alaska CB-1
Next time, Harley
-
Very well done, one of the best Syren builds that I can recall. Your rope work is exemplary and the photography and log are certainly top notch.
Thanks for sharing with us mere mortals.
Cheers, Harley
-
Nice work on the boats, enjoying your log, thanks for sharing.
Regarding your comment on lack of labeling on photo etch, I just received a photo etch fittings set for
Fletcher class destroyers from Gold Medal Models. They label what each part is on the fret plus labeling for the round or square bridge Fletcher.
Pretty handy. Their instructions are quite good also.
Best, Harley
- Salty Dog, Old Collingwood, mtaylor and 2 others
-
5
-
30 minutes ago, yvesvidal said:
Agreed. There is a limit to insanity.
Yves
Fellow photo etch addicts, "There is a limit to (this) insanity", as Yves said, should be our official moto.😵
- Old Collingwood, mtaylor, Salty Dog and 2 others
-
5
-
-
I'm going to bight on a stupid question, what type/kind of alcohol are you thinning with, thanks
Harley
- mtaylor, popeye the sailor and Canute
-
3
-
Outstanding log, thanks for sharing.
Harley
- J11, popeye the sailor, lmagna and 4 others
-
7
-
Salt, my friend, I think you just killed my hobby budget. My Commodore has been after me to do a "don't paint the PE" project for some time. She just saw your latest project which, if I may add, is outstanding. She really likes it and I'm getting that look. We all know what that look means🙄
Thanks for sharing your log
Harley
-
Greetings, Is that beautiful hull going to get the grungy weathering job? Following with great interest.
Thanks for sharing
Harley
-
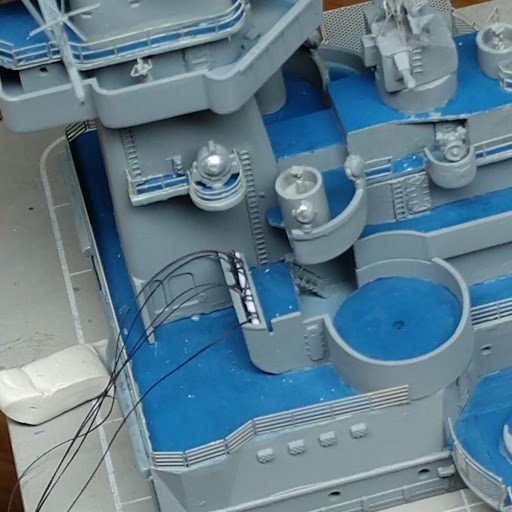
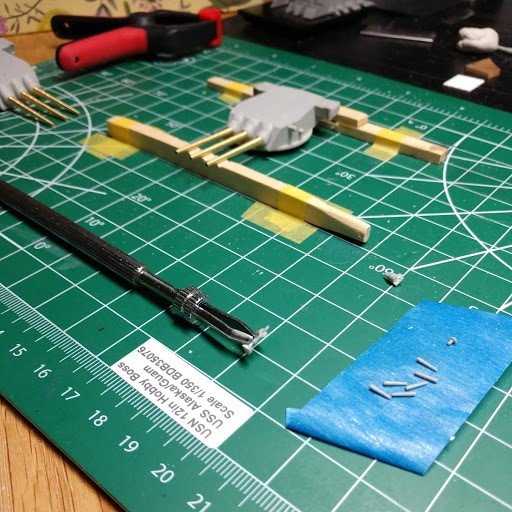
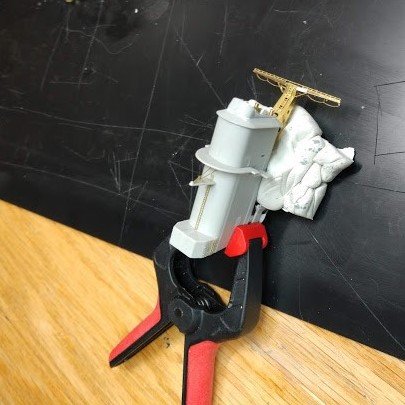
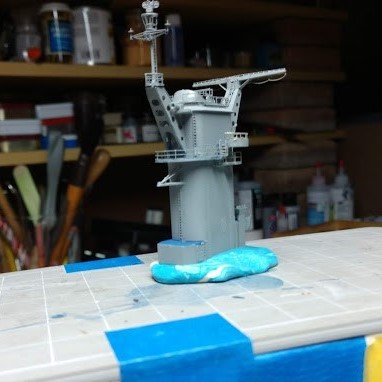
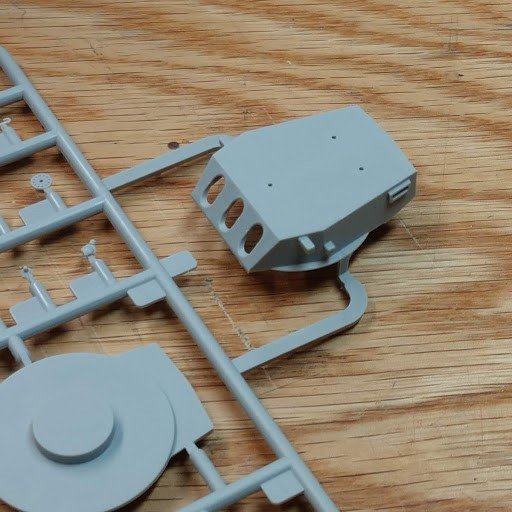
Multiple sub-structures being built:
I have found myself working on a multitude of different structures simultaneously. All this was leading up to a point where I could prime as many sub-assemblies as possible at one time.
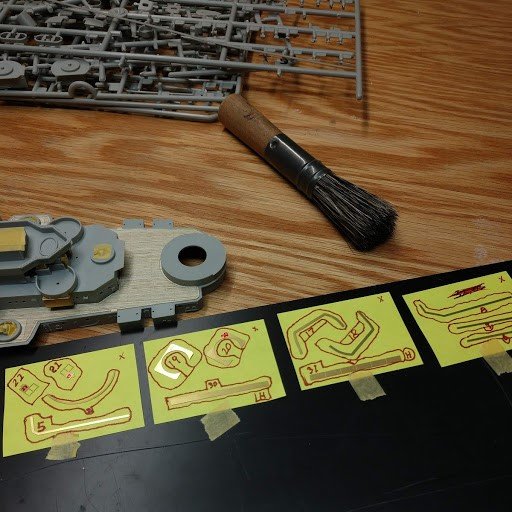
A word about PE. I used the Small Shop bending tool for most PE applications. Small strips of plastic were inserted to strengthen some of the joints like the catapults and the cranes. Gator Grip Thin is used for initial PE bonding followed by some spot welding with CA for strength.
As the various structures were assembled, all were checked carefully for fit, seams, and any surfaces in need of attention. Tamiya Putty and Mercury Adhesives Thick were used where patching was called for. I used Mercury Adhesives CA in various strengths throughout this project. The Tamiya Putty is pretty foul smelling to me but works well.
Folks, I apologize for this hodge podge of pictures, the preview showed all ok.
Alaska will be better than the log. I think I will just finish the model without having log headaches and, hopefully, be able to display a creditable model.
Funnel interior PE More PE
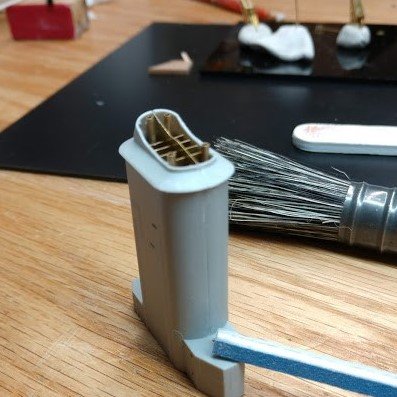
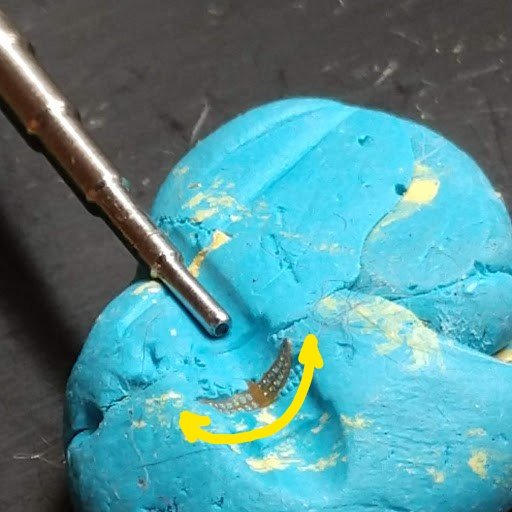
There about 70 pieces to the completed funnel Mandrel and soft clay to curve SG & Mk22 radar screens
Early paint stage
 More Later- - -
-
Great weathering job. Was she really that beat up? The B-24s must have gone after the paint factories while hitting the oil refineries.
Thanks for sharing your methods and techniques.
Harley
-
That has to be one of the best Syren builds I've ever seen including my own🤔. Your log is very well done too.
Thanks for sharing
Cheers, Harley
-
Glad your son is better, best wishes that he continues to improve.
Regards, Harley
- keelhauled, mtaylor, Canute and 1 other
-
4
-
The Plan—
It’s important to plan ahead to avoid conflicts and problems as construction progresses.
Questions to be resolved:
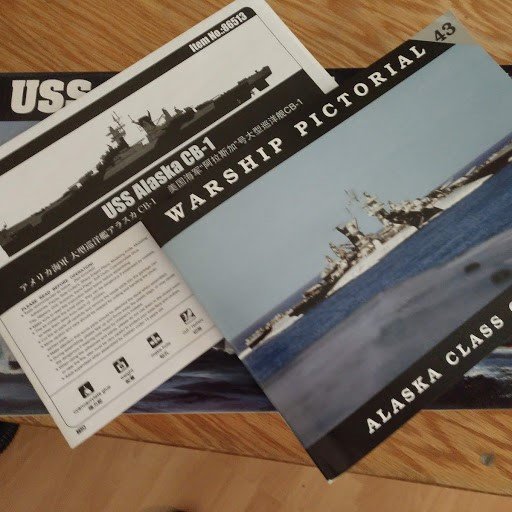
Degree of attainable accuracy, I consulted the kit instructions, Ashey’s book, and the Warship Pictorial #43. A lot of computer research time is being logged.
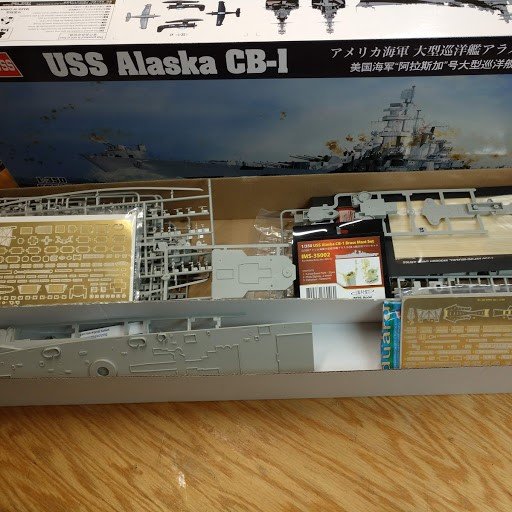
Materials available, this dealt mostly with a choice of kit vs aftermarket/PE such as main battery barrels, plastic or brass.
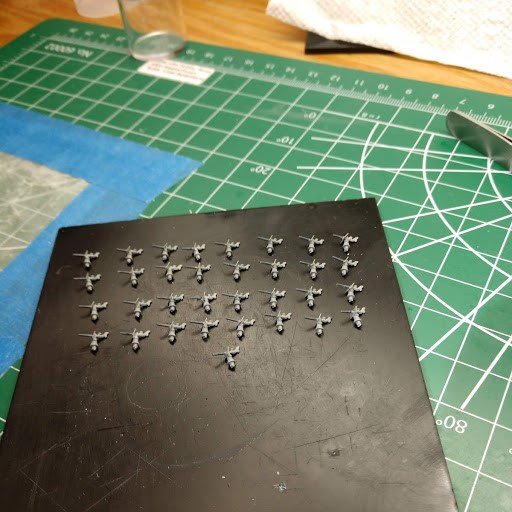
My current skill level, I have practiced PE on some 1/200 40mm Bofors quads by Veterans. I also did a practice build on a 1/700 Iowa to get up to speed on plastic adhesives, procedures, etc. The airbrush got some work. The paint job will be pretty clean. Oil canning and weathering hopefully on the next build. The kit supplied 40mm quads (14) and 20mm Orlikons (34) are reasonable so will be used. PE Orlikons are a real challenge to fold.
The superstructure will be constructed as separate mini projects.
The plan calls for working from the centerline out. Two major considerations for that are the paint scheme and fragile PE pieces and railings. Because most of the horizontal surfaces are blue and the vertical surfaces are gray, I feel it would be easier to paint most of the horizontal surfaces first and mask those surfaces when the gray is sprayed. I will prime all with Vallejo white surface primer. Both Vallejo and Model Masters acrylics are in the paint locker.
Thanks to CapnMac82 for his paint color comments on RGL’s Fletcher DD. That will help on Alaska’s paint scheme.
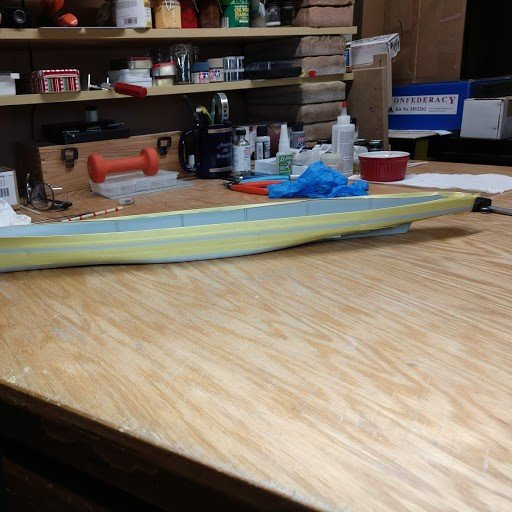
Painted deck
glued to hull,
brass capstans are wrong,
the bigger ones should be inboard, fixed. Deck masked for first gray paint on gun tubs etc.
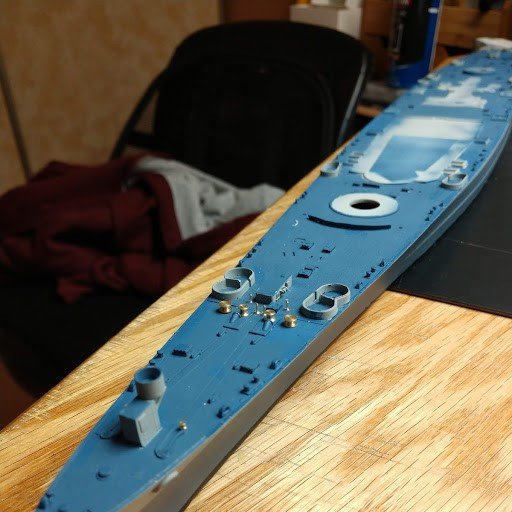
Forward superstructure building up. Hanger doors are PE vents, ladders, etc. being added
Evergreen .5mm V-Groove & .3mm half round

Clay used to brace PE support while glue dries Forward mast (Infini) building up

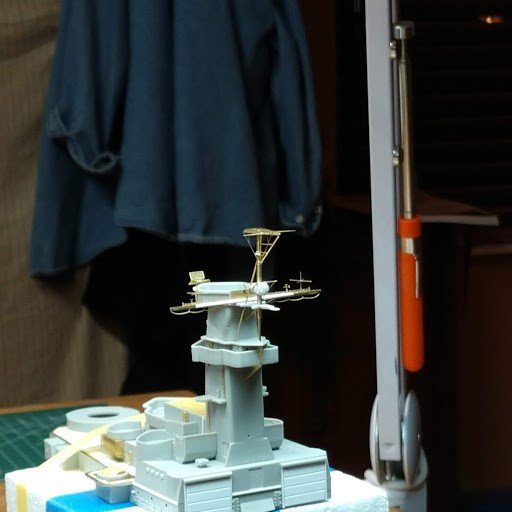
More next time, edit because the post fell apart!!
-
I think all the adjectives have been used up but an outstanding build and informative log.
I may have missed it but what did you use for the rigging. I'm thinking of trying E_Z Line on my Alaska.
Thanks, Harley
- mtaylor, Canute, Old Collingwood and 1 other
-
4
-
All horizontal surfaces per USN Ms22😂😂
- lmagna, Canute, Old Collingwood and 2 others
-
5
-
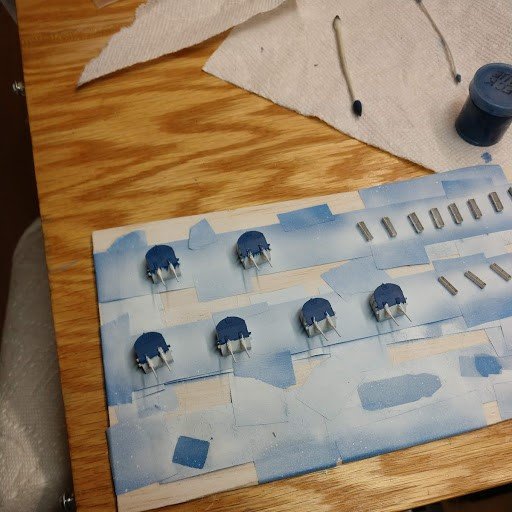
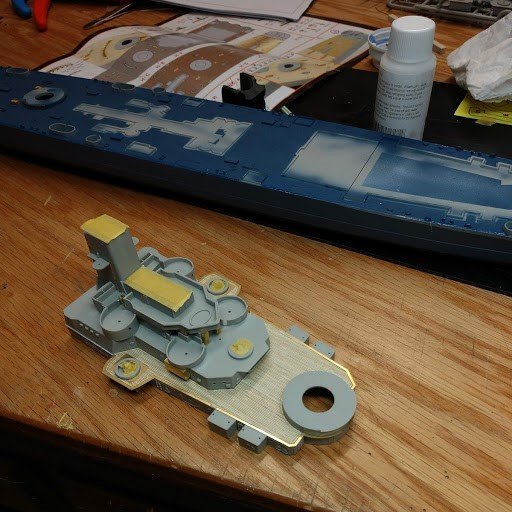
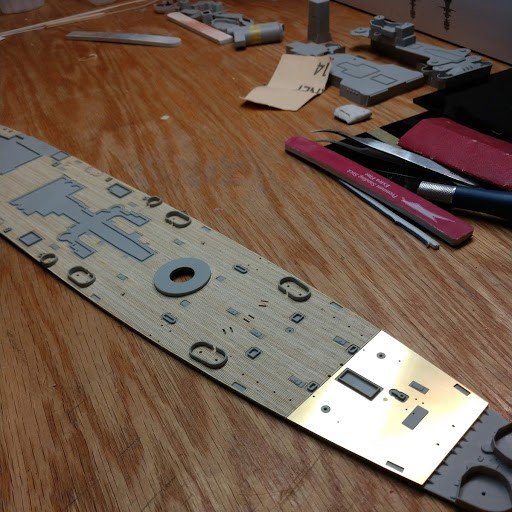
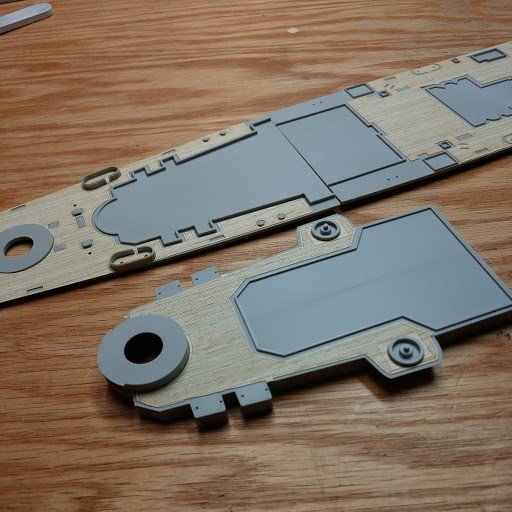
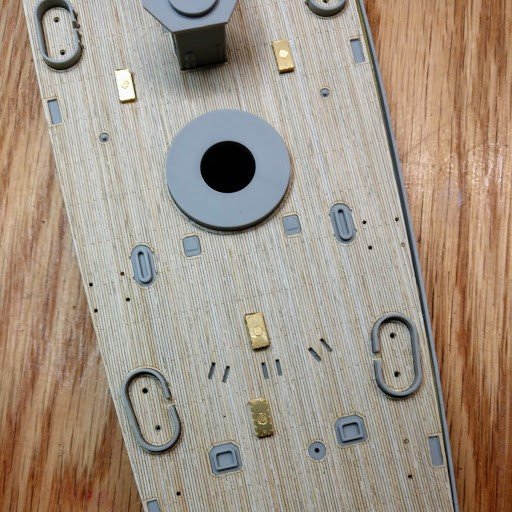
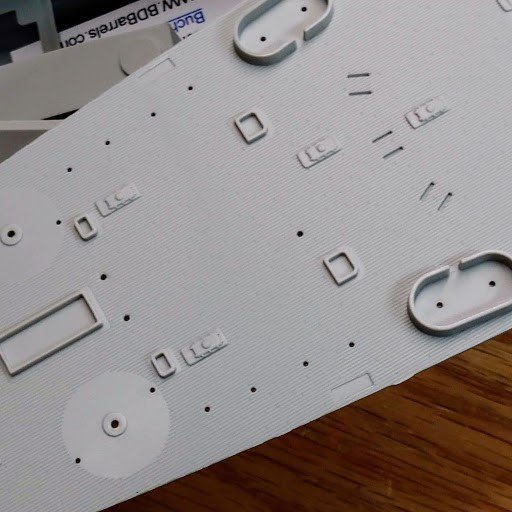
Wood deck:
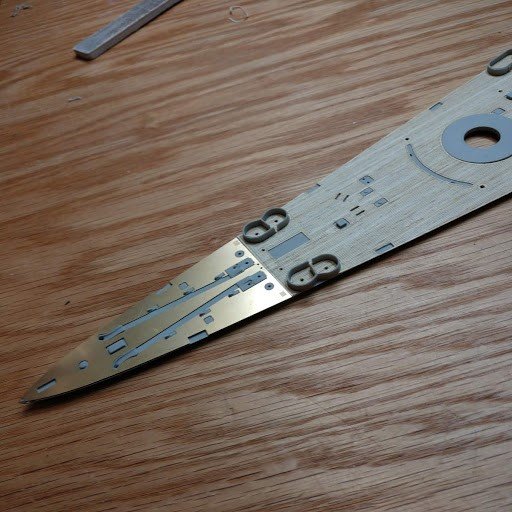
The wood deck went on with no problems. There are a few places where Gator Grip Thin Blend was used to assist the deck adhesive. The deck kit included the “steel” deck from the capstans forward and the area of the aft 40mm mounts. Brass capstans, hatch covers, and other PE deck fitting are included in the deck kit. In most cases the PE hatches fit over the hatches already on the deck so little sanding was necessary. The PE deck fittings were all easily assembled per normal PE procedures. The pictures of making the PE flotation net bins went to computer heaven unfortunately. I'm going to hate painting the deck blue.
- hexnut, mtaylor, Haliburton and 9 others
-
12
-
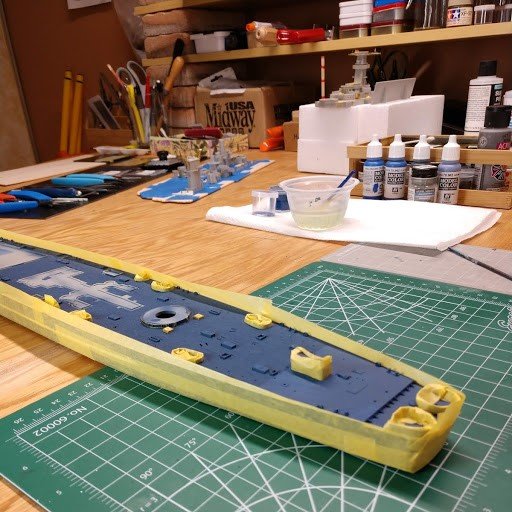
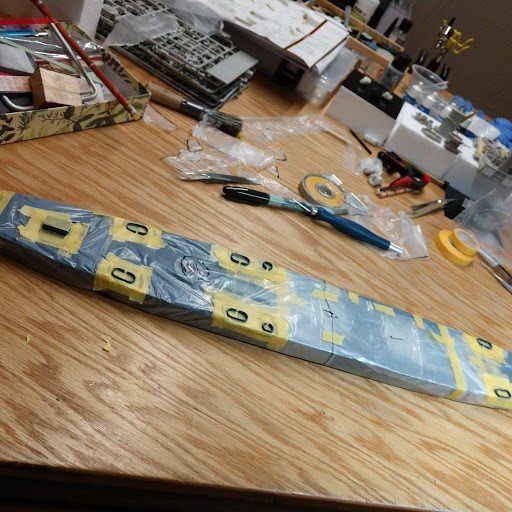
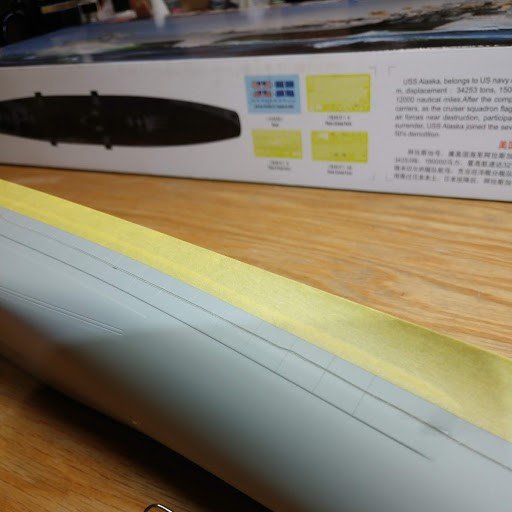
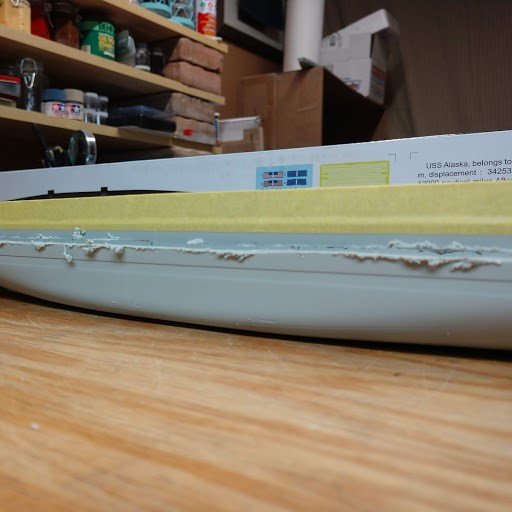
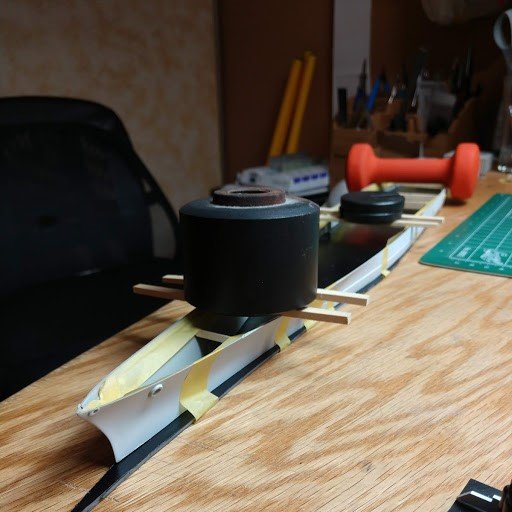
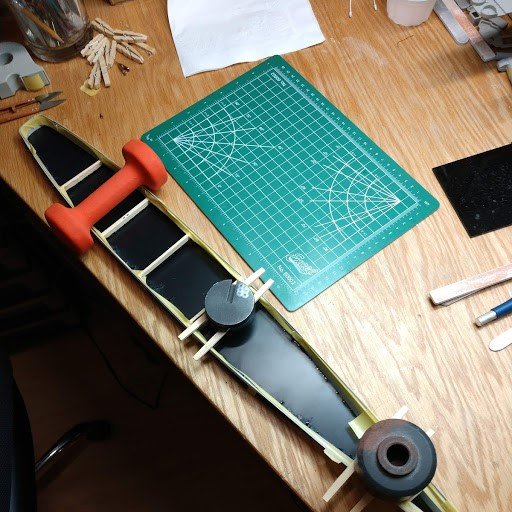
A Waterline Configuration--
I used my Dremel to cut away the bottom of the hull. Care had to be taken to minimize melting the plastic. The picture looks really gross but it looks worse than it was. A number of cross braces were installed to minimize the hull flexing while sanding it. The hull was dressed and leveled.
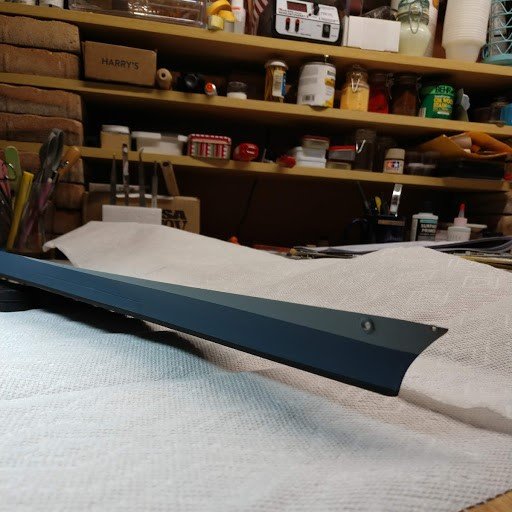
The hull was used as a template for the making the boot line. A piece of 2mm black polystyrene by Evergreen, was rough cut using the template. This was glued to the bottom of the hull and shaped to provide permanent boot line.
 Cell phone pictures
-
Since I was a youngster, as many of the participants in this website, I have been building models that range from stick and tissue airplanes, solid hulled ships and planes, and armor from all fronts of World War Two etc, etc.
I spent four years building the Model Expo Syren which I consider my first serious wooden ship effort. That was a great learning experience for me. The Model Ship World website served as an invaluable source to make my model building experience meaningful and, although frustrating at times, an enjoyable hobby.
After I retired I finished the Syren and jumped right into the ME Confederacy. For me, Confederacy was almost too much but I don’t give up easily. She’s coming along quite well but I needed a change.
Today’s plastic models are a far cry from my previous plastic builds. Photo etch presents challenges and possibilities not thought possible a few years ago.
So Confederacy was put on the shelf temporarily and research on a new project began.
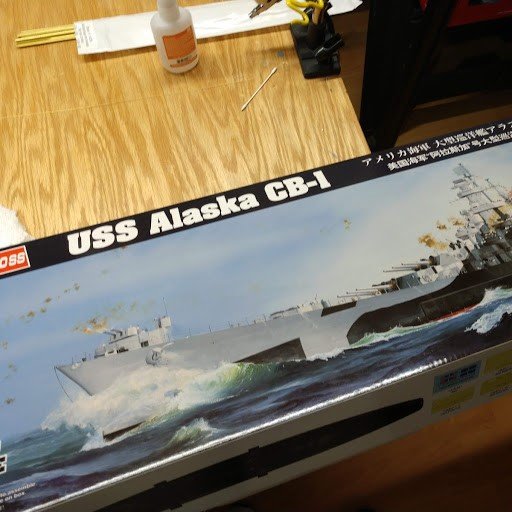
I chose the Hobby Boss USS Alaska, CB-1, in 1/350 scale. I really don’t why I chose this ship. It just caught my interest. The kit had good reviews and plenty of photo etch options available. Anything with multiple 40mm Bofors quads gets my attention.
The USS Alaska enjoyed a brief but meaningful wartime history. She went to the Pacific with the Missouri at the end of 1944. Alaska’s main battery was nine 12in guns with ten 5in as a secondary dual purpose battery. With a speed of 33 knots and an extensive AA compliment, her main task was providing AA support to the carriers. Alaska was longer than any of the battleships at Pearl Harbor. There is much discussion as to whether the Alaska class was a Heavy Cruiser or a Battlecruiser which it had originally been designed to counter.
Kit: Hobby Boss 1/350 scale. The instructions are well done. I didn’t strictly follow the suggested sequence. For instance I assembled the 40mm quads early to see if I would want to replace them with PE. The kit PE are good but I did use some aftermarket items. The kit could be easily built as is from the box and produce a very nice model.
References: Warship Pictorial #43, Alaska Class Cruisers, a multitude of websites too numerous to mention, and Mike Ashey Publishing #3, Building and Detailing the Hobby Boss USS Alaska.
Note: Although Mike Ashey’s Publication #3 deals specifically with the Alaska, I think the book serves as a good training tool for beginners or, in my case, getting back into plastic and PE.
After market upgrades: PE items were purchased from White Ensign, B&D Barrels, Master Models, Alliance Modelworks, and mostly Infini.
Note: The kit supplied PE is, IMHO, quite good and in the future I would have a new kit in hand before I started buying upgrades. Of course seeing what other modelers are using can be a good starting reference point.
Paint: I didn’t know that so many shades of gray and blue existed and I still ended up mixing my own deck blue.
I decided to use USN Ms.22 paint scheme as this was in use when Alaska went to war in the Pacific. The flashier Ms. 32/7C scheme shown on the box was used during her shakedown cruises to the Caribbean.
She will also be built in a waterline configuration which is where the build log begins.
- yvesvidal, lmagna, Ryland Craze and 11 others
-
14
-
Magnificent project Doc. A thought comes to mind, on a real ship, when would a cannon carriage only be secured by the breach lines?
Even though the clean concept has it's merits, when one looks at all the efforts you have made for realism, does the clean concept fit your overall goal.
Thanks for sharing an outstanding build log.
Harley


Focke-Wulf 190D-9 by Jörgen - Eduard 1:48
in Non-ship/categorised builds
Posted
Thanks for sharing your experiences and techniques. I'm probably old enough to be your dad but have been learning something each time you post. We don't have time to experiment with all the options so sharing is a great help.
Is your work station always that neat & clean, come on, fess up. That's a great setup.
Looking forward to your next post(s)
Cheers, Harley