CaptainSteve
-
Posts
1,858 -
Joined
-
Last visited
Content Type
Profiles
Forums
Gallery
Events
Everything posted by CaptainSteve
-
 Radical new approach to planking there, Dave. Consider me most impressed. One question, what about the butts of the planks ??
- 962 replies
-
- 4
-

-
- sovereign of the seas
- ship of the line
- (and 1 more)
-
Incidentally, at the very last moment, some paint was slapped-eth about the place a-fore CaptainSteve left for the Hospital. Pics were taken ... but were not processed until post-surgery today.


- 625 replies
-
- 14
-
-
- bounty launch
- model shipways
- (and 1 more)
-
Arrr ... "It doth be but a flesh wound !!" Thanks one and all fer the comments and well-wishin' ... much appreciated. And thank you, Mark, I have every intention of complaining ... coz me arm feels bloody sore indeed at the moment!! But, the surgery apparently went well, and as you can plainly see, CaptainSteve survived, though he didst come through with a greatly-reduced typing speed for some time to come. By the way, as any one of you who has ever been in hospital will know, there are certain formalities necessary upon being admitted. After identifying myself and providing DOB etc etc, the nurse asked me: "And what are you here for today??". Without blinking, CaptainSteve didst most truly reply, "To have a bionic arm installed."
- 625 replies
-
- 6
-
-
- bounty launch
- model shipways
- (and 1 more)
-
Tom, Yet another brilliant tutorial showing us how it is done !!! Awesome work !! (Although, I'd swap the positions of the second and third ones from your last pic ... which becomes the ones in positions 3 and 4 when I turn my lap-top upside down)
- 1,354 replies
-
- 1
-
-
- constitution
- model shipways
- (and 1 more)
-
This be jus' a quick update afore Our Hero be heading off to hospital to have his bionic modelling arm fitted for minor surgery. "Me rudder doth have-eth full lateral movement an' all, but before I go tick-ething anything further from the list," CaptainSteve opined, "I be still lookin' to touch-up the final look o' the lower pintle an' gudgeon arrangement." More than likely, Our Hero will add a few light touches of white to the blackened metal, in order that most of the black is visible. Time will tell. "Any-hoo, before I go dry-brushing anything, here be some o' me latest pics ..." Note: The above photos were more for Our Hero's usage in checking his work ... "I be really a-hatin' close-up photography !!!", he was heard to grumble.
- 625 replies
-
- 10
-
-
- bounty launch
- model shipways
- (and 1 more)
-
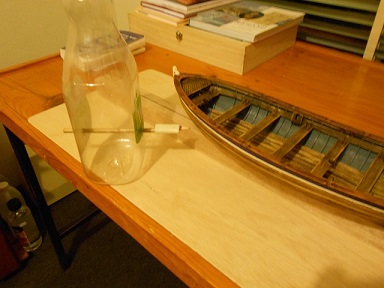
Per, Rigging up one of these took me all of three minutes:
- 335 replies
-
- 4
-
-
- 18th century longboat
- Finished
- (and 1 more)
-
Tom, Having just installed a two-strap rudder, I can only imagine how much fun you had with six straps !!! Looking very good !!
- 1,354 replies
-
- 2
-
-
- constitution
- model shipways
- (and 1 more)
-
Even though I am not building this kit, I seriously feel your pain, Keith. I went through a similar experience working on the stern galleries on my first build. In all honesty, I would go with your own suggestion of living with it, and simply "build them different". If you incorporate your changes gradually, and especially given the amount of detail work to come on your ship, then I, for one, would consider that no-one (apart from the 15,000+ people following your build) will ever notice a difference. But, hey, that's just my opinion.
-
Gotta say that I'm very impressed with the addition of the fids !! Your work is, as always, very crisp.
-
Since the incident happened at work (and as I'm a full-time employee), then, Yeah, all expenses are covered. As to a bionic-modelling arm - with separate functions for latheing masts/spars; serving ropes; circular saw/hand ... Well, I shall definitely suggest it to the surgeon. (But, I doubt it will be covered by insurance)
- 625 replies
-
- 3
-
-
- bounty launch
- model shipways
- (and 1 more)
-
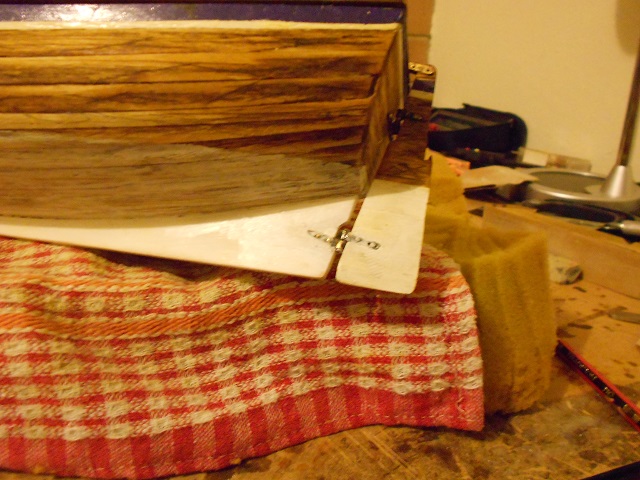
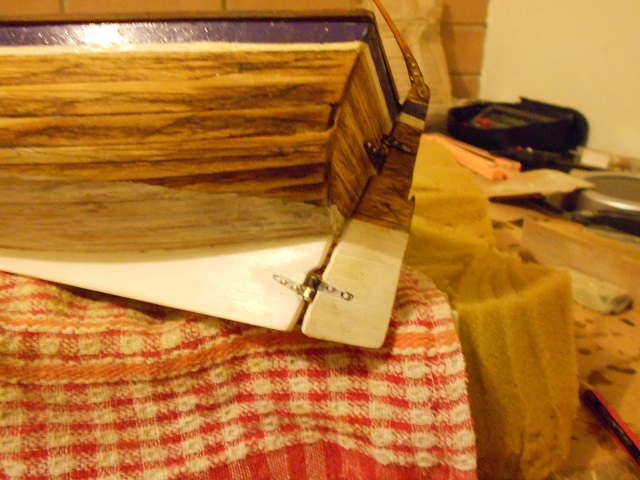
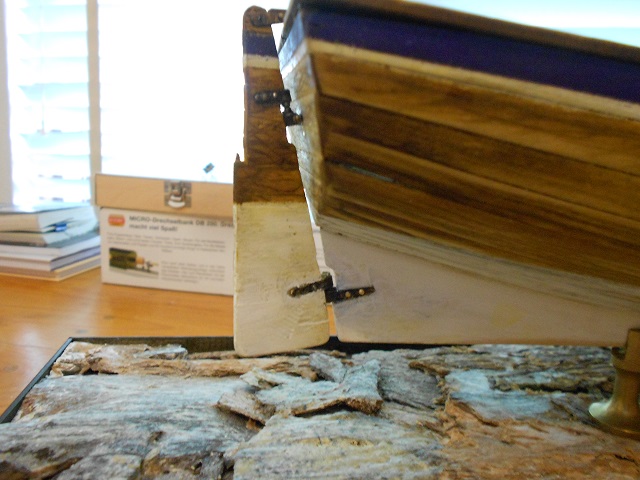
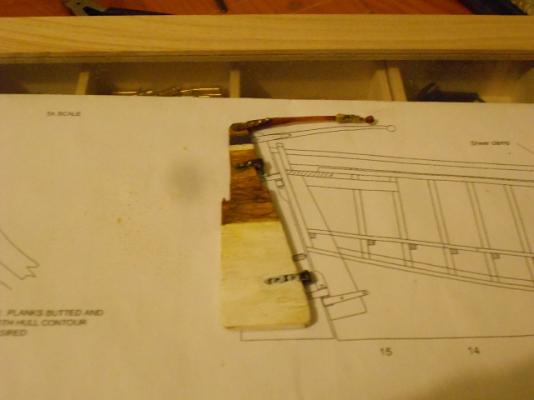
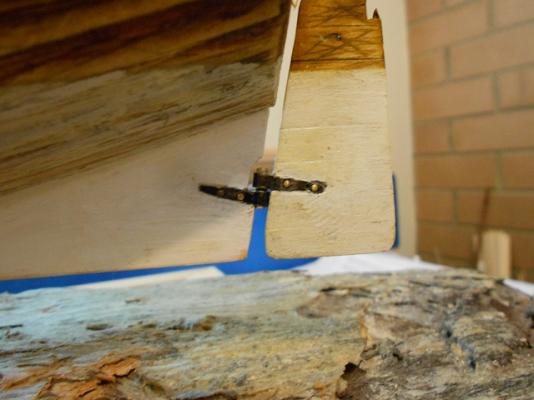
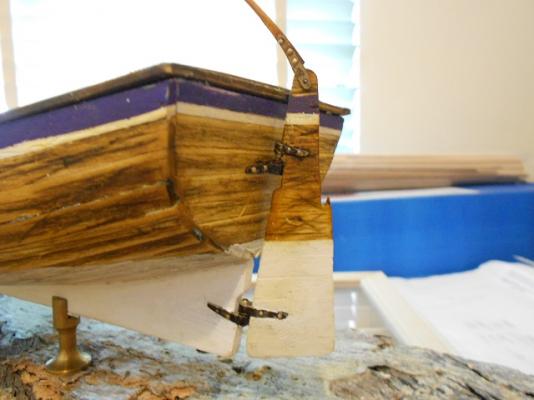
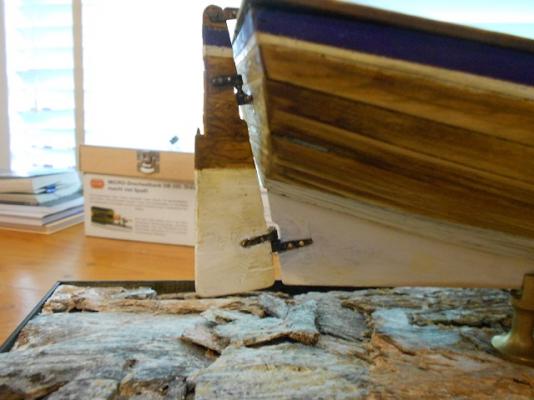
George, I'm thinking that I will lightly paint over the metal straps with white paint. Then, maybe, scratch it back a bit, once the paint dries. This will allow some (most) of the blackened metal to show through, as well as matching with the scratched-up water-line which was recently painted in. The actual working hinge sections between rudder and transom will be left as blackened metal, since they can move ("If it does move, DON'T paint it!!"). Yep. Day surgery on my fore-arm (modelling arm!!) as a result of a recent work accident.
- 625 replies
-
- 4
-
-
- bounty launch
- model shipways
- (and 1 more)
-
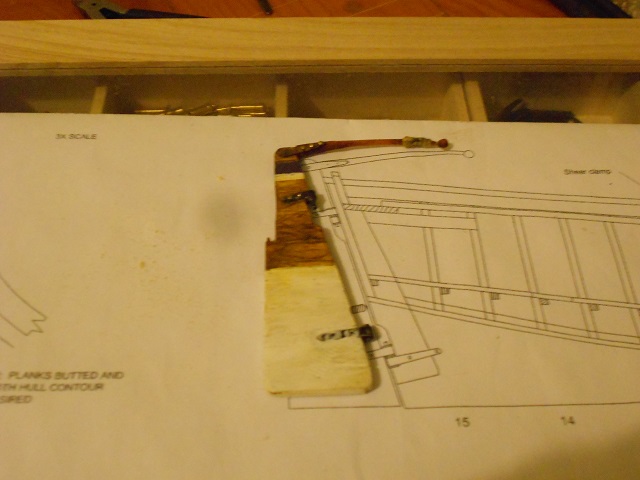
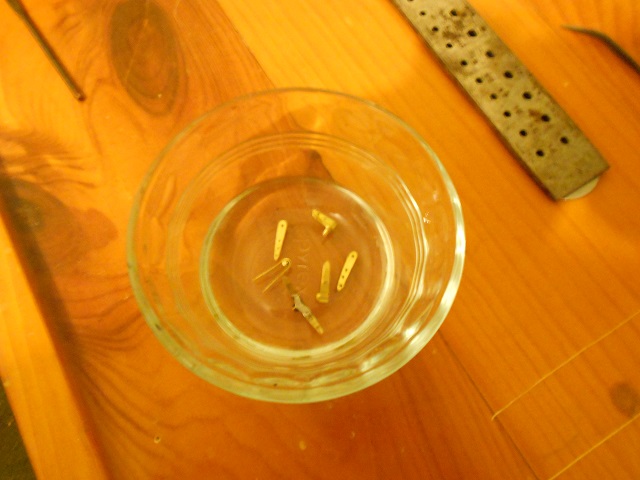
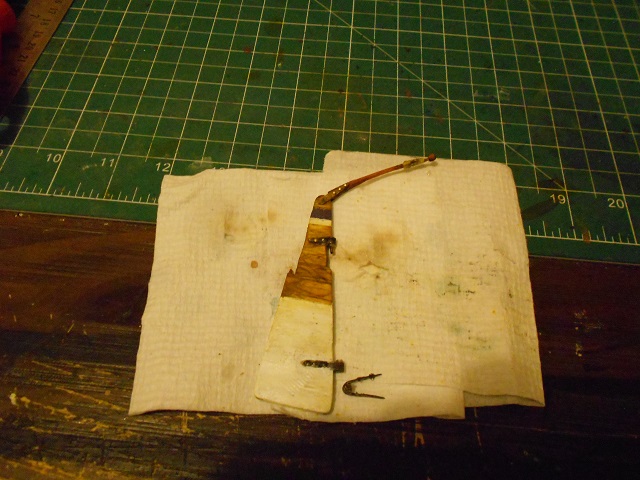
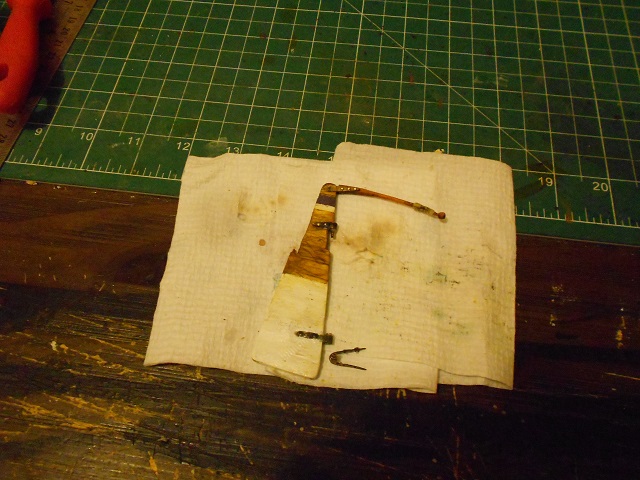
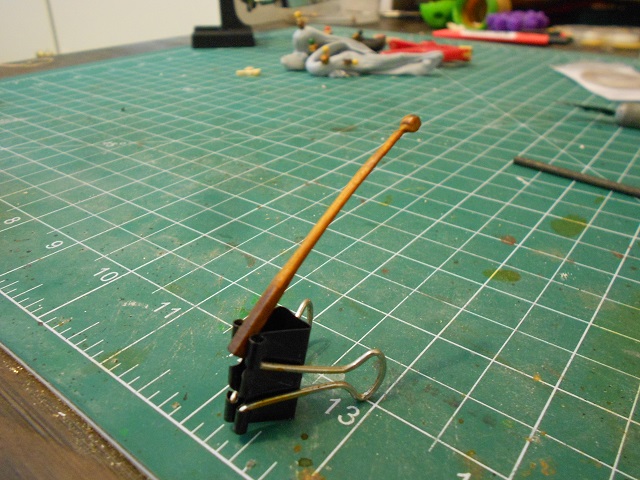
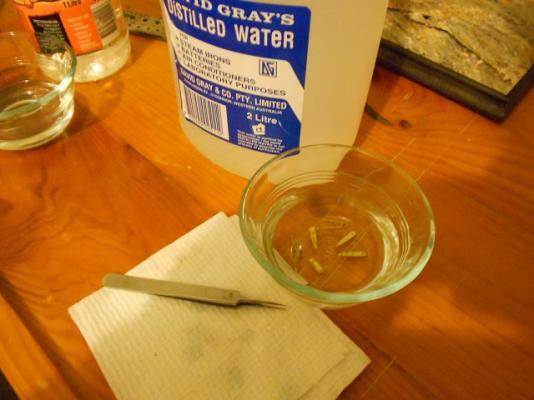
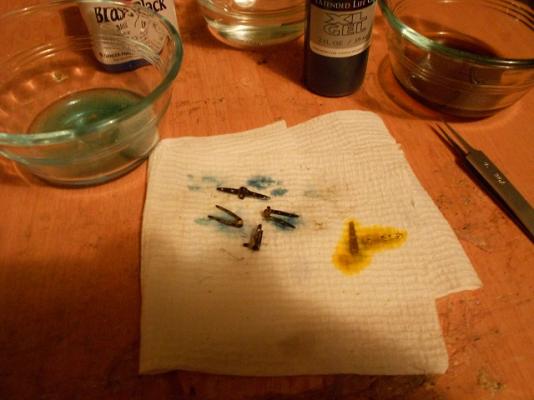
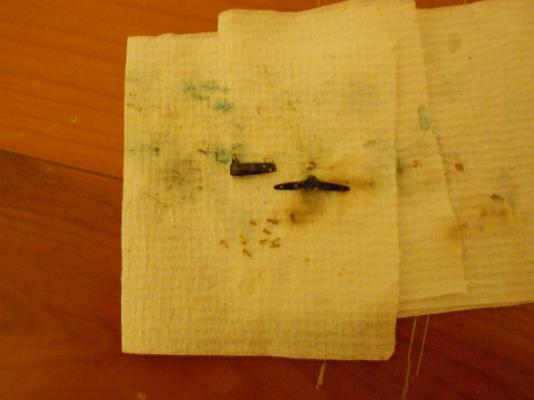
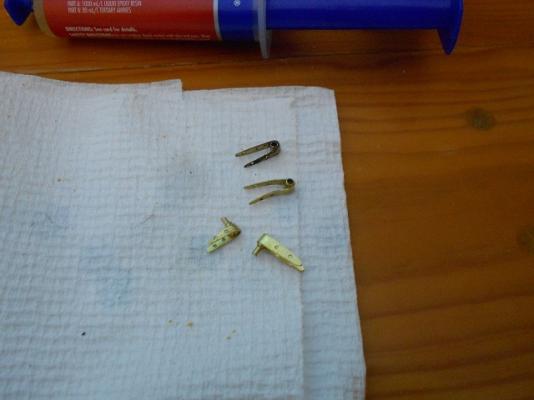
“I doest have some vials o’ the Liver O’ Sulphur (LoS),” CaptainSteve didst trieth to explain. “As well, there be recently-arrived vials o’ the Caseys’ Brass Black concoction.” Firstly, the pieces were washed clean in methylated spirits ... ... and thence were rinsed in distilled water … Thus, Our Hero didst decide that the plates jointing tiller to rudder were to be tinted by immersion in the LoS. This be primarily to give ‘em the same look as the mast-clamps. For the pintles/gudgeons to be attached to the transom, Our Hero didst useth this occasion to test-eth out his first ever usage o’ the Caseys’ blackening agent. Bolt-heads for the fixings were made by clipping the heads from miniature nails. Verily, much wailing and gnashing of teeth did occur-eth whilst trying to install these. “They be a right PITA to be a-fitting unto the corresponding holes,” Our Hero went on, “but they be adding to the overall look, in the end.” “And here be a couple o’ pics of me rudder/tiller arrangement, just prior to installation,” CaptainSteve were to conclude. "If ye doth squint, ye can just barely make-eth out the chamois grip-lashing upon the end o' me tiller-arm ..." "Fixed through wi' a pin, and most verily, it doth moveth !!" “Now, I be a-readin’ recently about the matter o’ the White Stuff which were applied unto the hulls of ships and boats up to and beyond the time o’ the Mutiny incident,” CaptainSteve summarized. “It were used as an anti-fouling treatment, o’ sorts.” Wi’ his recently applied water-line, Our Hero didst realize that his rudder wouldst also needeth the White Stuff. “This be a-leadin’ to me most recent conundrum,” he began to wind-eth up. “Doest I be painting the lower pintle & gudgeon pair, or do I be leavin’ them the blackened metal colouring ??” he was to posit. On the one hand, Our Hero hath noticed that other Launch builders have left-eth theirs black, even where they have also added a waterline. Indeedeth, this be the look which he hath so far applied. “However,” CaptainSteve theorized, “according to the time-honoured naval tradition of ‘If it doesn’t move, paint it!!’, then most surely I shouldst be over-painting the straps of this lower arrangement.” “What sayeth the horde??”


- 625 replies
-
- 10
-
-
- bounty launch
- model shipways
- (and 1 more)
-
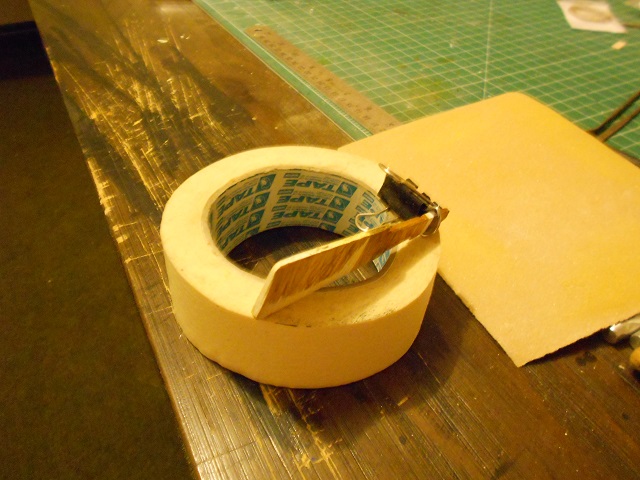
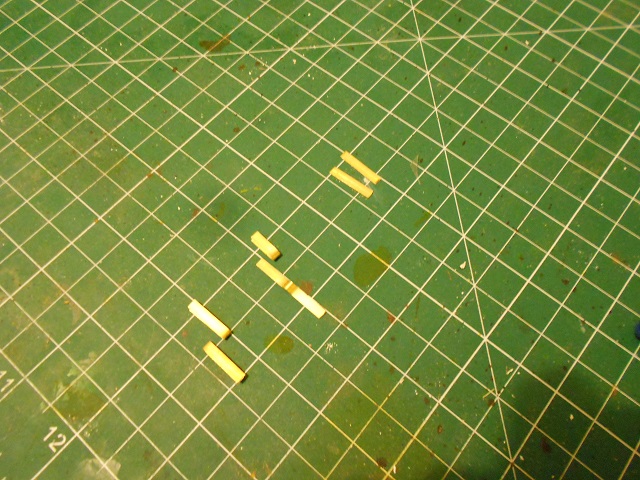
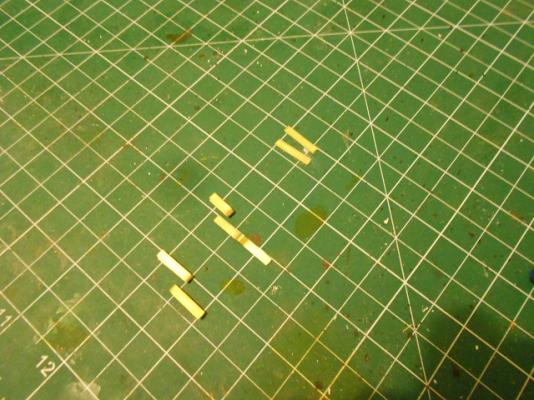
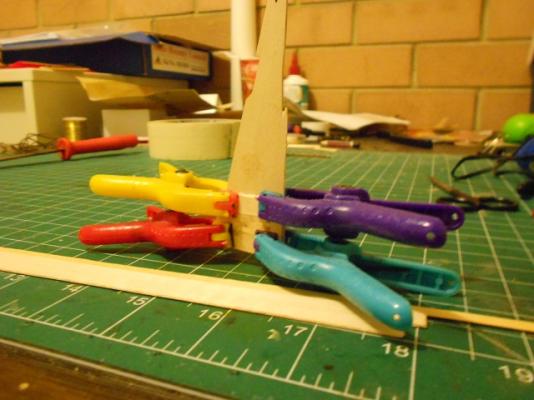
Our Hero didst jumpeth into the previous weekend, intending to haveth one further item tick-ethed a-from the List prior to his upcoming surgery. “If not, then a brace or more!!” CaptainSteve didst boast. Thusly, and with vigour, work didst commence upon his rudder/tiller arrangement. Firstly, the kit rudder was over-planked with strips o' thin veneer ... “Arrr … it be only much later,” he beganeth. “That I be a-realizin' that what I should have done were to be having the planks a-running up an' down, instead o' horizontally …” “Me tiller piece was shaped with fine sand-paper,” he said. “And then a grip added made from a strip of the same chamois cloth which hadst been use-ethed for me oar-lashings." This be-eth an idea which Our Hero didst learn-eth from the Artistic One ... and his squirrels. To alloweth movement o' the tiller-arm, note-eth that a small amount of wood hath been trimmed from the lower corner, where it doth meet with the rudder-piece. (See pics at end of next post.) Paint were applied to the rudder to match-eth with the transom, including the Docker’s stripe … O’course, ‘twould have been much easier to be noticing that the rudder piece needed additional tapering a-fore painting … but this wouldn’t be a CaptainSteve build if that were the case !! Next up, the pieces for the pintles and gudgeons, as well as the straps for the tiller, were cut from the kit-supplied strip of brass. “I be using just a pair of cheap scissors …”, Our Hero added, by way of explanation. The Dremel tool with grinding wheel helped shape the final outcome for the fittings … “I didst be a-using small pieces o’ brass rod and tube (not-eth supplied in the kit),” he went on, “to form-eth the hinge pieces making the working bits for me pintles and gudgeons.” More power to those o' you whose metal-working skills are adequate. Our Hero's be not ... and thus, he hath joined his pieces together with two-part epoxy, after failing with solder (and needing to be re-making at least one o' these pieces). As many of you are probably aware by now, CaptainSteve doth sometimes go-eth off on tangents, thus wasting valuable build time with oft-times friviolous research. This were to be yet another one o' those times. As usual, o' course, this didst leadeth unto the question of colouration (doesn’t it always??), with Our Hero contemplating upon the look he wouldst be applying unto his metal bits ...


- 625 replies
-
- 9
-
-
- bounty launch
- model shipways
- (and 1 more)
-
You could try using some Tulle to replace the material supplied for netting.
- 20 replies
-
- 1
-
-
- constitution
- mamoli
- (and 1 more)
-
You could be completely correct, Michael. As mentioned, I have no evidence of the actual mock-up that was used. One other point which has not been mentioned so far, is the actual usage of the oars. The two times I recall their use was, firstly, upon their fleeing Tofoa after the death of John Norton, and, secondly, on the party's final approach along the coastline to the port at Coupang.
-
Further to the installation of the weathering cloth, please note the following from Bligh's log: 7 May, 1789 16deg 29' S Variable weather & cloudy. Winds NE Set up "watch and watch" rotation. Continued reading of "The Bounty Mutiny" reveals that, essentially, this meant Bligh set up a series of six-hourly "watches", whereby half the crew is standing (if not employed as bailers etc), allowing the other half to stretch out/relax/sleep as much as was possible, given the circumstances. Adding a "weathering cloth" with frame, it seems obvious (to me) that a frame was built if Bligh has noted that the Carpenter was involved. This would have been of benefit to the Loyalists by: (i) allowing them to collect rain-water (ii) provide some cover from rain and high sun (iii) give additional supports for standing crew on work-detail (ie: non-resting) Unfortunately, I could find no further reference to the "weathering cloth" or its' frame. Thus, I have no concept of the appearance and construction. I can only imagine the whole thing as a large, floating tent.
-
Thanks, Keith. I'm sure many modellers will find this very useful.
- 396 replies
-
- 3
-
-
- Idea
- Bright Idea
- (and 1 more)
-
I think it be this one. (But feel free to start with Keith's link above ... that's the beginning)
- 425 replies
-
- 3
-
-
- bounty launch
- model shipways
- (and 1 more)
-
You and your squirrels are a very talented bunch, Matt !!
- 425 replies
-
- 2
-
-
- bounty launch
- model shipways
- (and 1 more)
-
Superb job on your Launch, CH !!! As for your next project ... Well, of the options you've listed, I'd go for the paddle-steamer. But that's only if it were up to me, which it ain't. As you have definitely proved that you've already got the skills, my suggestion would be to go for a project which is going to hold your interest.
- 83 replies
-
- 2
-
-
- bounty launch
- model shipways
- (and 1 more)
-
Just a thought, but how about putting the tiniest bit of flux paste into the nail holes (use the tip of a toothpick), followed by the tiniest drop of solder ?? Once it sets, you could shape the new solder "nail-head" with a flat file. I haven't (deliberately) tried this myself, Tom ... but whilst trying to solder the pintles and gudgeons for my Launch, I noticed that tiny balls of solder were flowing into my nail holes. This happened with annoying frequency, even without applying flux. (No doubt, if I were actually trying to replicate the effect, then it wouldn't happen !!)
- 1,354 replies
-
- 1
-
-
- constitution
- model shipways
- (and 1 more)
-
At least you've got your priorities straight !!
- 425 replies
-
- 5
-
-
- bounty launch
- model shipways
- (and 1 more)