CaptainSteve
-
Posts
1,858 -
Joined
-
Last visited
Content Type
Profiles
Forums
Gallery
Events
Everything posted by CaptainSteve
-
 Hope to see you back soon, Monkeyman.
 -
Seeing the white stripe really brings her to life.
- 1,354 replies
-
- 2
-

-
- constitution
- model shipways
- (and 1 more)
-
I read the results of your research, Matt. Not disappointing at all. Even though my grommets don't fit in with what you discovered, I won't be re-doing 3 weeks+ of work to remake the sails at this point. Reckon I'll still be adding a bunt-line, though. Primarily, this will be to lift the foot o' me sail to show off the internal details of my Launch.
- 625 replies
-
- 3
-
-
- bounty launch
- model shipways
- (and 1 more)
-
Nice piece o' research there, Matt. Bit late for me as I've already added the grommets (and streaks of rusting water stains) to my sails.
- 425 replies
-
- 2
-
-
- bounty launch
- model shipways
- (and 1 more)
-
That's a handy device ...
-
Thanks, George. Even though I have made little progress lately, I am still moving forward. Currently working on finishing up the base-plate which will become the stand.
- 625 replies
-
- 3
-
-
- bounty launch
- model shipways
- (and 1 more)
-
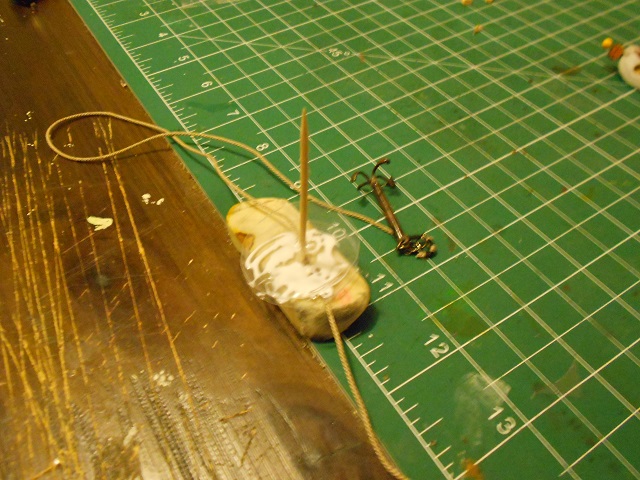
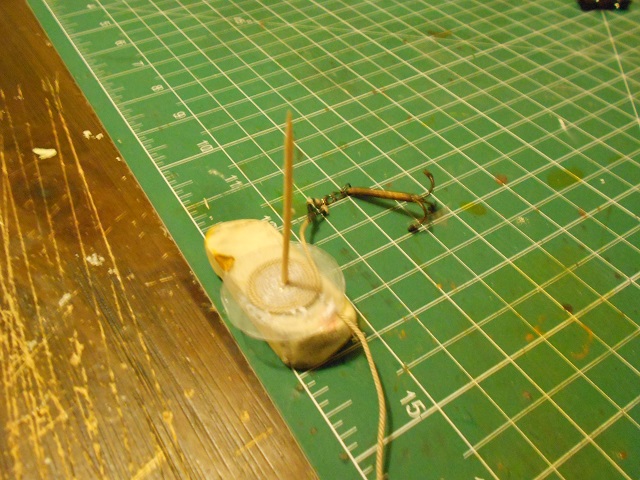
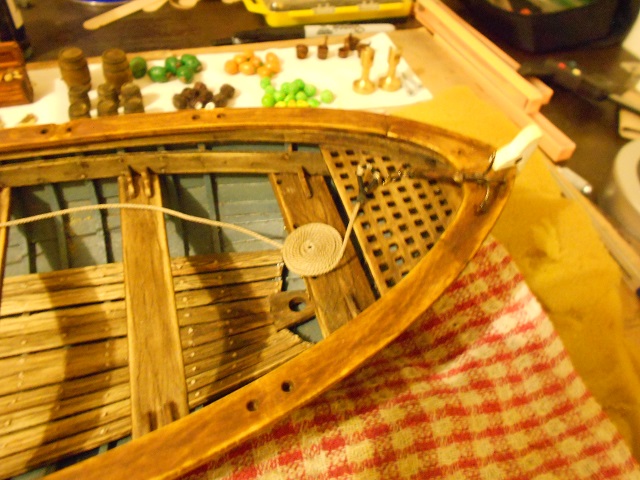
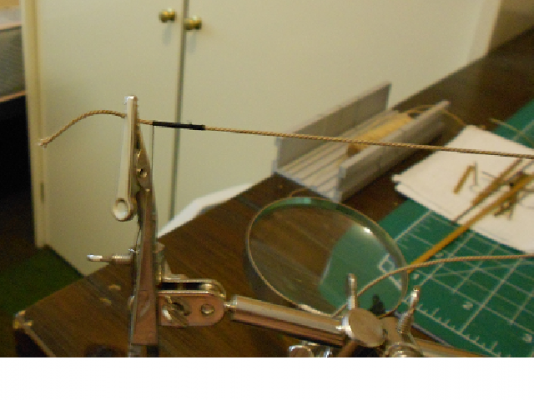
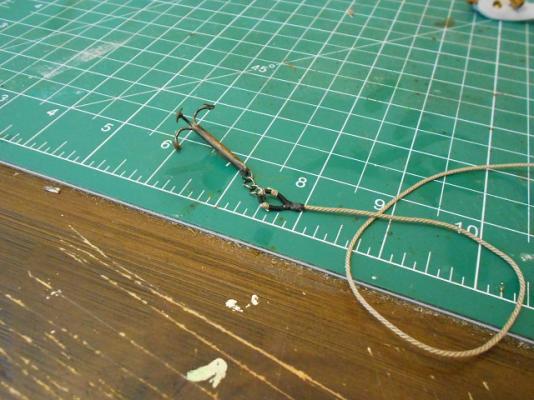
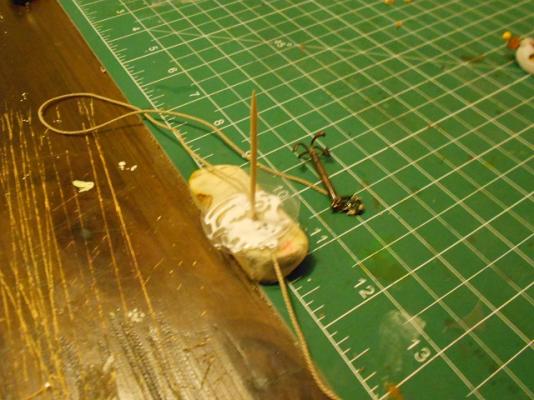
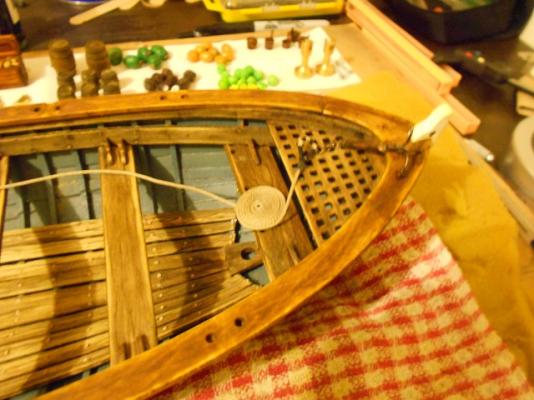
This be jus' another brief update to Our Hero's build-log ... "Recently, I didst take delivery o' some of Chuck's ropes," CaptainSteve didst begineth. "Indeedeth, verily they be most rope-like in appearance." As such, he doth plan to swappeth out the kit-supplied threads, which doest be most shiny. "Especially working with 1/16th scale, the new ropes will be looking much better," CaptainSteve didst suggest. First up, Our Hero didst seize a length of 0.045" tan line, using 0.008" black line ... ... once seized, he didst strop a loop for the grapnel chain and thence serve-eth that. Thence, he didst adapt an idea borrowed from Modeller12 to make Flemish coils ... They be simply two discs cut from hard plastic, then slipped down on a toothpick and stuck into a pencil eraser. "I didst first trail the end o' the grapnel rope through the hole in the bottom disc," CaptainSteve tried to explain. "And then smear some PVA onto one disc and thence proceed to wrap the line whilst pushing the discs together and turning the eraser around. "Here be me grapnel sitting lazily upon the front o' me Launch," he continued. "I be plannin' to let half o' me coil hang down over the edge of the thwart." As for the loose end, well, CaptainSteve still be a-waitin' the answer as to where the grapnel rope shall be tied off ... "To me, thee logical choice doeth seem to be to affixeth it to the for'ard mast-step," he didst concludeth.

- 625 replies
-
- 14
-
-
- bounty launch
- model shipways
- (and 1 more)
-
Nice work there, CH. She's coming along beautifully.
- 83 replies
-
- 1
-
-
- bounty launch
- model shipways
- (and 1 more)
-
Holly, again (with the usual disclaimer regarding Captain's choice)
-
Ah well, I guess we can't all choose model-ship building as our hobby ...
- 425 replies
-
- 2
-
-
- bounty launch
- model shipways
- (and 1 more)
-
I see an easy solution to the problem, Matt ... and it will also prove to be technically correct. Take your sails and spars, a whole pile of rigging line and the blocks you made ... Next, get a bottle (or two) of suitable fluid ... Then, invite your navy mate over and have him solve the problem for both of us !!! Simple, really.
- 425 replies
-
- 3
-
-
- bounty launch
- model shipways
- (and 1 more)
-
I'll vote Holly also .... The lighter colour will show-off any caulking between the planks.
-
Great to see you back at it, Adrieke. I really like the additional items ... in particular, the wine cellar and box of vegetables.
-
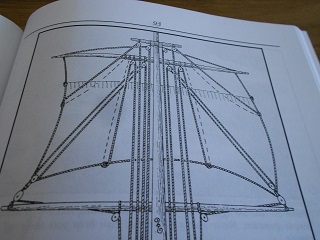
Lookin' good there, Matt. And when you add your oars with the blue whippings, it's just gunna look even better !! I've been considering the rigging, as well. The set-up as per the kit is just shrouds and a lift. It's too simplistic. Even someone with my non-existent sailing background can see that. Having said that, I doubt these two sails would require all the lines that a sail on a fully-rigged ship would need. (from Ship Modelling Simplified - Frank Mastini) Personally, I will probably just add one or two bunt-lines to each sail. This will mean either one in the middle (my original idea), or one at each end of the spar (as you mentioned above). I could be completely wrong (Hey, it's been known to happen !!), but I don't see the need for leech-lines and clew-lines etc etc.
- 425 replies
-
- 4
-
-
- bounty launch
- model shipways
- (and 1 more)
-
Arrr ... I'll confess that I've been on a bit of a hiatus build-wise (primarily because it is just too darn hot to work on anything other than a cold can of bourbon & coke when I get home from work). I DID read up on bunt-lines in Rigging Period Ship Models. It seems that "bunt" means "middle". So there will be one line from a single block on the spar, down to the foot in the middle of the sail which will be used to haul it up.
- 425 replies
-
- 2
-
-
- bounty launch
- model shipways
- (and 1 more)
-
Nice chisel pack. And those sails look positively decaying. If you are planning on adding saws, then I just remembered that mine were made from a broken Exacto saw blade. Might save you some time. Hang on ... look who I'm telling how to make tools !!! No doubt you will prefer to start by smelting your own (improved) alloy and black-smithing the blades from scratch.
- 425 replies
-
- 2
-
-
- bounty launch
- model shipways
- (and 1 more)
-
I think you have to go through and delete old conversations ...
- 732 replies
-
- 1
-
-
- constitution
- model shipways
- (and 1 more)
-
Nice work on the sails, Matt. So, what's the secret with the colouring (colouration) ??
- 425 replies
-
- 2
-
-
- bounty launch
- model shipways
- (and 1 more)
-
There are probably quite a few rock star "wrecks" you could immortalize in your build ...
-
Cutty Sark by NenadM
CaptainSteve replied to NenadM's topic in - Build logs for subjects built 1851 - 1900
Nenad. I would try a mix of Golden Teak wood stain (maybe 90% +) and black or dark brown paint (maybe a little less than 10%). And, perhaps, a little drop of paint thinners. Try it on a test piece first.- 4,152 replies
-
- 5
-
-
- cutty sark
- tehnodidakta
- (and 1 more)
-
Just stunning, Jesse ... it looks as tho' it has been sitting on your desk for the last 40 years.
- 607 replies
-
- 1
-
-
- scottish maid
- artesania latina
- (and 1 more)
-
Hey Cathead. This one only has two sails. See: Cutty Sark.
- 425 replies
-
- 3
-
-
- bounty launch
- model shipways
- (and 1 more)
-
Hey Matt, nice work on them sails, by the way. So, err, what are these tests going to prove .... ?? (Inquiring Crackers' need to know, y'know). Incidentally, I think I solved the problem of how long is too long to soak cloth in tea or coffee ... I happened to find a forgotten container of coffee under the bed which had been used to test soak some pieces of sail-cloth. The swatches had been soaking for some three weeks by the time I found them, and more resembled soggy pasta, rather than cloth.
- 425 replies
-
- 3
-
-
- bounty launch
- model shipways
- (and 1 more)