rlb
-
Posts
655 -
Joined
-
Last visited
Content Type
Profiles
Forums
Gallery
Events
Everything posted by rlb
-
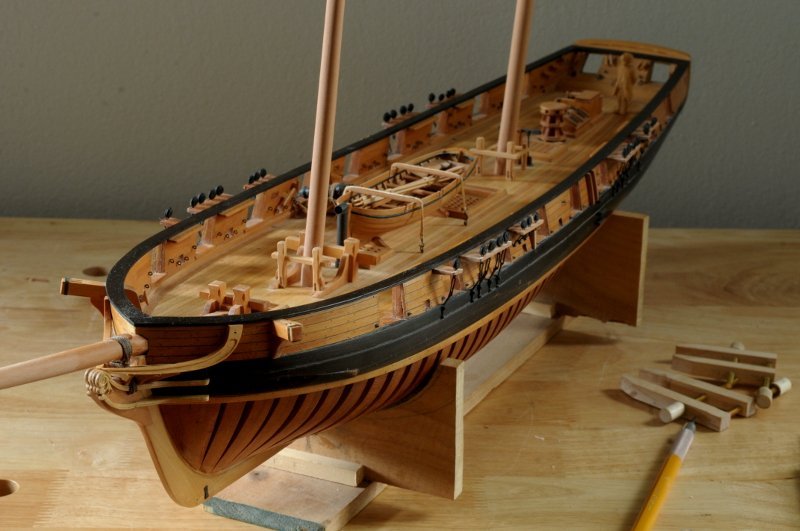
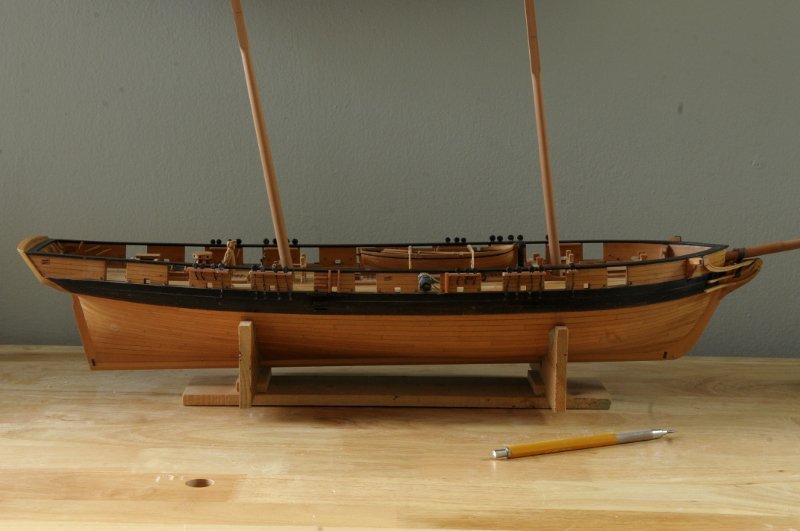
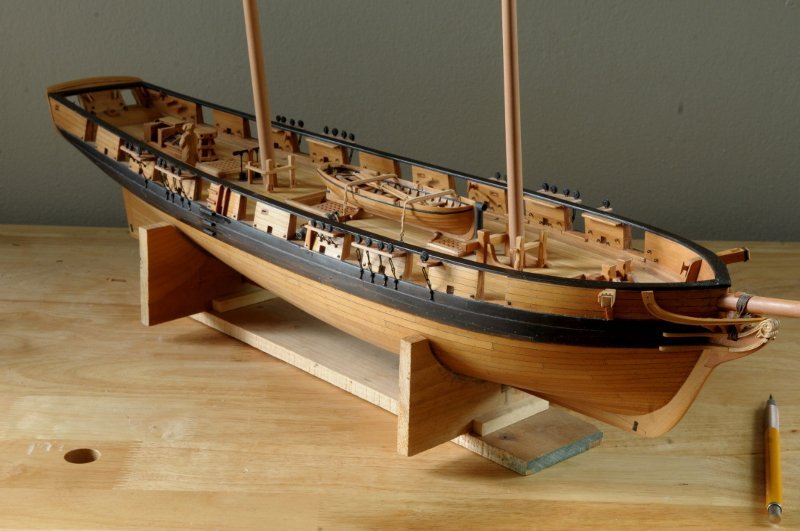
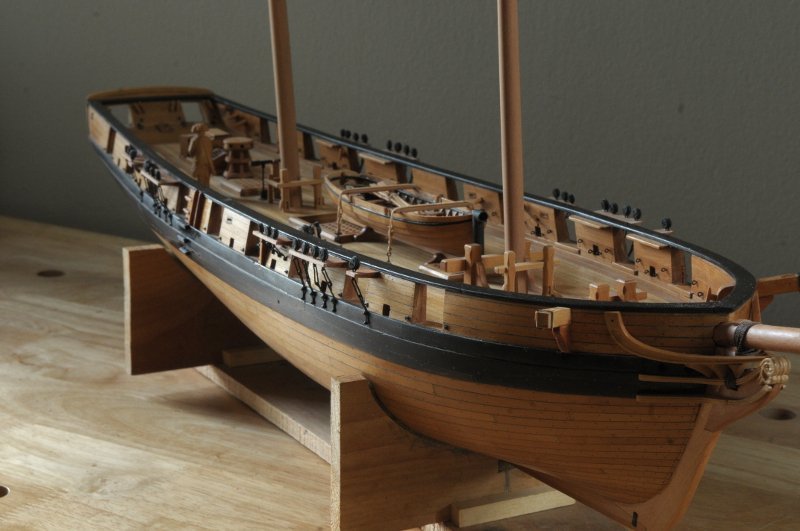
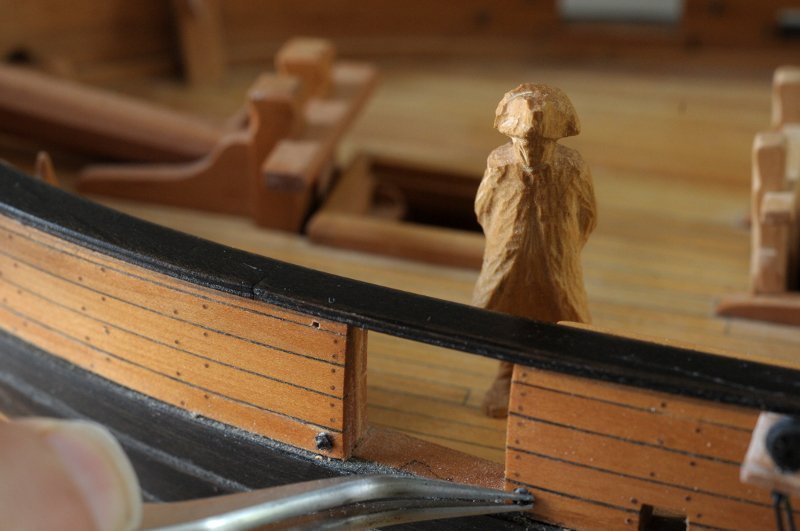
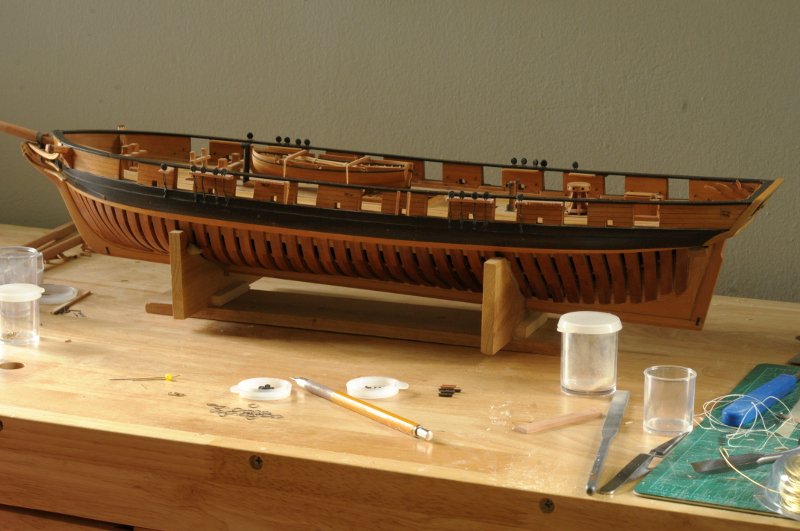
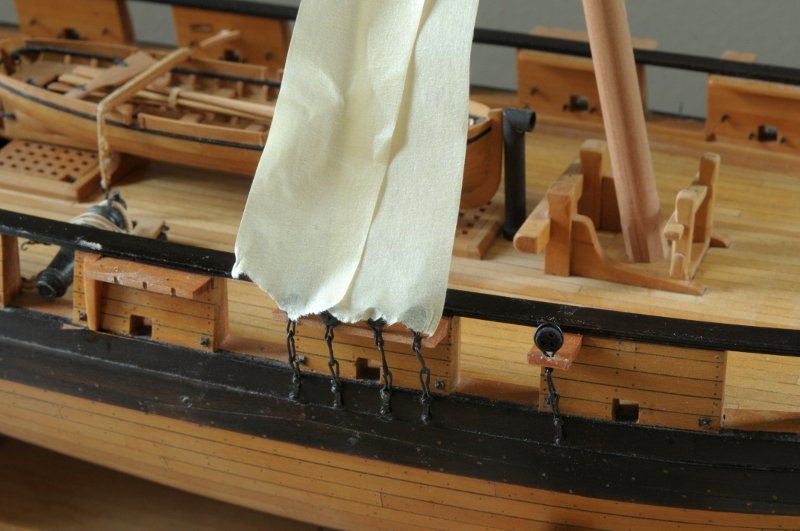
 Thanks, Dan. Great. Now I have to carve Ens. Cooper. Backstay deadeyes and chains are installed. They were much easier than the shroud chains--only one bolt to locate and drill-- The chains will get some tweaking at some point to make them to present a bit straighter, but I'm very happy to have this behind me. So, to celebrate, a few overalls of Oneida-- Next up, installing the carronades. For which I need to strop many small blocks. Ron
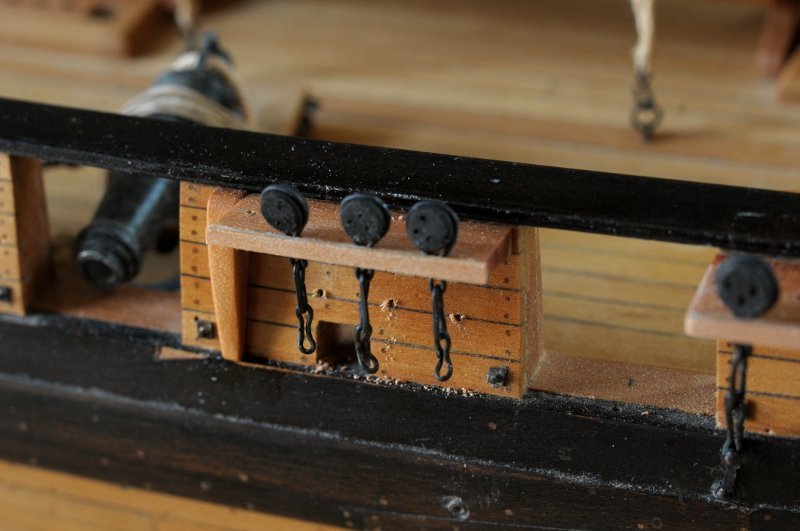

-
Lieutenant Woolsey continues to supervise the building of Oneida. The missing breech bolt ends have been blackened, and installed with the rest-- The brass wire pieces for the backstay chains have been cut, bent, assembled, soldered, bent some more, and blackened (in that order!). Then the deadeyes were bent into their loops, and some general remedial bending done to some links that were still too far out of whack-- These will be installed next. Ron
-
HMS Euryalus 1803 by rlb - 1:48 scale
rlb replied to rlb's topic in - Build logs for subjects built 1801 - 1850
I came downstairs this morning, and the sunlight was peeping through a curtained window-- I had placed the Scale Captain there last night! Ron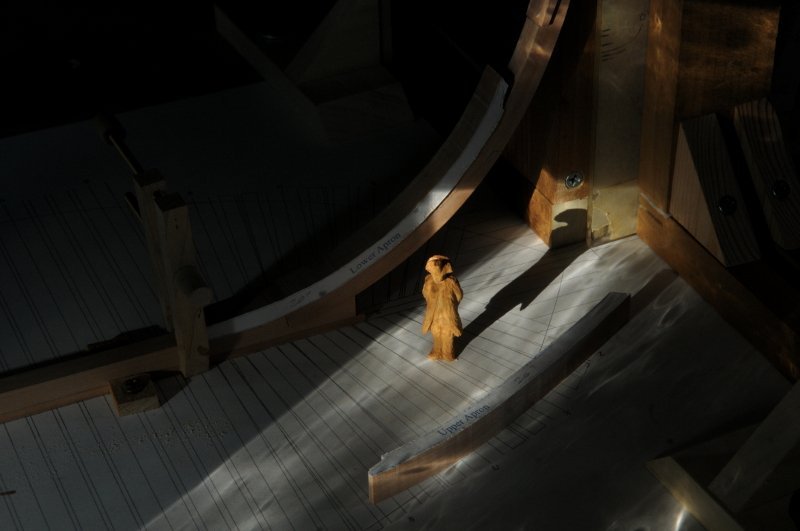
- 122 replies
-
- 19
-

-
- Euryalus
- Plank-on-frame
- (and 4 more)
-
HMS Euryalus 1803 by rlb - 1:48 scale
rlb replied to rlb's topic in - Build logs for subjects built 1801 - 1850
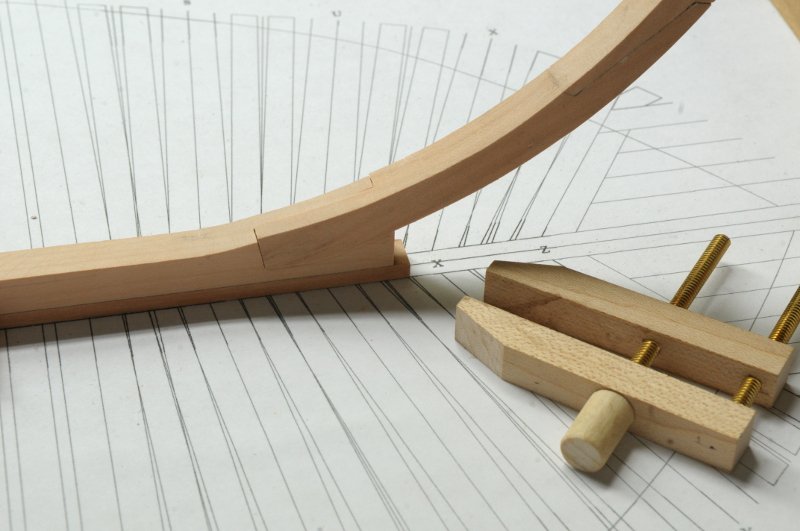
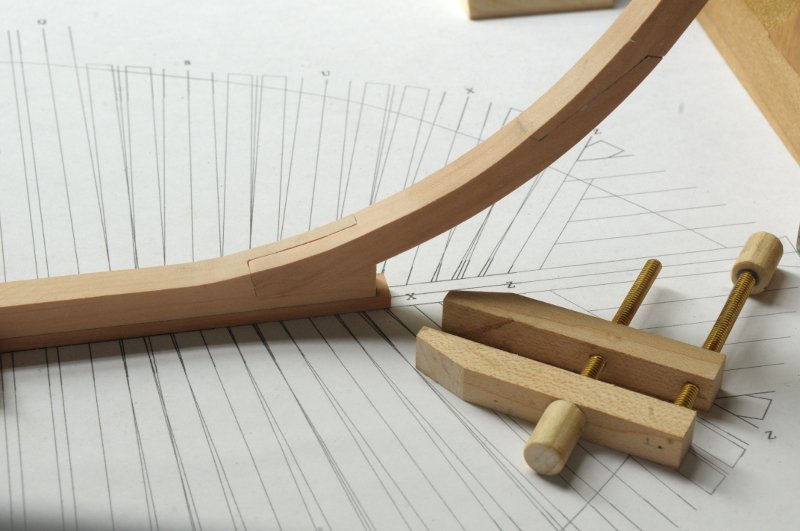
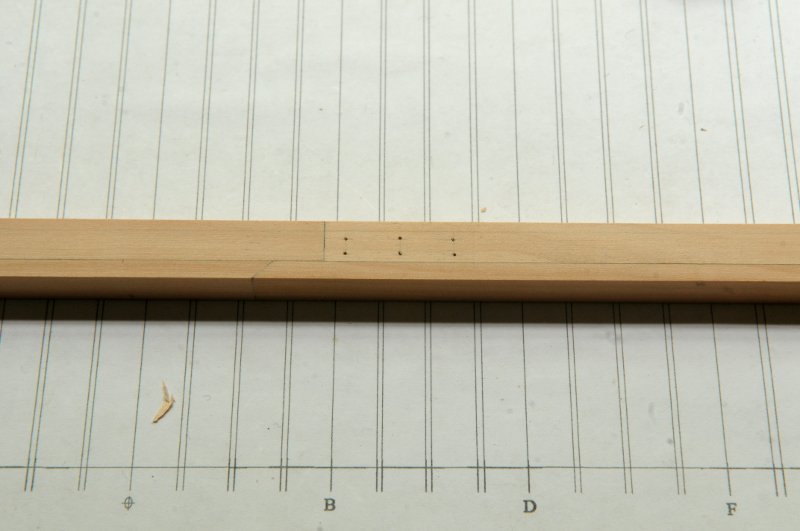
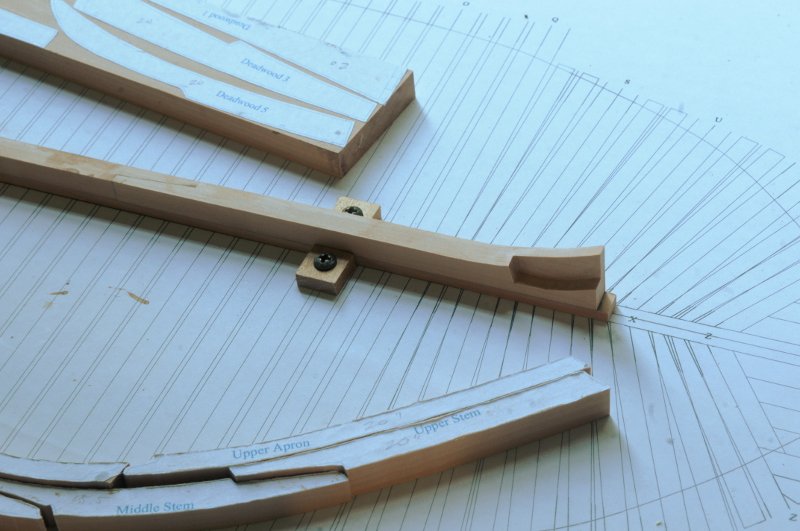
I have spent a lot of time on the boxing joint. It is dry fit here. The stem is now centered side-to-side, and reaches the forward point as it should-- A close-up shows that there is some final tidying up of the upper curve to do, as it reaches the aft end of the joint-- Here it is after that final shaping has been done-- There are still many pieces to be shaped and fit before the boxing joint can be glued. The next piece will be the tricky lower apron, and here it is roughly cut out, and and held in place against the stem and keel to test its initial fit-- I have also marked and drilled the holes for the keel scarf bolts, and lightly marked the rabbet line-- Ron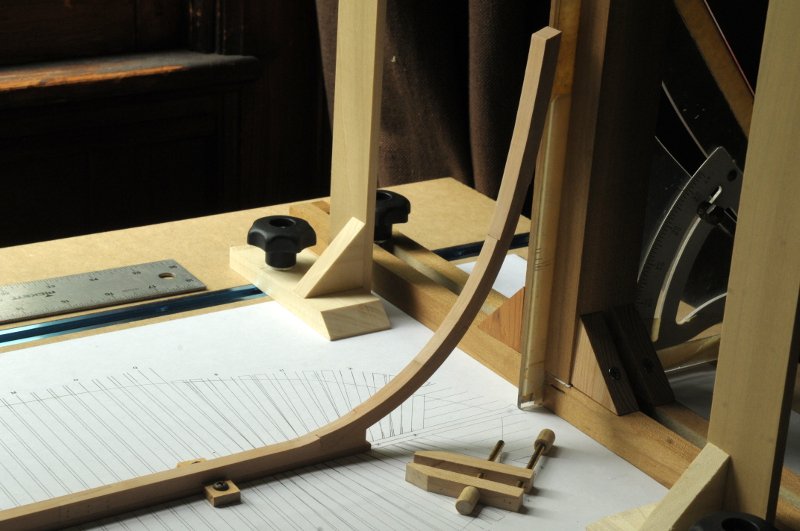

- 122 replies
-
- 13
-
-

-
- Euryalus
- Plank-on-frame
- (and 4 more)
-
HMS EURYALUS by Matiz - FINISHED - scale 1:56
rlb replied to matiz's topic in - Build logs for subjects built 1801 - 1850
Fantastic, Matiz! You have been busy! I follow your build with great interest, of course. Though I will be much slower! Ron -
HMS Euryalus 1803 by rlb - 1:48 scale
rlb replied to rlb's topic in - Build logs for subjects built 1801 - 1850
Ha! Well done, druxey! I'm going to send all my photos to you for editing! Ron- 122 replies
-
- 5
-
-
- Euryalus
- Plank-on-frame
- (and 4 more)
-
HMS Euryalus 1803 by rlb - 1:48 scale
rlb replied to rlb's topic in - Build logs for subjects built 1801 - 1850
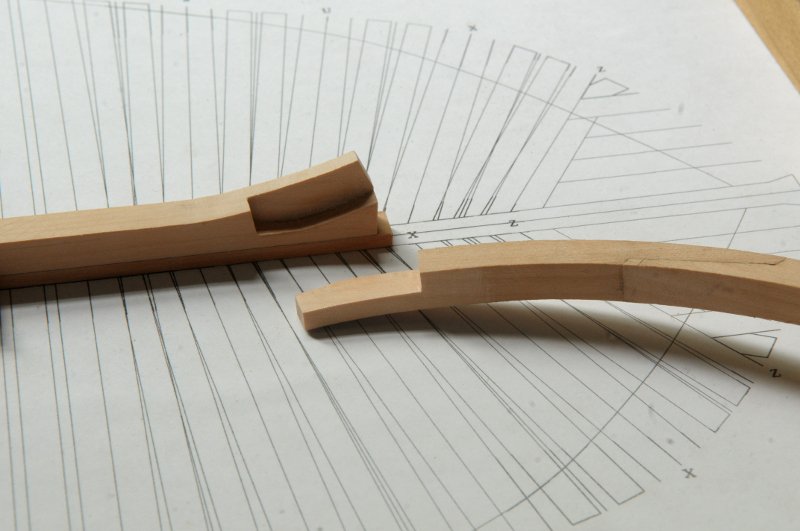
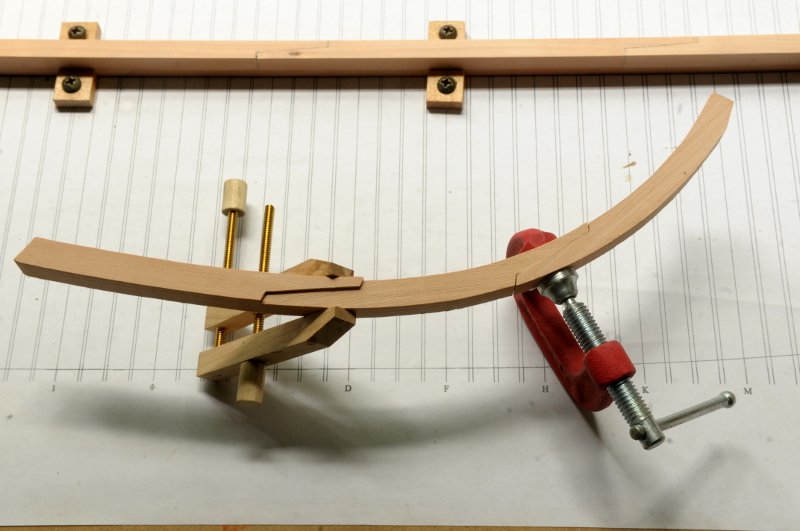
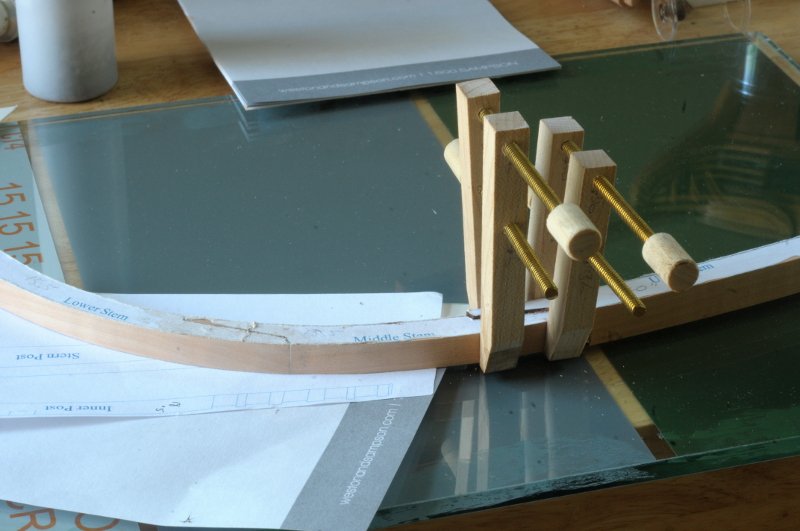
I've worked on the stem scarfs. Here are the three stem pieces test fit together against the drawing-- And a look at the joints-- These are just being test fit, and the shadow on the first (upper) joint is due to the upper stem piece being wider than the rest, to allow for the stem taper. In this photo, the scarf between the lower and middle stem has been glued, and paper shims are being used to (hopefully) maintain the alignment as the scarf between the middle and upper stem is glued-- Now I can test fit the stem to the boxing joint and get a rough look at what needs to be refined. There is a lean to starboard that will need to be corrected as the joint is made-- I have to say, that tree trunk is distracting!! Ron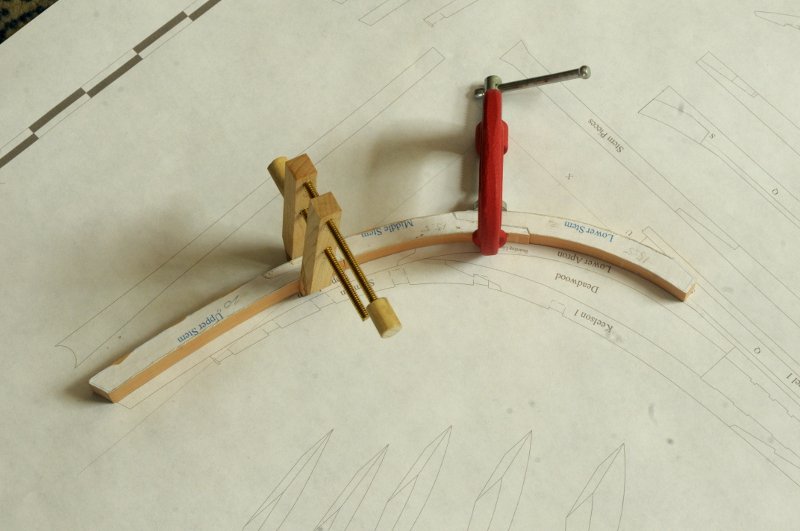
- 122 replies
-
- 14
-
-
- Euryalus
- Plank-on-frame
- (and 4 more)
-
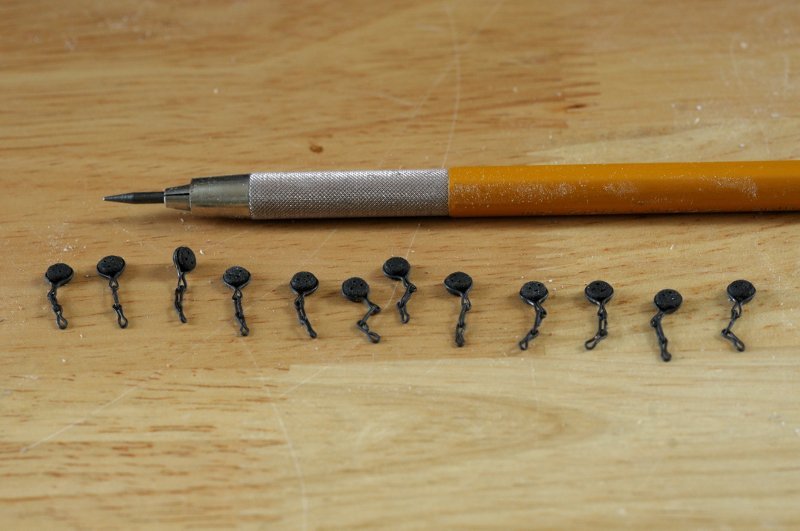
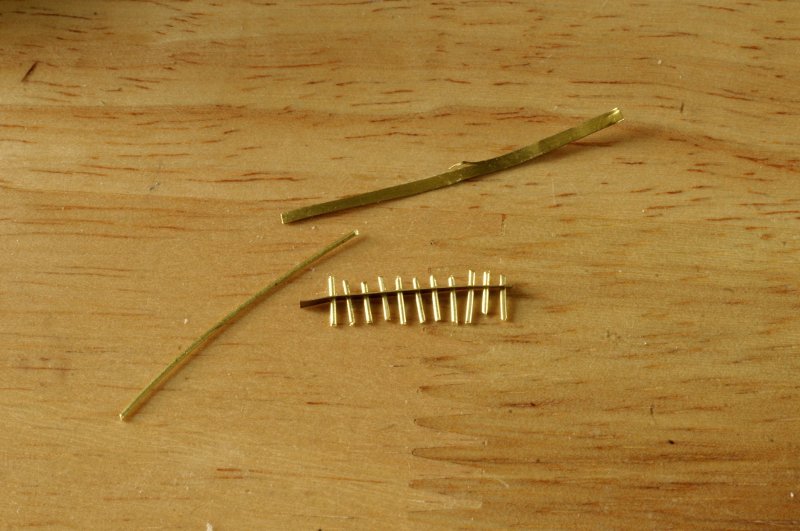
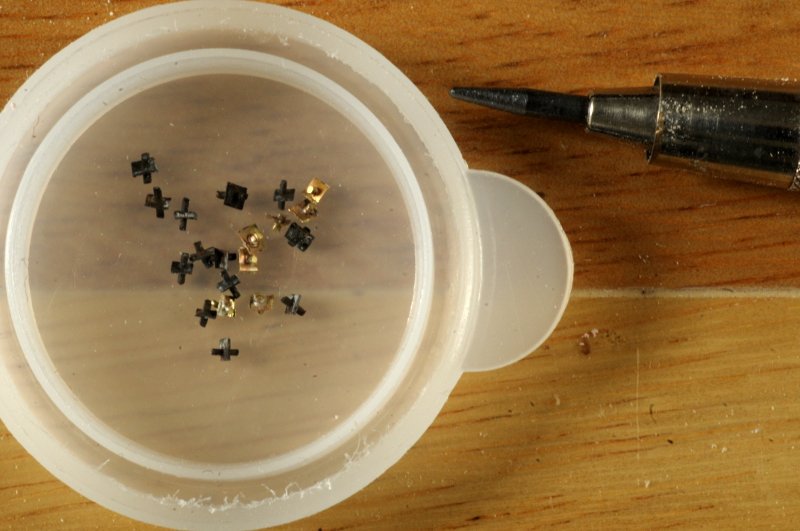
Here is the work to make up my lost breech bolt ends. A strip of cut brass sheet, a bit of wire--drill holes in the sheet and insert the wire-- Solder the wire in place, then trim them and cut apart. I made the mistake of placing the wires too close to each other. I ended up only getting half of these, fortunately I didn't need all of them. I think I might even have one or two extra now-- I wasn't as far along as I remembered on the backstay deadeyes and chains. I just have the deadeye loops. So I need to make up a bunch more loops and string up 12 'units'-- Good news is that the shroud dead-eyes and chains are all attached! Ron
-
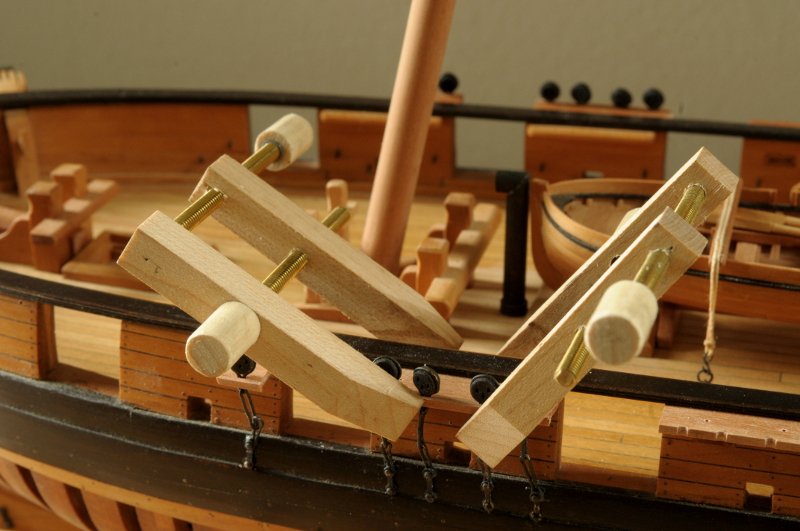
Hi Martin, Credit for the clamps goes to Ed Tosti (Naiad, Young America builds here on MSW). In post #19, of his Naiad build log, and in Volume 1 of Naiad from Seawatch Books, he explains how to make them. The book has a bit more info including a drawing, but I think you could figure it out from the build log post. I had some extra maple, and had to buy the threaded rod, a tap for that, and a dowel for the handles, but they were inexpensive, and relatively easy to make. I'm not sure what else I would have used (that I own) for the channel gluing, they were perfect for that. Ron
-
Michael, I'm sorry to hear about your CTS issues. Take care and I hope for the best. I never tire of seeing your work. Ron
-
Gary, This is probably the next big task on my model, and I'm not looking forward to it, and I only need them for 16 carronades. Thanks for posting, if you can do it, I can! Ron
- 370 replies
-
- 2
-
-
- Model Shipways
- Confederacy
- (and 1 more)
-
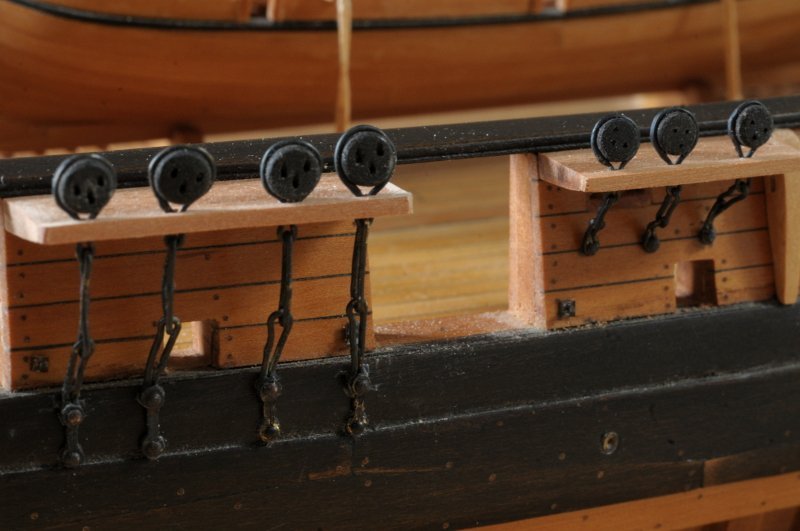
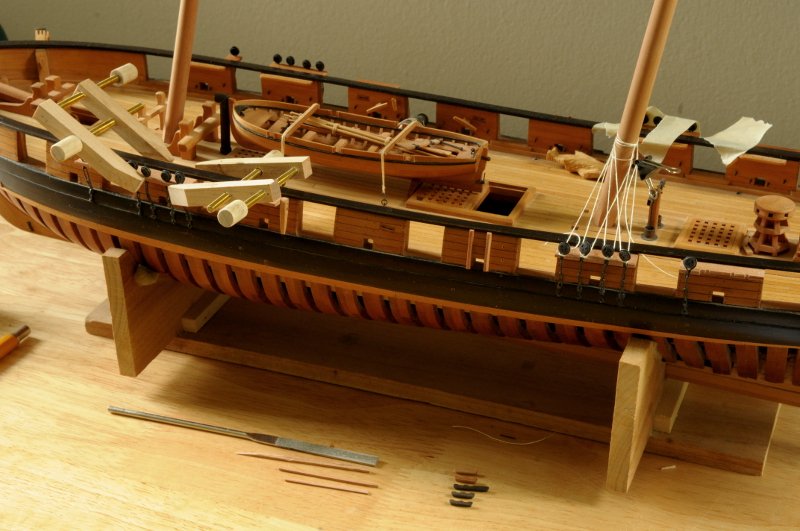
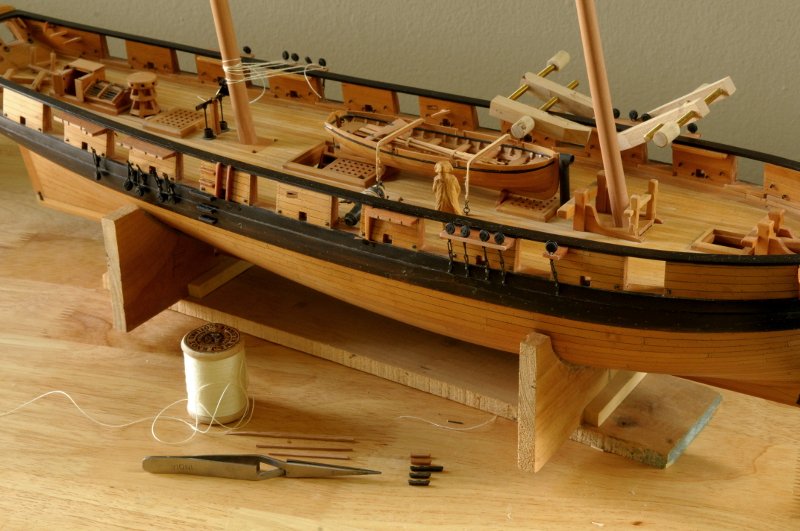
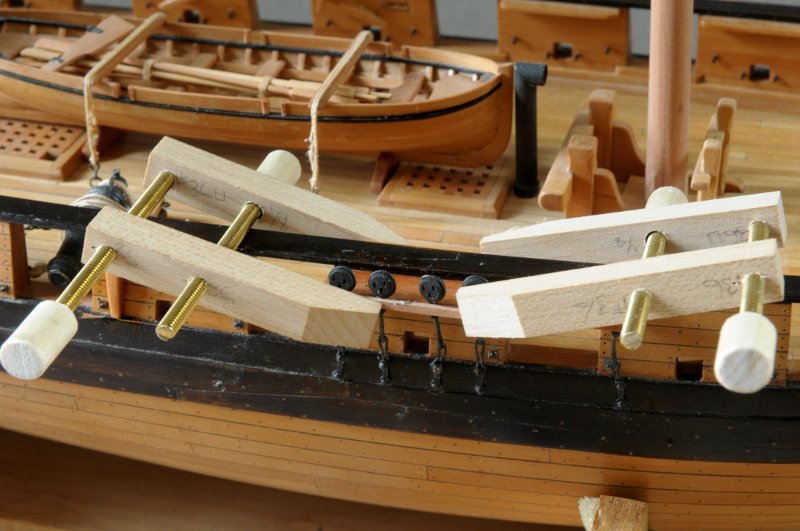
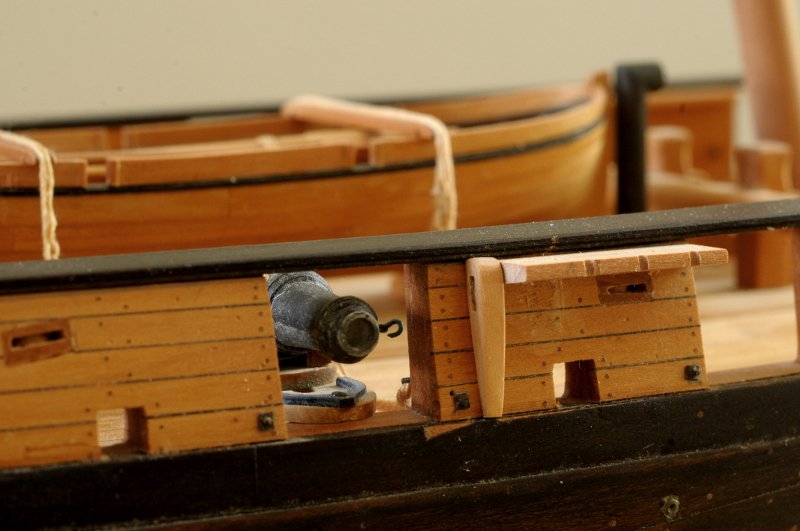
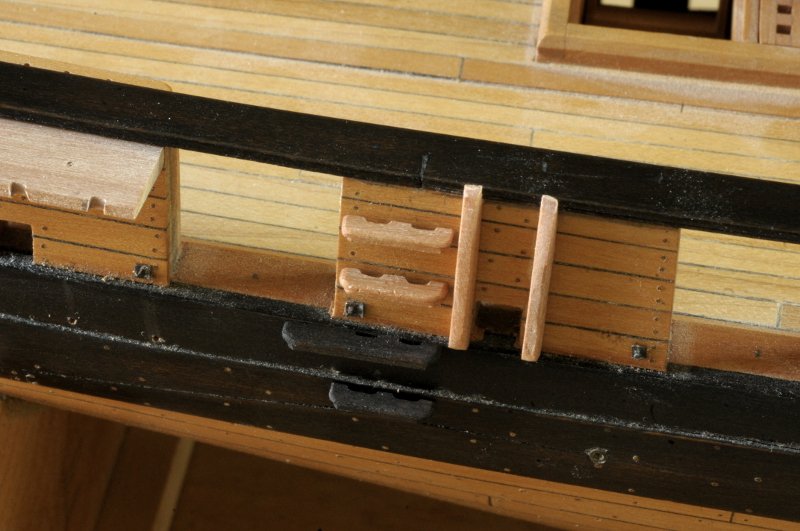
Continuing with the chains, I improved my procedure a bit. Thread is better for temporarily holding the deadeyes in their channel slots-- This is more secure, easier to arrange, and allows better visibility for checking and gluing the molding-- I have only made enough of these clamps to do one channel at a time, so I'm working my way around the ship. You can see in the next photo that I am also getting ready (pin holes drilled) to glue the boarding steps on the port side. You will also see that I have not glued the carronade breech rope through-bolt locations on the port side, as I did recently with the starboard side. Having made up the pieces many years ago and stored them away, I have now somehow lost a few, and don't have enough to complete the port side. I will have to make up some more. My backstay chains have to be blackened (that's one reason they are not getting attached now, with the shroud chains), so I will blacken the new breech rope bolt ends with them, and that will be next. -- Looking at the starboard side, here are four phases of the channel/chainplate fixing, and you can see those breech rope bolt ends I mentioned, one at each lower corner of the gunports-- Ron
-
HMS Euryalus 1803 by rlb - 1:48 scale
rlb replied to rlb's topic in - Build logs for subjects built 1801 - 1850
Thanks, druxey. The bar is high, and I am trying! The false keel is glued, one piece at a time. I am using pigmented glue in the joints, and the first few times were a mess, but I am getting better at judging how much glue needs to be used, and how to keep it relatively clean. -- The final false keel piece glued.-- The basic keel assembly is glued. It hasn't been tapered yet at the bow or stern, nor scarf bolts installed, or rabbet cut. I have cut out the stem and apron pieces, and am getting ready to cut the stern deadwood.-- The boxing joint is done, I mistakenly didn't angle it as the scarfs are, but as it won't be seen, that's okay.-- Ron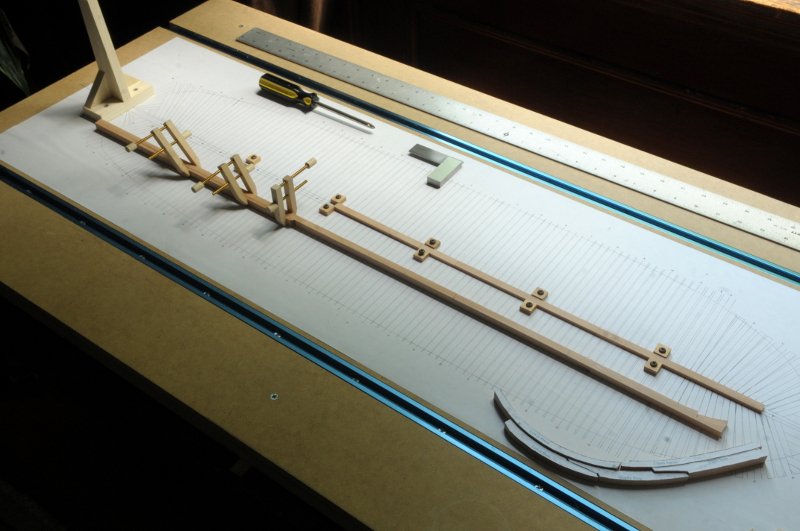

- 122 replies
-
- 13
-
-
- Euryalus
- Plank-on-frame
- (and 4 more)
-
HMS Euryalus 1803 by rlb - 1:48 scale
rlb replied to rlb's topic in - Build logs for subjects built 1801 - 1850
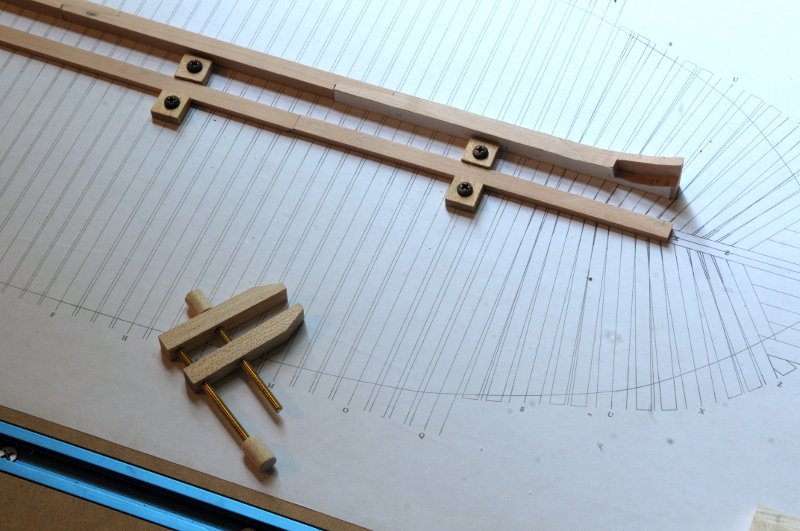
Rick, generally, counting the chocks, either 9 or 11 pieces. They form a pair together, though they need to be built and installed separately. Allan, the sawdust and chips are pretty well relegated to the workshop (at least so far), but the exercise point is well taken! After dry fitting, and adjusting each scarf to make sure the overall length is correct, I have glued the keel pieces together except for the formost. Still working on the boxing joint and scarf for that one. The keel height dimension (is that the sided or molded dimension?--I should know that) has been sanded to the final 15". The width is still 16-17". The false keel pieces have been cut out and dry fit. They will be glued one at a time to the keel.-- Both the foremost keel piece and false keel piece are being left a little long until final shaping of the boxing joint and scarf, then they will be trimmed to length and glued. Then the assembled keel width will be sanded to the final 15" dimension. Sorry for the poor photos-a mixture of poor light, and different color light sources causing white balance issues. Ron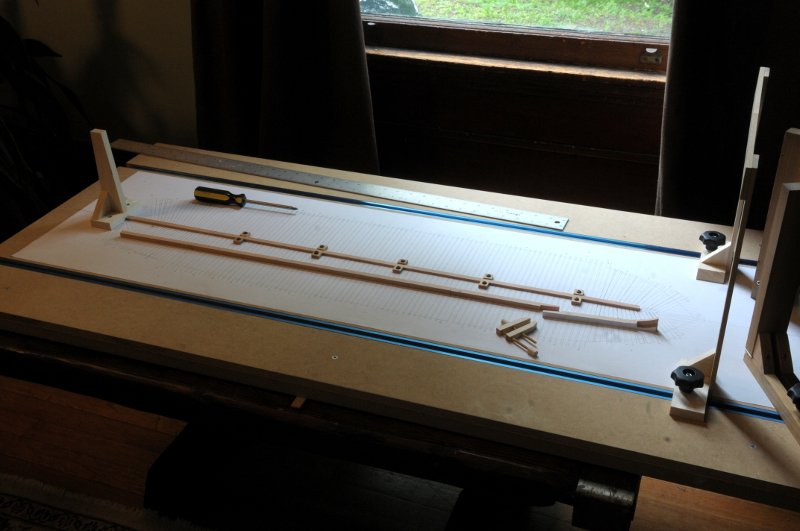
- 122 replies
-
- 13
-
-
- Euryalus
- Plank-on-frame
- (and 4 more)
-
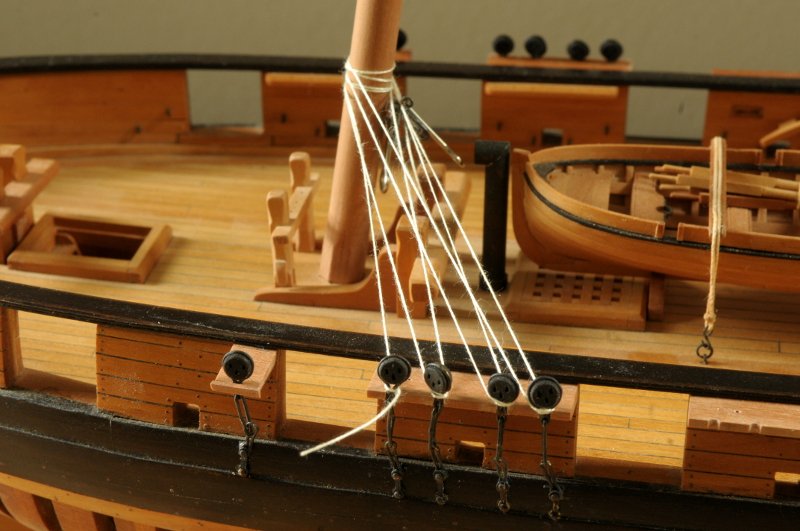
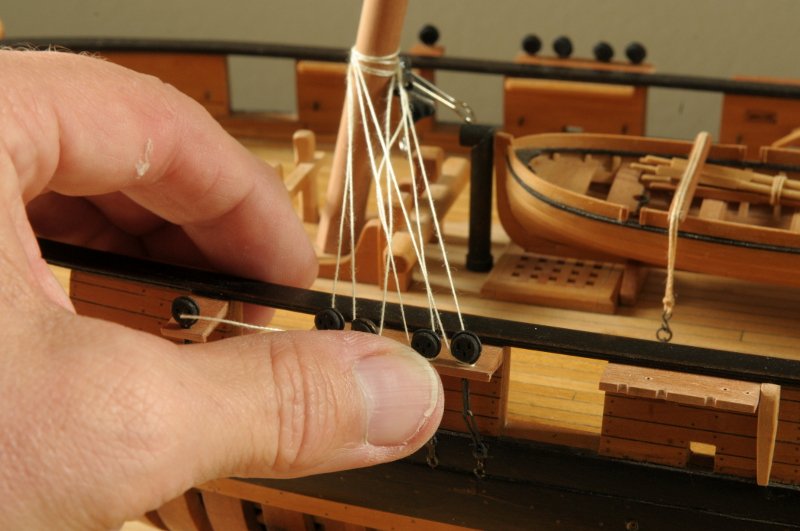
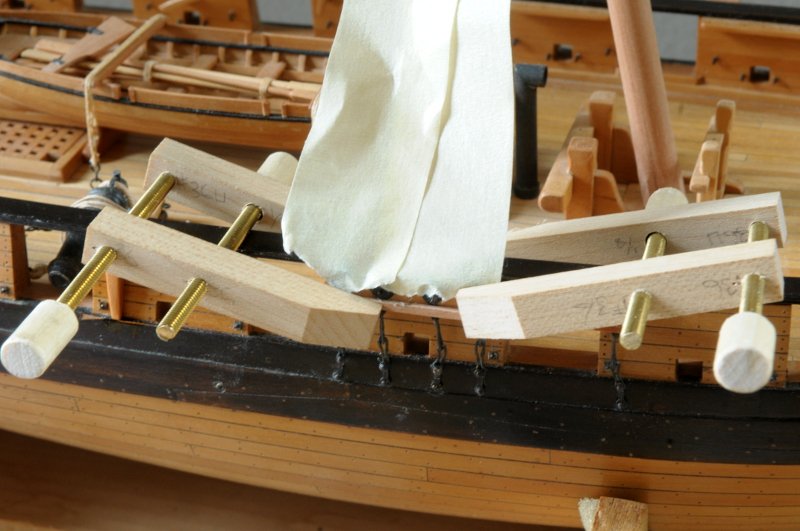
A small update-- Work on the chainplates has been very frustrating, and part of the reason for my snails pace. Figuring out a way to attach these wiggly things without going crazy took a few tries. After marking the varied angle locations with a string fastened to the point of the mast where the shrouds will come down, holes were drilled in the wale for the lower preventer plate bolt. The preventer plate was then pinned and epoxied into the hole-- Using the upper preventer plate hole as a guide, the upper pin location was drilled into the wale. Then, the chainplate-deadeye assembly was attached at the same time the upper pin was epoxied into place. Following that, the deadeyes were held in place in their slots in the channel with strips of masking tape attached to the mast-- And the channel molding glued on-- At this point the tape can be removed to check and make sure the fit is good-- You can see my pencil notes on the "Tosti" clamps reminding me which holes were to be drilled for tapping, what size drill, and which were only drilled part way into the wood. Ron
-
There seems to be no end to the minutiae of this hobby/craft. That makes it all the more interesting. Druxey, I imagine that you enjoy the making, more than the keeping, of these miniature masterpieces. As well as valuing that they go to someone who appreciates them. Unless you are destitute, which I doubt. Ron
- 433 replies
-
- 3
-
-
- open boat
- small boat
- (and 1 more)
-
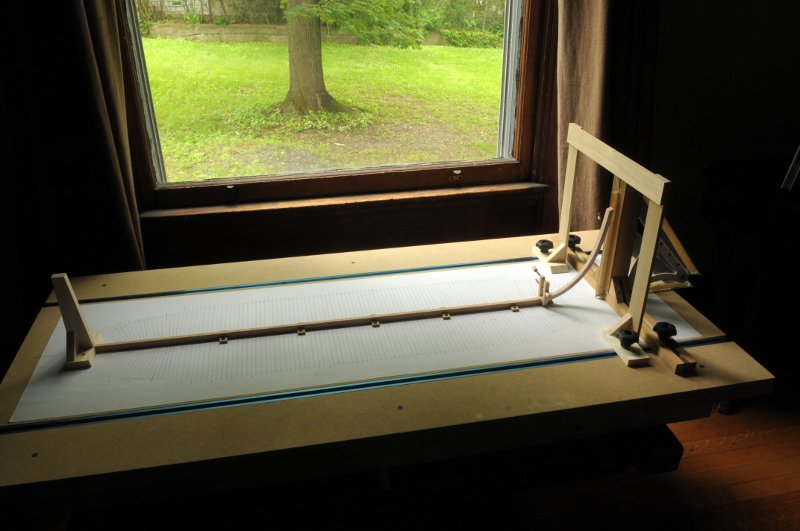
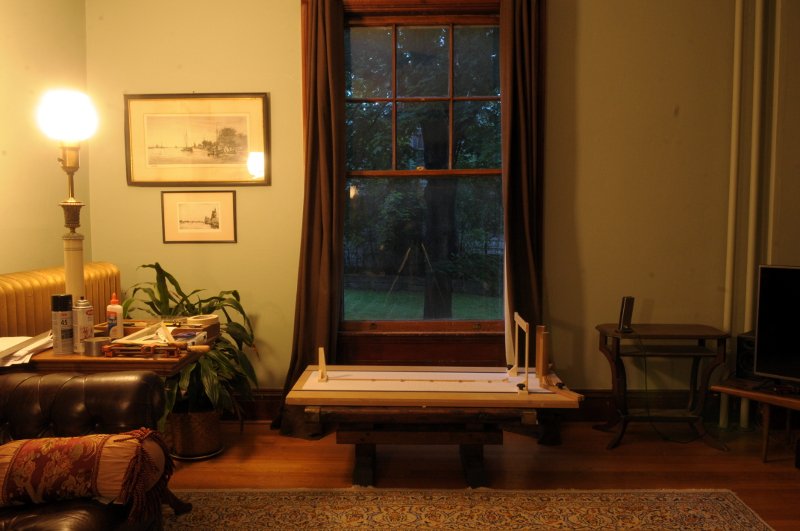
HMS Euryalus 1803 by rlb - 1:48 scale
rlb replied to rlb's topic in - Build logs for subjects built 1801 - 1850
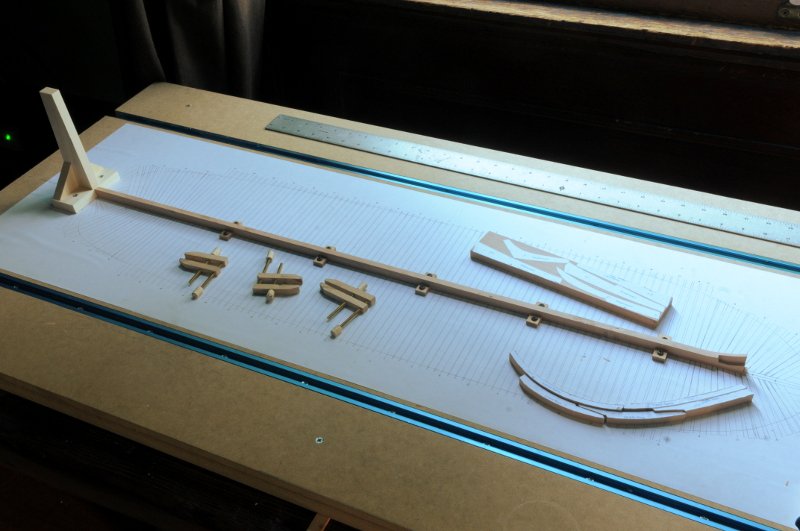
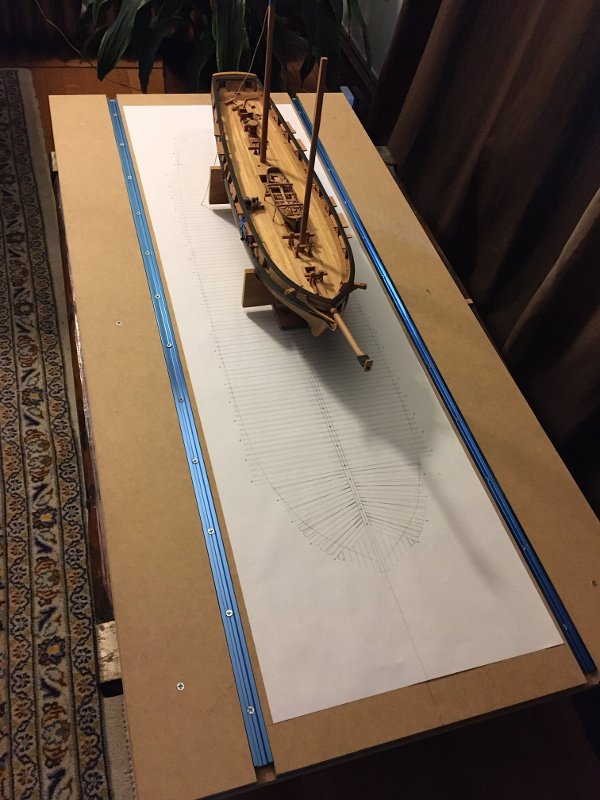
Thanks, Ed. I will continue work on Oneida. It would be unacceptable to abandon her at this point! I plan to use Swiss Pear for the framing. The stock I have is a light shade--not as dark as most I see. Hopefully this will not cause problems down the road (when I run out and have to restock). Castello Boxwood for hull planking and carvings, and maybe Holly for deck planking. I'm not sure, will have to see how it looks. Black will be "ebonized" pear, as I did on Oneida. I'm very happy with the way that looks. Still using hand tools, though I have also become a Byrne's customer! Right now this is taking shape in my living room. This is one advantage to being single!-- I don't have a place for it in my regular workshop. I'm running up and down the stairs (my workshop is upstairs) constantly. Eventually I'm going to have to fit it in my workshop somehow. Ah, that's why I should finish Oneida sooner rather than later. I have the gantry mostly complete, have installed a sternpost support, have trued two more of the keel scarfs, and worked on the boxing joint a bit.-- The last three keel pieces lie true, and you can see I have work to do on the forward two scarfs.-- Ron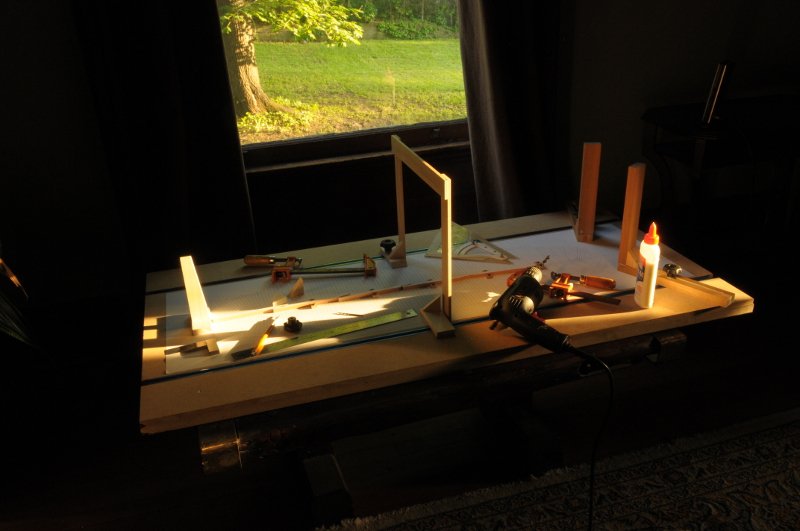

- 122 replies
-
- 17
-
-
- Euryalus
- Plank-on-frame
- (and 4 more)
-
HMS Euryalus 1803 by rlb - 1:48 scale
rlb replied to rlb's topic in - Build logs for subjects built 1801 - 1850
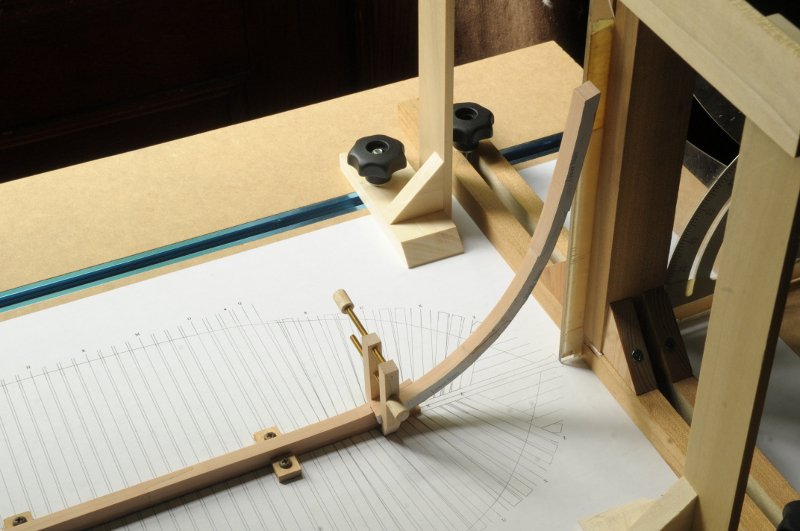
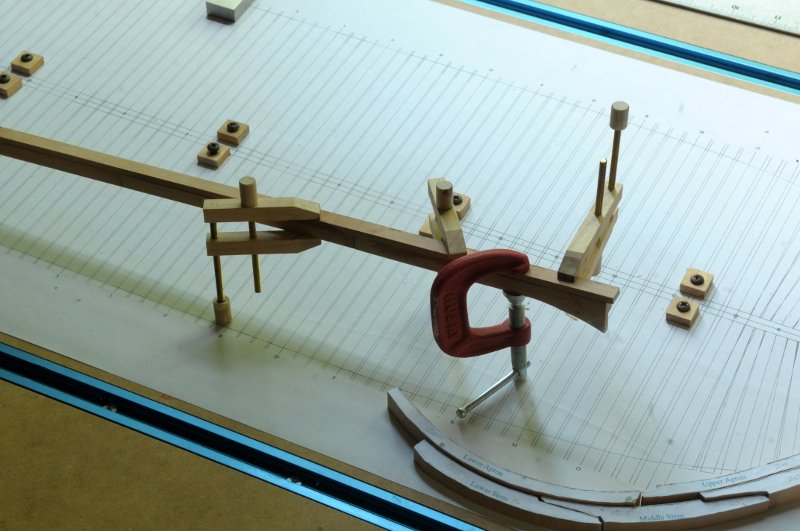
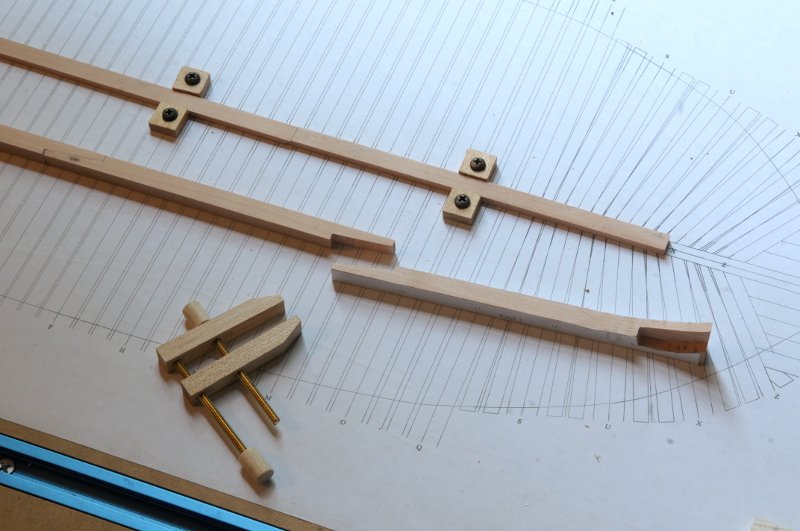
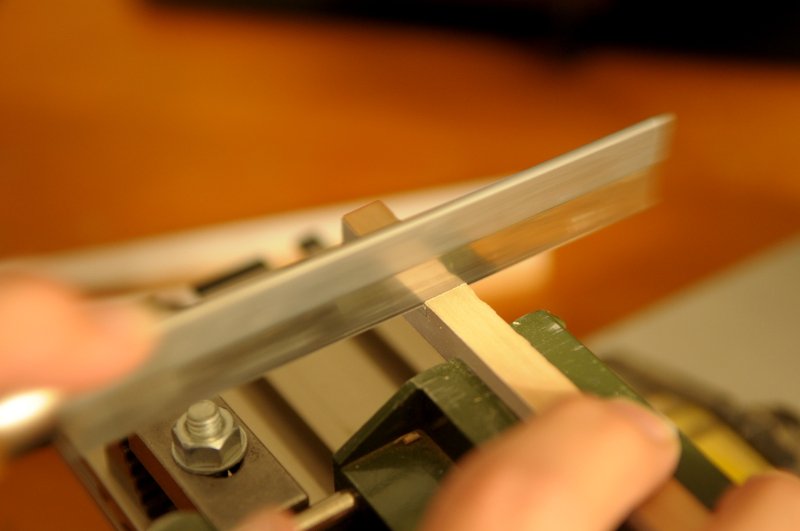
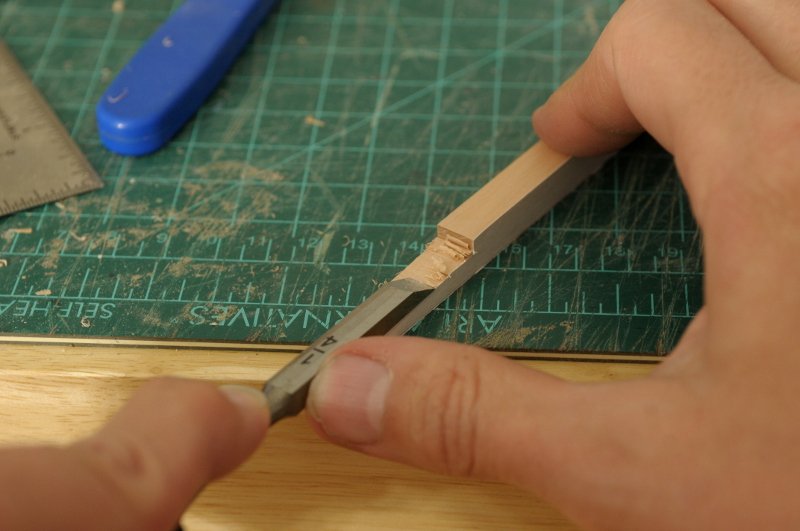
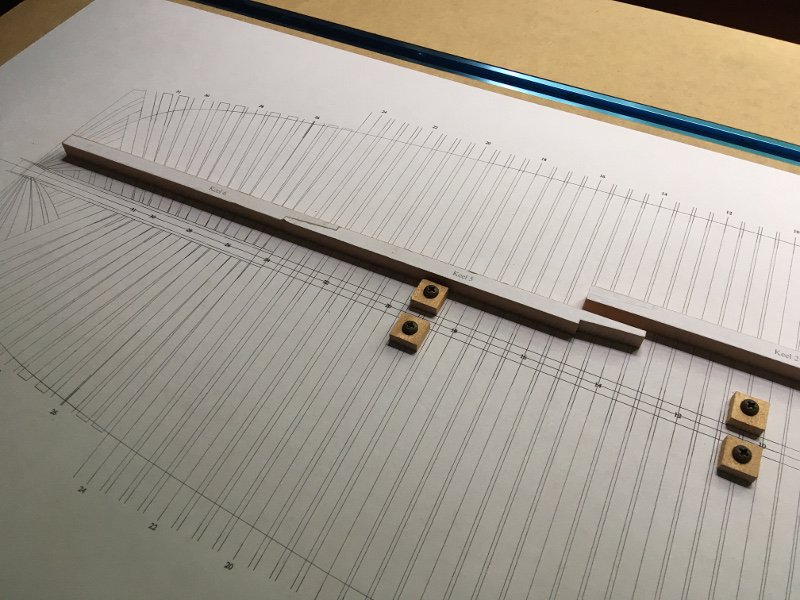
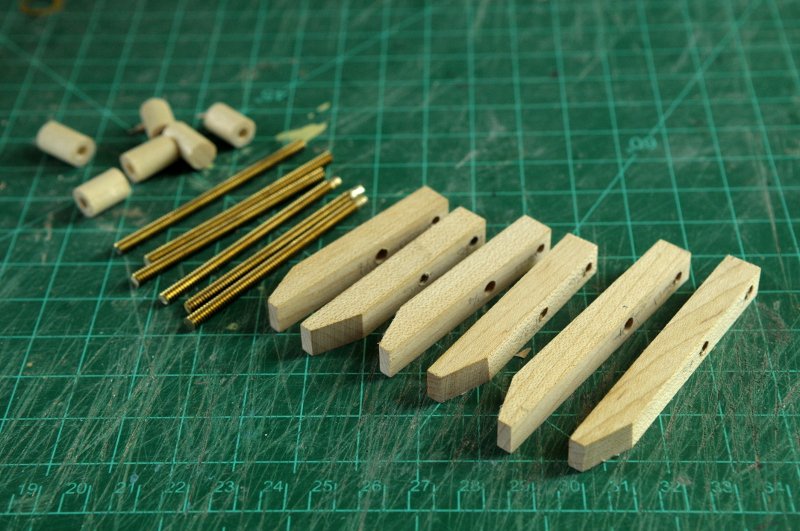
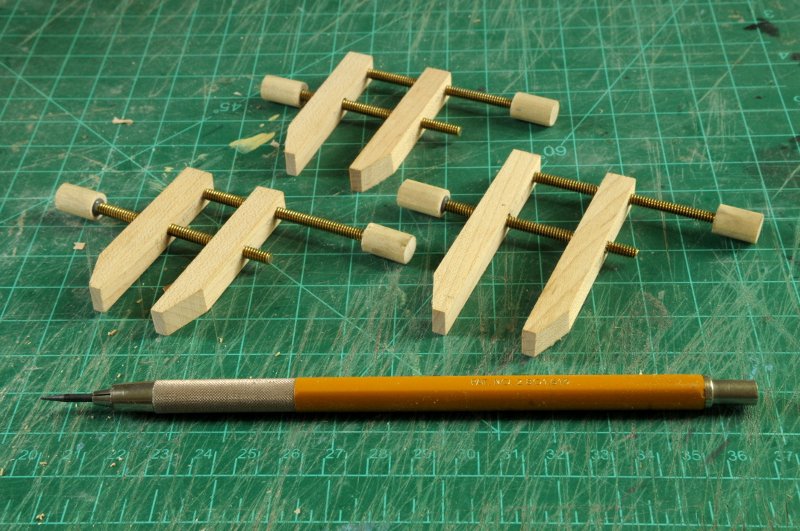
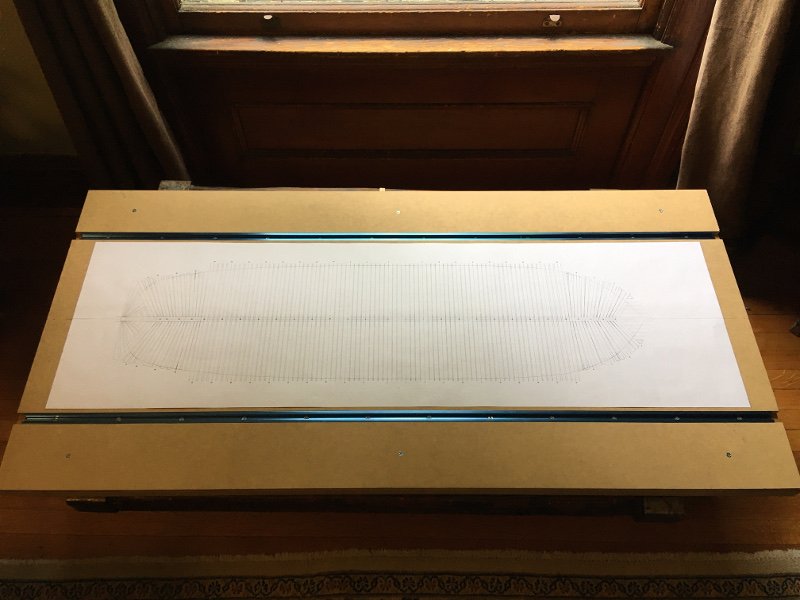
Work continues-- I have fastened the layout plan to the baseboard, though I had some issues when I sprayed a matte protective finish over it. The protective spray seemed to weaken the spray adhesive underneath, and in the high humidity of recent days I have some bubbles in some areas. I don't think it is a problem, but I am considering taking the plan off, re-copying it on heavier paper, and trying again. I built two clamp squares (a sliding gantry will also be built), and cut out the 6 keel pieces. They are slightly oversized—especially the foremost which will receive the boxing joint. The keel alignment pieces are adjustable and can be snugged up when the keel is finished to its final width-- I cut the keel scarf edges with a razor saw-- And after cutting the long angle roughly on a bandsaw, worked to smooth and true it with a chisel and files-- The scarf between 6 and 5 is ready to be glued, but that won't happen until the rest are also ready-- I have also made a few "Tosti" clamps (of the simpler "basic" variety), which I plan to use to clamp the keel pieces together when they are ready-- Ron
- 122 replies
-
- 16
-
-
- Euryalus
- Plank-on-frame
- (and 4 more)
-
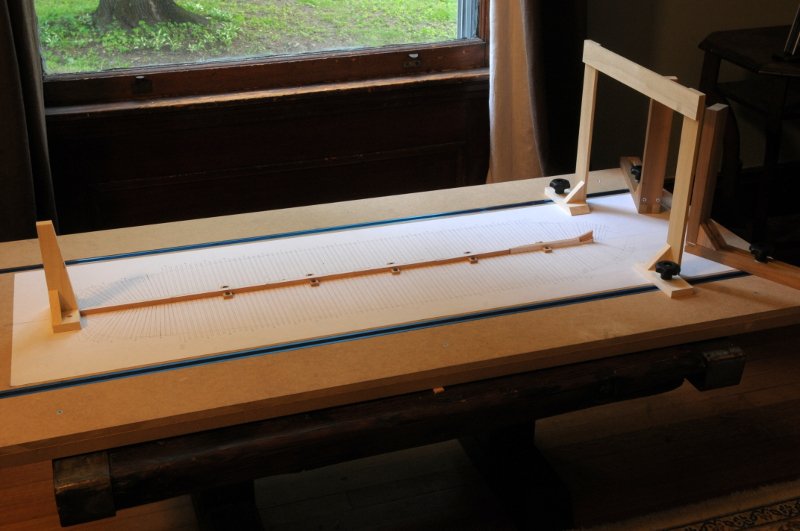
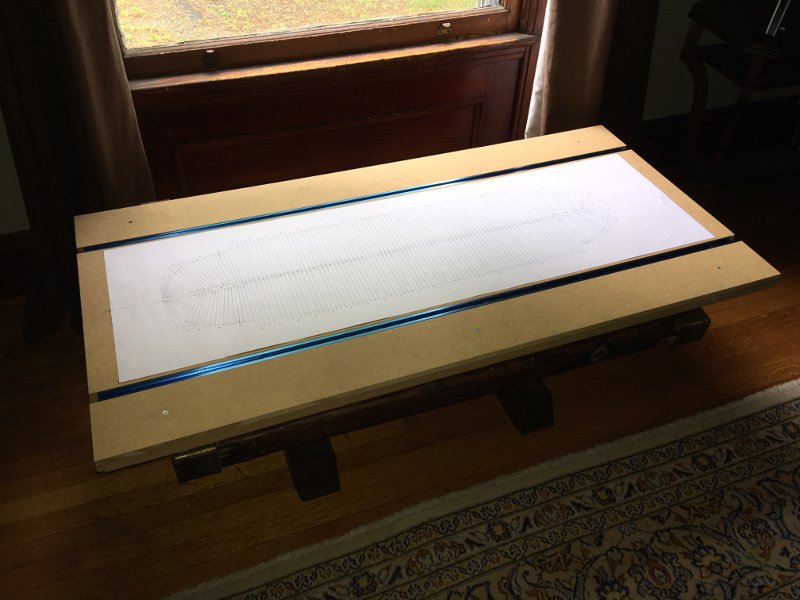
I am embarking on a new build. I had thought to not start another until I finished Oneida, but progress is going slow on her, and I am not getting any younger! Since Oneida is getting near the rigging stage, perhaps going back and forth between hull work on Euryalus, and rigging on Oneida, will keep my interest up in both. I am building a proper layout board, and this is the extent of my progress to date! It's not finished, and the framing guide is not fastened down yet. It is based on Ed Tosti's Naiad building board, but bigger, as his was for a similar sized ship, but at 1:60 scale. I understand why the smaller scale. When I saw the Euryalus plans which are drawn at 1:48, I was quite surprised at the size. However, I quite like the idea of always building at the same scale, so as my Oneida is 1:48, so also will be my Euryalus. As I mentioned, I am rigging Oneida, but I have no plans to rig Euryalus. I would have no place to put it. I have one issue, as I begin. Volume 1 of Euryalus is now sold out, and out of print at Seawatch books. I have purchased a new Vol. 2, so I have a complete set of the second volume drawings, but I am missing some drawings from Volume 1. I am wondering if anyone out there, who owns Volume 1 would allow me to copy the ones I am missing--I believe the ones I need are #6 Body; Bow Pieces; Rudder; Cross Section, and #13 Beam Patterns; Stern Timbers. Or, if you own Volume 1 (with all the drawings) and do not think you want to keep it..... If the book was still in print I would, of course, purchase it and support the authors, Allan Yedlinsky and Wayne Kempson; and Seawatch books. Allan and Wayne have been very helpful to me in getting off the ground (off the ways?). I just need to get copies of those missing drawings! PM me if you can help. Ron


- 122 replies
-
- 14
-
-

-
- Euryalus
- Plank-on-frame
- (and 4 more)
-
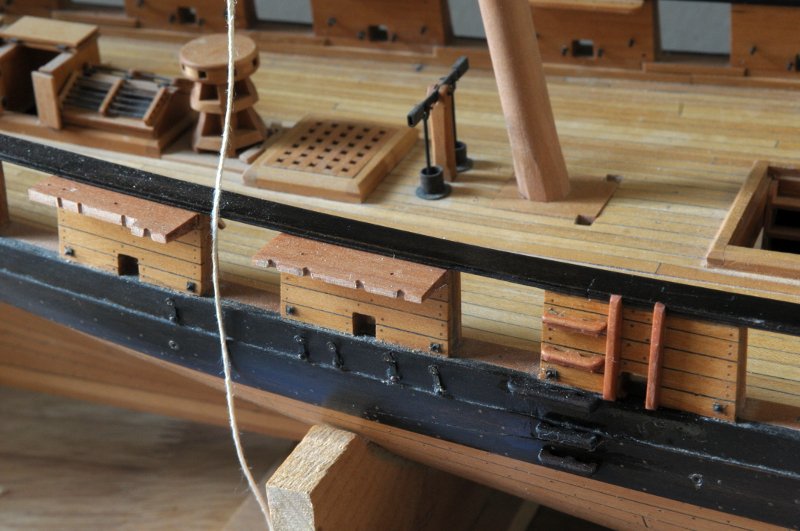
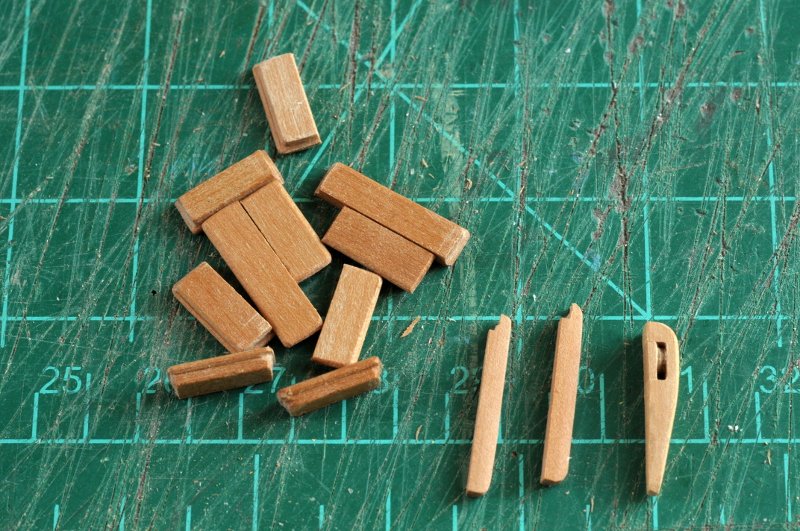
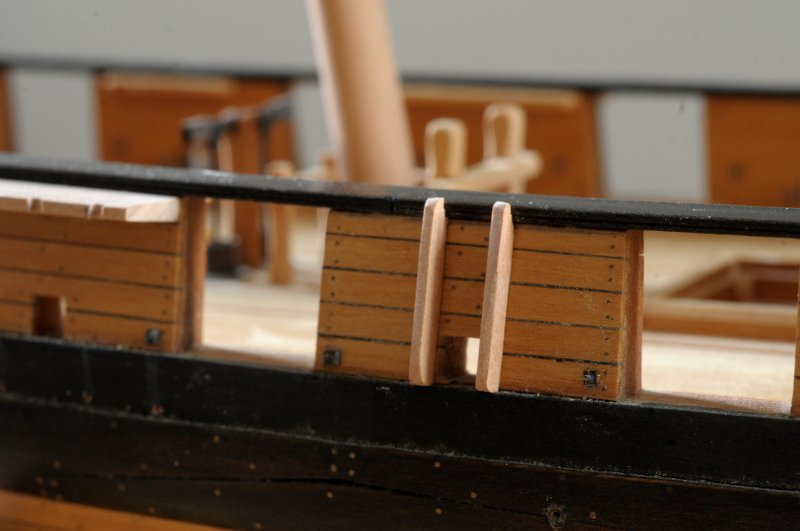
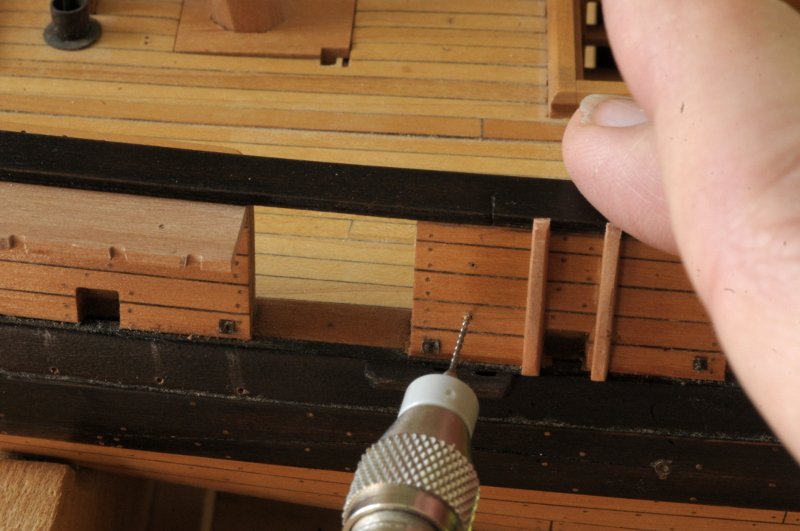
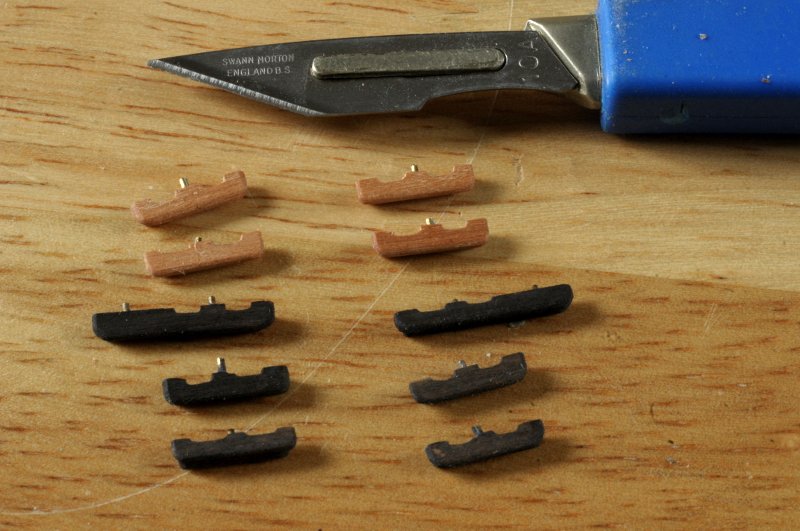
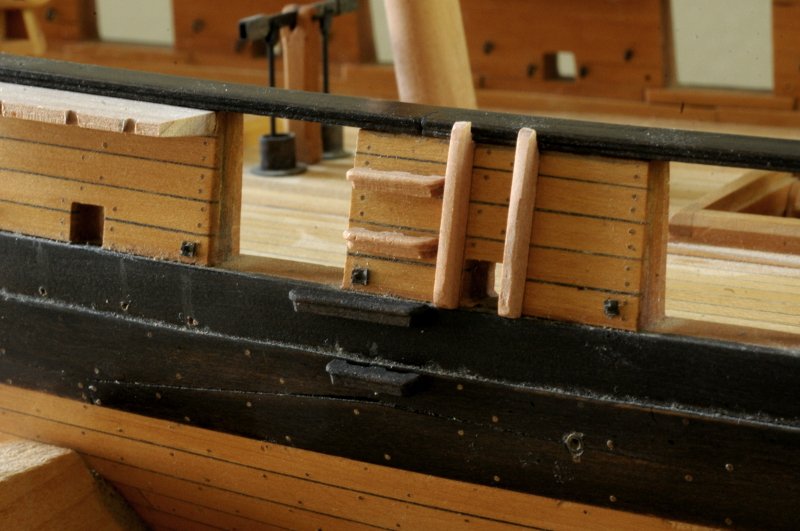
Well, finally a small update: I have been working on filling in some details on the hull, before finishing the channels and chainplates. Here are some of them. On the right is one of the Main Tack Chesstrees, to the left of that are a couple of the rub rails (not sure of the name), and the rest are rough blanks of the boarding steps. A profile has been scraped along the length, and these are in the process of being filed and shaped around the ends, and the width reduced, and then the hand holds will be filed-- Here is the Chesstree glued in position-- And the rub rails-- The boarding steps have been shaped, fixing pins glued in, and the ones which will be attached to the wale have been "ebonized" to match the wale-- Here the pin holes for the boarding steps are being marked, started with a pin, and drilled-- The boarding steps are just dry fit here-- They will be glued (epoxy at the pins), and then all these pieces will be wiped with Tung Oil Finish to match the planking and wale. The model is looking very dusty in these photos. I should probably spend some time cleaning. Cheers! Ron
-
Druxey, The delicate nature of this is revealed to me in the last photo. And if anyone can 'snatch victory' from what we see in the first photo, it is you. Ron
- 433 replies
-
- 8
-
-
- open boat
- small boat
- (and 1 more)
-
Thanks Maliba, and Joe a while ago. I know I am working very slowly at this point, but I think I will be able to post something in the next few days. Rick, all the frames were far too fat. What you see in the photo is 80 grit first, then I think it was 220, then 600. It took forever. I'm not sure I would bother with the 600 next time around. Ron
-
Thanks so much Steve and Martin. I have to say I don't think of myself as much of a machinist. It's not my background; I am not knowledgeable. I'm impatient with having to spend time 'making things to make other things'; but at the same time I'm in awe of people like Michael Mott and RJ Soane on this forum for whom the machining and jigs seem to come so naturally, and which they seem to enjoy doing! (And so many others, but those were the first two that came to mind.) But Martin you are right, I often do look at the model and wonder "how did I do that"!? Not in the technical sense, but just the accomplishment. You don't know until you try. It is rewarding, to be sure. Ron
-
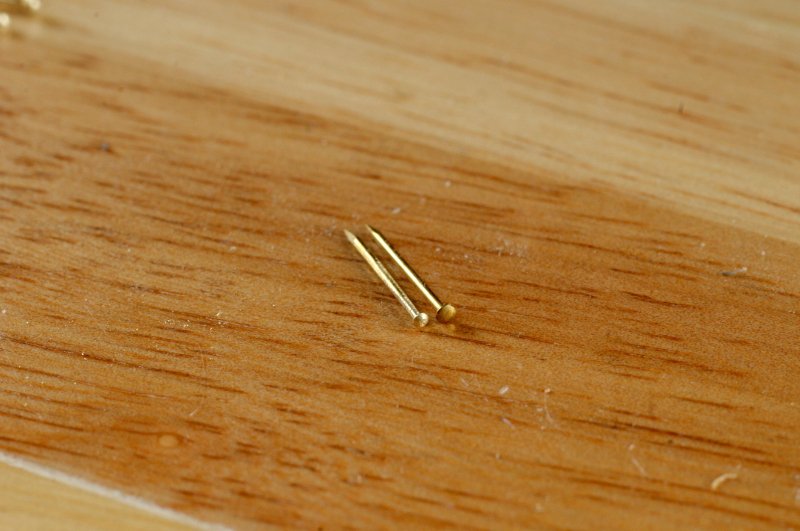
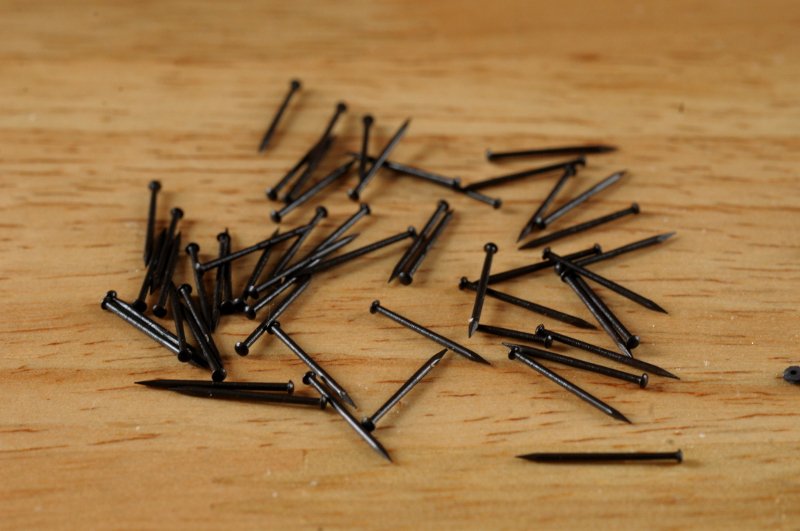
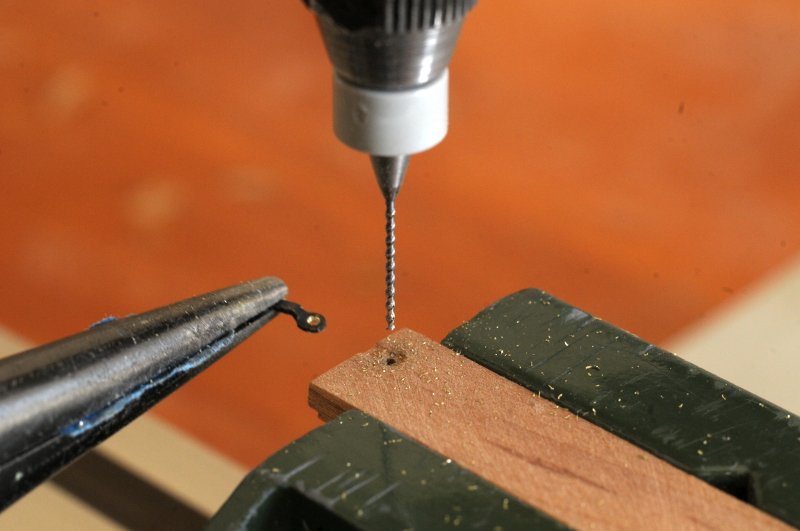
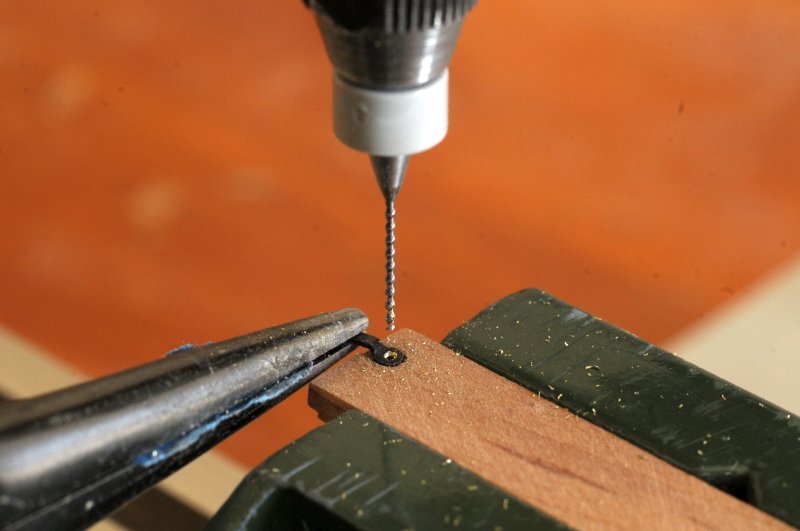
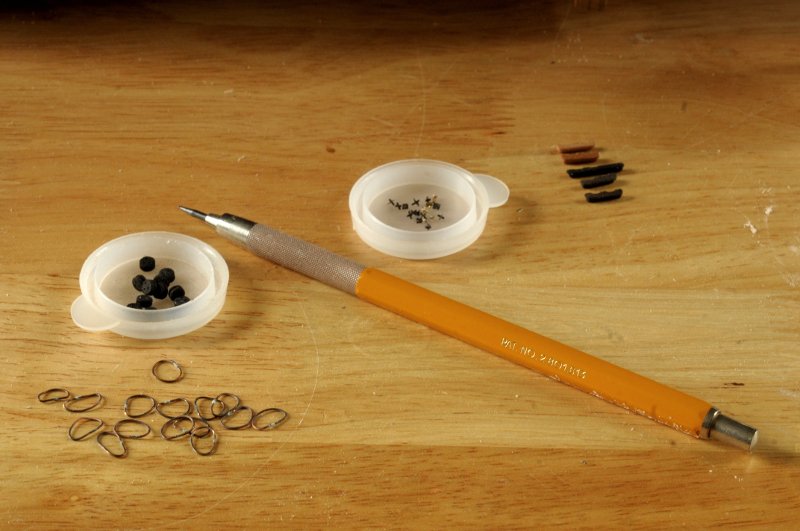
Finally, an update--and a very small one. I should wait until I have more to add, but I find that just posting something gives me motivation to continue. Here you can see the difference between the filed, and unfiled pins-- After doing them all I blackened them-- As I mentioned in the previous post, even with these narrowed pins (and you should be able to see, they are narrowed near the head, but not all the way down, as they will be cut short), I needed to drill larger holes in the preventer plates. And there I hit a wall. It should have been a very minor issue--how difficult can it be to just drill larger holes?! I tried using the pin vise, and holding the small pieces down by hand. The first one was fine, but after that, the drill bit would just "thread" the hole, without making a clean larger diameter hole. I'm not sure if I am explaining that well enough, but basically it wasn't working. I realized I would have to use the rotary tool with it's high rpm to drill the holes. I had no idea how to set this up with these tiny pieces, so I was stuck. What I should have done was move on to other parts of the model until a solution occurred to me, but I couldn't. This needed to be solved, and for some reason I just stopped working until I had enough motivation and persistence to figure it out, as insignificant as it seems. Finally, I had enough determination to see it through, and after some failed set-ups, hit on this one which worked, and seems so simple in the end. I clamped a piece of wood in a vise fastened to the rotary tool drill press "table", which had a small hollowed out bit to fit the preventer plate, so I could align and hold it there (via needle nose pliers), without shaking (I drink too much coffee), while depressing the drill press lever with the other hand. Presto. Twenty preventer plates (40 holes) drilled-- I hope to have another update before too long. Ron