


rlb
-
Posts
655 -
Joined
-
Last visited
Content Type
Profiles
Forums
Gallery
Events
Everything posted by rlb
-
 Ben, that's amazing. I remember feeling a shortness of breath on Pike's Peak. Ron
- 399 replies
-
- 1
-

-
- winchelsea
- Syren Ship Model Company
- (and 1 more)
-
HMS Euryalus 1803 by rlb - 1:48 scale
rlb replied to rlb's topic in - Build logs for subjects built 1801 - 1850
hamilton, if only you knew how how deficient I feel in matters of care and precision; though I know, of ourselves we tend to be the harshest critics. Thank you, and I'll try to continue to show how I manage to do things. Ron- 122 replies
-
- 6
-
-
- Euryalus
- Plank-on-frame
- (and 4 more)
-
Ben, I cannot guess where (though I know it's not Queensbury), but it is stunning. Ron
- 399 replies
-
- 1
-
-
- winchelsea
- Syren Ship Model Company
- (and 1 more)
-
hamilton, I am so glad you are able to play guitar again! I am also a guitar player, and I would be crushed if I could never play again (as I would be if I couldn't build models anymore) . Ron
-
Thank you Hal, yes, I do plan to rig her. No sails, though.
-
hamilton, I'm sorry to hear about your hand injury. I hope this project will allow you to ease back into modeling. And it's very interesting that it could serve as a "dry run" for building a full size version! Ron
-
Thanks Joe, and everyone for the likes. Thanks, Rick. I wish you success with your Oneida, and if you have any questions, ask away. You'll see I deviated from the Lumberyard plans along the way, based on sound historical info sometimes, other times perhaps less so. Ron
-
HMS Euryalus 1803 by rlb - 1:48 scale
rlb replied to rlb's topic in - Build logs for subjects built 1801 - 1850
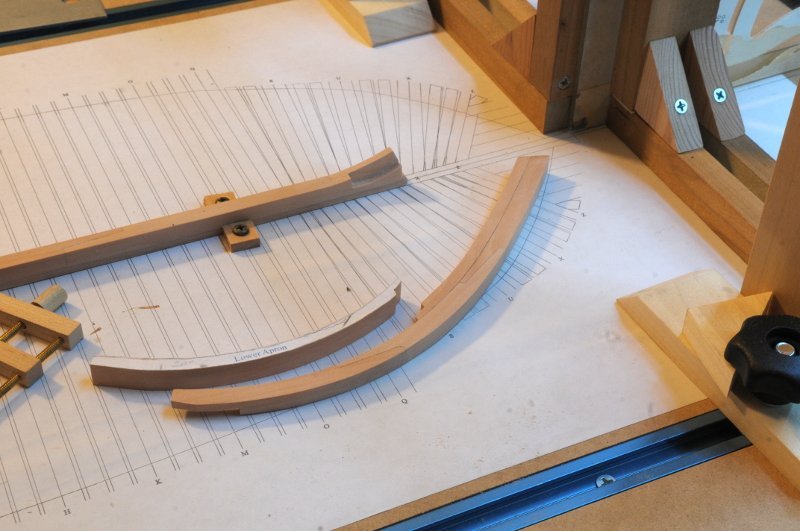
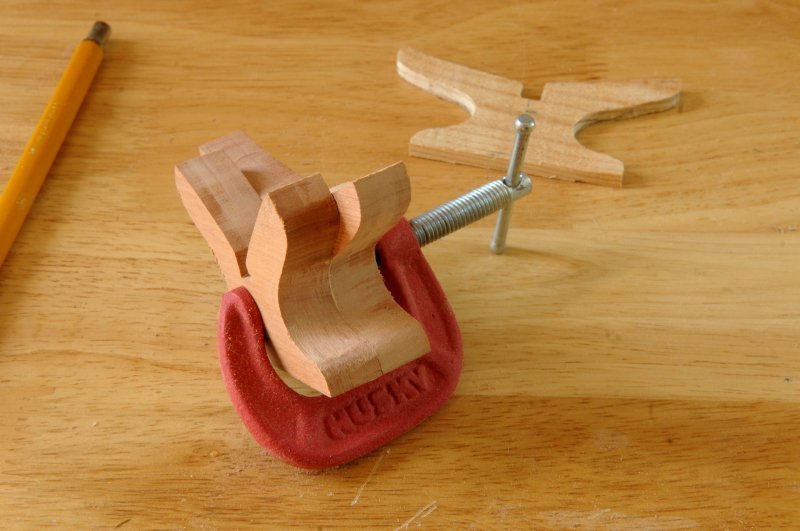
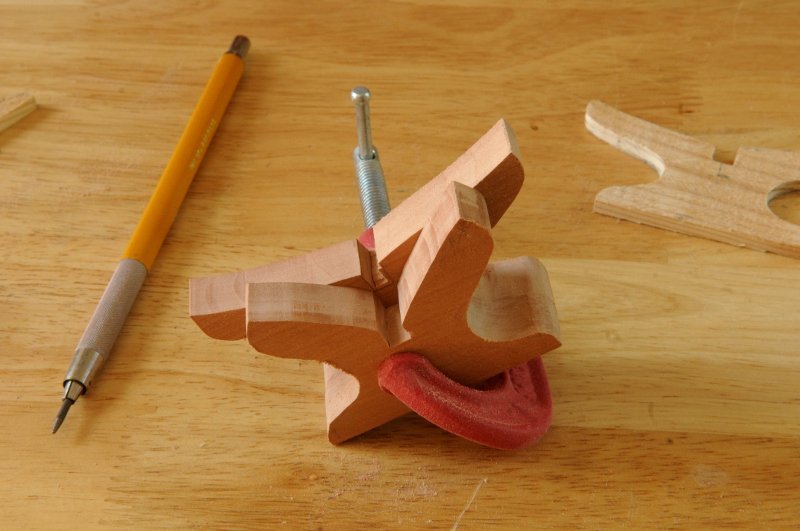
Thanks, Allan. The taper of the stem and bollard timbers is being sanded by hand, with that sanding block you can see on the left in the first photo. I have a sanding drum in my full size drill press down in the basement, but I only use that for roughing the basic curve of the pieces after cutting them out, and I don't trust myself with chisels for this work, so it's slow going. It's taken me a while to wrap my head around these pieces, trying to visualize what the end shape is, compared to the lines on the paper pattern, and how they need to fit with the stem, lower apron, rabbet and rest of the hawse timbers. Ron- 122 replies
-
- 5
-
-
- Euryalus
- Plank-on-frame
- (and 4 more)
-
HMS Euryalus 1803 by rlb - 1:48 scale
rlb replied to rlb's topic in - Build logs for subjects built 1801 - 1850
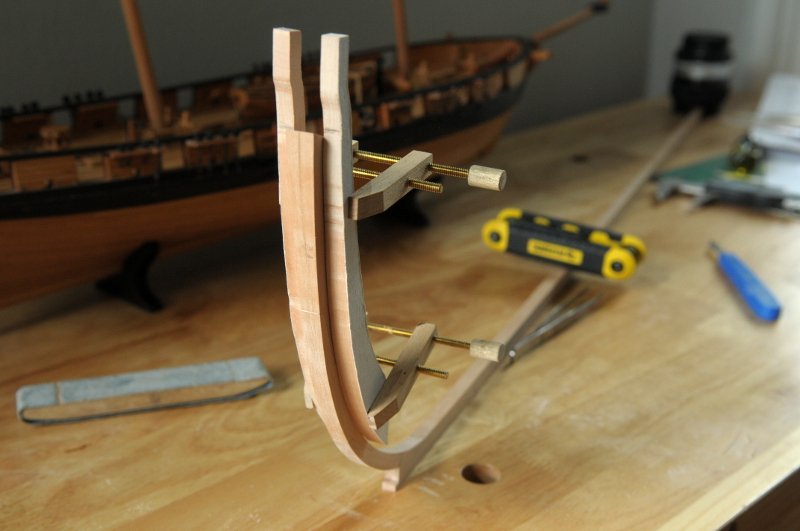
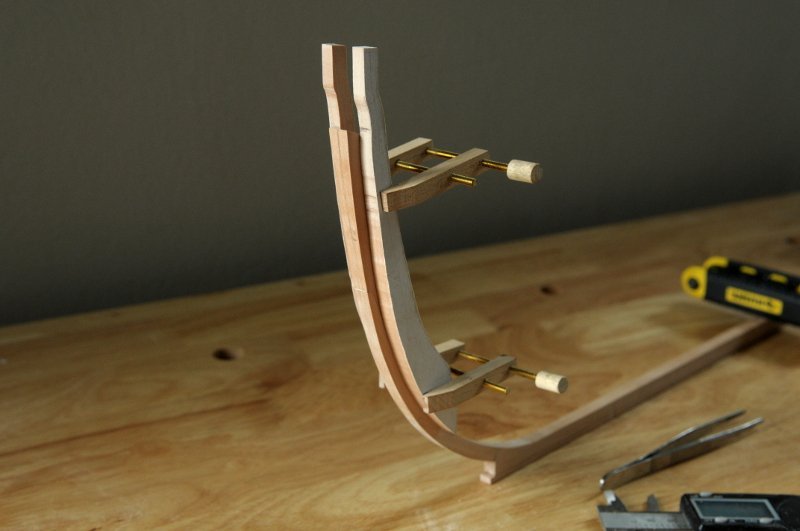
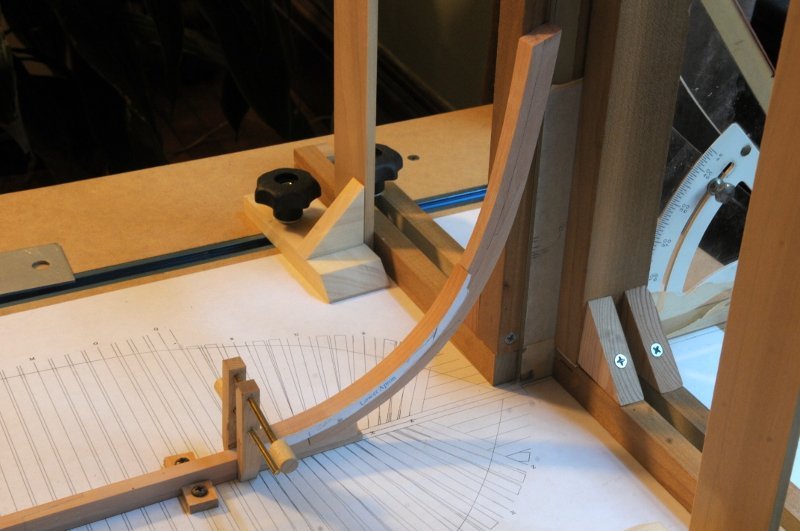
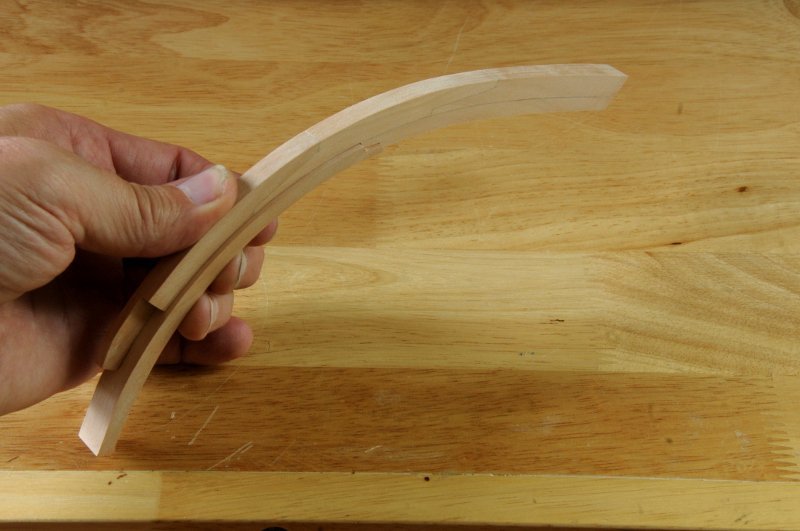
I hope you are right, druxey! Paul, yes, I made the clamps--credit goes to Ed Tosti, you can find them on his build log for Naiad. While most of my work this week has been on Oneida, I have spent some time slowly sanding the bollard timbers to fay to the stem. They need to match the concave taper of the upper stem-- Still some work needed, but they are getting close. The overall width is constant now at the head and foot of the assembly-- Once I have them tapered correctly to the stem, I'll start roughly beveling them forward, and at the foot where they meet the lower apron. Ron
- 122 replies
-
- 18
-
-
- Euryalus
- Plank-on-frame
- (and 4 more)
-
You're welcome, keep up the good work! Thanks for the info on the belaying pins. I have had trouble finding them just so, I'll have to give Model Shipways a try.
-
Your work looks very good. The belaying pin you show next to a penny and the companionway/skylight looks in scale and well proportioned. Did you make/adjust it, or is it a stock item? They are so hard to find just right. Ron
-
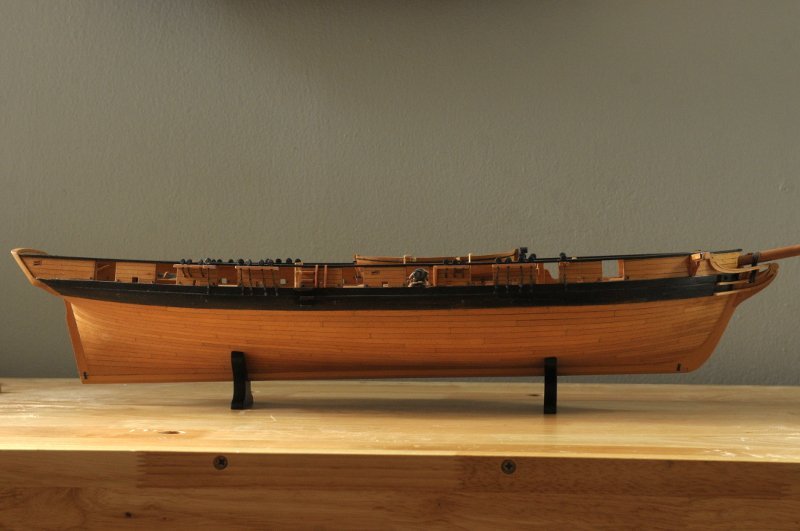
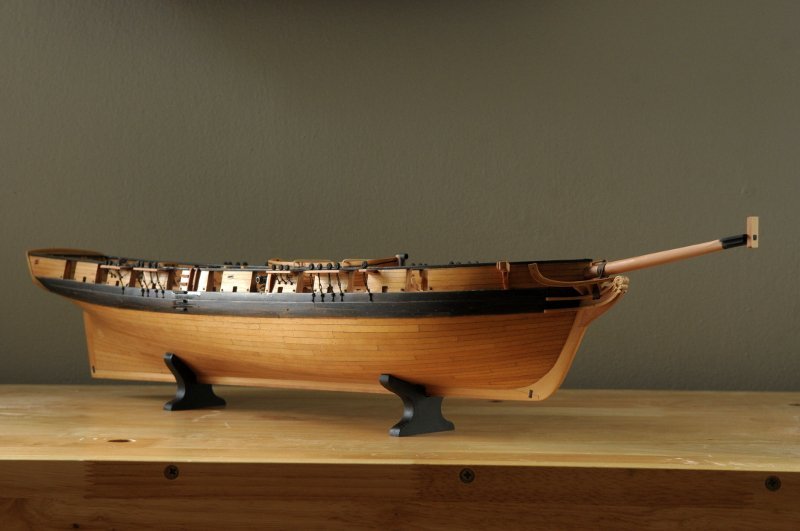
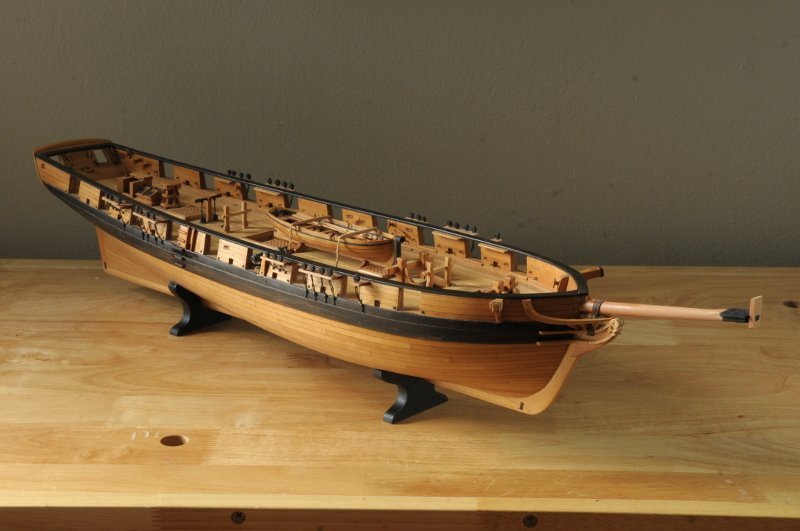
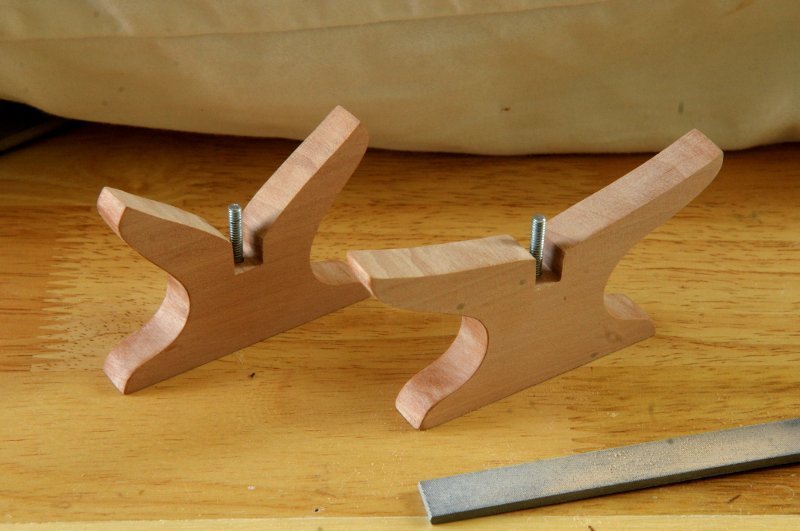
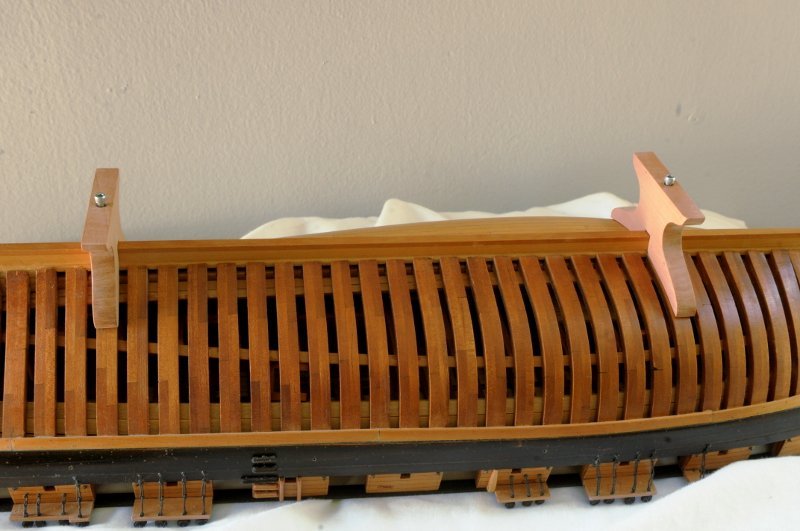
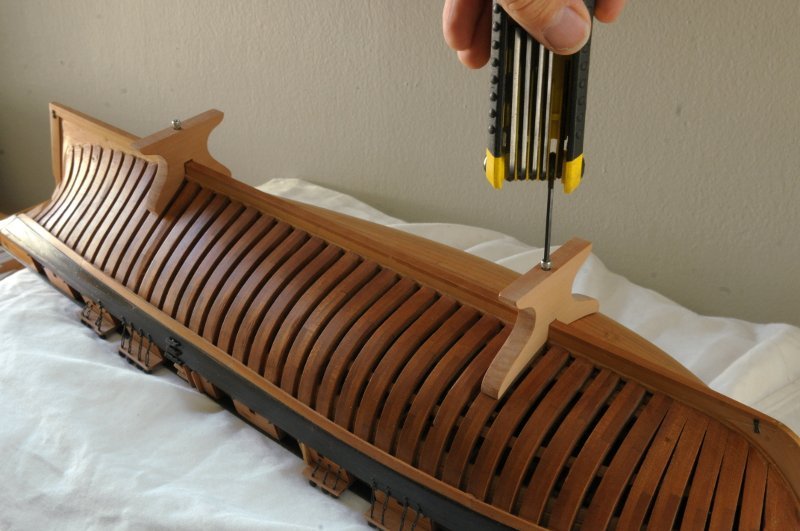
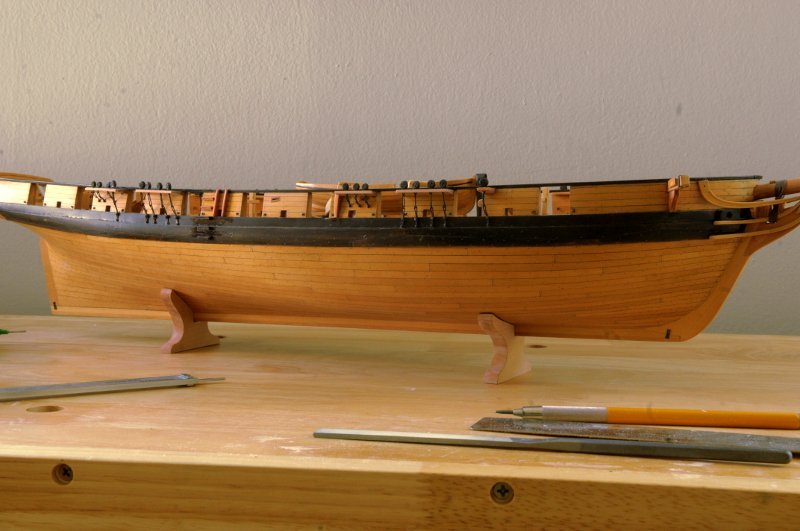
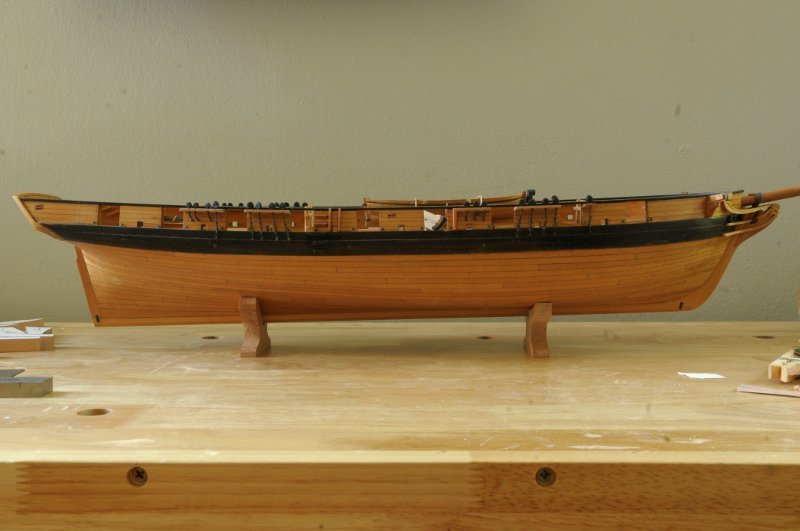
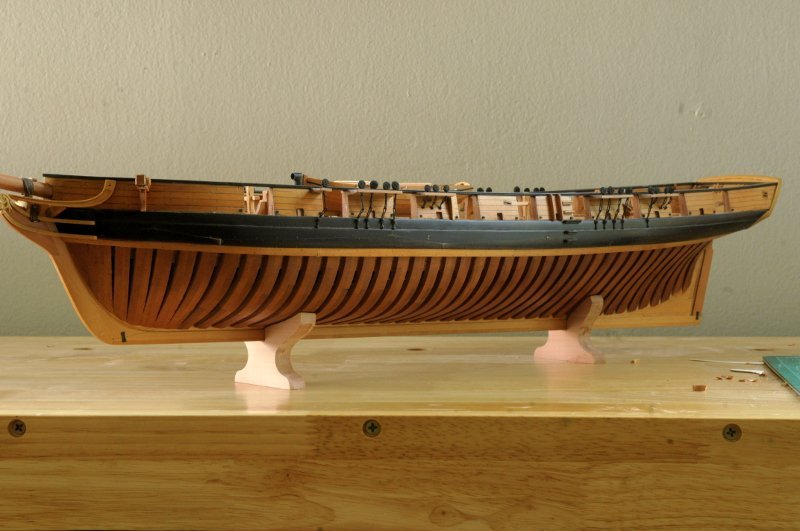
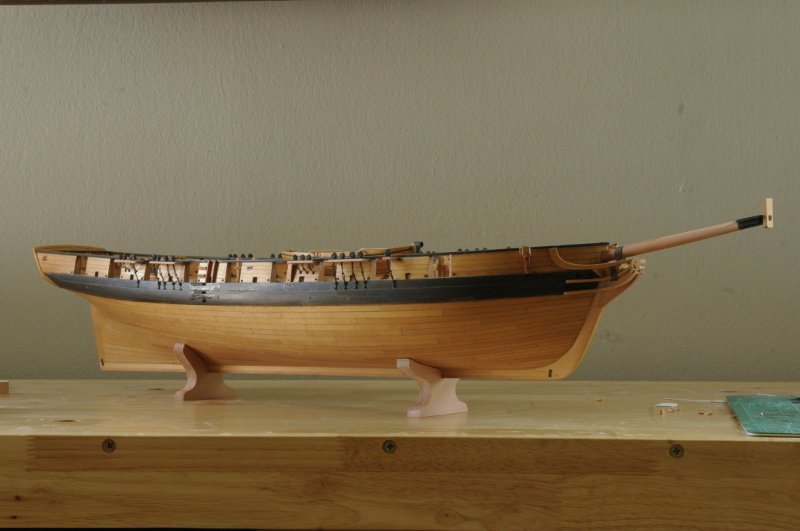
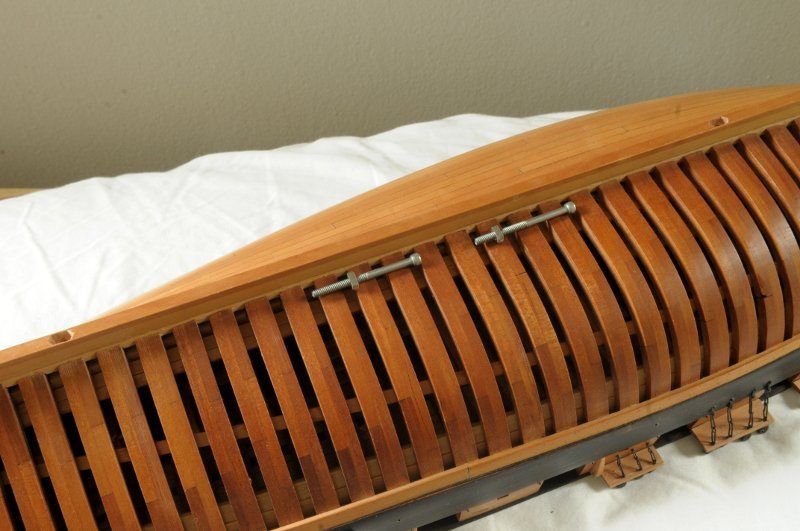
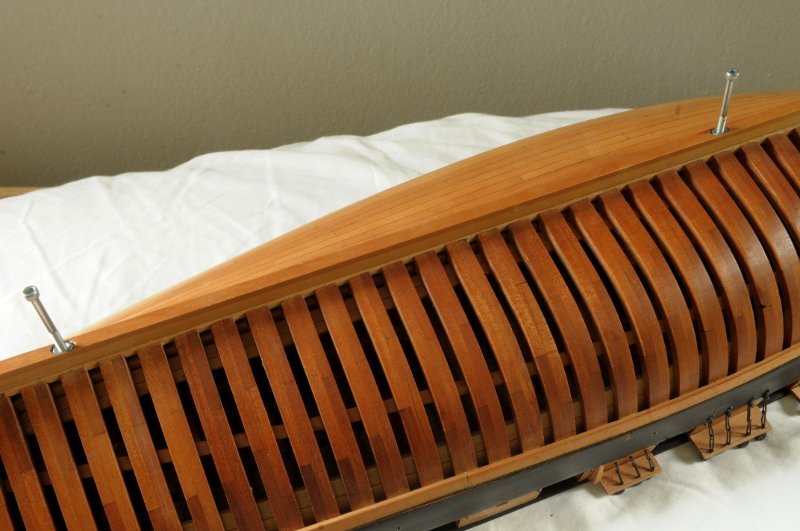
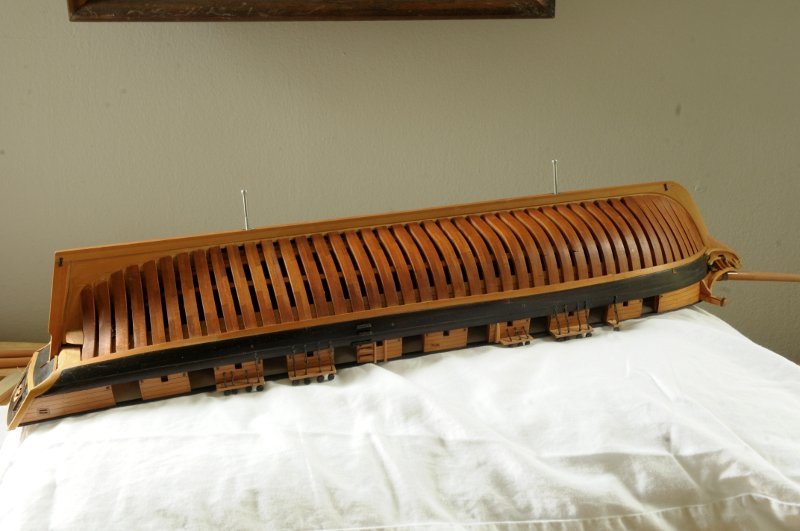
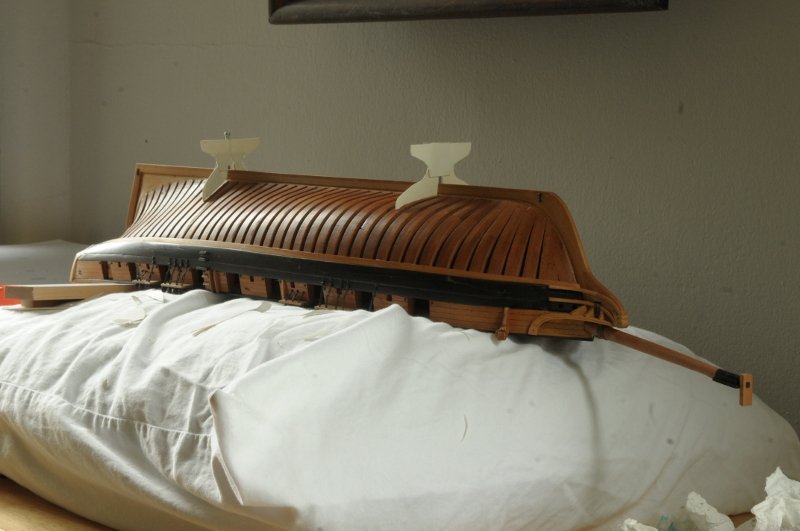
The pedestals ebonized-- And installed-- Now I can retire my not-so-pretty temporary (10 years or so) stand-- Ron
-
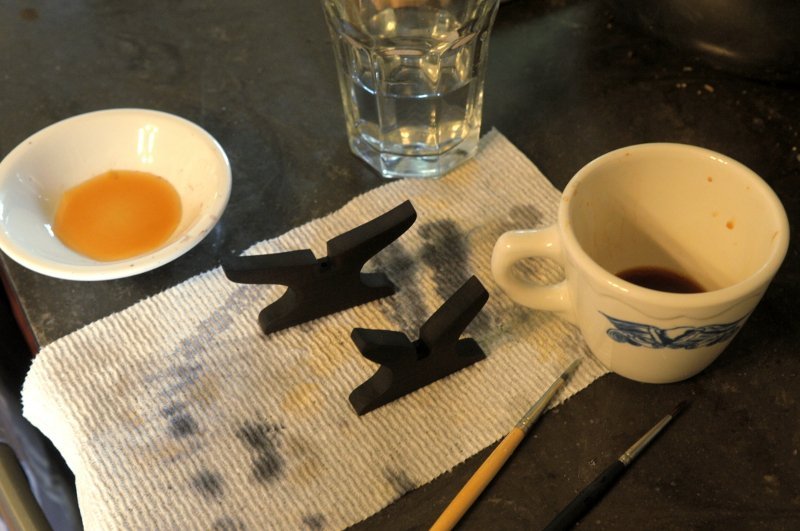
Thanks Martin. I'm glad I stopped to take care of the pedestals. Even if I had glued the nuts in place earlier, it was much more work, and turning the ship over many times to do it, than I anticipated. Dowmer, I explain the ebonizing in post #51. Ron
-
HMS Euryalus 1803 by rlb - 1:48 scale
rlb replied to rlb's topic in - Build logs for subjects built 1801 - 1850
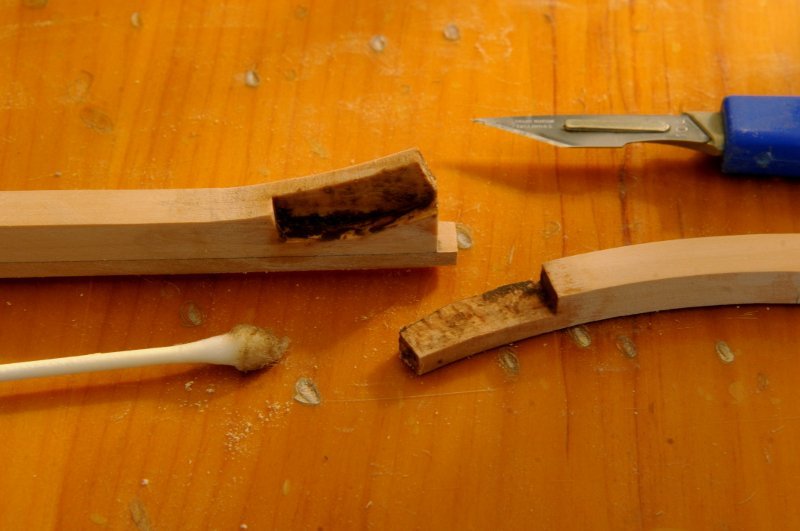
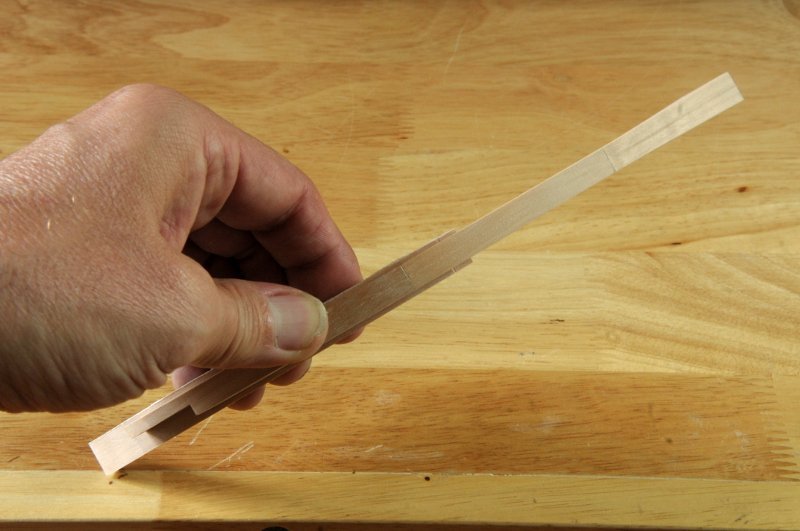
I completed #5 (glue the boxing joint), and I'm not sure how this happened, but it was not glued precisely correctly. The upper end of the stem was not quite far enough forward. I'm mystified by this, as it was good when I glued and clamped it. Wishing not to start off on the wrong foot, I made the decision to re-glue it. For the first time (and not the last, be assured), the isopropyl alcohol comes out-- With the tinted glue, this is not a pretty sight-- In cleaning up the residue, I kind of massacred the joint. This is a shame, as it will be visible. After re-gluing, the boxing joint doesn't look bad, but the first attempt looked almost perfect, though it was unfortunately "off" somehow. The re-glued stem positioning looks good though, and this is probably more important than the boxing joint LOOKING perfect; but it better not somehow change again overnight!! Here is the newly glued stem, and the blanks for the bollard timbers cut out. The paper pattern is on the underside of the bollard timbers, but the picture was better showing the wood side-- Ron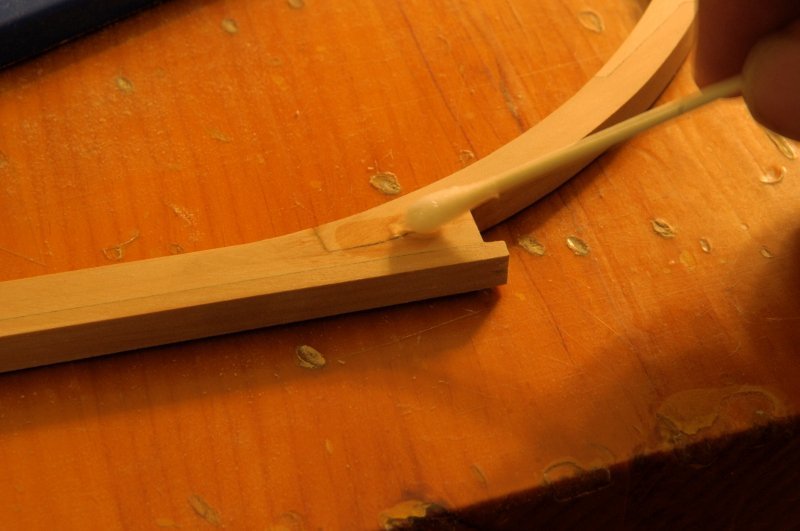

- 122 replies
-
- 13
-
-
- Euryalus
- Plank-on-frame
- (and 4 more)
-
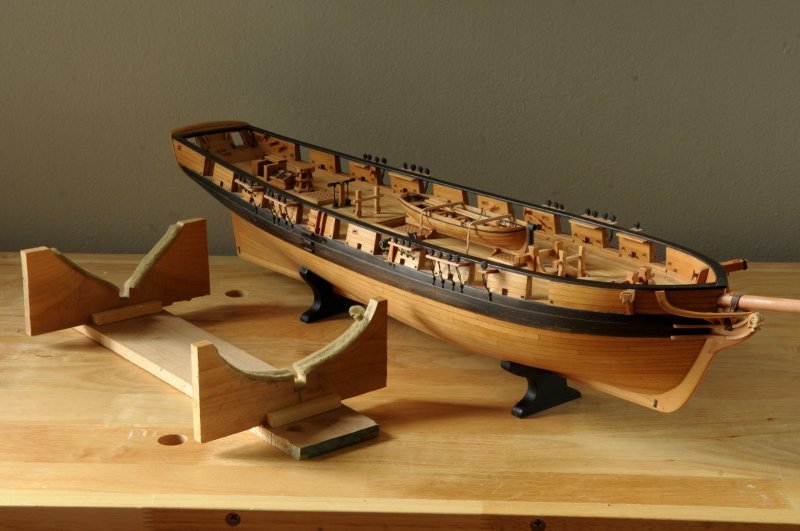
I decided that the pedestals are indeed too chunky. So I sanded them a bit thinner, and also reduced the thickness of the cradle arms. Satisfied with this, I drilled holes for the bolts. The aft bolt needed to be trimmed about a quarter of an inch. The front bolt was fine as is-- And located them on the keel-- Tightened them down-- I discovered that unfortunately, I needed to reshape the cradle arms. Due to various inaccuracies (the bolt not being precisely in the center of the keel, the hole not being drilled precisely in the center of the pedestal, the holes not being drilled precisely plumb, etc.) I needed to readjust the cradle arms, and the flatness of the bottom of the pedestals. I had to attach and detach the pedestals numerous times, sanding and adjusting them. If I improved one characteristic, another suffered. I got to the point where they were much better, though not perfect. But enough is enough. Here they are as I will leave them-- The aft pedestal is very good. The gap between the pedestal and planking on the forward one bothers me (it is better on the port side), but as I said, enough is enough, and I risk having to start over on them. With the pedestals blackened , that gap will not be as noticeable (I think). Now I wait for my blackening solution to "ripen". Ron
-
HMS Euryalus 1803 by rlb - 1:48 scale
rlb replied to rlb's topic in - Build logs for subjects built 1801 - 1850
Thanks, druxey. Your suggestion makes great sense, and I will follow it. Ron- 122 replies
-
- 2
-
-
- Euryalus
- Plank-on-frame
- (and 4 more)
-
HMS Euryalus 1803 by rlb - 1:48 scale
rlb replied to rlb's topic in - Build logs for subjects built 1801 - 1850
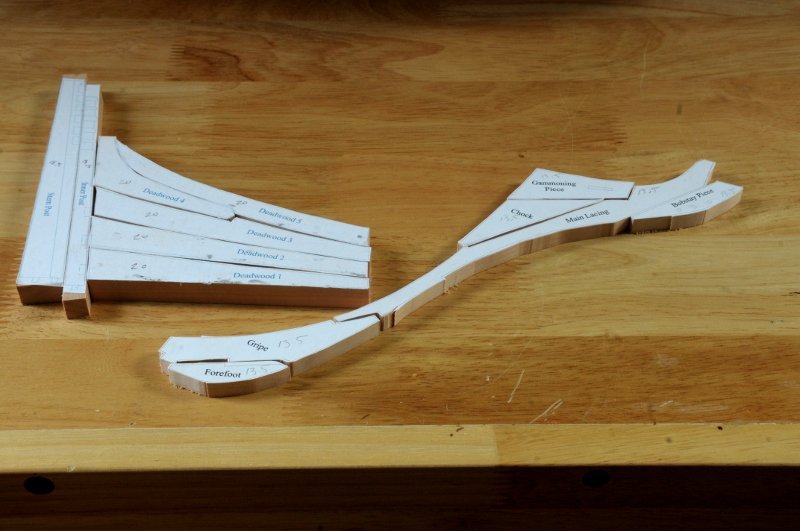
I have chosen my poison. It is a mixture of the TFFM, Naiad, and Euryalus poisons; we'll see if it does me in. The order of immediate business will be thus: 1) Taper the keel fore and aft 2) Glue the upper apron on the stem 3) Trim and angle the top of the stem 4) Taper the stem 5) Glue the boxing joint, attaching the stem (minus the lower apron) 6) Make the bollard timbers 7) Using the bollard timbers, verify and cut the bearding line in the lower apron 😎 Glue the lower apron on [sorry "8" then ")" gives me "😎" and I can't seem to get rid of it] 9) Make and glue the sternpost, inner sternpost, and deadwood 10) Make and glue the rising wood 11) Cut the keel and stem rabbet The Knee of the Head can be assembled at any time, but it will not be permanently attached until after the hawse timber work is done. At this time I have done #1 (keel tapering), #2 (upper apron glued), and #3 (stem end angle). I am most of the way through #4 (tapering the stem) On the paper pattern of the Lower Apron, about an inch away from the end, I have marked the end of the bearding line with a pencil (it didn't print on my pattern). Forward of that line, the Lower Apron will match the width of the stem, and aft it will be wider, and shaped to make the bearding line "step". I still have a bit of sanding to get the taper to the right thickness around the middle of the stem. To help judge the taper, I held the stem over the end view of it on the plans. Panic. On the drawing the upper end of the stem is wider (by about 1.5 inches) than my stem. How did I get this wrong?!!!! I went back and checked the Euryalus text, and the Naiad text and Naiad drawings (since up to now, sided dimensions have been identical). The Euryalus text calls for the stem to be 20" at the upper end, which is what I have. So there seems to be a discrepancy here. Naiad also calls for 20". I think I am okay then, and this will just make the bollard timbers each .75 inches wider at the top, to compensate (at least as they are shown on the drawings, which show the stem head at about 21.5 inches). They'll actually be closer in width to the rest of the hawse timbers in that case. Panic relieved, unless someone points out an error in my analysis of this. I've also cut out some future work, though I'm not quite ready for these yet--according to my poison plan. Ron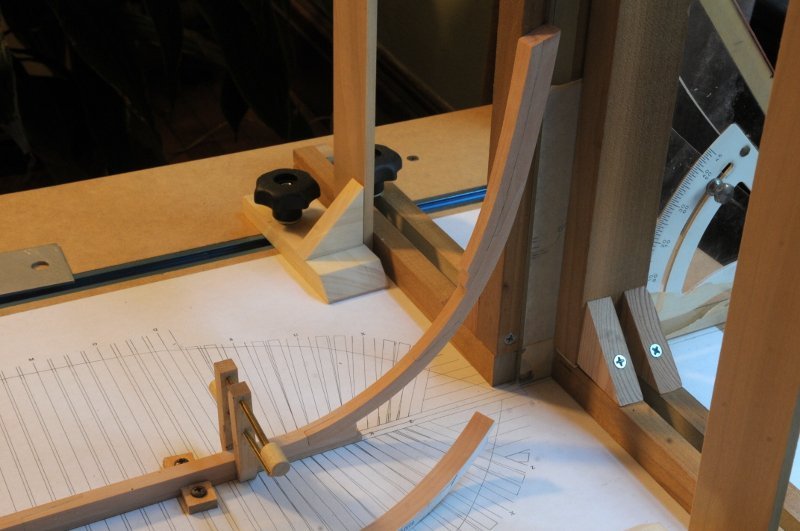
- 122 replies
-
- 10
-
-
- Euryalus
- Plank-on-frame
- (and 4 more)
-
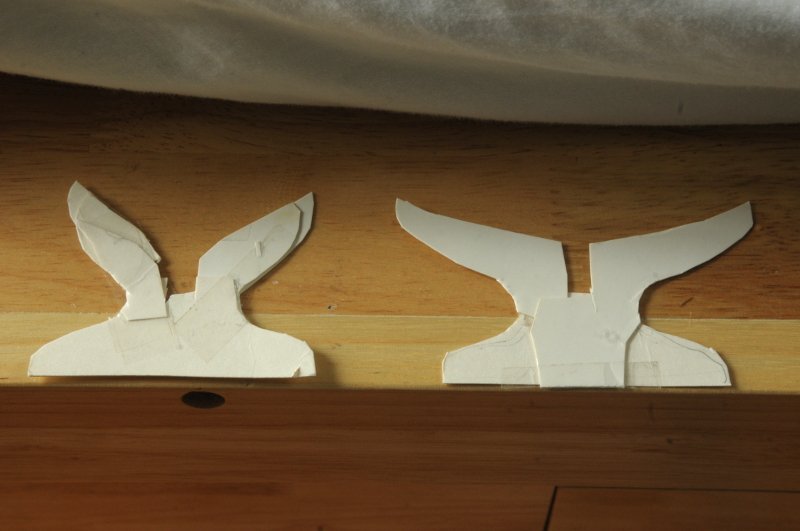
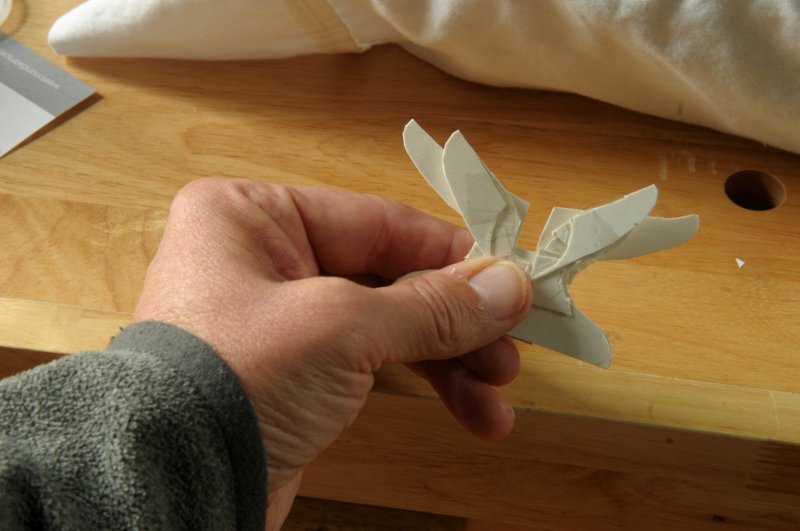
Continuing with the pedestals-- I now cut two new paper templates using my card mock-ups as a guide, folding the paper in half and cutting them out so they were true mirrors. Using the new paper templates, I then cut some scrap wood templates- After cutting the keel slots, I could put these on the hull, and refine the cradle arms-- And importantly, check the keel drag-- Using the wood templates, I could support the hull right side up, and check the drag again, and the general look-- I checked for vertical plumbness. I needed a shim under the port foot, and adjusted both the cradle arms, and sanded the pedestal bottom to correct this. The clothes pins are just for some additional stability so the hull doesn't topple forward or aft-- Once satisfied with the scrap wood templates, I used these to cut out the final pedestals. In adjusting the drag, and the vertical plumbness, the bottoms of the scrap wood no longer were exact matches to each other, and I tried to account for this in cutting out the final pedestals. It may not be obvious, but looking at the scrap templates you can see the difference in the cradle arms to account for the port side of the hull being unplanked (the right side as we are looking at the templates)-- Any remaining differences I could easily sand away after clamping them together-- After sawing, chiseling, and filing the keel slots, I could then I set the hull on the pedestals, and refine the cradle arms-- Check the drag again-- These are now getting close to the final shape-- Some fine tuning of the cradle arms is still needed, and the pedestals themselves look just a bit chunky to me--not sure whether it's the sided thickness of the pedestals, or the thickness (molded dimension) of the cradle arms. I will live with them for a while before making any changes, as I don't want to take too much off now and regret it. Once I'm satisfied, or after another round of adjustments, I'll drill the holes for the mounting bolts, and ebonize the pedestals. Ron


-
The available options are many. What do you recommend for cutting hardwood (Swiss Pear or Castello Boxwood), 3/16th to 5/16th thick? Ron
-
Charles Green above said: "In the category of power tools - none are needed". This is true. The trade-off is time and and patience. I speak from experience. A jeweler's saw, files, sandpaper, pliers, tweezers, eye magnification (if you are over 45), and glue can do a lot. Unless you have money to burn, the first power tool I would recommend is a dremel/proxxon rotary tool. They can be "spring-boarded" into many uses. Ron
-
As I was doing a cleaning and organizing of my workbench in preparation for the next phase. I discovered the keel pedestal bolts and NUTS (which had been filed thinner to fit within the width of the keel). I thought I had epoxied the nuts into the keel years ago! I felt underneath, and the holes were there, but no nuts. Getting near the point of no return for being able to turn the hull upside down, it was clear this needed to be done now. So-- Here are the bolts and their nuts-- I epoxied the nuts in place, taking care to keep epoxy out of the threads. The bolts are in place, because the holes drilled into the frames and keelson keep the bolts (so also the nuts) in the proper alignment-- Since I have the hull upside down, this is also the perfect time to finally make a decision, and start making the base pedestals. I've been undecided on this for the entire build! What finally swung my decision was the worry for lateral stability, especially as the bolts are only in the false keel (though the screws do go deeper). I've opted for some shaped cradle pieces, and started making templates for those-- These are VERY rough. The fore pedestal needs to be just a bit taller (but not this much!) than the aft, due to the keel drag. Many snips and iterations followed, sometimes lengthening the cradle 'arms', sometimes shortening them, adjusting the base curve, and making the two pedestals more consistent-- I ended up here, for now-- These will be made out of pear, probably about 3/8" wide, and ebonized-- Still a good deal of fine tuning to do, but I think these will do to start. Ron


-
HMS Euryalus 1803 by rlb - 1:48 scale
rlb replied to rlb's topic in - Build logs for subjects built 1801 - 1850
Thanks hamilton. Druxey, yes, and it's interesting to see different ways to skin a cat. (Not literally.) Ron- 122 replies
-
- 4
-
-
- Euryalus
- Plank-on-frame
- (and 4 more)
-
HMS Euryalus 1803 by rlb - 1:48 scale
rlb replied to rlb's topic in - Build logs for subjects built 1801 - 1850
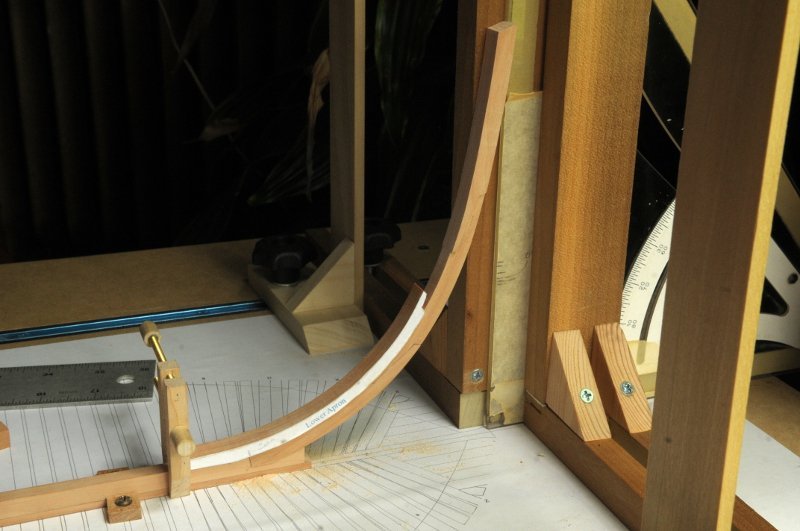
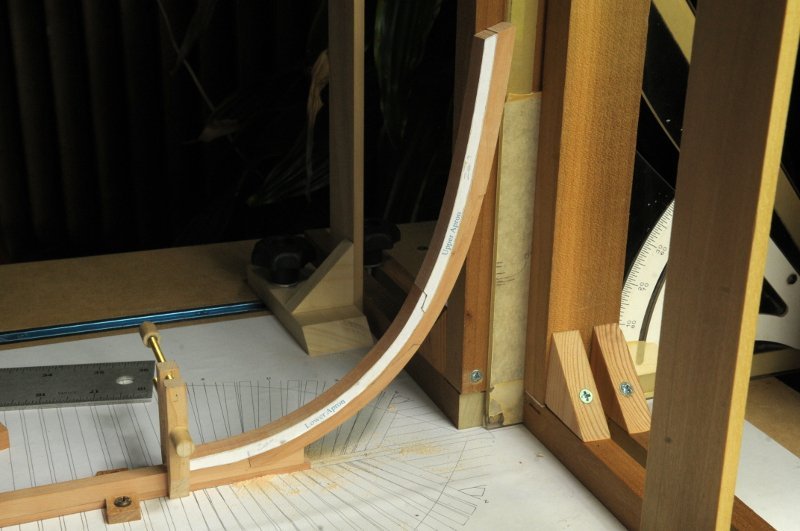
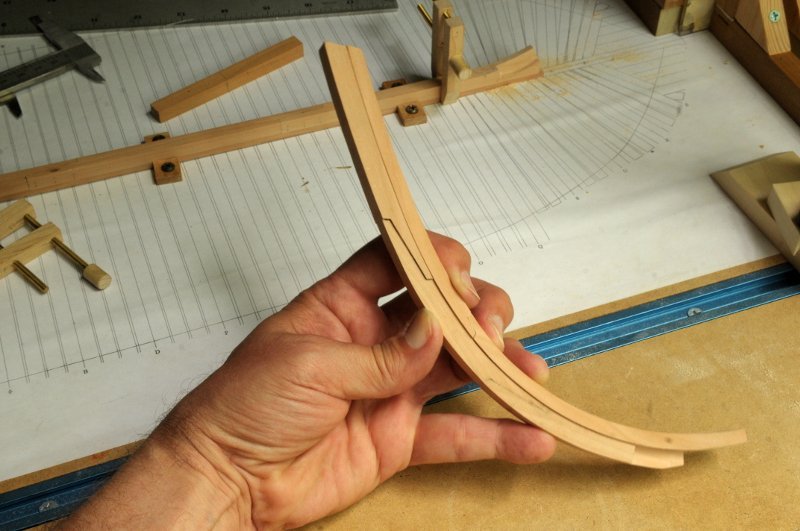
Thanks Ben, and all, for comments and likes! Here is the stem, sitting in place-- The three stem pieces are glued, but not the boxing joint. I've been shaping the two apron pieces. Here is the lower apron sitting in place-- And the upper apron added-- The stem and apron pieces are held together here just by finger pressure-- I'm reading between TFFM, the Naiad book, and of course, the Euryalus book, for fabrication techniques and instructions, and importantly, the order to proceed. They all are a little different from each other in that respect (that, or my reading comprehension is very poor). I.E. when to glue certain joints, when to taper the keel and stem, when to cut the keel and stem rabbets, etc. I'm delaying gluing any of the stem for now, and planning whether this is also the best time to cut and shape the bow pieces. Ron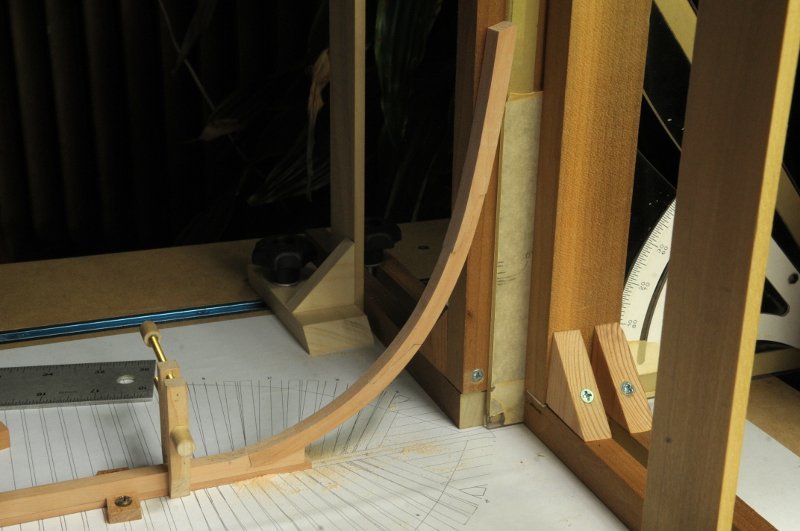
- 122 replies
-
- 11
-
-
- Euryalus
- Plank-on-frame
- (and 4 more)
-
Papegojan 1627 by mati - FINISHED - 1/48
rlb replied to mati's topic in - Build logs for subjects built 1501 - 1750
Beautiful! Ron
