


Bob Cleek
-
Posts
3,374 -
Joined
-
Last visited
Content Type
Profiles
Forums
Gallery
Events
Posts posted by Bob Cleek
-
-
1 hour ago, druxey said:
Grumble about the time it takes to 'treenail'? Try a ship of the line!
Seriously, your model looks very nice, Chuck. One question: weren't bottom boards removable for bailing and repair purposes? If so, that means less treenails!
Even if the sole were removable in some fashion, it would still have nails (this boat would seem quite light for treenails) fastening the boards to battens beneath to keep them in position. It is indeed "a model of a model" and the prototype model may have (and perhaps quite likely did) taken some liberties with the details. It would appear that there is no provision made for bailing and cleaning out the bilge unless there is some unseen way that the sole can be removed to permit access beneath it. That would not be seamanlike at all. The bilges would soon fill with crud and that would promote rot. Perhaps the rabbets on edges of the sole planks may intend to depict that the sole sections on either side of the center plank were designed to be removed, but I can't see from the model how that would be possible without deconstructing the thwarts unless the removable sole sections were cut into sections athwartships which I would expect to be the case in a real vessel of this type. It is entirely possible that the builder of the original model took that common detail as a given and didn't bother to cut them. As said, though, it's "a model of a model," and a damn fine one at that!

-
I've used what we here call "nail polish." I found, however, that it tends to be glossy. I suppose that problem can be solved by thinning it with acetone, no?
- thibaultron and mtaylor
-
 2
2
-
Just saw your wonderful workmanship. Truly amazing.
Can you explain how you make your treenails (fasteners ?) They appear to be cut from a triangular section stick, but they are so tiny! They are the correct scale. It really makes the model look great. Too many models have oversize, out of scale treenails.
-
On 9/15/2018 at 7:12 PM, tigerdvr said:
I didn't anticipate dowsing the model but some people are more susceptible to various fluids than others. That's why so many stains, paints, lacquers, etc. are specific on use in well ventilated areas.
Not to beat you up about it, but I think more often than not solvent cans say "use in well ventilated areas" because the manufacturer's insurance carriers want a defense to some fool who inhales great quantities of the fumes and then sues them because he got a headache. One good rule of thumb with finishes is that if it doesn't smell like a solvent, it's almost certainly not the best material for the job. Unfortunately, with VOC content regulations today, along with propaganda that has people believing they are risking their lives cleaning a paintbrush in mineral spirits, decent paints and varnishes are getting nearly impossible to find in a lot of places.
I'm with Welfalck on this one. I'm not familiar with the specific brand of lacquer he mentioned. (It's probably a European product.) While thinned white glue will work, one has to wait for it to dry and set and once it is set, undoing it isn't always easy.
My poison of choice is standard shellac, white or orange. (So little is used that the "orange" brown doesn't affect the color of the line.) I use it "out of the can" and it's the consistency of water. One application and the denatured alcohol in which the shellac is dissolved quickly evaporates (faster even if you blow on it gently.) The line can be worked with while the shellac is drying. More shellac can be applied if need be if the line doesn't want to behave, but that's a rare event. (Too much shellac, or too many coats, actually, will cause a glossy finish that isn't where you want to go with it.) When the shellac is dried, the line will remain stiff the way you put it. If it needs to be undone, an application of denatured alcohol with a paintbrush or cotton swab will soften it. I also use shellac to set rigging knots and servings. Shellac lasts forever (or at least 5,500 years, if the Egyptian artifacts are any indication) and is highly resistant to moisture permeation. For this reason, it also makes an excellent sealer beneath varnished and painted wood.
And, perhaps most endearing of all, it's dirt cheap and won't go bad in the can. If it starts to thicken up over time, just add more denatured alcohol.
- mtaylor and thibaultron
-
2
-
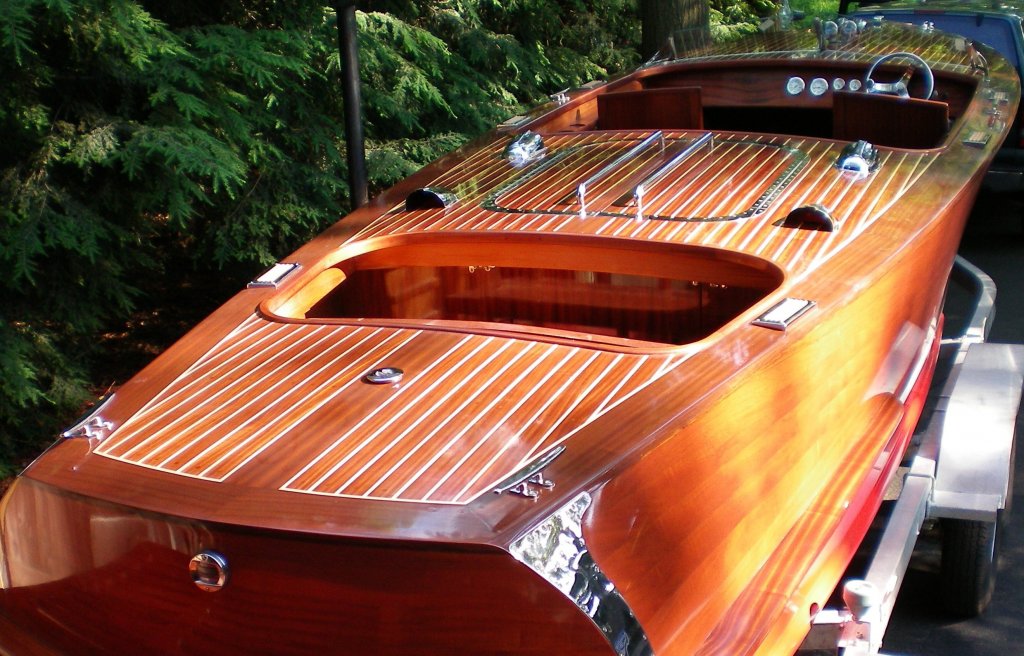
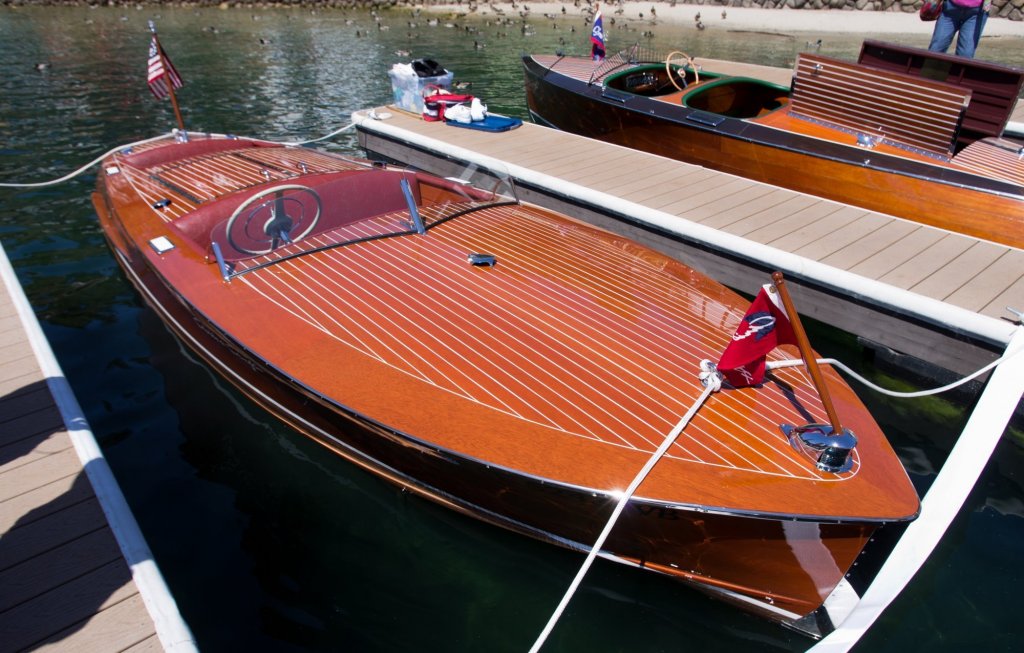
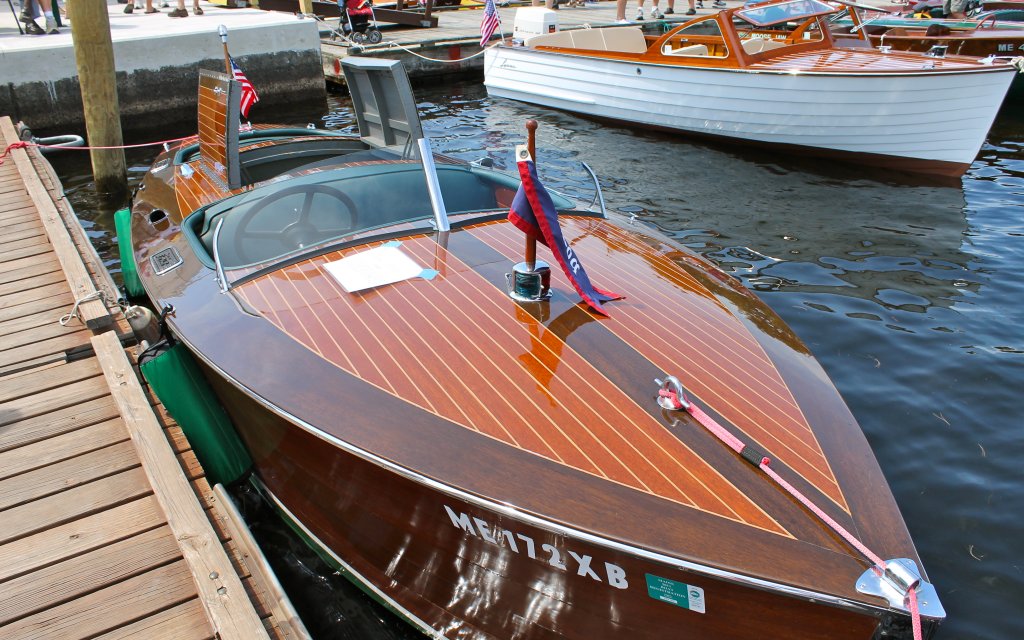
White drafting striping tape would work if you can find it in the right width and not so thick as to leave an out-of-scale edge. Otherwise, paint works fine, so long as you use 3M Fine Line tape to ensure a crisp neat separation line. I'd suggest you look at some similar boats and get a feel for the actual color of the stopping (it's "stopping," not "caulking." "Caulking" is what you do when oakum or cotton is hammered between carvel seams... or goop is squeezed out of a tube on your leaking bathtub enclosure.) Stopping is essentially putty or tar that is placed on top of oakum or cotton caulking material to protect it from the elements.
The white stopping was traditionally white lead putty, which sometimes has an off-white cast and will yellow with age, although modern stopping compounds are sometimes more pure white and stay that way. In any event, when the foredecks are covered in eight or twelve coats of varnish, the "white" is going to show the color of the varnish on top of it and be more of a rather light tan than a "white." You should experiment with your "varnish" gloss finish and see if you can replicate the "look." The stopping is varnished over on the full-sized boats. They don't try to cut in the varnish around the stopping. They go for a smooth gloss finish over both the wood and the stopping.
Here are a few examples. (Uncredited photos from Google images.)
-
MicroMark has a center marker made of steel that runs about $18. https://www.micromark.com/mini-hand-tools/measuring-marking It's one of their on-sale loss-leaders right now. I think it's going for ten or fifteen bucks on sale. (Sorry, but I didn't save their latest email advertisement with the promo code on it.)
-
Concept-wise, how about a "Pinewood Derby boat:" instead of a Pinewood Derby car. You can google "pinewood derby" and find all about the Pinewood Derby, a model car equivalent of the old Soapbox Derbies. Kids love them. Simple wood kits of cars that run down an incline. It's a staple of Cub Scouting these days. It's become quite a little industry with kit sales and apparently somewhat lucrative for the kit sales companies. They way it works is that there are simple dimensional limitations, a five ounce weight limitation, and stock wheels. Beyond that, it's up to the kid to make a car out of it. Prizes are for the fastest down the incline and for the best decorated and so on. It might be duplicated with boats using a pond and a big fan.
-
At the end of his spectacular build log on the cutter Cheerful, I asked Chuck Passaro a similar question the other day about the anchor buoys on his model being stowed well above deck lashed to the forward shrouds with the buoys' pendants and tag lines, rolled up in a "circular" fashion ("like a cowboy's lariat.") https://modelshipworld.com/index.php?/topic/8131-hm-cutter-cheerful-1806-148-scale-by-chuck/&page=36 It didn't look shipshape to this sailor's eye. Why would they go to the trouble to lash them so high? Why weren't the coiled pendants and tag lines hanging straight down like a coil on a pinrail? Why would they not stow them below unless they were to be deployed presently, in which case why wouldn't they simply be laying on deck? (This wasn't intended as a criticism of Chuck's great work, mind you, I just couldn't figure it out and presumed he knew the answer because he did it that way.)
Chuck answered that he'd noticed the same thing and had the same questions, but had no answer for me, explaining that his model was based on two contemporary models in the NMM, one recognized for the accuracy of its rigging, so he opted not to deviate from the prototype model which, arguably, is the more prudent course. That said, however, I think we should always be suspicious of questionable details in plans and contemporary models because the degree of their accuracy can always vary a bit, if not a lot in some instances. One of the attractive features of modeling ships is that we can produce something which is not only beautiful, but also of some historical value to future generations if we do the job well. That job includes the historical background research, as such may be possible, as well as the modeling techniques. While I don't stay awake nights worrying about it, I have this recurring thought that in some dystopian future, an archaeologist is going to find the last extant Santa Maria model, built from a kit pirated by some Chinese copyright violator, and it will end up in a museum, exhibited as "an accurate contemporary model of the ship Columbus sailed to discover the Americas."
I'm reminded of David MacAulay's classic Motel of the Mysteries (1979,) a great piece of illustrated satirical fiction set in the year 4022. It seems that back in 1985 "an accidental reduction in postal rates" quickly buried most of a country known as Usa under several feet of junk mail. Then a daring explorer named Howard Carson, who in the illustrations looks like someone from the 1930s, falls down a hole and thereby discovers something called a motel. In one of its rooms he finds two skeletons, one on a bed and the other in a bathtub, except that Carson thinks he has discovered an ancient crypt and that one body lies on the Ceremonial Platform and the other in a "highly polished white sarcophagus." To him, the toilet is the Sacred Urn, the television is the Great Altar, the remote control is the Sacred Communicator and a bra strewn across a piece of furniture is a "ceremonial chest plate." https://www.amazon.com/s/?ie=UTF8&keywords=motel+of+mysteries&tag=mh0b-20&index=aps&hvadid=78615135635402&hvqmt=b&hvbmt=bb&hvdev=c&ref=pd_sl_6wy3pngoct_b
"Contemporary" models and other sources are sometimes similarly inaccurate and more often so the farther back we reach in history. The more a modeler knows about actual naval architecture, shipbuilding and seamanship, with particular attention to the period with which they are working, the better their model will be. While model kits and internet practicums serve a valuable purpose and bring more immediate joy to many initially lacking in such background, the models they yield are sometimes consequently unreliable as historical records. Also, some modern modeling conventions in McLuhanesque fashion validate repeated inaccuracies, a few examples being out-out-of-scale copper hull sheathing plates with monster "rivets," hull and deck trunnels and plugs depicting a but a single fastening each frame, plank ends butted on frames instead with butt blocks, and, of course, the lack of spiling, unfair runs, and excess stealers in planking. Perhaps these inaccuracies may be excused as "artistic license" intended to merely "suggest" the prototype and no doubt are valuable for the satisfaction and enjoyment they provide, but that utility notwithstanding, they fall short as reliable historic records of a particular vessel or vessel type.
I commend the original poster's intellectual curiosity about rigging details and nautical nomenclature and his courageous admission that he "isn't fluent in the language.". That is what makes great models! I urge him to continue in his pursuit of accuracy. I'm also impressed, and educated, by those who are able to provide valuable criticism of certain contemporary published authorities. Not every modeler is an experienced traditional shipwright, rigger, or seaman. All of us must rely on academic research to address vessels which became extinct centuries before we were born and the sort of "peer review" here provided is invaluable. Just because a book was written a long time ago doesn't mean it's contents are particularly reliable.
When faced with the questions posed in this thread, it is good to remember the nautical maxim, "Different ships, different long splices." I'd hazard to guess that the vessels built to every Admiralty dockyard model and every builder's draught were modified many times over in the translation from the model or draught to the lofting floor to the stocks and finally at every change of command and certainly every refit. The British captains, if the literature is any indication, were famous for bringing their own idiosyncratic rigging arrangements aboard with them when they took command. It's hard to contemplate that a model built two or three hundred years ago hasn't over time been damaged, repaired, and rerigged a time or three, perhaps centuries after it was built. Just because a model is old doesn't mean it's accurate, either. When faced with "the lesser of two weevils," as Jack Aubrey might say, the present day modeler should know his subject well enough to resolve the ambiguities of detail they encounter with confidence in their command of their subject matter. None of us know it all and it is always best to ask when we don't instead of just "faking it." Well done, Bluto! Your question has given us all the opportunity to learned a bit more, even if it is "all Greek" to most mere mortals.
-
21 hours ago, Chuck said:
Thank you very much.
If we could only go back in time and ask them!!! But as model builders of boats from this era we can only guess. Sometimes more questions than answers. I do not know the answer to that question, but it must have seemed practical at the time. That set up was copied from two contemporary models one of which is known for its original rigging. I wondered the same thing when I saw that the first time.
Aha! Well, if the intent was to replicate an historic contemporary model, then it's all as it should be. We are between the devil and the deep blue sea when it comes to deciding whether to go our own way or not in such instances. It calls to mind a retrospectively humorous dust-up (one of many) between a well-known historian and curator of a certain maritime museum and its government administrators who, knew little or nothing about ships and the sea, their last job having been cataloging Indian pottery shards in the Southwest or some such. The administration decided to exhibit a certain very old and highly detailed model over the curator's strenuous objection that there were numerous errors in the model which rendered it historically inaccurate. The administrators overruled his objections, finding that "Even the errors, if such they be, are part of the historic fabric of the artifact and it will therefore be exhibited in its original state." Of course, few who saw the model really would have ever known the difference.
I recently saw a beautifully executed HO scale layout of an historic railroad yard and rail-ferry dock in a museum exhibit. It portrayed the area in the town where the museum was as of 1889. There were, however, three or four small boats in the waters off the piers depicting some people fishing. Each had a nicely modeled outboard motor on the stern!
It may have been Howard Chapelle... I can't be sure, but it sounds like something he'd say... who cautioned against less that the highest standards of research in modeling known vessels and vessel types, noting that we never know if our model might, by chance if nothing else, survive for a few hundred years and then be the only existing historical record of its type. For that reason, we owe it to future generations to do our best.
Nobody can argue with a fine model of a fine model, though!

- paulsutcliffe, mtaylor and Canute
-
3
-
Strikingly impeccable workmanship! It's a joy to behold. People seem to be effusive in their praise on this forum, which is nice, but not always as deserved as the praise for this masterpiece. Well played, Sir!
May I ask a question about the anchor buoys. I can understand that they might be stowed temporarily on the shrouds when jilling about the harbor to deliver messages, personnel, and the like, because the anchors were weighed and will soon be set again, but why so high up on the shrouds? Why didn't they simply tie them off at deck level? When at sea, I'd think they'd send them below to minimize windage aloft and do the same in action to reduce the amount of potential shrapnel that might result if struck.
Similarly, why are the buoy rodes and pendants so far up on the shrouds and not stowed separately to be lashed on when the buoy is used? Why did they carry them way the heck up there so somebody would have to climb the ratlines and carry them up and down? I'm also curious as to why the buoy rodes and pendants are depicted as coiled in a circle like a cowboy's lariat, one much higher than the other, which would indicate extremely hard-laid line. Why did the line not simply lay as do softer laid falls on a pinrail?
I've done some time sailing in vessels with similar rigs and my share of full-size traditional rigging, so I'm looking at it with a "sailor's eye." I'm sure you've researched it fully, so I expect it's correct, but it's new to me and I'm curious about what seems to be a convention in modeling vessels of this period with which I have no experience and don't understand.
-
There aren't too many tools you can enjoy without even using them, are there?
- Canute, Chuck, keelhauled and 3 others
-
6
-
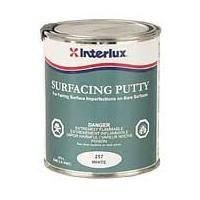
Interlux and probably other marine paint manufacturers make "surfacing putty" or "glazing putty" (not for window panes!) used to fair surfaces when finishing topsides and other gloss surfaces. It's much like drywall plaster, but is oil based (thins with acetone) and dries hard rather quickly. It is made to sand easily, but has a very fine grain. It's softer than the wood, so you don't get an uneven surface when sanding. It will go off in the can (keep the top on at all times except when taking some out,) but is easily "rejuvenated" by simply putting a small bit of acetone on top of the thickened putty and storing the can "top down." (The acetone evaporates very quickly.) Overnight, the putty will evenly reabsorb the acetone solvent and return to a thinner consistency. A pint can will last you practically forever. It's an industry standard. I use it on full sized and model boats alike.
-
Definitely "cut as you go." A bandsaw with a decent re-sawing blade will save an awful lot of what would otherwise be turned into sawdust on a table saw unless you are using an expensive veneer blade, and even then, you will be able to cut much wider stock on the bandsaw. It may be obvious to many, I'm not sure, but the grain needs to be taken into consideration when milling stock. There's a lot of difference between a vertical grain plank and a flat-sawn plank in terms of how each bends, tends to split, and so on.
- druxey, Seventynet, Canute and 1 other
-
4
-
I worked with a master boatbuilder planking and decking a 34' sharpie with AYC years ago. It was great to work with. I took a bundle of offcuts home to my shop with a mind to use it for modeling. It's been "seasoning" for about fifteen or twenty years now. I guess it's ready to use by now. LOL
-
-
Been there, done that, got the tee shirt. I'd say working on full size wooden boats versus models is a lot like working with large and small lathes. If you are familiar with traditional full size wooden boat construction, you can build a model pretty easily. On the other hand, if you are an experienced model builder, you'd probably have a lot of learning to do along the way in building full size. As mentioned, it mainly has to do with the engineering aspects of assembly. That and the fact that once one reaches "a certain age," they've still got some models left in them, but building full size is an athletic exercise that we grow out of.
- mtaylor, Canute and Bare_Koala
-
3
-
2 hours ago, michael mott said:
I would just add use the appropriate tool for the job. precision drawing and measuring requires precision tools.
Michael
Amen to that! The difference between cheap measuring and drawing instruments and not-so-cheap ones is like the difference between a cheap "toy quality" modeling table saw and one of Mr. Byrnes' precision saws. The thing about precision drafting instruments, though, is that they aren't making them anymore. The labor costs for handwork to produce precision instruments has made the quality instruments too expensive to make for a market that is now infatuated with CAD technology. It's a matter of getting 'em while you still can in a used market where collectors are snatching up whatever they can and "users" are getting harder to come by as time goes on. Quality drafting instruments will hold their value, if not increase, in the future.
-
12 hours ago, puckotred said:
I have no use for this and hardly know what it is for but I REALLY REALLY need this set...
Buy one and you'll find a use for it. It's got pens for India inking drawings and a large dividers and a small dividers and a couple of small compasses and a big one with an extension bar. Track "drafting" on eBay and they come up now and again. Look closely and make sure it's a complete set, though. A lot of times the parts have gone missing. The set pictured is actually missing it's "horn center." The horn center is a penny-sized round metal piece with three small points on the bottom and a piece of transparent horn material in the center. It is for placing on top of a point on a drawing that is used a lot to place a divider or compass point. The horn center thus prevents a hole from being worn in the drawing from the point placements. They are almost always missing from sets. The horn center would have set on top of the leather circle in the pictured cent.
-
46 minutes ago, Jim Rogers said:
No. A router bit moves two fast and just melts the acrylic. We tried and it was a mess.
Good to know! I almost tried it before asking. LOL
- Canute, mtaylor and thibaultron
-
3
-
Very informative and interesting! Would a 45 degree cone-shaped router bit in a router table do the same thing as the table saw blade set at 45 degrees?
- mtaylor, Canute and thibaultron
-
3
-
7 hours ago, el cid said:
There’s a reason compass leads are used in drafting, as opposed to just chucking a pencil on one leg. Compass leads aren’t sharpened to a conical point like a pencil, they’re sharpened to a bevel. That way as the lead dulls, the diameter of the circle (or arc) doesn’t decrease too (as measured at the inner edge of the line). Hard to picture in the mind’s eye, but I suspect if one could find an old drafting textbook, this would be better explained and illustrated.
Cheers all,
Keith
Precisely why a pencil compass will never be as accurate as a lead-holding compass. Perhaps more simply put, as the pencil lead wears down, the "pencil leg" of the compass gets shorter, thereby reducing the radius of the circle drawn by the compass. It may initially be a minor variance, but enough to be significant. The same thing happens with a lead in a lead holder, particularly when the compass lead is sharpened on sandpaper, and so the compass must be reset after sharpening in any event. A conical pencil point will wear more quickly than the angle presented by a sharpened compass lead, though, and as either point wears, the line drawn widens, which creates even greater chance of measuring errors. These problems are very familiar to anyone familiar with lofting lines for full sized boatbuilding from plans drawn at a smaller scale, and is indeed why lofting full size is necessary when building vessels, rather than simply taking the dimensions off the plans.
-
16 hours ago, JerseyCity Frankie said:
...but I am fed up with proprietary lead-holder compasss, as I said. I find them to be too much trouble. You are right though, I should admit defeat and just live with the necessity of stocking a tiny transparent tube of rediculous short bits of lead. But I feel it shouldn't be a daunting engineering challenge to fix a pencil to a compass frame, after placing men on the moon I think we can handle that much.
Would LOVE a K&E proportional divider but they are very dear on eBay. A quick glance shows them at $95. to $200. , too expensive for a cheapo like me.
Come on now, Shipmate! "Proprietary lead?" Naw. The good compasses use standard 2 MM drafting lead, the same as used in mechanical drafting pencils. Buy them at any art or stationery store. Many are supplied new with little cartouches that hold a few leads and, in the good quality sets, some extra points, but the lead is sold in tubes containing lead about six inches long. A compass should use hard lead (H2 at least,) which is going to last a long time, so you won't be having to add new lead very often. I'm sure you can live with that!
There are pretty good "carpenters' compasses" that will hold a pencil, but you'll pay the same, if not more, for a new one of those than you will for a used good quality drafting instrument and you will never, ever, get the same accuracy out of any sort of pencil in a compass. When working to small scales, that can make a big difference.
Don't give up on that proportional divider. Because they are getting scarce, it seems the Indian scrap metal recycling and knock-off industry is flooding the market with "solid brass" ones. There is no such thing as a decent "solid brass" proportional divider, so ignore those, but keep an eye on "proportional dividers" and "drafting" on eBay and I'm sure you'll find one that fits your pocketbook. Below is a decent one currently offered at a "buy it now" price of $35.00. It's a good quality Dietzgen proportional divider. It doesn't have rack and pinion adjustment, it isn't decimally scaled, and it's a six inch model, or so it appears, but it is German silver and hand fitted. You will have scaled settings for "lines" that will list common fractions and you can estimate from there for odd-ball proportions, or draw fixed distance lines in each scale and adjust the dividers by trial and error until one end matches one line and the other end matches the other line and you're good to go. This one is smaller, but perfectly good for modeling purposes, needs a bit of polishing (or not, depending upon your taste) and the outside of the case is scuffed up. For $35, it's still a good deal. Model Expo is selling the same size cheapo steel Tacro model for $99 and it is really junk.
I don't have any personal interest in this item. I'm just encouraging you to take the leap into a whole new level of tool-dom! The don't make tools this good anymore and probably never will again. We're talking "jewelry" here. Your grandkids will love to have it left to them (Or not.) LOL
-
Not to hurt your feelings, but you will never get the accuracy you are looking for (and deserve!) with instruments designed for use by high school geometry students. You need the same tools the draftsman who drew the plans with which you are working used to draw them. As with any other tool, you get what you pay for. Fortunately, thanks to manual drafting ("mechanical drawing") being replaced in the industry by CAD, there is quite a bit of high quality drafting and measuring tools available on eBay. (Admittedly, there used to be a lot more, but the collectors are like seagulls over a garbage barge.)
As you have learned from experience, the expense of fine drafting instruments is all about their rigidity and ability to "hold a set." The "joints" or "unions" of high quality instruments will not have to be reset all the time. Moreover, if you are only interested in drawing circles or marking arcs, you need a compass. Not one that holds a pencil, but one that holds a 2mm drawing lead, which is easily obtainable from art and stationary supply stores. (The difference is analogous to the difference between holding something in a collet and in a three jaw chuck.) These leads are easily kept razor sharp with a swipe on a flat piece of sandpaper. If you want to transfer measurements, you need a pair of dividers. A compass will do the same, but the dividers will not mark up your plans with pencil marks when in use and will be easier to use accurately. The high quality dividers (as pictured below) have hairspring adjustments. (You set the measure by spreading the legs. The hairspring adjustment "fine tunes" the point thereafter so that the setting can be absolutely perfect. (Important in scaling, where one can "split the line" when placing a point because, at full scale, the drawn line on the plans could be a half inch wide! That makes a big difference when taking off a vessel's lines to construct a table of offsets.)
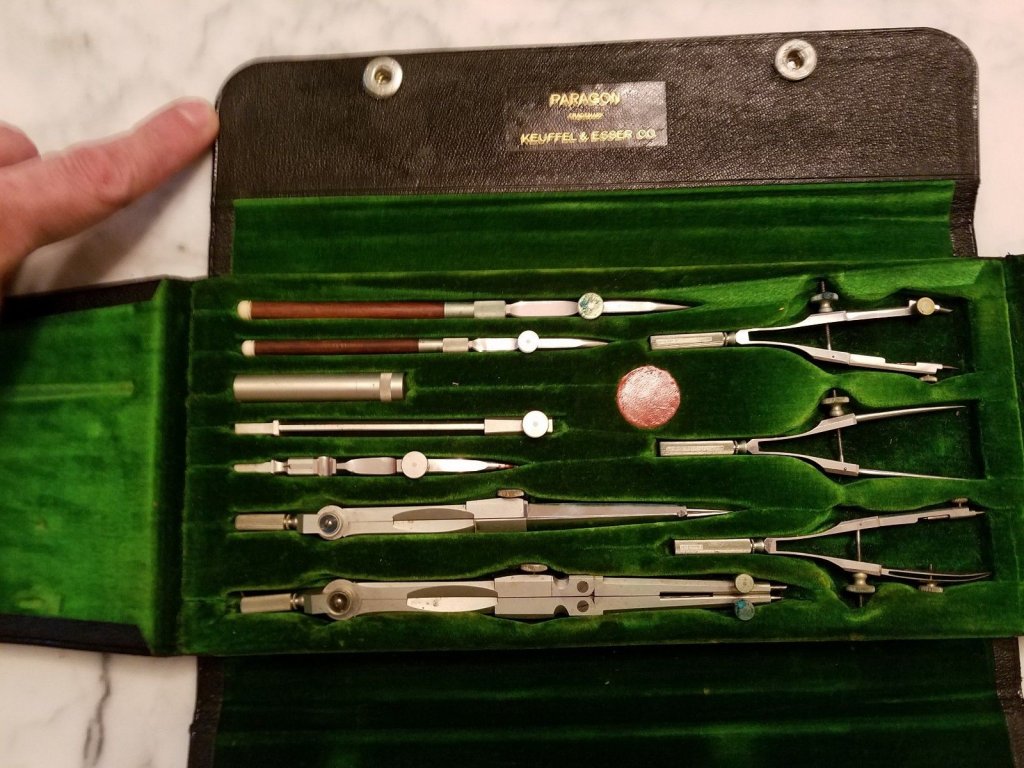
If you are working with different scales, you will find a pair of proportional dividers invaluable. (Keuffel and Esser's Paragon 10" model pictured top below.) These come in various sizes. (The 10" ones are preferable, as are all with rack and pinion setting.) The best are those which are scaled decimally, so that the proportion expressed as a decimal can be set exactly. (The pair below have Vernier scaling feature allowing for proportions set to .005) When a distance is set on one side of the proportional dividers, the proportionate distance, as desired and set, will be readable from the opposite set of points. (It can also be used as a regular divider, obviously, but is less convenient than using a regular divider.)
The lower picture is of a set of Keuffel and Esser Paragon drafting instruments, known as a "three bow set," having a basic selection of dividers and compasses and ruling pens. "Paragon" designated K&E's top-of-the line instruments, all hand-fitted of German silver (a nickel and copper alloy, also called "nickel silver.") They are generally considered the finest drafting instruments ever sold by a US vendor. (Dietzgen, the other US top-quality vendor's top line was their "Gem Union" instruments.) Other fine quality brands are Aarau Kern, Bowen, Alteneder, and Charles Bruning. All of the worthwhile instruments (and all of junk, as well) will be made in Germany or Switzerland. Most of the top vendors will have "lines" that range from "student" to "apprentice," to "professional," and usually an additional "finestkind" line, like K&E's "Paragon" and Dietzgen's "Gem Union."
The Keuffel and Esser and Dietzgen catalogs are on line and can be googled. (https://books.google.com/books?id=P1gZAQAAIAAJ&pg=PA63&lpg=PA63&dq=three+legged+divider&source=bl&ots=PY4vqrKjTl&sig=lNmQcCSIBxrsoATGVrhgzG8FJGM&hl=en&sa=X&ei=MRltVK2YHIqaigLF3oGICw#v=onepage&q=three legged divider&f=false)These are full of information on the products they offered and their ranges of quality. You don't need the "top of the line" for modeling, but a good "professional" quality set, or even just a pair of dividers and a compass from a good quality set, will serve. The collector's market is looking for pristine "mint quality" sets with all the instruments present. There are many partial sets with missing instruments, or instruments singly, that are offered on eBay at a fraction of the cost of a "perfect" set. Look under "drafting," and you should be able to find something suitable. A pair of "Paragon" proportional dividers as pictured below will go for between $50 and $200, depending on the condition of the case, or lack of a case, and the instrument's condition. (A bit of tarnishing isn't going to affect the performance of the instrument at all.) A full "three bow" Paragon drafting set as pictured will probably run between $150 and $300, assuming the case is in decent condition and all the instruments are there. If the case is trashed, the felt faded and worn, the case grippers shot, an instrument or three are missing (like ruling pens, which you might not need,) and the like, two or three bows, a pair of dividers, and a of compass with leg extensions, which may be a bit tarnished and the steel threads a bit rusted, might be had for as little as $25.00. Like anything on eBay, you have to know what you are looking at and be willing to wait.
Bottom line, "dime store" student compasses are never be satisfactory for serious use. If you find the prices high even for the used stuff on eBay, just remember that the price of a Paragon "three bow" set as pictured below (that one sold recently for about $235) when new cost about $750 in today's money. These were and are serious technical instruments. Few of us would ever have been able to afford to purchase them for hobby use until CAD made them obsolete in most of industry. Instruments of this quality are no longer made, (the labor cost of hand-fitting is prohibitive today,) so they are likely to only increase in value over time.
Serious modelers beware! Collecting drafting instruments, many, if not most, of which are invaluable additions to a modeler's shipyard tool kit, is highly addicitive!

- Peter Bloemendaal, jud, mtaylor and 2 others
-
5
-
10 minutes ago, CDW said:
I would say that if a modeler used a 3D CAD program to design his/her model, then printed it on their 3D printer, most definitely that would be scratch building. Hands down.
I'd agree wholeheartedly. I'm just wondering if modeling judges will disqualify "scratchbuilt" models with 3D printed parts once somebody finds a way to sell a wide range of download-able (and easily infinitely scalable) 3D parts printing programs. A catalogue of every part imaginable, downloadable in CAD format from the internet, would not be all that difficult to create. (And might be a nice retirement income enterprise for some CAD-savvy forumite!)
- thibaultron, Canute, lmagna and 1 other
-
4

French 74-gun ship by matiz - scale 1:56 - Tiziano Mainardi
in - Build logs for subjects built 1751 - 1800
Posted
Thanks much, Matiz! That's what I figured. It must be tedious splitting off all those hundreds of wedges, but they really look great. I enjoy your log very much. There's a lot to learn in it.