


Bob Cleek
-
Posts
3,374 -
Joined
-
Last visited
Content Type
Profiles
Forums
Gallery
Events
Posts posted by Bob Cleek
-
-
-
A trick I learned from a professional picture framer was to chuck one of the small finishing nails used for the corners of picture frames into an "egg beater" hand drill and use that to drill the pilot hole. A finish nail of the same size fits perfectly into the drilled pilot hole. It's counterintuitive. You'd think the nail wouldn't be tight in the pilot hole, but it works well.
-
Trucolor model paints, made in Phoenix, AZ, are somewhat new on the scene. I saw somewhere that their "business model" was to product an oil-based line of model paints to replace the old tried and true Floquil colors that everybody loved. They seem focused for the moment on railroad, automotive, and military models, but they have scads of colors and finishes (high glosses to matts.) Here's their website: http://trucolorpaint.com/
Has anybody used these paints as yet?
If they really have recreated the old Floquil paints, sign me up!
-
-
Airbrushes are the best way to go for the "wide open spaces," even assuming you are an experienced hand-painter, because building up coverage goes much faster, as does drying time overall. There's usually no problem in returning to cover a light patch along the way with an air brush or to go continuously "round and round" a hull until the job is done, all at one go. With bristle brushes, you have to wait for the coat to dry completely before going over it with another brushed coat or you risk brush strokes, "curtains," "drips," and "sags." To do a brush job properly, the paint must be conditioned to the point where several, if not many, coats will be required to finally get enough paint on the piece and in a manner which avoids application defects. And, while less of a problem on the small areas of a model than on full sized jobs, the risk of "holidays" (missed or thinly covered areas) is far less with a spray rig. On the other hand, masking is a more exacting and time consuming exercise for air brushing because, while the tendency for paint to flow under the tape is much less with the air brush, the slightest flaw in the masking process is almost certain to cause an overspray near the masked interface that will have to be repaired.
Brushing generally requires masking as well (use 3M "fine line" tape) if one wants a perfect edge, and more time and coats, besides a greater knowledge (acquired through trial and error, usually) of proper "conditioning" (thinning and adding driers or retarders to the coatings.)
Sometimes, there are places that simply can't be, or don't warrant, the complication of masking, and that is where free-hand brushing, which really separates the men from the boys, comes into its own.
The coating type also enters into the equation. Acrylics can be more difficult to condition for spraying than oil-based enamels. (Use denatured alcohol as a thinner or Flood's Flotrol, depending upon what solvent is compatible.) Thinning acrylics with water is a bad option because it takes water a long time to dry and when applied without out an oil or shellac sealer, will often raise the grain of the wood when applied. Oil based coatings, applied properly and competently will always yield a better looking, and often easier to apply, final finish, but I think it's easier for an inexperienced painter to get a moderately acceptable finish with acrylics on their first try than with oil based paints. As with all things, experience begins when you start.
The accomplished painter choses his weapons from the entire spectrum of tools available to suit both his personal preferences and the circumstances of the job.
- vaddoc, Canute, Ryland Craze and 1 other
-
 4
4
-
Just a possibly redundant safety note: Real tung oil (Which should be clearly disclosed on the container, rather than "tung oil finish," which can be darn near anything, is basically "Chinese linseed oil." "Linseed oil" is also known as and sold as "flax seed oil," often in health food stores (and for a lot less than "raw linseed oil" in paint stores.) Tung oil, a common component of varnish, like linseed oil, once a common component of paint, when "drying," or "curing," can cause oil-soaked rags to spontaneously combust. Everybody seemed to know this in the days before water-based coatings became popular. I've had younger people look skeptical when this is explained to them. Back in the day, a lot of shop fires were caused by oily paint rags left lying around or just tossed in the trash can.
All rags and other material containing tung, and linseed oil, or any wet solvent, should be carefully disposed of by hanging outside spread in the cooling open air away from where fire might spread and cause damage, or better yet, submerged in a water-filled covered metal container and left to "cure" in the water before final disposal. An oily rag or paper towel balled up and tossed aside can burst into flames without warning long after you've left the shop.
A bit "preachy," I know, but it doesn't seem to be common knowledge to the extent it used to be.
- Rustyj, keelhauled, Canute and 6 others
-
9
-
The "netting" in the photo above is a good example of what is often encountered in kits: rigging that doesn't work. When examining it, "think like a sailor." What conceivable mechanical purpose could such a thing ever serve. At the end of the day, a single peak halyard would serve as well. There is no way to support weight distributed across the length of the spar from a single halyard unless there are blocks there which equalize the strain on the spar. It's obvious that people who draw plans like the one described know nothing about their subject, save perhaps their inaccurately copying a picture they saw in a book somewhere. Your "good eye" and common sense spotted this one straightaway.
-
Ditto on Micro-Mark's mediocre quality and high price point. Looking where you might not first think often turns up far better quality and far more reasonable prices. Jewelers' supply houses, medical and dental supply houses, watchmakers' tool outfits, even manicurists' and fly-tiers' supply places will always have something of interest. Micro-Mark now sells a six inch Tacro proportional divider for a hundred bucks or so. I bought one from them years ago for about half that price and, while serviceable, it's fit and finish is pretty much junk. Today, one can buy a seven and a half inch standard rack and pinion adjusting or ten inch top quality rack and pinion adjusting decimally-scaled set of proportional dividers with Vernier-adjusting to .005 made by Dietzgen, Keuffel and Esser, Bowen, or other makers of what were the finest instruments made in their day, in a velvet-lined hard case, for what Tacro's cheapo will cost, often considerably less, on eBay. The Micro-Mark catalog is a good place to discover that somebody is making something you didn't know existed before, but I've found them to sort of be the Harbor Freight of small tools. They do have some quality tools and materials, but at a high price. "Google is your friend." Odds are you may find the same quality product for considerably less elsewhere on line.
-
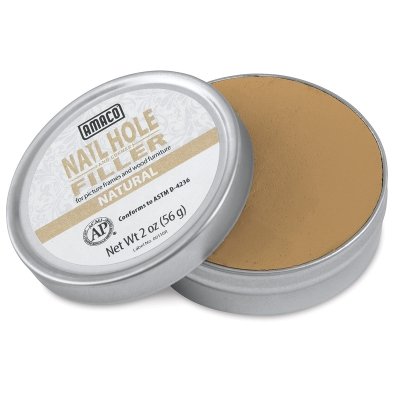
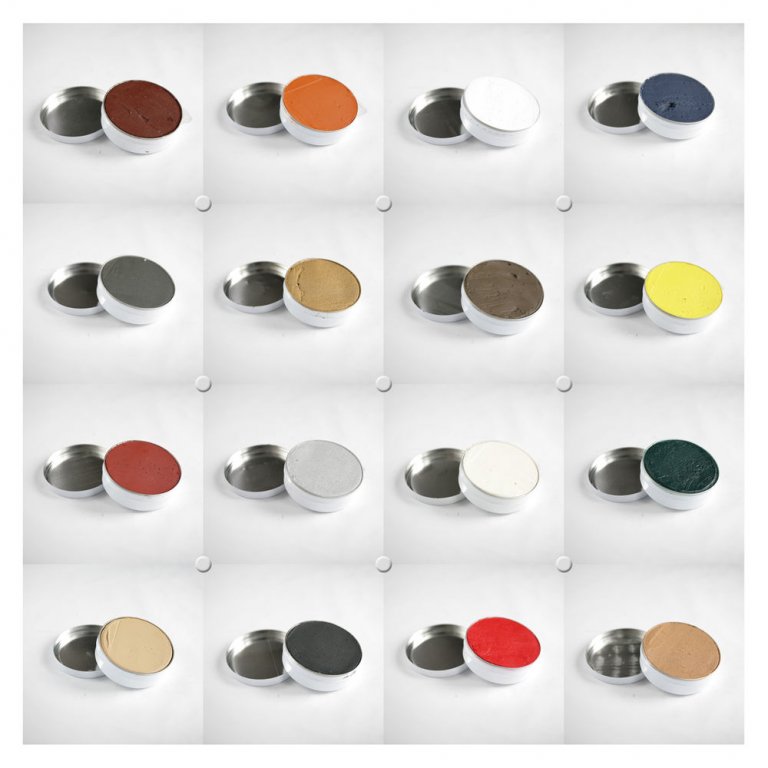
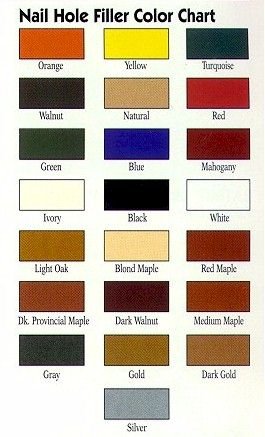
It can work well in some instances, depending upon the wood species. Some species aren't as amenable to absorbing wax as others. The color selection is somewhat limited, as well. The result is about the same as waxing after staining, but shoe polish is probably a lot less costly than "model" paints and stains. Similar wax-based colors can be sourced from fine cabinetmaking and furniture restoration catalogs. There is also a selection of wax-based filller (slightly creamier than Shinola and in every color of the rainbow) sold for covering nail holes and gaps in the miter joints in picture frames.
https://www.dickblick.com/products/amaco-nail-hole-and-corner-filler/
http://www.framingsupplies.com/PuttyFillers_amaco.htm
-
Having owned a smaller, but similarly rigged boat, a Laurent Giles Vertue, for many years, I'm quite familiar with the same infernal roller reefing gear you have so beautifully recreated on your model. Like most who have inherited the gear, I ultimately "bypassed" it and rigged slab reefing. I realize that you aren't going to be facing the full-scale challenges of the system and it is appropriate to, if not practically characteristic of the pilot cutter type, but I'll mention that the biggest problem with the roller reefing system is that it really requires at least two skilled crew to get it to work as intended. One crewman has to turn the crank while simultaneously lowering the throat and gaff peak halyards in coordination therewith, while the other has to tend the leech of the main, maintaining tension on the leech as it is rolled such that the sail rolls evenly on the boom without naturally creeping towards the gooseneck and making a dog's breakfast of rolling the canvas on the boom, and, unless there be three aboard, tend the helm with a foot at the same time! Some of the difficulty with all that can be minimized if the boom is tapered, with the larger diameter aft, so that it takes up the sail evenly, allowing for the greater length of the leech at the aft end and the shorter length of the luff at the narrower end of the boom. Without the taper of the boom accounting for the sail shape, the reef is rolled in, the end of the boom will droop progressively, ruining the set of the sail, even with the gaff peaked higher, and in some cases even to the point that the boom becomes so low as to foul deck fittings or, God forbid, the helmsman's head. Of course, the builder must give some thought (and arithmetic) to calculating the degree of taper so it matches the proportion of the luff and leech lengths. On some rolling booms which were not tapered, I've seen six or eight tapered battens fastened to the boom to create the taper necessary to accommodate the shape of the sail. Additionally, although reef points would seem superfluous with a roller reefing rig, some also install these, with reef points long enough to be tied around the boom and rolled sail, to avoid the inevitable stretching which quickly impairs the shape of sail as originally cut when it is routinely reefed over time. This is, of course, much less of a problem with modern synthetic sailcloth than it was with cotton canvas back in the day.
Still and all, it wouldn't be a pilot cutter without that roller reefing gooseneck fitting and a beautiful job of it you've done, to be sure!
-
On 11/5/2018 at 11:38 AM, No Idea said:
I thought that my wife would have a fit but she’s been the complete opposite. No doubt this will cost me many pairs of shoes as recompense but I’m fine with that. Wait till she finds out I want the thickness sander too!
Yes, I believe it is a common problem. Whenever I catch flak for buying "another tool you'll never use," I retort that, "At last count, there were more than forty pairs of shoes in your closet, most of which you will never use." And the fight is on!
I've found the best way to get away with tool purchases is to tell them that the tools were a great deal and will be worth far more when I croak than now. It's the greed that gets 'em every time.
-
Knowing a bit about the relevant history, albeit less scholarly-researched than you have done, I'd suspect that Grace O'Malley's "pirate fleet" was more along the lines of todays Somali pirates taking on oil tankers in the Horn of Africa than anything else. Their shore based territory was incredibly impoverished. I doubt there would be much trade to be had, given what was essentially a subsistence economy in western Ireland at the time. That much remained true into the 20th Century.
They were, however, a strongly maritime oriented culture, to be sure. It was not possible to inhabit the western coastal islands of Ireland, which were inhabited continuously at least from the Dark Ages forward, without vessels to support that. They were, however, relatively small coastal vessels, not large ocean-going ones. This is not to say they weren't seaworthy, though. They had to be, sailing from small and often unsheltered harbors on a lee shore. The rocky terrain did not support much in terms of timber, either for firewood or any large scale shipbuilding. The people relied upon peat dug from mainland bogs for fuel which had to be shipped to the islands from the mainland and from village to village along the shore. Hookers, some over 100 years old and still in service, carried peat to the islands until as recently as the late 1960's. Again until recent times, the traditional sailing craft fished, of course, and operated in the seaweed harvesting industry. The seaweed was an essential fertilizer for the poor soil of the region.
The framed, carvel planked Irish hookers and related types, all generally less than about 50 feet long, evolved to essentially their current form sometime prior to the mid-1700s, but historians are uncertain of their origins and can only speculate whether they were based on other craft or locally developed. The smallest hooker variant, the pucan, being distinguished from the others by rig only, notably carries a lateen mainsail. Other types of west coast Irish craft were skin-on-frame construction which has also continued to modern times. Oars were a significant means of propulsion and the term "galley" seems to have been a generic reference to any multi-oared naval vessel of the time.
It was not only the geographic isolation of the region that kept it out of the mainstream of larger shipbuilding technological development, but also the simple fact that there were locally no forests that might have supplied the timber needed to build the sort of large sea-going "galleys" you believe are described in historical references. Such vessels may have been captured, but it is unlikely that many vessels ventured into the western approaches of Ireland at the time (unless, as with the Armada survivors, fortune and the winds blew them off-course.) The fact was, the inhabitants of remote western Ireland had little if anything at all to export and no money to buy imported goods. A look even at the ports of modern Ireland illustrates how inhospitable the western coast of Ireland was and is. Once a vessel heading west clears Cork in the south ("Queensland" under British rule,) it may as well continue on to Boston or New York, for there's little to be had "around the corner."
You may wish to check out the Traditional Boats of Ireland Project and their great book, The Traditional Boats of Ireland, for further information on the subject. The Project may have information of interest to you concerning the earlier seafaring history of the western Irish coast. If you want to connect with Irish maritime historians, they are the place to go. (A "virtual museum" of Irish boats and c
ontact information on their website at: http://tradboats.ie/about.php)

- druxey, mtaylor, Louie da fly and 2 others
-
5
-
-
"He who dies with the most tools, wins!"
That said, as a recovering tool addict, there are some tool rules that will stand you in good stead.
1. Never buy a tool until you actually need it.
It's just too tempting to grab the "latest and greatest" just because you "might need it some day." The more you have, the harder it is to find the one you are looking for, anyway.
2. Always buy the best quality tool you can possibly afford at the time.
As the old saying goes, "A cheap tool costs twice as much when you have to buy another one." Besides, good tools can always be sold for decent money, sometimes even more than you paid for them, depending upon how long you've had them.
3, An old (hand) tool is often better than a new (hand) tool.
"They don't make 'em like they used to." is generally true.
4. Store your tools in a well-organized fashion and always return them to their place as soon as you are finished using them.
They will be easier to find and you will save an amazing amount of time looking around "where you last left it."
5. Never loan a tool.
Whether you borrow a tool if somebody will lend it to you is up to you. If somebody asks, your options are to politely decline or loan them one from your "junk drawer" that you won't mind never having returned!
- JpR62, Landlubber Mike, wefalck and 12 others
-
15
-
I recall reading once in a pre-WWII British ship modeling publication that a modeler had built his model with fine cloth sails that billowed perfectly. There was a picture and it was impressive. His technique, as described, was to set an electric fan behind his model such that the sails filled (I presume he made provision to prevent the model from sailing off the table top!) and then brushed on a soaking of highly thinned acetate in acetone. Working downwind of that evaporating acetone might have been hazardous to his health, not to mention the consequences of smoking while doing so, but all else considered, it certainly worked well. The acetone evaporated very quickly, while the sails were filled, leaving the acetate to stiffen the cloth. When the sails dried and the fan was turned off, the sails were permanently and authentically formed.
That was a long time ago and I've not heard of the technique since, but something similar might be worth a bit of experimentation modernly. I'd suggest using a variable speed fan and starting on "slow," unless, of course, you wanted to depict your clipper with her sails blown out by a squall in the Roaring Forties! (Come to think of it, that would sure be some spectacular model!)
-
On 10/14/2018 at 5:49 AM, druxey said:
A very well put-together video. Just don't set your planes down on their soles as the guy did with some near the end.
Oh, that'll sure get your hand slapped by the old timers! I'll bet at least three-quarters of those suburban weekend wood butchers who spend the big bucks on those Lie Nielsen planes lay them down on their soles.

-
All you need to do is use a thinner batten. The whole point of a fairing batten is to have a stick sufficiently stiff that it will bend in a fair curve when laid against the frames and/or planking. If there isn't a perfect faying surface between the stick and the hull, then there's a divot or a lump somewhere that needs to be built up or taken down. You can take a batten and rub carpenter's chalk on it and then rub it on the frame edges or planking. Where the chalk transfers to the frames or the planking surface is the "highs" and where it isn't are the "lows." Alternately, you can even glue sandpaper on your batten and then bend it across the frames or planking at various angles and lightly sand and you will end up with a fair hull with no lumps or bumps in the surface. There's no reason to soak a batten to get it to bend! Fairing battens are used dry. You don't want them to bend and stay put, by to bend and spring back.
-
I'd suggest you assemble your "backbone" (keel, stem, and sternpost) and your bulkheads/frames and make sure your bulkheads are perfectly straight and true. Then make yourself a "fid stick" (sometimes called a "fit stick,") which is simply a small piece of wood the same thickness as your planking. Place the fit stick against each bulkhead and slide it down until it hits the side of the keel, or wherever else your rabbet is going to be running and tick off a mark with a pencil. Where the inboard corner of the fit stick hits the keel is the top of your back rabbet. The outboard corner, once the rabbet is cut so the fit stick fits in the rabbet you will cut, is going to be your rabbet line. The fit stick should lay perfectly flat against the bulkhead and the back rabbet when the rabbet is cut.
If you make a small length of rabbet at each bulkhead with your fit stick(s), and then you draw a fair line between the rabbet lines with a batten, and cut the rest of the rabbet along those lines, you should have a perfect rabbet. As the back rabbet is a rolling angle dependent upon the shape of the hull above it, trying to mark a rabbet line from a plan is almost always a disaster. You have to "work from the boat," and not "from the plans" in a lot of instances. A rabbet is a three dimensional creature and all you've got are two dimensional plans. Without a fit stick, you are pretty much flying blind, whether a rabbet line is on the plans or not. Rabbet lines on plans are basically there to illustrate the extent of the planked surface and never the depth and angle of the rabbet itself, which is defined by 1) the thickness of the planking and 2) the angle at which the plank hangs as defined by the frame or bulkhead. If you have a station construction drawing that includes the rabbet, you will see how the shape of the rabbet is different at any point along its length.
Hope this helps.
- Boxbuilds, druxey, paulsutcliffe and 1 other
-
4
-
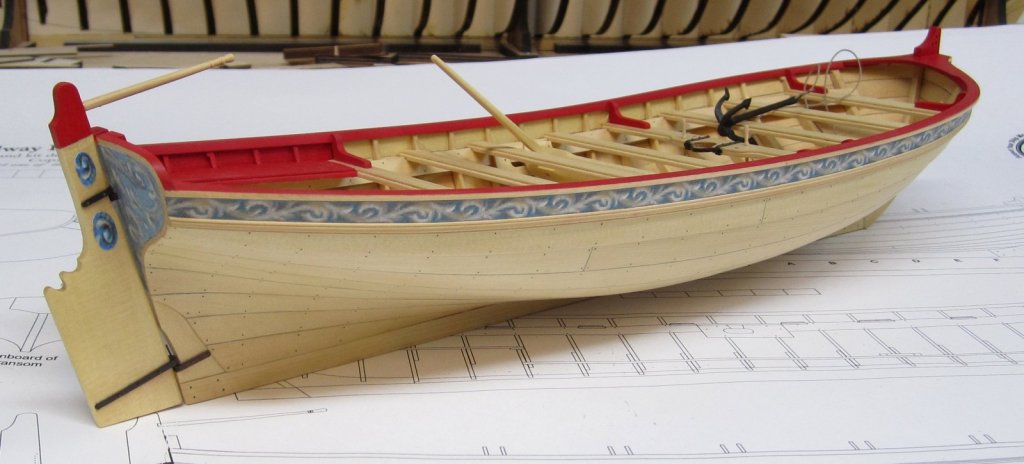
Based on the maxim that there's never anything on a boat that isn't there for a reason, while watching this interesting build, I've been scratching my head about what could be the reason, if any other than decorative, for the "squiggle" top edge of the rudder blade. It looks a bit like a shark in need of orthodontia took a bite out of it. It's seemingly too high to serve the purpose of aiding in boarding the boat from the water, although rudder shapes have been cut for the purpose, sometime with a hole to provide a foothold. Could it serve some purpose in handling anchor rodes or anchors which might be draped over the notches when an anchor was carried out for kedging? Or is it just some old time boatbuilder's version of a "racing stripe," or a signature detail like today's Nike "swoosh?"
"Enquiring minds want to know." Is there some period wonk here that knows the answer, if any answer exists?
-
The Luxo "draftsman's" lamps are superior to most "gooseneck" desk lamps because you have so much more range of motion and they are easier to position. They also extend above the table top much farther than most goosenecks, which is very useful for rigging work.
Also, if you can find one at a garage sale cheap, the old articulated magnifying lamps with the fluorescent loop light around the large magnifying lens are great for fine detail work.
-
Lessee... Rotary tools: I've got two of the old Dremel variable speed black stand-bys, one of the new grey ergonomic (7000 series?) ones mounted in a Vanda-Lay drill press, two of the rechargeable battery ones, and a Sears and a Horror Fright knock-off. I've also got a Foredom with collet and Phillips chuck hand pieces. One of the old corded Dremels and one of the rechargeable battery Dremels with sanding drums are used by my wife for manicuring her show dogs' nails. The Sears knock-off (my first many years ago) is half dead. The Horror Freight knock-off is too long and heavy to really do any fine work, but is entirely serviceable. It's my "loaner" on those rare occasions when I can't avoid loaning one to somebody I know well. The Dremels are well-made and reasonably priced, but they have their limitations for fine work. The rechargeable battery ones, while smaller and better for detail work, have limited power and, importantly, are no good for long running. If they are run too long, the battery contacts heat up and melt, so the battery is toast. If you are going to buy one anyway, make sure it's from somewhere that will take the burned out battery back with no questions asked.
You really do get what you pay for. I'd suggest:
1. Don't waste money on "kits" with a bunch of bits, wheels, and accessories, eighty percent of which you'll never use. Just get the bare bones tool and buy the bits and such that you need. Get a range of collet sizes. You'll find those handy.
2. As a rotary tool, the Dremel corded models are all fine for general work, but the flex cables and other attachments (often over-priced IMHO) aren't at all what they are cracked up to be.
3. Save up and buy a Foredom with a collet and a chuck hand piece. They aren't cheap, but they are readily marketable if you decide to sell it after a while. Better yet, find a decent used one. The foot pedal speed control and the Foredom flexible shaft, as well as its superior torque and top speed, put it light years ahead of the Dremels and their knock-offs. The Dremel is a "Magic Marker," while the Foredom is a fine-point Cross pen. I find many uses for my Dremels, particularly as cut-off tools, but if I knew then what I know now, I'd have spent the bucks for a Foredom from the git-go and been bucks ahead.
4. If you aren't sure you really need a rotary tool at this point, consider grabbing one of the Harbor Freight ones. They sell them for less than ten bucks or so and they are pretty much bulletproof unless you drop them and crack the body! Just remember to keep the receipt if you have to return it. That happens a lot with HF products, especially any of the ones with moving parts! Once you get one that passes your DIY "quality control" standards, they are decent enough to give you an idea of what use you might have for a rotary tool.
Also, American Science and Surplus has a Dremel clone and a Foredom clone for sale at a low price. https://www.sciplus.com/Tools-c/Rotary-Dremel-Tools-s Unlabeled, but I'd expect they are made by the Revolutionary People's Democratic Rotary Tool Collective, so I can't vouch for their quality or performance, though.
-
My bad. Carry on, Ed. If your work wasn't the masterful technical modeling tour d' force it is, I wouldn't have bothered commenting. Your patience is appreciated.
-
With a nod to Monty Python, "and now for something completely different..."
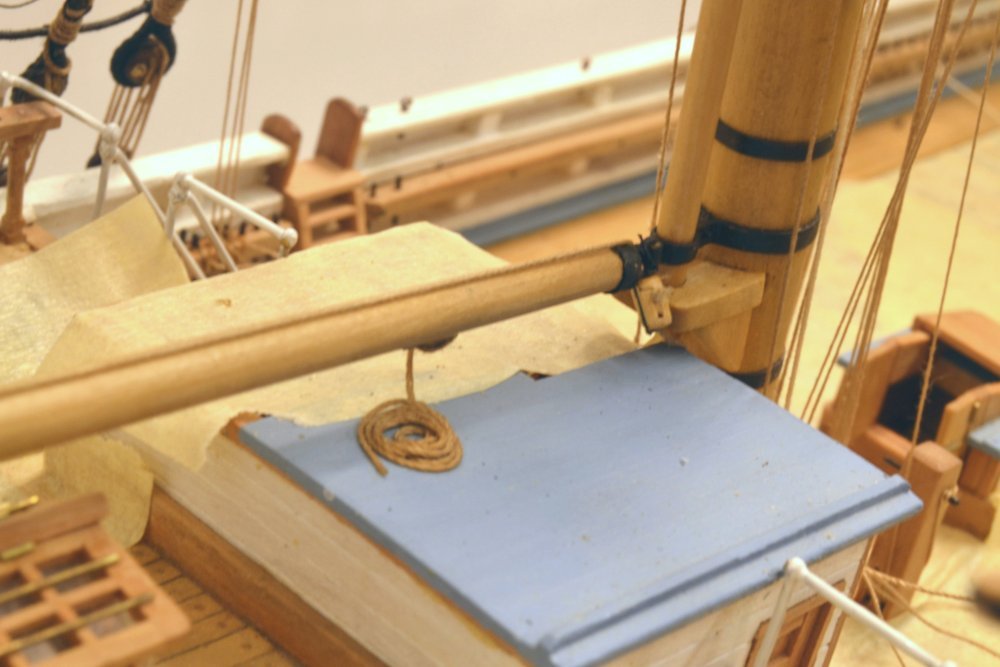
The sheets control the sweep of the boom. The boom is also fitted with an inhauler and outhauler that attach to the clew of the spanker sail. In the absence of sails, the outhauler is stopped at the gooseneck, runs aft over the boom to a sheave near the end, back under the boom to a cleat near the foot, with the remaining line coiled on the roof of the cabin. The line and boom sheave may be seen in the above photo and the inner end in the next.
I'm sure you've placed the spanker outhaul belaying cleat exactly where is shows it's supposed to be on the plans you are following. I'm simply curious if you might know why the cleat is placed on the boom so that it is over the cabin house where hauling it (the direction of the hauling would be forward when tightening the outhaul) would seem to put the seaman hauling it in a most inconvenient position, perched on top of the cabin. This would be particularly so where there is no purchase on the outhaul and tightening it would be done, on the wind at least, by letting the boom luff, and the cleat on the boom consequently swinging further forward over the cabin top, to port or starboard as the case might be, hauling in on the outhaul, belaying it, and then sheeting in the spanker boom? I would have expected the cleat to be on the boom directly above, or slightly aft of the leading edge of the skylight so a seaman could have his feet on the deck and really put his back into hauling the outhaul and belaying it.
Please understand it isn't my intent to pester you. I just find that there is much to learn from the way they rigged these clippers which were pretty much the highest stage of development of rigging technology. There's always a sound reason for everything they did on these vessels and there's so much to learn in discovering why the things we know they did were done.
-
Bob, I really wanted to get off of this.
You said:
My copy of Crothers' book has the forward end of the span fastened ahead of where the vector line of the pendant crosses the boom, of that I am sure. No matter, though.
With the span running through a block on the pendant, the vector of the pendant will always fall between the two legs of the span regardless of where the ends of the span are fixed.
Ed
Yep, I agree, Ed. We really have flogged the poodle on this one. However, "in the interests of full disclosure," you are absolutely correct. My bad. It's been a while since I got my "gentleman's C" in geometry, so I had to look it up. What I should have said is that the angles formed by the bridle legs running from the pendant blocks should be obtuse and not acute.
Crothers' running rigging diagram is what I meant. T'was I, as well as the angle, that was obtuse!
Beautifully executed work, Ed!
Sealer for solid hull
in Painting, finishing and weathering products and techniques
Posted · Edited by Bob Cleek
Jaager beat me to it and then some. Shellac is a great all purpose sealer and not a bad model finish for "bright work." It will yield a gloss finish if it's built up with multiple coats, but one or two coats will yield an excellent representation of varnish brightwork on models. I've never used anything but plain alcohol from the hardware store to thin it and that's worked fine. I buy it premixed in a can from the paint or hardware store. It may thicken in the can, but a bit of alcohol added brings it to whatever "cut" (thickness) you want. I love the way it is so easy to clean up brushes with alcohol, too. I save the alcohol I use form brush cleaning. (Alcohol evaporates very quickly, so you'll probably find you do a lot of thinning to keep the solution diluted like you want.) As the shellac builds up in the "first rinse" alcohol, it can be used for thinning thicker stock or for very light sealing. Shellac is also excellent for stiffening line coils and card stock. It should be considered an essential modeling material.