HOLIDAY DONATION DRIVE - SUPPORT MSW - DO YOUR PART TO KEEP THIS GREAT FORUM GOING! (Only 24 donations so far out of 49,000 members - C'mon guys!)
×

md1400cs
-
Posts
2,839 -
Joined
-
Last visited
Content Type
Profiles
Forums
Gallery
Events
Everything posted by md1400cs
-
 Peter, Thank you (:-). Glad to hear about your civil harmony Nice!! Yes, retirement will be a "new game, with new rules". Well you will be able to fly away at a moments notice, nice part of your career perks. Yes, the Wasa has become, especially after the museum opening, a very popular build. You may want to revisit a new build. ------------------------------- So you are a driver for one of the Star Alliance carriers. Good for you. I have, also, always loved aviation. I stopped flying after about 2000+hrs of flight time. Now the big joke in my family is; they tell me that now when I push a button in an airplane its to get an other drink (:-) I should be back to my real life very soon. I miss checking in at MSW. I will have a lot of catching up do. Looking forward to it. Curious, are you with (LX) SWISS? only Airbuses except for some Avros (the 340 is super nice). LH, is my only experiences with Star as a passenger. Nice but mid cabin seats are not yet all fleet consistent. Everything else, for me, has been with those that feed Asia, with SQ, NH and TG as my favs. UA is well UA (:-) PS: Are ATC still on strike over where you are? Regards, Michael
 -
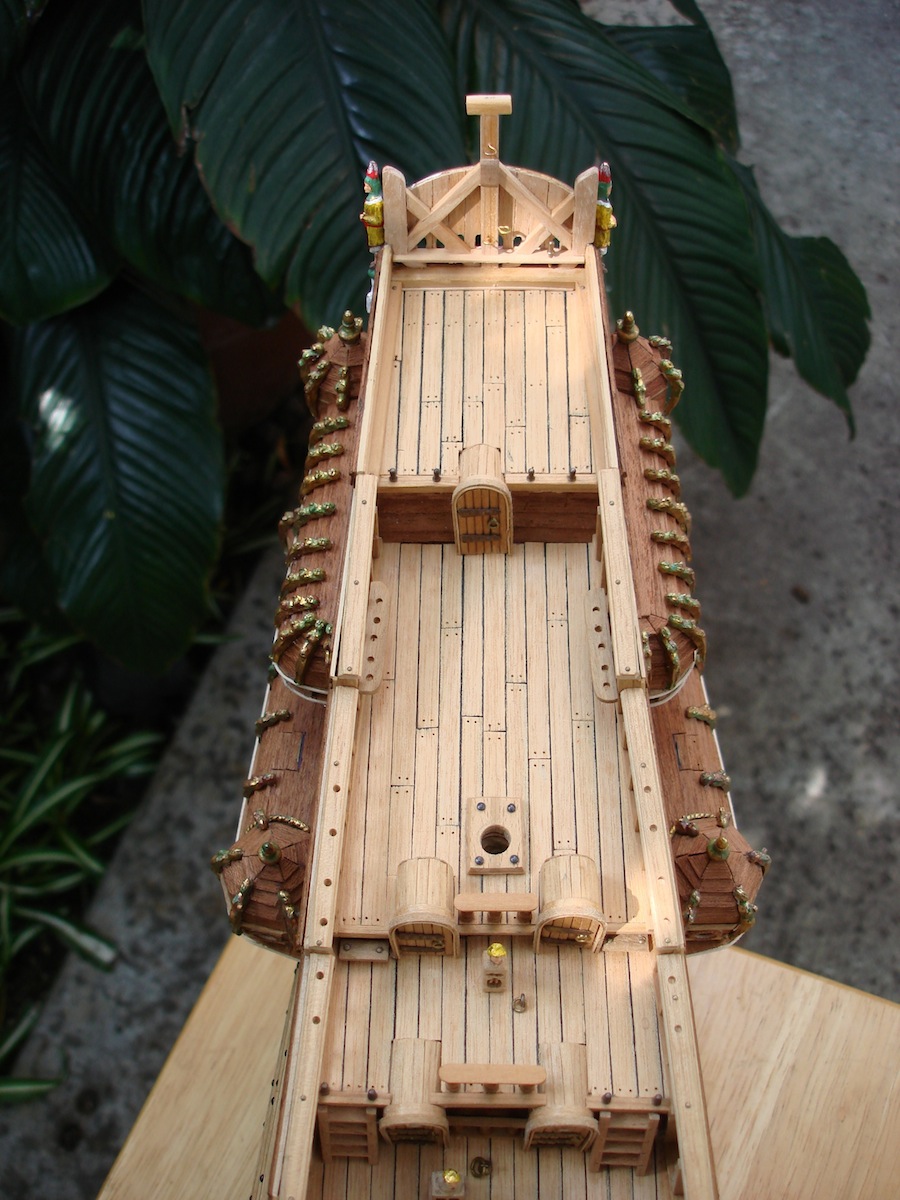
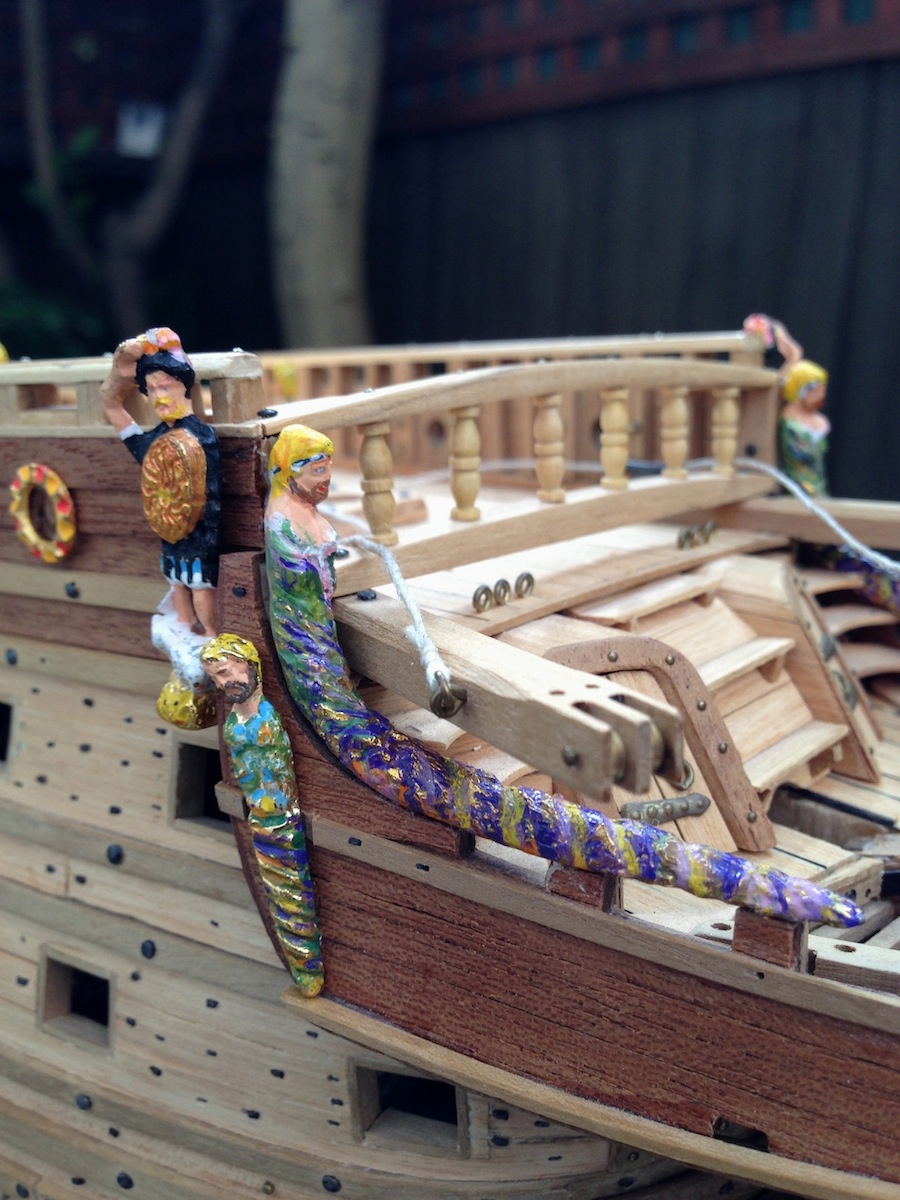
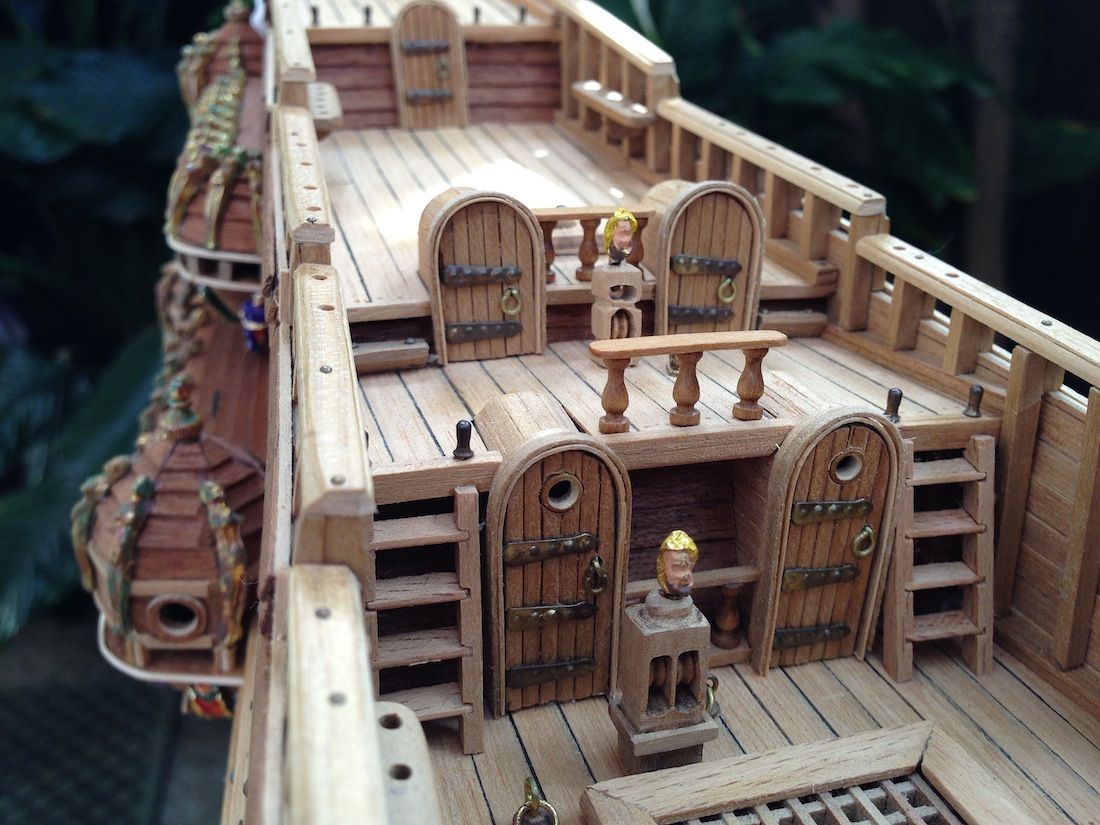
Guys, Peter, Andy, Buck, Mark, Ferit, B.E.,Matti, JanV, Andre Thanks for all of your really nice comments on how things are coming along. Much appreciated. Your comments really motivate me to try to always improve my skills as I read, and learn from MSW's great members and registered guests. The ship has been in dry dock, along with a forced labor strike for the last couple of weeks. I hope to resolve this "labor issue' within the next month or so. I'm just about ready to "go back to work" for this one overseas project I mentioned earlier. I hope to be away for less than 4 weeks. But, one never knows...I was scheduled to leave a week ago, but..... There has also been a sort of civilized civil war (oxymoron I know) here at the house. My wife thinks that I should not start travelling again. Especially on those 24hr+ long haul rides that are required. She thinks that I should put my music on, continue building my ship and send you folks the photos, and enjoy my single malts on the weekends (:-) Women are always right.... I do have mixed feelings, however I'm lucky that I travel with a lot of comfort (Star Alliance owes me!!.) And I also sometimes miss the "business game" if you will. This "bump" will resolve itself in due course. But I love retirement. OK enough of my personal ramblings...Sorry - got caught up in a way to vent. -------------------------------- Specifically regarding JanV's comment about now getting to the masts. I wish! I don't think I'm quite ready for that. When I return, I need to do the following first; •Cut hull water drains on both sides. Along with two large protruding drains near the stern •Holes for cannon ropes •Build, hinge and install cannon doors •Build and install deck cannons (each of the fourteen cannons will have a lot of added details) •Build and install ship mooring stays on both sides of the deck, with some within the deck railings •Re-build bow railing (stanchions are not correct) •Re-build stairs leading astern (wrong shapes) •Remove poop deck stairs and replace with those bench looking things I see in the 1:1 pics •Hull openings need to be cut and windows installed near the galleries on each side •Build and install ratline braces x6 •Paint bowsprit figures. I plan on adding slim vertical supports for each figure this time, as is shown on the 1:10th. I should have done the same for all of the stern figures as well. Too late. If I started installing masts it would be very difficult, given my workspace, to roll the ship on its sides. So my "to do list" is rather long. After I can go "vertical" Again I so thank all of you who have taken the time to view this build, and especially leave your super nice remarks. Thanks Regards, Michael
-
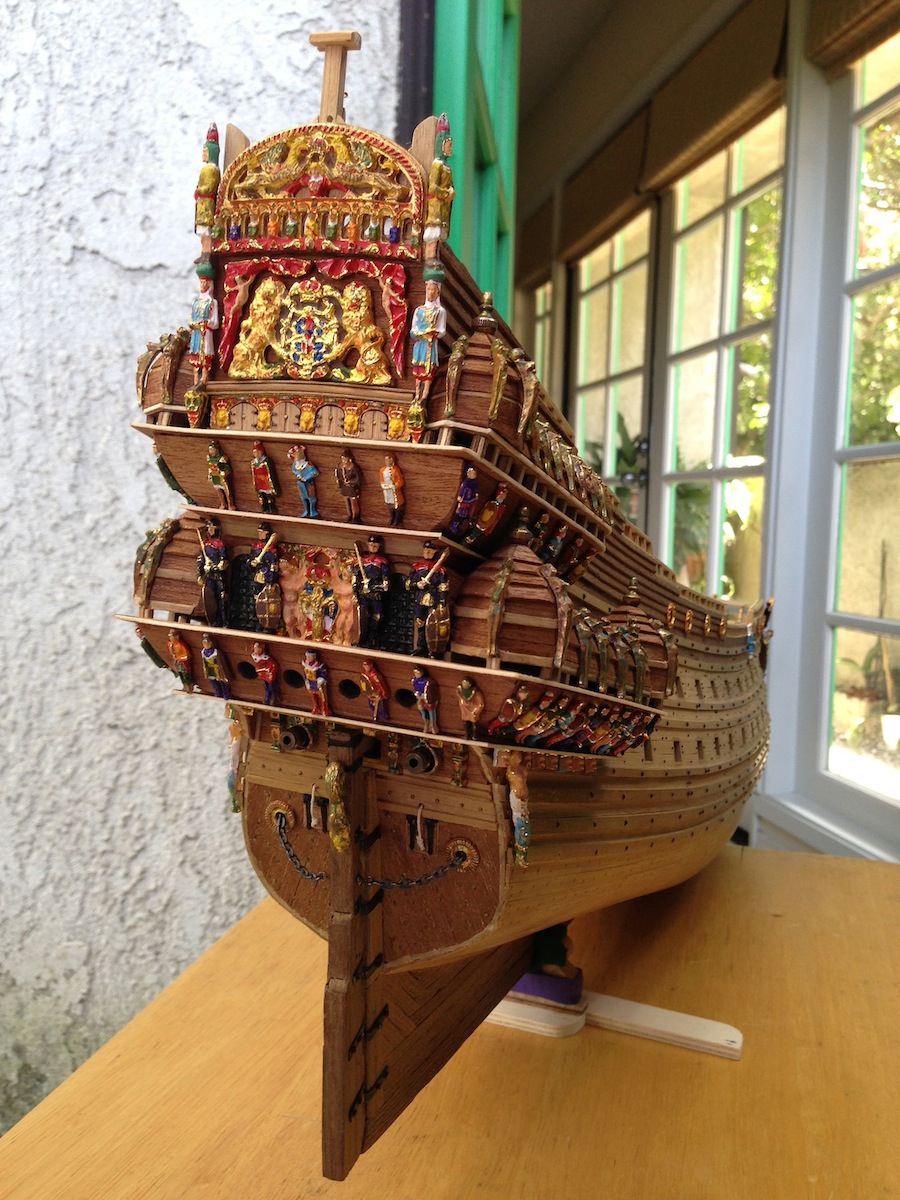
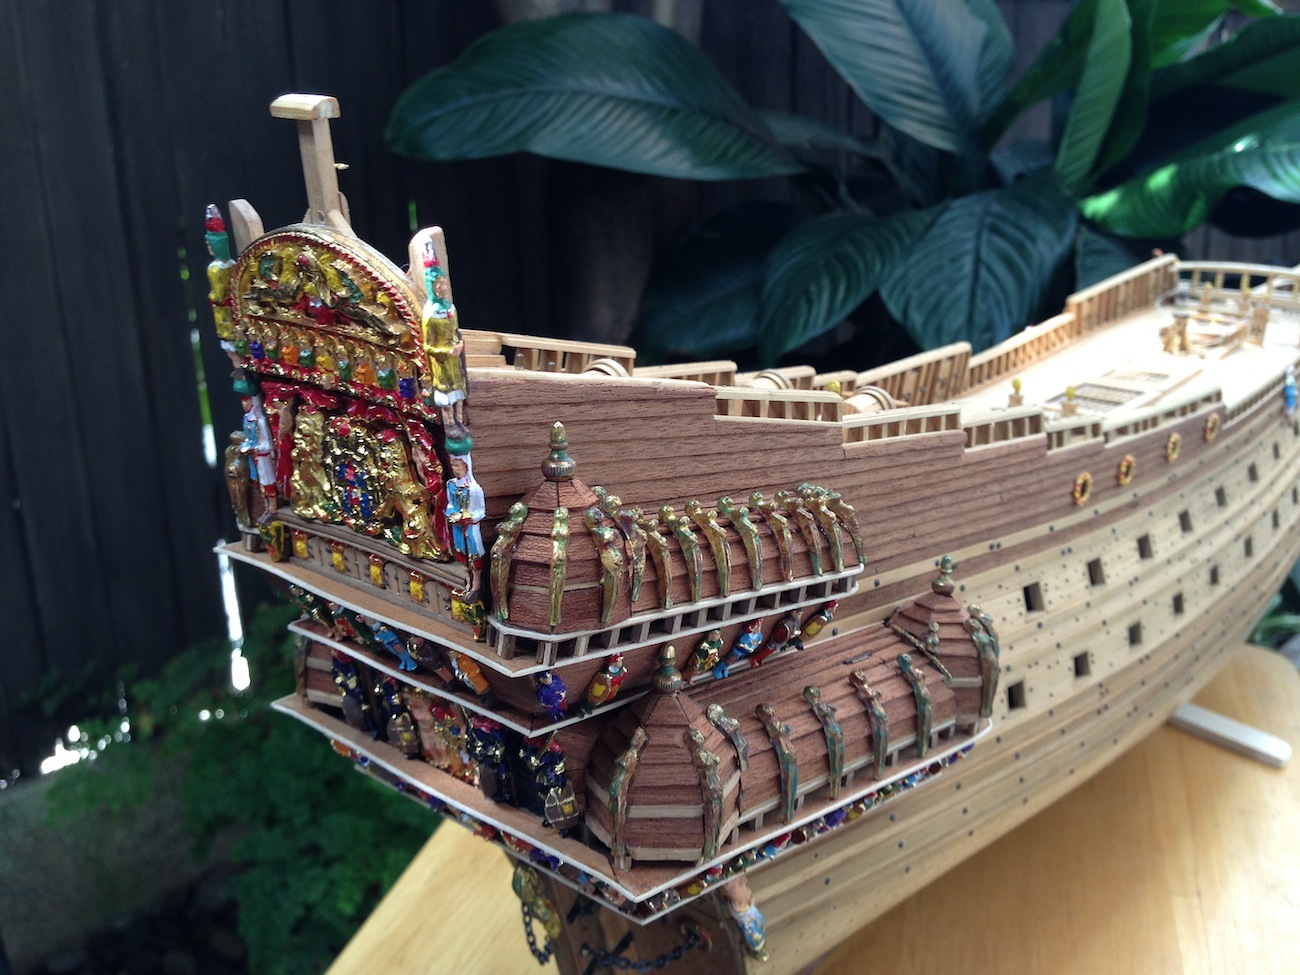
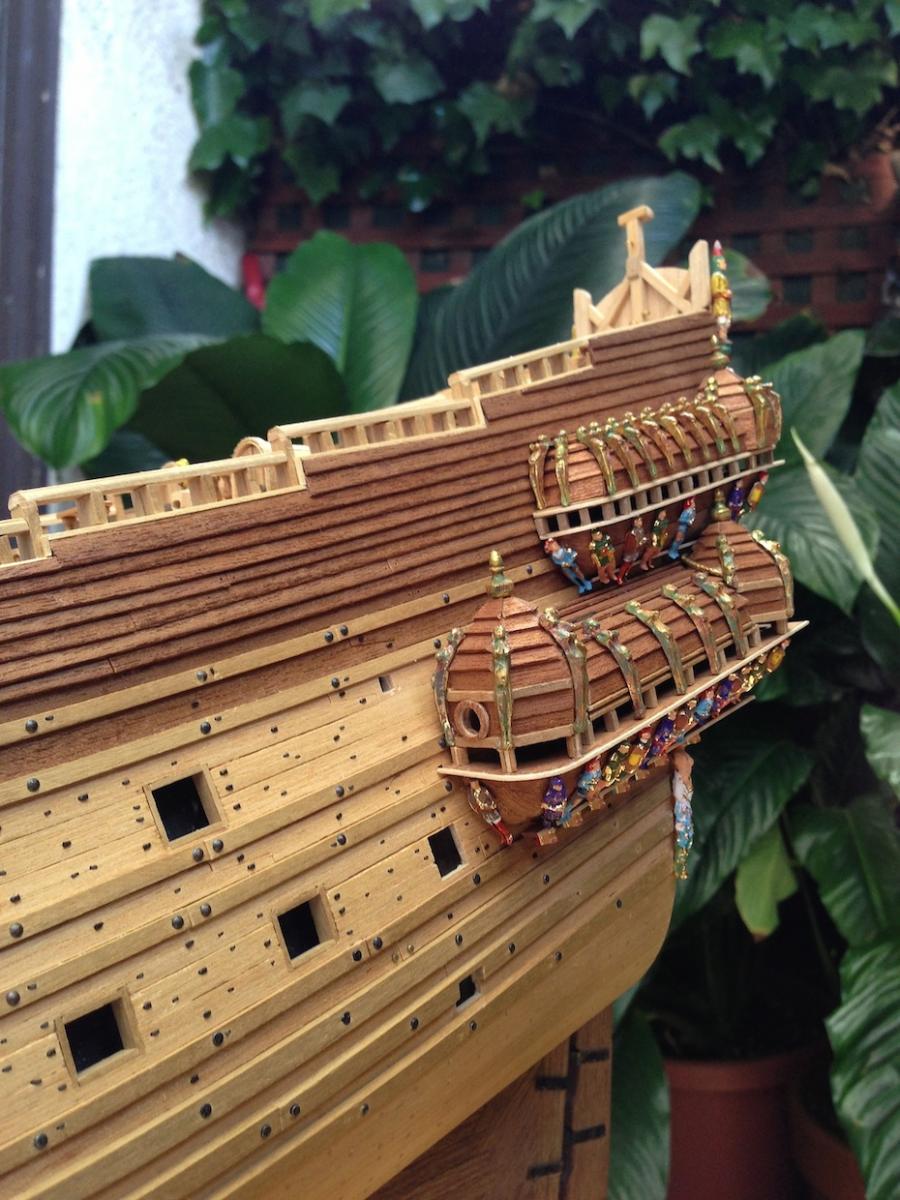
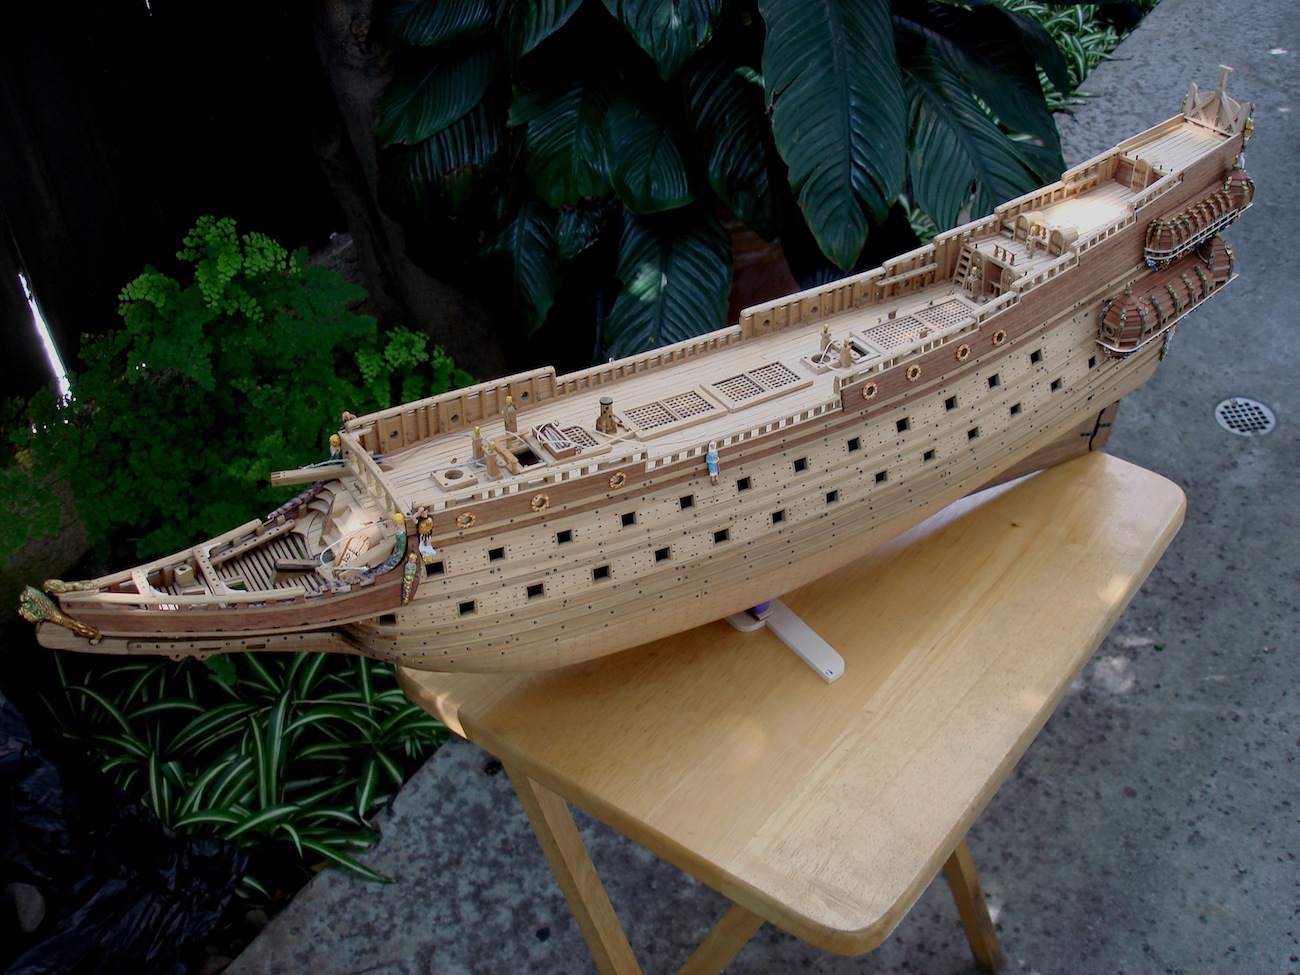
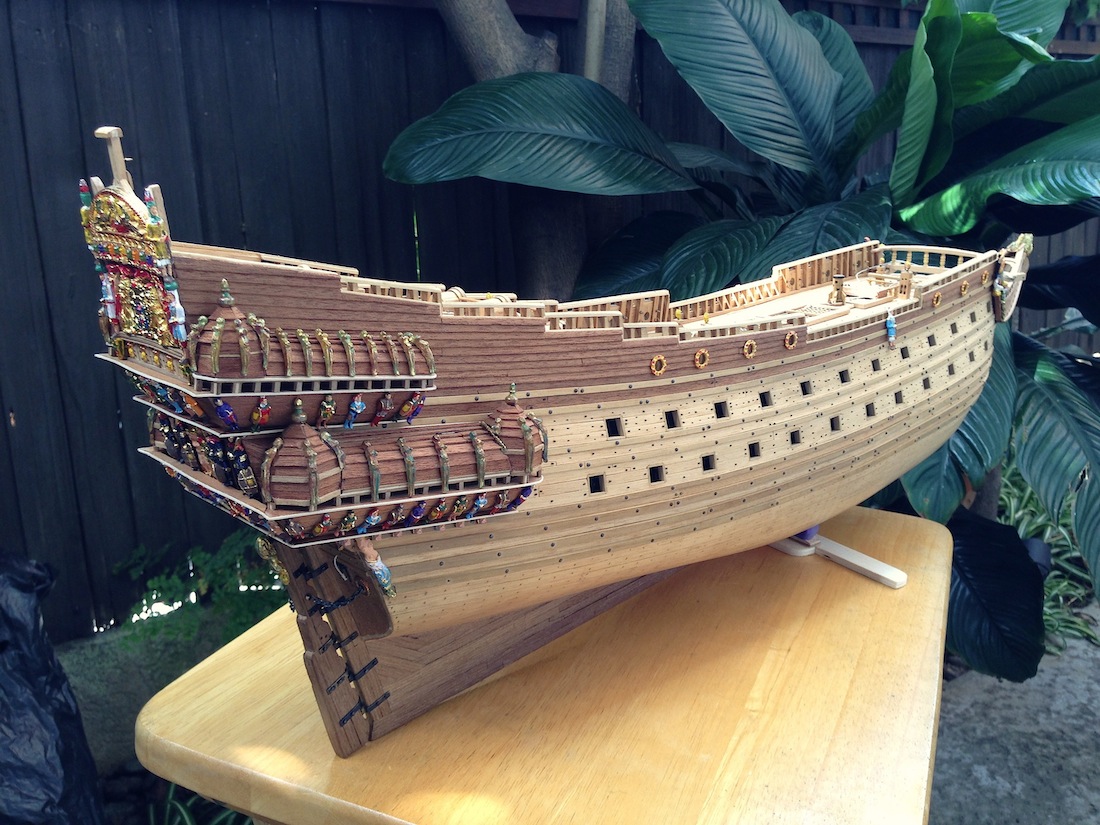
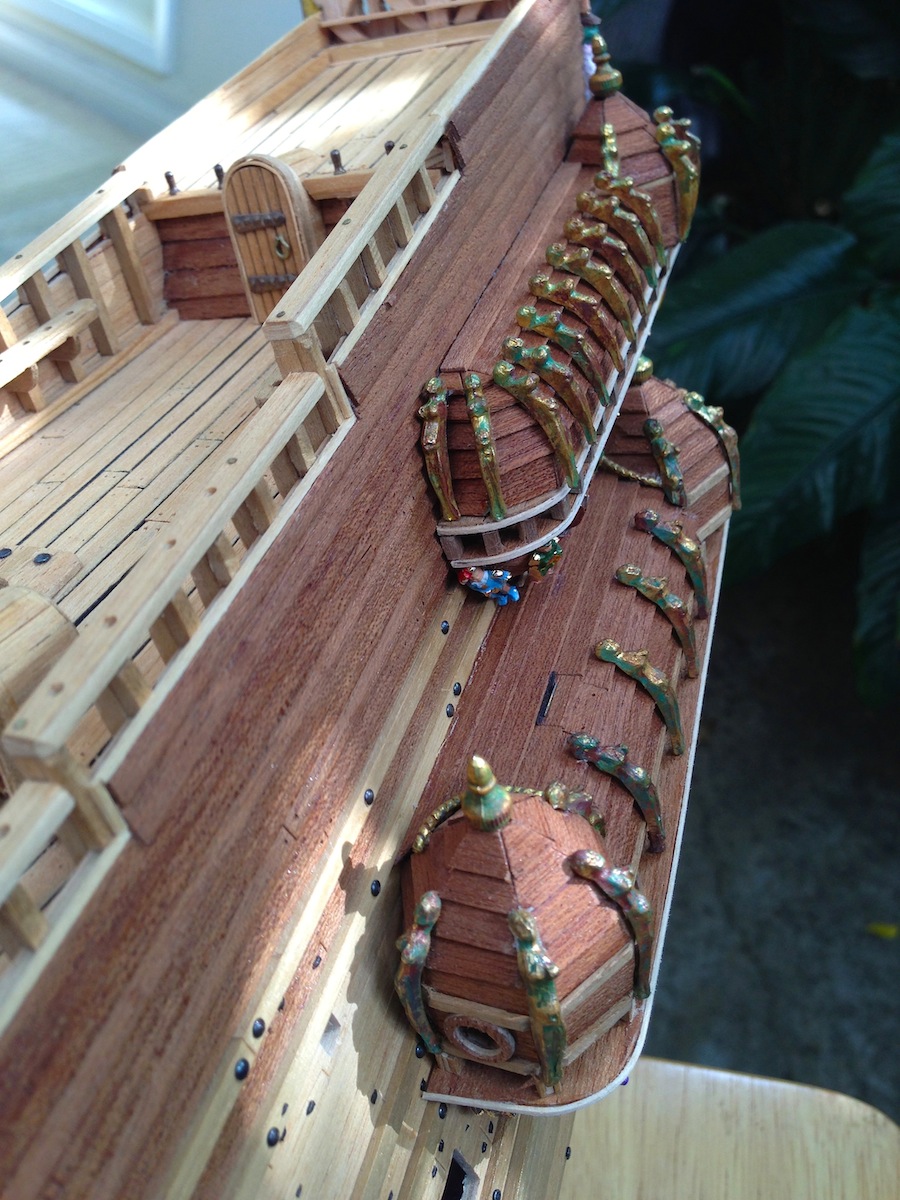
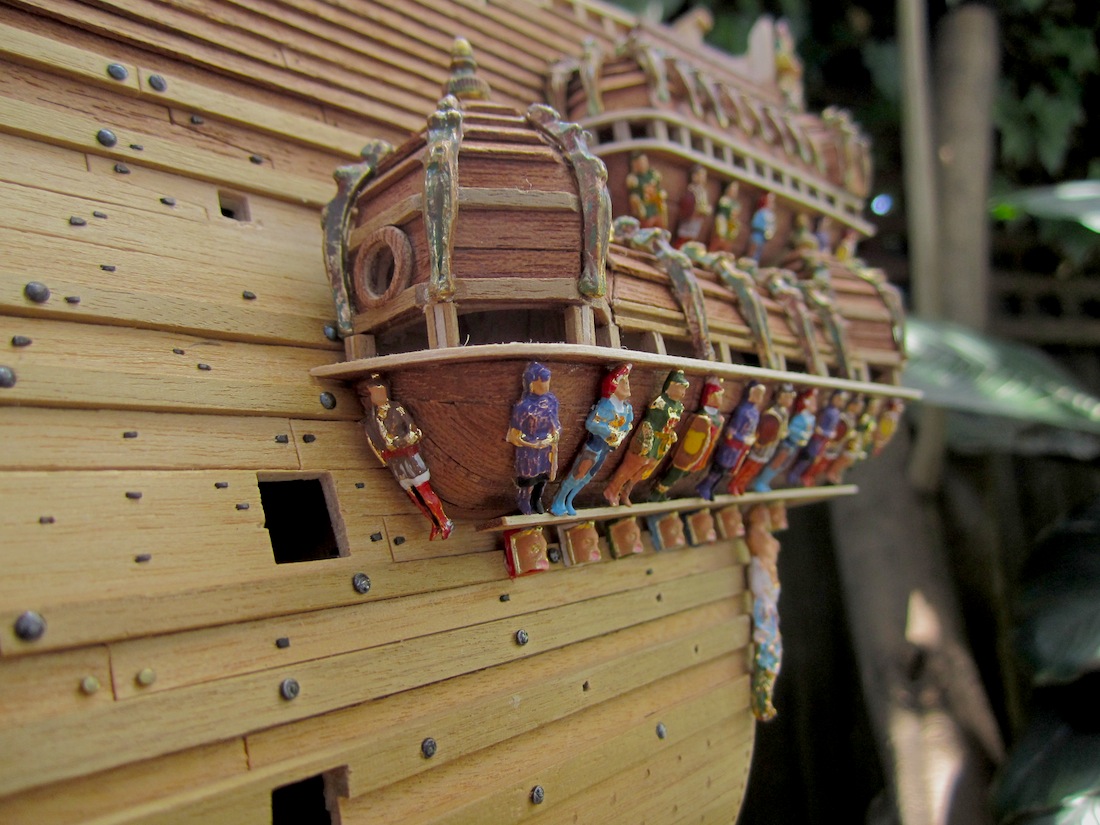
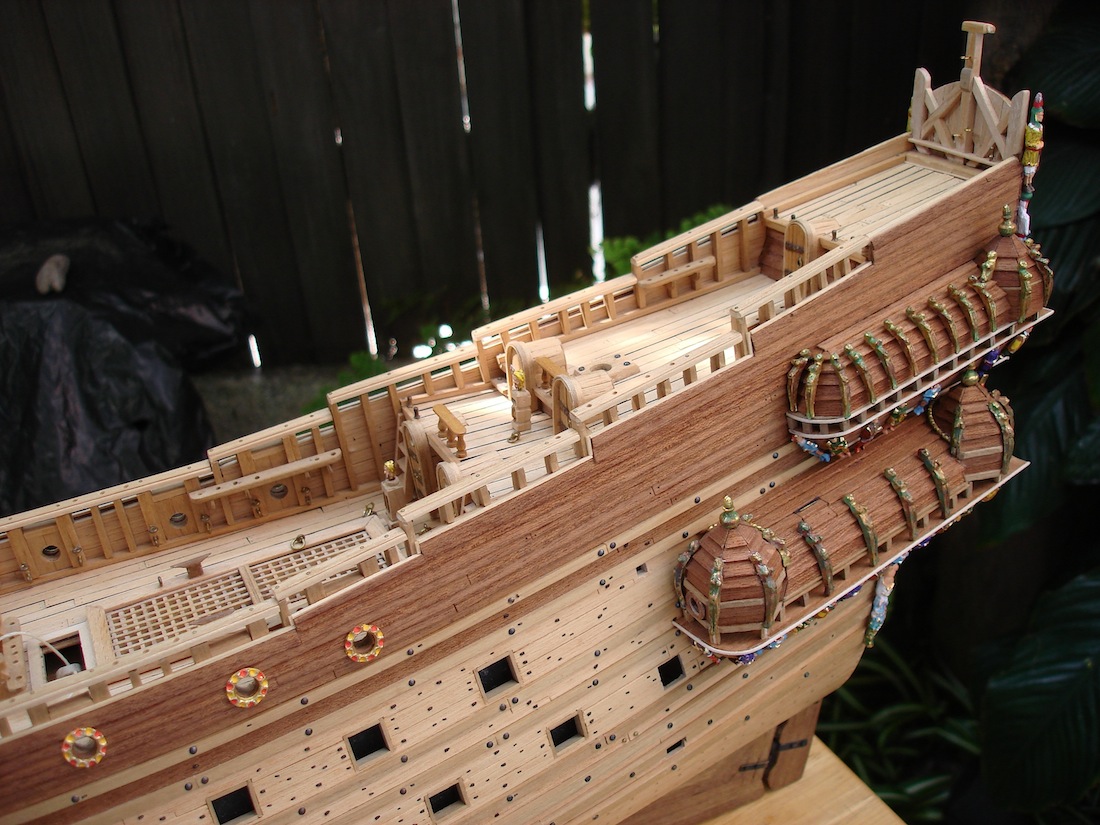
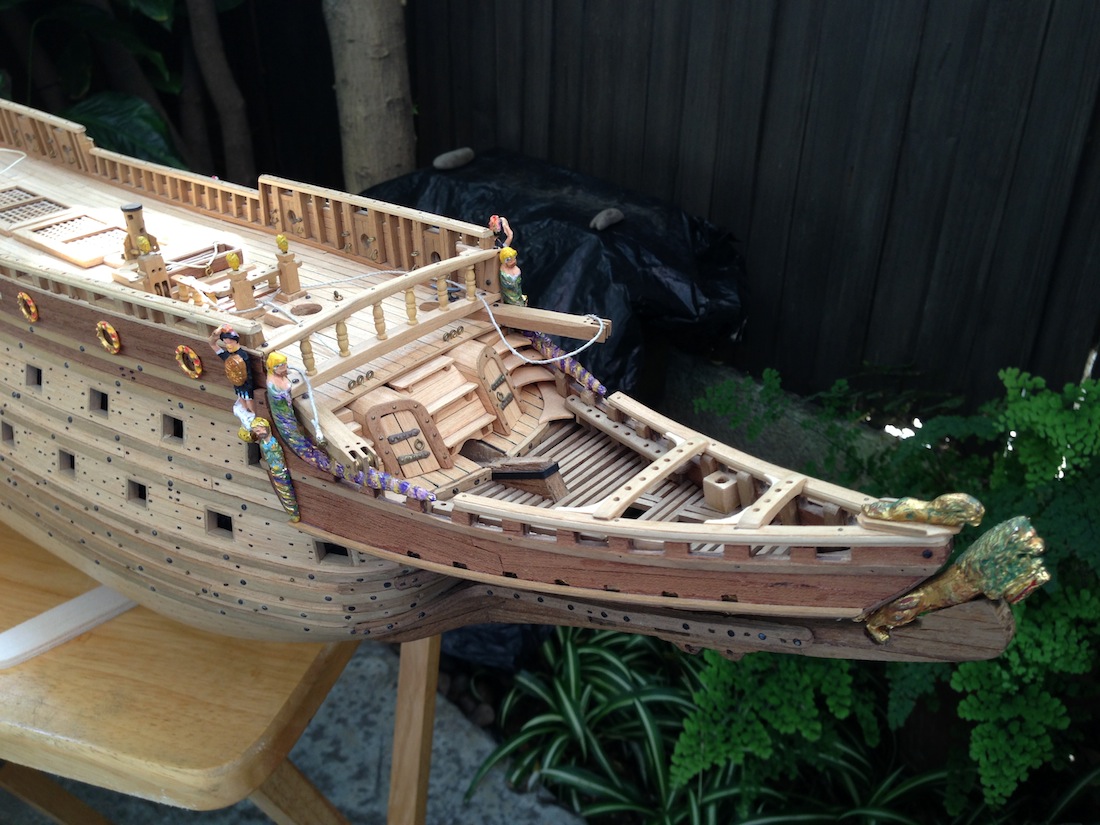
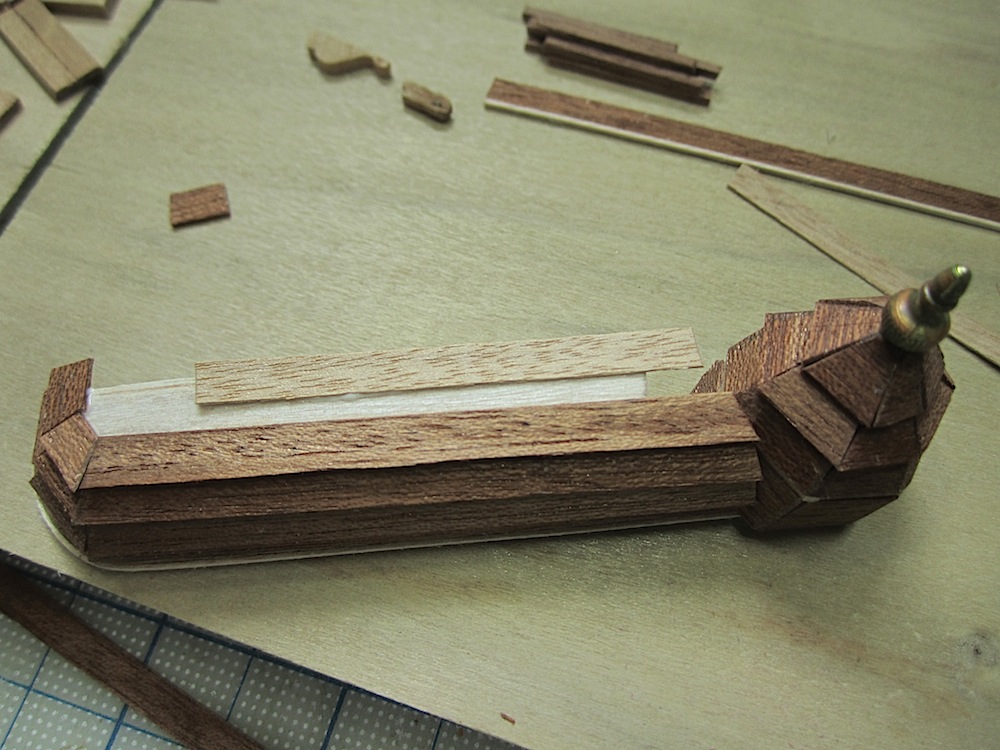
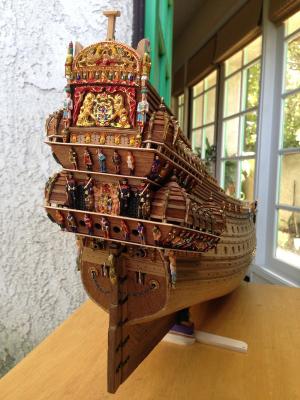
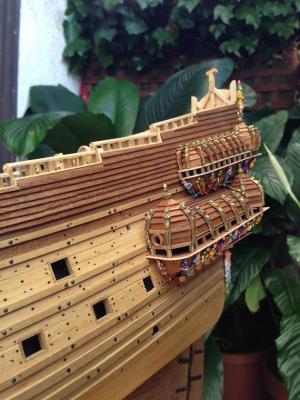
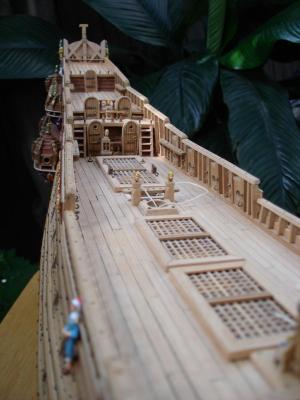
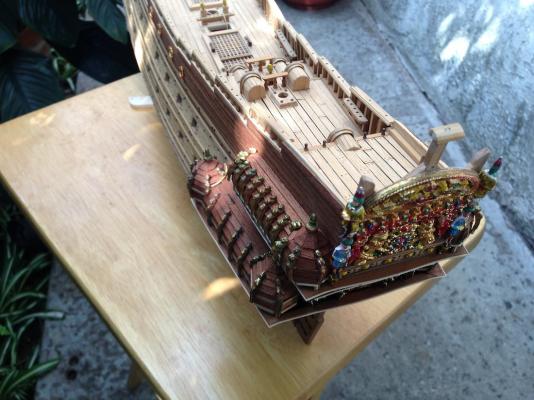
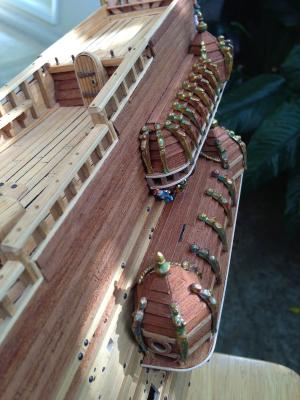
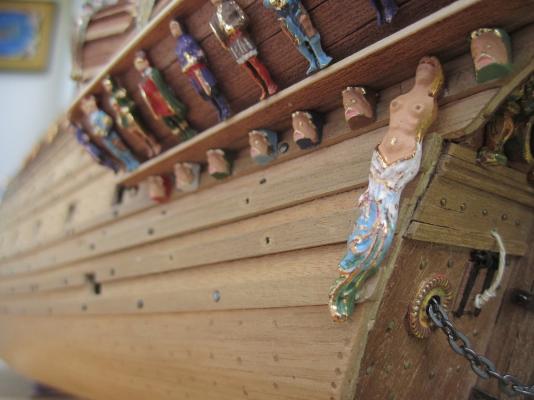
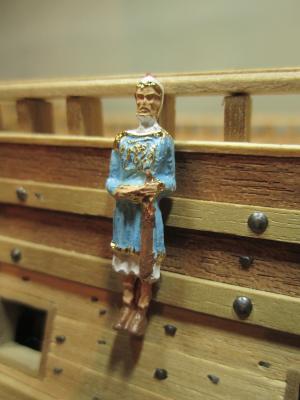
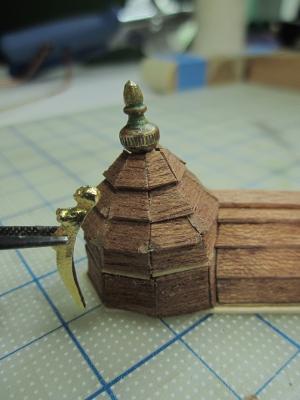
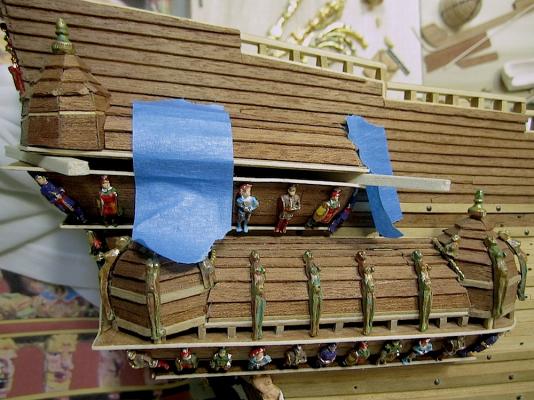
Hello fellow hobbyists, I would like to, firstly, thank all of you who have been so kind in taking the time to post comments, letting me know how much you appreciate my version of this Wasa build. Your kind words have continued to be a real source of encouragement. I also thank those of you who were also kind enough to add a "thumbs up" to certain posts or jpg's. There is so much art to appreciate on MSW, that I am touched that you have found the interest, and the time to look at, and respond to my efforts.....Again thank you......OK.. An update. It's hard for me to believe, but the stern, and galleries in their entirety, are actually almost completed. This part of the build was very labor intensive. In retrospect, I would have done some things differently but as we say here "put a fork in it - it's cooked" and so it is. Oh what is missing are the two wood trim timbers that appear on each side of the flag and lantern spar, just above the upper gilded curved carving on the stern. I will try my first attempt at sculpturing those two pieces of wood. Speaking of doing things differently; I SO regret not indenting the hull canon port framings as I was framing those. I tried to initially indent the four small pieces of wood in each port, but I didn't have enough of a lip, if you will, and nothing was aligning correctly. So I flushed them all flat along the hull. This work was done before joining the MSW community. I have since learned of a great technique. Always hindsight isn't it? So, that detail failure just glares at me now. It will be an issue when adding canon doors. Hmmm. On the plus side only hobbyists such as us would even notice such a glaring error. I thought of pulling them all out. But I think that I would make a mess of things. Segwaying forward with this posting, I enclose "full body shots" (pardon the pun) to offer a better perspective of the project as it looks so far. I also include a few other pics. as partial updates on side tasks that have been completed to date; for example deck, and hull figures were (some removed) painted and attached. I'm will be taking a break for a while. I have to do some traveling again. Hmmm, and I thought that I was finally retired. I'll tune in, from wherever I happen to be, and continue to admire builds that I very much enjoy following. When I find myself back on my side of the world again, I will continue with deck details that need to be added. I also plan on removing the existing ladders. (Not correct). I will also re-work the front bow cross railing that leads to the bowsprit. That is also not correct. And I removed the most stern ladders. Those will be replaced with a "bench" type looking thing with a wooden sculpture on each side above the "benches" So it goes. And then onto the masts.... Again thanks for your kind words...Always, always appreciated. Regards, Michael


-
Need help regarding specialized drill bits
md1400cs replied to md1400cs's topic in Modeling tools and Workshop Equipment
Mark, Thanks for that idea. Good to know. Regards, Michael -
Mark, Thanks for the nice thoughts. Hmmm I thought that I had done that. As I was loading the pics, and adding occasional notes they (the pics) showed up on the white frame as I was adding more. But then mid sequence they seemed to go out of order. I canceled the post and started all over again. Same results. I am obviously doing something wrong. I will be more careful when I add some pic of the (finally) completed stern. Thanks for your suggestions... Regards, Michael
-
Jan, Nice update. I'm going to follow your lead and revisit my bowsprit lion, I really like the colors that you chose for the crest emblem. Mine were a pure guess and poorly done. Matti was discussing the lion paws. They should separate on each side of the timbers. But Corel's guilded piece does not allow for that. A minor issue, but one that makes us more aware of kit errors as we go along. Keep up the really nice work. Regards, Michael
-
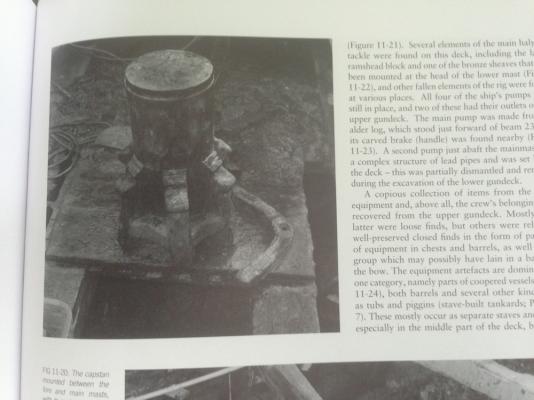
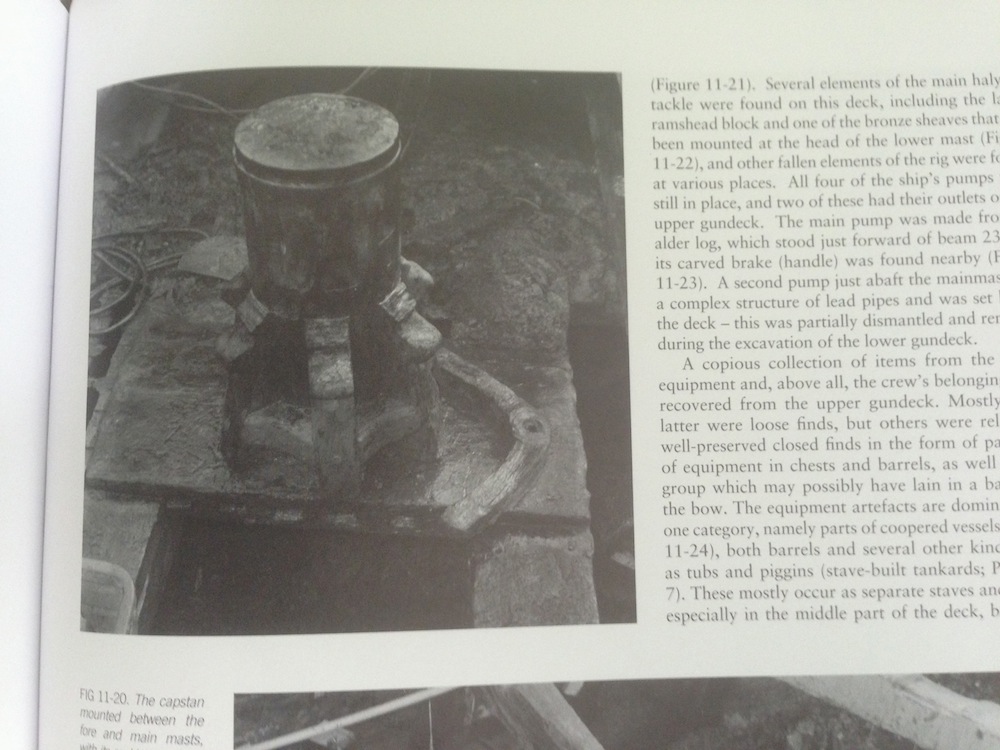
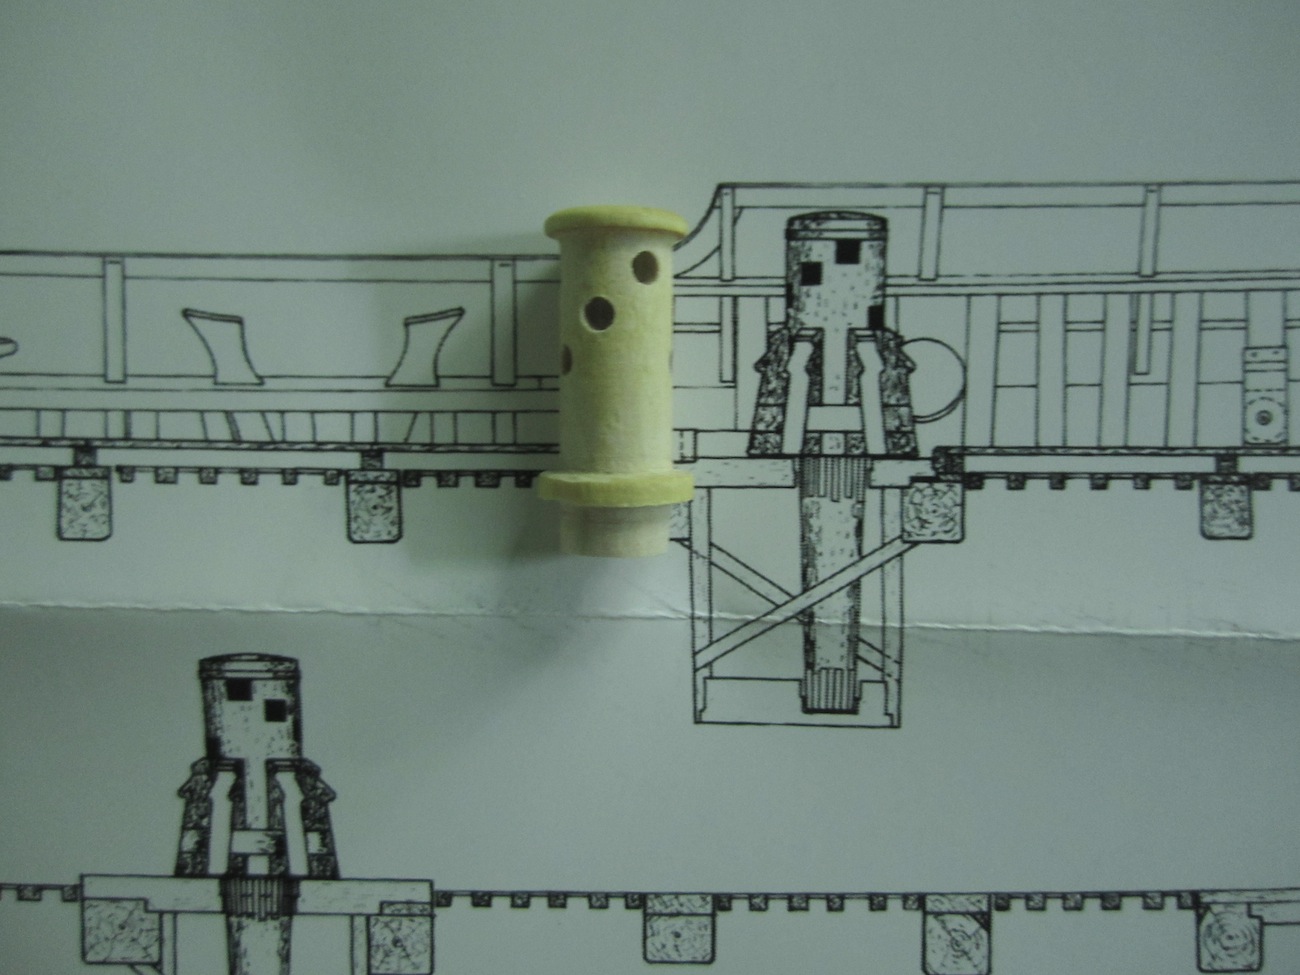
Andre, Looking very very good. Ulises is right. Your resurrection is really so great; certainly in keeping with the original history as well. I cna only imagine how you would do with a new kit. Any thoughts on what might be next for you? I also have the blue box edition. It was such a long time ago, that I may have purchased a separate capstan that looked more detailed and then added it to the deck. It was not until Blue Ensign and Ferit (both of their current builds are spectacular) discussed capstans that I learned that mine was mid 17th century and incorrect. You are also right about the deck gratings. Curved frames are correct. Good for you. Nice touch. Regards, Michael
-
Kevin, Ive been following your build. Stunning....really excellent. Regards, Michael
-
Need help regarding specialized drill bits
md1400cs replied to md1400cs's topic in Modeling tools and Workshop Equipment
Gaetan, Thanks for your excellent advice. I will follow this once I acquire the bits. Regards, Michael -
Matti, Nice update. I'm enjoying watching your BB example of the Vasa. Looking v. good. Nice Avatar. Mystery solved (:-) Regards, Michael
-
Hmmm pics all out of order I need to figure that part out. I loaded them in sequence. Oh well Michael
-
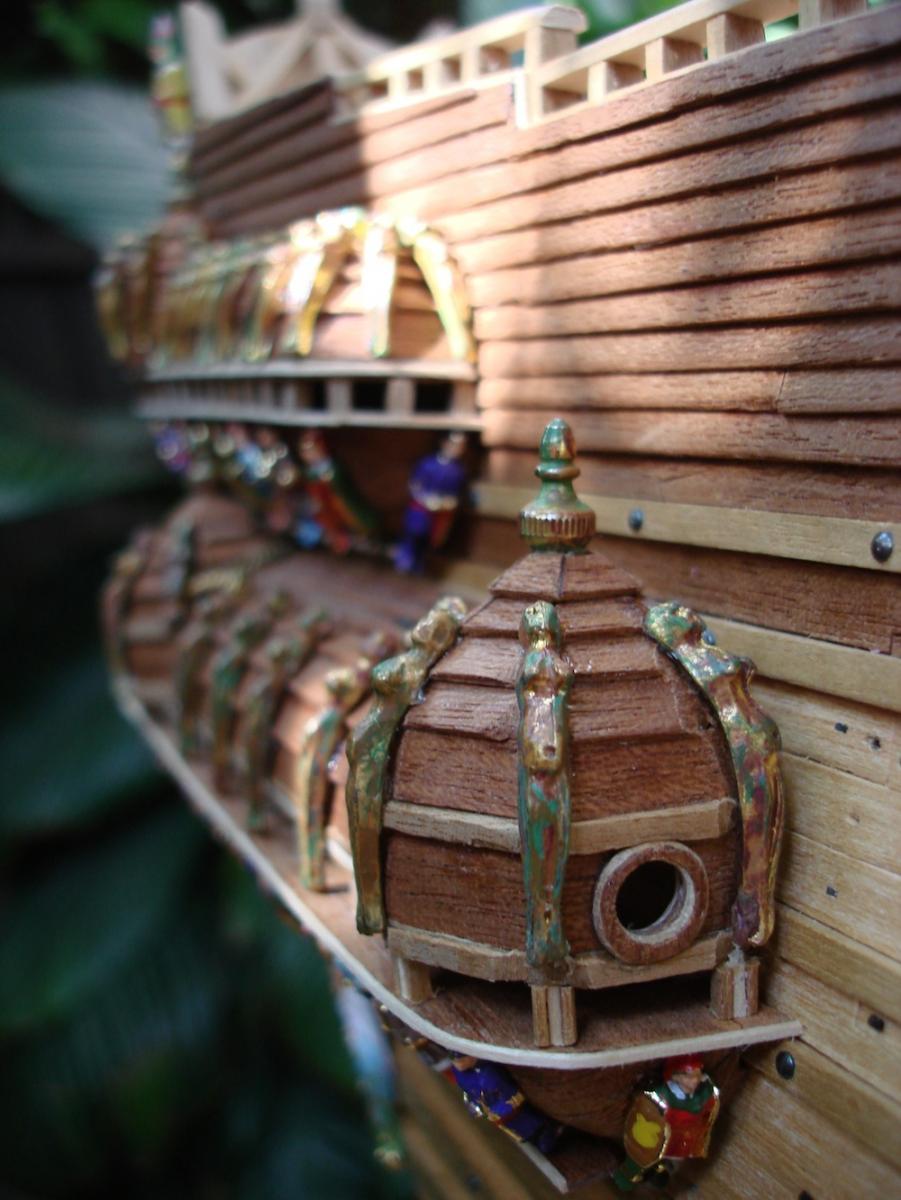
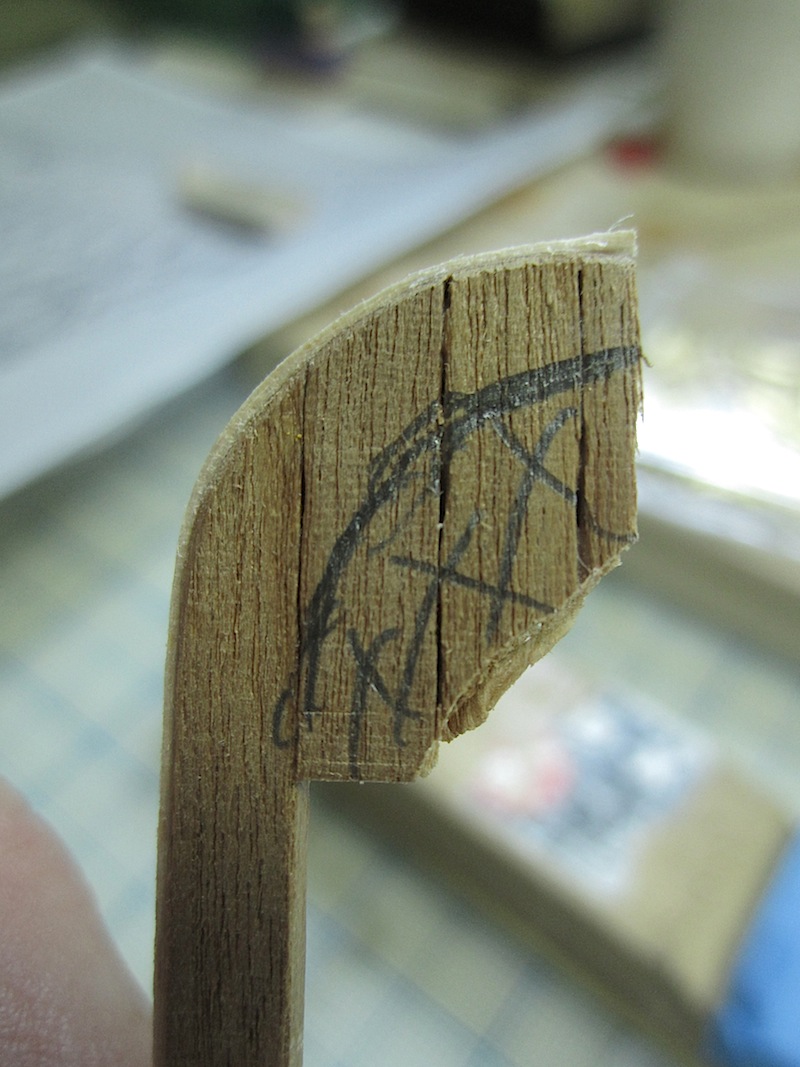
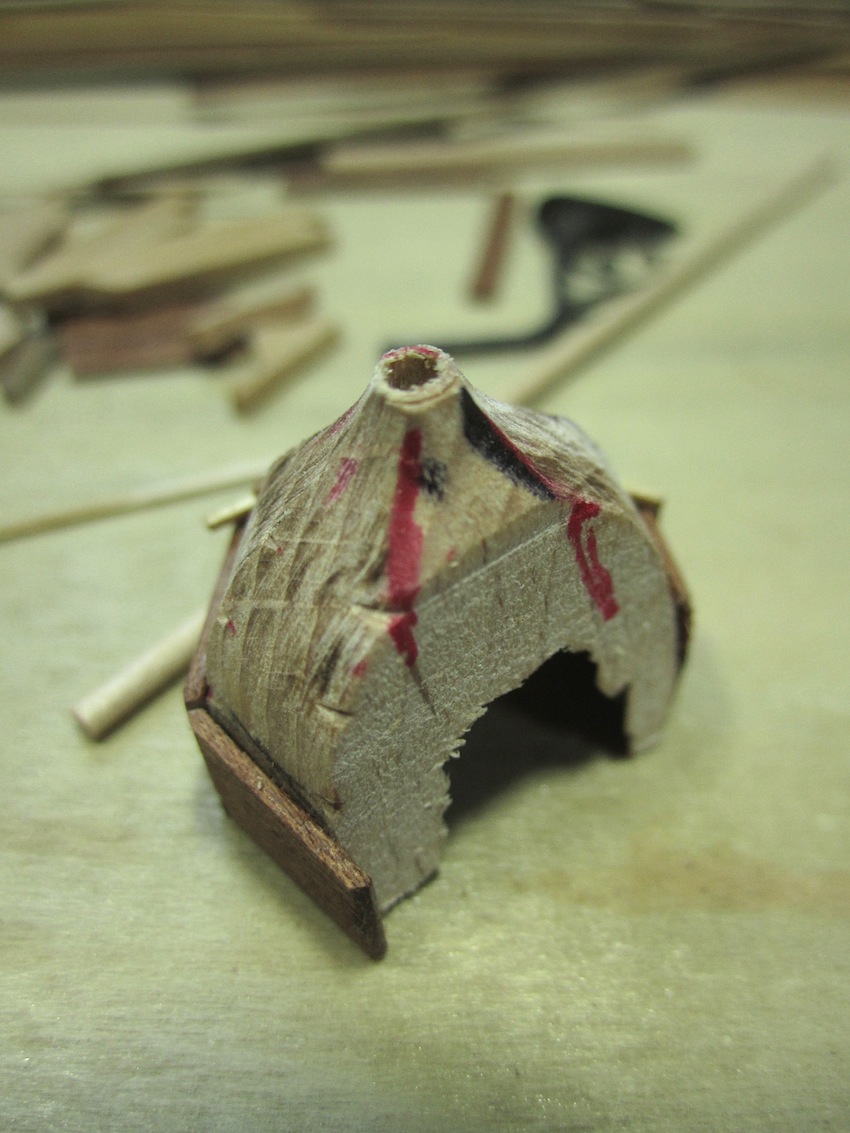
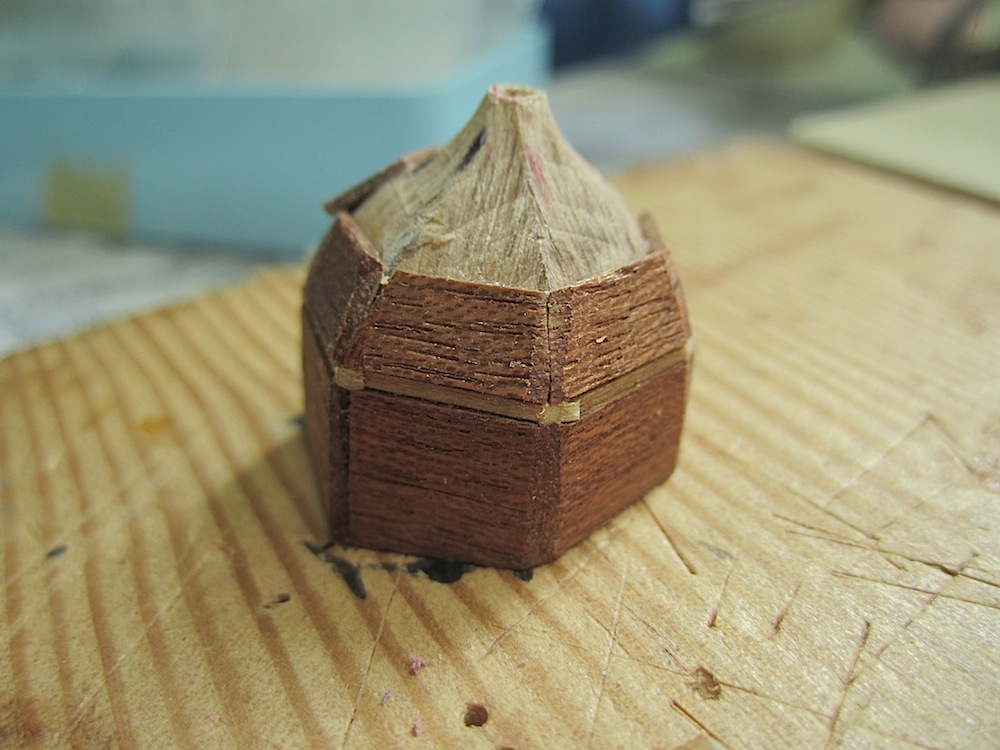
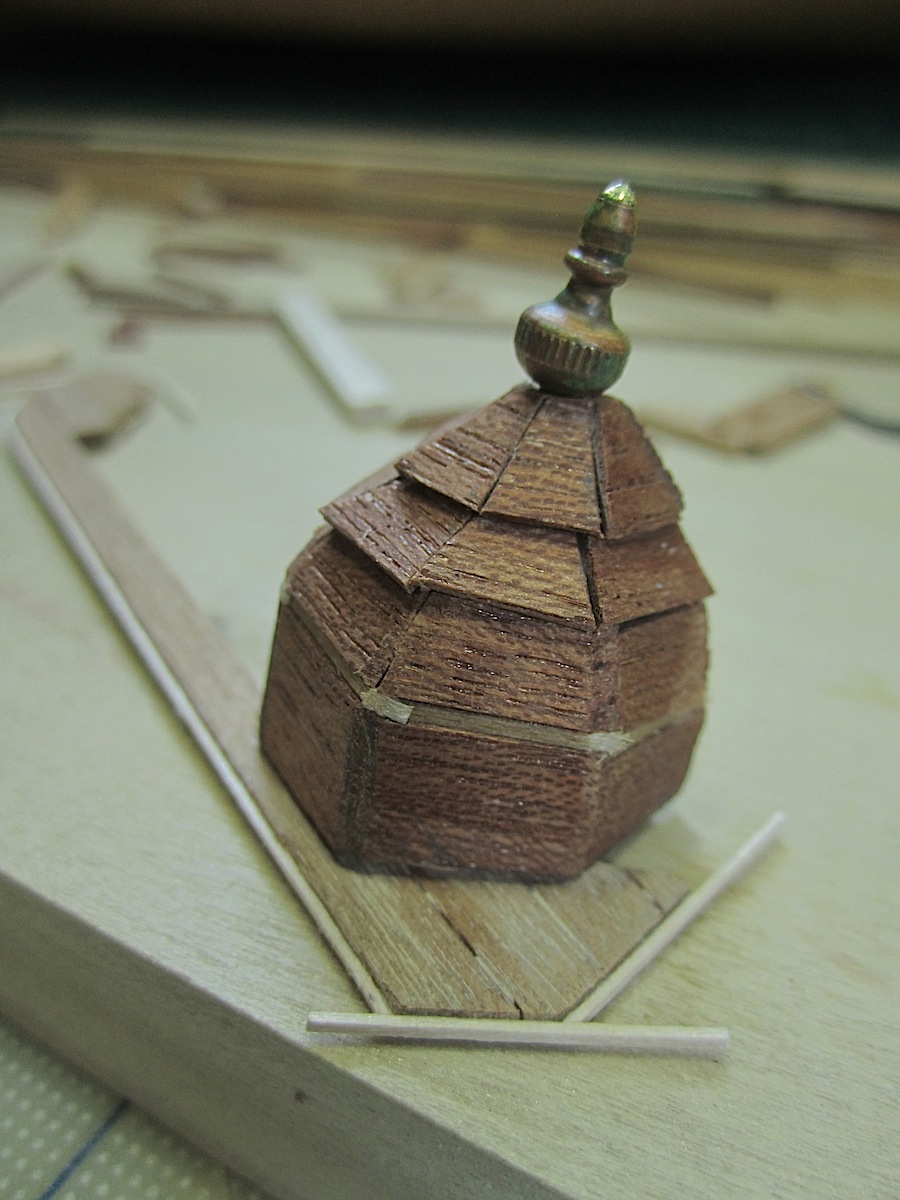
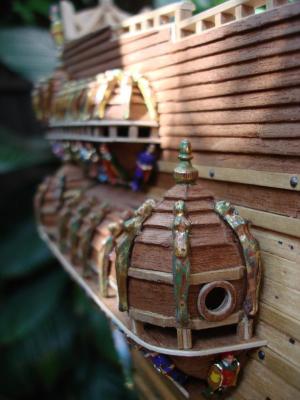
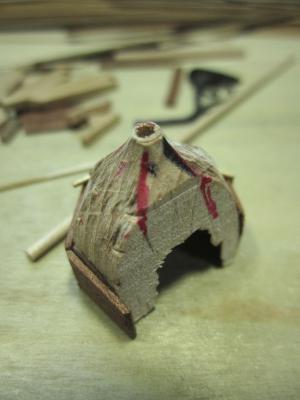
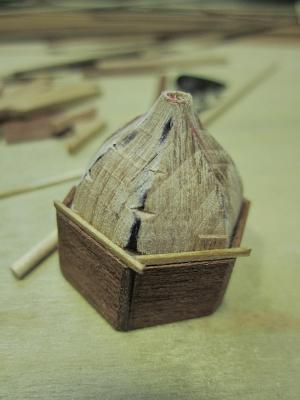
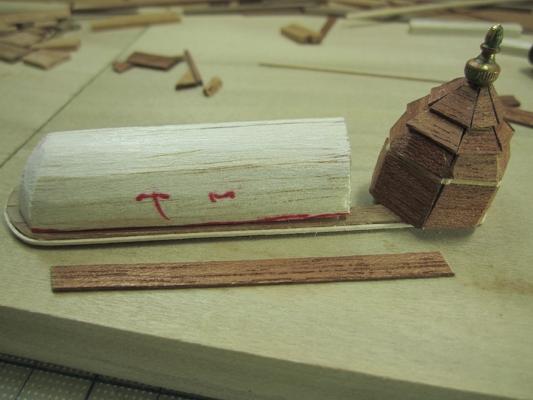
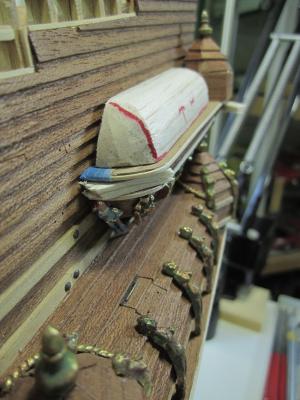
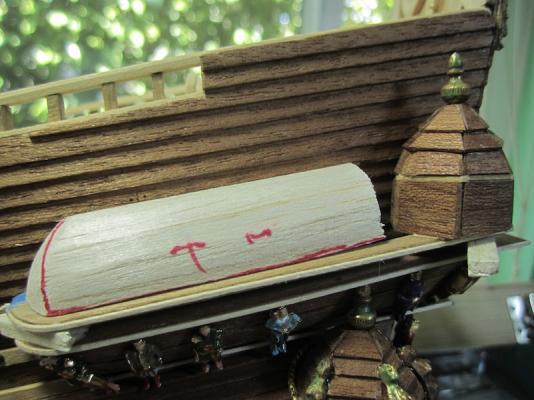
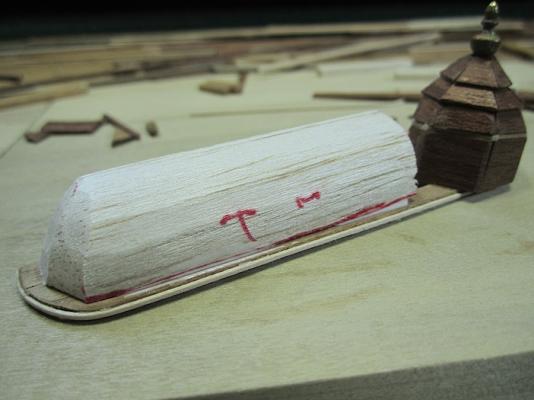
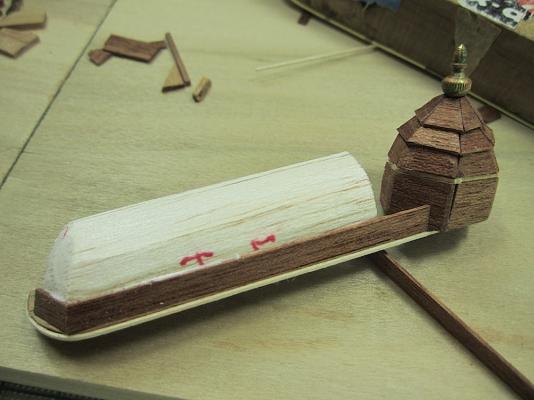
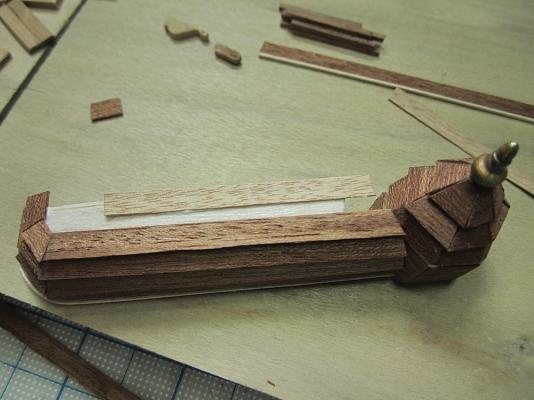
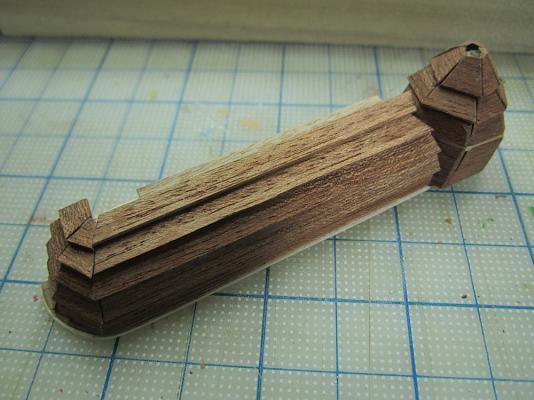
Hello again, An update for the two upper gallery covers I decided to build "pre-fab" housings. These upper gallery covers were less labor intensive, in that there is only one bobbinet per side. I should have done the same (pre-fab) for the lower ones as well... Hmmm, learning as I go along. I am finishing some last figure painting details. When it's all done I will post some pics. of the totally completed stern. In the meantime built rough support frames for the bobbinets and the gallery covers with a pencil I outlined the shape needed by placing the rough frame on top of the lower existing structure. I cut the housing to match my pencil marks, and added edge trim piece. trimmed away the inside lip to better match the actual intended shape then focused on covering the bobbinets. I wanted to, as best that I could, match the lumber cuts of the 1:1 marked where I should cut the stern ends to match the bobbinet shapes glued on the trim pieces glued on the bobbinets I now shaped, and glued the cover dummies. added the filler cover lumbers checked the shapes of the bobbinets lumbers to make sure that the gilded pieces would fit "ok" I flattened out corners as needed. finally glued the housings in place, leaving spacers for the small support timbers.


-
Need help regarding specialized drill bits
md1400cs replied to md1400cs's topic in Modeling tools and Workshop Equipment
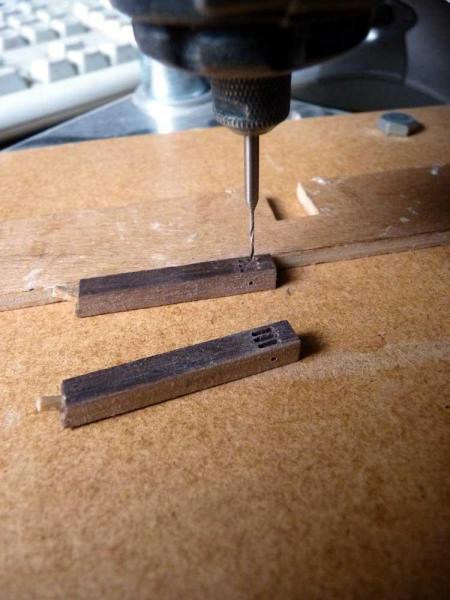
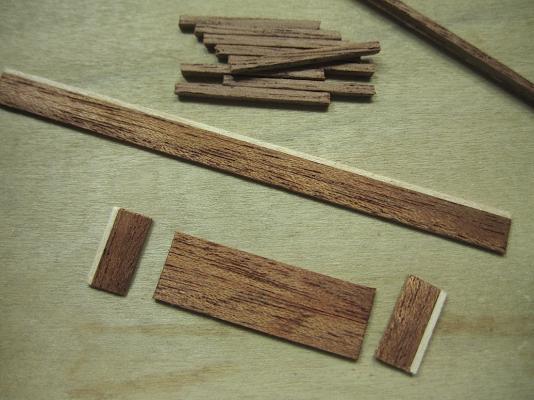
Thanks to all for your suggestions. It seems that end mill micro size bits are the answer. I will search for some that fit a Dremel. Here is a pic of what I needed. I was not unaware of these end mill bits. Again thanks for all of your help. Regards, Michael
-
Ferit, Again. Beautiful updates. Your attention to superbly well done details is really delightful. Love the deck canon door rope brackets, love the long rope on your bucket next to the long boat, love your deck planking detail Super great idea. PS: Nice tools, I need to get some of those. The only one I have is the Proxxon micro lathe, and a Dremel vice. mmmm need to get "real" if I am hopefully going to join builders of your quality. You have an amazing "eye" for this this art form. Super nice !!!! Regards, Michael
-
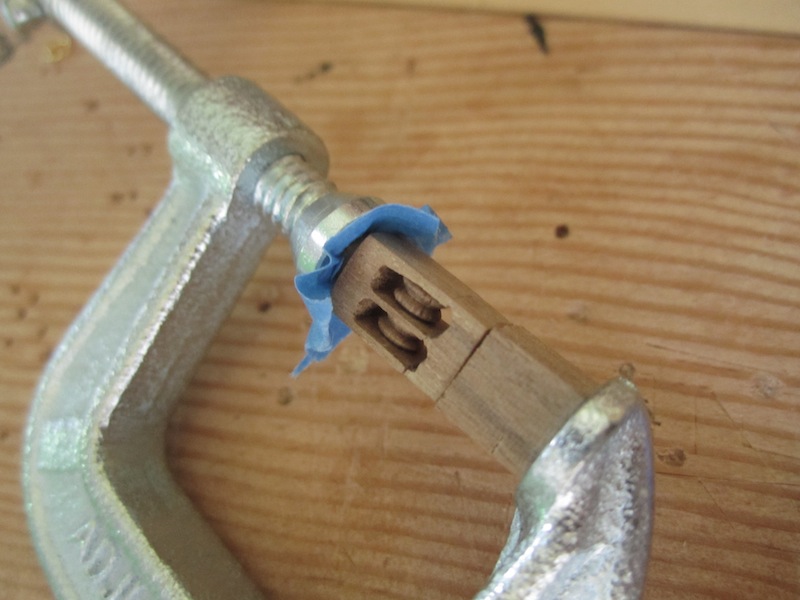
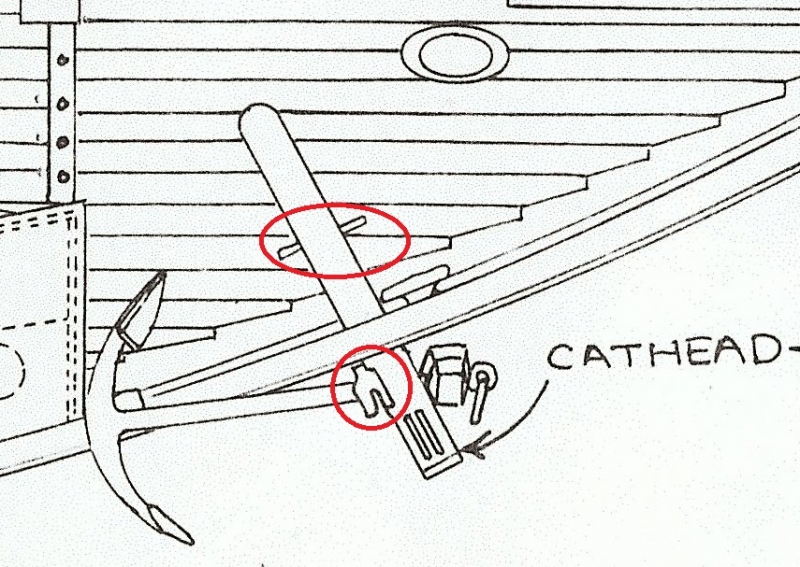
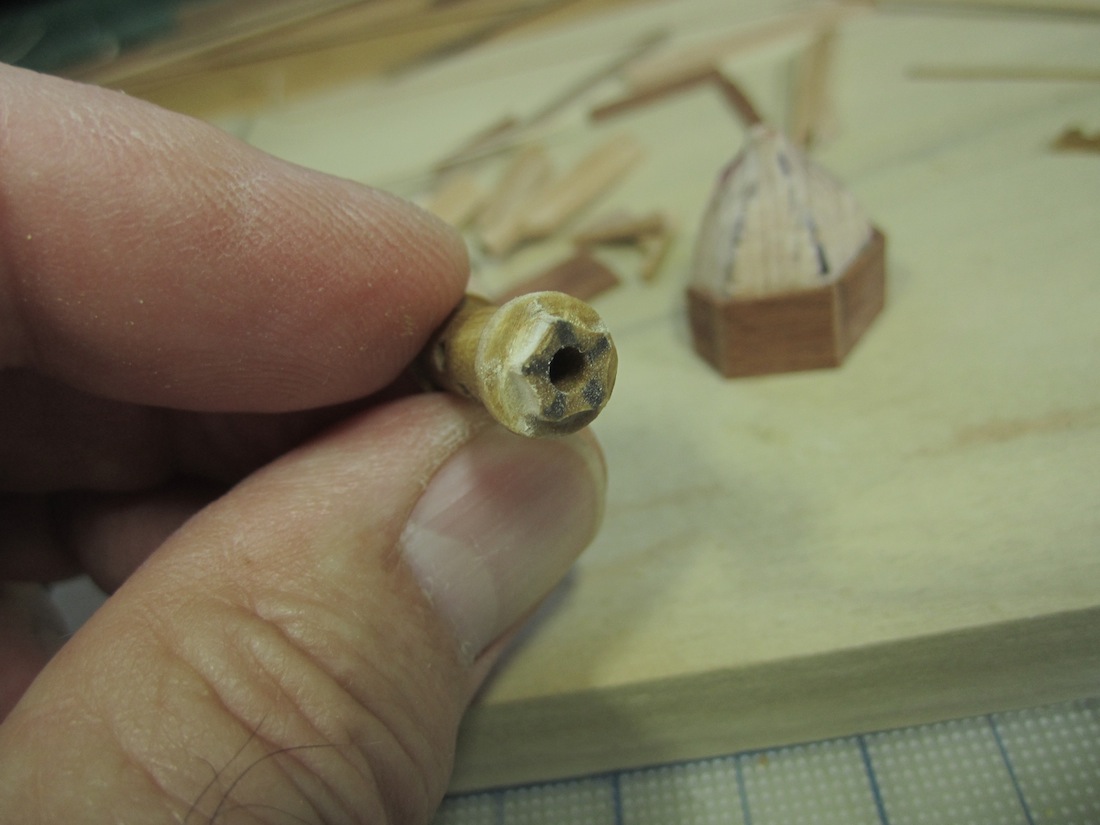
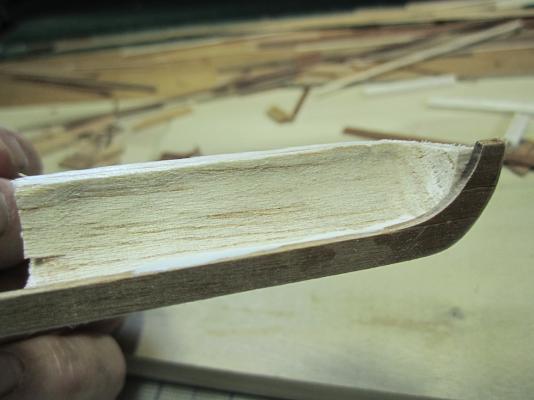
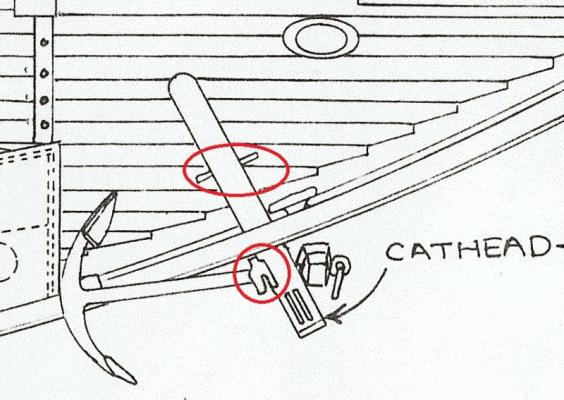
Hi everyone, Please see pics. I want to be able to cut long grooves, such as those you see on this cathead (ignore red circles). I have a Dremel as well as a Dremel drill press.What are these specialized bits called? What I am doing is unacceptable. I cut gooves, then add a block at the base. Very poor Hmmmm...., as you can see. I've Googled it but can't find what I need. I can't locate the right kind of "straight" bits. I have some router bits, but all are with ball tips. Thanks in advance for any specific help. Regards, Michael

-
Karl, I rarely venture to the Scratch Built Section because it makes me soooo nervous (:-) Builds, such as yours are so "out-of-this-world" stunning that I then look at my efforts and need to improve so much. Examples, such as yours, make "all of us" as Karl just said stare for minutes at each photo gazing in wonder. Such a pleasure on the eyes.... I will spend more time learning, and ingesting ideas from this "side" of this great MSW forum. Your work of art is beyond superlatives. I have the Boudriot books, and may (one of these days) try something French (:-) PS: From a kit ha ha ha.... Again, yours is incredibly astonishing. Regards, Michael
- 662 replies
-
- 1
-

-
- bonhomme richard
- frigate
- (and 1 more)
-
Hello Joachim, Yes, it was for that box. Thanks for the suggestion as well as for the link. Nice German site, and Google translates the pages for me as well. I will refer to it.
-
Ferit, Nice!!! you and I seem to have similar ideas. I have also "re-built" or changed sections of my build to better suit the look. What you are doing is very creative. AND super improving the realistic details of the ship. Always a pleasure to catch up with your Berlin. Oh, thanks for your response to my barrel question. I will remember your details when I get to that stage. Regards, Michael
-
Kevin, OOPS just re-posted this. I should have scrolled down first. Yes nice site. Regards, Michael
-
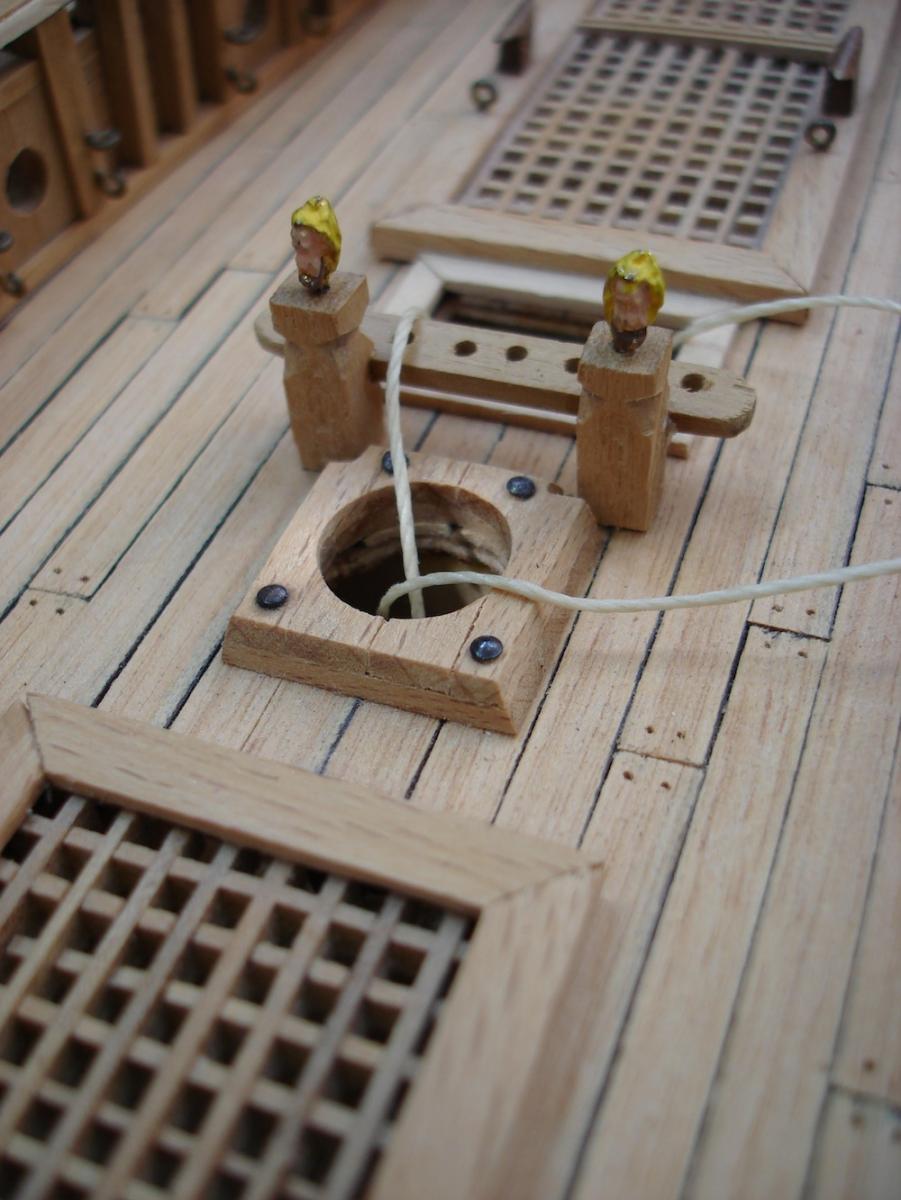
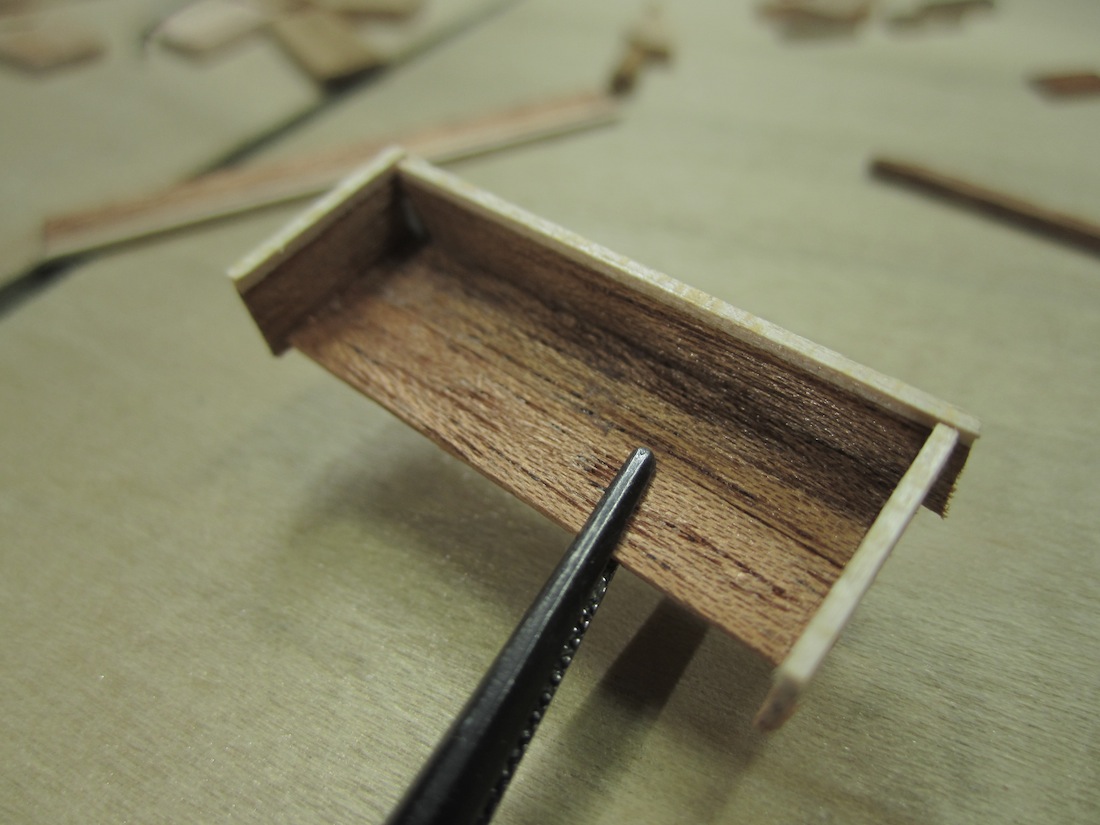
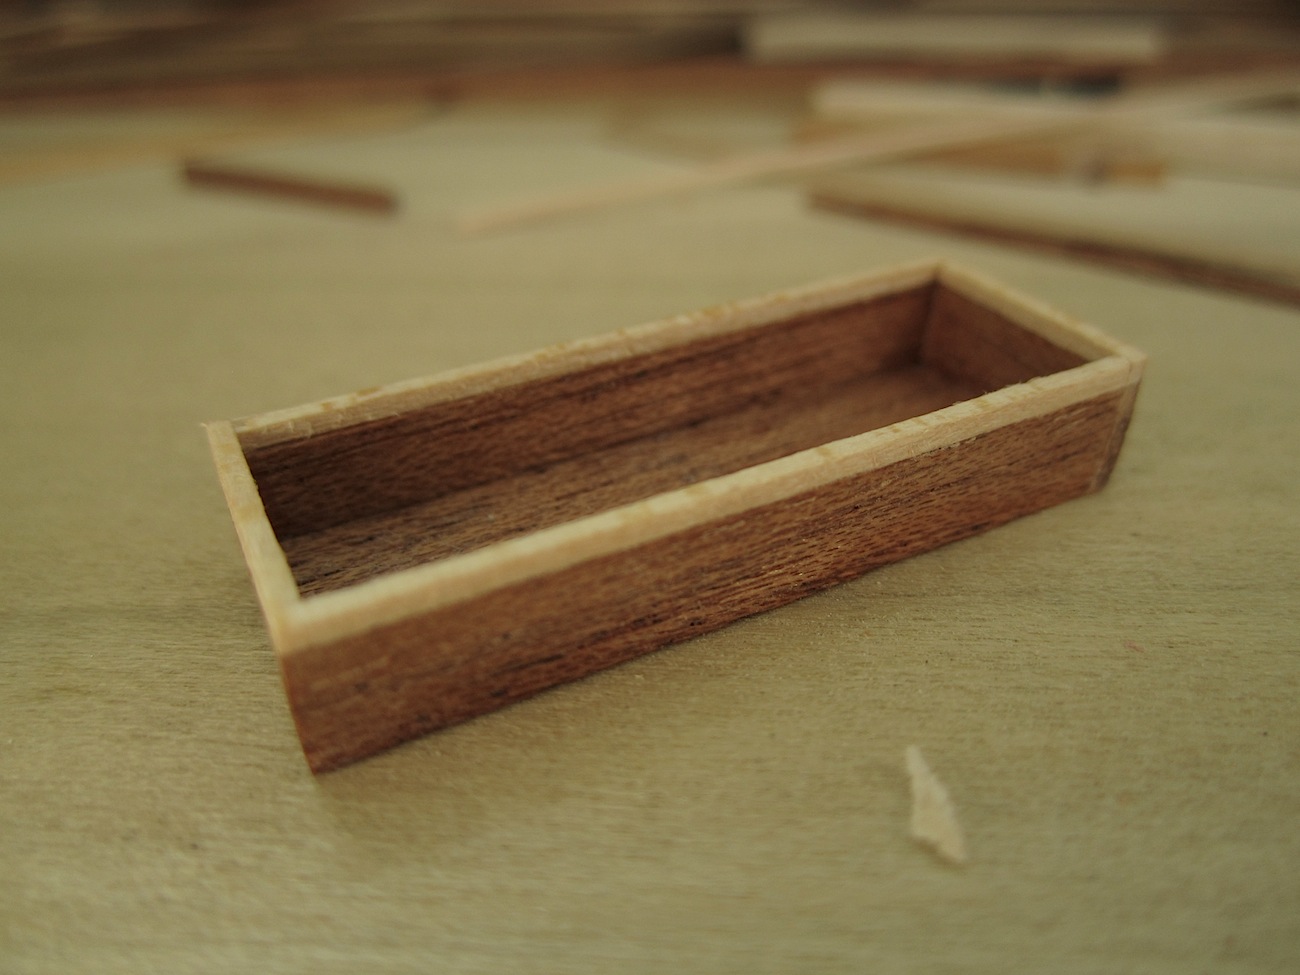
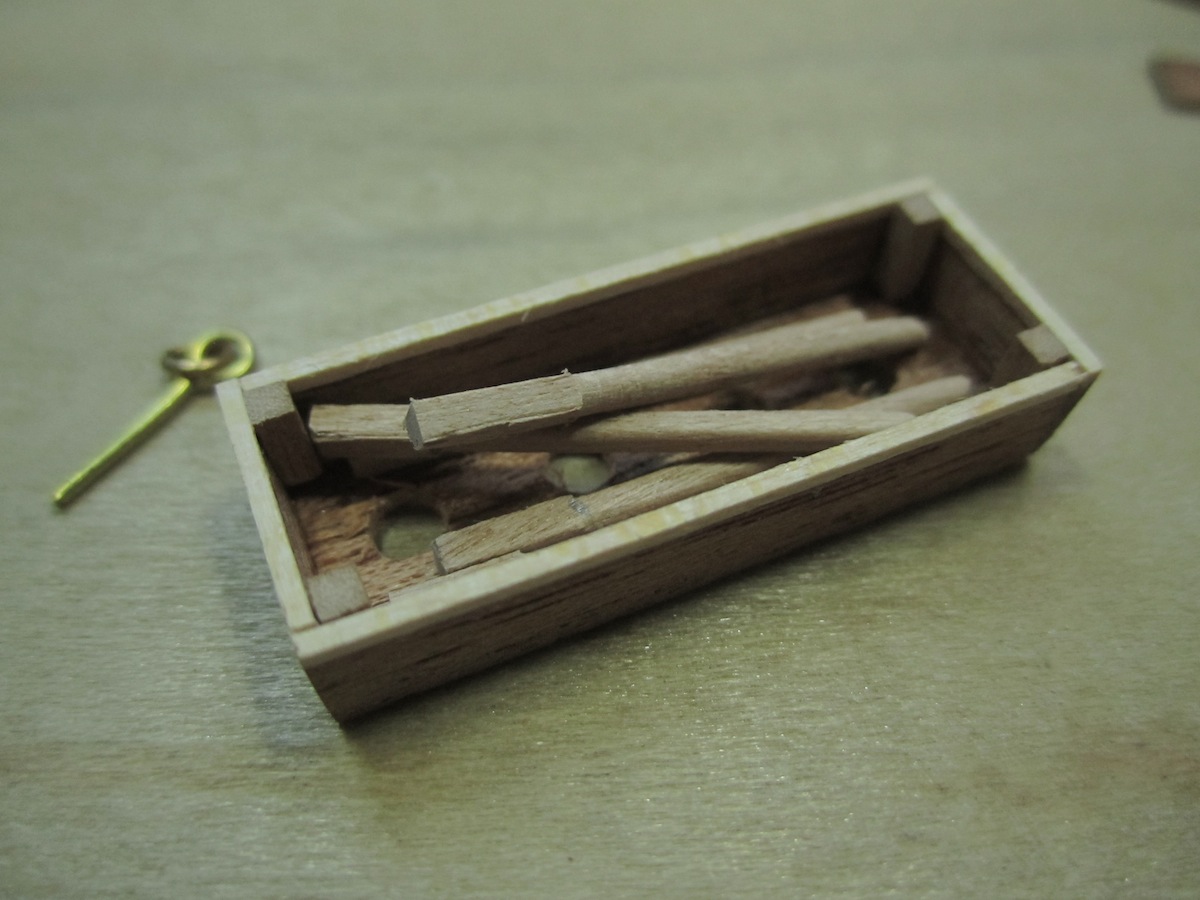
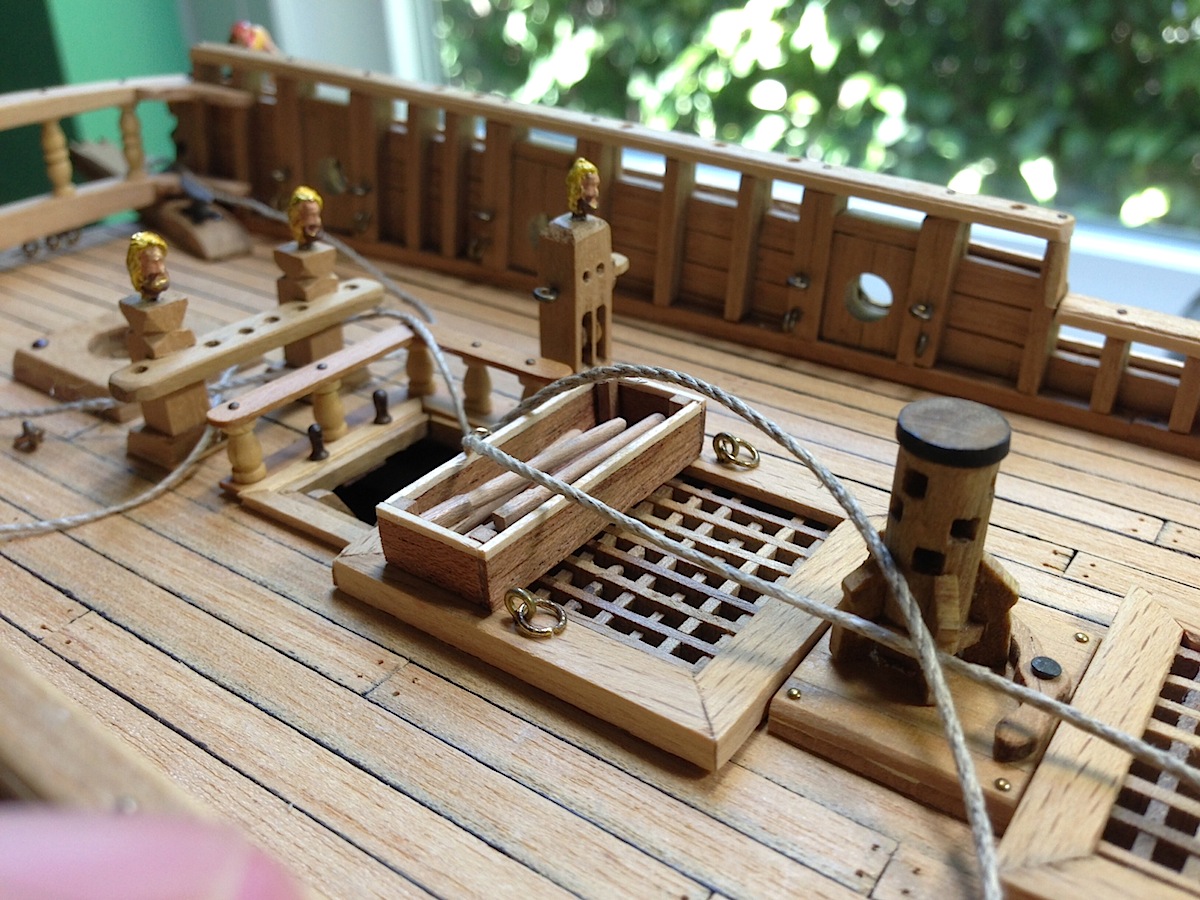
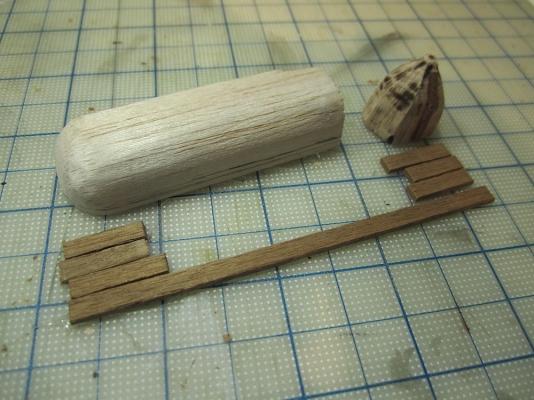
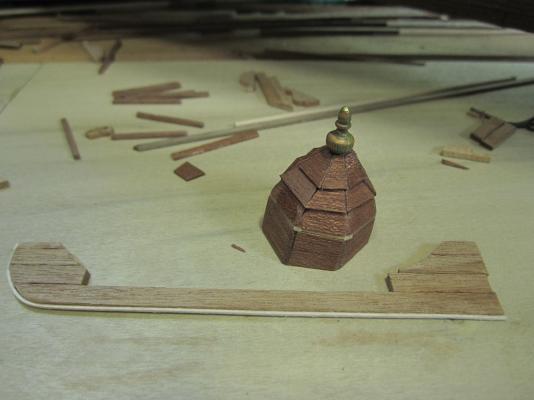
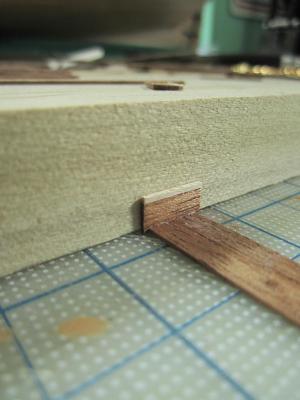
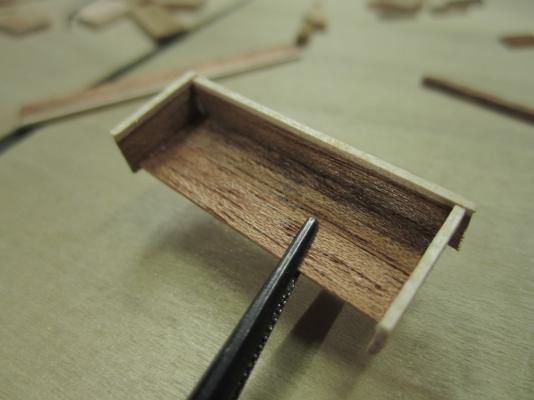
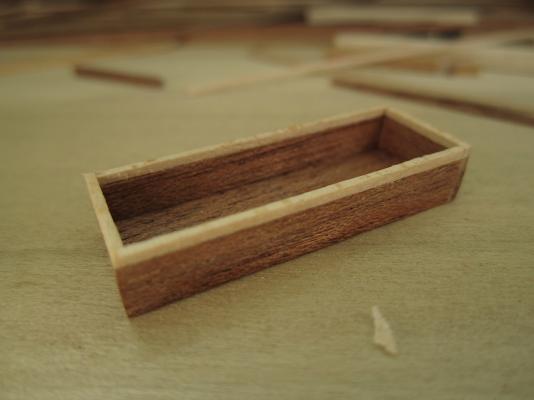
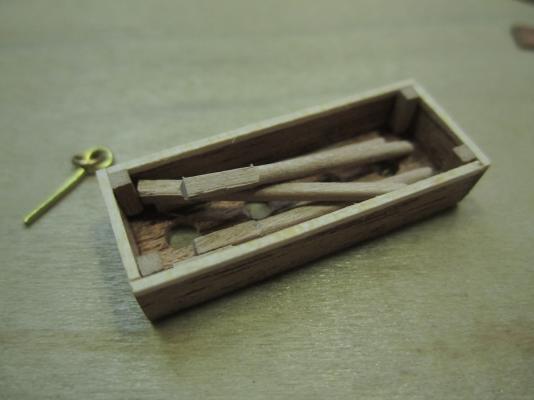
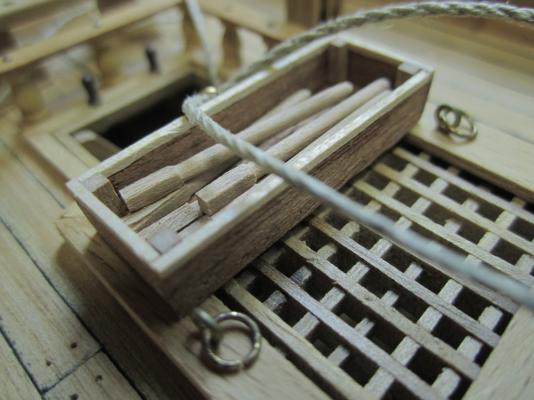
Wayne, Joe, Mark, Joachim, Ferit thank you for the latest kind words..(:-) Fellow postings are always so nice to read. But I need help (Hmmm) with knots ?? So I decided to build a small box for the capstan oars(?) with some left over pieces I had used for the stern trim detail. The pics are self explanatory, but please note the last pick of box on the deck. I don't know what kind of knot to use. I found this really cool website that also animates the knots in three speeds (link bellow) So, do I use a buntline hitch?? Hopefully one of you will help me out on this bit. I'm sure that when I get to the rigging I will be semi-lost for sure. Again regards to all of you. Michael http://www.animatedknots.com/indexboating.php?LogoImage=LogoGrog.jpg&Website=www.animatedknots.com

-
If this is a re-post I apologize. Super cool website. It also animates the knots in three speeds. http://www.animatedknots.com/indexboating.php?LogoImage=LogoGrog.jpg&Website=www.animatedknots.com Regards, Michael
-
- 2
-
-
Ferit, As everybody is saying....beautiful. Hmmm one question, On your barrel, did your make the small tap? such attention to small details (:-) ? I would like to think of something like that as well for my build. You are my guide ! Regards, Michael
-
Buck, I'm a bit late to the party, but I side with the Golden Hind crowd. A great stepping stone for the Wasa. The GH will let you explore painting details which the GH certainly has. I also agree with the group that says that you are ready for a bit "deeper end". Your skills, and attention to detail are "way up there". My brother has the GH, though he never started it. I've seen the kit. Piece of cake for your skill set. And it is closer to a Wasa type compared to your other available choices. Many of us will look forward to your new build log, whatever you decide to launch next. Regards, Michael
-
Hello Colin, I have been silently following your build. Its time to say something. So beautiful, the level, and quality of detail is superlative. Love the razor blade "tool" I may try something like that-great idea. Thanks for posting so many pics.....This will be an amazing cross section. Regards, Michael
-
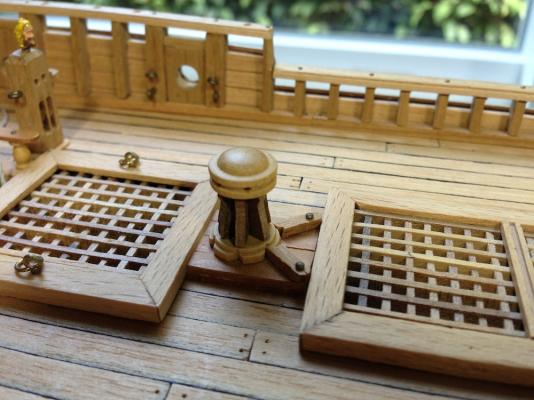
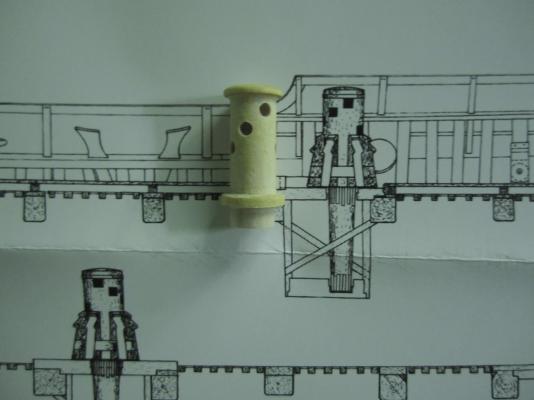
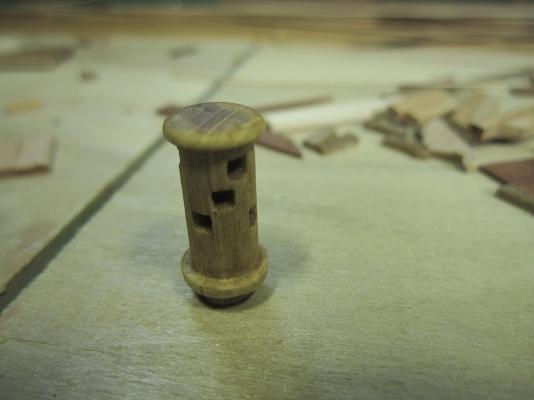
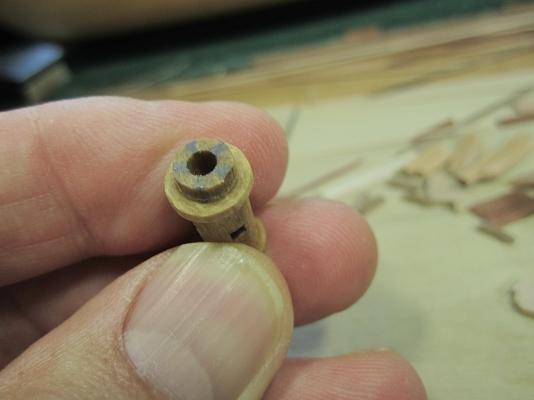
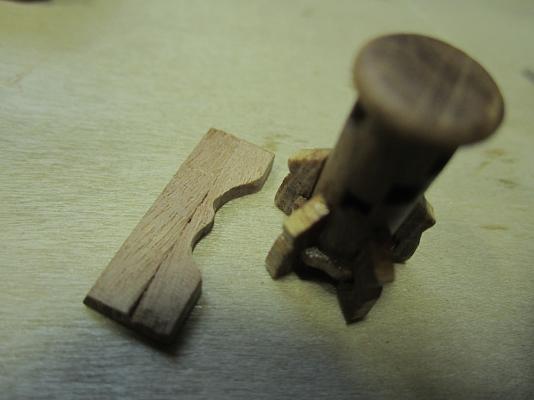
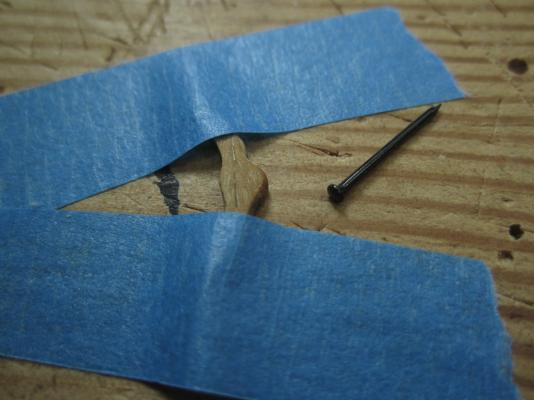
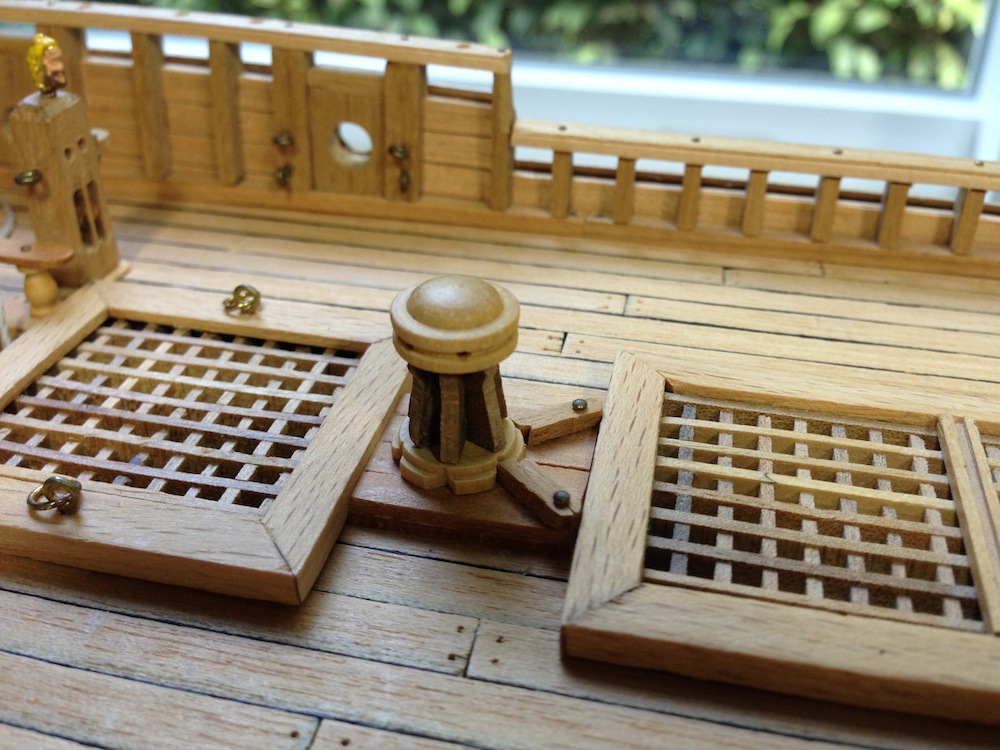
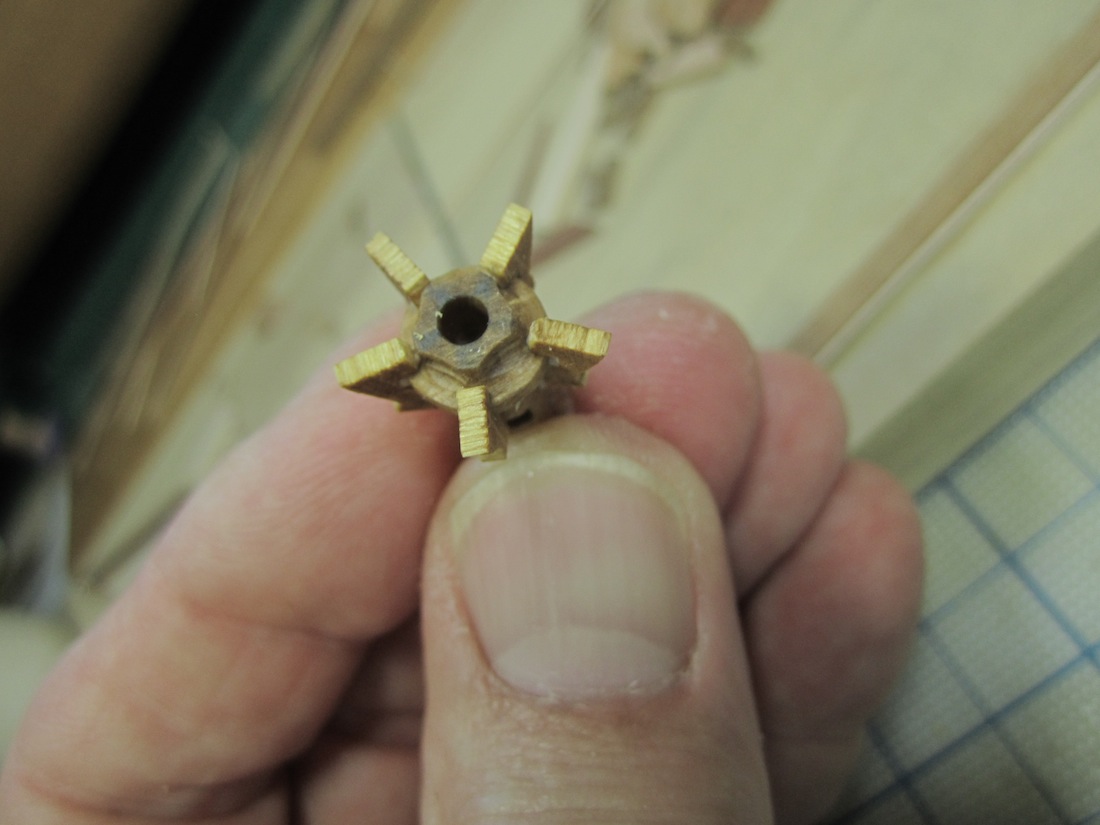
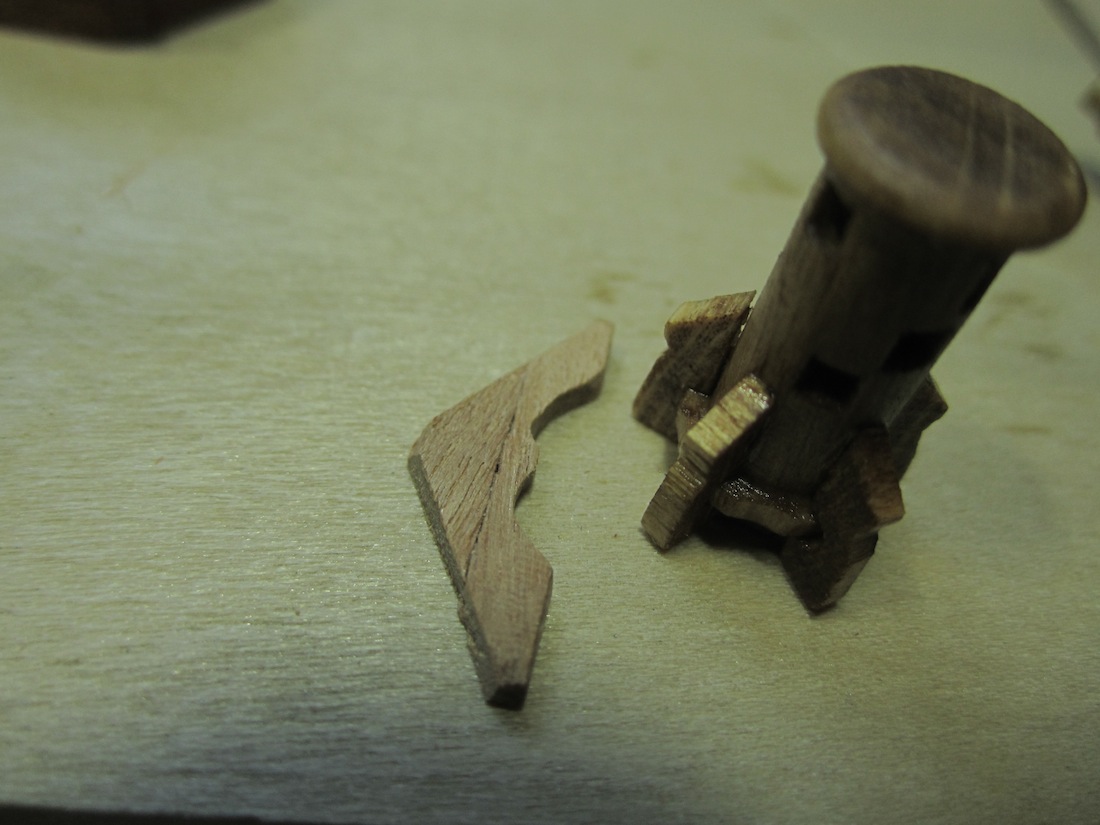
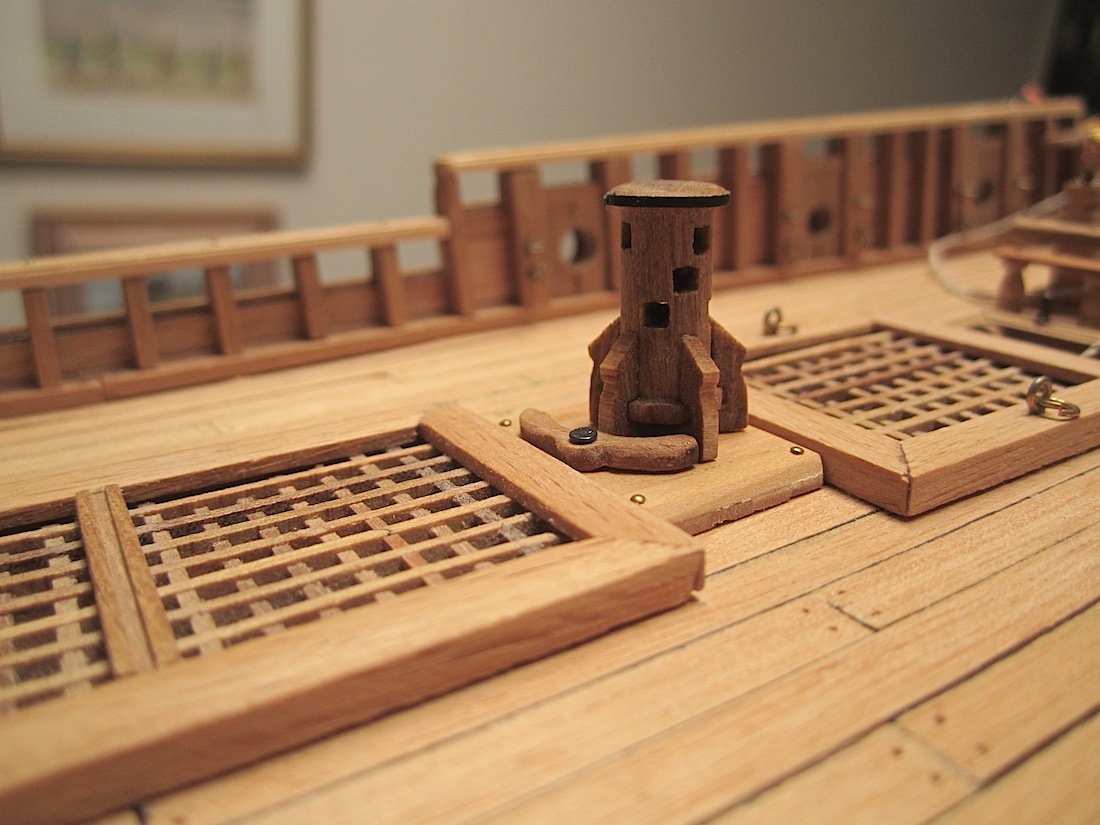
Original installed piece. Hmmm wrong !!Vasa original (the only one, of the three, to survive)Ferit thanks Thank you JPett and Joachim A minor update, but apparently a significant one, I owe this change to Blue Ensign and Ferit. They were discussing the spectacular capstan that F installed on his Berlin (If you have not visited his build log you are really missing an astonishing upgrade for the basic kit). So it turns out that the "parts bin" capstan supplied by Corel for the Wasa is period inappropriate. Something I had no knowledge of, not surprising in that I am just now learning so much... Pulled the piece and rebuilt a more period looking example. I learned how to do square cuts from Ferit (not to his level, but...) So I include these updates. Again thank you B E and F you own this change. THANKS Michael