HOLIDAY DONATION DRIVE - SUPPORT MSW - DO YOUR PART TO KEEP THIS GREAT FORUM GOING! (Only 24 donations so far out of 49,000 members - C'mon guys!)
×


bear
-
Posts
362 -
Joined
-
Last visited
Content Type
Profiles
Forums
Gallery
Events
Everything posted by bear
-
Ahoy Mates My Dad who was also a Tool and Diemaker had the same opinion of wearing protective eye wear and then later gloves. I can remember seeing him come home on several occations with an eye patch on due to either grinding particals,or metal chips getting into his eyes because they did not wear eye glasses back in the 50's,60's. It then changed because the owner and state had had enough of the bills of sending guys into the hospital. When I strated out as an apprentice in 1971 it was manditory to wear eye protection. As for model building-those who do not wear eye protection as far as I am concerned are IDIOTS- sorry for any hurt feelings-but how would you build without your eyesight being gone totally or even limited by getting a chip,superglue or and of a xacto blade point that broke off and flew into your eye? As for gloves,I have had to get stitches in my thumb and finger a couple of times. But my Dad before he retired started wood carving for a new hobby. He was lucky for a couple of years until one day while carving a piece with a carving tool,he slipped and it went into his other hand which was holding the wood. Being an old toolmaker,he took lots of pride having the sharpest carving tools that he could sharpen. Which he succeeded at. Well the tool cut into his hand severed a vein and tendon,he bled like a "stuck pig" and his blood flew onto my Mom's sewing table where she had a new wedding dress that she had just completed for a customer. It did get onto a corner of the dress to my Dads horror,and my Mothers yelling and cussing him out while she helped him get a dressing on the injured hand,and then he had to listen to her the 45 minutes to the emergency room and then the rest of his life until m Mom passed away 7 years later. He recovered from the wound,but not my Mom's tounge when the subject would ever come up. After that he got a set Kevlar gloves and appron. Which he used all the time when he was doing cutting that used a lot of preasure. I have his tools and gloves and appron that I now use all the time when needed. He recovered the use of his eyes and hands after all the injuries,but I have seen others who have not,and would have not had their disability for life after not using their eye wear or gloves. Please do not do modeling without wearing eye glasses at least,as for the gloves,use your own thoughts,but there are gloves that can keep your hands safer when you carve. And for sure get an appron to protect at least your clothes,and keep you from having an xacto knife or carving tool imbeded in your thigh or knee. BE SAFE MY FRIEND'S -BEING SAFE IS NOT AN ACCIDENT YOU KNOW! Keith
-
Ahoy Mates Is there any drawings or books that contain material on what types and styles of hinges and latches were used on English ships of these periods? Please let me know if there is any information on these items. Thanks Keith
- 1 reply
-
- 1
-

-
Ahoy Mates Depends on just what you mean by "Best Kit Maker" Here's what I would define it as: Not having to replace the following,since the kit would have top standard material in the first place. Wood Rigging rope Blocks Cannon barrels Cannon carriages Rings,eyebolt's, Grating Deadeye's Right now I have in my kit stash and have built kits from the following makers: Euro Model- Royal William and Lyde Pan Art Royal Caroline and 1803 Armed Launch Lauck Street Shipyard Halifax and Fair American Aeropicola Golden Hinde Model Shipways Union Picket Boat Number 1,Fair American,Armed Virginias Sloop,Gunboat Philadelphia ,USS Confederacy, HMS Bounty Launch Woody Joe Royal Charles Yacht Navy Board Models The Battle Station Inter-Action Enter. CR Lamb Sternwheeler Caldercraft/Jotika Mary Rose Syren Cheerful Billings Viking ship,Smitt Ocean Tug,Nord fishing boat Dumas Chris Craft Runabout, Typhoon, Broklyn Tug,44 Foot Cost Guard Motor Life Boat. Bluejacket WW1 Four Stack Destroyer Amati Ferrari Arno Hydroplane with cast metal engine Saito Star steam Launch As you can see I have a cross section of the makers of kits.NONE of them are perfect. I would say that you can build all of them without replacing anything in their kits,but it would be a real task on some due to the garbage wood that they include for planking. Overall that is true for 99% of the kits listed below except for these kits: LSS Fair American,Halifax. Woody Joe Royal Charles Yacht Inter-Action CR Lamb Sternwheeler I have spent a lot of money on boxwood and swiss pear from Jeff and Jason to plank all of my ship's that I have completed and have a large supply waiting for the kits to be built. I build vintage RC Gliders also and the best thing that has happened in that side of the hobby is the "Short Kit" where you can buy laser cut ribs and plkans without having to also buy all of the other wood for the kit. That way you can get what you like in balsa and other woods when you want and the quality that you want,without having to buy wood thats sub-standard and just fit to start a fire with. I love the way that Chuck is going starting with his Cheerfull. You get the plans and laser cut bulkheads and keel parts and other sub assemblies when you want. And then can get the wood you want to build it with. From either basswood to boxwood,and have no problems with wood thats garbage and dried out that's bought in bulk for mass produced kits. The best thing is to read the build logs here and find out what the qualites of each kit maker is and ask about the kit that you might want to build. Each kit maker can have a different designer for each kit they produce,and each one will be of different building quality,along with instructions that also might differ in quality. Get with a building group and hear and see what others are having to do in their builds. Everyone's standards are different,what I woulkd call a great kit will be different from another builder in my group of builders.
-
Ahoy Mates Just received this new book Friday on the Mary Rose. I had pre-ordered mine just a year ago now. Glade that I did. I have all of the Trust books and any other books on the Mary Rose,and this new book is a great addition to my collection and more important to my building of the Caldercraft/Jotika 1/80 Mary Rose kit. It is soft cover paperback from the Naval Institute Press. around $40.00 with shipping. It covers the history of the Mary Rose and has added details that all of the previuos books have not covered. The Caldercraft kit has just two upper decks above the main gun deck,but this book has drawings showing the Mary Rose in several points in its life with 4 decks above the main gun deck with high forecastle and sterncastle's. It makes it look like it could capsize in any turn. They also include details of the hull and interior including the different guns and rigging. I highly recommend this book to Mary Rose builders and those who like the Mary Rose. I would have photographed the book and details to show here,but do not know if I would get into copyright problems. I do plan to finish my Mary Rose from Jotika as it is,but my 1/48 clone of this kit will be made to show the additional upper decks as it is shown in this new book. Keith
-
Ahoy Michael For you I would try to find a building group in the area where you live. And that's before you spend any of your hard earned money on any kit. Visit them and see what they are building and get what they know about the different kit makers and what kits are good and not and for what reasons. Each kit maker has it's best kit and a lot of bad ones-that's for all of the kit makers. You need to crawl before you walk and then run in life. And it's the same in model ship building. You need a simple kit,and a good one. That is not inclusive with either qualities. There are a lot of simple BAD kits and a lot of complicated good ones. I would recommend the Model Shipways Gunboat Philadelphia for a first build for these reasons- The large scale for ease of working on and the size and space and type of rigging. Simple shape of the hull. Flat bottom with all the types of planking required,but in easy shapes. You will have to do all of the types of building in this kit that you will do in your future builds. Our building group used this kit and there are ten started and of that 7 are finished with 1 still not finished and one member left our area. Out of this there were 6 guys that had little or no experence in building wooden ship models or really any models for years. Our group ages where a couple under 50 years with all the rest from 60-90. This kit is a great learning one and one that will be easy to complete without being too simple. Chech out our blog at www.woodenshipclass.blogspot.com There are a lot of crap out there in kits. Find a group,get the right kit and after a couple of builds is when you will know what kit maker is the one for your favorite ship to build will be,but first you need to learn and more important is to start and complete it with having fun threw the build. It will not be fun all the time. There are stages that I still do not like to do,but that's life. And the most import thing is that you are doing it for yourself and not competeing with others in building skills or quality. Have fun and learn a lot of new skills and maybe discover hidden ones you never knew you had. And just think of being able to sit back and look at what you did each day on your ship and the best time is after it's completed ,and looking at it with pride and with a new level of skills. Keith
-
In what time period did the Royal Navy start using the lead sheet covers over the touch holes on their cannon's? I have seen them on cannon's in the 18th century,but need to know if they were in use back in 1545 for my Mary Rose build. For the wrought iron cannons and bronze demi cannons and others. Thanks Keith
- 1 reply
-
- 1
-
-
Ahoy Mike and Mark I would also like to know what is the correct way to store strips and sheets. Sheets are 2",3" and 6" wide boxwood,swiss pear,basswood and balsa. I have a large investment in these woods that I have at home in the house. I have ended up replacing most of the woods that are in the kits that I am building and one's collected for future builds. The majority of woods that are in kits for the second and finish planking are IMHO only fit for either first planking or as fire starters. The exception is most of the basswood. The walnut,mahogany and other woods are of poor quality and for the most part have no wider strips for you to shape the bow and stern planks to fit the shape of the hull. So back to how to store the wood. I know to keep it out of sunlight and temp. changes. But how do you either stack them or what kind of racks should you make? Thanks Keith
-
Hello Iondriver After you get those planks off the bulkheads you need to find a wooden ship building group that's in your area. Starting off building this ship for a novice will be very difficult. You need to see from others first hand just what to do and in the right sequence and way. Do not order any wood until you find the group and are able to talk to someone about what would be the best wood for this build. The kits wood IMHO is garbage,and after being dried out it's just good for starting a fire. It is great to now rescue the kit after 40 years and to honor your Grandfather by finishing up this kit. But you need to maybe start with a beginner kit and have the gaol of building this kit after you have learned how to build wooden ship models. Otherwise you might end up stopping halfway threw the build after getting fustrated with the build. Again,find a club that builds wooden ship models and ahve a lifetime hobby that your Grandfather will be looking down at you while you build and finish the Wasa that he started 40 years ago. Keith
-
Ahoy Mates What are your thoughts on keeping a small or large supply of hard and soft woods for your builds? Myself, I keep a large supply in house. Keith You just never know when the Zombie's will come!
-
Ahoy Vince I will spend this weekend going over all of your posts on the Royal William's build here. I was fortunate to have been given this kit last week by a great friend of mine. And I have seen in past postings on this kit that there are problems with the deck sheer and how thw stern decorative decks are not in line with the extended curve of the decks. Thanks for posting all that you have done to correct these problems in the kit. I have been doing the same type of work on my Mary Rose 1/80 Jotika kit on the main gun deck. Which in the kit is nowhere near where it should be,and has no sheer-but is flat. A lot easier to correct than the number of deck's and stern work you have done here.And then working with the white metal castings on top of it all. Keith
- 593 replies
-
- 2
-
-
- royal william
- euromodels
- (and 1 more)
-
I know what the tackle is for the wrought iron cannons that were used on the Mary Rose looks like. But have not found any drawings of what they used for the bronze and cast iron cannons on the Mary Rose or any other English ships of that time period. Would it have been of the same type- Just a simple breeching rope going thru rings with no blocks? I have all of the Books from the Mary Rose Trust and they do not cover this tackle used for the guns other than the wrought iron ones. Thanks for any help you can be of. Keith
-
Hi Clare They are out of stock right now. Will be ordering about 4 of them when I can. Looking forward to using one on my new Woody Joe Charles Yacht kit. Thanks again for steering me to his site. Keith
-
Hi Chuck Great job,you would have made a great Toolmaker back when I started back in 1971. Now days they use Wire EDM's for this kind of work on steel. Back when I started it was a band saw, band file and files. All layout,cut to the line and fit. We had one customer pacific Saw,who made large circular and band saw blades for the lumber industry around the Pacfic Northwest. We made punches and die's that were the shape of the curf cutout of the blade tooth-where the chip is formed and curled. We would get just a tracing of the out line on onin skin paper,and have to match it with a punch 3" high and a die section-bottom 2" thick out of D2 tool steel. Then we made up the set with only .002 clearance between them all around. By band sawing first,band filling,hand filling to finish with. These teeth cut out's were on average 3" across-not small at all. Good way to really learn a trade.I did them every week for years. Too many to count except that I know how mant there were-11. Keep up leading us to the near perfect ship model Chuck. Now back to my cannon making for the Mary Rose.And this damn hot weather here in Troutdale,Oregon 101 today! Keith
- 1,051 replies
-
- 4
-
-
- cheerful
- Syren Ship Model Company
- (and 1 more)
-
Finishing a ship's hull
bear replied to Ulises Victoria's topic in Painting, finishing and weathering products and techniques
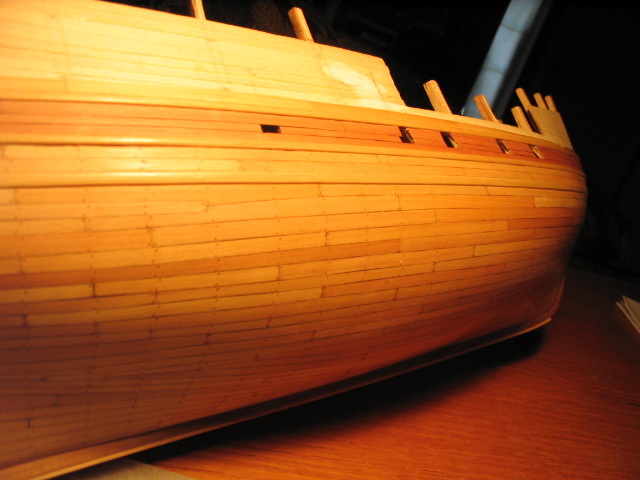
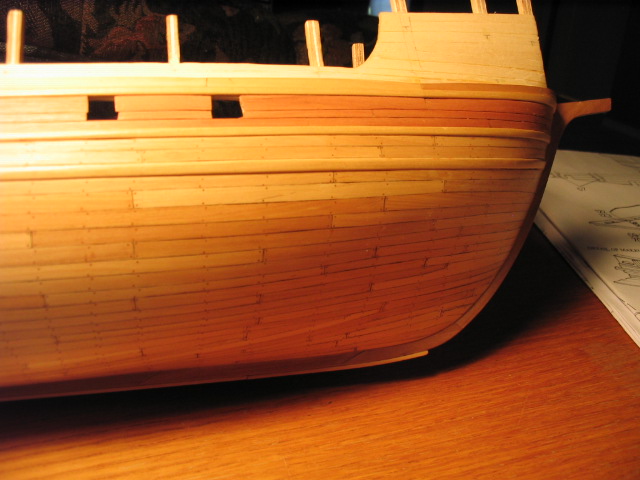
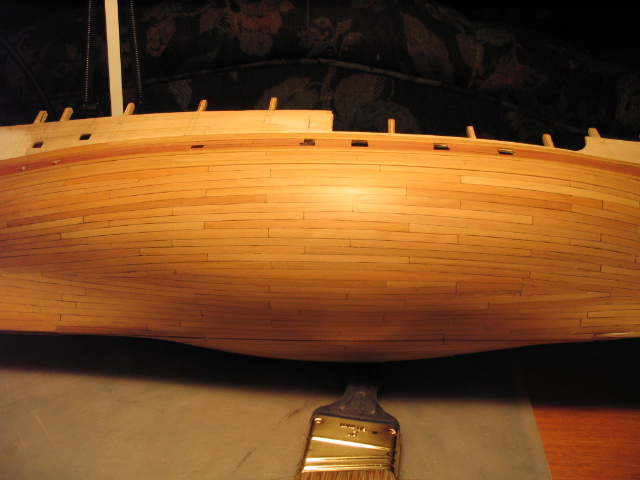
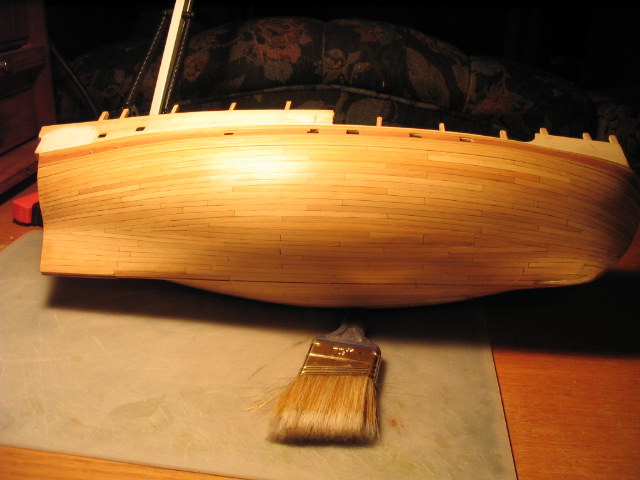
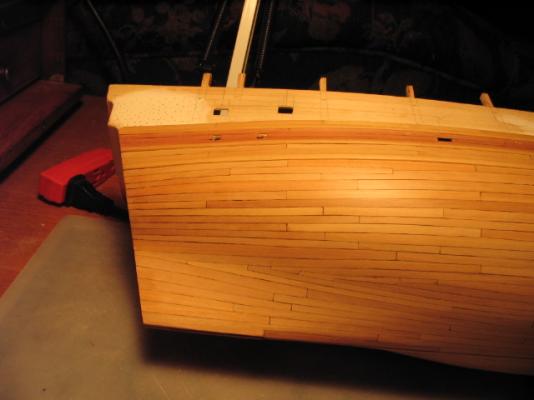
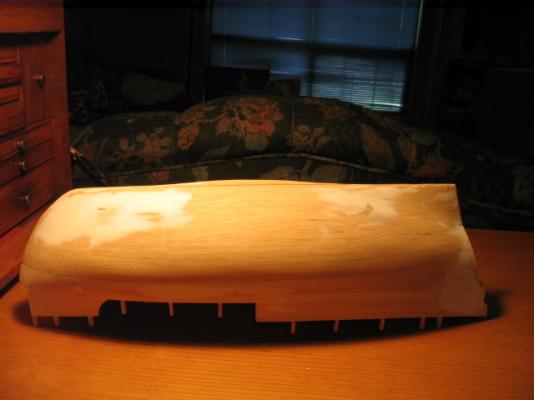
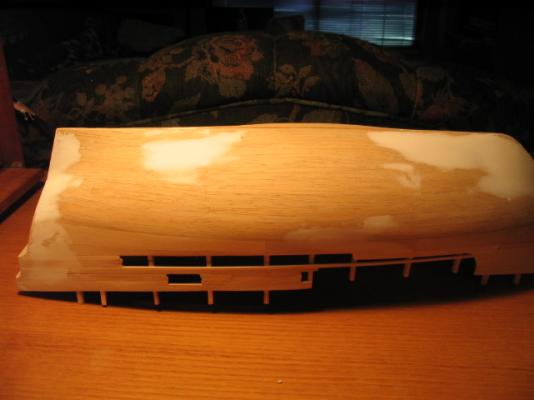
Hi Ulises I have been using Testors Dullcote Lacquer for finishing on my hull,decks and other wood surfaces on my ships. You can leave it flat finish as brushed on,or you can sand and buff it with a paper towel to get up to a shinny finish. I have had nothing but good results as long as you do the following. If painting it over prior finishes,test them out because the lacquer can soften up and make the other paint bleed into the clear lacouer.m Always test it out with samples. It dries fast and you can make multiple coats in one day as long as you let it dry for a couple of hours in between coats-again test it out to make sure your local temp and humidity doesn't effect the drying times. And if you will be painting over this clear coat,test out what you will be using first. I like it because it dries hard and can be sanded and then buffed out to any degree of flatness to gloss. I have used it over swiss pear,boxwood,basswood,walnut,mahogany. It brings out the color in the wood without adding ant itself. Try it out. The photos are of my 1/80 Mary Rose from Jotika. The hull is planked with boxwood and has 4 coats of brushed on Testors Dullcote Lacquer,which was lightly sanded and rubbed out with just a paper towel sheet. Boxwood used is from Jason at Crown Timberyard. Great wood and FAST shipment. Keith

-
Ahoy Mates When I stated using boxwood and swiss pear for planking I did some tests as to how good Titebond held it. Since it's a hardwood and the grain structure is very tight and dense,the gklue did not hold it as well as basswood that I was used to. To give the glue more surface and texture to grab onto I have started using a xacto razor saw blade to scratch the surface that will be glued. I use the side of the teeth on the blade to groove the planks surface. It looks like what you see when you use a toothed trowel for laying down glue for tile work. I also use this method to make wood grain on basswood before staining. The grooves add to the total surface area and roughness that the glue has to bind to for added holding power. It also prevents you from pushing all of the glue from under what you are gluing together by pressing them together. With the grooves there is always some glue between the parts to hold. And it cuts down on the amount of glue coming out from under the plank. It also works for CA. Try it out and let me know what you think of this way of prep for gluing planks and other parts down. And try it to simulate wood grain on basswood and other types of wood and materials. It works on plastic also. Keith
-
Hi Did I see where this kit is now OOP? Is it now out of production because Bob could not sell enough of them,or was it because the 3D parts could not be produced to a acceptable quality? How are the 3D printed parts in the kit you received? I have his Halifax and Fair American kits. Have not started them yet. I was surprised that he chose this ship since there are other kits of this ship being produced by others. Keith
- 306 replies
-
- 1
-
-
- armed virginia sloop
- Patrick Henry
- (and 2 more)
-
Hi Cathead Your work is great. I love seeing all of the framing and structure on your build. Being that it's 1/87 scale I have a question as to a kit that's in 1/87 of a sternwheeler. I have been trying to find the kit of the C. L. Lamb in 1/87. I have tried to contact the company that had made this kit by email and phone but have had no success. Have they gone out of bussines, or out of production on this riverboat kit? If you know of a kit thats for sale or where I might find one now,please let me know. I look forward to watching your progress on your build. Thanks Keith
-
Hi Guys Here's what I just did using a scraper on my 1/80 Mary Rose build. Just finished planking on one side of the bottom of the hull using boxwood and swiss pear from Crown Timberyard. Keith


-
Just was thinking about just how much I scrape now instead of sanding. I scrape planks when splieing them into tapers and shapes,use radius gauges to scrape edge raidus in planks and molding,also use them for scraping the hull where there are rounded areas like on the stern and keel. The standard radius gauge sets that I used in diemaking come in handy to scrape all tpyes of areas. And since they are made of hardened tool steel and have sharp edges they work perfectly on models,either plastic or wooden. I have a couple sets of cabinet makers scrapers,but they are too large for a lot of areas on models. Another plus is that they make chips,not sanding dust for the most part. And leave a mirror smooth surface,and do not close up the grain with wood sanding dust. Has there been any articels on using scrapers in model making? I have seen Chuck with his brass molding shaped scrapers here.And he is a master at making moldings for his builds. What have you done with scrapers? Keith
-
What style-type of ends on steelers were used in these time periods of ship building? Where they angles-tapered by 3 X plank width ,with flat on ends 1/2 of plank width,just a straight angle- or are there others? Want to find out what type goes with each time period's listed above. Thanks Keith
-
Practice makes perfect. Yes that's right. The more you do the better it will be. And that's exactly what you should be doing. Why waste the first planking to just a slap dash type of planking job? If you ask the question ,then you need to practice even more. Be honest with yourself. No mater how many times you have done it,you always improve in other ways. Just look at your last work,then list the things that could be better. Then you have those to improve on,and your first question is the answer-the first planking should be as good as the second planking. That first planking is for you and God. The second is for the rest of us to see. Enjoy the planking as a quest of perfection that will never be achieved. But after time and practice it will be close. Keith
-
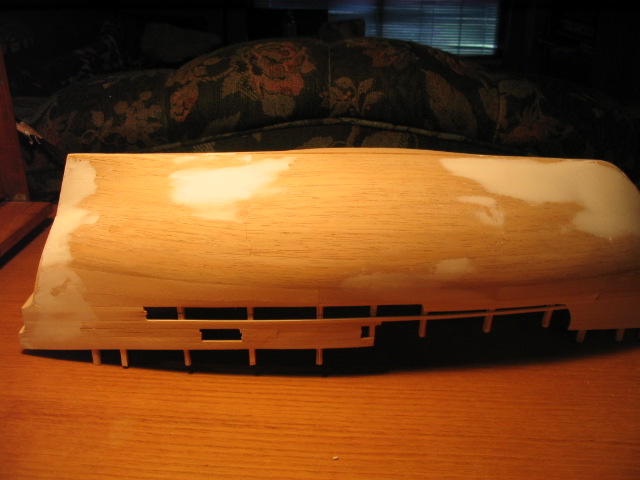
Thanks for the good news Brian. I also drilled some .020 dia. holes into the wood thru the filler so that the Titebond will have contact with the first layer of planking under the filler. Keith
- 1 reply
-
- 1
-
-
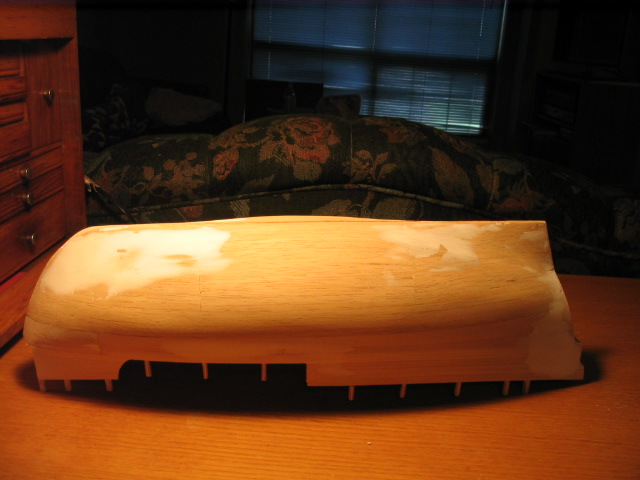
Ahoy Mates Have you used this product for filler-Elmers Carpenters Wood Filler on a wood hull and then planked over it using Titebond to glue the planks over it? Or used another type of glue? Has it worked out for you? or did you have problems? I will be planking with boxwood and swiss pear over the hull and some areas that will be covered have this filler. Thanks Keith
-
Want to know if Minwax stainable wood filler is compatable with Titebond Glue? Can you use Titbond to glue planking to it,after it has been used to fill some low areas on a hull? If not,what wood filler can I use that will take Titebond glue(other than homemade filler from Titbond and wood sandings). I will be gluing with Titebond and the planking is Swiss Pear. Thanks for your help. Keith
-
3D printing tests (Form1+)
bear replied to iMack's topic in CAD and 3D Modelling/Drafting Plans with Software
How is the total cost of these parts after all that you spent on the 3 D printer and all thats needed for it? Just want to know how much it comes out to per part that is shown here now. Keith