vossiewulf
-
Posts
1,477 -
Joined
-
Last visited
Content Type
Profiles
Forums
Gallery
Events
Everything posted by vossiewulf
-

Fokker Dr.I by Torbogdan - FINISHED - Model Airways
vossiewulf replied to Torbogdan's topic in Non-ship/categorised builds
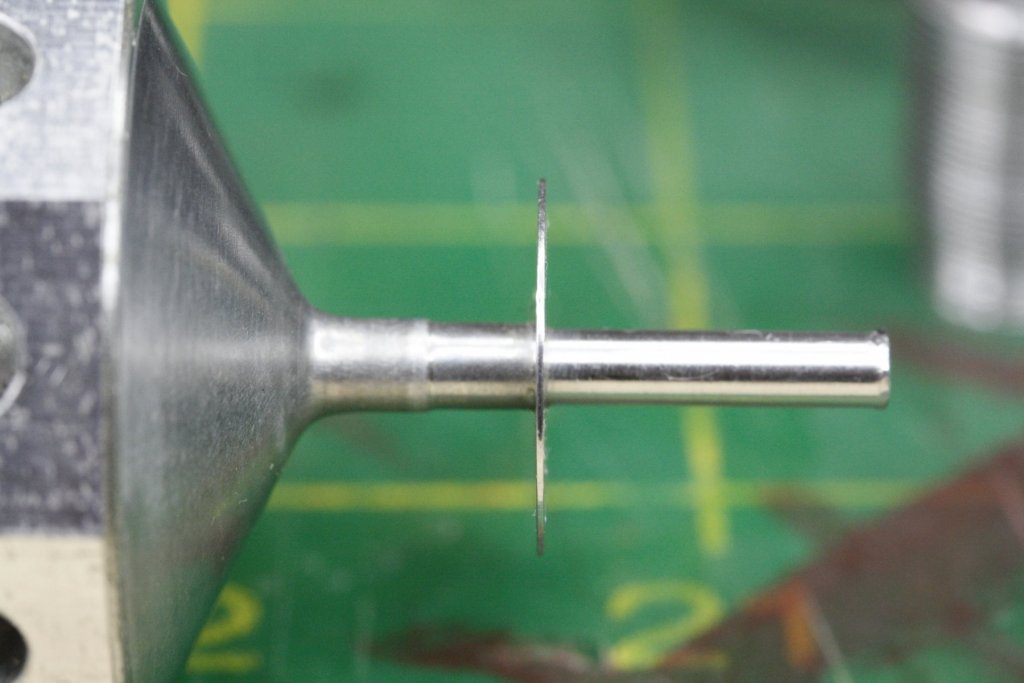
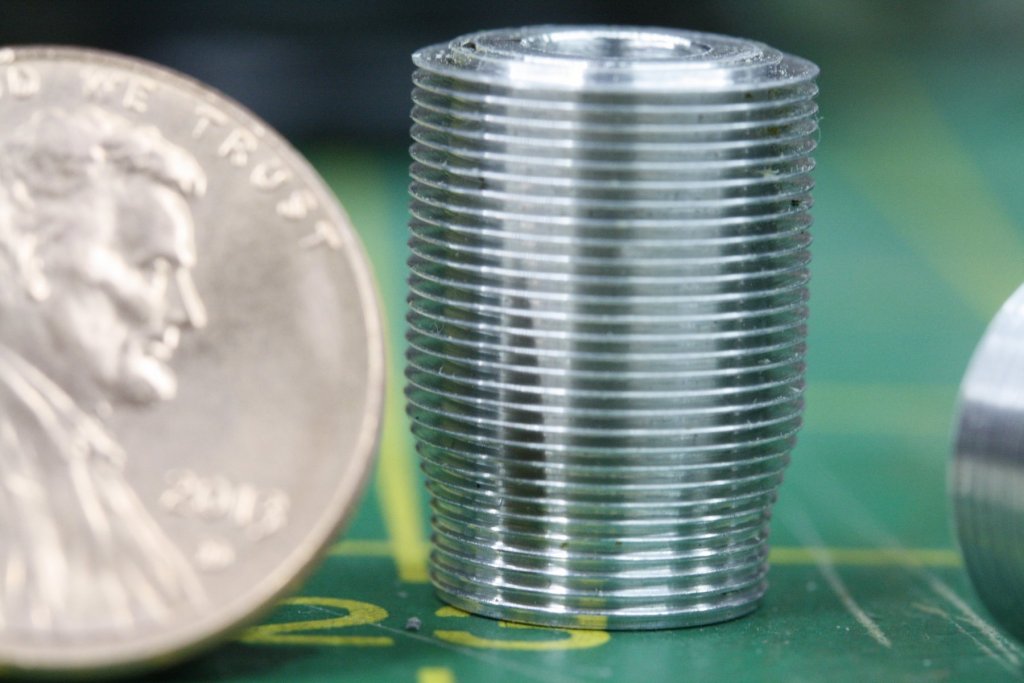
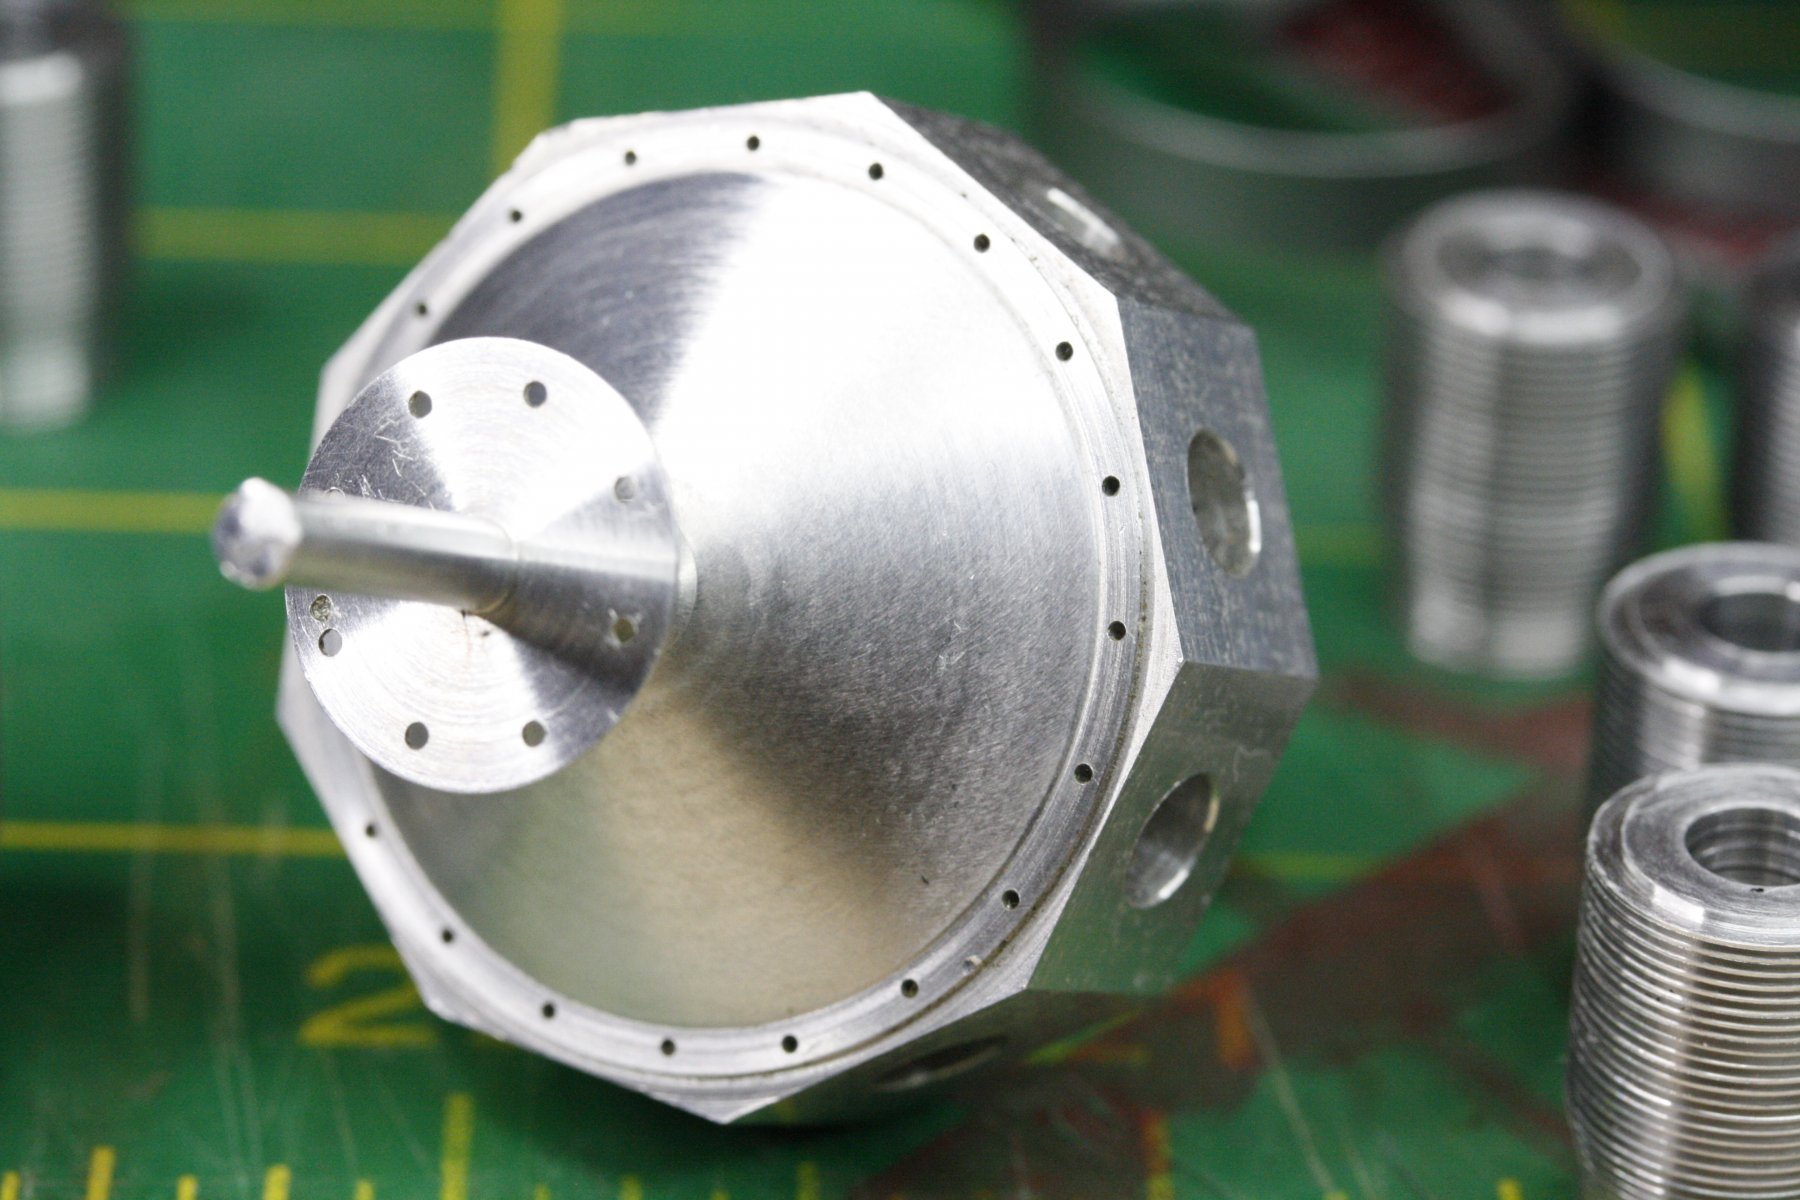
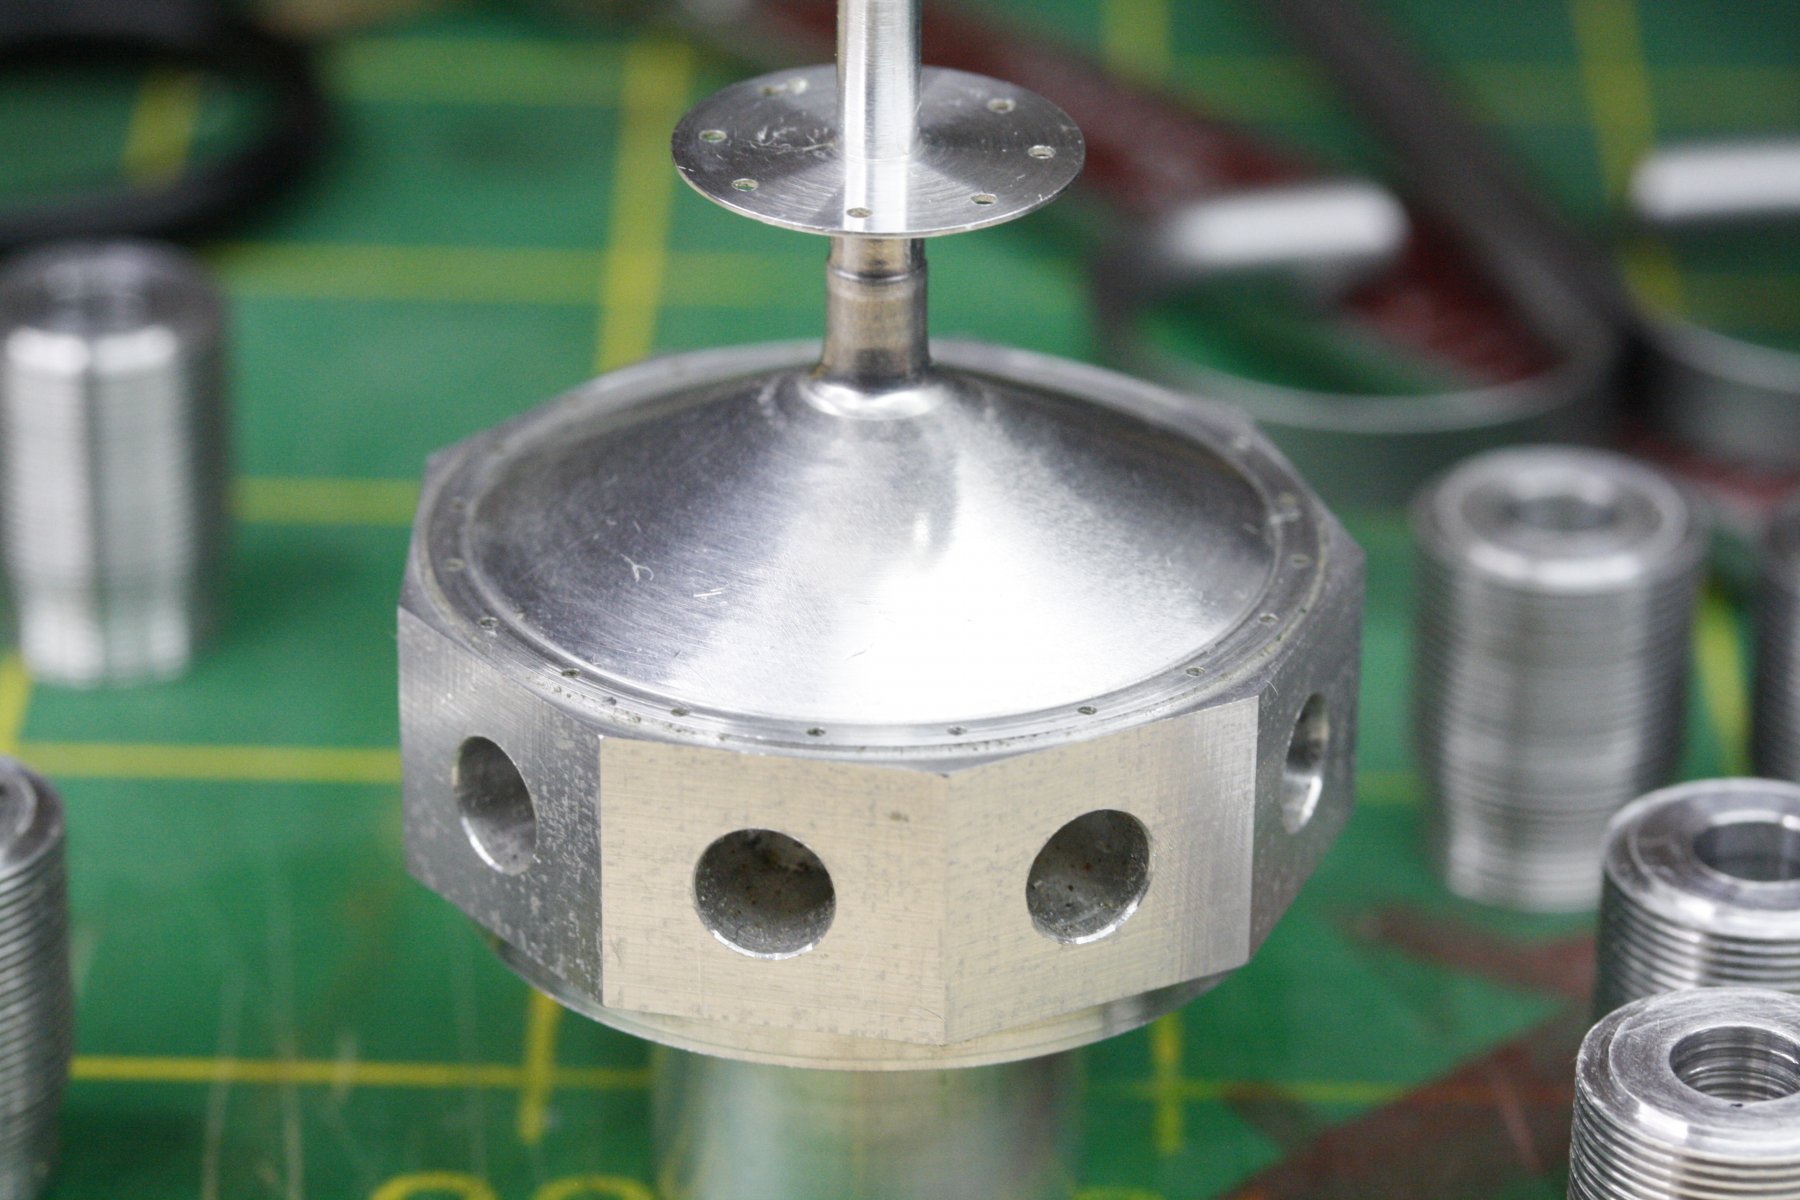
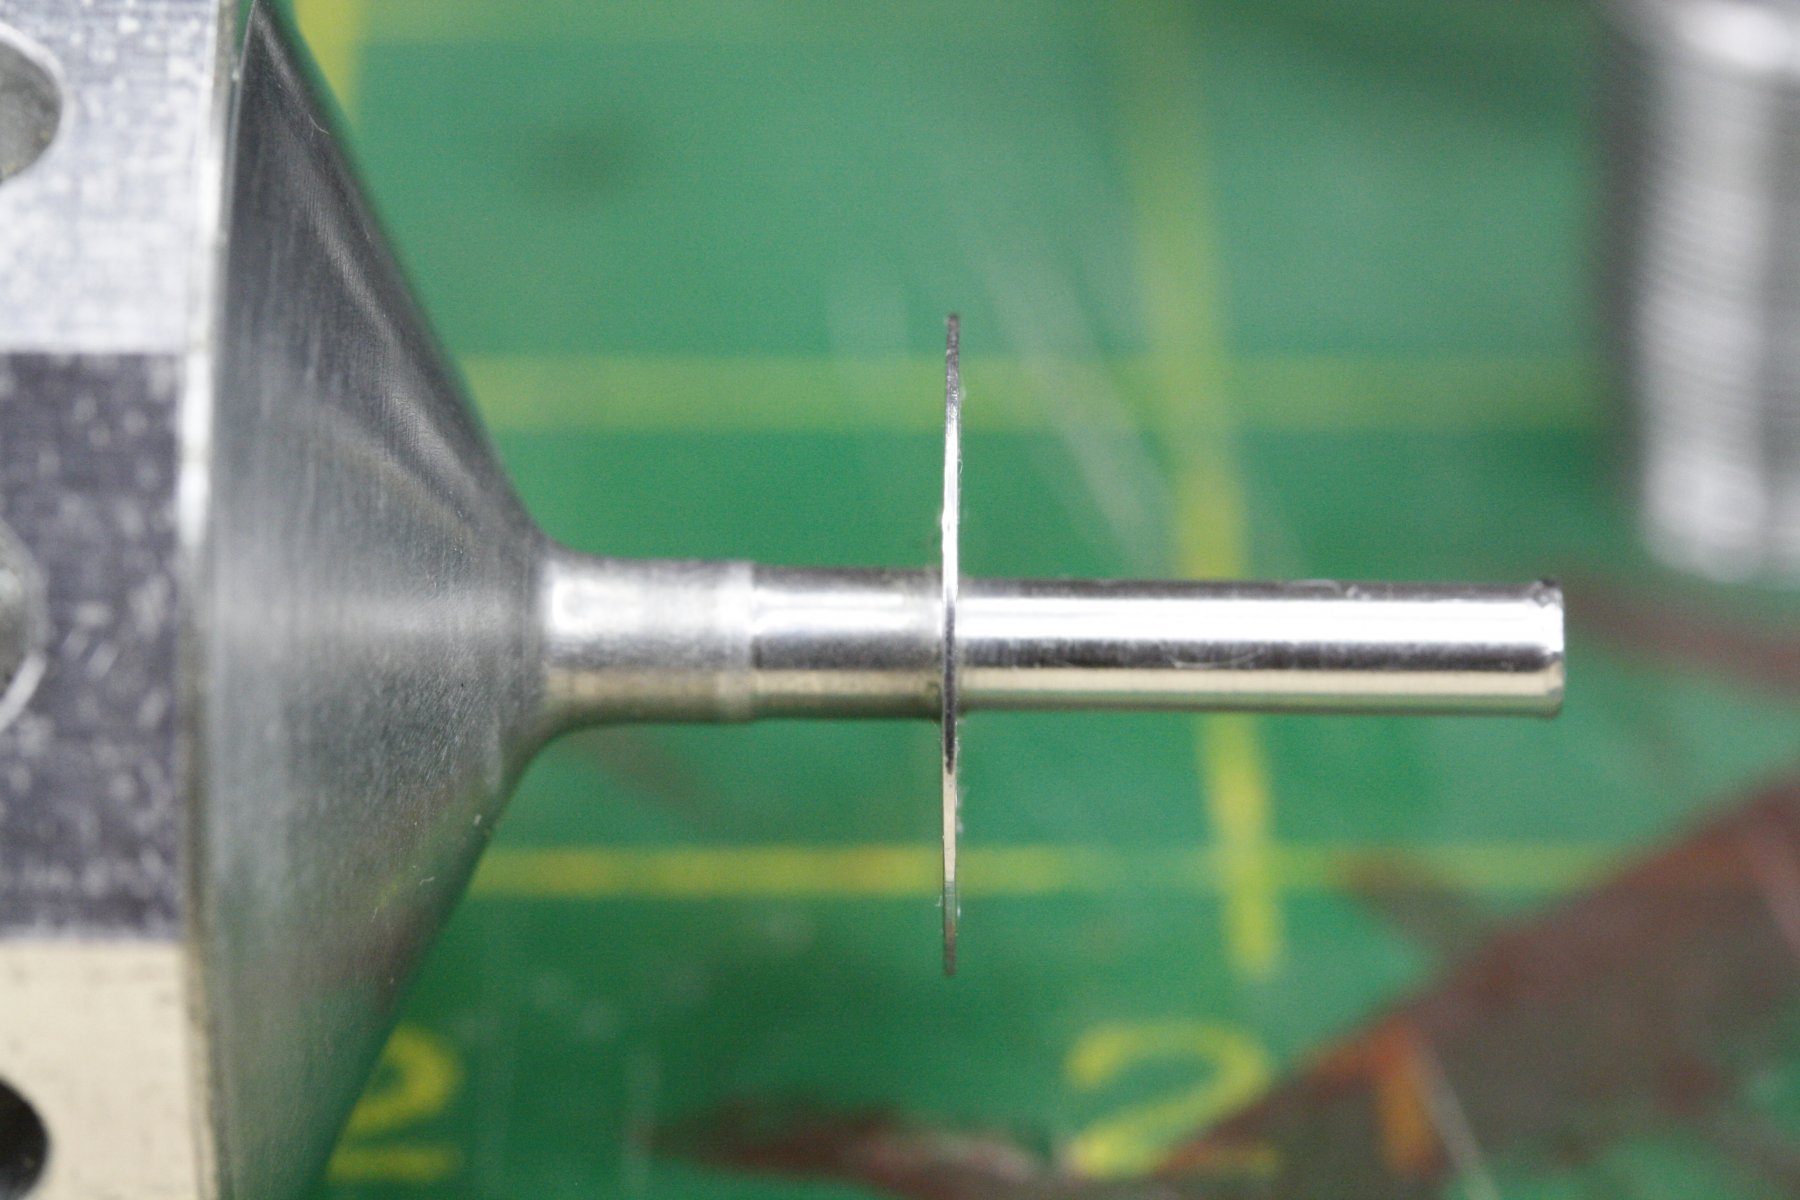
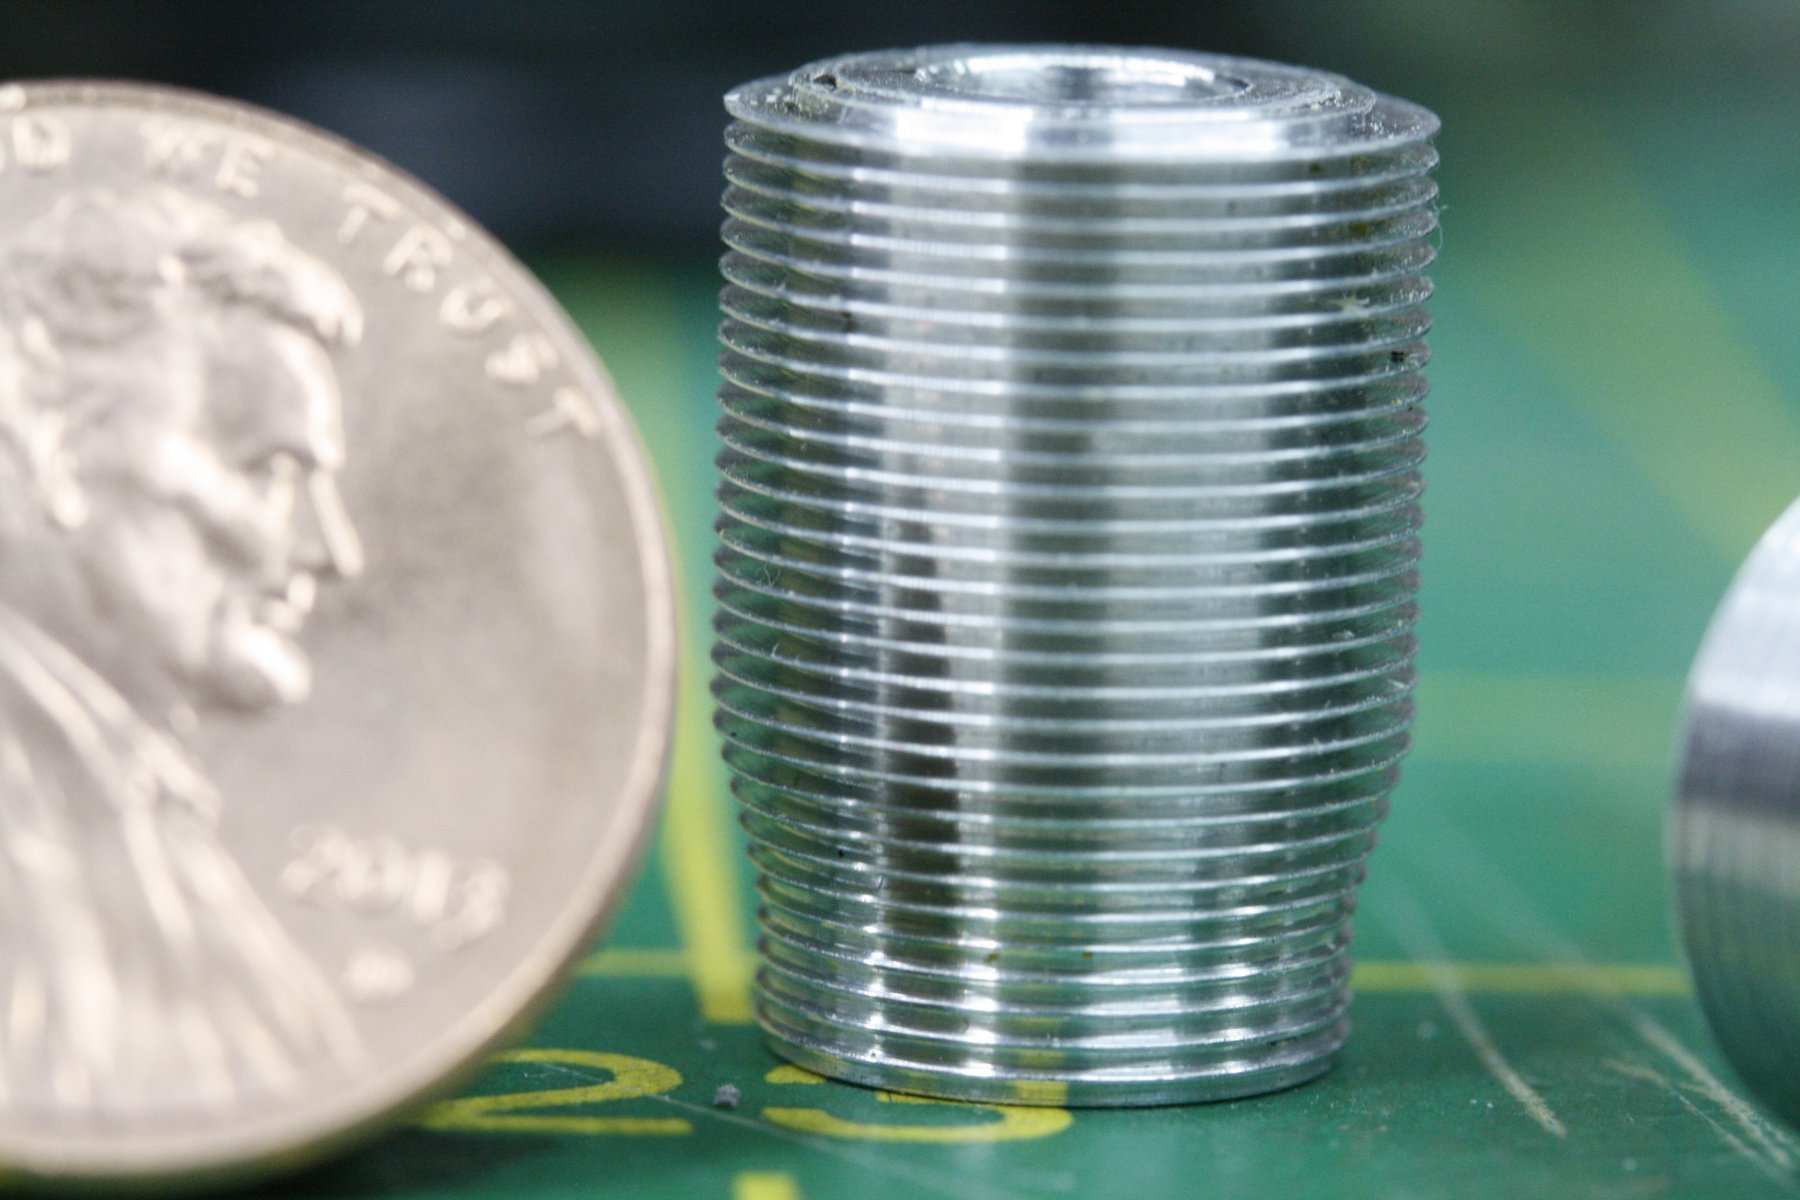
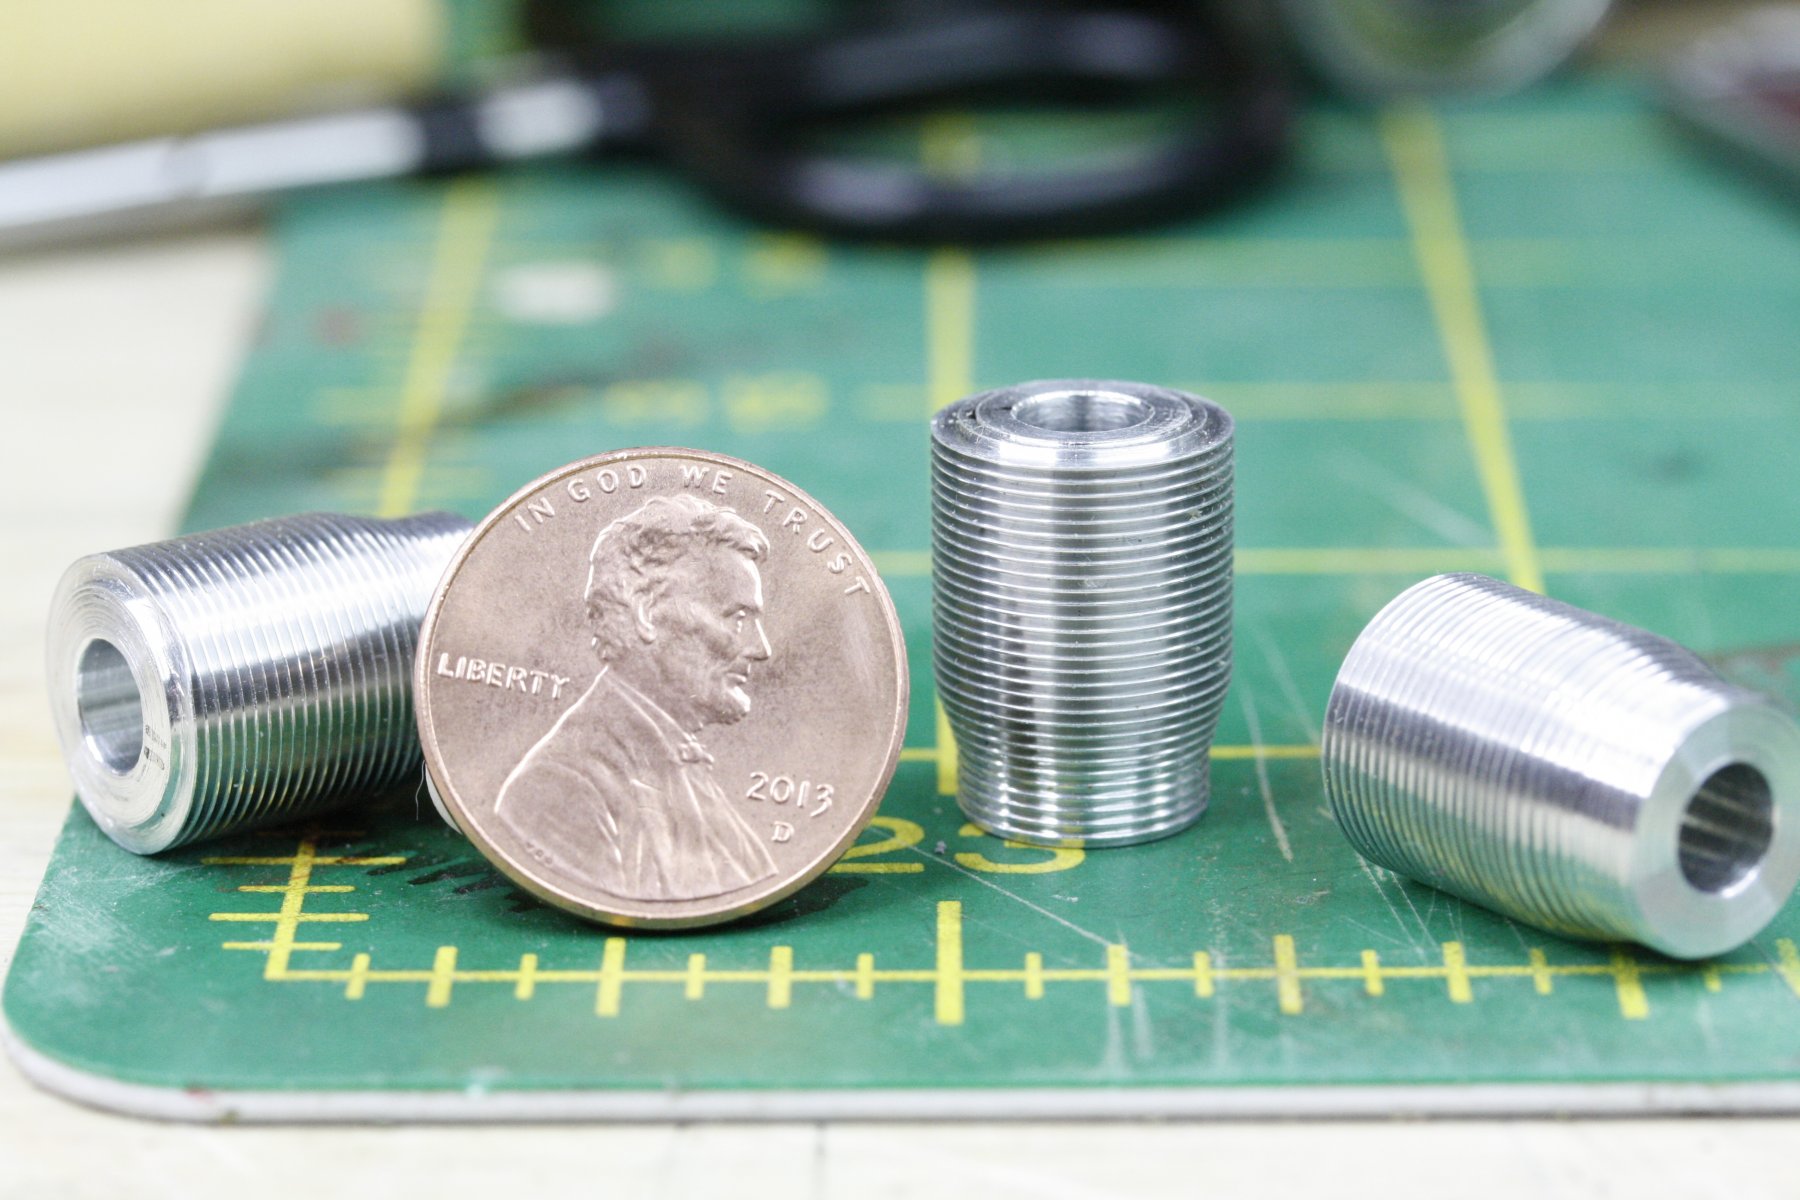
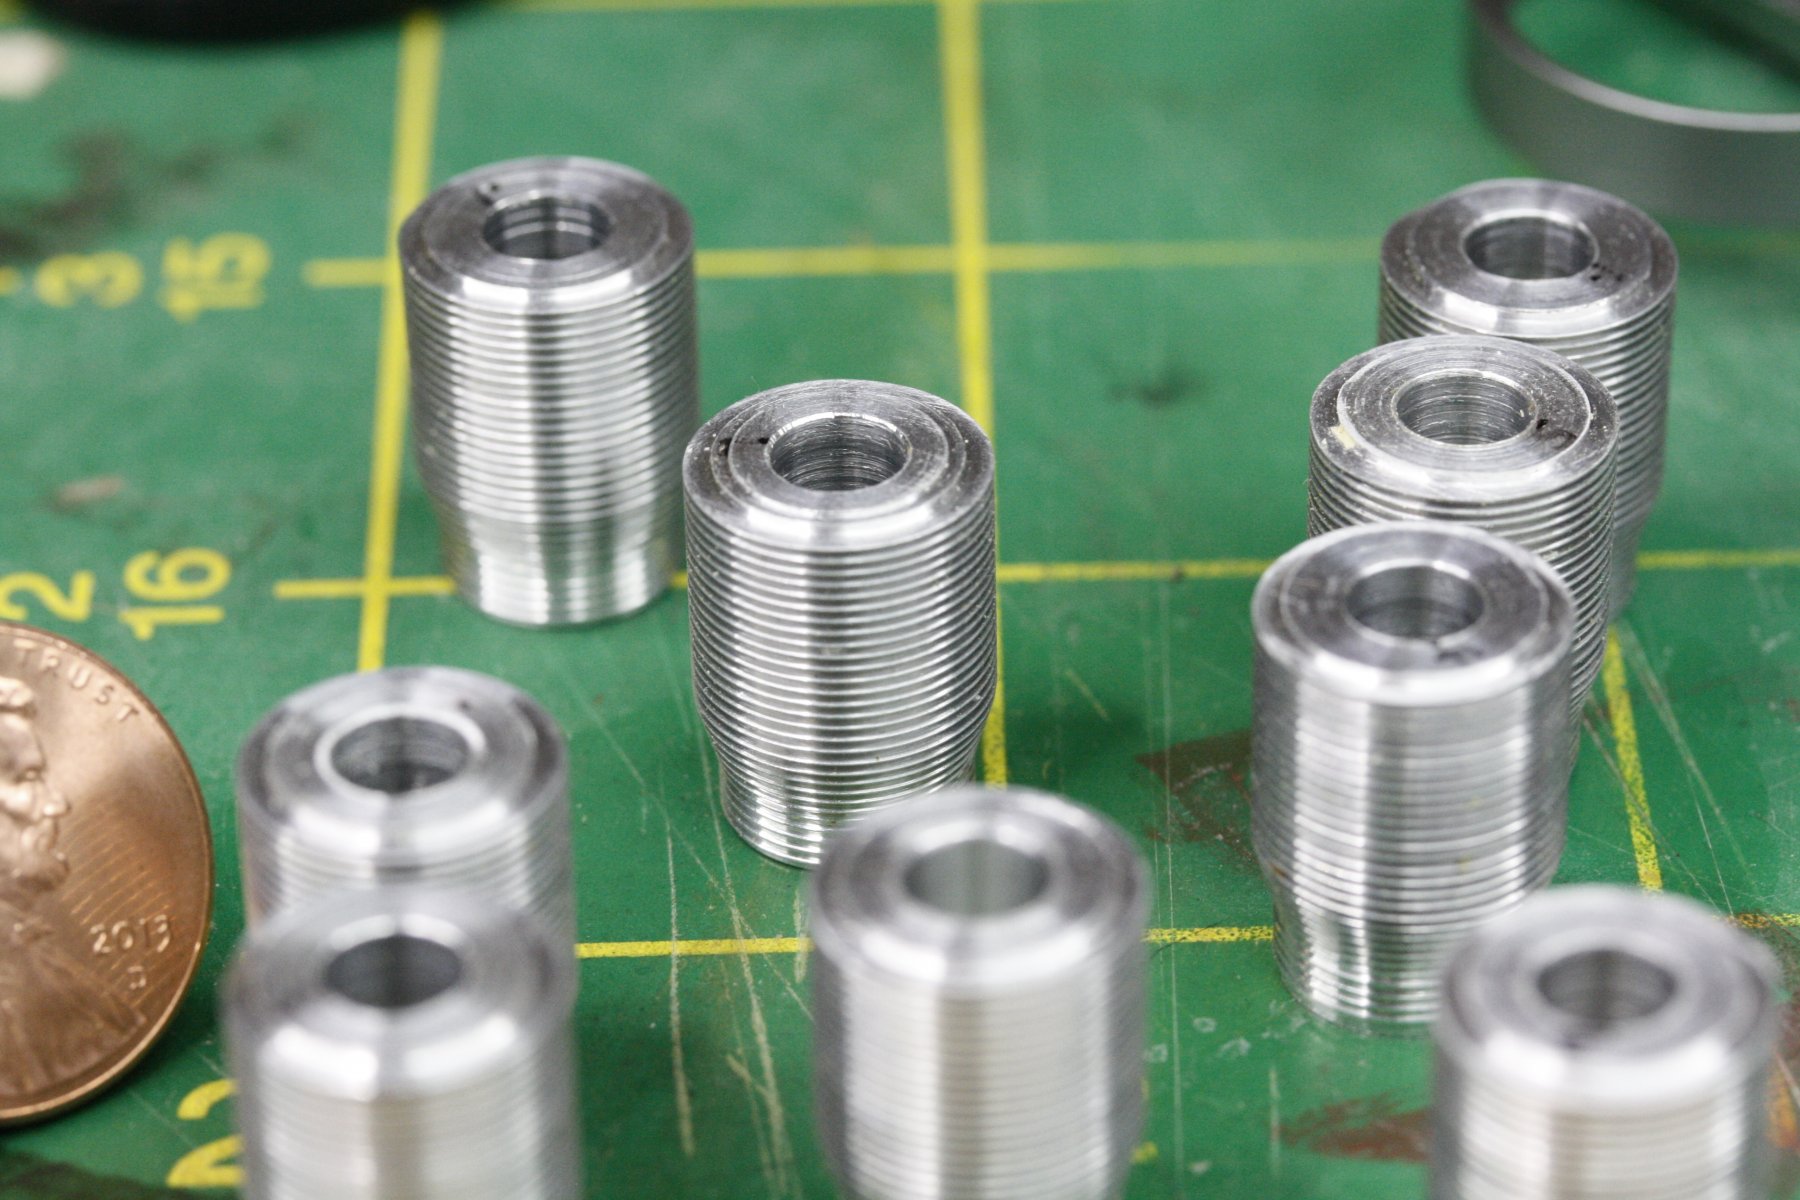
Tom passed away like 20 years ago now isn't it? If they're still carrying 1/16th Spandau jackets, those are based on the ones he made for me, I had him make 1/16th jackets back in 1992 or 1993 when the largest he made was 1/32 and I was the first person to request 1/16th from him. VERY nice guy, spent considerable time on the phone with me working through a couple prototypes before we got it right. I was very saddened to hear when he passed away, he was a very cool guy with big ideas, he would have remained a real presence in several hobbies. As I was saying, spinning out an accurate Le Rhone 9b/Oberursel UR.II is not exactly child's play, and if done in the standard manner of casting the cylinders split along the long axis, it can lead to the loss of will to live as you try to level and sand out the glue joints from eleventy hundred cooling fin joints. That plus the challenge led me to machine them, these are for a 1/16 Camel that is currently on hold, I need to swing back to my WWI stuff at some point. The cooling fins are .006" and I had to make a custom cutting tool similar to a parting tool and you can assume there were a couple of spectacularly exploded prototypes before I got one that would hold together. I used a DRO for depth and a dial indicator stuck with a magnet onto my lathe bed for the fin spacing. It was slow careful fiddly work where I pretty much held my breath the whole time as I was operating beyond the hairy edge of what the mini-lathe, and 2024 aluminum as a whole for that matter, could handle and had several explode or jam the machine, will train you to be fast on the emergency stop if nothing else. Engine block/casing/prop shaft/rear prop mount were machined out of a single piece of aluminum on the lathe first, then taken to milling machine where I used a rotary table to machine the 9 flats, drill the cylinder mountings, and the holes around the ring on the front of the casing and the prop mounting holes. If you know how to cast resin reasonably well or know someone who does, I could send the engine and one of the cylinders to you, let me know.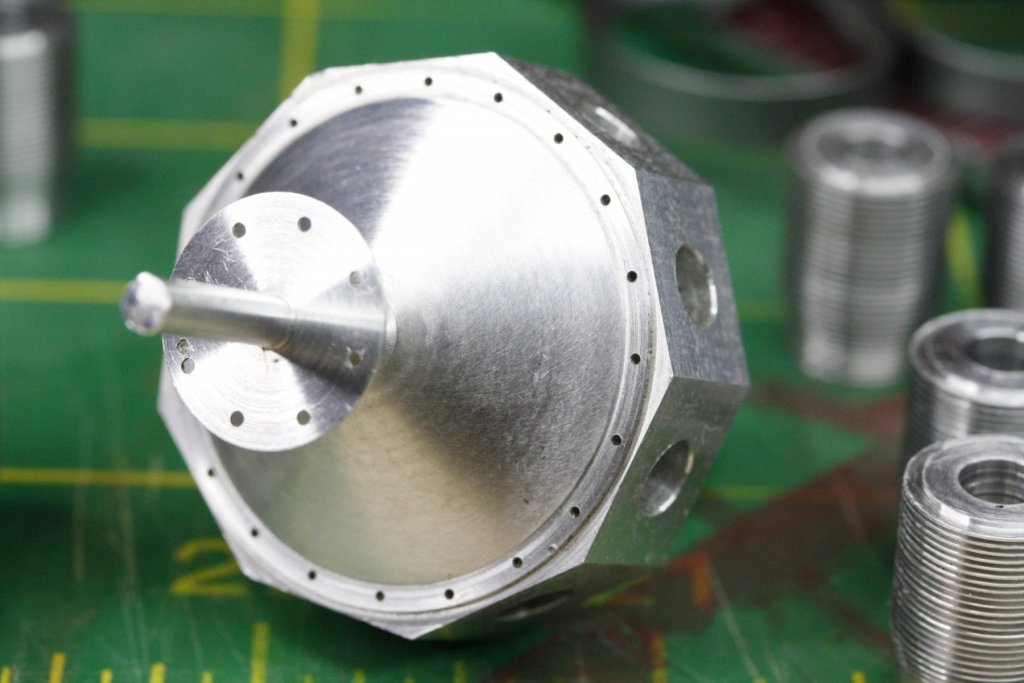


- 250 replies
-
- 10
-

-
Fokker Dr.I by Torbogdan - FINISHED - Model Airways
vossiewulf replied to Torbogdan's topic in Non-ship/categorised builds
Scratchbuilding the engine is considerably more difficult than the guns. I of course when the very hard road because some reason I don't know, and did it in aluminum. Even doing it in simpler materials is not easy and you'll need to be reasonably good at casting. I'll post some more info later. -
Fokker Dr.I by Torbogdan - FINISHED - Model Airways
vossiewulf replied to Torbogdan's topic in Non-ship/categorised builds
If you don't want to total scratchbuild, you HAVE to replace the cooling jackets, they are iconic with respect to German aircraft of WWI and anyone who knows the subject at all knows what they should look like. Here's a mid-road to take - these are the people I use to do custom photoetch as their costs are extremely reasonable and they'll work with you to get it right. In fact I used them for the exact purpose of creating Spandau cooling jackets, unfortunately in 1/12 which doesn't sound like much but it'd be obviously too big for your plane, or I'd send some that I still have. However I think I still have the artwork and if so it's a trivial matter to rescale it. They need vector artwork, one can do it in Photoshop where they are called paths, or Illustrator, which is designed from the get-go to do vector artwork but I find Photoshop easier to learn if you're not familiar with the process. But in this case you wouldn't need to learn that bit if I can find the artwork. They have a minimum size so you won't get just two, I think I had 10 or 12 in the sheet they made for me. If you went with the smallest sheet size you'd be around 50 pounds shipped... maybe 60, or about the cost of one of the Gas Patch guns. That said, unless you prefer to make the Spandau bodies with their exposed gizmology yourself, it would be a much better idea to use the Gas Patch guns if you can afford it. -
For small blades like this you have lots of options for sharpening, including diamond and ceramic and water stones. Of those I prefer water stones even though they're the most messy, they cut fast and leave an excellent surface. Diamond cuts fast but tends to be much more coarse in terms of grit, their supposed 1200 grit is more like 300 in water stones, plus they wear out. I've tried several ceramics and they all got tossed as useless, they cut slow and glaze easily. Probably best option if you don't want water stones is sanding films, they come in appropriate grits for sharpening and work well, but I find them to be expensive as like any sandpaper, these wear out rapidly and you can spend $3 or $4 just sharpening one knife. My favorites are the Shapton Glass stones, not cheap but cut faster than anything else I've used but unlike water stones they stay reasonably flat. I have those in 220/1000/4000/8000 with a strop to finish and haven't used anything else since I got them
-
Fokker Dr.I by Torbogdan - FINISHED - Model Airways
vossiewulf replied to Torbogdan's topic in Non-ship/categorised builds
Yeah, I wouldn't use those, this is where I have a problem with Model Expo aircraft and cannon kits - their insistence on using white metal where it's totally inappropriate. I took forever to do one of the cannon kits because it took many hours to file, sand, fill, and rescribe detail. I recommend either buying the Gas Patch versions or making your own, but as you see they had lots of complicated bits sticking out the right hand side and you either need to simplify those bits or be prepared to spend a few hours scratchbuilding accurate versions, if you do the latter use styrene sheet/plasticard. -
Fokker Dr.I by Torbogdan - FINISHED - Model Airways
vossiewulf replied to Torbogdan's topic in Non-ship/categorised builds
Having scratchbuilt quite a few Spandaus including this scale, the accuracy of the Gas Patch version is quite good, only part that looks a little heavy and simplified is the ammo feed. Otherwise looks quite good for a mid-late production LMG08/15 version. Like all Maxims, it ejected the rounds forward from the lower receiver under the barrel. The long box on the left side is the fusee spring that controlled recoil, the little gauge in the middle is where you set it; back then it helped to have an easily adjustable spring to handle the greater variability of ammo. Can't remember what the top and min values where but it's set in the typical place, about 250 rpm. They were called Spandaus btw as many were made at the national Spandau arsenal and those have the city/arsenal name stamped on the top of the receiver. Also the cone on the end of the barrel isn't a flash suppressor, it's a muzzle booster to provide a bit more backward recoil energy, the WWII MG34 and MG42 had something almost identical. The Parabellum machine gun that observers used was also a Spandau/Maxim variant, just further lightened for ease of gunner handling and the internal mechanisms were lightened to provide the higher ROF a gunner needs compared to the fixed forward-firing Spandaus. -
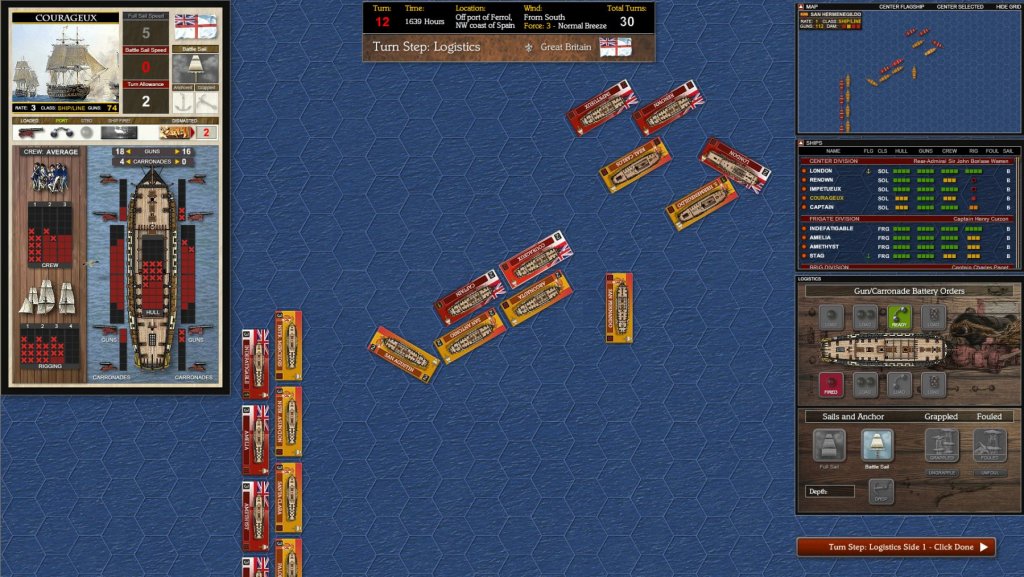
Yes, it's a semi-clone of WS&IM. it's something I am working on, I'm about 80% done.
-
Alexander in his Carving from Belgogrod topic cites taking pictures regularly as one of his trade secrets, specifically because it shows him flaws he's not seeing. If you don't know this trick, my advice is to keep a small mirror handy and look at the piece regularly in the mirror. Flipping it prevents your brain from recognizing it as your work and making all the little improvements to the shape/lines that it will make to boost your ego. Always amazes me when something I'm working on looks completely different in the mirror. Small tight curves are of course the most difficult, almost always crossing the grain. And doing it with a #11 is the most difficult. Honestly I wouldn't do it that way, I'd get it in the ballpark with the knife and then use diamond points in a pin vise to work in the smooth curves. If part of this exercise is only using the knife, try cutting somewhat down as you cut the curve, as close to 45 as you can, this makes it more of an oblique cut and less likely to leave fuzz/protruding bits where the curve crosses the grain. Oh and strop the hell out of the #11 blade as you go. They really aren't very hard and lose their edge rapidly, on the up side because they're not hard you can remove big dings with just a strop. Also, learn to sharpen, not that hard to do. That will allow you to use much better tools with Rc62-64 edges that can be made much sharper than a brand-new #11 and will hold that edge far longer. When I'm sharpening one of the tests my knives have to pass is to cut basswood end grain cleanly, with zero tearing. Xacto can't do that brand new.
-
Prestidigitatus COURSUS! But you'd need to give the player a wand, and call the sailors suggles. Although I haven't sat down with it yet, I saw that Seamanship in the Age of Sail has good clear explanations of ship maneuvers and operations including all the commands. And good luck, below is mine that is still WIP. This is gameplay not artwork, basically a mostly clone of WS&IM.
-
More tools - Luthier, jeweler, fly-tying
vossiewulf replied to vossiewulf's topic in Modeling tools and Workshop Equipment
Wefalck, being cautious buying over the intertubes is always a good idea, it's 100% caveat emptor out there. But this particular company has been around for almost 20 years, seems to have a very good EBay reputation, and I've bought a few things and they seem to be what I paid for. That's why I posted it here. Not that I can make any guarantees, of course, but if someone is interested in trying some surgical tools they could do a whole lot worse than buying from these people. -
More tools - Luthier, jeweler, fly-tying
vossiewulf replied to vossiewulf's topic in Modeling tools and Workshop Equipment
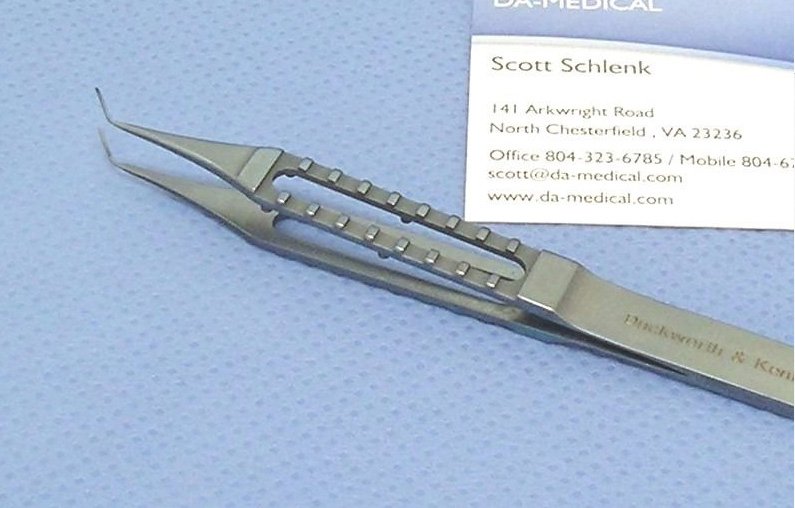
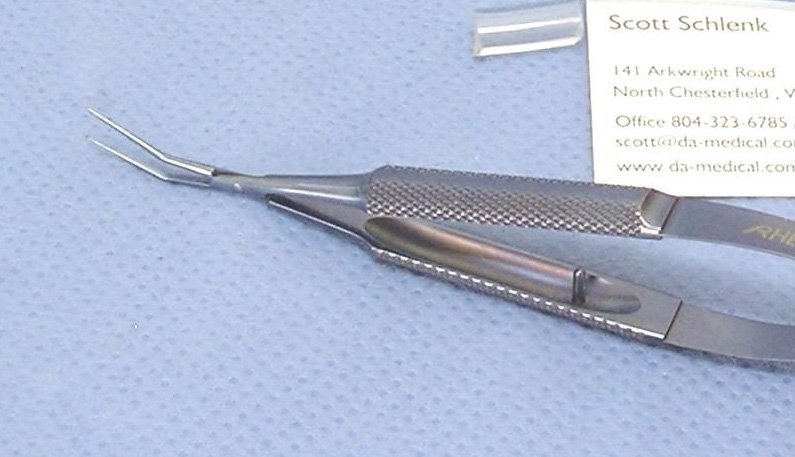
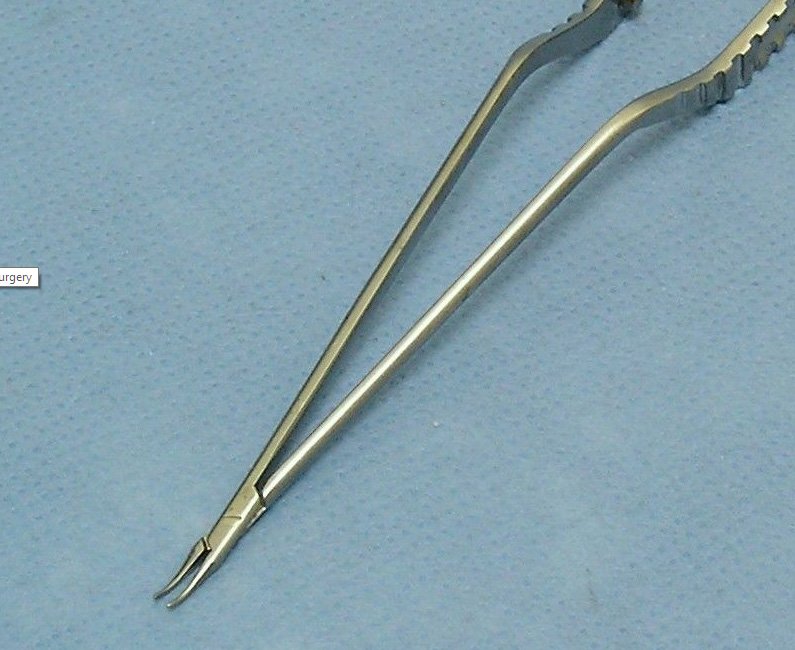
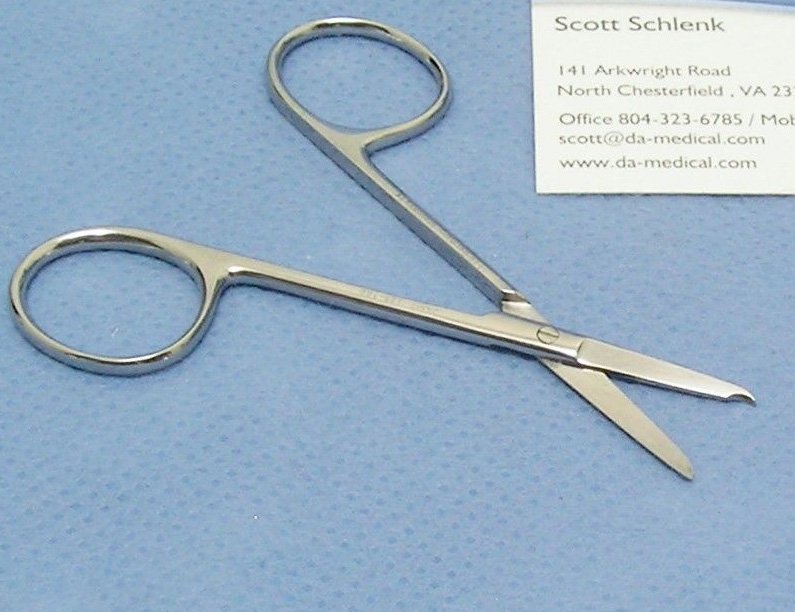
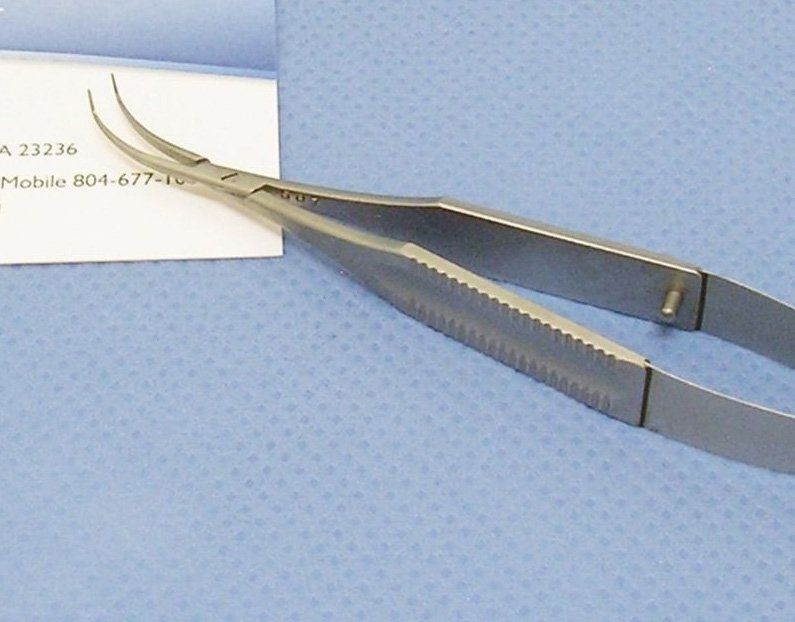
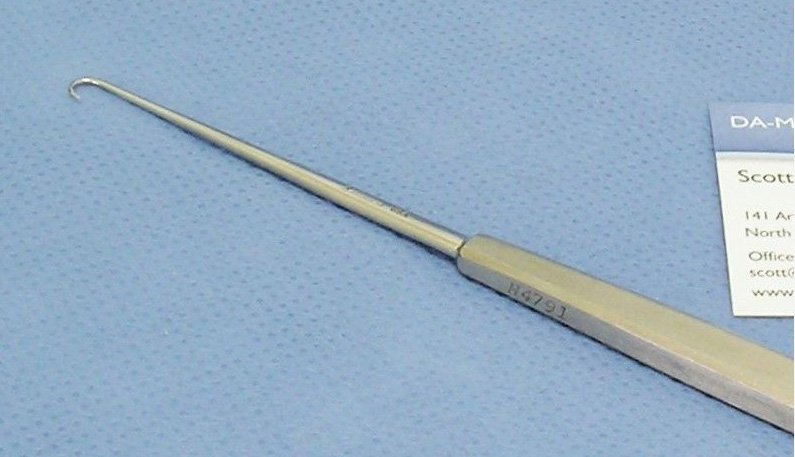
Another place to look for good precision tools is surgical tools, particularly micro surgery of various types (duh). However, if it's cheap, it's cheap. The good ones cost, but buy something from V. Mueller or Jarit or Storz and you're getting things that can't be improved and do what they're supposed to do so well you can get distracted just playing around with them. I've bought a few things from this guy on EBay, he seems to have good prices and also sells used (fully sterilized) tools at good prices. At least I haven't caught anything from mine so far. That's the micro section, also look at the general surgical tools section. And dental too for that matter, we should cover dental probes Some examples... This is a Jarit-made Yasargill needle holder and is about 8" long. I want it but it's $100. Rationalizations > $50 for a tool like this start to become very tricky for me but I'm working on improving my ability to rationalize. Spencer type suture scissors that grab what they're cutting. Castroviejo type, non-locking. Most of these that we'd call tweezers are forceps and most come in locking and non-locking versions. Although locking sounds theoretically interesting I find they always lock when I don't want them to and vice versa. So I avoid locking versions or remove the locking mechanism. You can't have this one, I just bought it. It's a Storz Blair-type palate hook. I don't want to know what it really does. It was $15 and has a nice hefty stainless steel handle.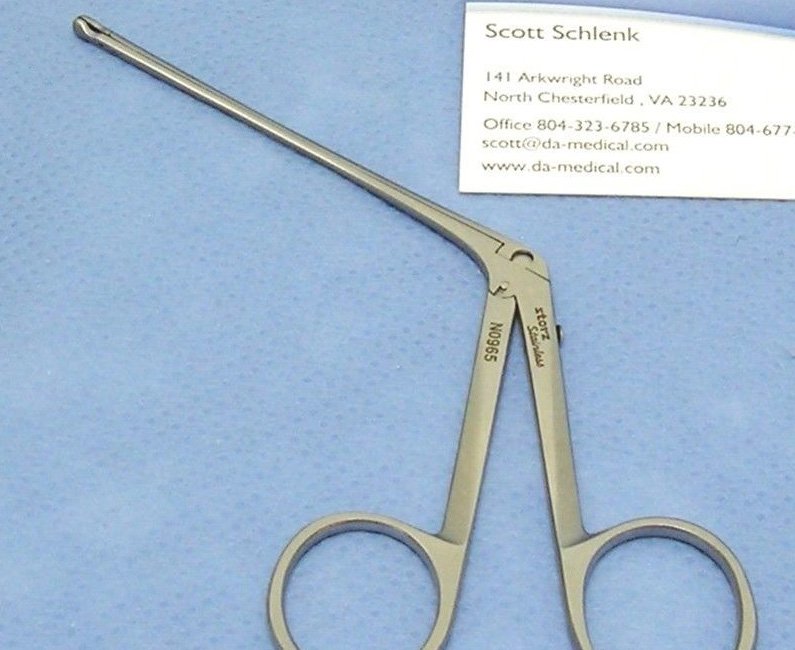
-
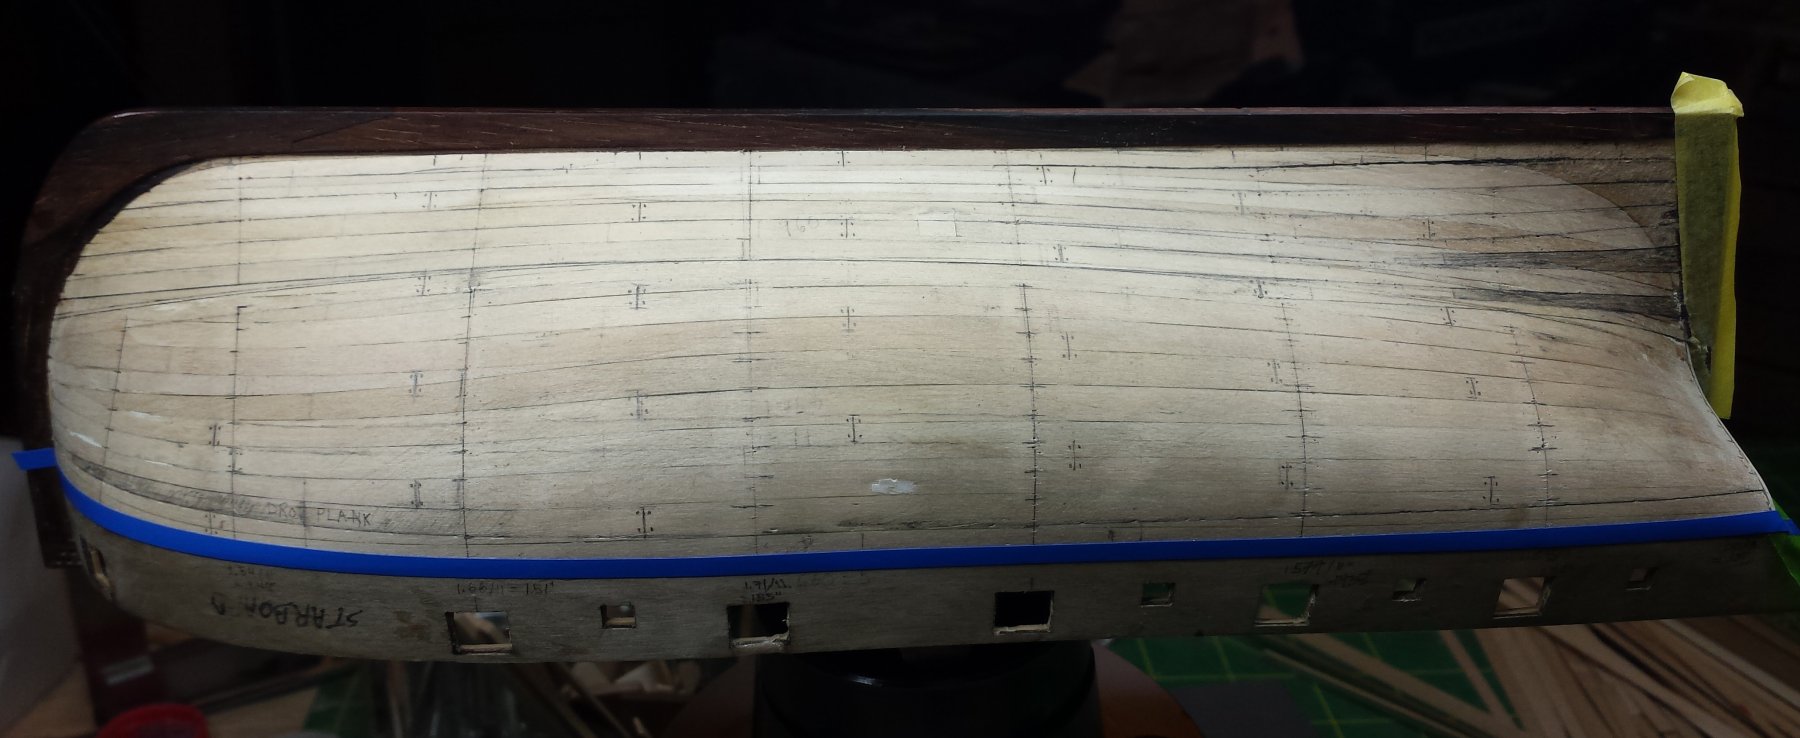
Oh yeah no further changes will be made, this is it. The previous version had only one stealer, but that was pushing it to the point where the lines were less attractive overall for the sake of closing one gap, I decided that the imaginary shipwright building this ship would have opted for the more attractive lines, so the last revision leaves it with two stealers on either side of a plank and the resulting lines make a smooth transition from the straight run of planks on the lower hull to those running significantly upward to the transom. Unfortunately I am completely cooked to a blackened crisp today, didn't get done until 1AM or so when I finally decided things were sufficiently on course that I could turn the rest over to my team in Bangalore. And these crises are very intense since they involve dollar amounts with many many zeros associated with major corporations you all recognize, we handle 100% of their payment processing so if we're having a problem, they don't get paid. And when they don't get paid, SVPs and COOs on their side rapidly start calling their counterparts on our side. And I am the focal point they are all staring at. Well, me on the application side and one other guy who's on point on the network side. Last night's issue was pure application though. No I'm not quite sure why I do this. I assume it's a sign of some undiagnosed mental illness.
- 714 replies
-
- 4
-
-
- lady nelson
- victory models
- (and 1 more)
-
LOL
-
No Alexander, I understand perfectly. I look forward to seeing your sharpening machine also And I also understand health concerns, I have a few of my own. So don't worry about that part either, if you're away getting treatment we will just wait until you get back. And I also get delayed with work. Because of crises I worked 15 hour days Wednesday through yesterday. I'm a little tired today
-
Miniature plywood
vossiewulf replied to Kurt Johnson's topic in Building, Framing, Planking and plating a ships hull and deck
It's specifically designed to bend freely on one axis, not only is the grain all one direction but it's been split a bunch (or at least the stuff I used 30 years ago was) such that only the inner layer is solid. You know all those news shows and office greeting areas that have curvy fronts covered with veneer? This stuff is the substrate, veneered via vacuum bags. -
I've continued poking at this, but it's been small slices of time for the last couple weeks, I've redone the planking layout twice, it just wasn't working for me and as mentioned above some of what I was seeing indicated there was a fundamental problem someplace and I just wasn't seeing it. I finally did in that I was cramming too many planks on one side of my arbitrary main tape line and not enough on the other. The side of the boat looks like I've been trying to torture it to death with divider points. But I finally got it as right as I think I can get it, and then repeated the layout to the other side. That was a couple days ago. But work is being problematic, I'm still on a conference bridge with 75 people or so spread around the world for today's crisis and am into hour 30 or so in two days, and it's been like that a lot lately. And I have family and one ex-wife coming at the same time to visit me (they get along fine) next Wednesday through the weekend. And it'll take a good three days to get my fully bachelorized pad with socks on the floor in every room presentable for temp female habitation again, she visits a few times a year and as always throws my life into total disarray for the duration. So it will be early week after next before I can spend quality time with it again. It has a four-butt shift with 25 foot planks like Cheerful.

- 714 replies
-
- 6
-
-
- lady nelson
- victory models
- (and 1 more)
-
Miniature Russian carving tools
vossiewulf replied to druxey's topic in Modeling tools and Workshop Equipment
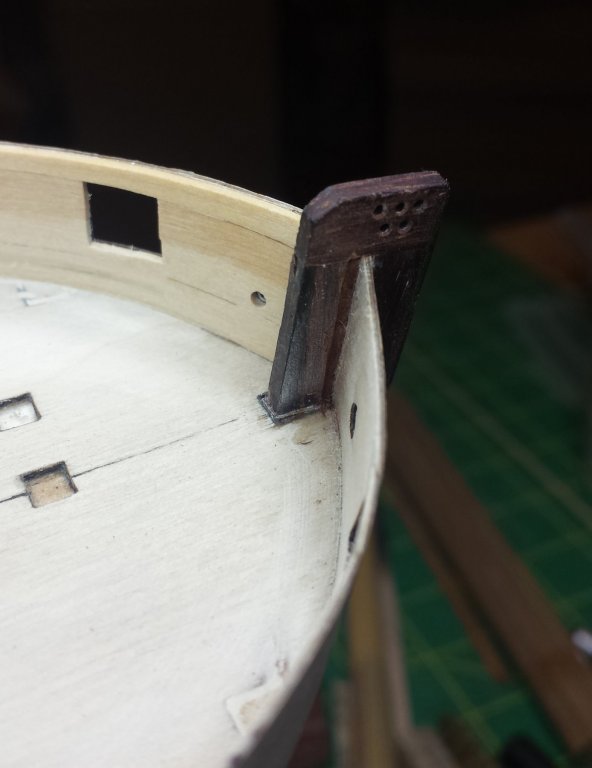
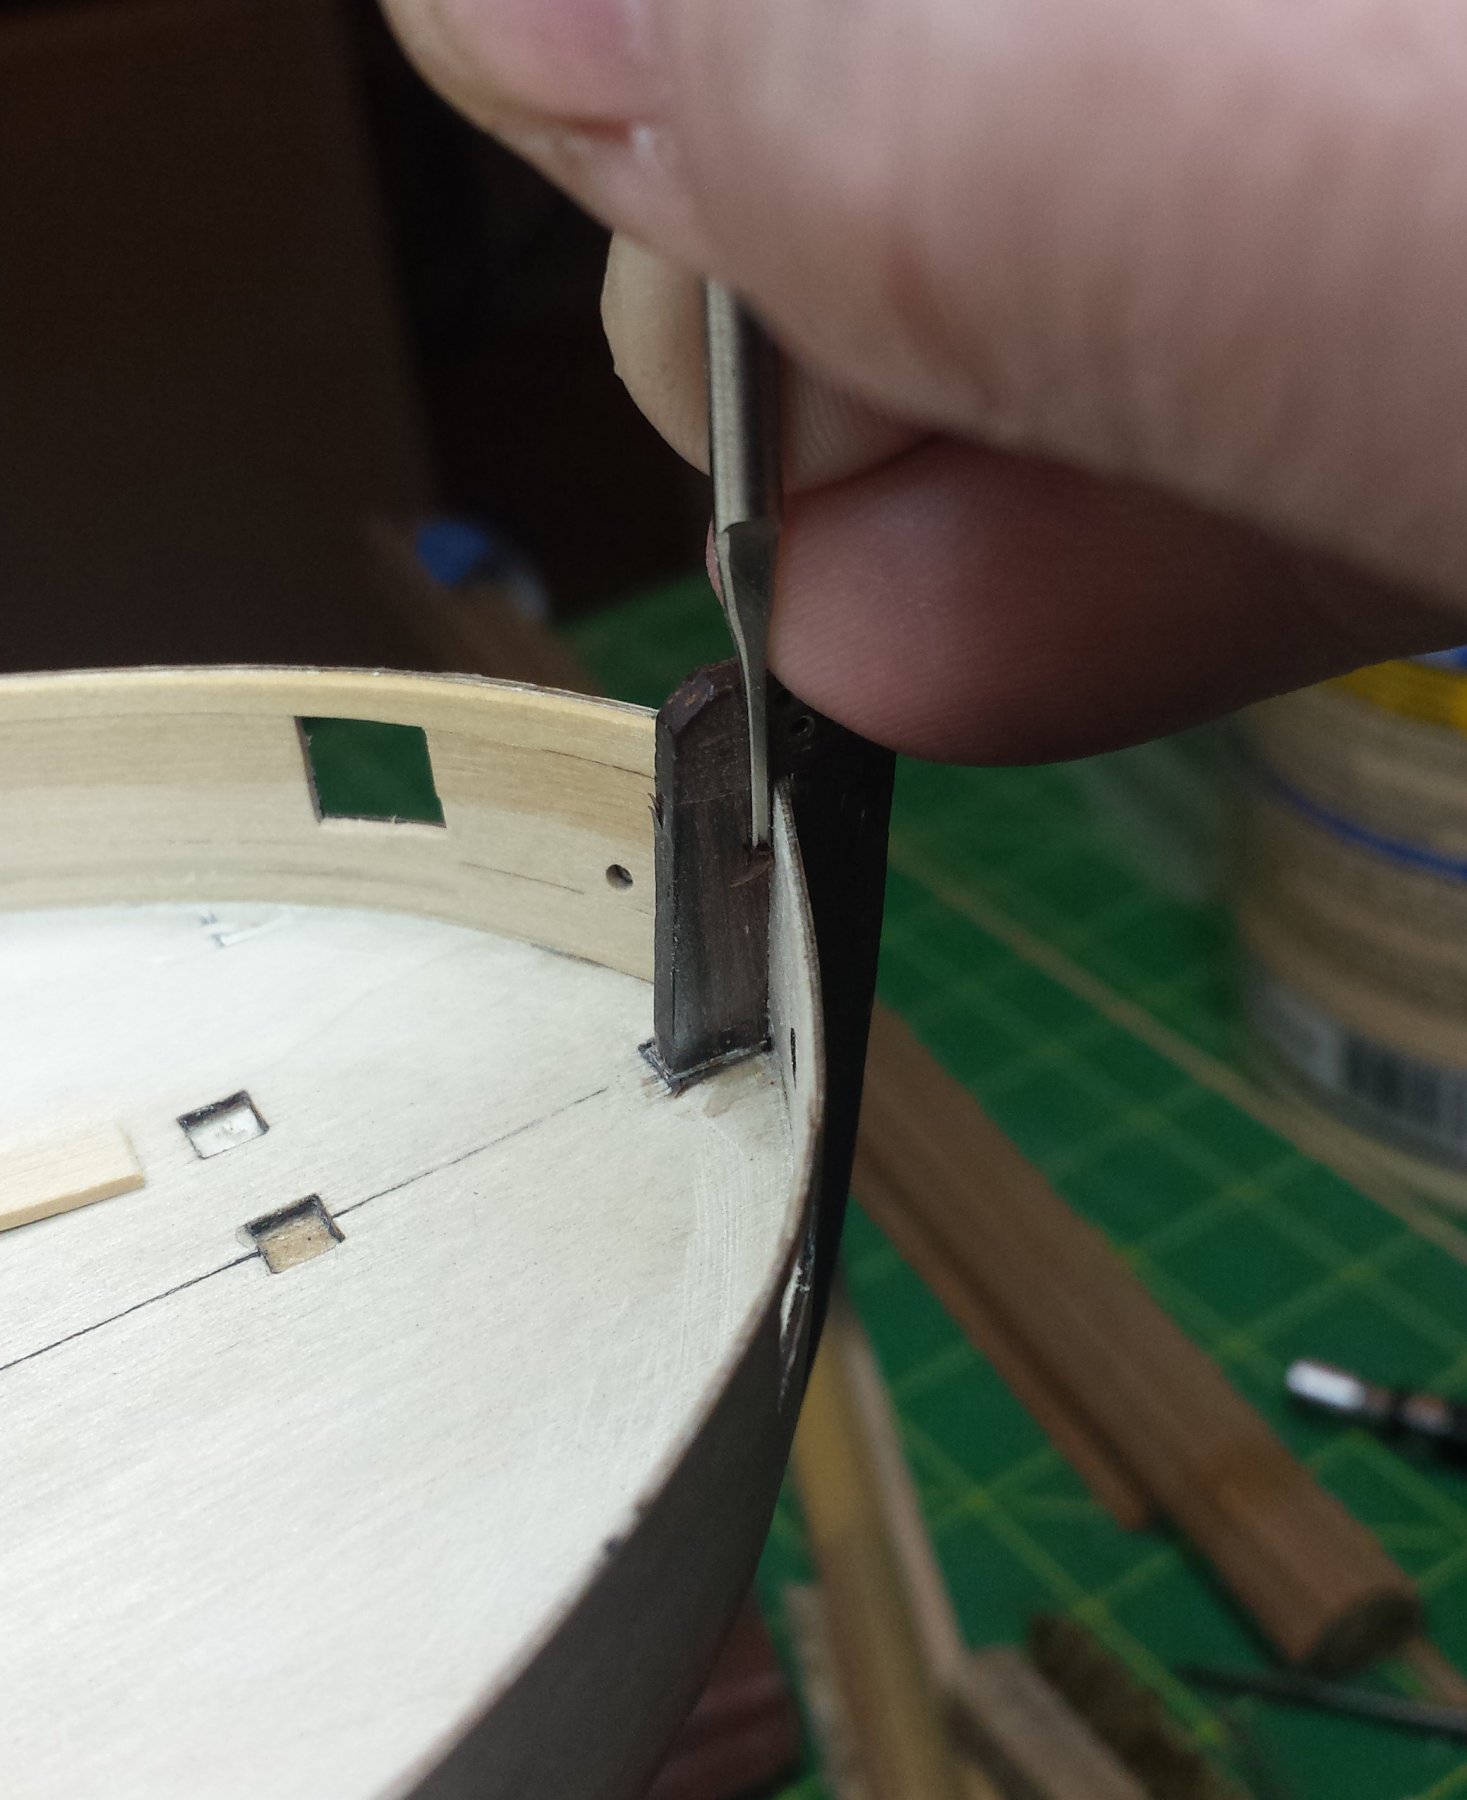
Important thing is don't think of them just as carving tools, think of them as the best micro joinery hand tools in existence, over half the set is straight and skew chisels, with the latter having left and right-hand single bevel tools in three sizes. Speaking again about handles, if you intend to primarily carve with these get the palm handles as you see below. If you intend to use them for general ship joinery, get the pencil handles as they will be able to reach places these can't and will be more natural to people used to holding xacto knives. I told Mikhail what I think he should do and I might do is pull the tools out of these handles, get a pencil handle set from him, and then modify the handles like graver handles with set screws to hold the tools. I first thought about cutting the wood part off on the lathe and then adding a threaded insert and switch between handles that way, but he has the tool a good 5cm into the handles. My set: This is what I mean about joinery, I decided to cut a rabbet on the stem for these inside planks, just because I could now with my spiffy tools. What you can't see is that despite the confined area and that the carved wood is cocobolo that never saw an edge tool it didn't hate, I was able to quickly cut a perfect rabbet that even has an angled bottom relative to the stem so it perfectly fits the square ends of the planks.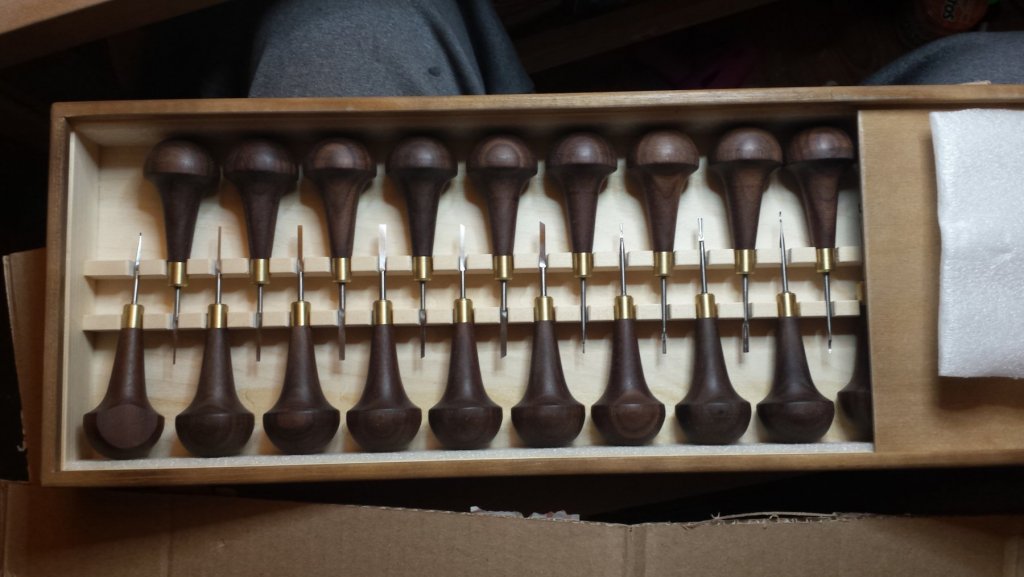


- 73 replies
-
- 14
-
-
Couple questions of Sherline Mill purchase
vossiewulf replied to sfotinos's topic in Modeling tools and Workshop Equipment
Not sure why you'd want a Sherline, seems to me there are far better options for roughly the same price. Little Machine Shop is where I have always bought my machine tools. The micro mill is better than the Sherline, but it's the mini-mill for about $100 more than yours that's an order of magnitude more capable with a far greater and varied ecosystem of accessories and modifications and DROs that can be added. Edit, the HiTorque versions are preferable as those can handle machining steel no problem, but if you're willing to machine steel a bit more slowly, see the Sieg X2 Mini Mill that's on sale for $599. Out of the box I think it's a considerably better choice than Sherline. The HiTorque mini mill is just a Sieg X2 modified per LMS' specs to have an upgraded motor. -
Miniature Russian carving tools
vossiewulf replied to druxey's topic in Modeling tools and Workshop Equipment
They are a complete and utter steal at $300, this quality sold in the west would easily be >$1000. I've told him that but he says "my prices are normal for Russia". I've had mine for many weeks and I use them daily in the shop now. As good or better than any carving tools I own and I own lots of expensive ones. You should run, not walk to book a set with Mikhail. Only problem is his earliest delivery window is now October. You can either get the pen handles like Druxey or more traditional palm grips. Biggest problem is sharpening, let's say it's not easy to maintain correct angles with these sizes. Take a look at the Carving from Belgograd topic for a discussion between me and Alexander, designing a sharpening jig. I received brass and some other things for my design, will be working on it soon. -
To be clear, I still plan to make something myself, and if it works I'll make one for you, and this week received some brass and screws and things for my version. BTW, American basswood is same family as lime but not quite the same, it has less variance in color and hardness but in general is even softer than lime, so the clean-cut end grain test is even more challenging. That's what my experience says at least.
-
Miniature plywood
vossiewulf replied to Kurt Johnson's topic in Building, Framing, Planking and plating a ships hull and deck
Why is CA a problem for natural finishes? That's the one case where it's never a problem since it's crystal clear. Most cottage pen makers use solid CA for the finish since it's also nearly indestructible. I started using it 25 years ago as my preferred tool handle finish and it still is today, you can make it mirror shiny if you want and it's still more grippy on skin than wood is, and it will stay nice and perfect even bouncing around on a workbench for years. Don't go with a new glue for a single part. How big is this part? Unless much bigger than I am thinking, take two pieces of pear and put them 90 degrees to each other, use titebond or slow CA, put between two pieces of plywood, clamp with c-clamps. I've made up to seven layer plywood this way for carving scale airplane props. If you use CA you do it one layer at a time. -
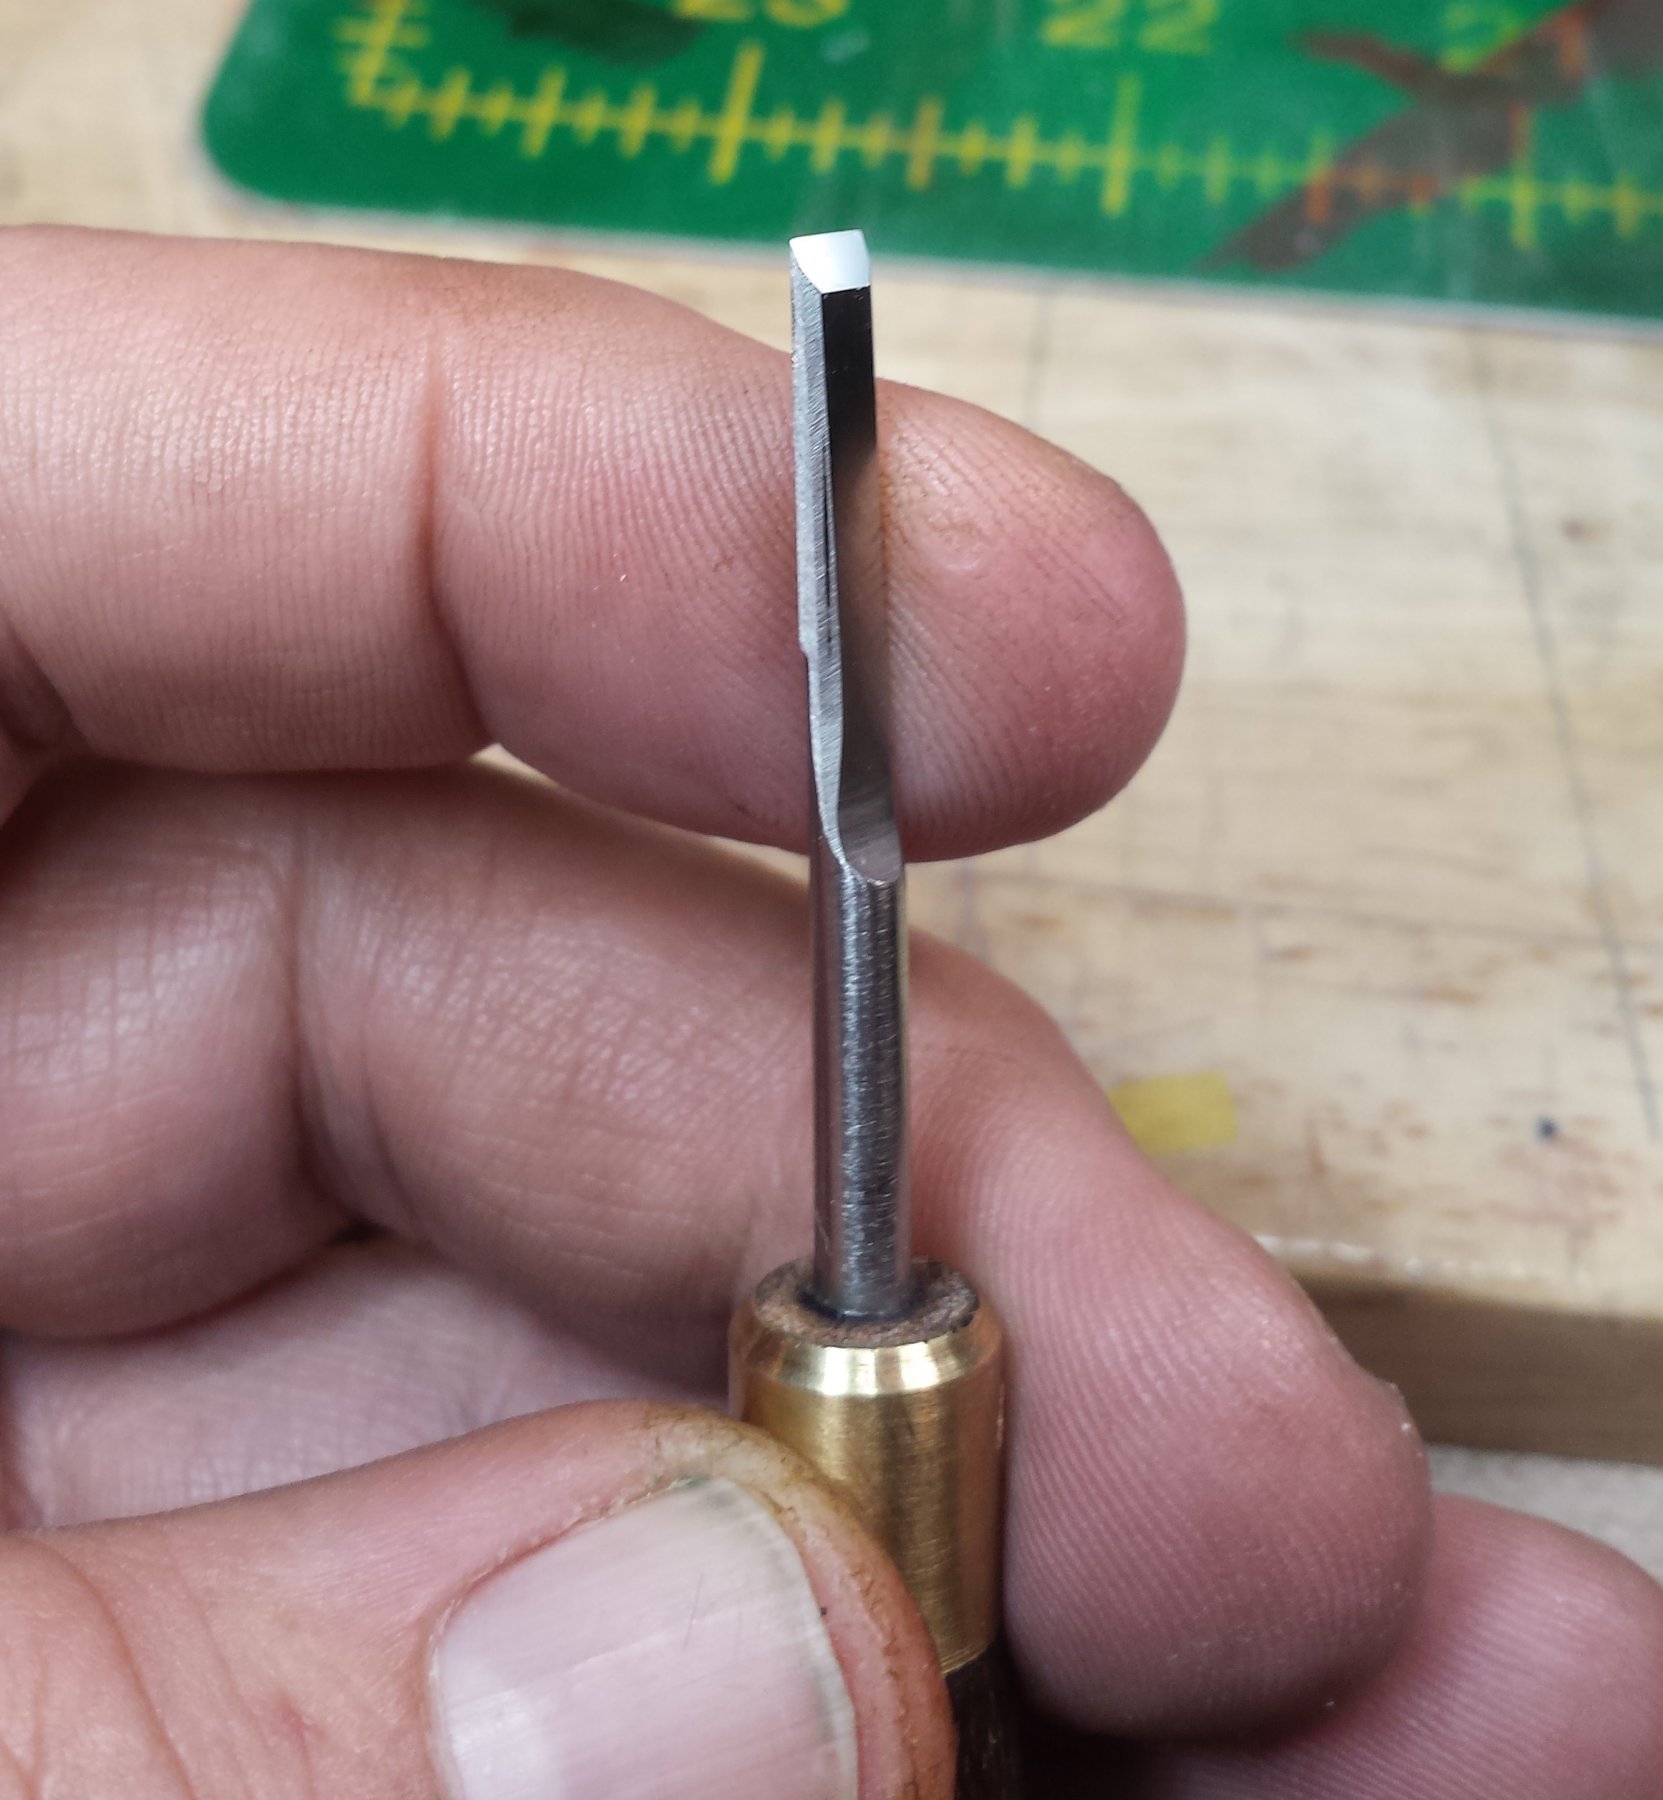
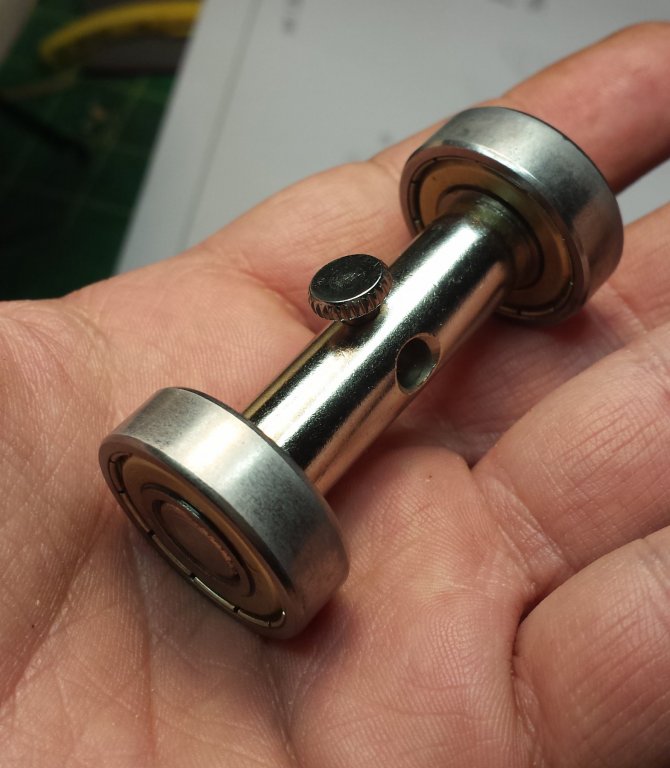
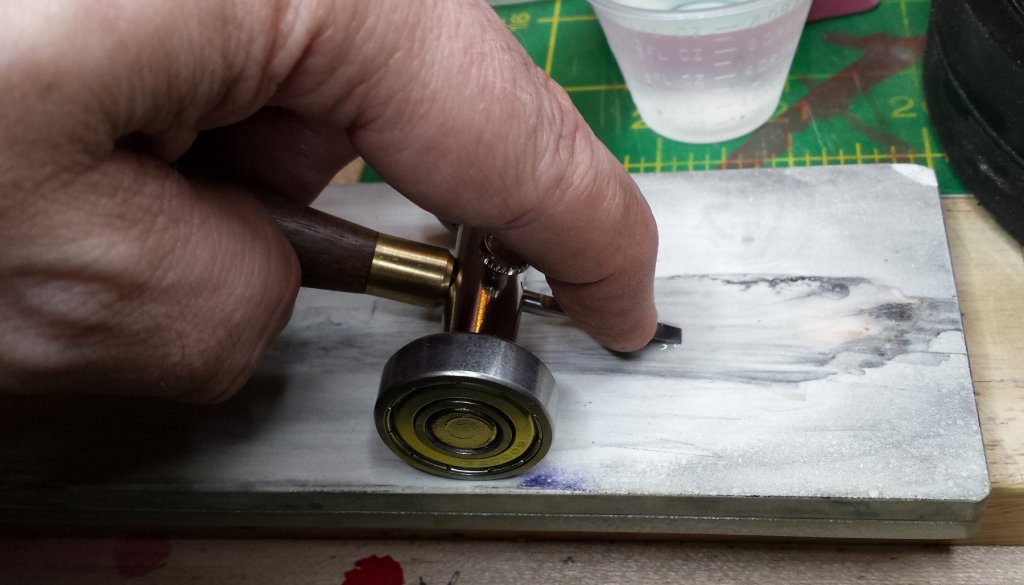
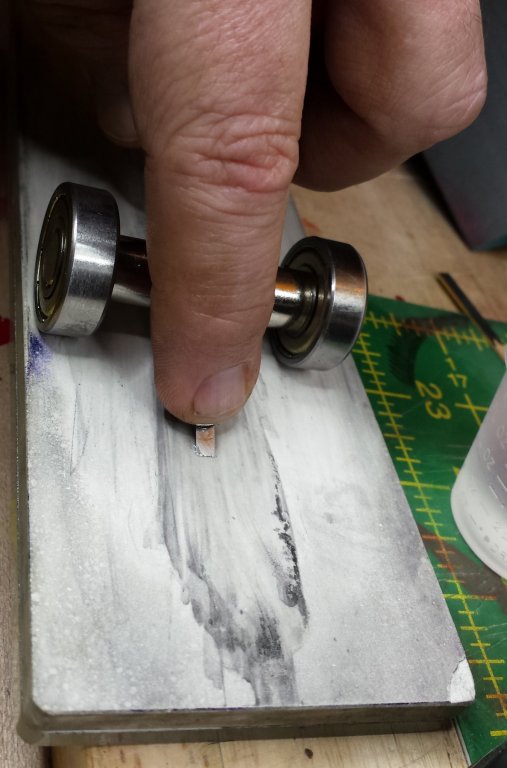
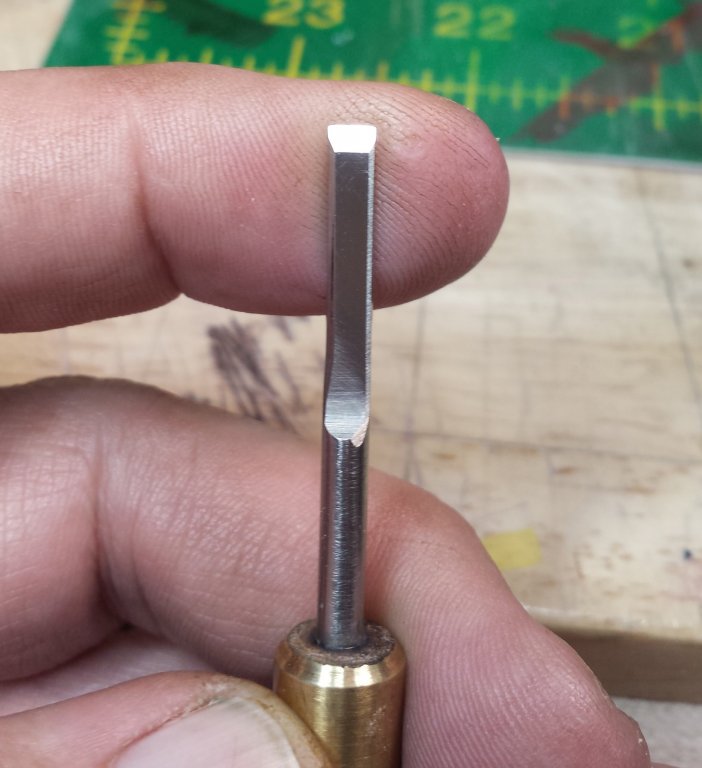
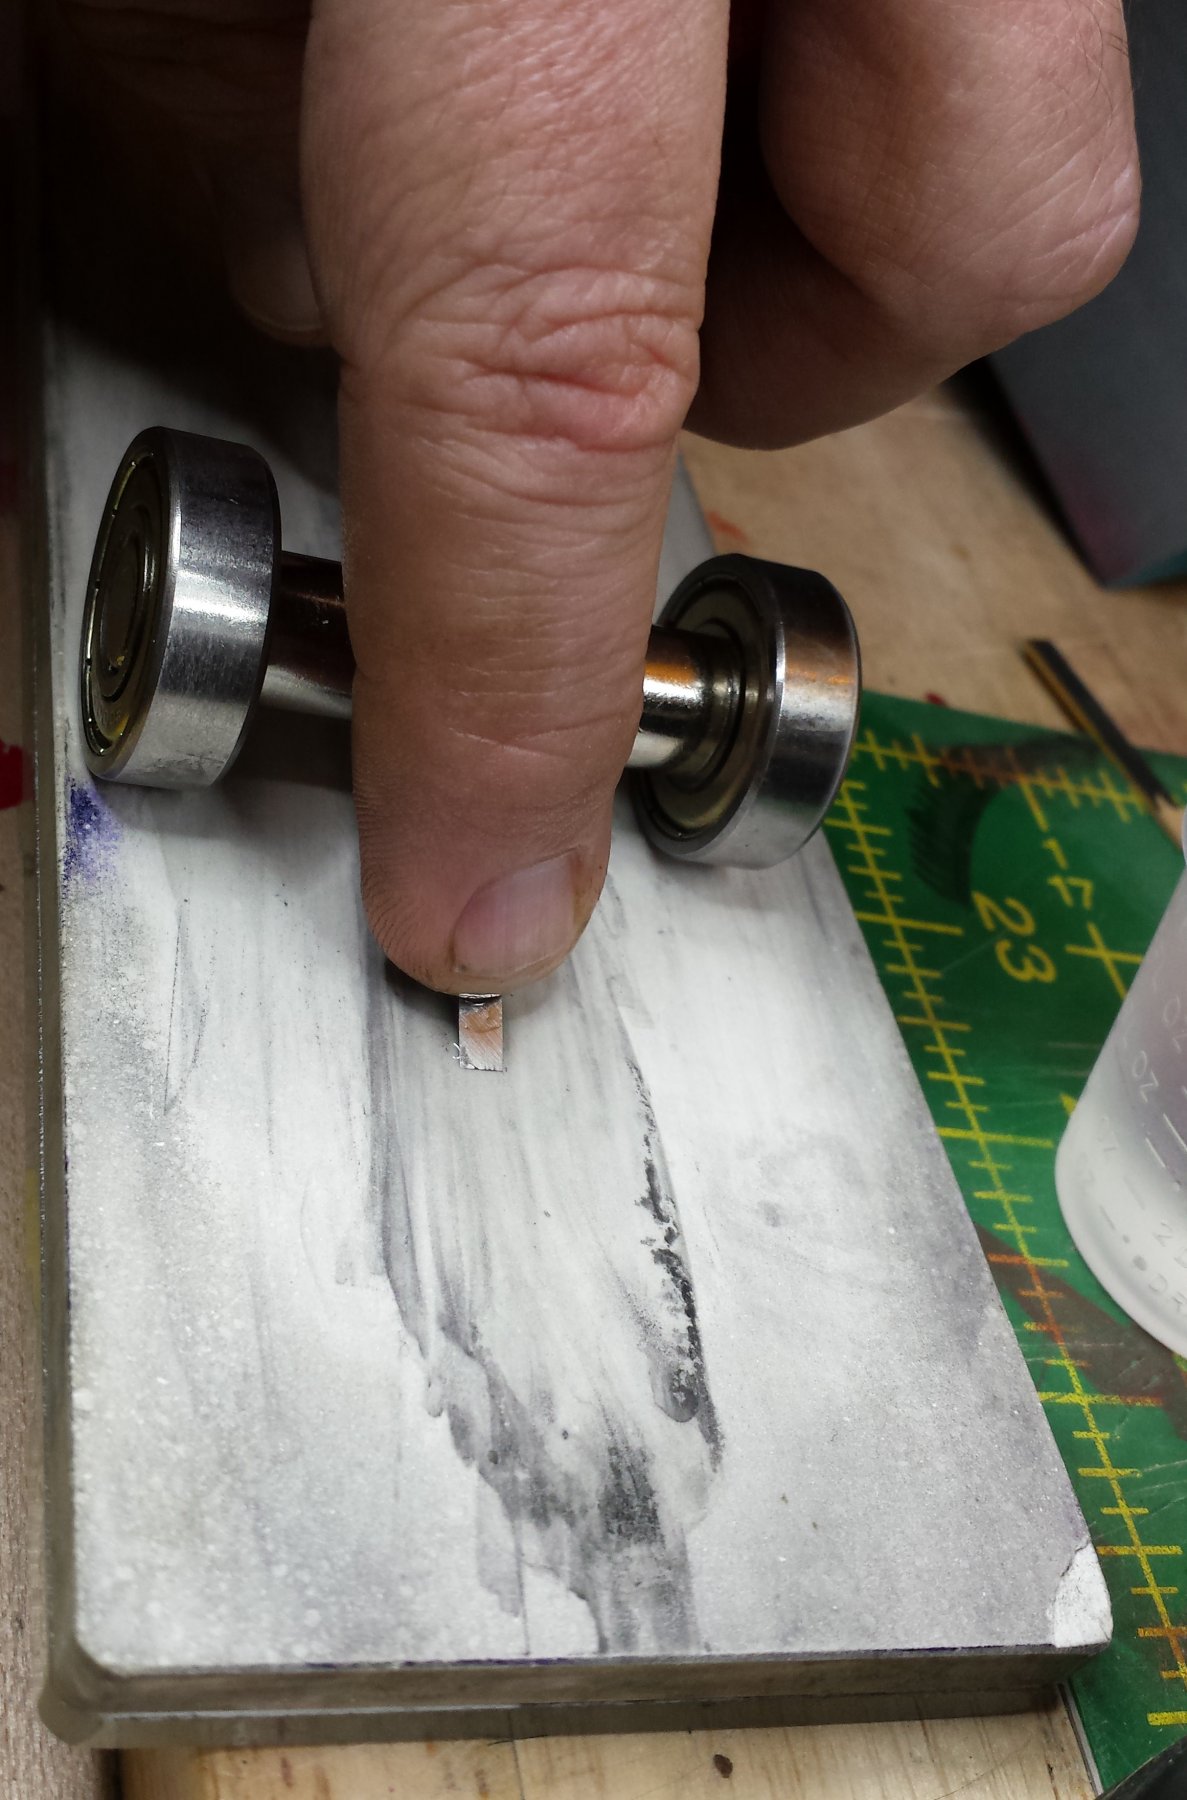
I'm wondering if anyone ever figured out how to do the green paint/orange paint switch Ok one step forward, this was one of the screwdriver sharpeners I bought for experimentation, it's $8.95 on EBay and if nothing else, these will provide perfect sharpening for the straight chisels. It is just a mild steel axle between two unsealed bearings with an outer size that doesn't make sense in any measurement system, 1.025"/26.05mm. However, putting a straight chisel in up to the ferrule through the hole in the axle results in an angle just a little more than 25 degrees, I'm guessing 27 and the screw holds the chisel firmly. I think somewhere in the 22mm to 24mm range for the outer diameter of the bearings would give 25 degrees with the hole cut through the axis center. I figured out that I needed to keep my finger even closer to the edge than that, because even at that distance the tool was bending and giving very slightly uneven results that got better once I had my finger literally on the cutting edge, so I was sharpening my fingertip too. But once I understood that it went quickly, it works fine, just would be much nicer if we had a weight keeping consistent pressure instead of trying to do so with our hands. Bevel is straight and flat and it's sharp enough to pass the basswood end grain test, all cut cleanly.
.thumb.jpg.7e590b82cbf71daabb7698c6dfa3ca71.jpg)

-
MONTAÑES by Amalio
vossiewulf replied to Amalio's topic in - Build logs for subjects built 1751 - 1800
Think it qualifies for zeroeth class. -
Actually now that I think about it starting with 2D probably helps. When I'm working in MAX in 3D, about half of the objects I make I start with making a 2D shape and then extrude it, so working with 2D paths you're learning things you'd directly use modeling. Another way 2D shapes are commonly used is in what are called lofts, you make a series of 2D shapes and position them along a path and the program will create the 3D object defined by those cross sections by creating a skin that transitions from one cross section to the next, so yes the best way to make a ship 3D model is to do it the same way folks do here. In your case Hubac you could eventually take your frame shapes into a modeling program and loft them to create the inner surface of the planking. Extrude that surface to the depth of the planking, you have a the ship's basic shape. Take another copy of those shapes and then position them inside your ship and extrude each of them and you have 3D frames that should fit perfectly inside your lofted ship object. Now take all the vertices at the very top of the frames and copy them. Turn that into a surface (several ways to do it) and then extrude it and you have a deck that should exactly fit the top of the frames and your outer planking. Not quite as simple as that of course but that describes a valid workflow.
- 2,699 replies
-
- 3
-
-
- heller
- soleil royal
- (and 9 more)


.jpg.408a0e479bd6a2ef8ec1c8cf81041a1b.jpg)