vossiewulf
-
Posts
1,477 -
Joined
-
Last visited
Content Type
Profiles
Forums
Gallery
Events
Everything posted by vossiewulf
-
 Yes, but also keep in mind there are like 137 Lady Nelsons and Sherbournes being built at one stage or another here
- 714 replies
-
- 4
-

-
- lady nelson
- victory models
- (and 1 more)
-
They differ very little, so in general experience with one puts you in a position to suggest what to do with the other. Thanks for the reminder/suggestion of placing an early plank at the bottom of the gunports to ensure they are aligned. And welcome to the cutter party BTW:) I AM making progress here, just slow as my time windows remain a bit constricted and I keep finding myself spending half of it on workshop logistics, this evening was making new sanding tools using spring steel pieces of various thicknesses as a backing for PSA stikit gold paper of various grits. Then I got annoyed at the lack of a curved-edge scraper of small enough radius for this ship so I took one of Lee Valley's small scrapers (which are nice BTW) and ground it into a basic curved scraper with several convex and concave curves. That said I'm sure Lee Valley scrapers are just spring steel of the right thickness, I keep meaning to get a roll of that thickness plus some heavier- I really like my heavy luthier scraper's lack of chatter and want to try thicker small scrapers. And I've been thinking why not make some "carving" tools with traditional straight/convex/concave/v-parting cuts but make them pure scrapers - a "gouge" would just be a fully hardened tool steel piece like any small palm carving tool, except it ends in a transverse blunt curve of the correct radius. When you really sharpen something like that, you can carve with them with far more predictable results than the usual edge tools. On the downside, of course much slower. So I want to make some for finishing of difficult curves that cross the grain but I also think they'll be quite handy for general ship work and particularly planking.
- 714 replies
-
- 3
-
-
- lady nelson
- victory models
- (and 1 more)
-
More tools - Luthier, jeweler, fly-tying
vossiewulf replied to vossiewulf's topic in Modeling tools and Workshop Equipment
I found you can get these polishing/separator strips on Amazon. The stainless steel ones appear to be spring steel coated with diamond so very promising, I ordered some yesterday. The mylar ones look good also and I ordered some of them, but they're more or less flexi-i-file pieces so they might be just a better replacement for those. -
I figured you would have just worked from M. Boudriot's careful calculations of the amounts of wood of various types required. At least I remember him having good data for wood quantities, it's not something I look up on a regular basis. Although you're working at furniture scale, the easy calculations we use doing that wouldn't apply to an object where um, maybe 20%-30% of its internal volume is more wood structure in zillions of separate pieces, so I like your method of working off the volume.
-
How to sharpen a file.
vossiewulf replied to dgbot's topic in Metal Work, Soldering and Metal Fittings
The issue with making them into anything that will be heavily stressed is the metal is excessively hard for those applications and therefore too brittle in general, doesn't need teeth scores to be a problem. If you do make anything out of them you need to take that into account. -
Miniature Russian carving tools
vossiewulf replied to druxey's topic in Modeling tools and Workshop Equipment
I sent a PM to Grant Druxey, so no need. -
How to sharpen a file.
vossiewulf replied to dgbot's topic in Metal Work, Soldering and Metal Fittings
And you want these or these. At least buy one and see whether you think how much better it works from the start and how much longer it lasts than cheaper files make them a lot less expensive than they seem. -
How to sharpen a file.
vossiewulf replied to dgbot's topic in Metal Work, Soldering and Metal Fittings
Options for dull file: 1. Make it into something else 2. Toss it in an old file drawer for those jobs you need to do where you really don't want to use your nice new files 3. Recycle bin -
MONTAÑES by Amalio
vossiewulf replied to Amalio's topic in - Build logs for subjects built 1751 - 1800
It's like a perfect ship-building machine. -
Proportional Dividers
vossiewulf replied to Worldway's topic in Modeling tools and Workshop Equipment
Yeah I bought a Dietz set some years ago that had a rough case and didn't look terribly good for $40. I don't care about the case and all it took was some 1500 grit sandpaper and it looks great and could be used another 100 years. -
HMS Pandora 1779 in 3D
vossiewulf replied to ppddry's topic in CAD and 3D Modelling/Drafting Plans with Software
When you're done with the model building, you should look at Substance Painter 2 for the texturing, a model that good deserves a good texturing job and CAD programs simply aren't designed to do that. I've used Substance Painter quite a bit and nothing out there can compete with how easy it is to generate outstanding results. There's a pretty significant learning curve coming from a CAD world as to how high end rendering works today, with low and high poly models with normal maps and ambient occlusion maps and ID maps and curvature maps and how physics-based rendering (PBR) works with the now-standard metal/roughness shaders. And with a model that complex you'd definitely want an automated tool for generating the UVW maps for all the textures like Unwrella or Flatiron (that's the one I use). But the results are well worth it. -
I find the decision process easier than that, I long ago decided that if I think "hmm maybe I should fix that, it's really not as good as I want" then I should just stop and fix it. If it's bubbled up to that point in my mind it's something that will annoy me every time I look at it and disappoint me when I show the result to others so it seems to me the decision is pretty obvious. It may involve a considerable number of profane invectives of course and possibly throwing some of the offending bits around the room once you have them off, but no point in delaying or waffling about it - if you think you maybe should fix it, you should.
-
Go the other direction! I have a couple of his 1/300 frigates, very nice little kits. 1/300 Langton HMS Victory
- 906 replies
-
- 13
-
-
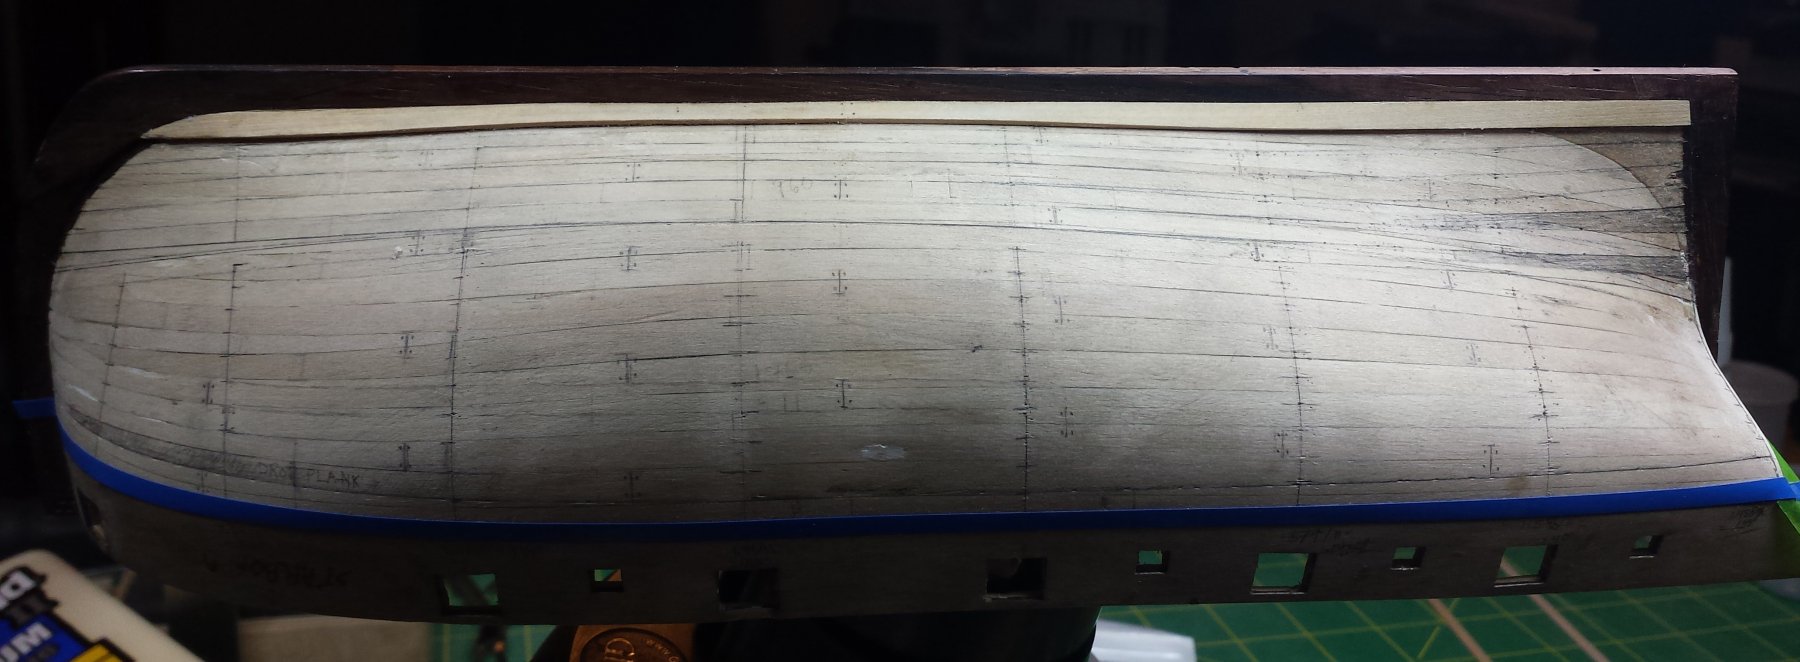
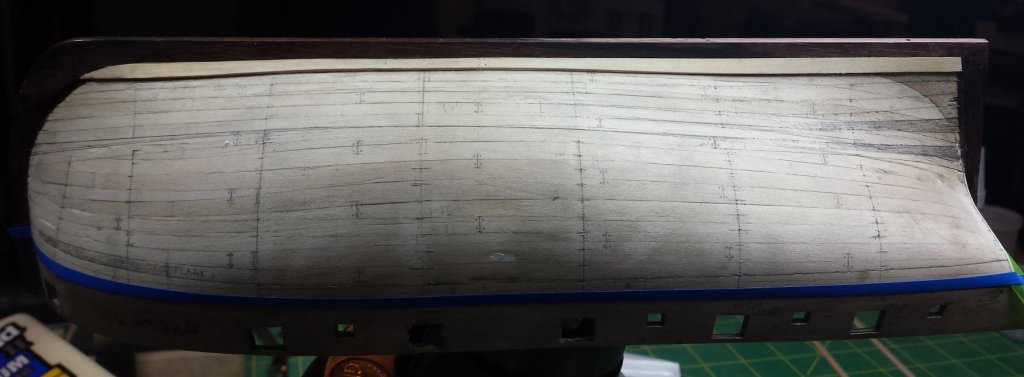
I'm planning just to do the bottom 6 planks on both sides as that was one band, and then switch and work from the bulwarks down. Everything is carefully marked, so as long as I pay attention to those marks it should work fine. But just as with the first planking I didn't want the garboard to be the last one I was trying to fit. Also I prefer to keep it the way it's oriented now, if I flip it up I have to hold it by the keel and I don't care how much glue and how many CF pins there are in there, torquing around on that joint is not something I want to do. My Keelalator thingy is grabbing the ship's central keel plate so I can put quite a bit of force on it, something that's important when I am mostly using CA and hand-clamping.
- 714 replies
-
- 4
-
-
- lady nelson
- victory models
- (and 1 more)
-
Fokker Dr.I by Torbogdan - FINISHED - Model Airways
vossiewulf replied to Torbogdan's topic in Non-ship/categorised builds
You should check with the guys working in 1/32 or 1/24, chances are they will have some heavy rigging wire that would be the right size for 1/16. You should definitely look at what Uschi has available, look at the leather decals and the metal powders at least. Also here's some good general rigging info on WWI aircraft/models. Remember that rigging wire of the time was solid steel, not braided, so best material at your scale might be fine piano/hard wire, and you should be using a fine enough wire that bending and twisting shouldn't be a major issue. I don't think they have any British aircraft so you don't need to worry about British streamlined wire. -
I'm not sure, but this appears to be a plank. Well two planks of one strake, you can see my dots for treenails. I got everything back in place and functional and family members back home and ready to push ahead on this again. Had to trim bottom edge of bow plank pretty severely post this shot to get it back on its lines, seems like the garboard line rises toward the bow more than I thought. But it's straight now and I'll be doing more tomorrow.
- 714 replies
-
- 7
-
-
- lady nelson
- victory models
- (and 1 more)
-
Fokker Dr.I by Torbogdan - FINISHED - Model Airways
vossiewulf replied to Torbogdan's topic in Non-ship/categorised builds
Torbogdan, use lighter wire than that shown for the internal bracing, that is much too heavy and will annoy you over time. Trying to find a good Dr.I pic but here is a repro D.VII, same wire and turbuckles and steel tube and little quarter circle gusset/connectors used on both. Adding this one, this was the one displayed in some agricultural museum in England during the war. You can just barely see the control cables and the bracing is there but almost invisible at this distance.- 250 replies
-
- 10
-
-
Hey Alexander, these appear to be very expensive but also potentially VERY nice for roughing out. There's a video on this product page showing the use of an NSK ultrasonic cutter on thick leather, and I don't see any reason it wouldn't work just as well on wood. I haven't done any real research but it appears to be basically an X-Acto knife that they are vibrating along its length like a saw with a very short cutting stroke at 20,000 rpm. Logically, that should work to make any cut easier. I am not sure how good it would be at precision cuts, but it looks like it might be very useful in removing the excess wood before you start the real carving.
-
More tools - Luthier, jeweler, fly-tying
vossiewulf replied to vossiewulf's topic in Modeling tools and Workshop Equipment
And the sig graphics look fine on home machine, so must be something with work laptop, probably something about cross-domain files or something, our laptops are pretty highly secure. -
More tools - Luthier, jeweler, fly-tying
vossiewulf replied to vossiewulf's topic in Modeling tools and Workshop Equipment
Anyone ever tried an ultrasonic cutter? I see no reason why this wouldn't work as well on wood as it does on thick leather in the video on this product page. It's quite expensive but may be something I put on my long-term queue, I own the NSK Emax Evolution micromotor and know that the expense is very much reflected in the quality and sturdiness of the end product. -
More tools - Luthier, jeweler, fly-tying
vossiewulf replied to vossiewulf's topic in Modeling tools and Workshop Equipment
Thanks Welfack, some good finds! I'm going to go look at those also. BTW, I'm seeing your sig graphics as broken images. This is my work laptop, but using same Chrome I use at home, will check from there. -
More tools - Luthier, jeweler, fly-tying
vossiewulf replied to vossiewulf's topic in Modeling tools and Workshop Equipment
This is a supplier some people already know about, but it's one everyone should know about: RB Productions, home of micro-tool mad scientist Radu Brinzan. He's the guy who was first to realize you could make actual tools with photo-etching, he started with his scribe-R, then moved on to saws and other tools. Other companies including the inevitable Chinese but also large model companies have started copying his tools, make sure you give those bastards the finger by buying from Radu directly. I have quite a few of his tools and use them daily in the shop and I've never been disappointed. The scribers can be useful for very fine cut marks, but its primary use is for plastic modelers, they are extremely good panel line scribers. He has a new take on his scriber though with the Scribe-R-File, which has tools lined with teeth so fine that I have a hard time seeing them under a 10x loupe. They're basically .003" files and can draw very fine and clean lines in anything but hardened steel. But the most useful tools are the saws, .003" thick so tiny amounts of material are being removed and in combination with very sharp teeth, means they cut through wood strip with extreme ease and (especially the pico saws) leave a surface that looks polished. The "coarse" blades are 40tpi. The Micros are 56tpi. Nanos are 76tpi. And the Picos, my favorites, are 120tpi. Probably the coolest though is the bucksaw. I had my doubts when I ordered it but as long as you use it as intended (let the blade do the work) and don't go all caveman on it, it works extremely well and can obviously handle much thicker material than the saws above. Three blade heights, all 56tpi. Last saw is like a razor blade with a little folded holder, and it comes with the same tpi options as above including 120tpi. Although it works well also, I've found this one to be the most fragile. With any of the saws, not just these, all it takes is jamming them in a cut once and they'll get bent and it's nearly impossible to remove said bends. This one is most prone as the edge, especially offset, is the least supported. These are what I use for glue in tight places. They get pretty gnarly looking but will last a long time and stand up to having dried glue stripped off them repeatedly, and if you have someplace you want to put glue and a .003" piece of steel shim can't fit, you need to stop what you're doing because you're doing it wrong These sanders for PSA paper are a fundamentally good idea but in my opinion this is a case where he needs to go with thicker material. If these were made of say .015" full hard shim steel they'd be genius. However on the plus side, these are easily bendable so I have some anyway because careful bending can allow you to sand in some crazy inaccessible places. If you're not restoring something and have to do that kind of sanding it's a good guess you didn't think a plan through very well, but still nice to have these to save the day when we decide to do something stupid. As it is I keep trying to remember to order some shim steel in various thicknesses and making my own, perfect for finish sanding of gunports and the like if they had the right springiness. Or you can buy some cut 8 needle files, that works too. In fact I'm going to order some now. Six inches by 100", gosh I wonder if that's enough. I like VME, have used them for years, they have some good deals and are honest. I just bought a 0-1" NSK micrometer that was labeled Draper and as such was about 50% of an NSK branded one. After having it in my hands I'm sure it's NSK, and I've saved considerable money over the years with deals like that and have never felt I didn't receive the item I purchased. Also, their own branded tools are inexpensive but really hard to complain about, you could do much worse than buying a VME-branded 0-1" .0001" accuracy outside micrometer, and it's all of $11.- 86 replies
-
- 10
-
-
I heard they keelhauled you.
-
Fokker Dr.I by Torbogdan - FINISHED - Model Airways
vossiewulf replied to Torbogdan's topic in Non-ship/categorised builds
Work yes, "well" is a relative term. For Le Rhone cylinders like mine, you'd need 56 disks in 6 diameters (one the inner diameter, other five outer diameter including the tapered width section at the bottom of each cylinder). Times 9 cylinders is 496 disks. So let's say you just focus on the two main diameters, you'd need to turn two cylinders of the appropriate diameter. Then you drill and ream out the center, because you need an exact fit and also to minimize the amount of material to be cut to part off each disk. And the parting off process has to create disks of equal thickness down to a couple ten thousandths of an inch. That's harder than what I did. So a better route would be to part off perfect thickness pieces of each diameter, and then create a fully enclosed RTV mold and then make say 12 of each, and then make new molds that will cast 12 of each at a time. And then you'd need to cast 41 sets of 12 each. Then you'd need to glue 496 pieces. I think you're getting the point <g>, I thought about this too and decided although in some ways it wasn't as hard to do it that way, doing it that way would actually require far more time and effort than just turning them on the lathe. The one thing I didn't try that may have promise is to get RTV that's as flexible as possible, and then instead of making a two-part mold that results in a mold seam on the cooling fins requiring many many hours to remove, cast them in a one-piece mold and hope it's flexible enough to demold each part without tearing the mold or breaking the resin fins. If that would work, you'd need to machine only one good example of the cylinder and then cast the rest, with almost no clean up processing required. If someone wants to try that, let me know and I'll send one of my cylinders to try, but you also have to promise not to damage my parts as I really really really don't want to have to make replacements that match. Thanks Ken, it's on the schedule now BTW name is Jay and that obviously works, but if you use my handle it's Vossie, not Wulf. I answer fine to Vossie, I've had this handle since 1991 on CIS and GEnie and even (ex) wives have frequently called me that. -
Fokker Dr.I by Torbogdan - FINISHED - Model Airways
vossiewulf replied to Torbogdan's topic in Non-ship/categorised builds
Where the hell were you when I was making these? OTOH then you lose the excitement of cutting one of those grooves in one pass when you can feel the piece pulsing, with each pulse just infinitesimally short of the point at which the cutter grabs and then there are loud noises and lathes bouncing around a workbench and mass hysteria, gets the blood flowing. Sometimes literally. I'm familiar with the Makers Faire, not sure if that's what you mean. I considered that and decided yeah I think I'll go with an internal steel dowel pin for alignment ;-)