


Jond
-
Posts
758 -
Joined
-
Last visited
Content Type
Profiles
Forums
Gallery
Events
Posts posted by Jond
-
-
Derek
I just enjoyed going through your build. I too have run into many similar issues with kits. I broke many stanchions and also chose to cut them off and start over. I put in enough to run one or two planks. Then I used the planks to help align the stanchions. Then it went quite quickly. Also a drilled hole with pin vise locates the scuppers from the inside then a square small file makes the holes line up from the outside.
It is fun to follow along. The seizing looked great! I have not mastered Chuck's machine yet..you have inspired me to try again
Cheers
Jon
-
Brian
great to see you building this great boat
i just got to sail on Bluenose ll in Lunenburg. amazing ride in 20 knot breeze
enjoy your build i look forward to following along
cheers
jon
- Nirvana and Don Quixote
-
 2
2
-
I would like to make this posting as the end of a phase where I sort of knew what was what as to the fishing schooners. In the next posting I shall share my experience in Lunenburg this month and the impact it has on one studying these great boats. Before I do that I have a few more things I did and I would like to get them logged. I wanted to start getting the sheets and running rigging on deck completed so I could go ahead and get the shrouds in place. I also throught this would get me further along in preparing my list of questions for the trip to Nova Scotia.
-
 I wanted to use lines that best replicate the size and color of the real thing. I bought a few samples from Syren and boy are they great. Thank you Chuck! Here I am using the line and splicing it to a shackle for the first sheet.
-
 Here the jumbo sheet is rigged and passes through the fairlead to a pin on the fore mast rail.
-
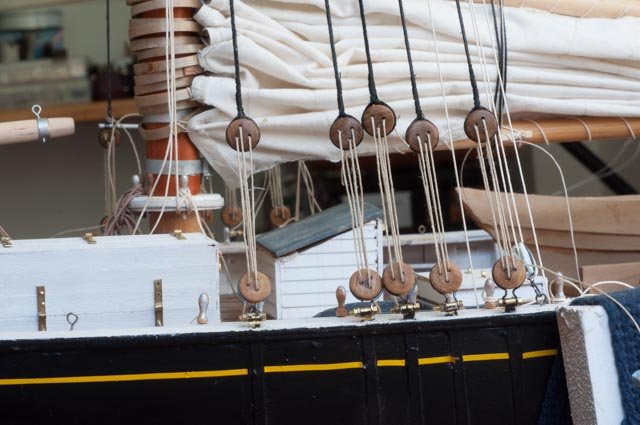
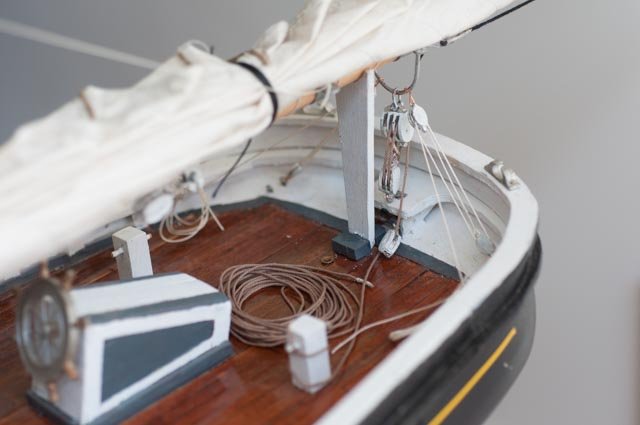
 Here the sheet feeds through the blocks then the fairlead to the port bitt. I had to reverse the buffer location with the horse [ and fairlead] from the Eisnor plans based both on the photos from 2014 in Lunenburg and the sense of how they work. my buffer is only a shaped dowel
-
 Here the main sheet is rigged through a single block [ as shown in the 1940 survey photos] to the port bitt. I again made up a buffer with painted dowel to replicate the rubber fitting.
Next I needed to get the shrouds in place. My plan is to keep the model with the lower masts in place. The top masts can be removed, so at 4 feet high we can possibly move the model. The issue then is to get the top dead eyes reasonably straight and the process to become sort of an assembly line.
-
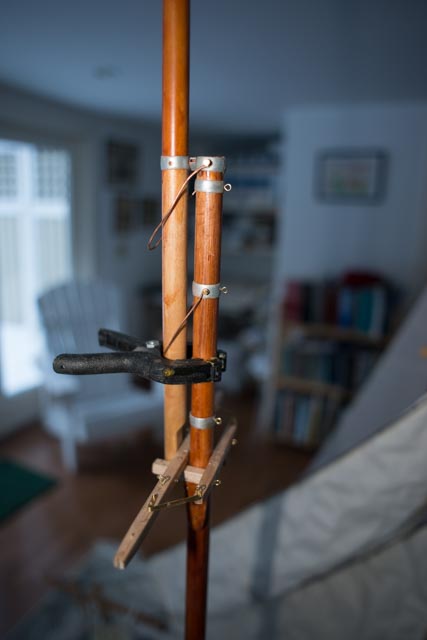
 Step one is to make a jig and clear the deck so the upper dead eyes can be attached at a common height
-
 Step two is to lash them leaving the tail loose. On this first go i did one at a time.
-
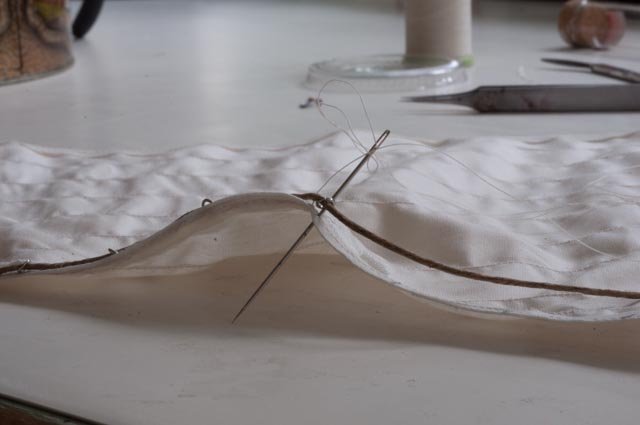
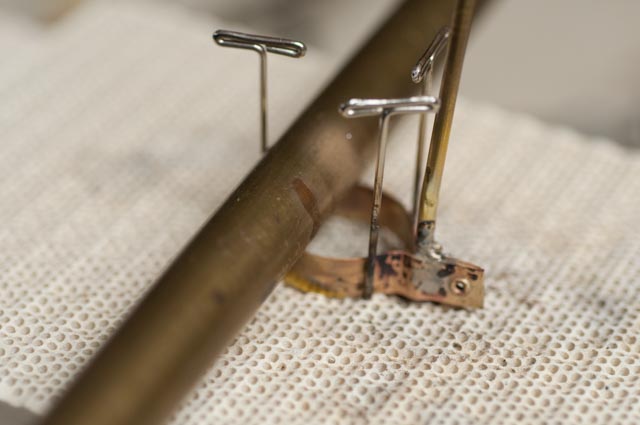
 To be able to splice while the top end remains attached, I upset a stool on a stool added a shelf and sewed the splices in place.
-
 I share this image of splicing a shackle for the top mast shrouds with a smile. As I shall show in future posts following the modeling plans that suggest little eyes at the top of top masts [ thus needing shackles] is an oops. They are all hoops!
-
 Here we are with a full set ready to tie together. yes a little more adjustment to get straight.
-
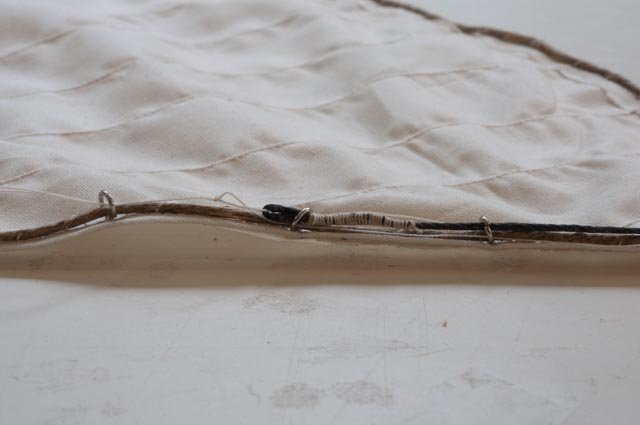
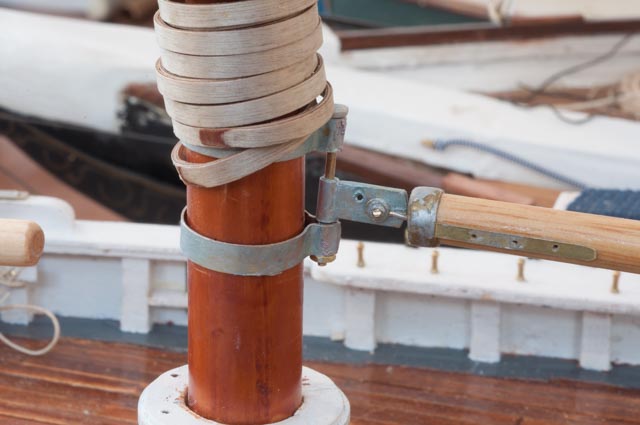
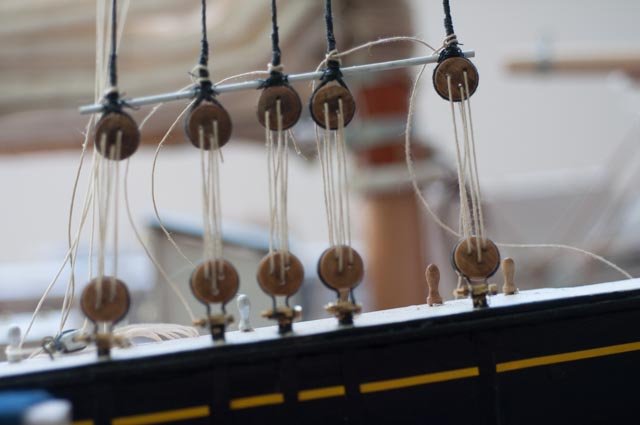 and here the steel rod is lashed and parallel to the rail. I choose distressed white for the bar because the 1940 photos clearly showed them to be white as well as the paint on the seizing going up about a foot. I may choose to add the white paint later but more thought on that first. i want to see how the Bluenose ll finished the lashing before I complete these. one of many questions.
-
- My final act before travel was to add the crotch tackles to the main boom. They help hold the boom steady so I am glad i did. There is an additional turnbuckle security chain to be added as well. I have them but want first to see what I must do to complete the booms and then work outward.
cheers
jon
Now off to Nova Scotia
-
-
During these weeks I continue to tackle different items trying to figure out what I don't know. This update completed the three sails for now [ I'll hold off on the jibs for a while]. I need to rig the sheets, lazy jacks and early shrouds and top masts rigging. Here is part of what i did in the last two weeks.
-
- I have used the same technique for this forestaysail as previous builds. I sew the rings into the bolt rope to replicate hanks. It is a bit tedious but it works. I still only have the No 20 hemp jewelry twine.
-
- I had a little struggle feeding the previously spliced forestay through the hanks, but we made it.
-
- Here we have the sail bent and remounted on board. I will change out the black lines when I get some more good tan twisted rope.
Now we have several deck items needed for rigging. I thought to do the sheets next. First i completed the halyards on the foresail.
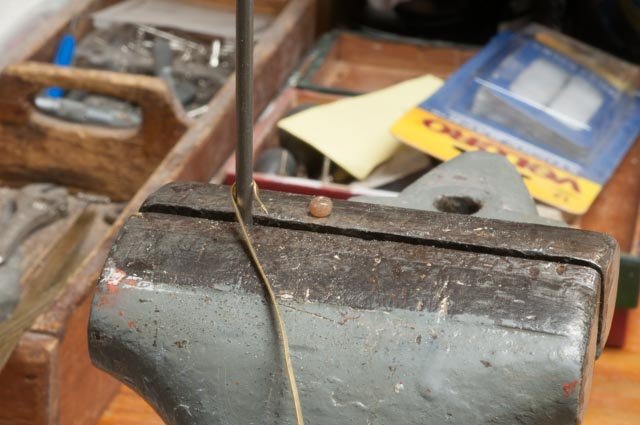
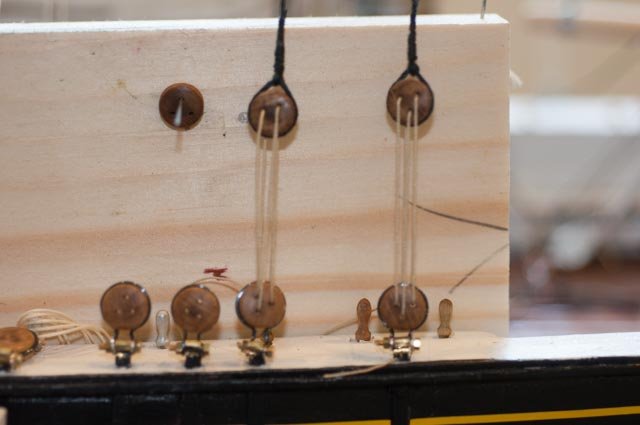
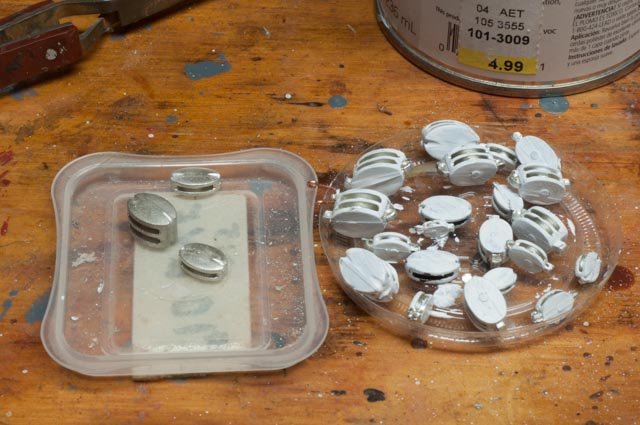
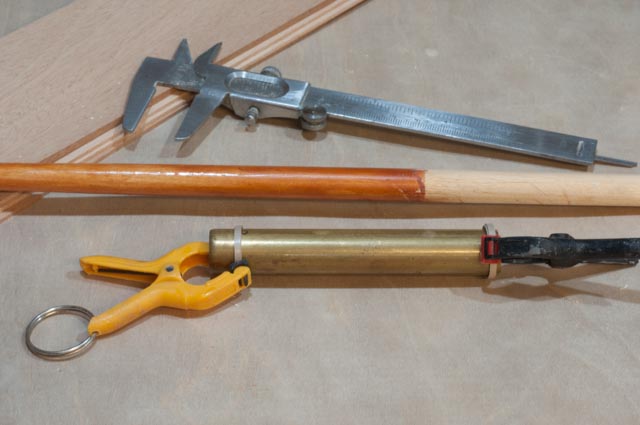
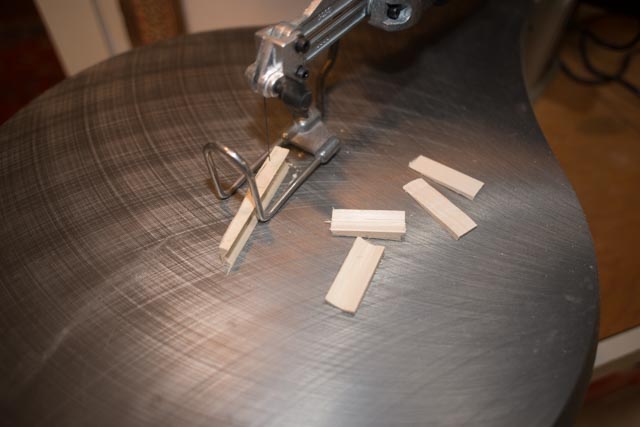
- to rig the foresail and forestaysail sheets we need to have fair leads. reading about the early 1910 and newer schooners where I found they used lignum vitae a very heavy dense wood. I chose to use tan glass beads to replicate this detail. Here are the four [ low tech] steps I used. One is to to prebend light brass around a bar of similar diameter.
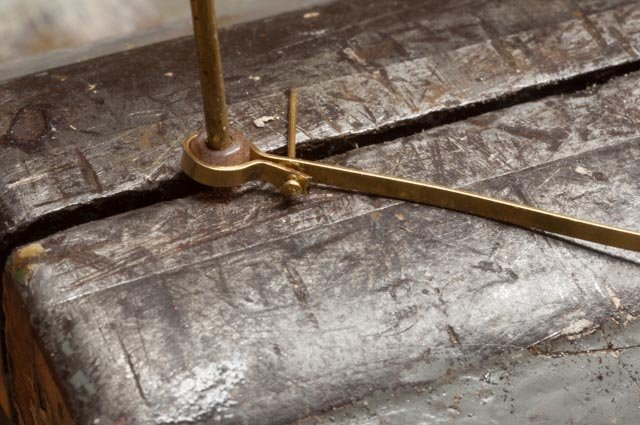
- Here I crimp the bend to make it tight. I then drill holes for a pin.
-
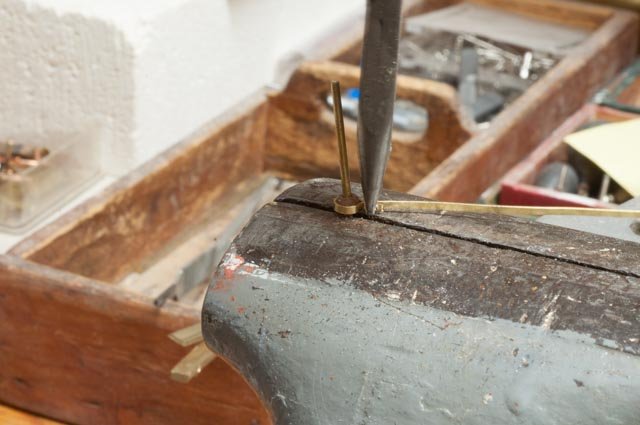
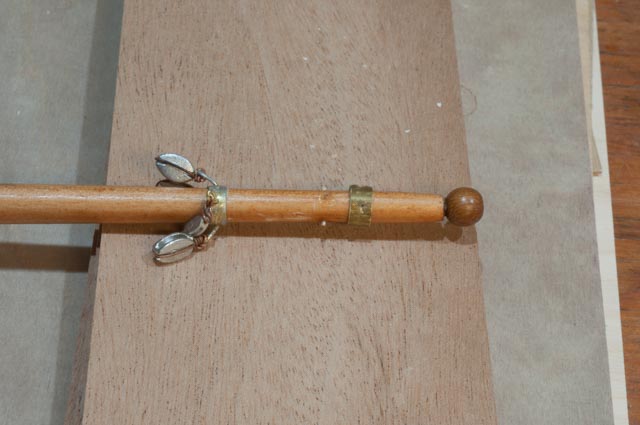
- here i have inserted the pin.
-
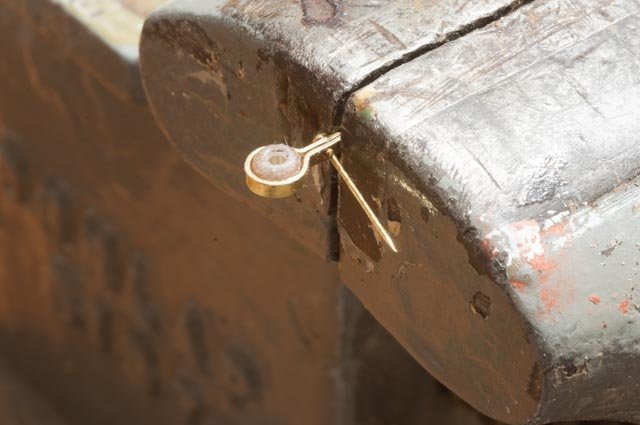
- Here I hold it as the CA dries. If I were smarter i might be able to solder this but I chose to use CA and so far it worked.
Now we are off to the shrouds and cross stays. Since I have decided to make the lower masts fast it is time to move on.
-
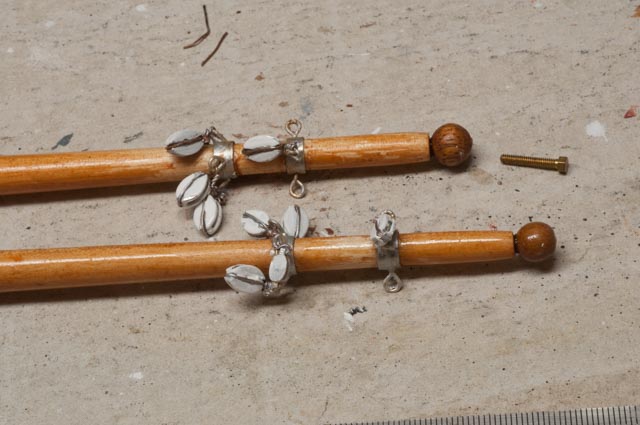
- on 1:48 scale I was able to do this detail using pins. here I do not like the look and in the Nova Scotia Archive photos the bolts are quite clear.
-
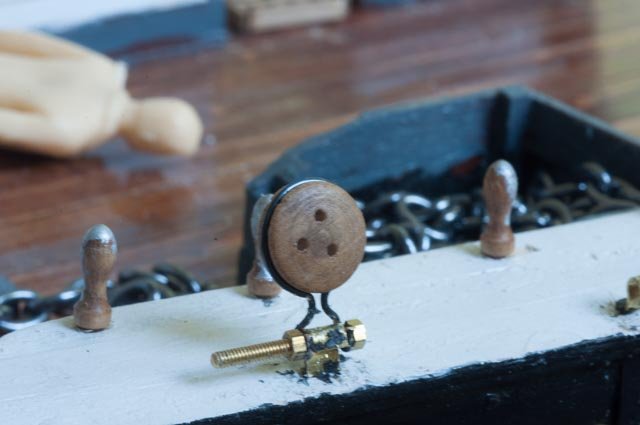
- Here i am experimenting with O-90 hex heads and I like what I see for scale. I rebuilt the wire wraps and the nut and head hold them well. I am also also struggling to understand if the belaying pins were metal or wood. I painted some of them galvanized and will decide after my next trip north.
-
- here the foremast set of dead eyes is done and ready. It looks in the photo like I need to revisit the gold tape in a few places.
I thought I would end this update with another of my oops. they are fun and many.
-
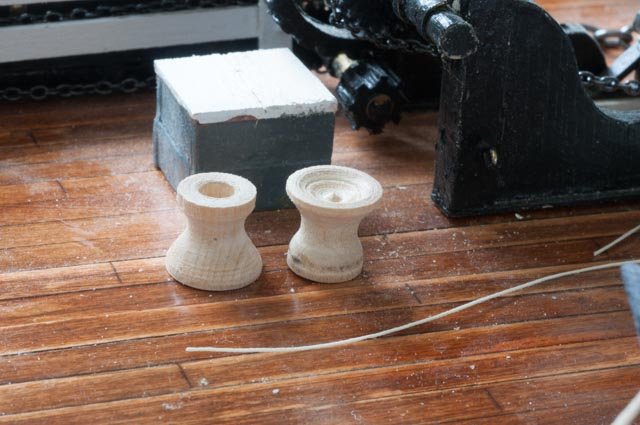
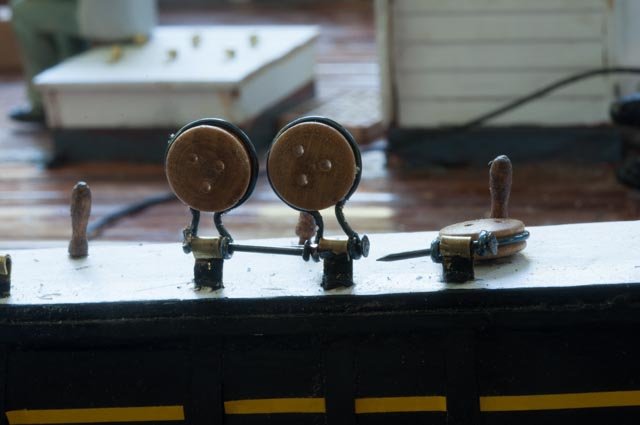
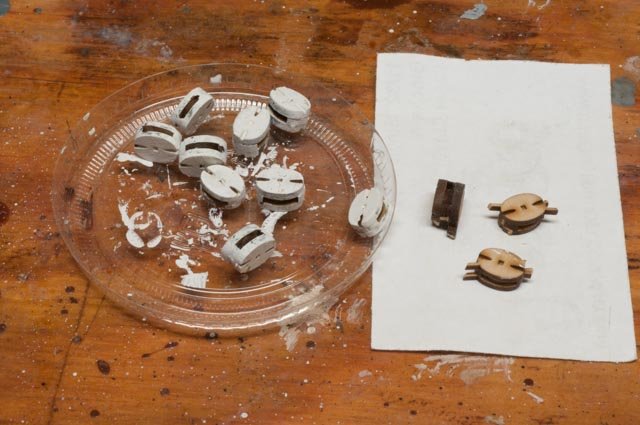
- I needed to build the missing capstans for the donkey engine. Perhaps in a race the huge crew may have pulled up the sails. While fishing however, with only six dories, a crew would have been under 20 and there surely was assistance in raising the sails. This whole thing is a big part of my upcoming research in Lunenburg. Anyway the oops!
- I took a simple dowel in the midi lather and turned these two pieces. The large outer ring has a nice indentation just like the real thing....but
-
- oops it is backwards. The small end should be outside
-
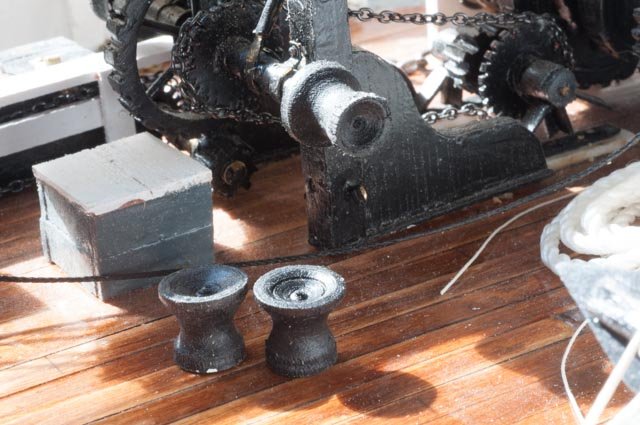
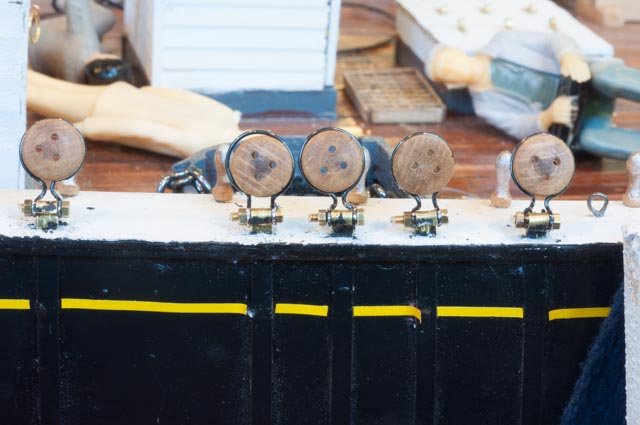
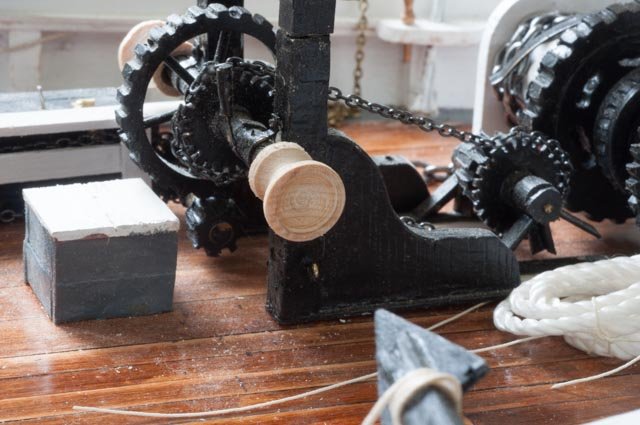
- here I remade them in the correct orientation and size. I am not totally happy yet as the reals one were spun metal. However they are there and ready to have some traveler lines wrapped as soon as I confirm the routing to either raise the topmast or big sails.
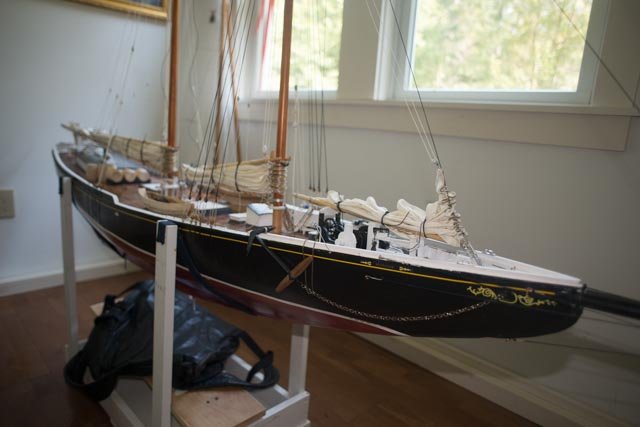
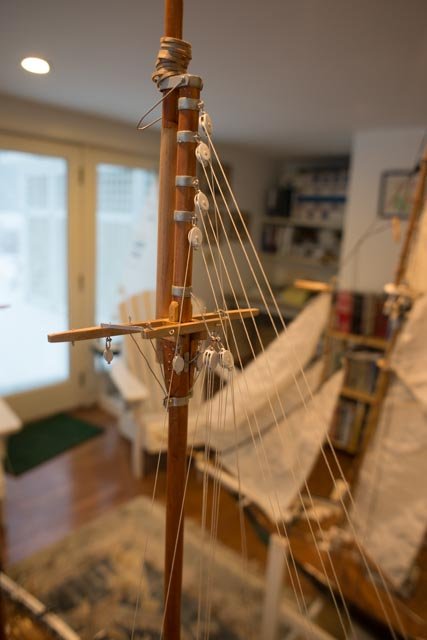
I include this view...a little ahead of the process [ fore mast shrouds are complete] , but it is fun to see how the overall progress is coming. I will do the shroud show next week.
cheers
-
-
It's time to start replacing main mast and take a look. Then it's time to make the foresail and see how these sails came out when back on board.
-
- Here we complete lashing the main sail to the boom. As stated last time I found this to be an error for attachment should be individual lines tied through grommets.
-
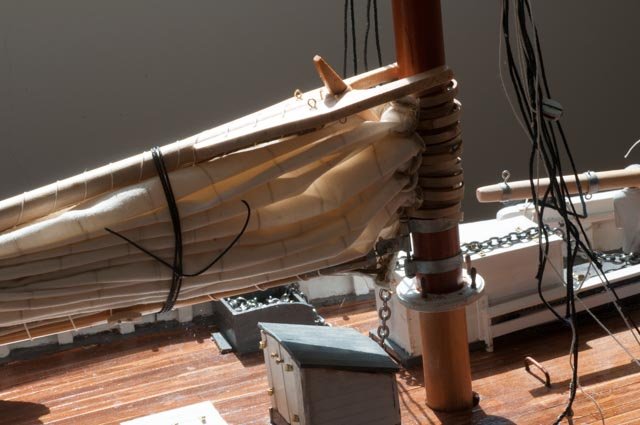
- Once we roll it up an lash it, as in the 1940 photo, the lashing seems to disappear. The black lines will get changed out for dark tan when I get some.
-
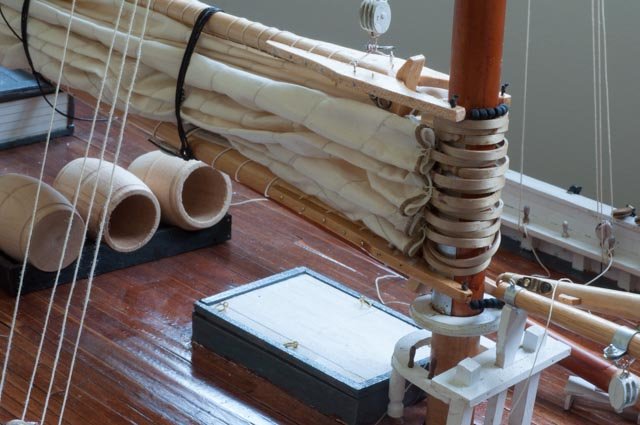
- now back in place, I added the bails and 7 parrals and then re-rigged the halyards.
-
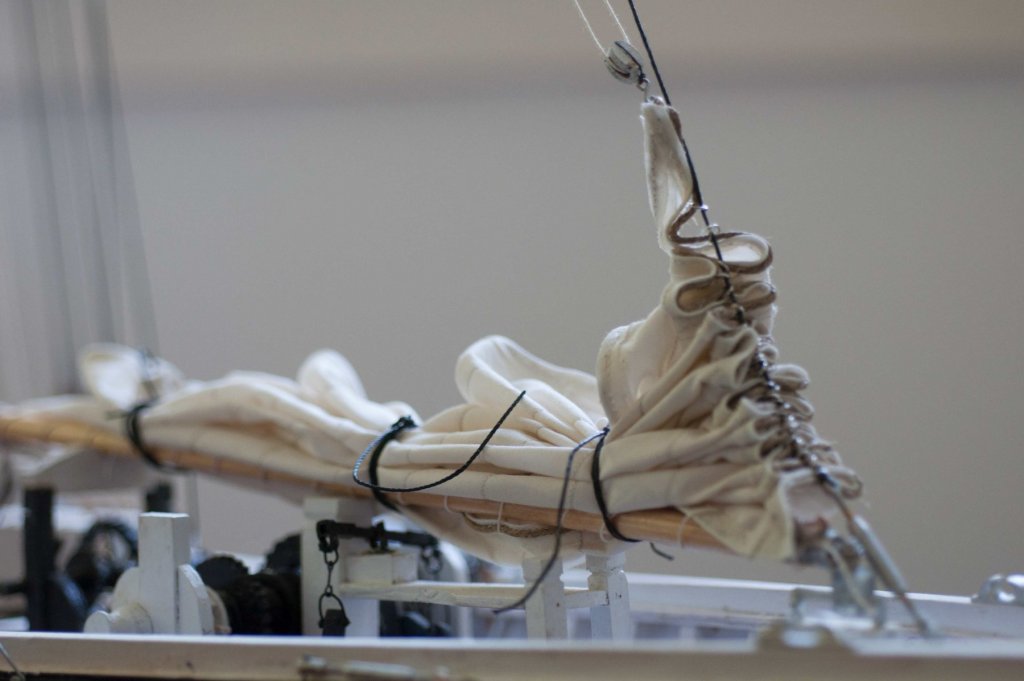
- finally we have a bent and furled mainsail. I am sure it is not perfect scale but it really makes me smile. With all the ironed folds[ flakes] it would be a mess to pull it up , but if challenged I can raise it up.
-
- further to the scale issue, I fear the hemp bolt rope is a little too pronounced in this flash photo. I sure wish i could have found a medium size. maybe next time I am back in Joann fabrics. Now off to make the foresail
-
- I basically followed the same process; here we are all done and ready to install.
-
- Looking here again I am not happy about the bolt rope. Maybe as I add all the lines it will fade away .
-
- here I see the height of the gaff is due more to the hoops that are a little big for strength, but backing off maybe we are OK. It is just more pronounced than the main due to the short length.
-
- Two sails are done and since this is my first ever attempt to make furled sails I am ok with them. My lessons learned are to do them before rigging halyards to avoid a lot of fussing and untangling, find a more suitable bolt rope, fine mini-grommets for the foot and maybe a thinned method to double cloth and make the reef point strips, clue reinforcing etc. i normally have used bias tape and that makes three thicknesses of the cloth. Maybe an iron on or tape method.
-
- now off to get the forestaysail on and to start rigging lines.
cheers
jon
-
-
Thanks Hamilton
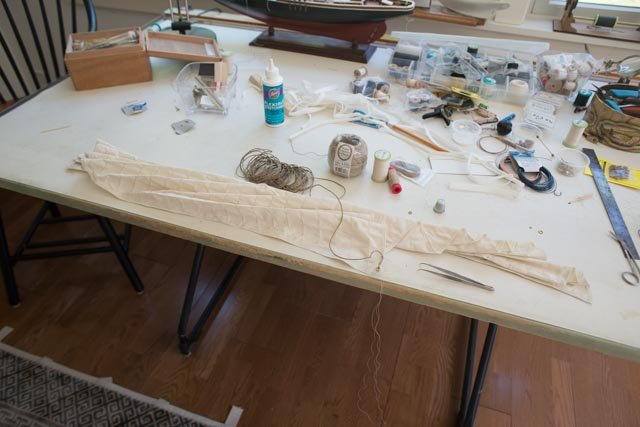
I just finished making lazy Jack's for the foresail. I am rushing through several items to make my list of 'need to learn' as our trip to Lunenburg is now only weeks away.
Like you seeing the large size sail, I often wonder why. I am having fun and learning so that is why. I have now determined my plan is to finalize all including the main masts. The top masts are being rigged to either be in place but removable for transport or be shown being erected. Learning how they did that is my big search. Also thinking about weight, they must have been able to run the engine with the windless unengaged, to help haul up the sails when fishing. I know how the bigger schooners rigged this but find nothing yet on these boats.
Cheers
Jon
N
-
-
I still have not decided if I will ever sail this boat. As part of the options in how to possibly be able to display this model with the most detail but still be able to move it, I need to be able to un-step the masts.....move the boat.....set it up in an hour or less and then repeat the process to go home. So far I have the peak and throat halyards only on the main and similar but different rigging on the fore. Going forward to the next step and still have options, I have decided on the following:
- see if I can make full size sails and then furl them. at this large scale that might be OK
- find a way to temporarily attach shrouds at the dead eyes. The stays are no problem as they have turn buckles below and shackles above.
- continue to add halyards and running rigging knowing I need to be able to untie and retie. tangling during movement is a hassle so far.
- be able to un-step and re-step top masts as an alternate. The model is then a fraction under 4 feet tall. This is my best option and my current plan. i am trying to learn where the blocks were mounted that carried lines through the sheave at the bottom of the top mast. This was a common function with the four masted schooners as well as they some times needed to lower their top masts to go under bridges. I find no information yet on this detail.
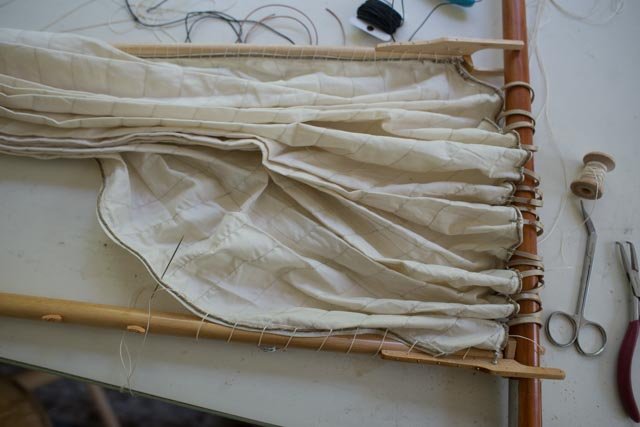
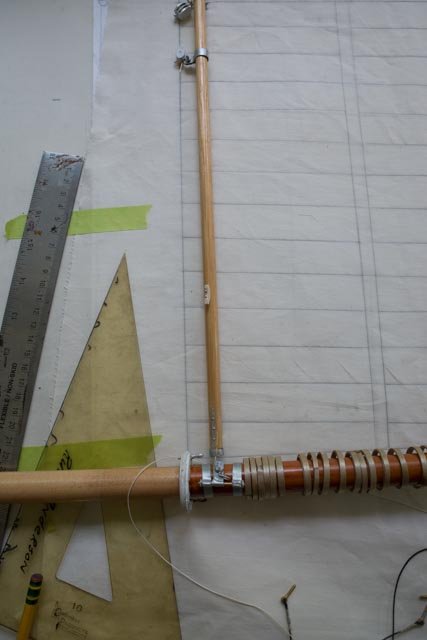
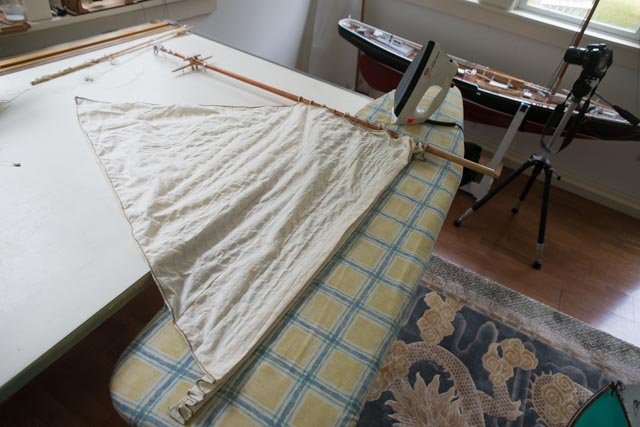
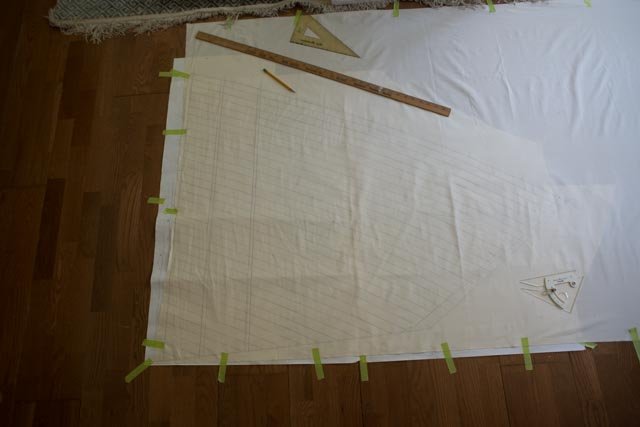
Here we go on the first step. can I make muslin sails to full size and fold [ furl] them to where they look realistic. I have used simple Muslin to nicely represent the sail cloth. Many folks go to foreshortening cloth or substituting silk span etc at smaller scale. i wanted to try this to see if at 1:24 i am ok with full size sails...let's see how it goes with the biggest one first.
-
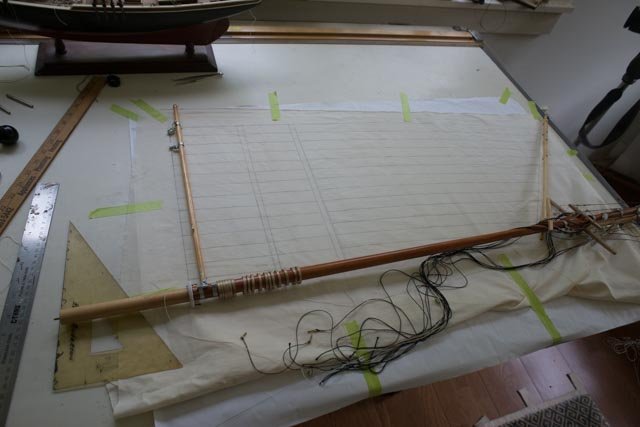
- Here I have laid out the sail as per the scaled up plans. It is important to follow the roach as that is how the seams were made. The lines are about 5-6 inches long making a nice arc. An old fisher plan showed straight lines and the outer most strip curved to make the roach. I have laid out the reef lines and plan to leave them on the cloth but not add bias tape for doubling since I want to be compact.
- A previous lesson learned is to lay out the model spars and be sure they fit before final marking and cutting. I find typically that to simple cut out sails per the plan, add bias tape to edges, stitch etc. they tend to be a bit big. I am also no seamstress!
-
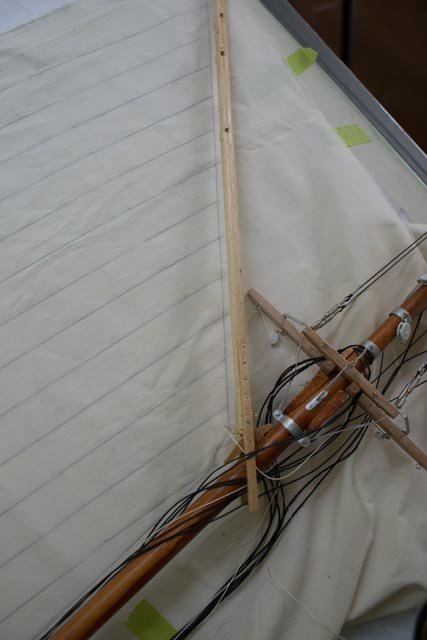
- The gaff looks good
-
- Here we can see we are about 3/4 inch too tall. So I had to raise the foot, adjust the reef lines and roach a bit before cutting.
-
- Now the sail is cut, bias ribbon glued and then sewn on. All the seams are also stitched. I had some tension issues as I chose incorrectly to keep sewing around and around and did not allow for stretching out the seams [ as My daughter just explained to me yesterday]. Anyway the minor puckering mostly ironed out and as you see with the first attempt to flake the sail are not too visible.
- In this step i determined the bulk was looking good, so I proceeded, as on other models, to select a hemp twine more for color to hand sew on to be the bolt rope. as often the case, it comes in 10 and 20 weight and I would have loved to use a middle size that just isn't there.
-
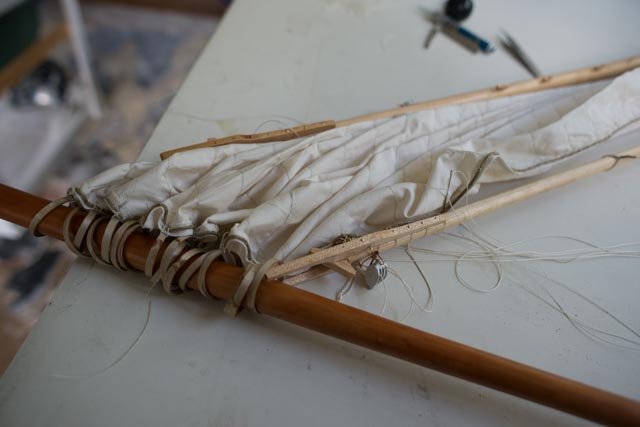
- The bolt rope is sewn on, I have folded and unfolded and now sewn on the hoops I had purposely installed three extra hoops to the mast so that if one broke or was weak I had an option. If I had needed to add a hoop that would be hard as the whole process would have to be done insitu.
-
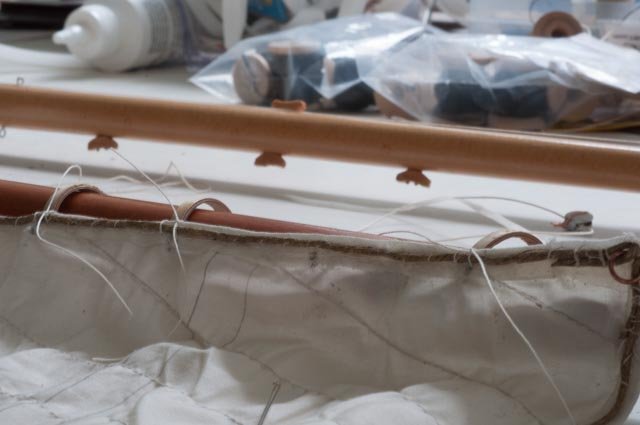
- Here is a detail of the hoop sewing. I plan to revisit Lunenburg and study details like this some more. I likely will not upgrade this model but I am sure there maybe a better means to replicate perhaps with grommets. Again being furled I am escaping some scrutiny . You can also see the reefing pencil line without the doubled cloth
-
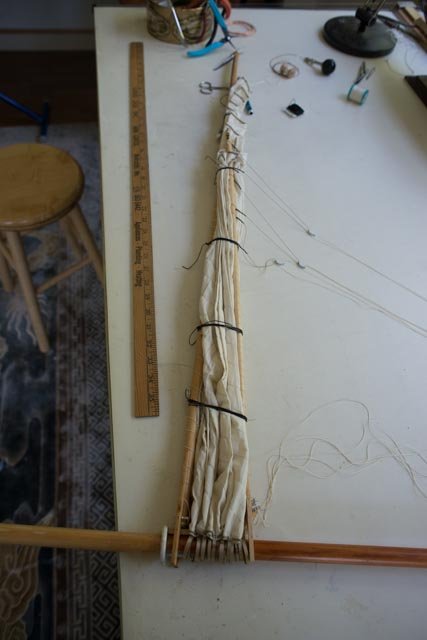
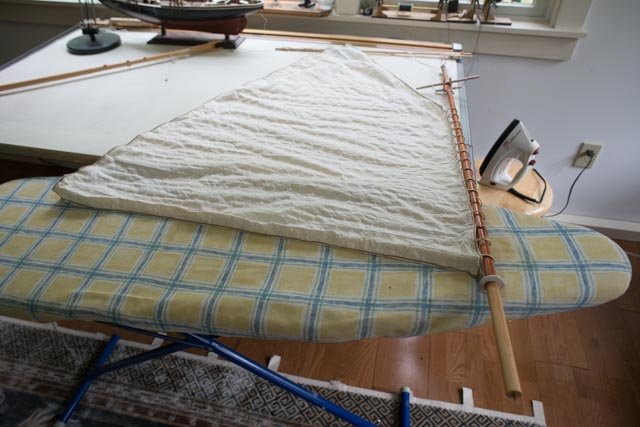
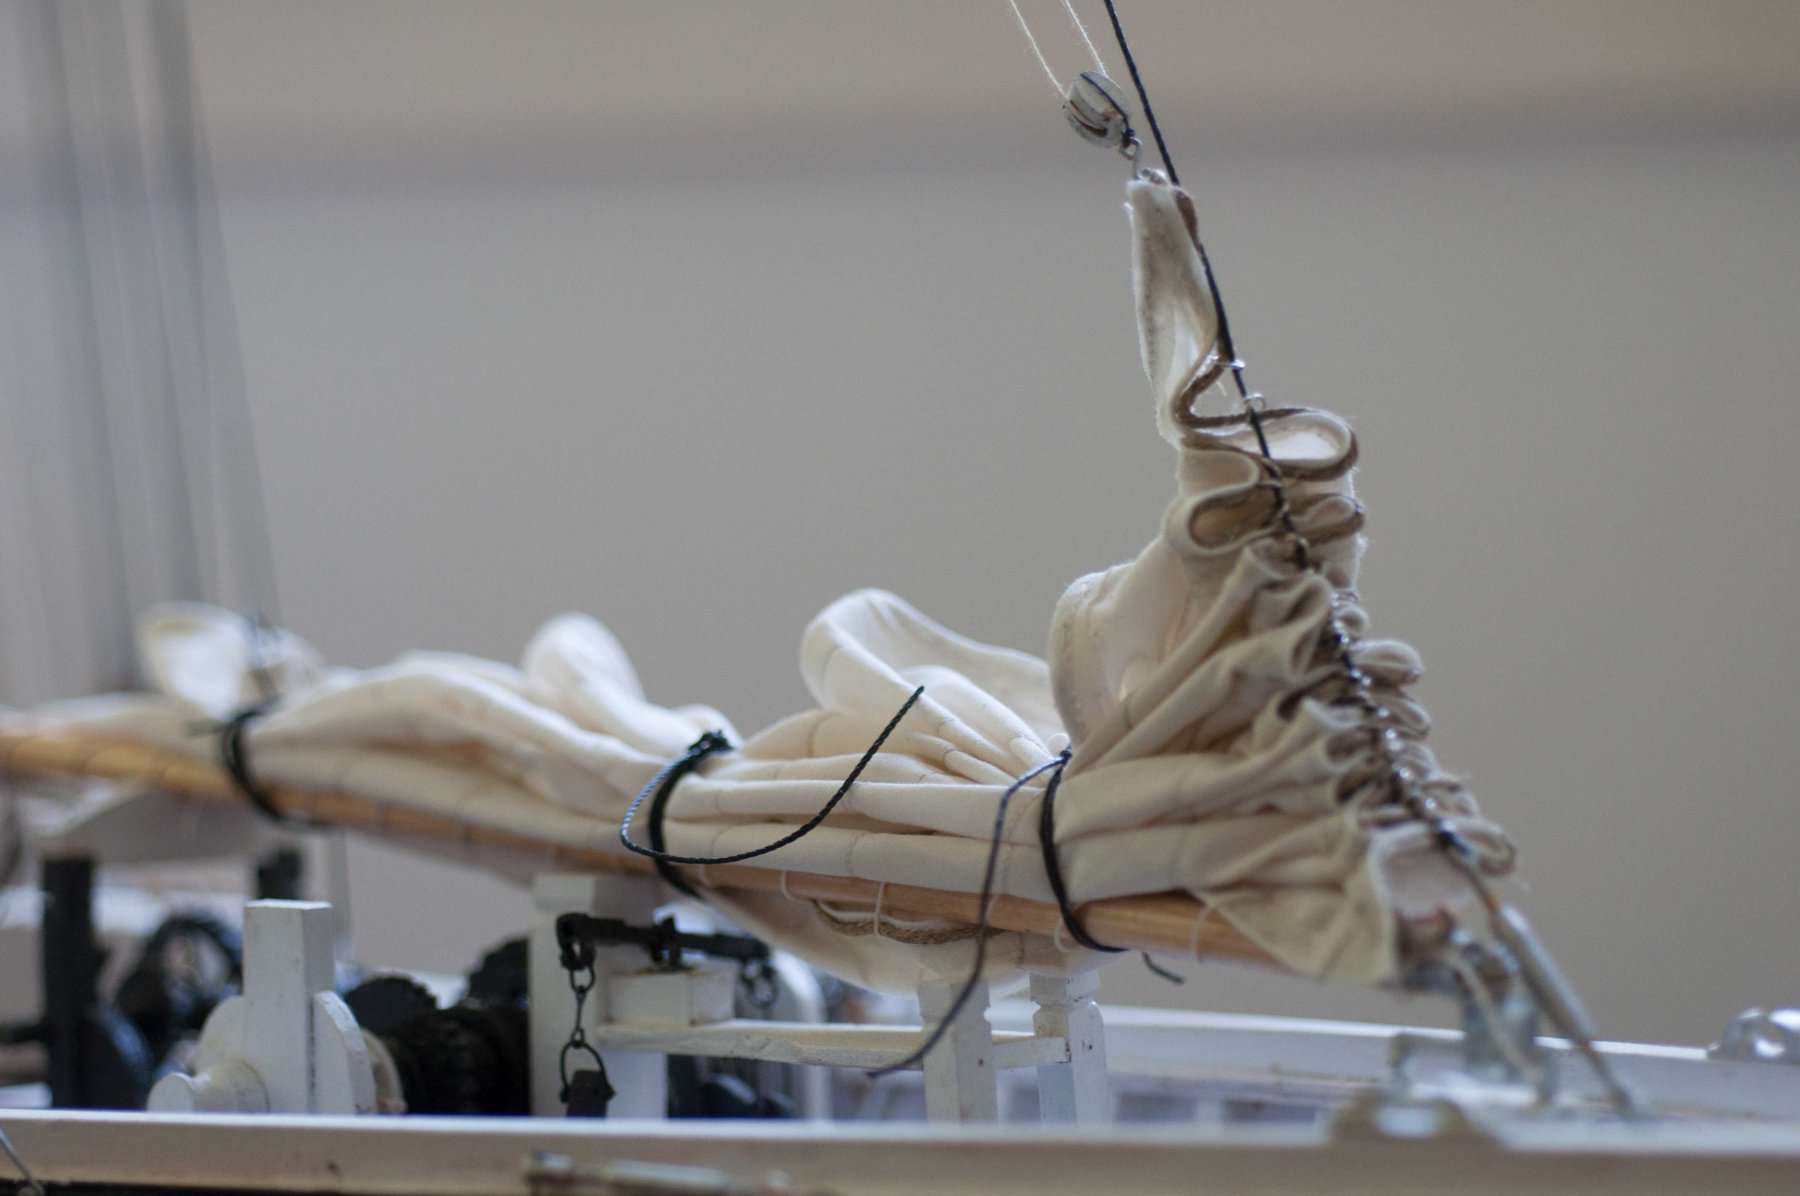
- Now we fold [ flake] then touch with the iron and fold again, matching up with the hoops.
-
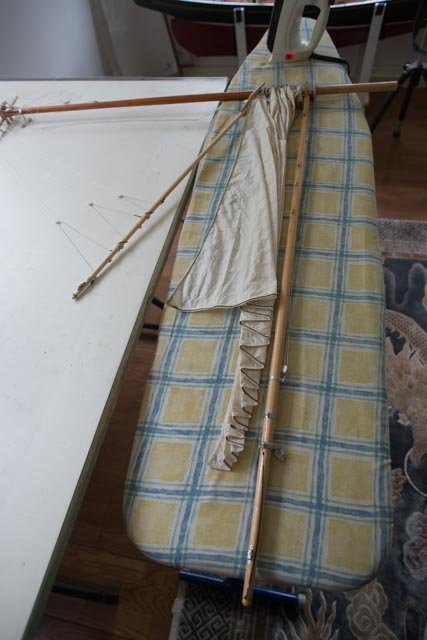
- We are almost done but i felt i needed to lash on the gaff before completing
-
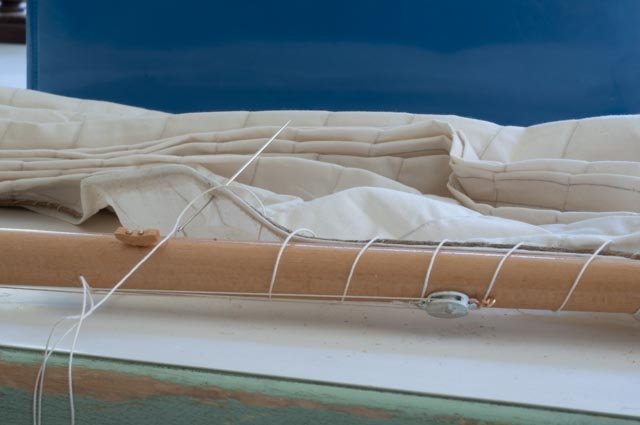
- Here I have lashed on the main sail foot to the boom. On the real schooner, the photos show individual lashing with grommets. If the sail is to displayed raised I may upgrade that in the future. At the moment it is an oops, as I did this work and then found my error.
-
- Here we have sail flaking almost finished. The lashing of the head to the gaff is under way. You can see the loose throat halyard on the table. It was a bit of an effort resetting and untangling that after all of this as I re-stepped the mast.
I get there in the next posting
cheers
jon
- archjofo, mtaylor, kees de mol and 3 others
-
6
-
Well it has been some time since I have had time to get moving again on Bluenose. We wait so many months here in Maine for summer that we need a little break. Summer here is so packed with real sail boat racing, summer parties, hiking, yard work and friends and family visits. Let's see what I have been able to squeeze in since starting summer in early June.
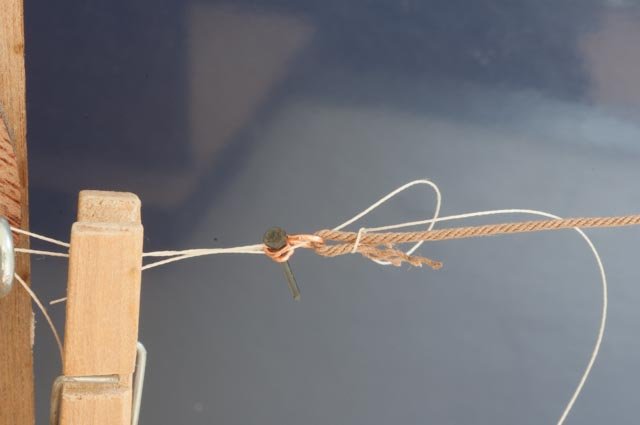
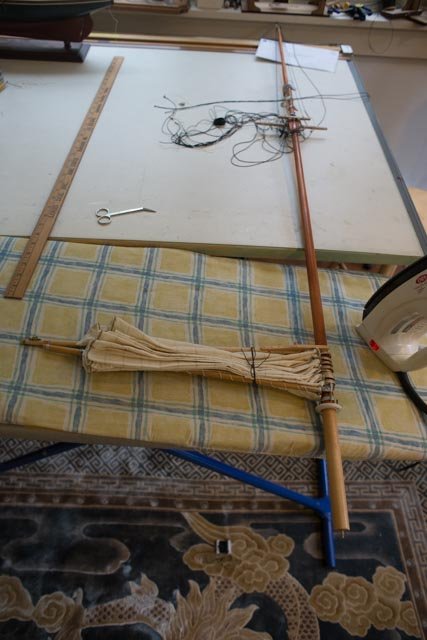
i started by saying i was going to figure out how to make baggywrinkles at this scale for my summer activity. I showed the drawing from the classic instructions in my last post. I got that ans instructions from a colleague rope work craftsman, and sure enough my trying to do it right proved to be tough.
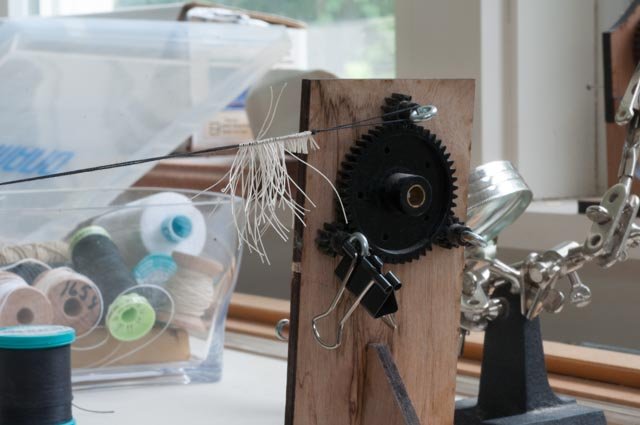
i set up a jig using the rope walk kit to stretch two lines[ black] I then tied the loops per the instructions to make a real one. Pulling the natural lines from under the two lines up over the outsides and down through the middle. We then slide them down to the end and pull them like a hitch. Here you can see the first 15 or so strings pulled tight and trimmed as well as the second batch pulled and ready to be trimmed. It looks like one is upside down and needs to be removed. trust me...it is harder to do than it looks for those of us with stubby fingers.
i did this and some where between 40 and 50 lops got me an inch which should be long enough to wrap a lazy jack to make one baggywrinkle.
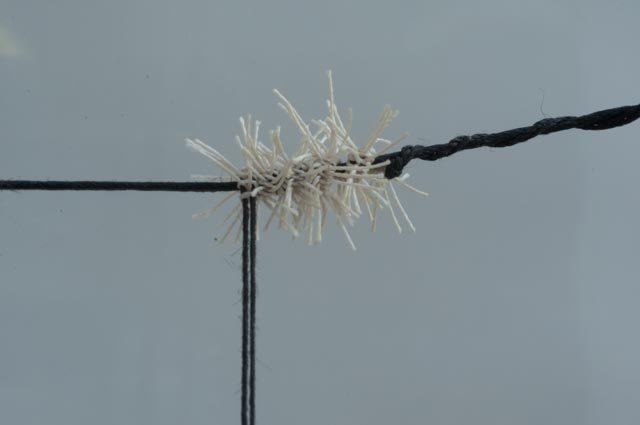
here you can see i put in a mock line to be a lazy jack. I then wrapped the one inch assembly roughly 6 or 7 times. What I have is a real mop. My conclusion is at this moment this process is too intensive. I need 26 of them for the lazy jacks, and also they are not really attractive. I visualize if I used smaller thread in both parts it could be 100 knots in an inch and more dense etc. the real lines though where somewhere between 1/4 or 3/8 so it is the "fuzzy' aspect of old manila that is not present in new thread......maybe. I am back to the drawing board and looking for alternate solutions. While reading other posts, I have seen good solutions for the smaller scale. Pipe cleaners and example. at this scale...15 inch average means about 1/2 diameter...maybe sponge??
i tied up a few more stays around the the bow.
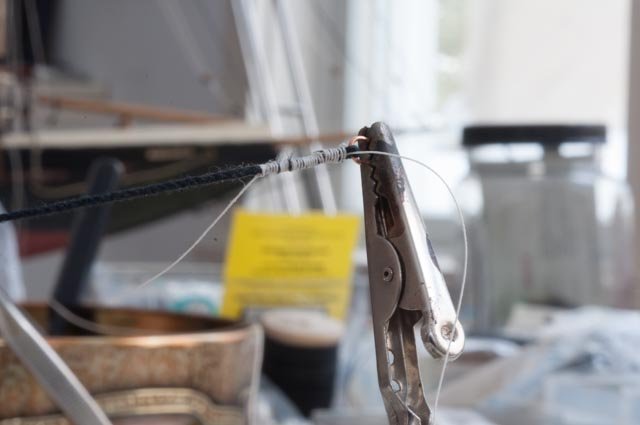
The result is still not great but I feel better each time I try to taper the heavy thread and get a more realistic splice under the wrapping. The white wrapping of the boat exaggerates the detail. Maybe the next one will be better
I made up a real rudder. even as a radio sail I thought the need to show how it was really made was important
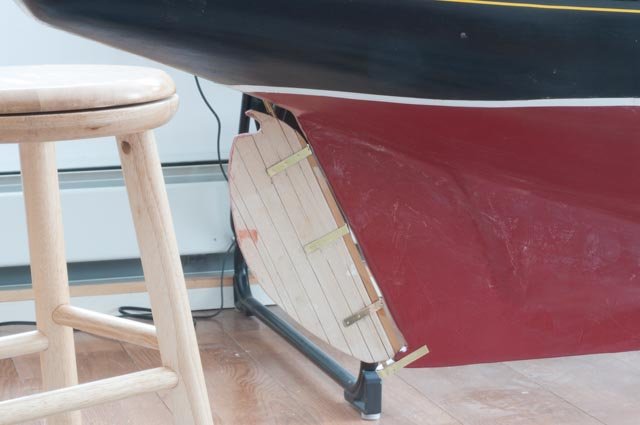
Since this rudder actually works, I need a little license on the hardware
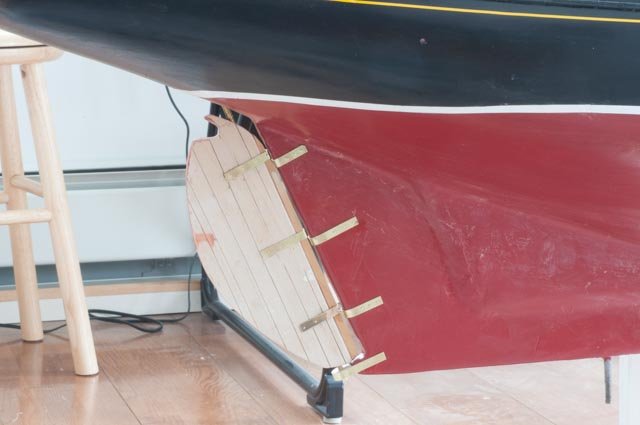
A close look shows only cosmetic use of hardware as the brass rudder rod seen entering the rudder on top and bends in an L shape is the actual control. A second brass rod also a L shape goes down to be captured in the extended keel. For potential radio sail there are two slots for Popsicle sticks to add extra area to the outer edge of the rudder.
I end this post with a tease....I have made the main sail and foresail and they will be in the next few postings
Here you can see the large size of these sails. Also I want to furl them....I think it worked..stay tuned i'll organize the photos
cheers
-
Hi there
I just found this string as I am in the same stage. My scratch build Bluenose is 1:24 scale, so I also have many different issues due to large size. I may want to go with furled sails if i have the ability to de-step masts and travel, and maybe go with full sails if I try to sail the boat.....therefor I am experimenting.
as to your comment on plans, the Lunenburg Bluenose II gift shop sells the Phillip Eisnor plans as does the modleshipbuilder site. they are drawn to 1/4 scale for the boat and the sail plan is 1/8 in. they are very good
cheers
jon
-
Michael Pat and all who may follow this some day. I have not posted in a while and this posting is to share what is being done. I am really at the decision time and that is why I have slowed down. Also spring came and we are fast approaching summer. That means the real boat got worked on launched and sailed....all successful and tomorrow we go for the second race
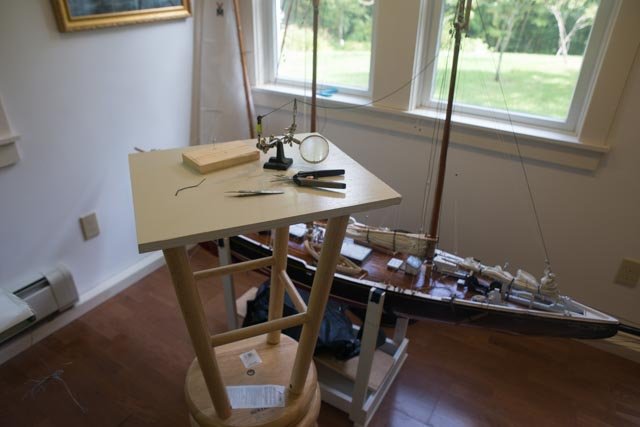
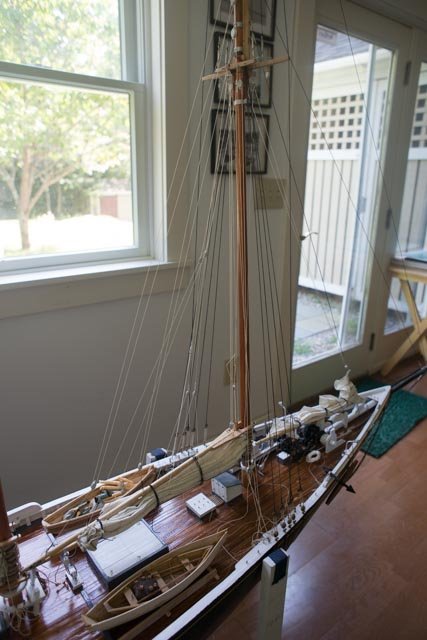
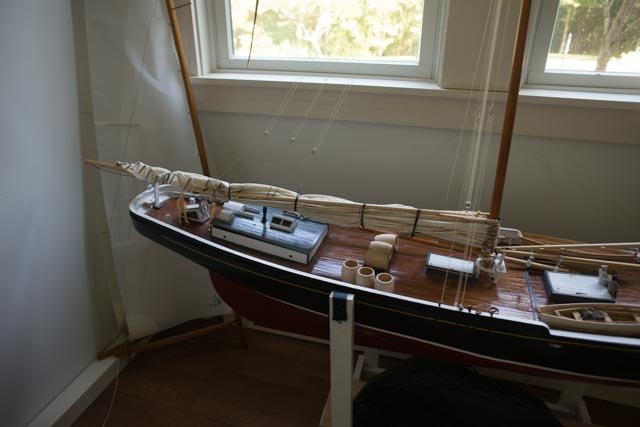
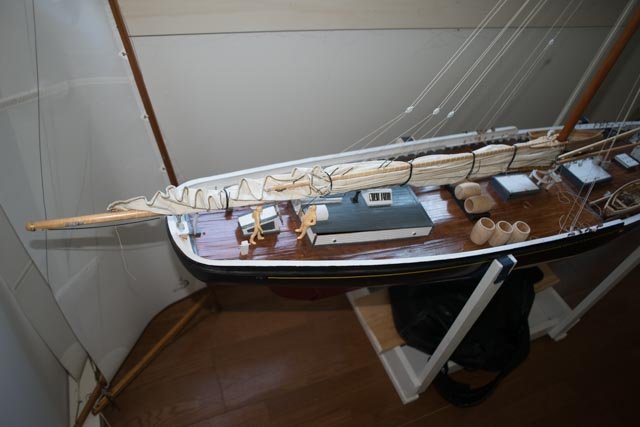
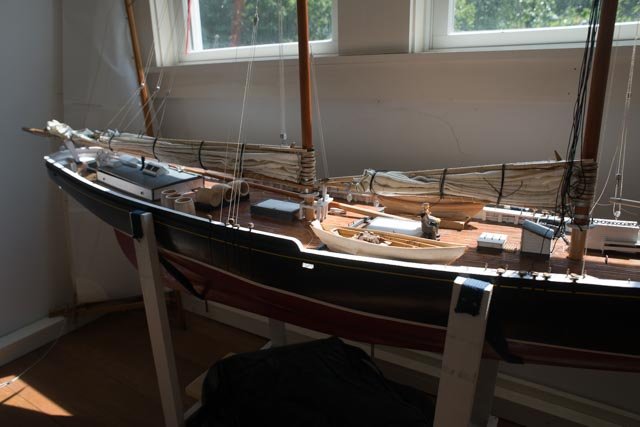
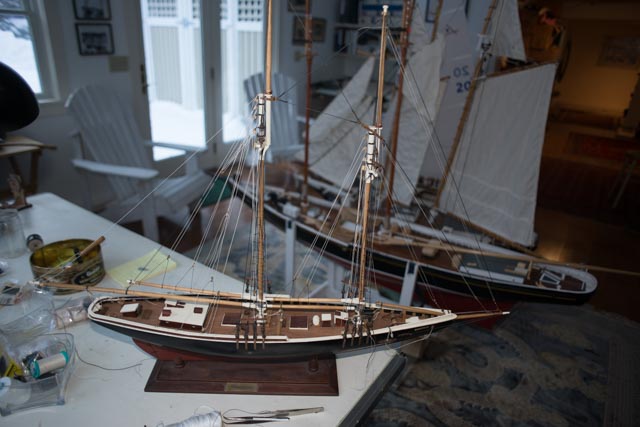
Bluenose came home from the show in April and others have asked for her to visit. that means being able to transport her. So here she is in her summer station with a window view, a Brazilian parrot and a print of the Bluenose ll to keep her happy as I am truly outside and thinking about what to do. During the last month or so I also took the two 50 inch Marblehead pond yachts you see in the photo below and sort of rebuilt them
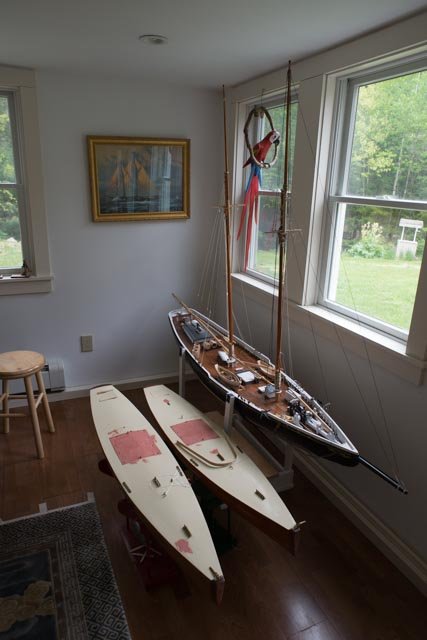
I removed their decks, redid the interior sailing rig that never really worked, and replaced the old deck with 1/16 birch plywood painted out. My goal this summer is to get these two really sailing and then be better prepared as I need to decide if Bluenose is going to sail or not. As she is, I can take her, de-mast her to go to show or whatever and set her up and take her down. If I attach the shrouds, she may be stuck where she is now for a long time. I am not committed to that yet and thus no progress. Someone suggest I go buy a VAN...great
Here you can see i roughed out the cabin for showing and worked on the different rigging materials. Talking with others I find if I go ahead and fully rig her we will focus on learning how things really worked and try to replicate. example...I have installed a sheave in the main top mast. Nobody yet knows which blocks were used to raise that spar. The foremast is easy the jib halyards are at the right location. One thought is I will display her with one top mast partially raised and sails furled like on a mooring between trips. that reduces the height of the model 15 inches
If I do that I plan to learn to make Baggywrinkles. something that at this scale one can actually achieve. So we putter along and do a few things and learn an few things and I suggest that next fall we have to decide the next direction....lots of fun detail or less detail and make her ready to sail.
cheers
-
Dave
just had fun catching up. I love the work you did on the deck equipment, and am envious of your working with a machine to make the gears. I plan to get there some day. I totally failed on two attempts for mass producing 6 dories so I am very interested in how you go with glue up.
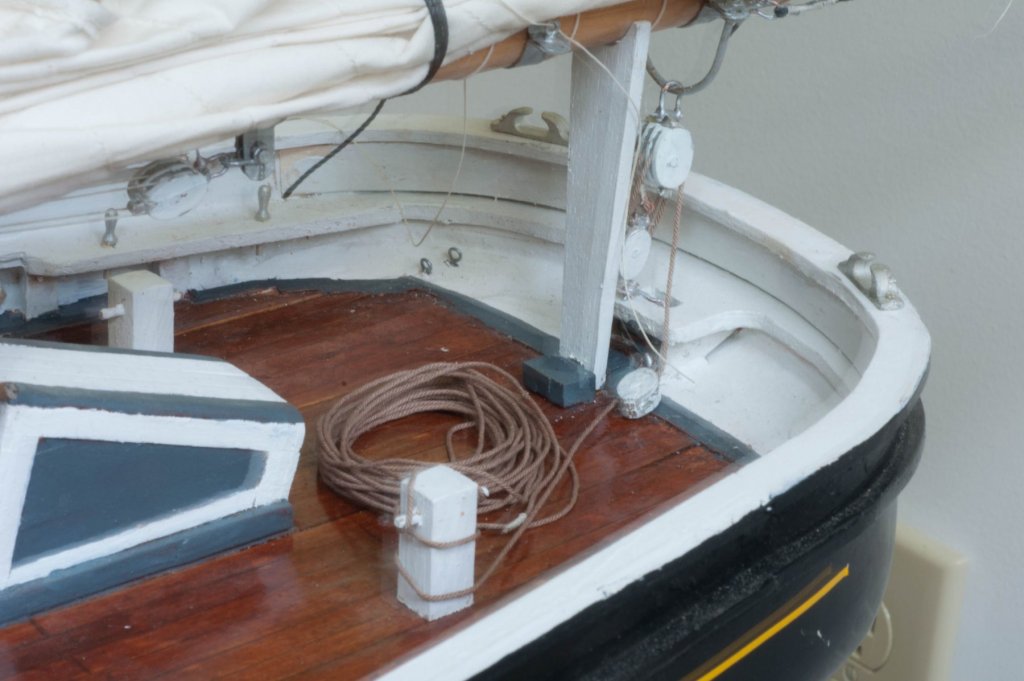
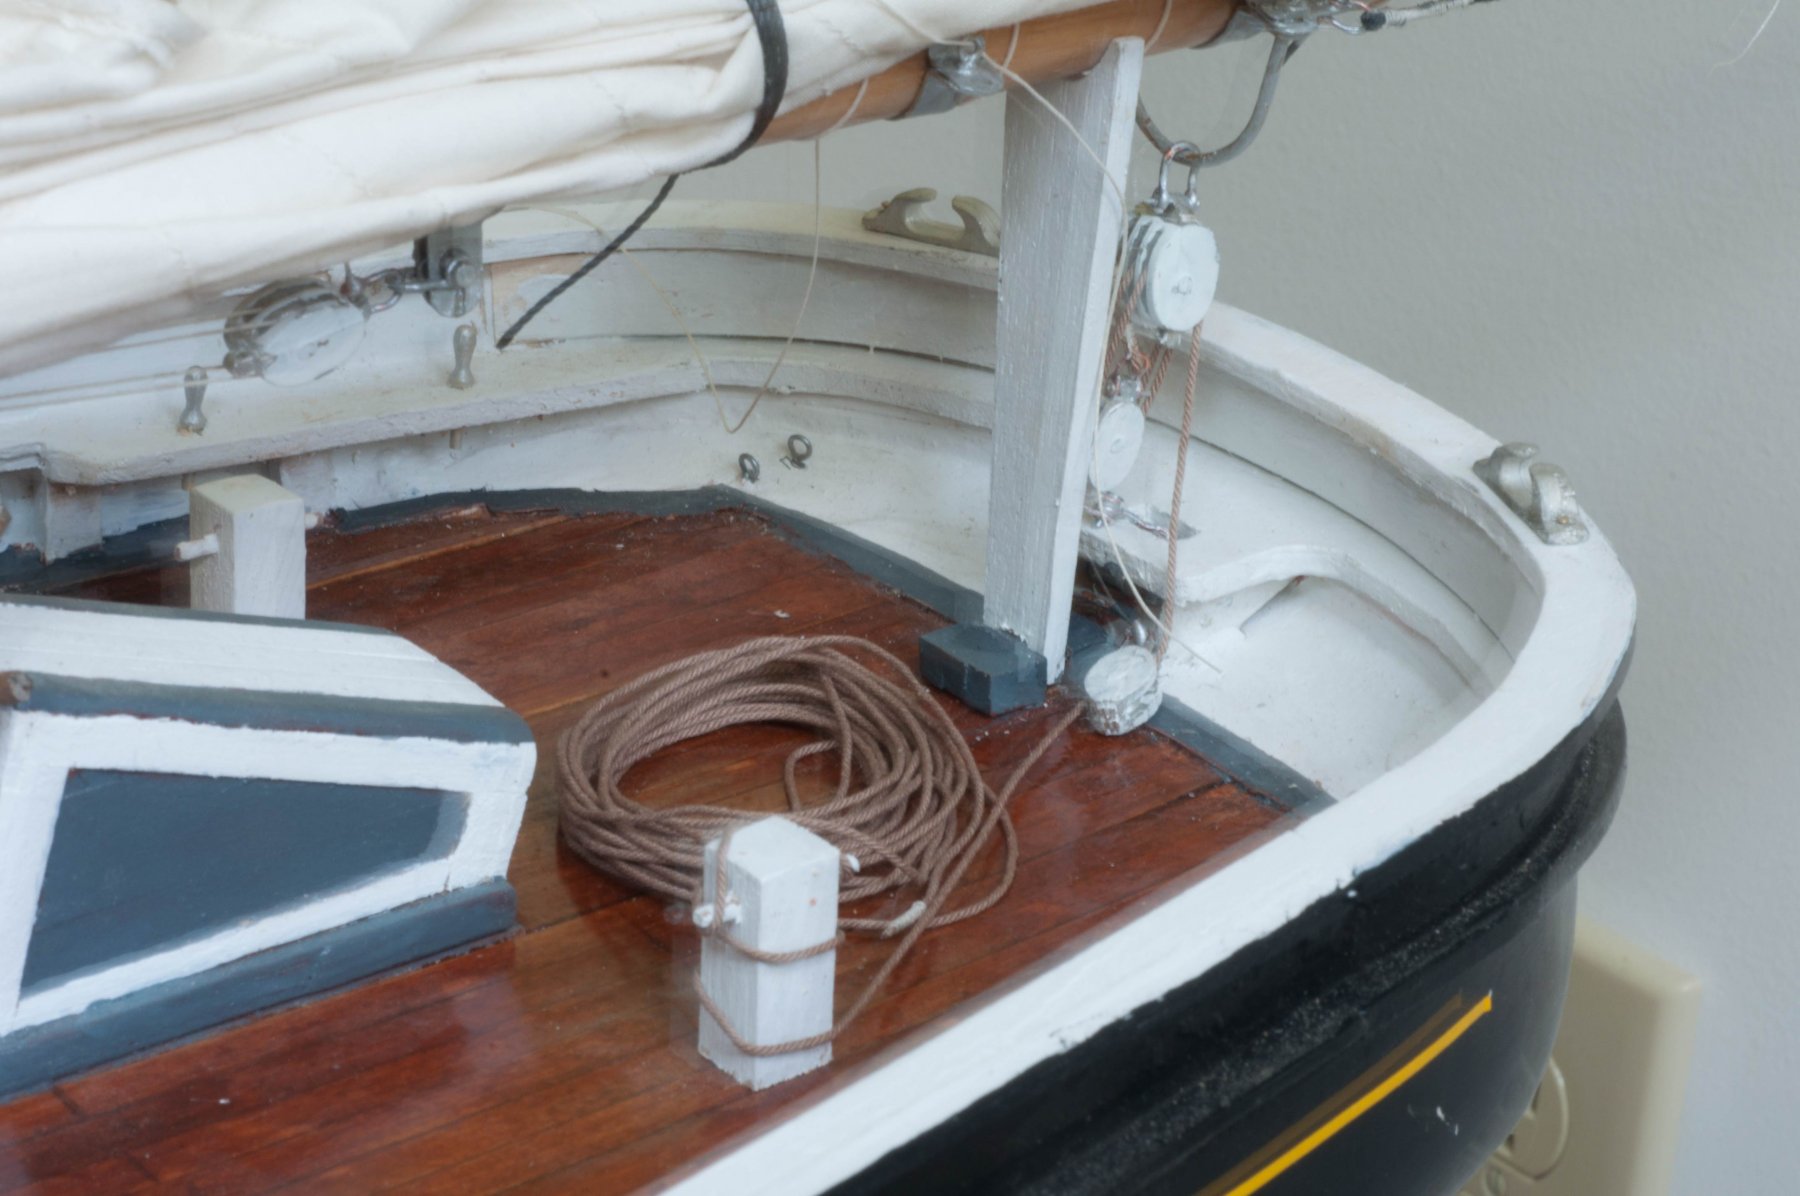
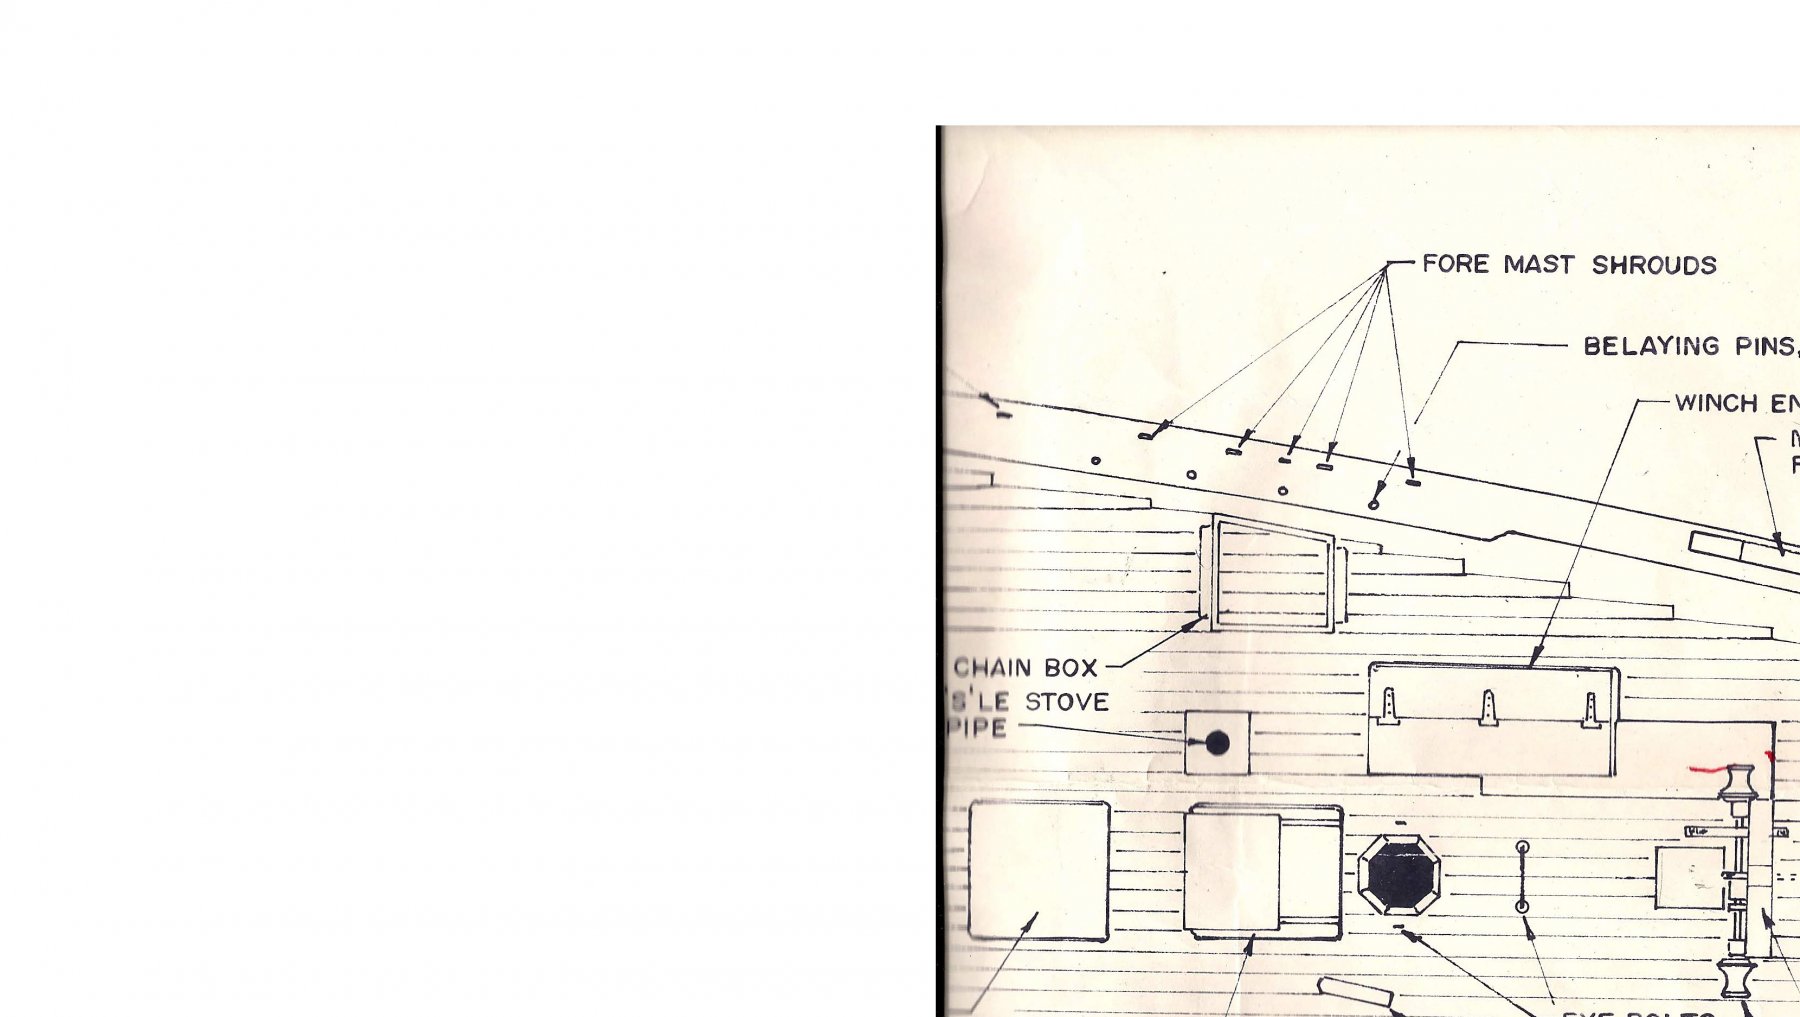
- I noted a question you floated on location of the anchor box. I wanted to share an image from the deck plan done by Phillip Eisnor off the modelshipbuilder website. the box is trapezoidal and against the water way. 1940 nova scotia archive photo confirmed that location.
- Where is the chain??? From reading a bit my understanding is because it was so heavy they would not have too much due to capacity of the winch and you didn't move it around much. Looking at the photos on the nova scotia archive they wrapped the port winch and went to the chain box. maybe one or two shots.... and perhaps used only for harbors and banks [ shallow rocky bottom ....added chain weight] . The other side I believe would have been rope [ chain to lay on the bottom then rope to winch] I believe and could have gone deeper. Some other schooner models in Lunneberg show that as well, one with a very large coil of anchor line center starboard.
- I love your work trying to make the cat head work. I believe there is another line line perhaps dory tackle that with added hook dropped to snag after the ring breaks water. The tackle lifts the ring and pulls it aft by its angle to the rail height...flukes still in water ...then the cat head chain is made around it. then the tackle with hook slides down shank to pull up fluke. A Spoon [ oar like] holds the fluke off the hull and then levers it up on to the rail where it is lashed. tackle then goes back ready for dories or unloading fish boxes. if any one seeing this can help make it more right please jump in......this is the learning part that I love.
- Barrels.....in the 1940 archive photos there were three fixed ones and they were about that size, but more straight sided...I wonder if they were steel??? They were laid horizontal in a rack a little forward of the main cabin. They were thus closed in so no need to ream out and make hollow. My question is what was in them?. they needed drinking water and they needed fuel for the winch engine, maybe kerosene. Sardine barrels were different I think...more like your photo, surely would have been loose, standing up rigged in and out of the hold etc. salt barrels ??
we all have so much to learn...how do you fish for cod and what do you need on a schooner in 1917?
cheers
Jon
- Nirvana, Elijah and genericDave
-
3
-
-
The last month ran away from me. I drove out to Arizona then got a cold and ended up getting through our annual spring show living on comtrex.
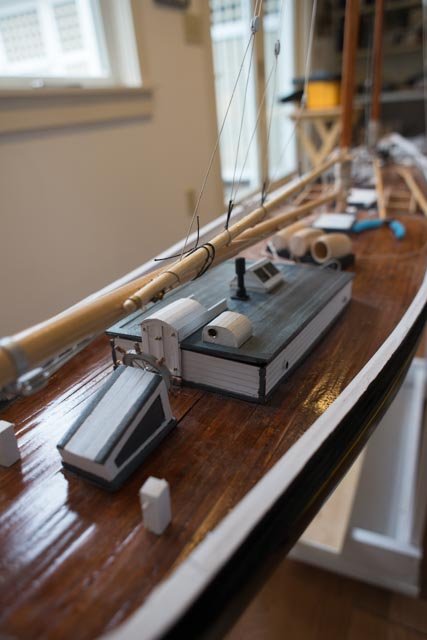
 i decided to rough out the deck cabin before going public. I had fun trying to use steel pins for the bars on the skylight.
Here are a couple of shots of the set up in the Owl's head transportation museum up in Rockland ,Maine. The main throat halyard crane broke in route but re-stepping the masts was not too hard as i only have a few lines connected at this point. The boats around me are from many members of our group...Downeast Shipmodelers Guild . On Sunday a nice guy came by and told me he had personally flown all of the planes behind us. He also collected motorcycles. I guess sailing passed him by.
cheers
-
I am glad to see you back again. nice work setting up the gig for the plates.
cheers
-
It has just been too long since i could sit here and put something together. It is snowing again so that is incentive. I also needed to get to this update to help me focus. We have our annual showing in early April at the owl.s Head museum and I hope to take Bluenose with a few more things started.
I have been working on setting up the rigging. I need to be able to de-step the mast and go out and set it up in place. I suggest it's not reasonable plan or a long term approach but for the next time or two a needed asset.
so here we go
-
 I set up the main gaff and needed to follow their angles to get the right lengths. I am not showing the gaff raised and it will be interesting to see how the lines shift in the lower position. I ran the line through the Becket on the block so it should slide. I am sure the real ones did, now that I have seen it is the different angles when in the up or down position.
-
 Here I chose to set up the main boom and gaff. The peak halyard and whip are tied off to belaying pins and I will need to detach then for shipping and reattach at the show as I set her up. similarly the throat halyard is set up reversed,[ the whip is to starboard.} The Eisnor plans do not show a whip on the throat but it had to be there, the sail was just too heavy not to need it. Note the double blocks up here with a triple on the gaff. The double blocks behind are for the lazy jack which doubles as the topping lift in this rig.
-
 Well it's time again for more hoops. These top mast hops are smaller this time and a my forth go at this process. These hoops are the first ones that I am satisfied with as to scale and strength. their roundness still isn't great. I saw some last year made from white oak shavings an they were perfect. I hope to see TIM at the show next month and learn some more.
-
 here they are varnished and ready to set
-
 Here I am experimenting with a new type block. these come from Syren ship model and need to be assembled. They are a bit tricky at first but they are really good to look at. I will incorporate some of them into the works.
-
 Here I am painting up the Bluejacket metal blocks that I like to use where I want strength as well as looks.
-
 Now we get to the fun. here I needed to splice in the main halyard whip blocks and suspended them between the masts to help get a little tension in the line.
-
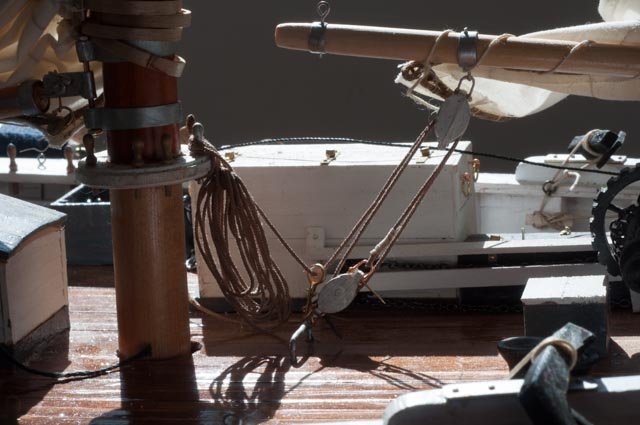
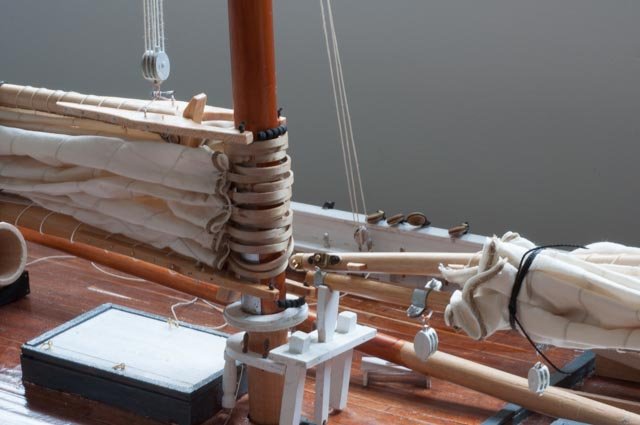
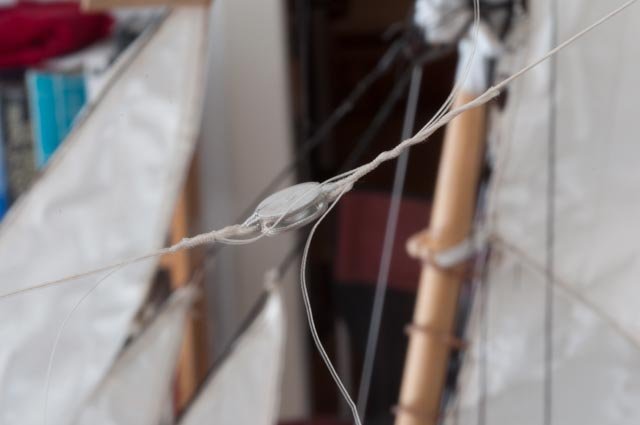
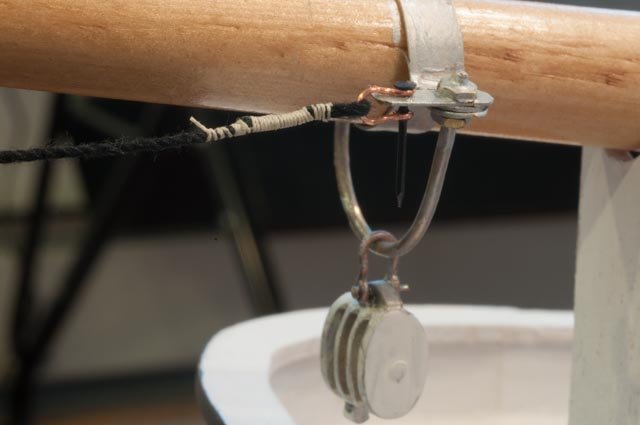
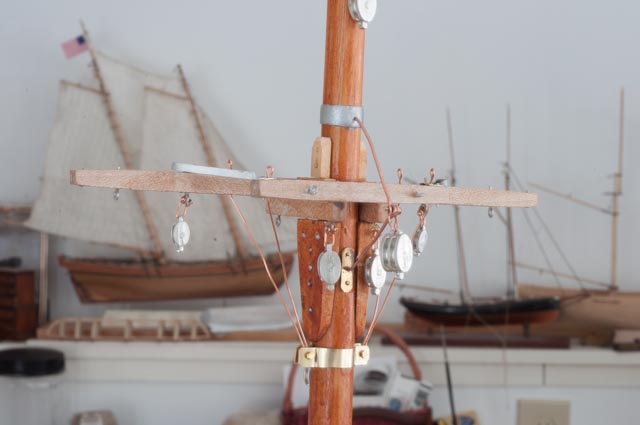
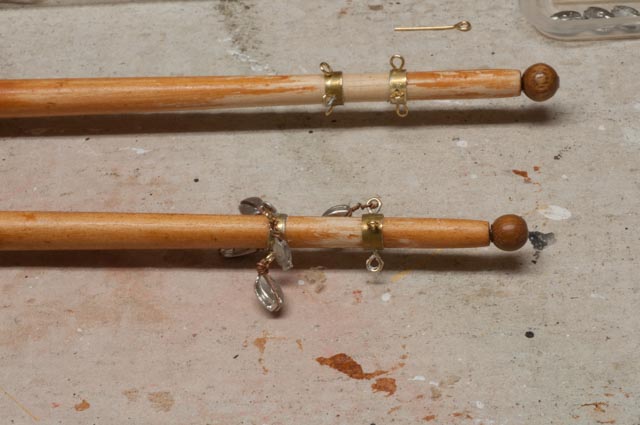
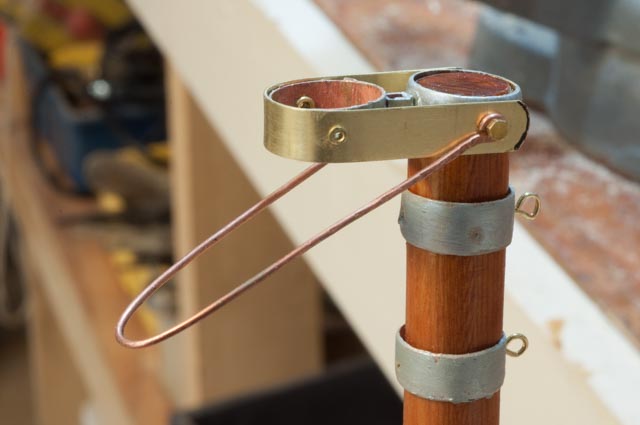
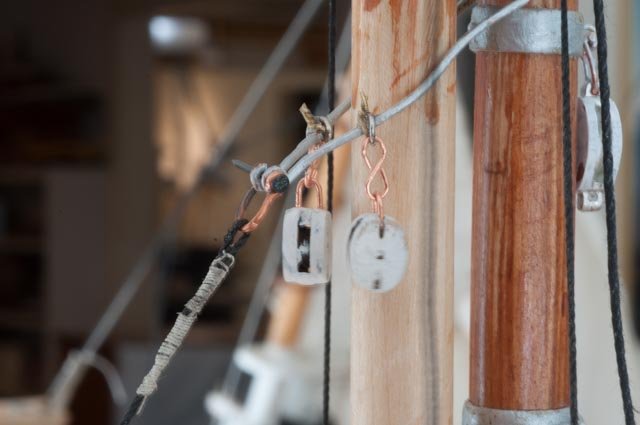 This is my newest favorite detail. I learned about this at the Lunenburg museum. The bales actually came to rings to fit a shackle the held the spliced stay. What I love about this scale is it forces me to figure out how things worked and try to emulate it. The Jumbo Jib Halyard blocks are held by hooks onto the bale at a barb that I assume was forged. I twisted fine copper wire. I may add a dab of putty and paint them out.
-
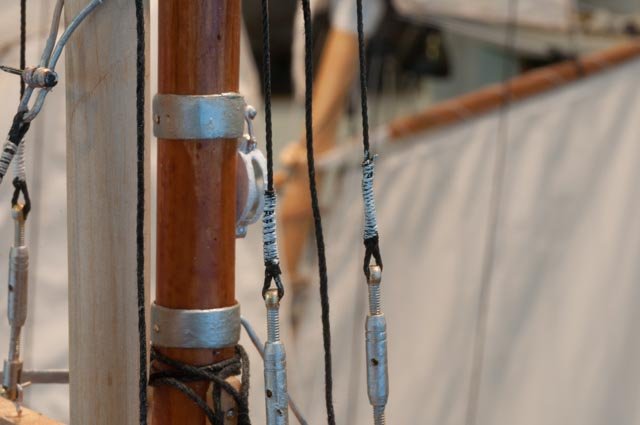 For my next challenge the seizing on the twisted wire shrouds was painted white as I see the photos. Here the truth is I missed it and tried to get away with a dab of white paint on the black thread.....let's see if I get away with it. More about the turnbuckles later. they are real just uincase we sail.
-
 here on the main boom foot rope I switched to a white line for the seizing. I also tried to capture the tail but as you see this really needs to be done again. I need to taper the main line for the smoother wrapping
-
 finally for today here is the opposite issue, the manila lines had tarred seizing. To the point on the angles of these halyard straps in the first photo. you can see when the gaff is horizontal on the peak halyard forward straps slide forward from the cleats, The temporary lashing is also the detail I saw in the 1940 photo of how she was when moored. I am thinking about trying to add furled sails.......some day
all for now
cheers
-
-
Ok for this week only a little progress. Unfortunately not enough excuses, although I had to paint a room .
First off an update on procurement. As in past models, I support our local Maine Bluejacket for many of my fittings and raw material. in this year's purchase, I have some good new news,, a nice surprise in fact,
-
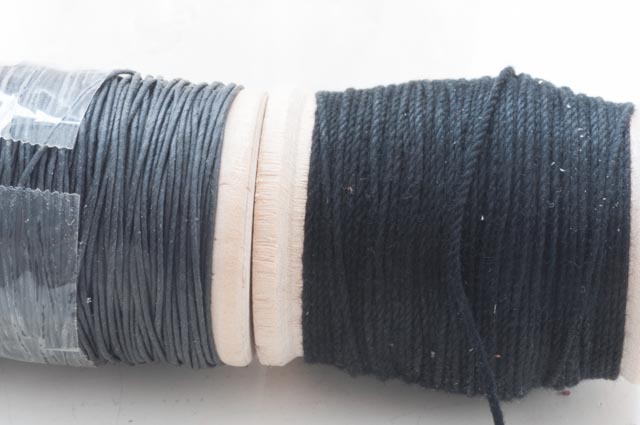 In this photo we have the largest size black line that Bluejacket sold a few years back on the left. I bought it and have not yet used it yet on another model. Notice it has a 'waxed' and smooth look. I have gone through study to figure out how best to replicate steel wire rope in this size. It would have twisted strands as I understand it. My RC models typically use copper stranded wire [ air craft cable] or stainless with turnbuckles and lots of force. i do not want to do that here, as we have dead eyes on the shrouds. Looking to see if the stands are noticeable on the NS archive or even the new Bluenose II photos I took, does not really answer this question. It is hard to tell in the photos. I went to several sites and bought a few samples.Some were beautifully hand made but not much was available and pricey for such a large model. In interest of progress I just went ahead and bought new large line from Bluejacket. ...wow surprise... look at it on the right wow you can see the twisted strands... it is perfect....thank you Nic
-
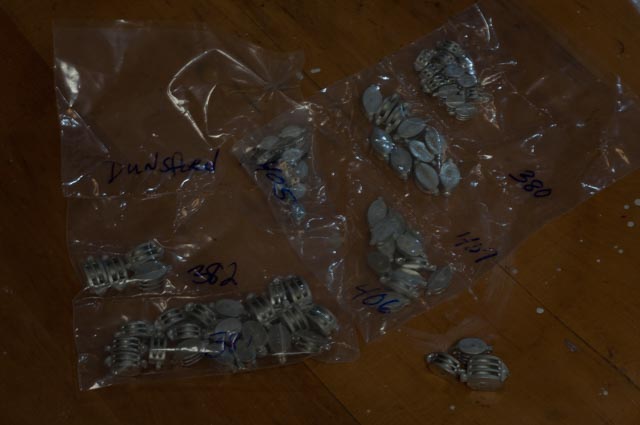 also because blocks on masts hold sails, I chose to use Bluejacket large cast metal blocks. Using either their metal strops and made up copper wire shackles or copper wire strops they are pretty strong, so I got a bunch. already not enough.
-
 Here is the foremast set in place to take a look.
-
 here the blocks are ready to paint. Blocks will be white and metal is already silver for galvanized,
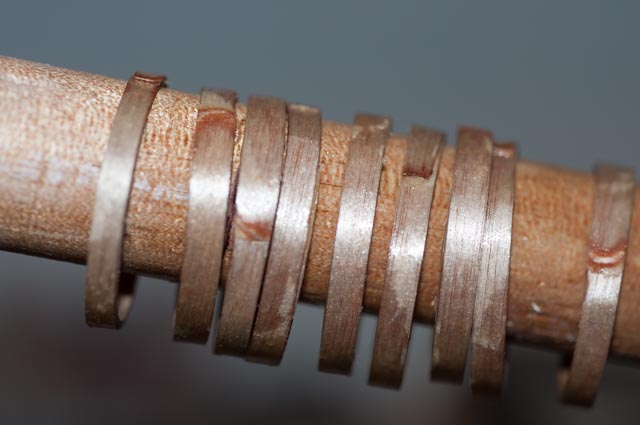
now it time for upper hoops. I learn each time and I get a little better...I hope
-
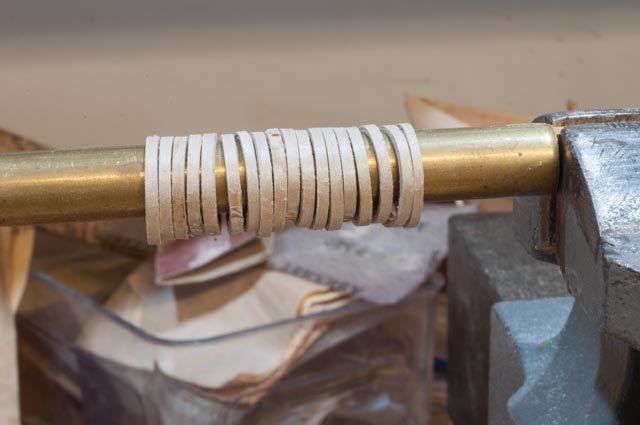
 for sizing I selected a copper tube that slips nicely over the spar. I then cut strips of 1/64 ply [ narrower this time] and soak them for about an hour in ammonia water. you can see the first two wrapped and drying
-
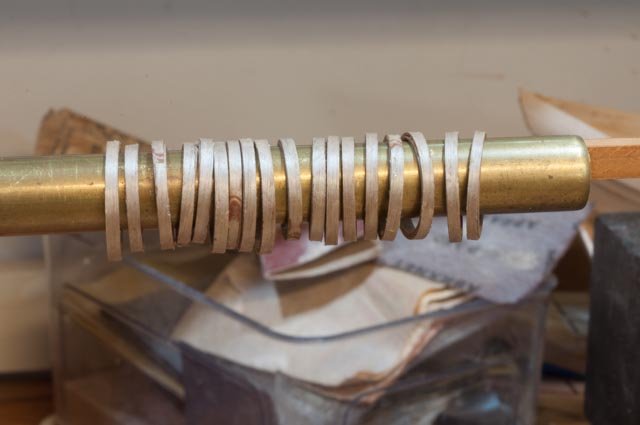
 here the bunch is glued and drying again
Finally I wanted to share one of many oops
-
 here drilling and setting the upper stay band on the top mast it got twisted. I had to remove it and plug the holes with toothpicks and try again.
-
 here we are ready for re staining and painting.
-
 here is the first paint job....kind of rushed. it typically takes two cycles to get it right
I am now thinking about doing the sails furled like in the archive photos. that will be a fun experiment. I am still suffering and making poor progress on the dories
cheers
-
-
thanks Bob...not sure I will sail this one. Too much detail and I want to continue as I am learning so much. plenty of time to decide.
Pat we had over two feet here too I put it on face book for the kids who live in Phoenix.
Jeff the secret is ...let the admiral build a new sun room and you get a great office / study, or for me a model sail loft below.
I got 6 windows not bad for a shop
cheers
-
Thanks Pat
I made a little more progress and snow is coming so maybe even more in the works. I wanted to set things up and see how they looked...sort of mid point check
-
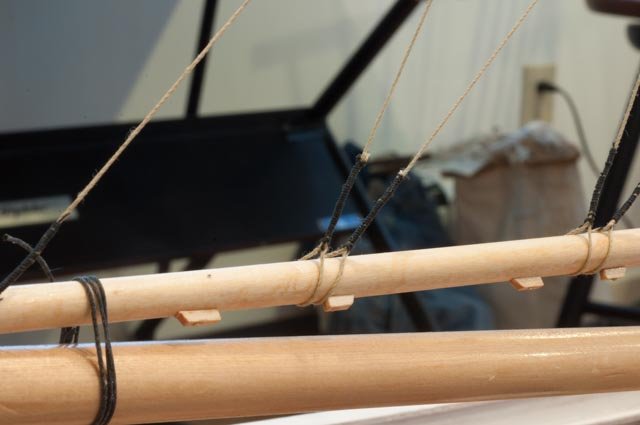
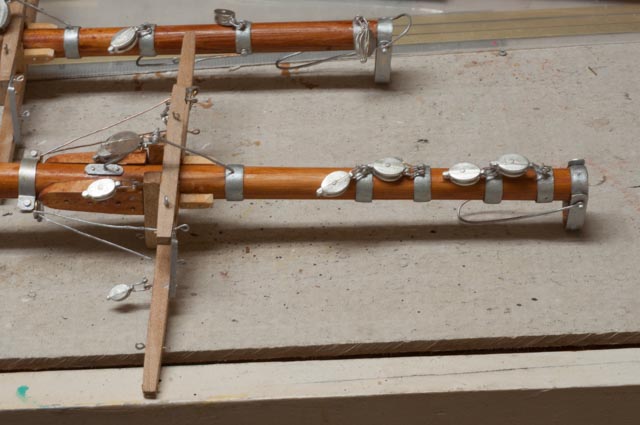
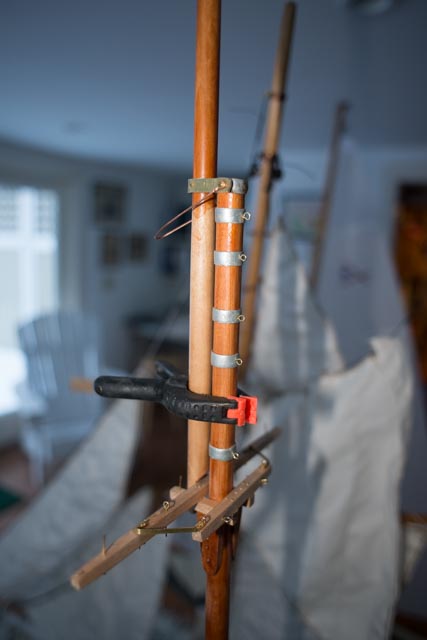
 for sequencing, I needed to install the hoops first. { I learned that by experience]
-
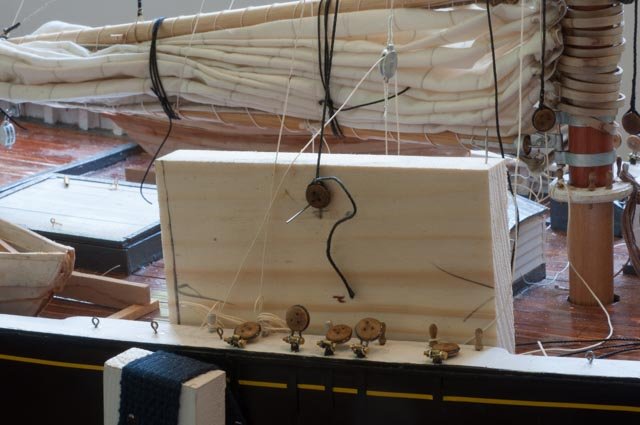
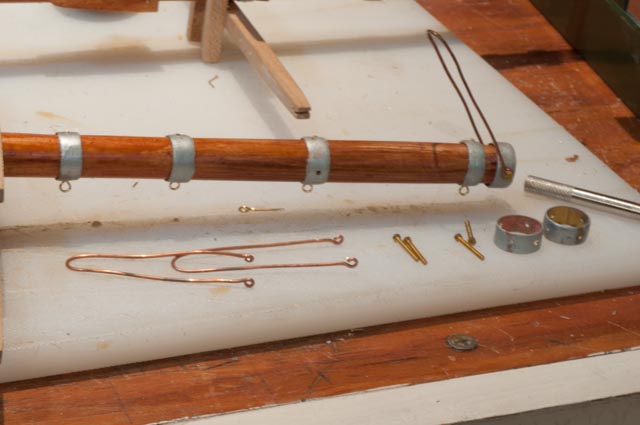 Then we have all the bands. I made these from different size tubes. I tried to roll and solder 1/64 x 1/4" bands, but with no flaps/ tabs, there is only the butt joint. The brass tubs worked well with a little spar sanding to fit.
-
 To build the top band, I wanted them to be strong enough to stand on their own and then to receive the top masts repeatedly. I am thinking of a display option of lower masts rigged and top masts being rigged...more on that later. The forward bands are riveted and the main mast has 000 machine bolts holding bales and band. I need to fill the rivet holes. I also need to add spring stay bales, schakles and blocks and paint etc. it does go on.
-
 Here we are laying down with the hounds [ cheeks in Gloucester] attached and finished. needs silverpaint to galvanize. The cross trees are still loose until I rig the bolster and slabs to hold them down.
-
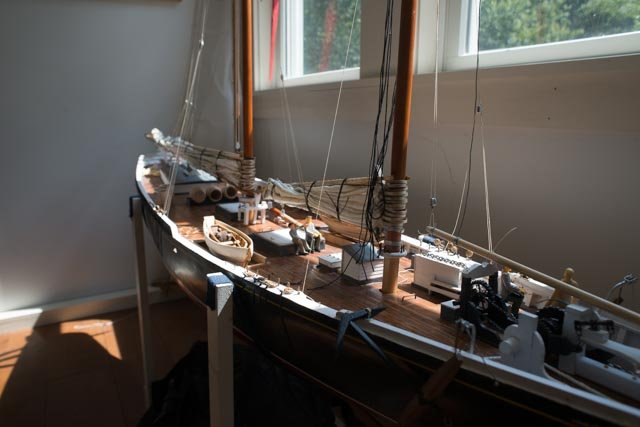
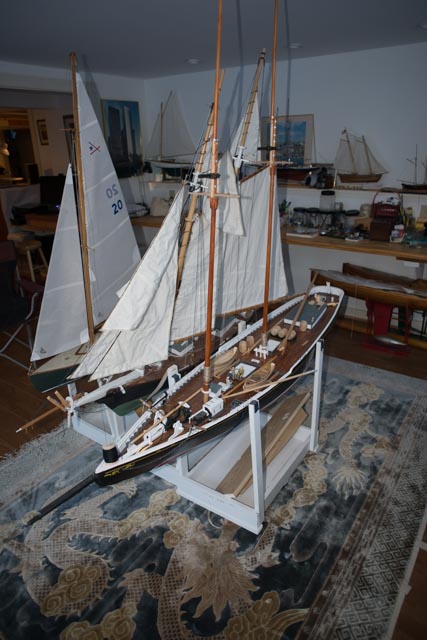 Bluenose has left the shop and is now in the sail loft. Here we have masts stepped to take a look. She is sitting next to the old pond yacht schooner Dancing Feather my first ever scratch schooner, and a future project to complete new rigging focusing only on sailing. Then we see Bittersweet, one of my last Boothbay Harbor One design builds rests, waiting for summer sailing.
-
 here is the main top held up as I have not yet made the heel gate.
-
 here is the fore mast.
-
 here we have the fore boom goose neck cleaned up and painted.
-
 Here is the main sheet band and bale . I have added a crotch band and then the tackle band. The main sheet bales rides aft of the crutch, but it's scale i am after here.
-
 here i repeated the process for the for boom sheet bale and I find looking here it is too big. back the shop for a finer bale.
-
 Finally i want to share another Bluenose model that has been here in the shop for now two winters. It belongs to a friend and he comes once a week and I am helping him restore it. She is almost ready to go home. the model was built many years ago and lives in the family dinging room
-
-
Ok I am finally ready to update some progress. The book shelves are in and many other projects going but this is more fun.
Today I will share progress on the spars. Several things all happen at once and I am trying to be careful on sequencing. I also have to consider how or more like if to attach masts. Our annual show and tell at the owl's Head Museum is coming up in April and with masts attached, I can not fit Bluenose in the car.
-
 First I need to make a goose-neck for the fore boom. Soldering is a weak point for me but this time it actually worked structurally at least.
-
 Here are the two bands with a 1/16" Id tube. A little or a lot of filing, some silver paint [galvanize] and lets see what we get.
-
 Cross tree hounds at this scale are 2" by 5/8" and need to be carved out to fit the boom. They are then tapered in both directions. My new toy scroll saw makes lay out easier and to cut the taper is so much safer than on a band saw. It was my daughter that insisted i get this scroll saw more in the name of safety than need. My hand me down 1975 sears 12" band saw with old un replaceable blades does in a pinch, but this scroll saw is great for small work.
-
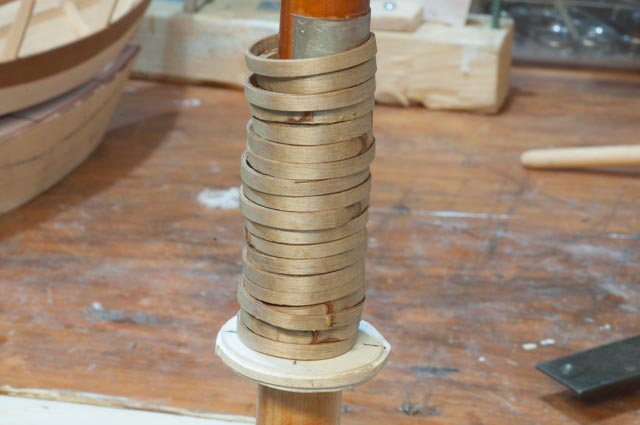
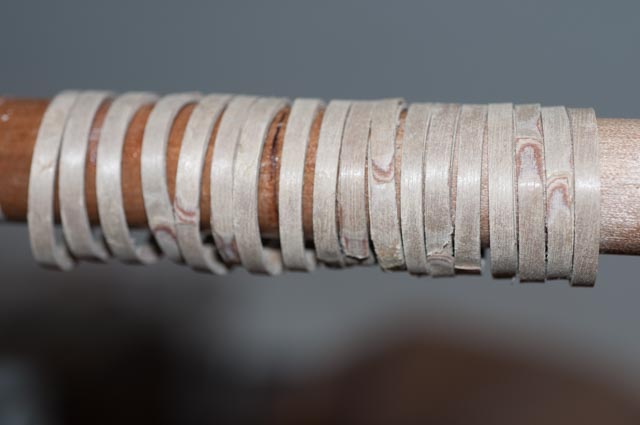
 Mast hoops are a little problem to make in scale and strong enough at the same time. I have used the 1/64" birch plywood and cut strips about 1/8th wide. I learned the hard way to be sure the outer grain goes with the cut. Here after shaping I glue them up.
-
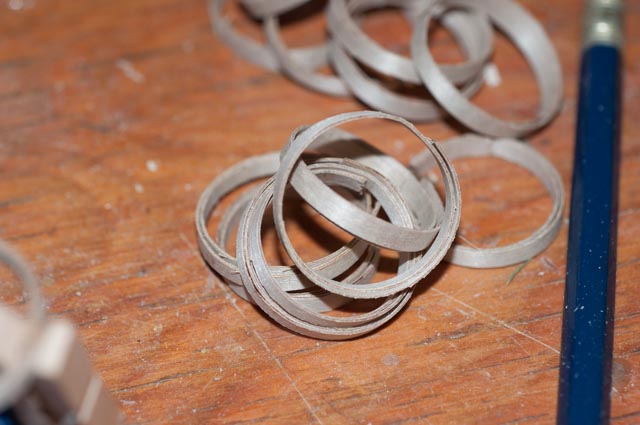 here they are ready for sanding.
-
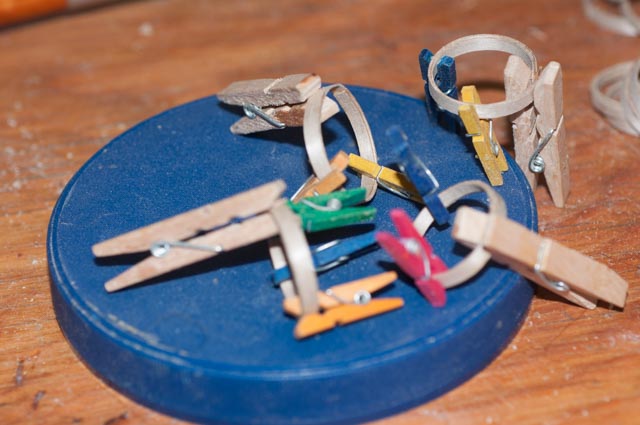
 here I find my accuracy is not great on diameters. I could have done better on making them equal. I wrapped them on a couple 5/8 diameter copper tube that allows cloths pin to hold in place while they dry. I am not sure why they are not all exact. oh well
-
 here they are with varnish. They are bright in all the photos so I did not stain them.
-
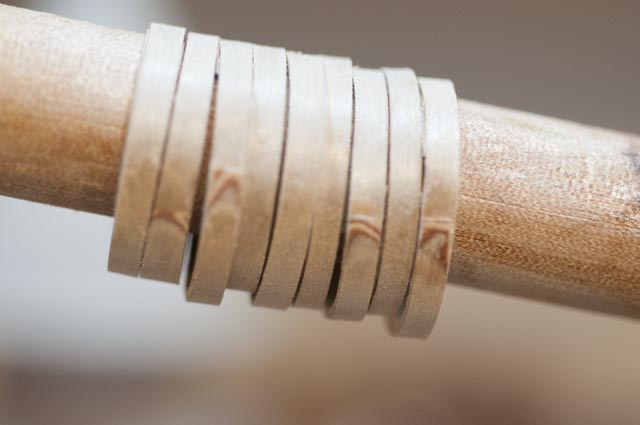
 here they are riding on the mast. I would love to be able to make them thinner [ I think I mean narrower] but if I ever sail this boat they need this strength.
-
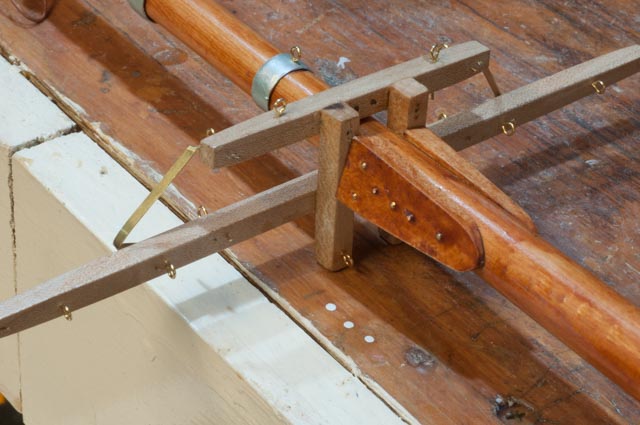
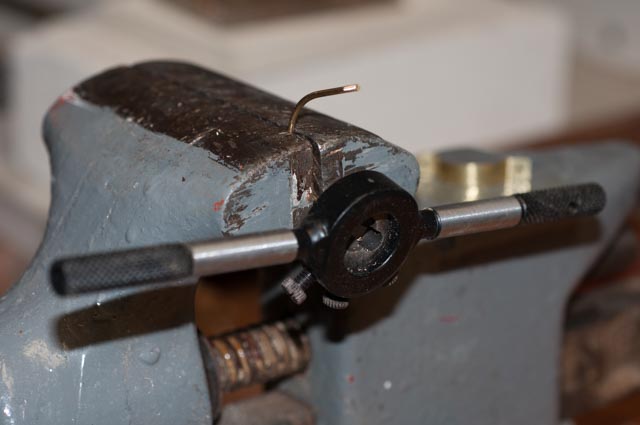 Now it's time for boom fittings. Here I am constructing the main sheet bale.
-
 here you can see the threading of the rod. It is number 1.
-
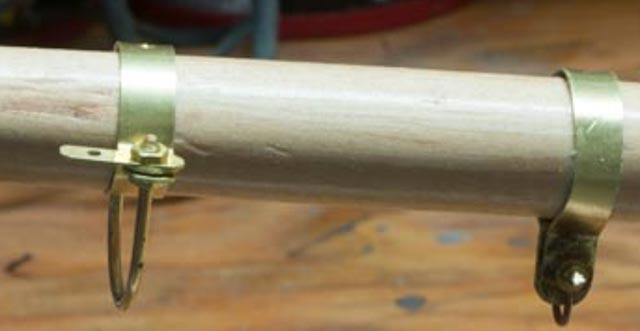 here it is assembled. the number 1 nut seems to be the right scale. The tabs going aft are for the foot lines. The forward fitting is the boom tackle. I found it interesting that the Eisner plans did not show a tackle on the main.
-
 Here again from the Nova Scotia archive, one can clearly see the boom tackle rigged to the port side.
cheers all for now
jon
-
-
-
Thank You Pat Jeff and Bob
I actually successfully soldered up my goose neck but am building a book shelf in the living room...sound familiar? i also have made a maple plug for the dories and have started my first build. I hope to update sometime next week.
Pat it would be great for a visit you would be welcome. If you wanted to visit the Maine Maritime museum on your trip our lunch and meetings are the second Wednesday of the month. One of our members used to live in Houlton
cheers
-
The last few months have not included much modeling time. I hope to get back to it soon. In the mean time we had a winter session of our Downeast Shipmodelers Guild at the Maine Maritime Museum in Bath. After a good lunch and a few tales we got to the fun stuff.
-
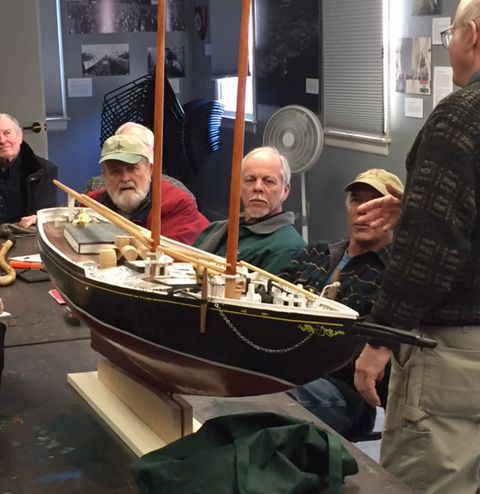 A friend help me load up and deliver Bluenose to the meeting and we had a good session talking about the plus and minus of working at this large scale.
- piter56, michael mott, GemmaJF and 4 others
-
7
-
-
Chris
i am also working at this large scale. I too went to chuck's site and picked several different lines and ordered them along with a few sample blocks.. His work is gorgeous.
I have a rope walk sort of set up and am still a coward. I will however try to make my own sometime this winter. it reminds me however of a duck dinner. It's $30 dollars in a restaurant or $300 to go duck hunting.
cheers


Bluenose by Jond - 1:24 scale - RADIO - Racing Schooner
in - Build logs for subjects built 1901 - Present Day
Posted
Patrick
thanks for your kind words. as you will see in upcoming posts I went to Canada to ride on Bluenose ll and learned so much about the boat. I am thinking more and more about being sure about making the rigging work. also to be able to move it around I have chosen to furl the sails. thy are full size and it is possible to unfurl and raise them and go for it and I may do that some day. But weather is cooling down, so we are back in the shop more and look forward to learning to make more parts.
cheers
jon